Toyota Tacoma: Why Won't My A/C Work?
Some diagnostics can be done without needing to visit your local mechanic. Read on to learn how to diagnose problems with your Toyota Tacoma.
This article applies to the Toyota Tacoma (1996-2015).
Let's face it. In the winter, it's pretty easy to allow a faulty air conditioner to go unfixed, slipping further and further down your "to-do" as other more pertinent repairs and maintenance work creeps high and higher. Hot summer months, on the other hand, are a completely different story. Spending days (let alone weeks) without a functional air conditioner in sweltering heat can seem simply unbearable. If your funds are low, you won't need to visit a mechanic to diagnose basic problems. We've outlined the most common culprits that could be causing your air condition to not work properly. That way, you can make the needed repairs (without needing to pay for a mechanic), so you're able to get back to that cool fresh air sooner!

Materials Needed
- Replacement fuse
- Outlet servo motor
- Needle nose pliers
- Thin knife
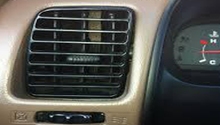
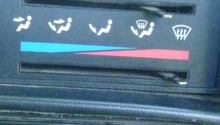
Step 1 – Check your vent selector switch
It might have gone bad.
If there's a problem with your vent selector switch, the first thing you'll notice is a lack of change in airflow, even when the selector is at various different settings (e.g., face vents, leg vents, both).
- Check to see if the switch shows any signs of physical damage; it may not, but always check as a first course of action.
- Also, check for signs of faultiness and damage to the vent speed switch or temperature control switch.
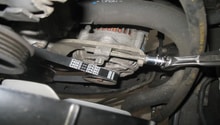
- The likely culprit in all of the above-mentioned scenarios is a faulty air outlet servo motor. This controls the direction of airflow in your Tacoma.
- Or, you could also have a blown fuse, which is the simplest and cheapest repair option here.
- Loose linkages could also be at play, so check for those, too.
- A quick way to identify a faulty outlet servo motor is to listen for a whirling sound. If you do not hear one, the motor is not working properly and will need to be fixed.
- Finally, you could also be dealing with a leaf, or some other item, that is stuck in your dashboard and blocking the damper. (You'll need to access your center dashboard area to resolve the issue.)

If a replacement servo motor is required, they can be purchased from your local Toyota dealer for about $150, or roughly $50 used, when available.
Step 2 – Check your duct hose
It might be damaged or has become disconnected.
If the selector switch for your floor vents, cabin defroster, and face vents is not working, one culprit could be a disconnect duct hose. Check it out.
- With the blower turned to maximum speed, check for airflow underneath your dashboard as well as behind the stereo; select the face vent when doing so.
- Check that you're not in "defrost" mode, as this will prevent air from flowing out of your center vents.
- Finally, check underneath your glove compartment box (on the passenger side).
- Near the floor (on the left), you will see a valve.
- Push it to active your air/heat system.

If a replacement duct hose is needed, you are looking at a replacement cost of $30 or less.
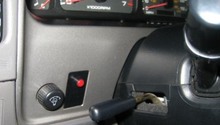
Step 3 – Check your switch contacts
They might be poorly fitted.
You can get your blower switch operating properly (responding to all four settings) by ensuring the internal contacts are properly fitted (e,g, touching).
- If the strip of copper leading to the contacts inside the switch (where the pin to the connector is located and feeds out to the back of the switch) becomes thin, charged (burnt) or loose, you are highly likely to experience performance-related issues.
- Make the repair by removing your stereo and the face plate for your control module.
- Slide out the switch and repair as needed; remember to unplug the switch from the electrical connector first.
- Use a thin knife to remove any surrounding tabs, and then remove the faulty piece of copper.
- Replace the wire with a new one; you may need to use a pair of needle nose pliers to ensure the placement is good.
- Solder a wire from the wiring harness directly to the contact; allow it to exit out of the top.
- Put the switch back together.
Related Discussions
- Vent Selector Switch not Working - YotaTech.com
- No Air From Center Vents - YotaTech.com
- Blower Fan Switch Repair - YotaTech.com