When you click on links to various merchants on this site and make a purchase, this can result in this site earning a commission. Affiliate programs and affiliations include, but are not limited to, the eBay Partner Network.
I have the engine out of my '93 xtra cab. I figure it's a good time to do some clean-up and restoration in the engine compartment and on the front frame rails. The front suspension definitely needs work too. I'm replacing as much of that stuff as I can. I ordered some upper control arms and torsion bars from a salvage yard in Colorado. New ball joints and bushings are on my �to do� list. I was looking at the FSM to prepare for replacing the bushings in the upper control arms. I'm kind of disappointed with the quality of the description they're offering for the procedure. The bushings have that �upper arm shaft� that complicates things a little bit. The special service tool that they use to get out the first bushing looks kind like a �U� frame suspension joint puller. Once you get that out it looks like the shaft comes right out and then the Second bushing just presses out in the conventional way. Installing the bushings also looks like a pretty normal press job. So what's the best tool and technique for getting out the first bushing?
It sort of depends on if you are doing OEM style bushings (i.e. comes with the shells) or "aftermarket poly" bushings (re use the OEM shell)
The FSM has you press off the outer metal shell.
If you are re-using the shells for aftermarket urethane bushings, you don't want to press the outer shells off the arm - you want to leave the shells in place
Thanks for the link. Very informative. I tried to search but the results were confusing.
So the main thing I come away from this with is that there are two ways to do the bushing job.
1. the old-fashioned way, where you press out the entire bushing, or
2. the polyurethane aftermarket bushing where you leave the external shell of the bushing in the control arm and just take out the rubber and the metal inner sleeve.
And if you try to do it the old-fashioned way, You might destroy the control arm if the bushings are frozen in the arm
.
My control arms are not terribly rusty, as you can see. So I am still on the search for information about how exactly to get that first bushing out. And that is where I say that the instructions and illustrations in the FSM are not so clear. I'd like to know exactly how that SST (special service tool) that they show works and find out if there is a comparable tool available at my local auto parts store or something that I could buy online.
Last edited by wrenchtech; 06-29-2017 at 10:24 AM.
Now I am looking at aftermarket control arms in a whole new light! For around $86-$125 you can get a brand-new aftermarket control arm with new bushings, with a new ball joint and with the torque arm for the torsion bar!
What a screaming deal that is! Especially if you're Control arms are rusty. If you got those parts from a Toyota dealer you would have to shell out about $800 to do both sides.
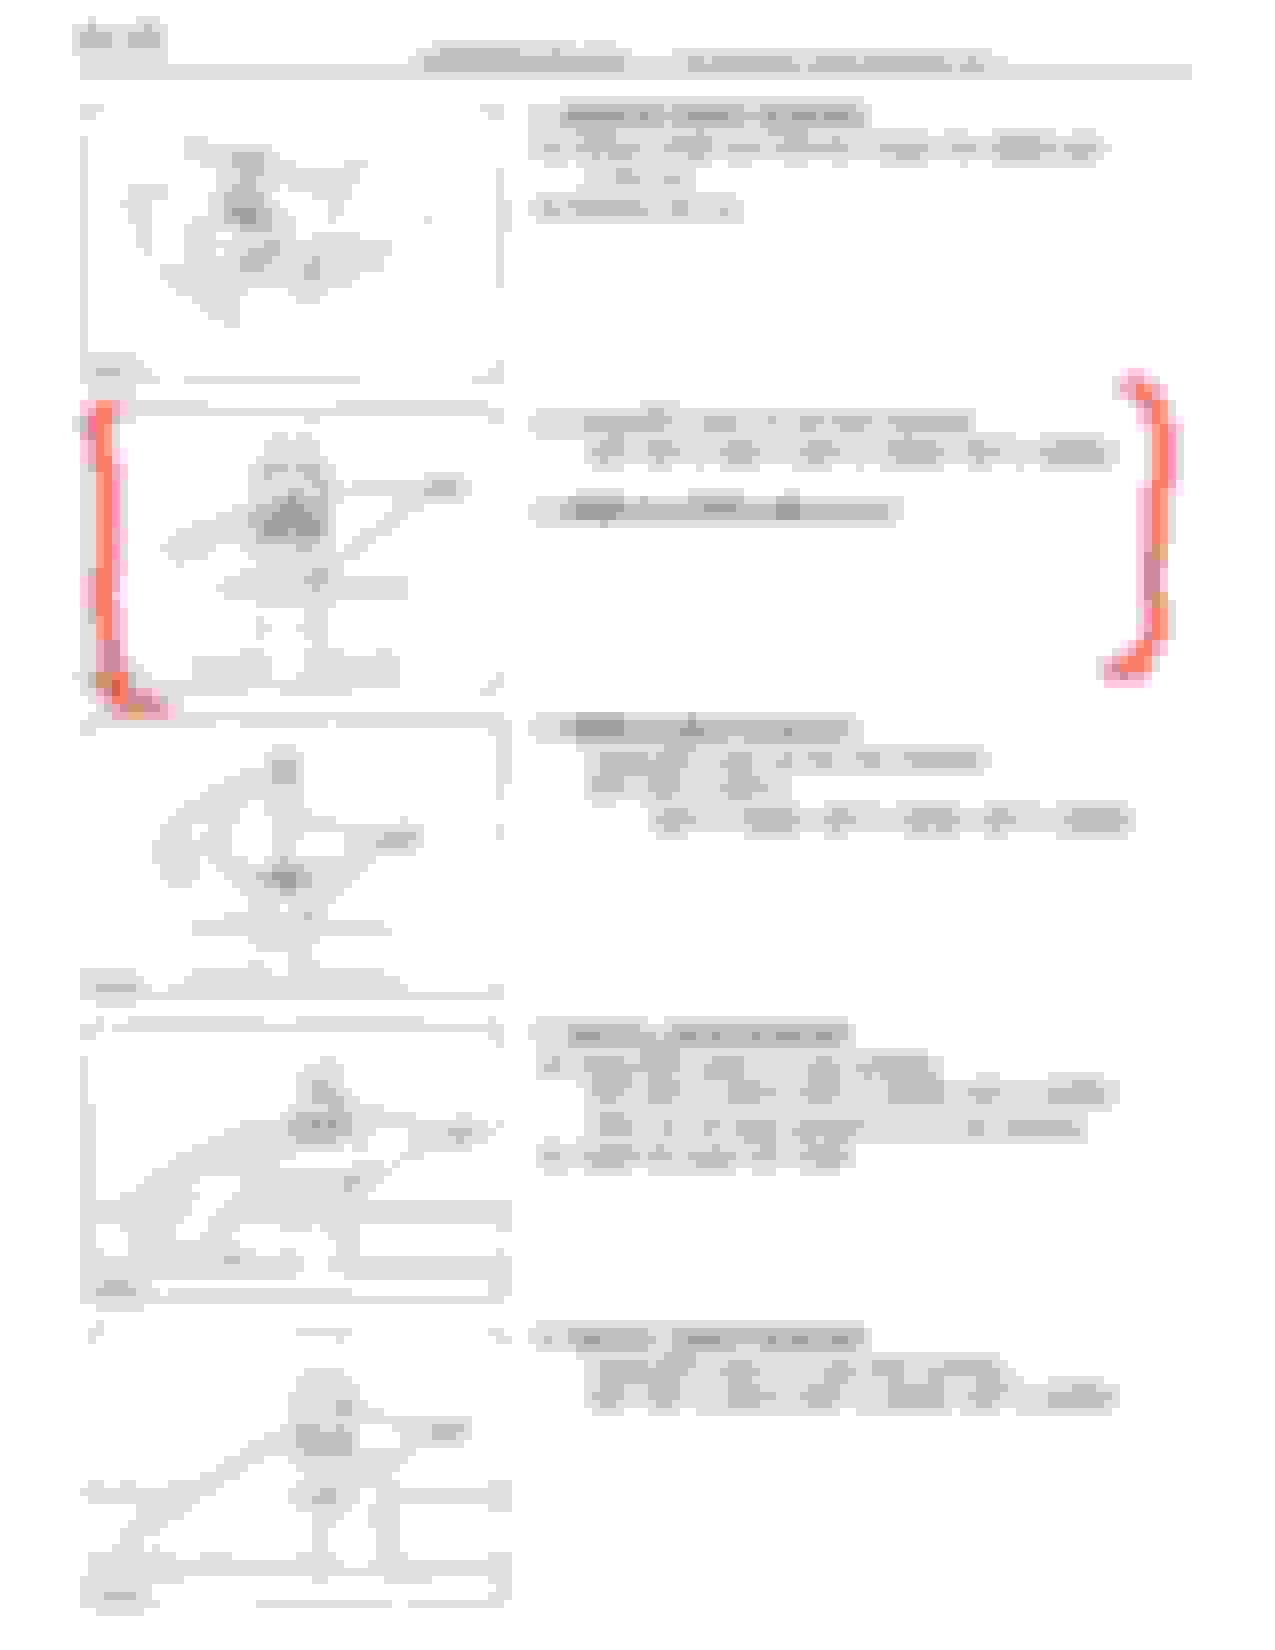
Step number 3 in this diagram, which I have made red brackets around, puzzles me. How are they pressing the bushing with the shaft in place? Must be a special fixture on the bottom that lets the shaft pass-through while the outer diameter of the bushing rests on it.
Last edited by wrenchtech; 06-29-2017 at 11:47 AM.
The "front" side mount has "one" bolt, the "rear" side mount on the cross arm has TWO bolt holes
The REAR side will obviously NOT pass through the middle of the rear bushing
BUT
The front side can "side forward" through the front bushing
The reason that this does not happen ON the truck, is that the rear side stake nut and washer prevents the arm sliding forward
Once you take the staked nuts and washer's off, you can slide the arm on the shaft.
WIth some finagel-ing (slide forward far enough to get the REAR part of the shaft out of the rear bushing, then slide shaft at an angle to clear the arm and the slide backwards and remove the shaft from the arm.
Thats the steps thats missing between step 2b and 2c
The SST in step 2c can be done with some short sections of appropriate diameter pipe
The reason that the top one is a U shape and not a cylinder is that the "seam/lip" of the arm gets in the way on one side of the bushing.
Notching a piece of pipe should work
You MIGHT be able to use a set like this to remove the bushings.
I'm interested in trying to do the job as described in the factory service manual, or as close as possible. Of course I'll have to do it without that kit of special service tools.I like OTC tools.The ball joint kit you linked to above costs $306 on Amazon.com, but they also offer the kit with a reduced number of accessories at a lower price, and you can get the ”C” press by itself for around $60.
I have a harbor freight 12 ton press, but the table is too small to press the control arm bushings the way they show it in the manual. Next time I'm in Harbor freight I'll have to take a look at the 20 ton press and see if it is big enough.
In the meantime I'll investigate the possibility of getting the crossbar out before taking out any bushings. If that is possible I should be able to do the rest with my 12 ton press. If not, I will start to look at making up a custom screw type press or puller to get the front bearing off.
As far as aftermarket control arms go, the ones you linked to are listed as "new”. The one I linked to, I couldn't find any definitive statement of whether it's new or remanufactured. I recently bought some control arms for my Nissan Maxima with the Dorman brand name on them. I would have to say they look brand-new to me.
Last edited by wrenchtech; 06-30-2017 at 07:32 PM.
Great info from EWONG on how to do the upper control arm bushings -- THANKS! I am no expert on automotive suspensions; however, it seems to me that you have
to use a shop press in order to remove at least the entire front busing from this style of UCA's since they have a cross bar in them. Once the front bushing is pushed out, the bar can be removed in order to remove the rear bushing. There is a very tight space between the lip of the control arm and the large rear bushing along one section which made me have to trim out a section of a 3-inch dia. nipple to do the job -- but you are not limited to a shop press to remove it. Here is a photo of the sleeves I fabricated/used for the front bushing which I used in a press. Also, these control arms are short and bulky and require a LARGE press to accommodate their shape. Tried to use my Harbor Freight 20- ton press but it set up with the ram having about a 2-inch offset from the bushing --you need a press with a wide frame
. The UCA is a challenge but the bushings in the LCA's are very straightforward and can be removed with a press, threaded rod or vise. Also, try to use only one hard blow if you can to free the staked nut as the more you pry and hammer it -- the more you mess up the threads. If the nut is too badly "fubar'd" it's still available #90179-18004 (don't ask why I know the part number).

 06-28-2017, 07:52 PM