
Fitting 39.5" Iroks under an 84 4Runner
 03-05-2008, 08:06 PM
#41
Registered User
Thread Starter

 03-09-2008, 06:51 PM
#43
Registered User
Thread Starter

Plenty of clearance all way around the tire! Good, I didn't want to have to trim that big hole any bigger


Rear tire barely kisses the frame rail at full flex. Nothing to worry about.

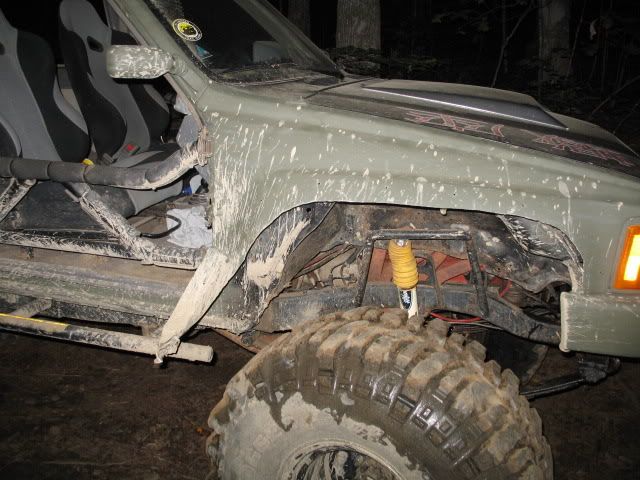
I took the fender off to get a better idea of how much rubbing the front was going to have on the firewall rather than on the fender itself (I can trim the fender back later).
This was at full stuff with the bumpstop fully mashed with a level spring. It was rubbing at full turn to the driver's side. I plan on lowering the front bumpstops down an inch and trimming that pinch seam on the firewall for now. I will still have decent compression travel but am limiting it compared to when I ran the 33's.

Closeup of the rubbage. Not as bad as I thought!!! I figured it would have been worse.
03-09-2008, 08:18 PM
#45
Registered User
Thread Starter
Three more pictures! Driving it the 1 mile down the road with the 40's on one side and the 31's on the other was an adventure in itself. The rear aussie locker hated every second of it

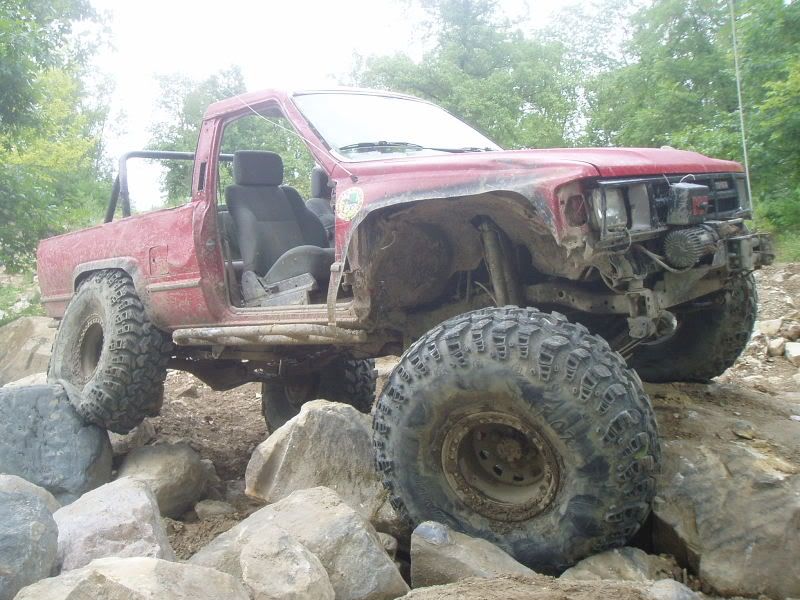
Finally starting to look like a real rockcrawler

Front fenders will be cut to fit

Finally starting to look like a real rockcrawler
Front fenders will be cut to fit
03-11-2008, 05:52 PM
#48
Contributing Member
My ECU is in my glovebox. I used a small airsaw to cut the pinchweld, you could use a sawzall with a short blade as well. Once its cut, get out the bfh and start the massaging. I know its not a good pic but heres what i have right now, it shows the end result. Ill try and snap a couple others for you later.

 03-11-2008, 08:47 PM
#49
Registered User
Thread Starter
03-14-2008, 01:12 PM
#50
Registered User

Join Date: Jan 2008
Posts: 29
Likes: 0
Received 0 Likes
on
0 Posts
whats your plan for covering that big ass hole?? i am planning on doing the same thing to my 87 and am trying to plan it out ahead. im thinking of buying some wheel tubs from Jegs.com and welding them in i think it would be the easiest and cleanest way to go.
03-14-2008, 09:23 PM
#51
Registered User
Thread Starter
Making my own wheel well tubs. I've got some 16ga sheetmetal that I need to cut and bend to fit the contour of the cut fender. I haven't had any time to work on it lately.
03-15-2008, 05:42 AM
#52
I think I used 20 or 22 gage on mine. Leave a lip wherever you can to overlap, punch some holes in the tubs and just spot weld everything in after using a cardboard pattern to get your tubs the right shape/size.

Then just pound things like you want with a hammer and a dolly, clean up a bit, some seam sealer, undercoating and no one will know the difference.

Then just pound things like you want with a hammer and a dolly, clean up a bit, some seam sealer, undercoating and no one will know the difference.
Last edited by waskillywabbit; 03-15-2008 at 05:47 AM.
 03-23-2008, 09:02 PM
#54
Registered User
Thread Starter
Got a ton of work done Saturday thanks to CuBuff4Runner!!
I ended up working on tubbing the firewall with Jeff while my brother, dad, and other buddy worked on making some 16ga. sheetmetal tubs for the rear.

After plasma cutting the drivers side firewall out

Big hole from the inside. It's cut back all the way to the body mount.

After welding in the replacement sheetmetal. I hate welding sheetmetal after this project (first time welding sheetmetal). CuBuff4Runner was much better at it then I was.
I will seam seal both the inside and outside welds. Then I will shoot some rubberized coating on the outside and herculine the inside.

Inside driver's side. I will need to remount the fuse block. Welds look like goose but it doesn't matter what they look like under seam sealer and herculiner

Passenger side inside. I will relocate the computer into the glove box.

Passenger side outside. We tried a different method from the drivers side and it cut the fab time in half. Once again, seam sealed and covered up with some kind of liner will hide the ugly (plus make it water proof).
It was a tough job but I'm glad it's done. Will be nice not to have the front tires rub on the firewall while flexed out and turning.

Here's a rear tub that my brother, dad, and friend cut and rolled up. Turned out perfect and will fit and weld right into the quarter panel.
I ended up working on tubbing the firewall with Jeff while my brother, dad, and other buddy worked on making some 16ga. sheetmetal tubs for the rear.
After plasma cutting the drivers side firewall out
Big hole from the inside. It's cut back all the way to the body mount.
After welding in the replacement sheetmetal. I hate welding sheetmetal after this project (first time welding sheetmetal). CuBuff4Runner was much better at it then I was.
I will seam seal both the inside and outside welds. Then I will shoot some rubberized coating on the outside and herculine the inside.
Inside driver's side. I will need to remount the fuse block. Welds look like goose but it doesn't matter what they look like under seam sealer and herculiner
Passenger side inside. I will relocate the computer into the glove box.
Passenger side outside. We tried a different method from the drivers side and it cut the fab time in half. Once again, seam sealed and covered up with some kind of liner will hide the ugly (plus make it water proof).
It was a tough job but I'm glad it's done. Will be nice not to have the front tires rub on the firewall while flexed out and turning.
Here's a rear tub that my brother, dad, and friend cut and rolled up. Turned out perfect and will fit and weld right into the quarter panel.
03-24-2008, 08:28 PM
#55
Contributing Member
Join Date: Jun 2004
Location: Monett, MO (Springfield)
Posts: 2,644
Likes: 0
Received 2 Likes
on
2 Posts
hey, just wanted to say great work, and thanks for all the pics. I'm getting ready to do about the same myself and having some pics of whats up is very helpful!
Heres my little tire fitment: https://www.yotatech.com/forums/f147...-tires-140785/
Couple quick questions:
1. what are you planning on using for seam sealer?
2. what did you do to the pass side to cut fab time in half, minus the whole tabbed fitment?
3. Is there still room for the fuse box in its factory location, or nearby? IF not, thoughts?
Last edited by colsoncj; 03-24-2008 at 08:32 PM.
03-25-2008, 05:42 AM
#56
Registered User
Join Date: Oct 2003
Location: Thornton, Colorado
Posts: 1,133
Likes: 0
Received 0 Likes
on
0 Posts
hey, just wanted to say great work, and thanks for all the pics. I'm getting ready to do about the same myself and having some pics of whats up is very helpful!
Heres my little tire fitment: https://www.yotatech.com/forums/f147...-tires-140785/
Couple quick questions:
1. what are you planning on using for seam sealer?
2. what did you do to the pass side to cut fab time in half, minus the whole tabbed fitment?
3. Is there still room for the fuse box in its factory location, or nearby? IF not, thoughts?
Heres my little tire fitment: https://www.yotatech.com/forums/f147...-tires-140785/
Couple quick questions:
1. what are you planning on using for seam sealer?
2. what did you do to the pass side to cut fab time in half, minus the whole tabbed fitment?
3. Is there still room for the fuse box in its factory location, or nearby? IF not, thoughts?
03-27-2008, 06:54 PM
#57
Registered User
Join Date: May 2007
Location: Summit County, Colorado
Posts: 1,441
Likes: 0
Received 0 Likes
on
0 Posts
Looking good! Thanks for reminding me that I have to tub my firewall 
If you spend some time routing the wires for the computer, it will fit in the glove box without cutting and splicing.
Thanks for reminding me that I have to tub my firewall If you spend some time routing the wires for the computer, it will fit in the glove box without cutting and splicing.
03-27-2008, 07:07 PM
#59
Registered User
Thread Starter
colsoncj, you can just unplug and reroute the computer wires up to the bottom of the glovebox. Cut a small hole in the bottom of the box and reconnect the harness to the computer.
03-27-2008, 10:06 PM
#60
Contributing Member
Join Date: Jun 2004
Location: Monett, MO (Springfield)
Posts: 2,644
Likes: 0
Received 2 Likes
on
2 Posts
ahh... thanks! i havent really had time to figure it out yet, mines just laying in the middle of the floorboard until i get my patch panels welded in. then i was going to try and figure out how to move it.


