
Corax's new multi-mount winch bumper
 09-05-2011, 04:11 PM
#1
Registered User
Thread Starter
Corax's new multi-mount winch bumper
I figure it was time for a new project and with some of the organizations I'm trying to get involved with a winch bumper is in order. I modeled the base of it off Robinhood4x4's bumper build - I really dig his multi-mount functionality. That takes care of the center part / winch mount, I still had to decide on what I want to do with the wings. Excuse the poor google Sketch Up renderings, but this is what I started with in my mind. I could have easily built another tube bumper, something like this

and mocked up to a 2nd gen pickup since I couldn't find a pre-made 4runner model (ignore the factory bumper)

Or I was thinking of making a tube bumper and then fiberglassing between the tubes to make front storage compartments. The finished product would look something like this, the lateral lines off the center section would be tube - the 2 lowest tubes being 1.5" and the 2 upper ones just 1"

I couldn't get the planes to fill in on the bumper quite right, but hopefully this'll give some kind of idea what it'd look like covered

I decided against the front storage idea partly because I started to realize the compartments would be small and difficult to seal - I could see the PNW turning them into a mold & mildew experiment.
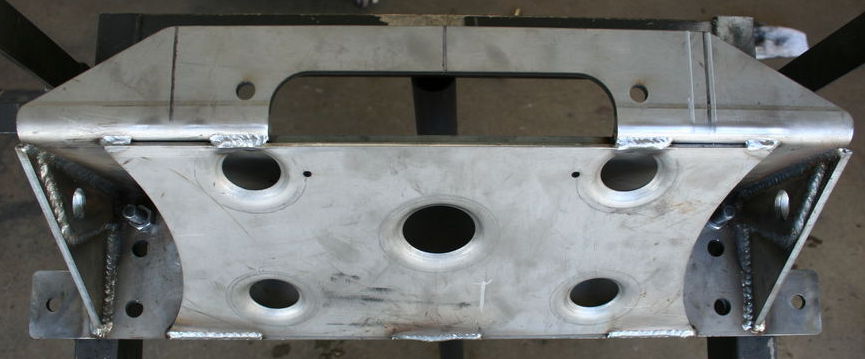
This is where I started. I picked up a 1/4 plate remnant and made the center part of the bumper. Here it is all laid out and ready to get cut

After a few hours with the Sawzall, grinder and HF Welder (just to tack it together). I took it to work and use their welder to burn the final welds in - every gusset and plate is welded on both sides. I also added the center gussets once the receiver box was fully welded in. I'll also add mounting bolts in the center of the crossmember (which is already reinforced with Front Range Offroad's 1/4" plate frame brace
 )
)
Here's the center section all finished up. I decided to angle the inner gussets to help with any side loads I might generate. Luckily, the receiver cradle only tightened up about 1/32" after I was done welding so there was minimal grinding needed to get the receiver tube to slide in again.


A little bit more progress. The main bars were bent and tacked into place well enough to transport it into work so I can finish weld them (and heat bend the far passenger side about 1" up to match the other side).

BTW, I also figured out a simple solution for the "dimples" that my HF bender leaves in pipe. Here's an example from my old bumper - see the dimple just above the turn signal?

The fix was simple - I got a threaded pipe nipple big enough to fit over the 1.5" sch 40, cut in in half length wise and placed between the pipe and rollers. Now when I'm bending, the pressure isn't localized and there are no more dimples

One more project down and mostly finished - I still want to bend up some headlight guards out of 1" pipe, but that can wait awhile. The white paint is Rustoleum oil based white metal primer, after it dries for a few days it'll get a healthy coat of black oil based paint. And yes, I need to make a stop by Fastenal for some 12mm x 1.25 bolts to fill the other mounting holes.

As with any project, it evolved and changed a bit while it was being put together. For example, once I get a winch, removal will have to be from the front - I don't think there's enough space between the top hoop and the grill to lift it straight up, so I had to change the top hoop a bit to make sure there was enough room to slide the winch forward.

I also decided to attach the top hoop to the lower lateral tube instead of the main tube. This allowed me to lean it forward a bit more than if it was welded to the main tube.

I didn't primer the lower half of the lateral tube because I need to heat it up to get the bolt holes at the bottom to line up again (welding the hoop onto the lower tube caused it to shift a little. BTW, like the parking light? That was just radiant heat from the tube when I heated it up to fine tune the bend. By the time I saw what was happening it was already too late.

and mocked up to a 2nd gen pickup since I couldn't find a pre-made 4runner model (ignore the factory bumper)
Or I was thinking of making a tube bumper and then fiberglassing between the tubes to make front storage compartments. The finished product would look something like this, the lateral lines off the center section would be tube - the 2 lowest tubes being 1.5" and the 2 upper ones just 1"
I couldn't get the planes to fill in on the bumper quite right, but hopefully this'll give some kind of idea what it'd look like covered
I decided against the front storage idea partly because I started to realize the compartments would be small and difficult to seal - I could see the PNW turning them into a mold & mildew experiment.
This is where I started. I picked up a 1/4 plate remnant and made the center part of the bumper. Here it is all laid out and ready to get cut
After a few hours with the Sawzall, grinder and HF Welder (just to tack it together). I took it to work and use their welder to burn the final welds in - every gusset and plate is welded on both sides. I also added the center gussets once the receiver box was fully welded in. I'll also add mounting bolts in the center of the crossmember (which is already reinforced with Front Range Offroad's 1/4" plate frame brace
)Here's the center section all finished up. I decided to angle the inner gussets to help with any side loads I might generate. Luckily, the receiver cradle only tightened up about 1/32" after I was done welding so there was minimal grinding needed to get the receiver tube to slide in again.
A little bit more progress. The main bars were bent and tacked into place well enough to transport it into work so I can finish weld them (and heat bend the far passenger side about 1" up to match the other side).
BTW, I also figured out a simple solution for the "dimples" that my HF bender leaves in pipe. Here's an example from my old bumper - see the dimple just above the turn signal?
The fix was simple - I got a threaded pipe nipple big enough to fit over the 1.5" sch 40, cut in in half length wise and placed between the pipe and rollers. Now when I'm bending, the pressure isn't localized and there are no more dimples
One more project down and mostly finished - I still want to bend up some headlight guards out of 1" pipe, but that can wait awhile. The white paint is Rustoleum oil based white metal primer, after it dries for a few days it'll get a healthy coat of black oil based paint. And yes, I need to make a stop by Fastenal for some 12mm x 1.25 bolts to fill the other mounting holes.
As with any project, it evolved and changed a bit while it was being put together. For example, once I get a winch, removal will have to be from the front - I don't think there's enough space between the top hoop and the grill to lift it straight up, so I had to change the top hoop a bit to make sure there was enough room to slide the winch forward.
I also decided to attach the top hoop to the lower lateral tube instead of the main tube. This allowed me to lean it forward a bit more than if it was welded to the main tube.
I didn't primer the lower half of the lateral tube because I need to heat it up to get the bolt holes at the bottom to line up again (welding the hoop onto the lower tube caused it to shift a little. BTW, like the parking light? That was just radiant heat from the tube when I heated it up to fine tune the bend. By the time I saw what was happening it was already too late.
 09-05-2011, 04:53 PM
#2
Registered User
Nice looking lines, beefy looking plate, very cool! Trust you've got some heavy duty locking pins in mind to keep the winch theft proof when it's on the vehicle. I've lost some hitch accessories by slacking in that department in the past.
09-05-2011, 05:35 PM
#5
Registered User
Thread Starter

I could also drill holes in the outer winch plate gussets and weld a bit of plate on either side to make it wider where the shackle goes through - kinda like the shackle mount on Addicted Offroad's winch plate:
Last edited by corax; 09-05-2011 at 05:51 PM.
09-05-2011, 06:14 PM
#7
Registered User
IMO the only problem with bolting on a shackle mount is that it's bolts. welding in that circumstance is going to make that stronger.
the other thing would be adding two bars from the upper bar to the hoop.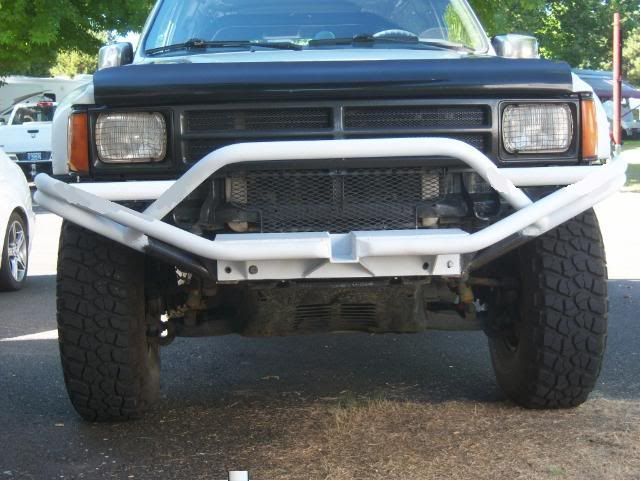
the other thing would be adding two bars from the upper bar to the hoop.
Trending Topics
09-05-2011, 06:57 PM
#8
Registered User
Thread Starter
Regarding the weld-on vs. bolt-on shackle mount, I'll kindly disagree. A lot of it has to do with welding skill and while it would probably hold, I just wouldn't 100% trust a shackle mount welded to 1/4" plate. The bolt on mount shown above uses (4) 1/2 bolts, each of which has a tensile strength greater than the mount is even rated for (over 17k lbs for a grade 5 1/2"-20 bolt. Also, I have a 1/4" reinforcement welded to the cross member + the 1/4" steel that the winch plate is made from for it all to bolt through . . . if I can find a bolt on mount which will work, that is. I may end up going with a weld on mount anyway with plug welds from the back as well as the regular welds around the front side.
09-06-2011, 02:57 PM
#9
Registered User
I'm very happy to see you've done your homework. there have been a few builds on here that really scared the pants off of me. one in particular, a young guy that cut up a brush guard and tried to make a stinger out of it...
08-26-2012, 03:19 PM
#11
Registered User
Thread Starter
While I've been a bit busy working on my '85 Celica "nothing pretty" rallycross project, I finally got around to bending up the headlight guards so I thought I'd update this thread. I have one month to get a few more things in order before Olympus Rally in Washington state, so the 'runner will be getting a bit of love in the coming weeks


08-29-2012, 06:46 PM
#15
Registered User
Thread Starter
Unfortunately, I've been slacking on updates recently - still have a few to post. I've almost convinced myself that I'm done modding it and just want to drive it now - the latest iteration is as a rally sweep/recovery vehicle
this is from the Oregon Trail Rally
[img] [/img
[/img
this is from the Oregon Trail Rally
[img]
[/img
10-28-2012, 09:38 AM
#18
Registered User
Thread Starter
 10-28-2012, 01:03 PM
#20
Registered User
Thread Starter
tell me if these help: https://www.yotatech.com/51991777-post356.html


