
Heavy Duty Knuckle Gusset Kit Install Guide
 08-13-2012, 03:39 PM
#1
Registered User
Thread Starter
Heavy Duty Knuckle Gusset Kit Install Guide
Heavy Duty Knuckle Gusset Kit Install Guide
Thank you for your interest in our Heavy Duty Knuckle Gusset Kit. This guide will help you setup and install our new gusset kit. Due to variances in the Toyota axle housing, grinding may be required for proper fitment. Before performing any grinding/welding, please familiarize yourself with the placement of the top and bottom gussets.
If you have any questions, visit http://www.MarlinCrawler.com or call us at (559) 25-CRAWL
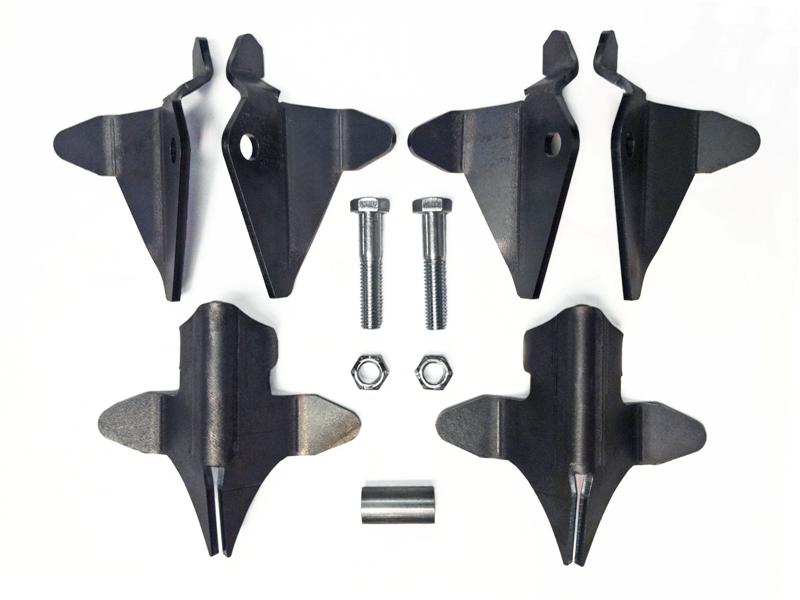
The kit is comprised of the following components:
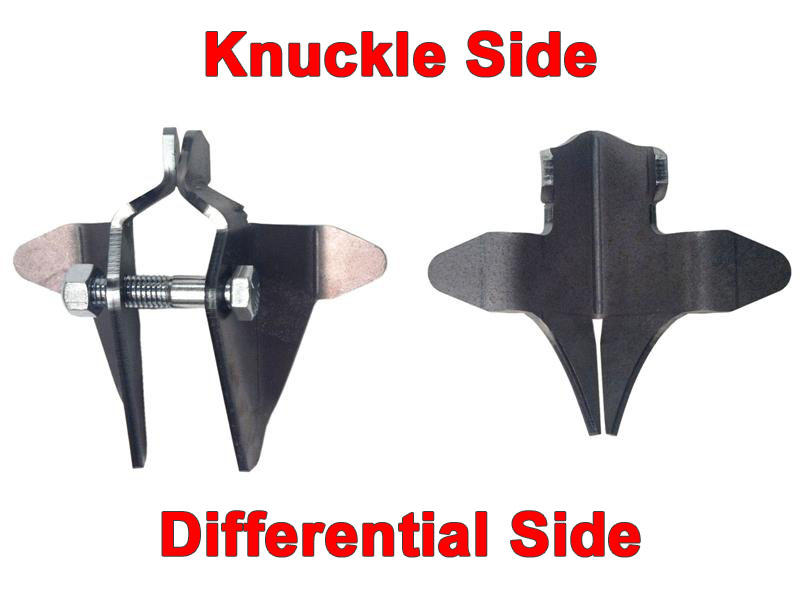
The top and bottom gussets are oriented as shown below:
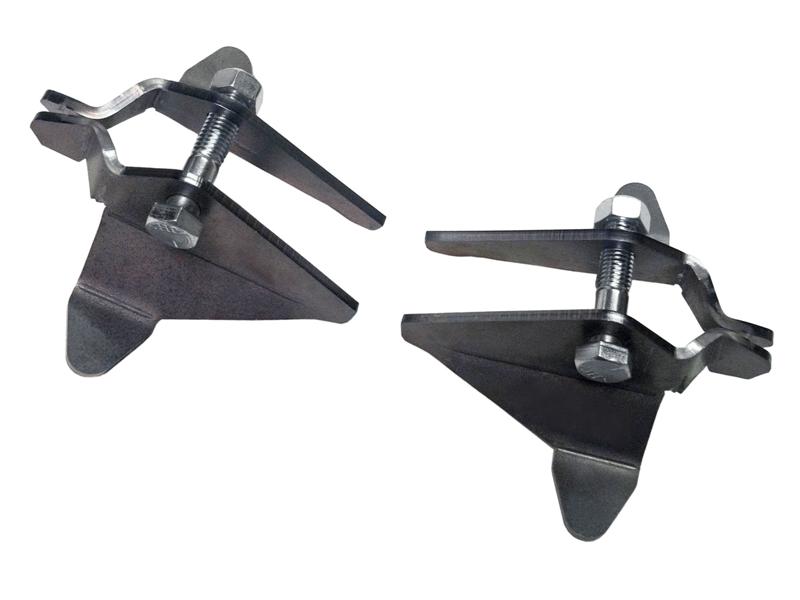
The top gussets assemble as shown below:
Thank you for your interest in our Heavy Duty Knuckle Gusset Kit. This guide will help you setup and install our new gusset kit. Due to variances in the Toyota axle housing, grinding may be required for proper fitment. Before performing any grinding/welding, please familiarize yourself with the placement of the top and bottom gussets.
If you have any questions, visit http://www.MarlinCrawler.com or call us at (559) 25-CRAWL
The kit is comprised of the following components:
- (2) Top gusset front plates
- (2) Top gusset rear plates
- (2) Lower gusset braces
- (2) Shock bolts
- (2) Shock bolt nuts
- (1) Alignment spacer
The top and bottom gussets are oriented as shown below:
The top gussets assemble as shown below:
Last edited by BigMike; 08-13-2012 at 03:43 PM.
 08-13-2012, 03:39 PM
#2
Registered User
Thread Starter
To begin, install a bolt, nut, and alignment spacer with a front and a rear top gusset plate.
Tighten the bolt and nut to a snug fit, being sure to keep the plates level with one another.

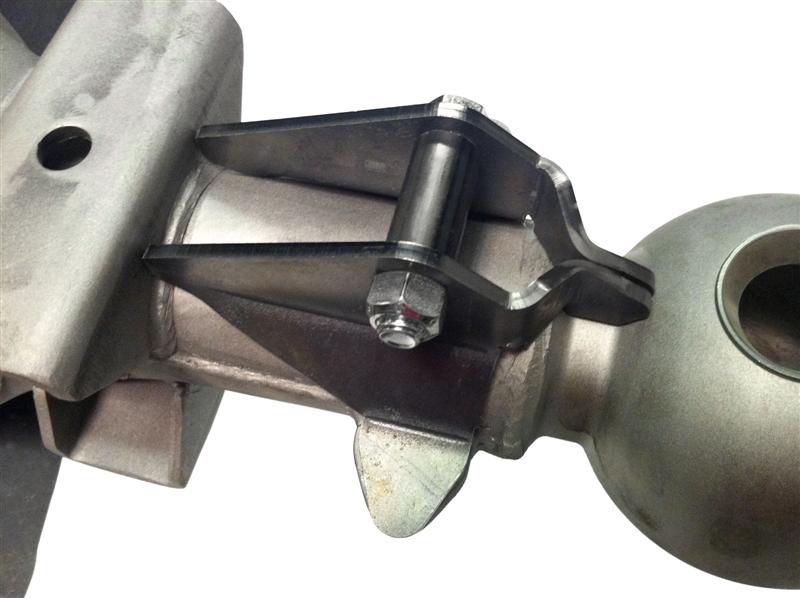
Unbolt your front shock from your front axle and grind off your factory lower shock mount.
Place the assembly atop your axle housing as shown below.
Tighten the bolt and nut to a snug fit, being sure to keep the plates level with one another.
Unbolt your front shock from your front axle and grind off your factory lower shock mount.
Place the assembly atop your axle housing as shown below.
08-13-2012, 03:40 PM
#3
Registered User
Thread Starter
There are two variances in the Toyota housings: The vertical and horizontal placement of the factory steering stops.
We designed our kit to be in the middle range of these variances.
Alignment: Position the assembly against the spring perch, circled below in green.
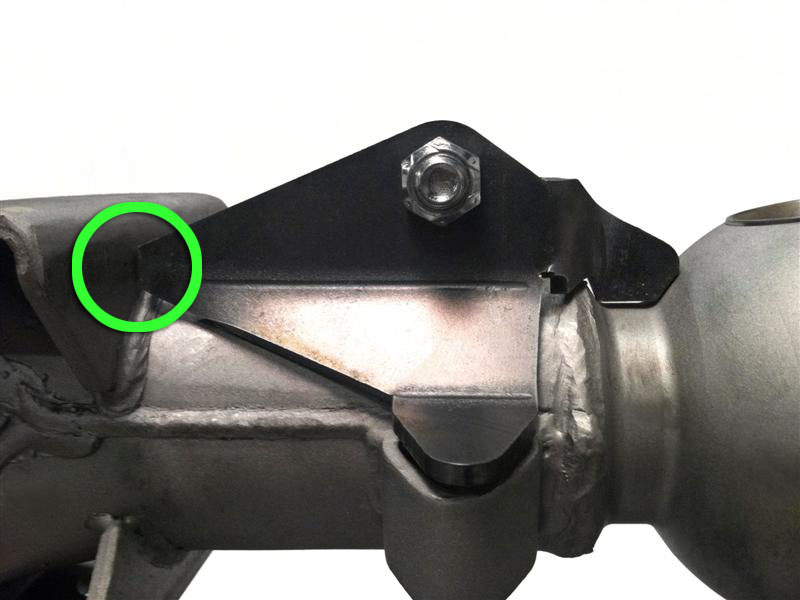
Horizontal Positioning: If your steering stop is positioned to the left or right of our gusset, ignore it: Use this gap for an improved weld penetration.
Vertical Positioning: It is important that our gusset assembly rests flush atop your factory steering stops.
The housing used in these images has a small gap between our assembly and the factory steering stop. This varies from housing-to-housing. Grind the area of your axle housing (circled in red below) as needed to eliminate any gaps above both steering stops. It is easier to grind the welds on your housing rather than trying to grind the gussets. Continually check both steering stops until a flush fit is made.

Once proper fitment is made, proceed to weld the gusset assemblies in place. If you are using air or coilover shocks, check for fitment before you weld the top gusset assembly in place. The width of our alignment spacer is designed for a stock Toyota shock bushing. Add washers for extra spacing as needed.
IMPORTANT: Keep the alignment spacer in place until the welds have cooled. This will prevent any distortion from the expanding hot welds.
We designed our kit to be in the middle range of these variances.
Alignment: Position the assembly against the spring perch, circled below in green.
Horizontal Positioning: If your steering stop is positioned to the left or right of our gusset, ignore it: Use this gap for an improved weld penetration.
Vertical Positioning: It is important that our gusset assembly rests flush atop your factory steering stops.
The housing used in these images has a small gap between our assembly and the factory steering stop. This varies from housing-to-housing. Grind the area of your axle housing (circled in red below) as needed to eliminate any gaps above both steering stops. It is easier to grind the welds on your housing rather than trying to grind the gussets. Continually check both steering stops until a flush fit is made.
Once proper fitment is made, proceed to weld the gusset assemblies in place. If you are using air or coilover shocks, check for fitment before you weld the top gusset assembly in place. The width of our alignment spacer is designed for a stock Toyota shock bushing. Add washers for extra spacing as needed.
IMPORTANT: Keep the alignment spacer in place until the welds have cooled. This will prevent any distortion from the expanding hot welds.
08-13-2012, 03:40 PM
#4
Registered User
Thread Starter
The lower gusset brace is installed to the bottom of the axle as shown below:
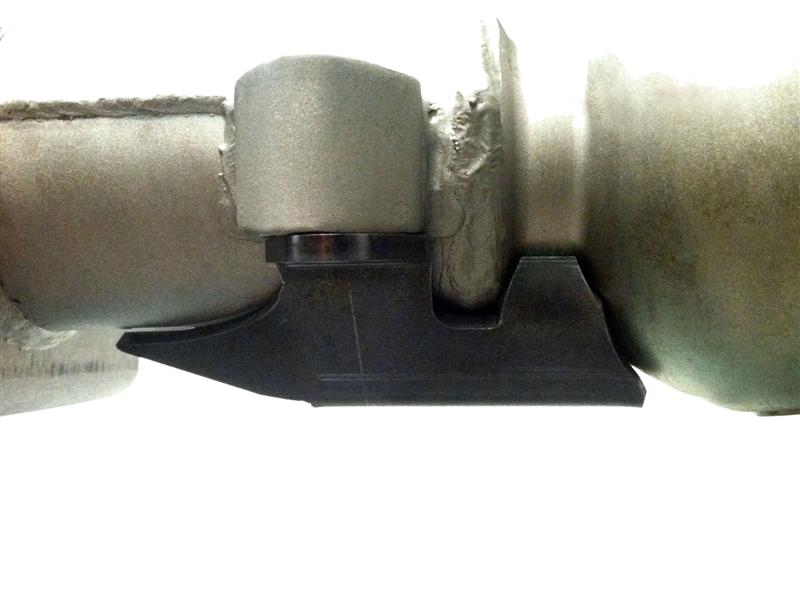
As with the top gussets, minor grinding may be required to eliminate any gaps between the steering stops. The axle used in this image vertically aligned with our gusset without any grinding. Ensure there are no vertical gaps between the gusset brace and the steering stops (as shown in the above image), and then weld the gusset brace in place.
After everything has cooled off, remove alignment spacer and repeat on the other side!
In closing, double check that your knuckle is able to fully pivot without interference to the oil seal retainer and/or felt gasket. Grind as needed for proper clearance! Enjoy!
Ordering information and additional details may be found by visiting our website at:
http://www.marlincrawler.com/axle/fr...kle-gusset-kit
Last edited by BigMike; 08-13-2012 at 03:45 PM.
08-13-2012, 05:24 PM
#6
Registered User
Thread Starter
Awesome 85TR, thanks for the order! Post up some pics when ya get it installed  !
!
These instructions are now also available via downloadable PDF on our website Tech section:
http://www.marlincrawler.com/tech/gu...-kit-installer
Regards,
BigMike
!These instructions are now also available via downloadable PDF on our website Tech section:
http://www.marlincrawler.com/tech/gu...-kit-installer
Regards,
BigMike

Thread
Thread Starter
Forum
Replies
Last Post
FS[PacSouthWest]: 2- 8"3rd members:4.88 ratchet lockers,new setup kit, rear axle rebuild kit,diff armor
jerusry
Axles - Suspensions - Tires - Wheels
1
10-19-2015 05:28 PM
GreatLakesGuy
The Classifieds GraveYard
8
09-04-2015 09:27 AM
crashburnoveride
86-95 Trucks & 4Runners
1
07-10-2015 06:39 AM


