
Corey's 2007 FJ Cruiser Build-Up Thread
 12-03-2011, 10:26 AM
#321
Springtail Solutions MPAC Side Rack For Powertank Installed 12-3-2011
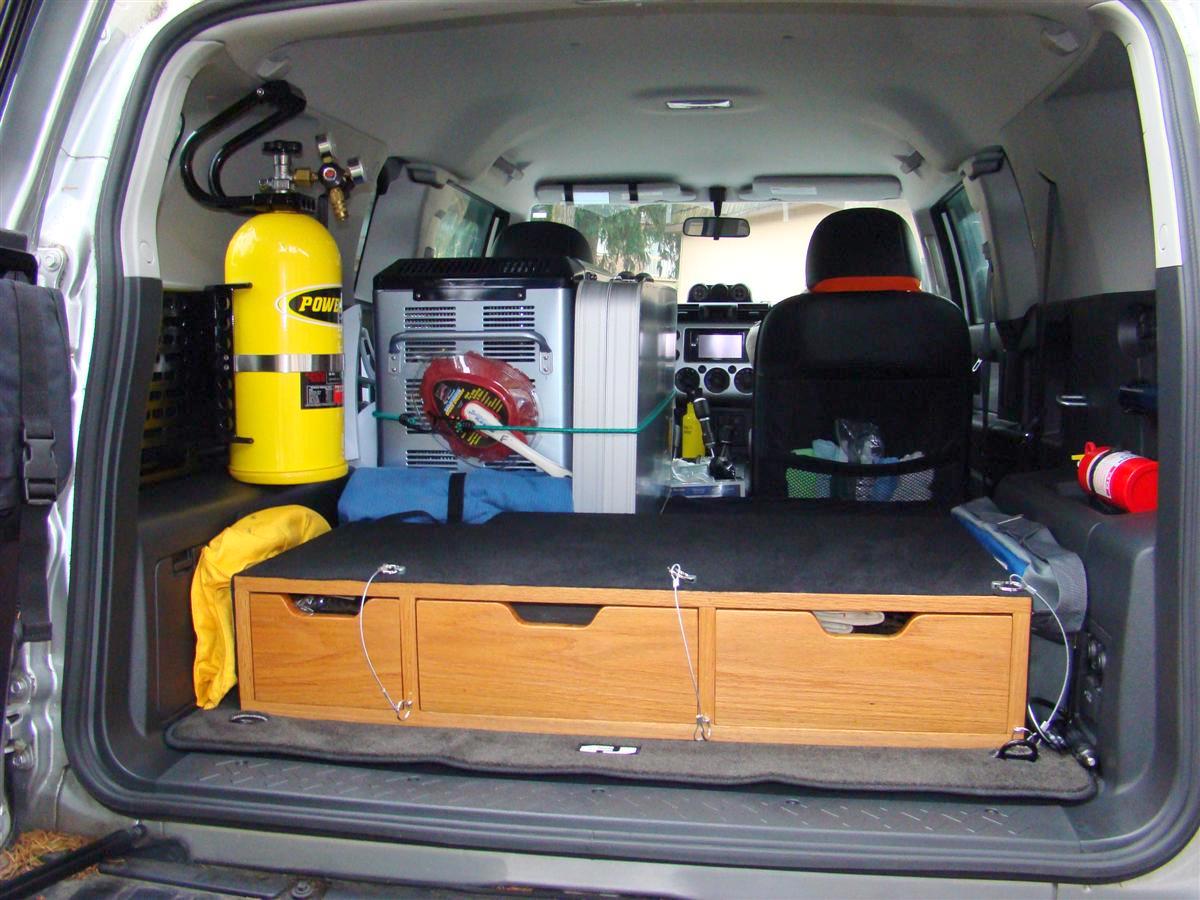
For years now the Powertank and one of my fire extinguishers has been mounted to the top of the cargobox as seen in the first picture.
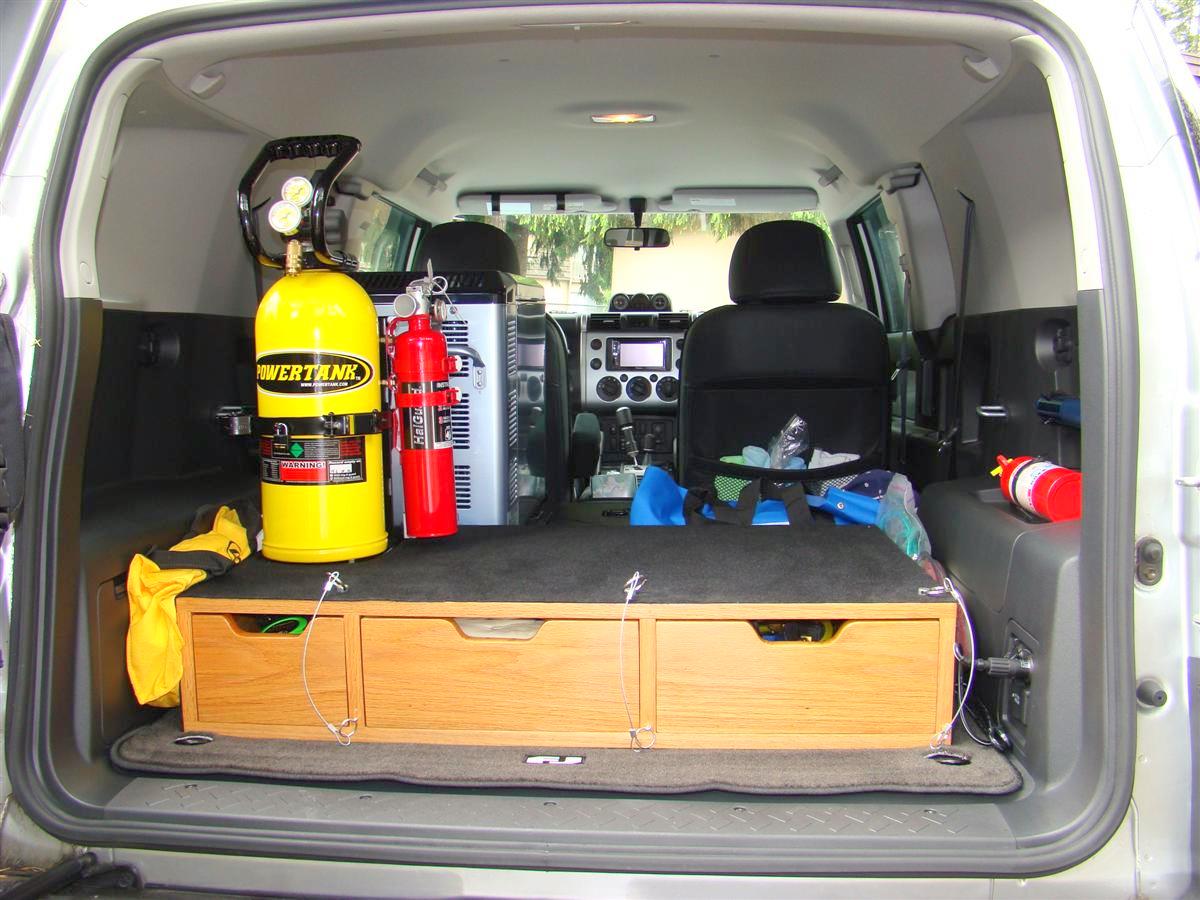
While this has worked out good, it takes up a lot of room there for valuable space for camping gear when the rig is loaded with it.
Springtail Solutions has had for quite some time now a side rack (click here to view it) for mounting a Powertank and other items via holes for Molle straps, Quick Fist mounts, and other methods.
This newly designed side rack I installed is just for the Powertank only, and also made to use the Super Bracket from Powertank that is linked at the end of this article.
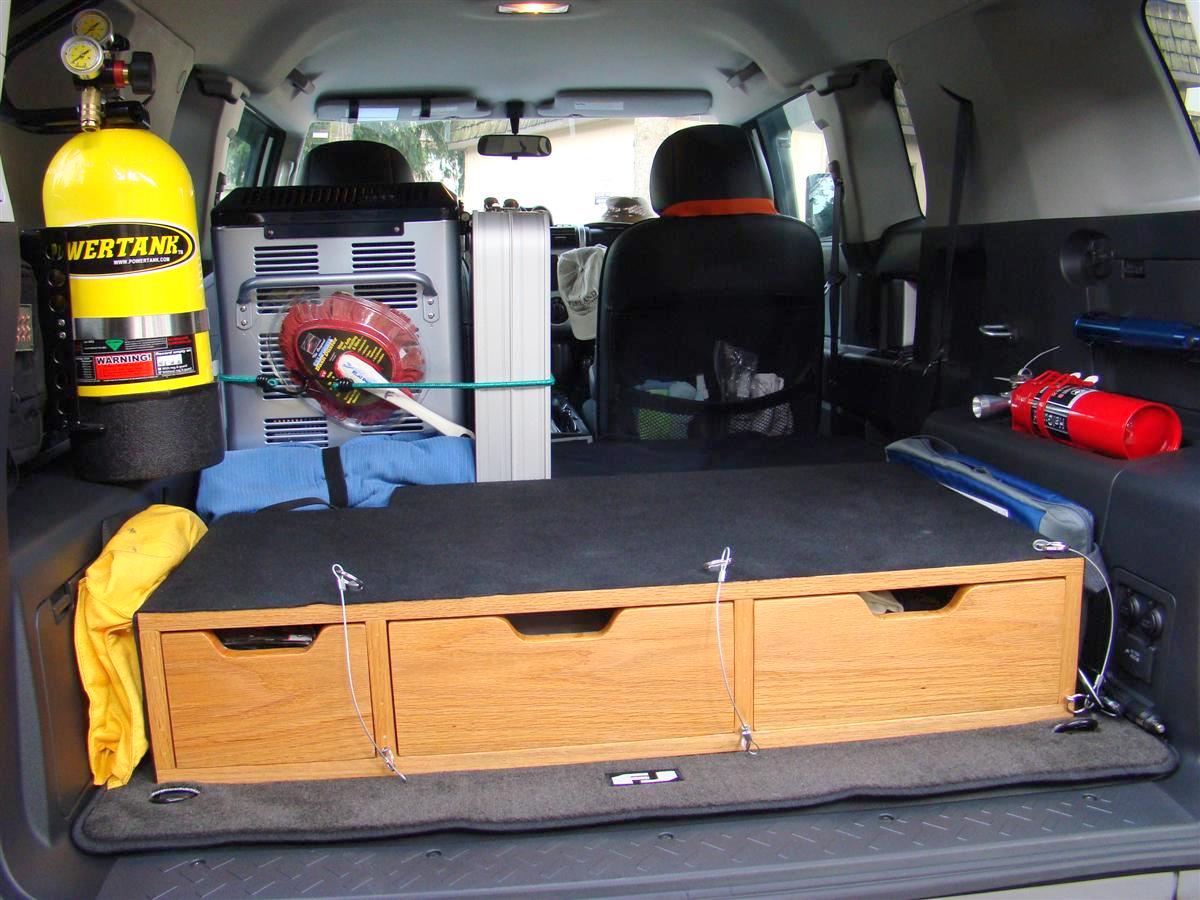
This will allow me to have more space for my 7 gallon drinking water jug, a large propane tank, and my chuckbox.
Depending on how much space this opens up, it will be much easier to load my camping gear back there now.
You can see by this older picture with the chuckbox back there that there is not much room on top of the cargobox for other gear with the Powertank there.
Please note this new rack is a prototype that I am testing for Springtail Solutions, so there is no URL for it yet on their website at the time of this writing.
This rack may not even get manufactured by Springtail Solutions unless they hear from other potential customers that there is a demand for these.
Hopefully after readers here see mine there will be enough interest warrantied for them to bring this into full production, and if so, it will be priced around $20 cheaper than their current side rack.
So if there is, please contact Doc at Springfield Solutions and let them know there is a desire to have these built.
My old large fire extinguisher bracket I have had since around 2000 or so for a Powertank in the 4Runner and then the FJ Cruiser is to big for the new rack, so Doc at Springtail Solutions suggested the Super Bracket from Powertank is the one I wanted to pick up, plus Doc's side rack is pre-drilled for the Super Bracket from Powertank.
I ordered the black Super Bracket one from Steve Sasaki owner of Powertank, and it arrived in a two days.
Steve, you guy's rock
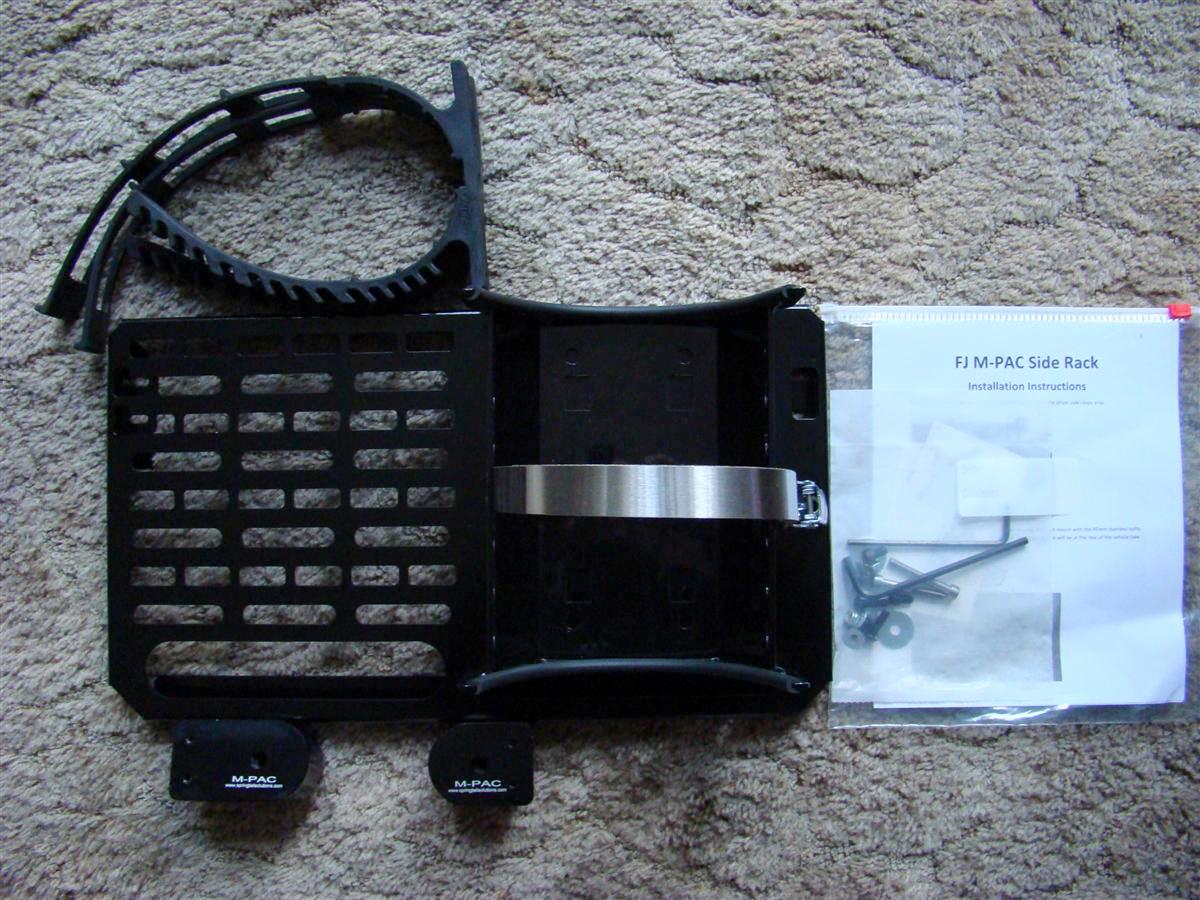
Below is a picture of all the parts spread out.
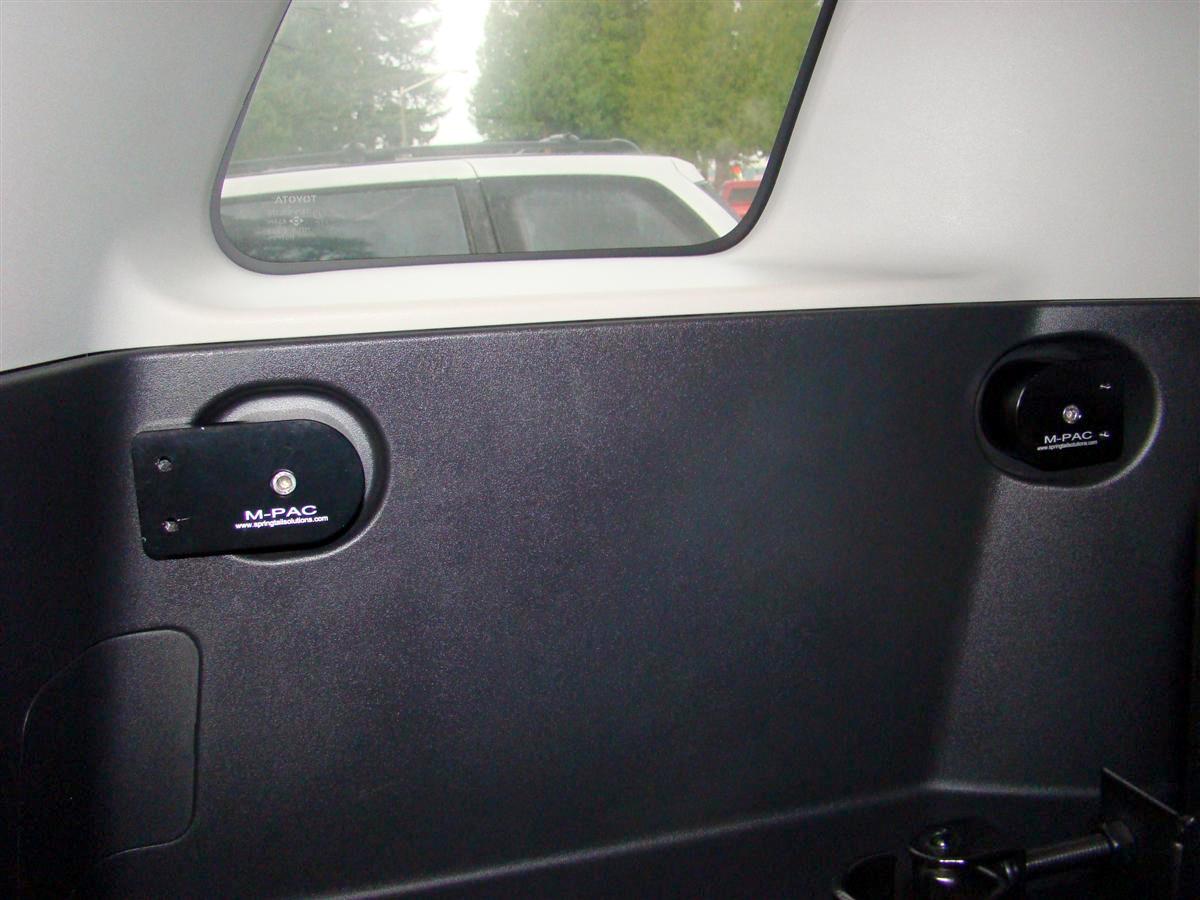
Here is a picture of the side of the FJ Cruiser showing the grocery hooks in place from the factory where the new rack will go.
Remove the stock bolts with a 10mm socket.
Here is a picture of the black billet aluminum mounts that replace the stock grocery hooks.
They install with 45mm stainless steel bolts and an included Allen wrench.
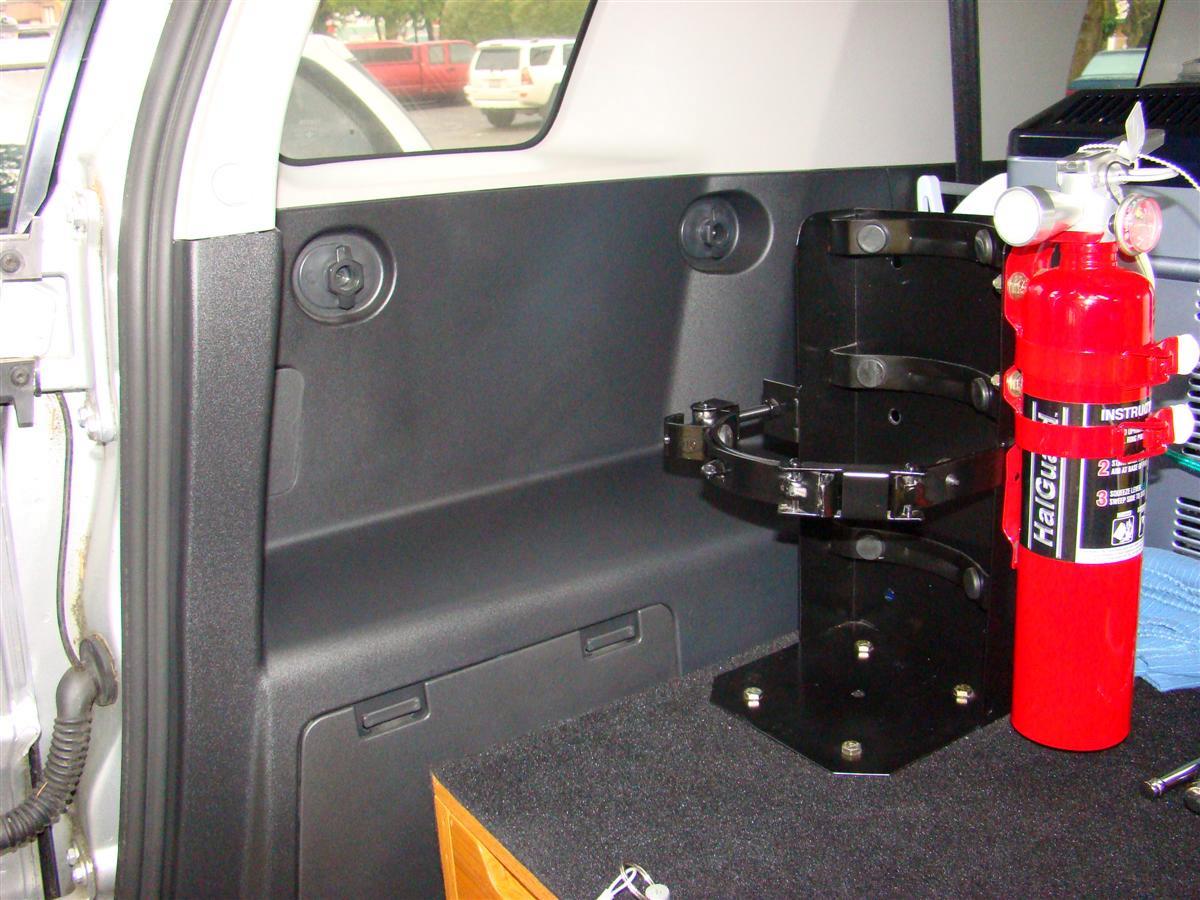
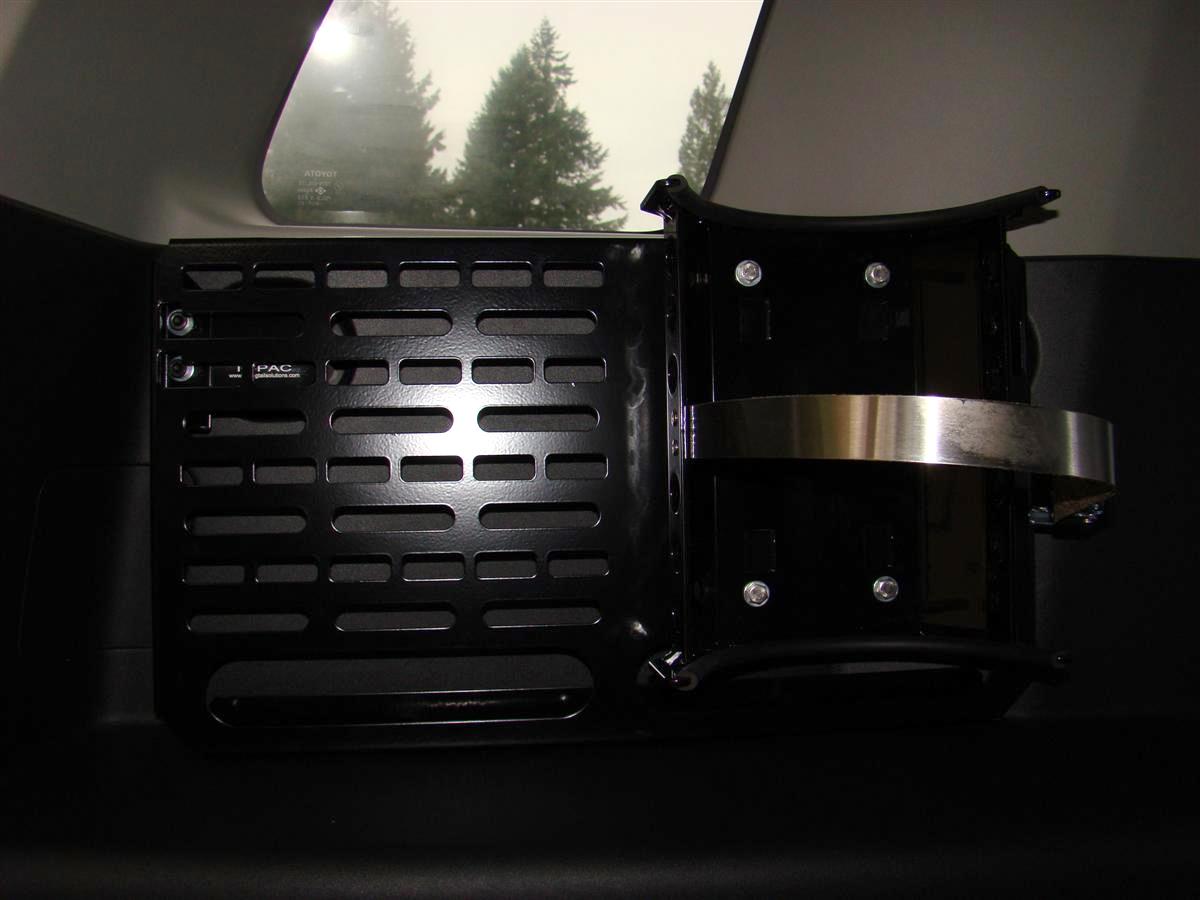
Here is a picture of the side rack and the Powertank Super Bracket in place.
The side rack is held to the billet mounts with 6mm bolts and washers.
If mounting a heavy item such as a Powertank or a fire extinguisher the below step should be taken.
There are two holes on the bottom of the side rack, and you drill two 15/64 holes through the plastic wheel well.
You then secure it with 6mm button head bolts and fender washers/locking nuts with another (smaller) included Allen wrench and a 10mm socket.
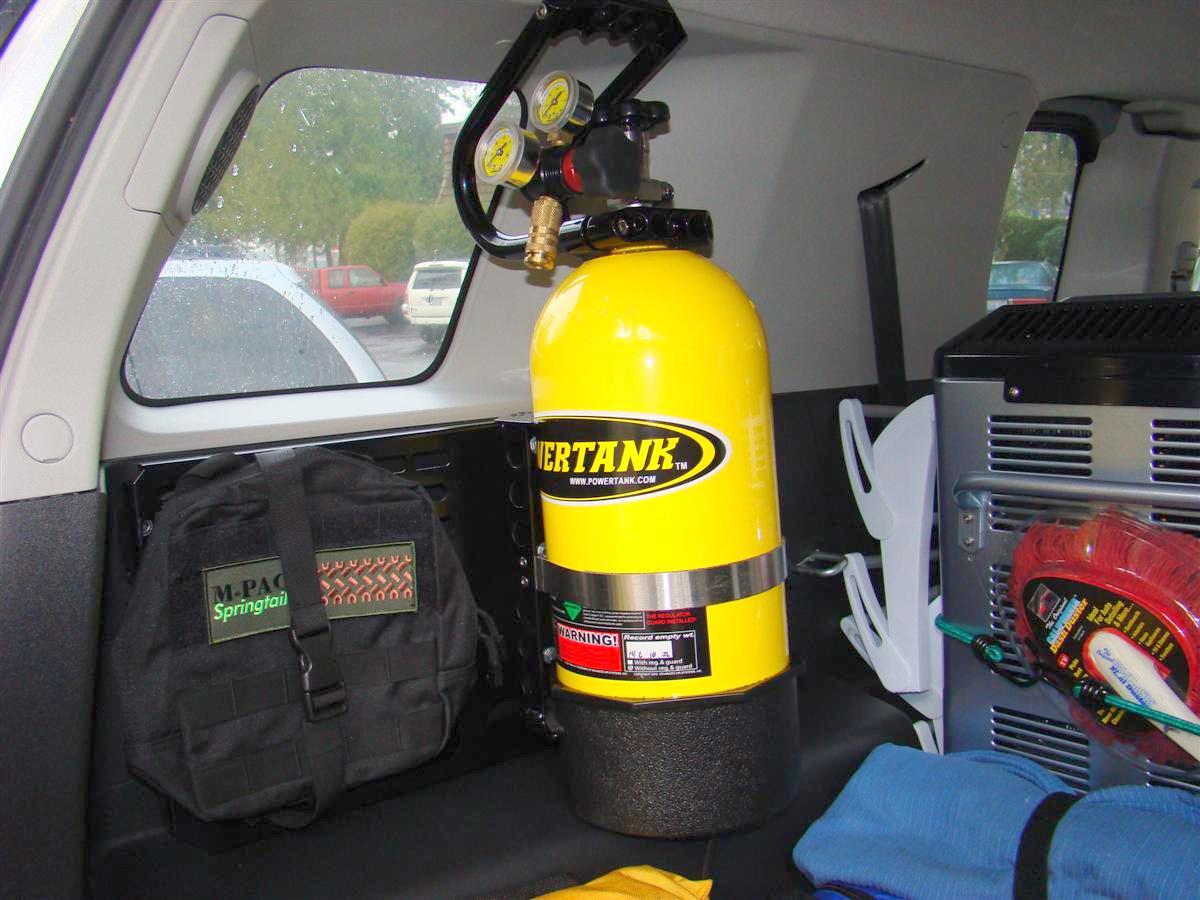
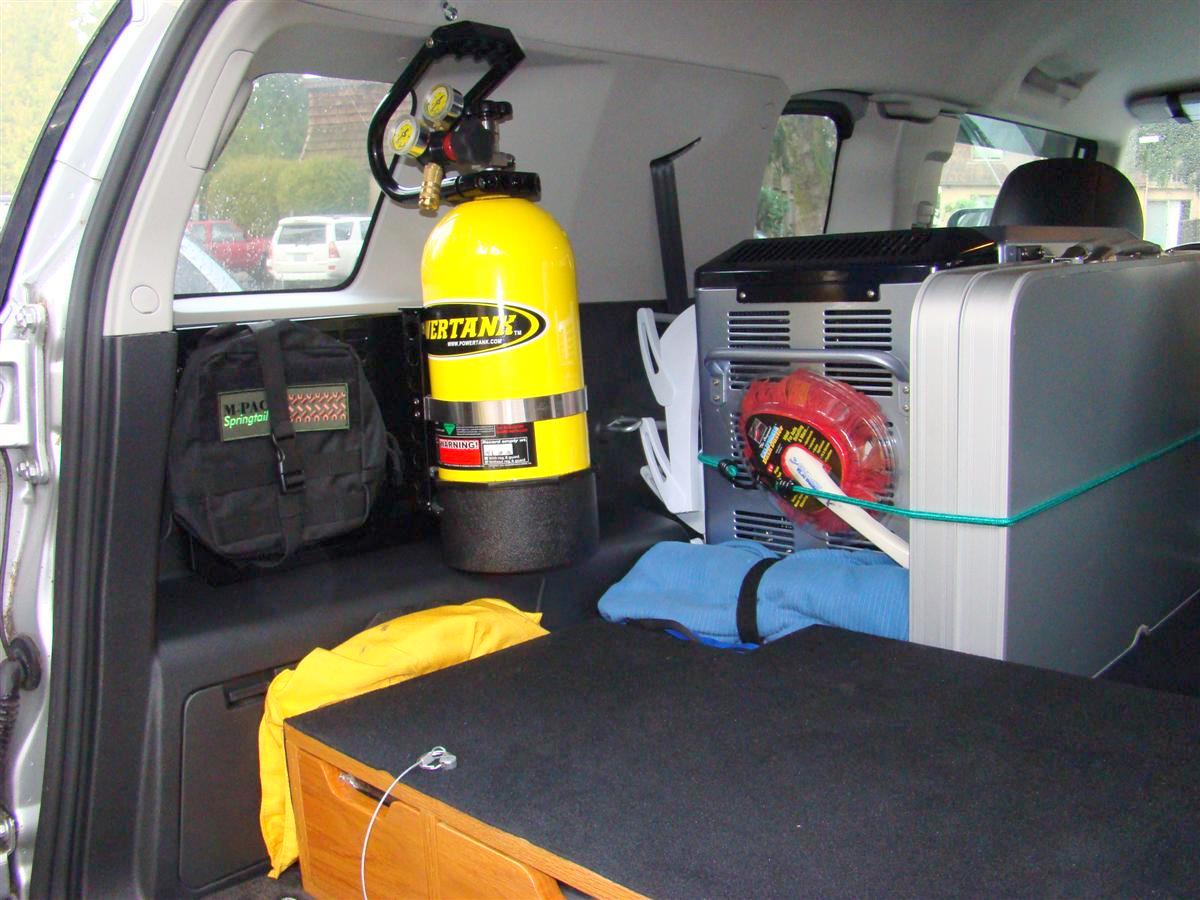
Here is a picture with the Powertank now in its new location.
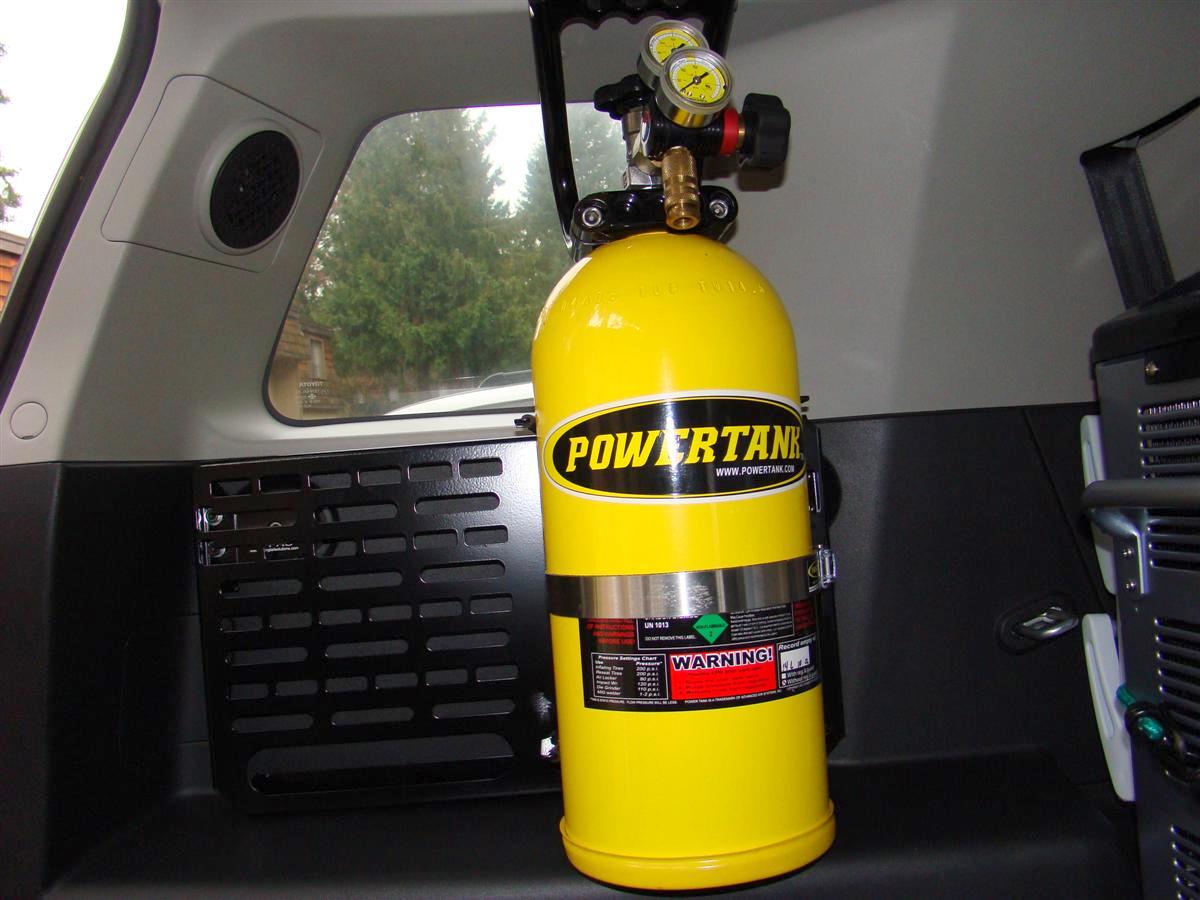
Another picture showing how much room was opened up by relocating the Powertank to its new position.
I will mount the Quick Fist mounts at a later time when I can do some more measuring and figure out what will be mounted with them.
Doc has an excellent installation guide over at fjcruiserforums site, and the install is the same for the new prototype rack I have.
The link to it is at the end of this article/post.
I will update this at a later date when I have the rig loaded up with camping gear to show you what it looks like with the gear and the new rack installed to the side now.
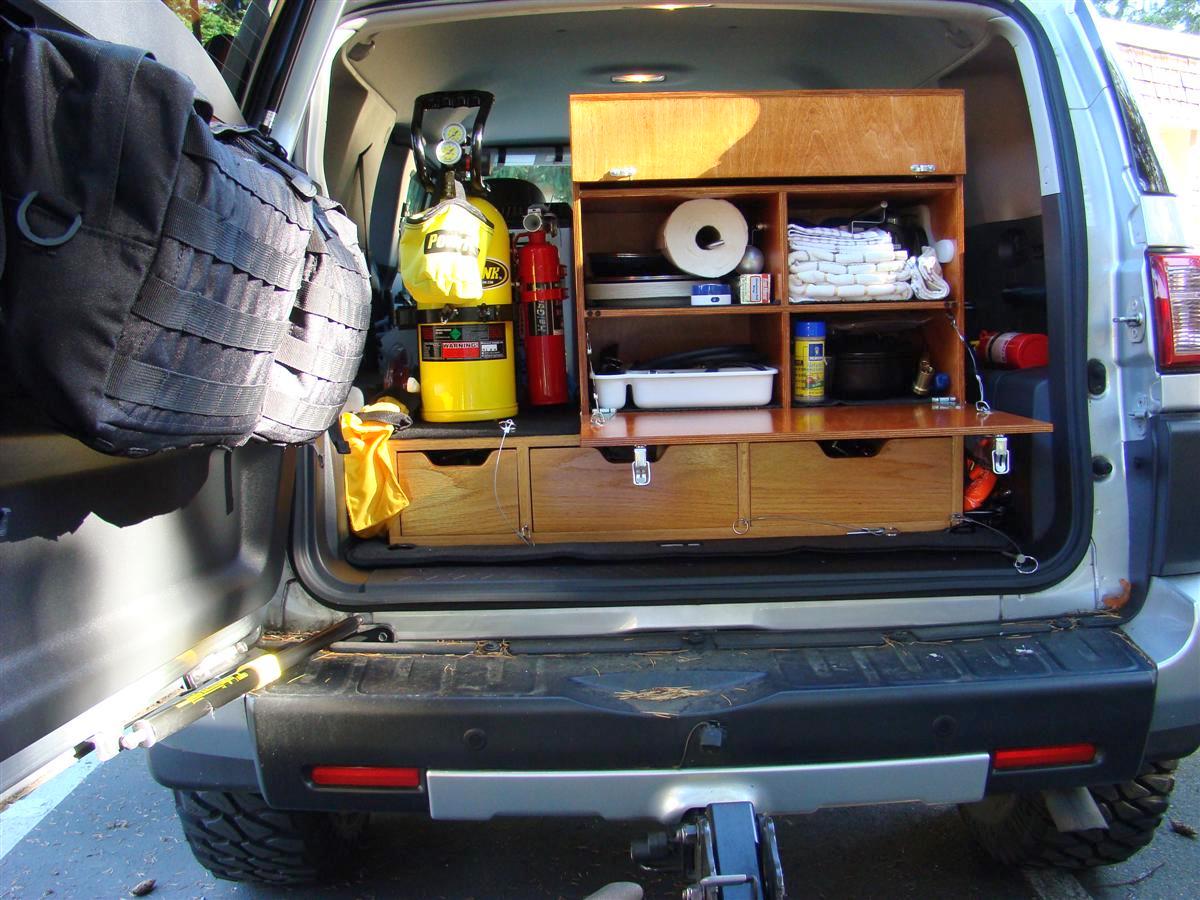
Here is a picture from 2010 showing how much valuable room the Powertank and fire extinguisher is taking.
I want to also add that this rack is beefy.
It is not going to flex on you, it is very well constructed, just like my MPAC rear door rack I have.
Links to parts used:
Springtail Solutions
Quickfist Mounts for the racks available from Springtail Solutions
Powertank Super Bracket part # BKT-2260-BK
Doc's installation guide for the regular style side rack over at fjcruiserforums
While this has worked out good, it takes up a lot of room there for valuable space for camping gear when the rig is loaded with it.
Springtail Solutions has had for quite some time now a side rack (click here to view it) for mounting a Powertank and other items via holes for Molle straps, Quick Fist mounts, and other methods.
This newly designed side rack I installed is just for the Powertank only, and also made to use the Super Bracket from Powertank that is linked at the end of this article.
This will allow me to have more space for my 7 gallon drinking water jug, a large propane tank, and my chuckbox.
Depending on how much space this opens up, it will be much easier to load my camping gear back there now.
You can see by this older picture with the chuckbox back there that there is not much room on top of the cargobox for other gear with the Powertank there.
Please note this new rack is a prototype that I am testing for Springtail Solutions, so there is no URL for it yet on their website at the time of this writing.
This rack may not even get manufactured by Springtail Solutions unless they hear from other potential customers that there is a demand for these.
Hopefully after readers here see mine there will be enough interest warrantied for them to bring this into full production, and if so, it will be priced around $20 cheaper than their current side rack.
So if there is, please contact Doc at Springfield Solutions and let them know there is a desire to have these built.
My old large fire extinguisher bracket I have had since around 2000 or so for a Powertank in the 4Runner and then the FJ Cruiser is to big for the new rack, so Doc at Springtail Solutions suggested the Super Bracket from Powertank is the one I wanted to pick up, plus Doc's side rack is pre-drilled for the Super Bracket from Powertank.
I ordered the black Super Bracket one from Steve Sasaki owner of Powertank, and it arrived in a two days.
Steve, you guy's rock
Below is a picture of all the parts spread out.
Here is a picture of the side of the FJ Cruiser showing the grocery hooks in place from the factory where the new rack will go.
Remove the stock bolts with a 10mm socket.
Here is a picture of the black billet aluminum mounts that replace the stock grocery hooks.
They install with 45mm stainless steel bolts and an included Allen wrench.
Here is a picture of the side rack and the Powertank Super Bracket in place.
The side rack is held to the billet mounts with 6mm bolts and washers.
If mounting a heavy item such as a Powertank or a fire extinguisher the below step should be taken.
There are two holes on the bottom of the side rack, and you drill two 15/64 holes through the plastic wheel well.
You then secure it with 6mm button head bolts and fender washers/locking nuts with another (smaller) included Allen wrench and a 10mm socket.
Here is a picture with the Powertank now in its new location.
Another picture showing how much room was opened up by relocating the Powertank to its new position.
I will mount the Quick Fist mounts at a later time when I can do some more measuring and figure out what will be mounted with them.
Doc has an excellent installation guide over at fjcruiserforums site, and the install is the same for the new prototype rack I have.
The link to it is at the end of this article/post.
I will update this at a later date when I have the rig loaded up with camping gear to show you what it looks like with the gear and the new rack installed to the side now.
Here is a picture from 2010 showing how much valuable room the Powertank and fire extinguisher is taking.
I want to also add that this rack is beefy.
It is not going to flex on you, it is very well constructed, just like my MPAC rear door rack I have.
Links to parts used:
Springtail Solutions
Quickfist Mounts for the racks available from Springtail Solutions
Powertank Super Bracket part # BKT-2260-BK
Doc's installation guide for the regular style side rack over at fjcruiserforums
 12-04-2011, 04:59 AM
#323
Thanks Todd.
I was listening in on long distance hams this morning waiting for Safeway to open up at 5 am
Yes, I like the extra room now.
If I get time, I will put on a molle bag I have onto that rack.
Can always use bags to store more stuff
I bet you are looking forward to the time off in a few weeks.
I am going to take a few extra days, make it a 13 day vacation instead of 11.
12-04-2011, 10:46 AM
#324
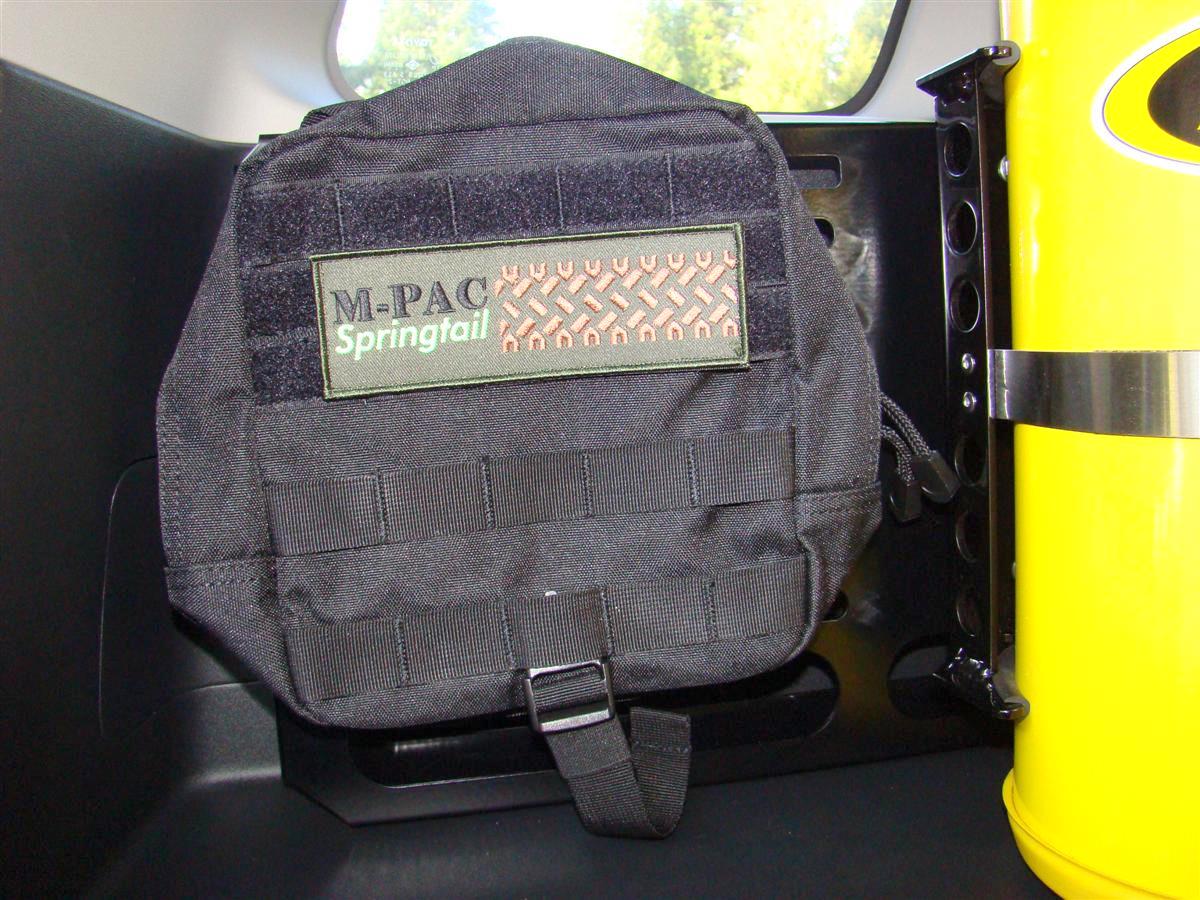
Just installed the new molle pack.
Once it is mounted via its two straps, you can grab the bag and separate it from its Velcro backing, thus leaving just the mount hooked to the rack, and you take the bag with you which has a carrying strap on top of it.

Once it is mounted via its two straps, you can grab the bag and separate it from its Velcro backing, thus leaving just the mount hooked to the rack, and you take the bag with you which has a carrying strap on top of it.
 12-05-2011, 03:30 PM
#327
Contributing Member
Join Date: Mar 2003
Location: COTKU,Ontario,Canada
Posts: 11,334
Likes: 0
Received 0 Likes
on
0 Posts
Good looking rack Corey...
Curious though... where are you mounting the Extinguisher now? Any thoughts of putting a matching rack on the pax side and hanging the ext. there?
Looks like an excellent product at a great price... if I owned an FJ I'd buy it.
Curious though... where are you mounting the Extinguisher now? Any thoughts of putting a matching rack on the pax side and hanging the ext. there?
Looks like an excellent product at a great price... if I owned an FJ I'd buy it.
12-11-2011, 10:02 AM
#329
Got Boot?
After all these years I chucked the yellow aircraft tubing protector cap I had on the bottom of my Powertank and put a tank boot on it.
The new boot protects the lower portion of the tank better than the cap I was using.
Part used:
Tank Boot, (Fits the 10# and 15# tanks)
Part Number: TBT-6090
The new boot protects the lower portion of the tank better than the cap I was using.
Part used:
Tank Boot, (Fits the 10# and 15# tanks)
Part Number: TBT-6090
12-31-2011, 12:26 PM
#330
HalGuard HG250R Fire Extinguisher Relocated 12-31-2011
Since I moved the Powertank earlier this month I lost my location for my HalGuard HG250R fire extinguisher.
I decided I did not need the el cheapo Kidde in the rig anymore since it is only for outside fires, you never want to use that type on your rig as it is bad for your wiring inside the rig and underneath the hood.
I am going to throw the Kidde into my camping gear footlocker to battle outside fires with.
I ended up putting the HalGuard in the same location as the Kidde one was.
I just had to take out the plastic tray over the wheel well and drill new bigger holes, and used the old hardware from when the HalGuard was mounted to the old Powertank bracket.
The HalGuard one is for battling fires inside of your rig and underneath of the hood since it is a "clean agent", and will not ruin your wiring.
04-28-2012, 01:22 PM
#333
Pioneer AVIC Z140 DVD/Navigation headunit installed 4-28-2012
Went to Cartoys today to get my Sirius tuner diagnosed as it was only playing out the right channel.
I suspected a loose connector, and I was right.
While I was there I looked at the newest GPS/DVD offering from Pioneer, and I decided to replace my Pioneer AVIC D3 from 2007 with the much improved Z140 which has built in bluetooth for phone calls, transferring Pandora music from my Droid Bionic to the stereo, voice recognition for playing songs off of the iPod, making phone calls, and entering an address into the GPS/Maps system.
Since the older Pioneer did not have voice recognition, you had to enter an address manually if you wanted to navigate somewhere.
My Droid Bionic with Google Maps does a much better job since I just have to tell the phone where I want to go, and it tells me how to get there.
Now with this new Pioneer AVIC Z140, it can do the same.
This deck is a huge improvement.
For a complete listing of what the deck can do so I do not have to type it all out here, here is the link from Cartoys page.
http://cartoys.com/products/product....In-Nav-iPod-BT
Here are a few pictures, and also a 1080 video I shot using my GoPro HD 2 camera.
https://vimeo.com/41210885
04-28-2012, 11:06 PM
#334
Contributing Member
Join Date: Mar 2003
Location: COTKU,Ontario,Canada
Posts: 11,334
Likes: 0
Received 0 Likes
on
0 Posts
Your radio is getting to smart... next thing you know it will take over and try to drive you... straight to the skynet incubation cubical thingy...
IK I'm mixing movies but I'm just taking both techs to their logical conclusion here...
our machines are getting too smart people!!!
IK I'm mixing movies but I'm just taking both techs to their logical conclusion here...
our machines are getting too smart people!!!
04-29-2012, 02:33 AM
#335
Your radio is getting to smart... next thing you know it will take over and try to drive you... straight to the skynet incubation cubical thingy...
IK I'm mixing movies but I'm just taking both techs to their logical conclusion here...
our machines are getting too smart people!!!
IK I'm mixing movies but I'm just taking both techs to their logical conclusion here...
our machines are getting too smart people!!!
Now I can kick back on the way into work and shave or read the morning paper on my Droid without even watching the road.


