
habanero's 1996 4Runner Build-Up Thread
 06-11-2022 | 01:24 PM
#4341
Thread Starter
Contributing Member
Joined: Sep 2005
Posts: 8,212
Likes: 479
From: mo
96 4Runner 321,xxx miles
Stepped away from the comms confusion to work on a few other things.
The speedo needle's been jumpy at lower speeds lately so I swapped the vss with a spare. The gear is pretty worn out, I'll likely end up having to order a new 10-32 gear. Toyota part #33403-29315
Didn't drive it around yet to test.
I also worked on the rear heat project. I've put the hard coolant lines in using the one bolt that is already there for it, on the firewall under the a/c drain, and the plastic clip that fits on the lip just under the cowl. It still needs one more bracket added, the hoses, and the heat guard where it enters the body.

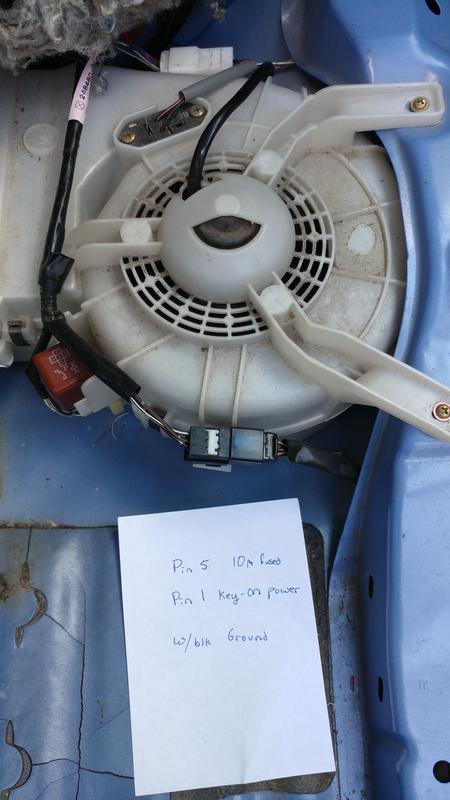
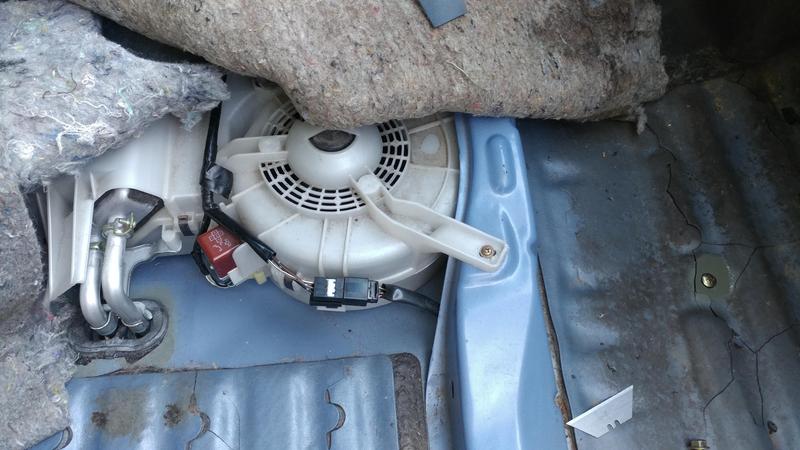
Since the rear heater core and blower has already been installed I spent a little time adding the electric. Pretty simple, 3 wires, 10amp power, ign switched power, white/black is ground.
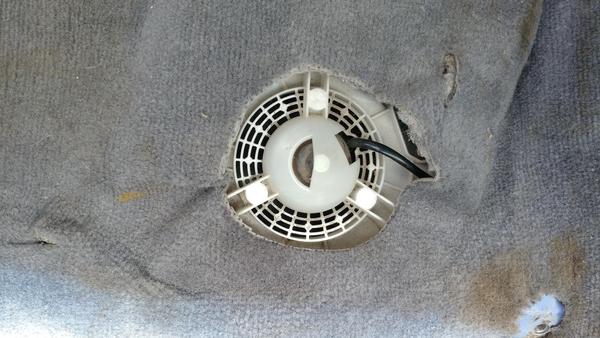
And cut a hole in the carpet for the blower
Stepped away from the comms confusion to work on a few other things.
The speedo needle's been jumpy at lower speeds lately so I swapped the vss with a spare. The gear is pretty worn out, I'll likely end up having to order a new 10-32 gear. Toyota part #33403-29315
Didn't drive it around yet to test.
I also worked on the rear heat project. I've put the hard coolant lines in using the one bolt that is already there for it, on the firewall under the a/c drain, and the plastic clip that fits on the lip just under the cowl. It still needs one more bracket added, the hoses, and the heat guard where it enters the body.
Since the rear heater core and blower has already been installed I spent a little time adding the electric. Pretty simple, 3 wires, 10amp power, ign switched power, white/black is ground.
And cut a hole in the carpet for the blower
06-11-2022 | 02:42 PM
#4342

Registered User
Joined: Feb 2010
Posts: 705
Likes: 123
From: St. Louis MO
And the triple-sticks are done (other than the shake-down drives). Just a matter of adding oil and working on the inside today. I think the shifter levers would have worked perfectly if I didn't have a 1" body lift, but that puts them down in the hole an inch more. And the right most lever get into the shifter console a little. I had to notch that and bend the wire that forms the perimeter of the shifter boot. And remove the single transfer case part f the boot, and sewed together 3 random Pick-n-pull car (Chevy Impala w bucket seats IIRC) that had nice little shifter boots. Then cut out a hole where the regular transfer case lever was, and sewed in the triple boot. Then reassembled it (after notching it as mentioned).
All I've done is test drive it about 25 feet back and forth in the driveway. As expected... it's slow. Double low and it's creeping. I think it maths out to about 6.6:1 gear reduction with both of them engaged. That will be NICE going over big ledges out in Moab this summer.
All I've done is test drive it about 25 feet back and forth in the driveway. As expected... it's slow. Double low and it's creeping. I think it maths out to about 6.6:1 gear reduction with both of them engaged. That will be NICE going over big ledges out in Moab this summer.
The following 4 users liked this post by Jomoka:
06-14-2022 | 11:50 AM
#4343
Registered User
Joined: Feb 2010
Posts: 705
Likes: 123
From: St. Louis MO
No issues so far in a couple of short highway drives. No weird noises, no drips, no vibrations, so far it's all great.
I need to take a long highway drive or two with it before heading out to Colorado in a month. Hab's Marlin Crawler taco box was perfectly fine driving around town for a couple of months, it was only on that long interstate drive out to Colorado that it decided to relocate some oil from the trans into the middle case.
I need to take a long highway drive or two with it before heading out to Colorado in a month. Hab's Marlin Crawler taco box was perfectly fine driving around town for a couple of months, it was only on that long interstate drive out to Colorado that it decided to relocate some oil from the trans into the middle case.
06-18-2022 | 03:06 PM
#4344
Thread Starter
Contributing Member
Joined: Sep 2005
Posts: 8,212
Likes: 479
From: mo
96 4Runner 321,566 miles
The VSS I swapped out earlier did the trick, no more twitchy speedometer below 60 or so. Not the gear as I thought- though it does look quite worn so I should probably get a back-up at some point.
Moved the roof basket back a few millimeters to better clear the sunroof at tilt.
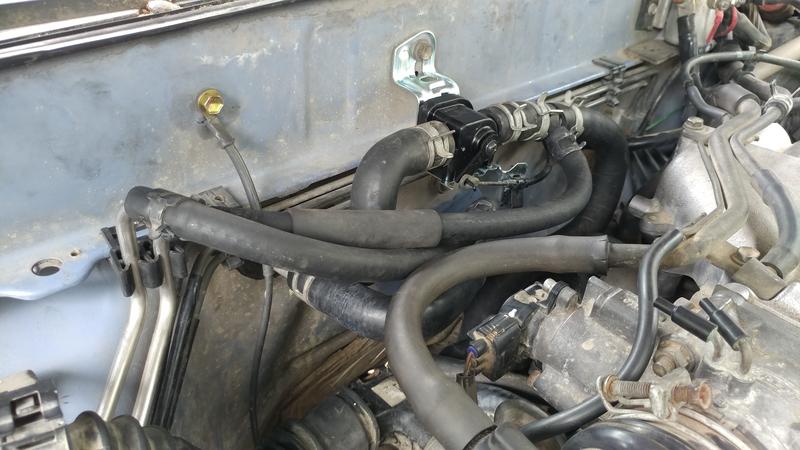
Finished installing the hard lines for the rear heater.
The top is secured with a plastic bracket at the lip on the firewall.
Near the bottom of the firewall below the a/c drain there is an existing stud for the metal bracket on the hard lines.
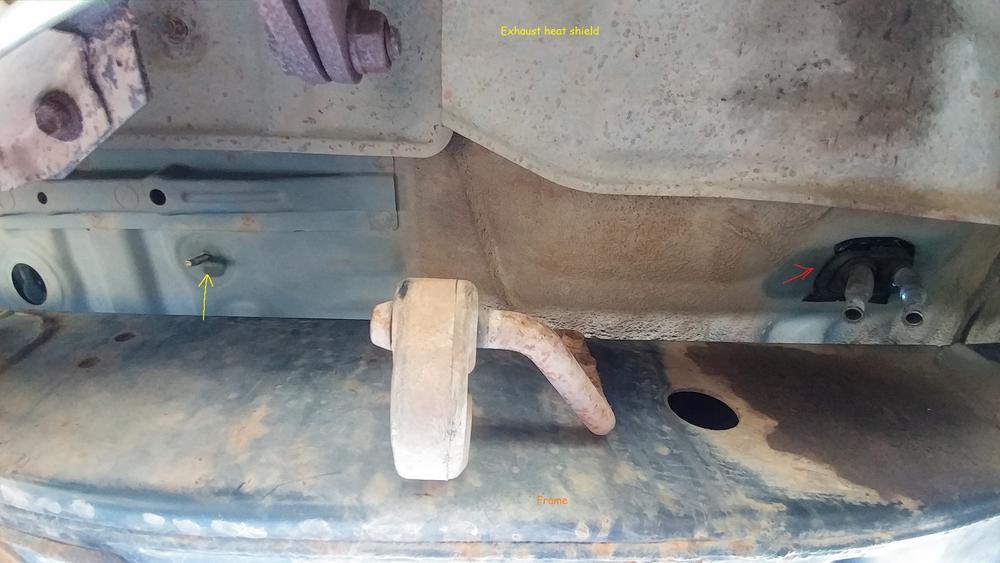
Near the end of the hard lines I had to drill a hole for the last metal bracket. It ends up in the passenger footwell so I used a lower profile machine screw that I already had, and clearanced the sound deadening for the head so it wouldn't be a lump under the carpet.
There's actually a circular depression that can be seen underneath the truck, that's where the bolt goes. Easy to drill through. Top of the pic is an exhaust heat shield, bottom is the frame. Yellow arrow points to the new screw, red points to the aux heater core in and outlets.
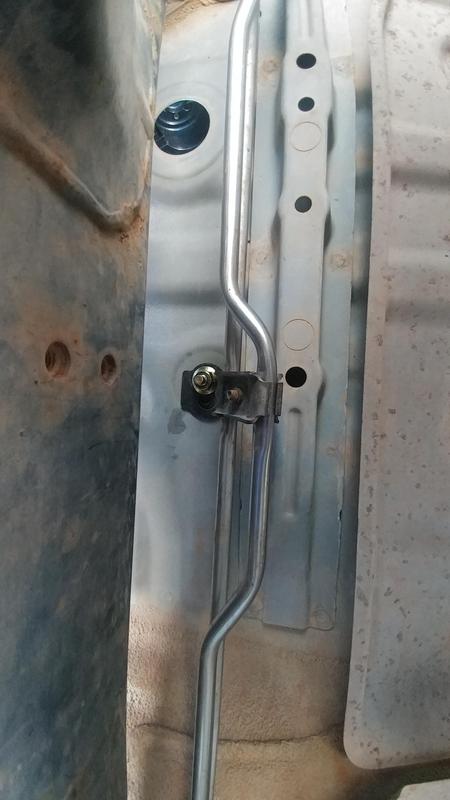
Bracket bolted on with hard lines attached.
Down to needing some 8mm...or 5/16"...coolant line to plumb it all together.
The VSS I swapped out earlier did the trick, no more twitchy speedometer below 60 or so. Not the gear as I thought- though it does look quite worn so I should probably get a back-up at some point.
Moved the roof basket back a few millimeters to better clear the sunroof at tilt.
Finished installing the hard lines for the rear heater.
The top is secured with a plastic bracket at the lip on the firewall.
Near the bottom of the firewall below the a/c drain there is an existing stud for the metal bracket on the hard lines.
Near the end of the hard lines I had to drill a hole for the last metal bracket. It ends up in the passenger footwell so I used a lower profile machine screw that I already had, and clearanced the sound deadening for the head so it wouldn't be a lump under the carpet.
There's actually a circular depression that can be seen underneath the truck, that's where the bolt goes. Easy to drill through. Top of the pic is an exhaust heat shield, bottom is the frame. Yellow arrow points to the new screw, red points to the aux heater core in and outlets.
Bracket bolted on with hard lines attached.
Down to needing some 8mm...or 5/16"...coolant line to plumb it all together.
06-24-2022 | 04:48 PM
#4345
Thread Starter
Contributing Member
Joined: Sep 2005
Posts: 8,212
Likes: 479
From: mo
96 4Runner 321,620 miles
Finally got all the heater lines in. Now I've got rear heat. In summer.
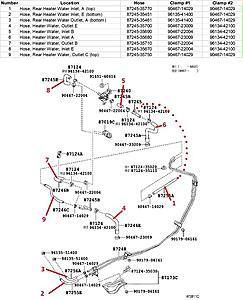
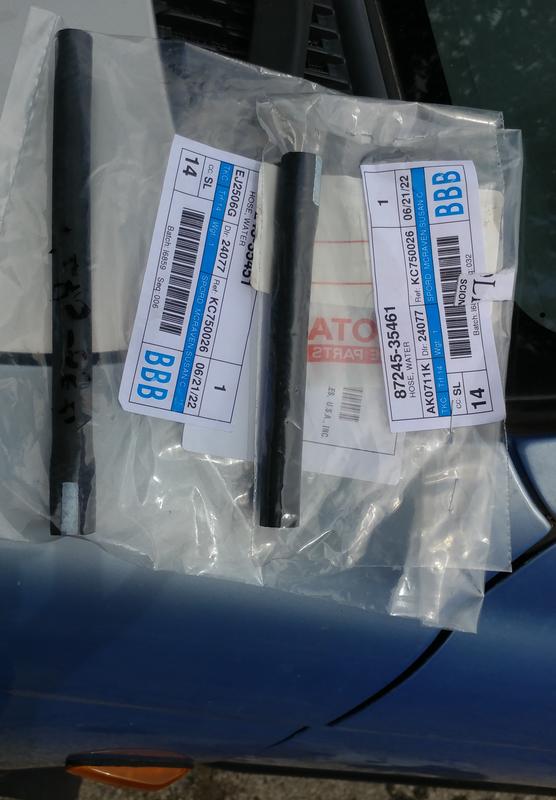
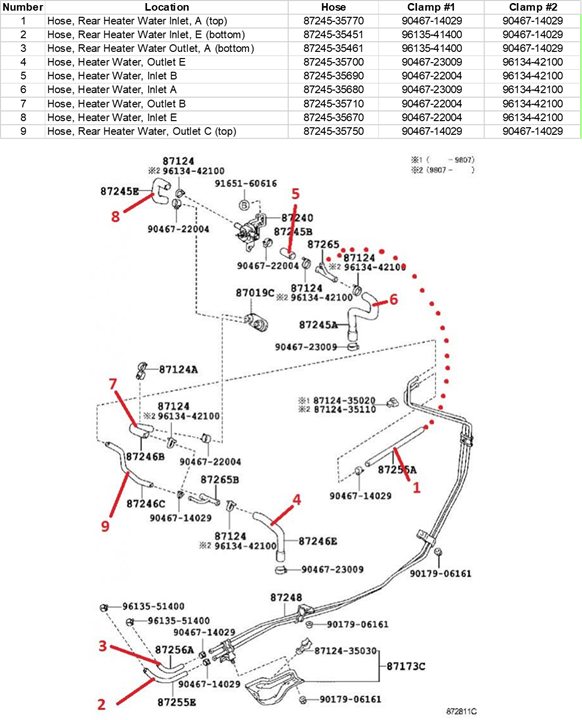
Spiker Engineering over on T4R suggested I just buy the two lines that run to the aux heater. Being that they're a different size at either end and $11 local for the pair I did it.
He even posted up a picture with part numbers to make things super easy for me. I'm posting it here for others...
Courtesy Spiker Engineering...
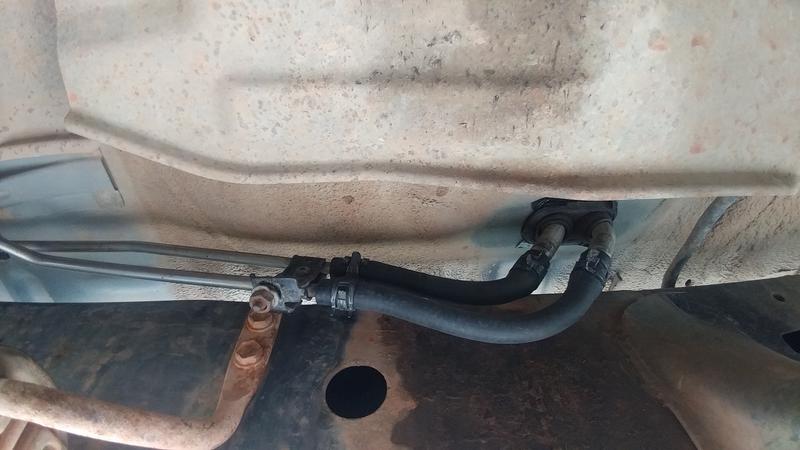
The hoses, when you get under there it's obvious which has to go where
Like so...
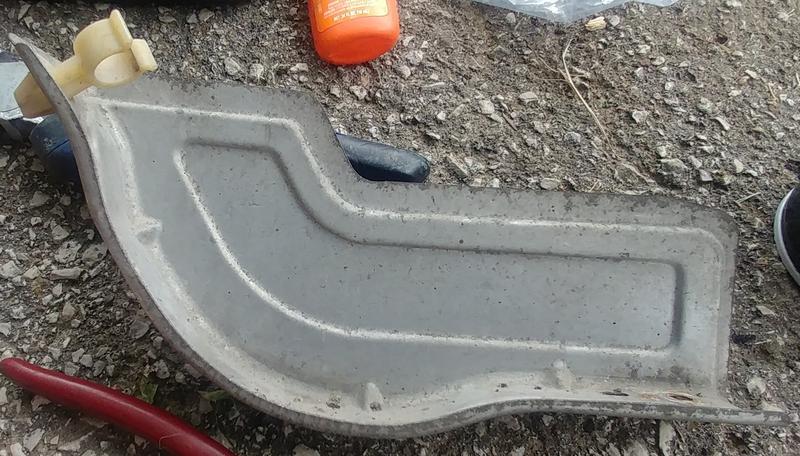
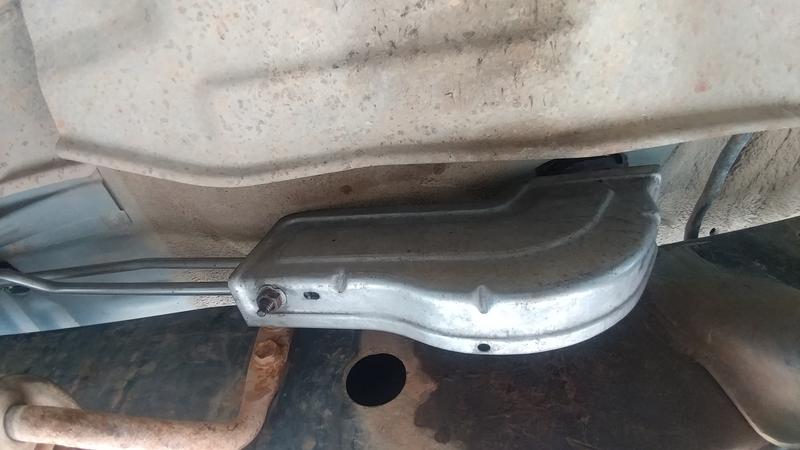
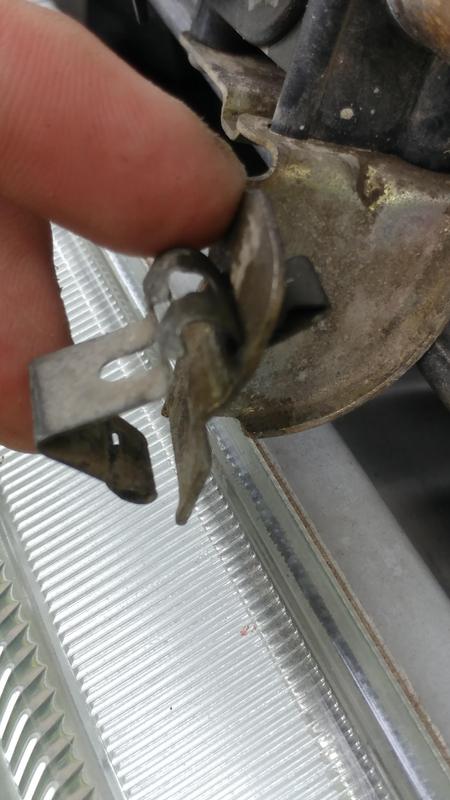
And then the heat shield, one clip and one bolt and it's in
For the stuff on the firewall I referred to the '99 since it has rear heat. I did go with Gates 28408 5/16" ID hose for the smaller line, and a compilation of new and the original hoses for the bigger molded stuff.
I'd already bought the heater control valve because of the way they deteriorate and break...mine was pretty old, something out of the junkyard...
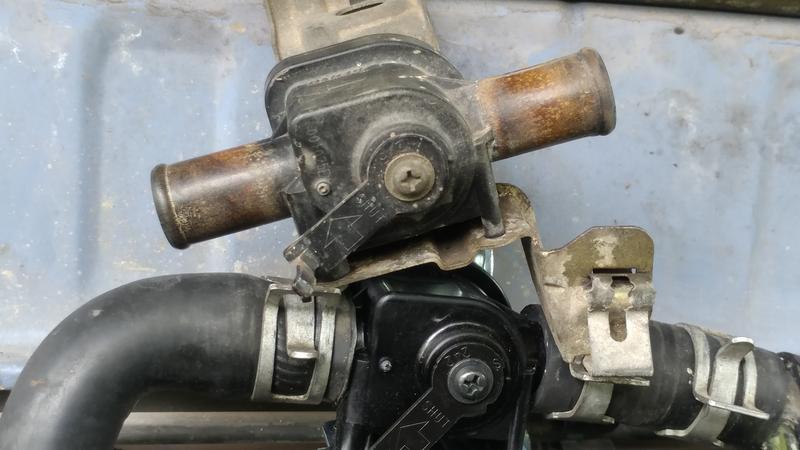
And getting the actuator cable off is very easy, there's a catch at the bottom of the keeper, pull down to disengage.
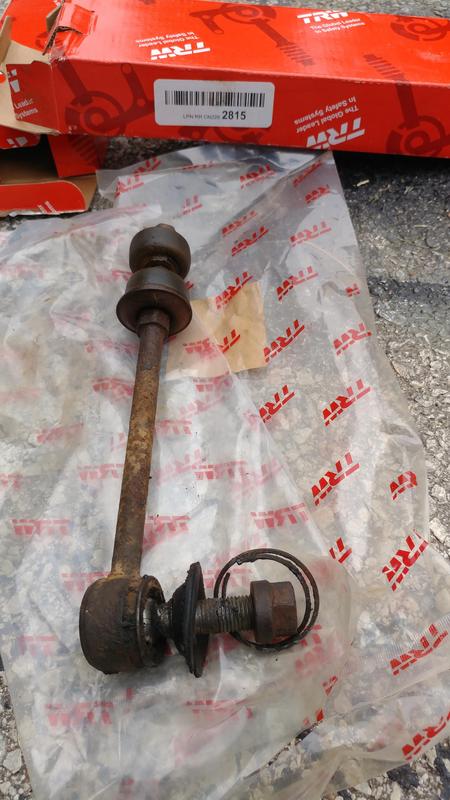
I also replaced my front sway bar links, one had broken awhile ago and I'd removed it. The other was looking the worse for wear so did the pair. TRW JTS187 from Amazon, cheap, not amaze. The last set was Moog, these seem about the same.
I use rear links for a 2nd gen 4Runner in the front, and the front links for a 3rd gen in the rear.
For anyone who could use this...
Per the Toyota FSM-
For the top part of the link at the sway bar (3rd gen is all I have specs for) 22 ft-lbs/ 29 N-m
For the bottom part of the sway bar link at the a-arm (3rd gen) 51 ft lbs/ 69 N-m
The sway bar brackets are 19 ft-lbs/ 25 N-m
Have both off, install both loosely at the same time, once in place tighten it all down.
There's a hex shape at the top of the shaft for a wrench so you can hold it in place while tightening the nut
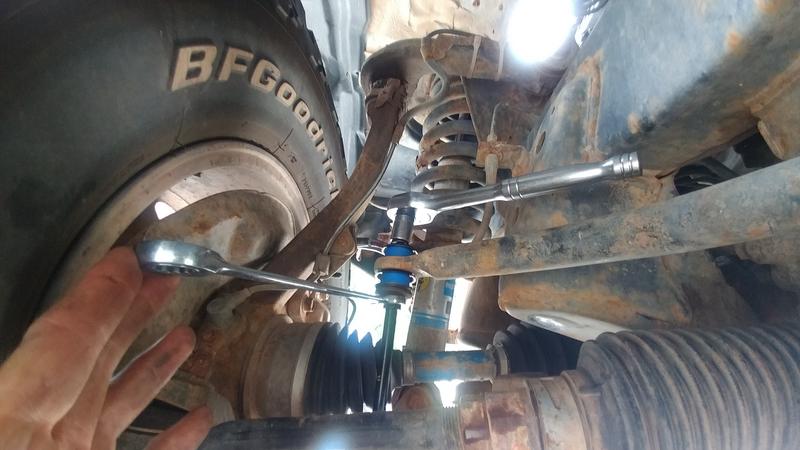
and a place for a hex wrench in the end of the bolt to hold the joint still while you tighten the nut.

Easy enough.
Next was headlight bulbs - 9003. I went with cheaper Hella Performance bulbs this time.
3200k because I find it easier to see with a warmer color bulb. These probably won't be a bright as the set I had before, I'll survive.
I replaced both so they'd match and saved the bulb that was still good for a spare. If you don't have a lot of junk immediately behind your headlights like me headlight bulbs are easy to do. Don't touch the glass.
The right side I can do as normal, the left requires the removal of the headlight (remove grille, eyebrow, marker, then 4 bolts for the headlight assembly. I did a write-up the last time I had to replace it so am gonna not do it again.
And last of all I finally pulled and washed my winch line. It's hanging to dry before I roll it back up.
Finally got all the heater lines in. Now I've got rear heat. In summer.
Spiker Engineering over on T4R suggested I just buy the two lines that run to the aux heater. Being that they're a different size at either end and $11 local for the pair I did it.
He even posted up a picture with part numbers to make things super easy for me. I'm posting it here for others...
Courtesy Spiker Engineering...
The hoses, when you get under there it's obvious which has to go where
Like so...
And then the heat shield, one clip and one bolt and it's in
For the stuff on the firewall I referred to the '99 since it has rear heat. I did go with Gates 28408 5/16" ID hose for the smaller line, and a compilation of new and the original hoses for the bigger molded stuff.
I'd already bought the heater control valve because of the way they deteriorate and break...mine was pretty old, something out of the junkyard...
And getting the actuator cable off is very easy, there's a catch at the bottom of the keeper, pull down to disengage.
I also replaced my front sway bar links, one had broken awhile ago and I'd removed it. The other was looking the worse for wear so did the pair. TRW JTS187 from Amazon, cheap, not amaze. The last set was Moog, these seem about the same.
I use rear links for a 2nd gen 4Runner in the front, and the front links for a 3rd gen in the rear.
For anyone who could use this...
Per the Toyota FSM-
For the top part of the link at the sway bar (3rd gen is all I have specs for) 22 ft-lbs/ 29 N-m
For the bottom part of the sway bar link at the a-arm (3rd gen) 51 ft lbs/ 69 N-m
The sway bar brackets are 19 ft-lbs/ 25 N-m
Have both off, install both loosely at the same time, once in place tighten it all down.
There's a hex shape at the top of the shaft for a wrench so you can hold it in place while tightening the nut
and a place for a hex wrench in the end of the bolt to hold the joint still while you tighten the nut.
Easy enough.
Next was headlight bulbs - 9003. I went with cheaper Hella Performance bulbs this time.
3200k because I find it easier to see with a warmer color bulb. These probably won't be a bright as the set I had before, I'll survive.
I replaced both so they'd match and saved the bulb that was still good for a spare. If you don't have a lot of junk immediately behind your headlights like me headlight bulbs are easy to do. Don't touch the glass.
The right side I can do as normal, the left requires the removal of the headlight (remove grille, eyebrow, marker, then 4 bolts for the headlight assembly. I did a write-up the last time I had to replace it so am gonna not do it again.
And last of all I finally pulled and washed my winch line. It's hanging to dry before I roll it back up.
Last edited by habanero; 06-25-2022 at 03:52 PM.
The following users liked this post:
chuckles89 (06-25-2022)
06-25-2022 | 12:46 PM
#4346
Registered User
Joined: Jul 2005
Posts: 2,323
Likes: 647
From: Chiloquin, OR
Good write-up, as always! Thanks. 
Question, if I may...
Is there a specific torque spec for the front sway bar links you replaced? I like the ways provided to hold the various joints, but was there specific torque for them, or just a 3/4 grunt torque spec?
Keep the post coming. I'm really enjoying them...
Pat☺
Question, if I may...
Is there a specific torque spec for the front sway bar links you replaced? I like the ways provided to hold the various joints, but was there specific torque for them, or just a 3/4 grunt torque spec?
Keep the post coming. I'm really enjoying them...
Pat☺
The following users liked this post:
habanero (06-25-2022)
06-25-2022 | 03:51 PM
#4347
Thread Starter
Contributing Member
Joined: Sep 2005
Posts: 8,212
Likes: 479
From: mo
Per the Toyota FSM-
For the top part of the link at the sway bar (3rd gen is all I have specs for) 22 ft-lbs/ 29 N-m
For the bottom part of the sway bar link at the a-arm (3rd gen) 51 ft lbs/ 69 N-m
The sway bar brackets are 19 ft-lbs/ 25 N-m
I'll stick this up there too.
06-26-2022 | 12:23 PM
#4348
Registered User
Joined: Jul 2005
Posts: 2,323
Likes: 647
From: Chiloquin, OR
Thank you! I appreciate the response.
My concern was that, being after-market, they might be different than the FSM's requirements. Since the specs are the same as the FSM, I could figure it out, but I appreciate the detailed answer.
Thanks again!
Pat☺
My concern was that, being after-market, they might be different than the FSM's requirements. Since the specs are the same as the FSM, I could figure it out, but I appreciate the detailed answer.
Thanks again!
Pat☺
06-26-2022 | 06:21 PM
#4349
Thread Starter
Contributing Member
Joined: Sep 2005
Posts: 8,212
Likes: 479
From: mo
Same concern here. I did post the Toyota specs but I generally ugga dug the bottom bigger gauge bolt well enough and tighten the wimpier top not too much, but enough. The TRW links aren't all that substantial.
06-26-2022 | 06:36 PM
#4350
Thread Starter
Contributing Member
Joined: Sep 2005
Posts: 8,212
Likes: 479
From: mo
96 4Runner 321,620 miles
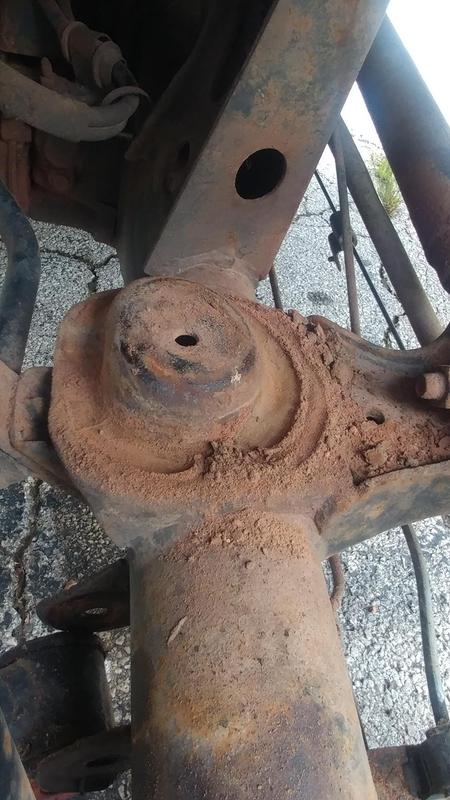
It rained a lot all morning and then got really sunny in the afternoon. Awning for the win!
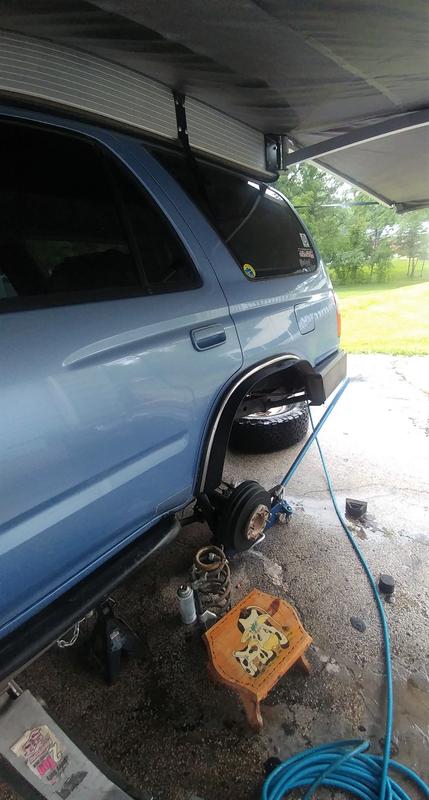
Today was replace the left bump stop
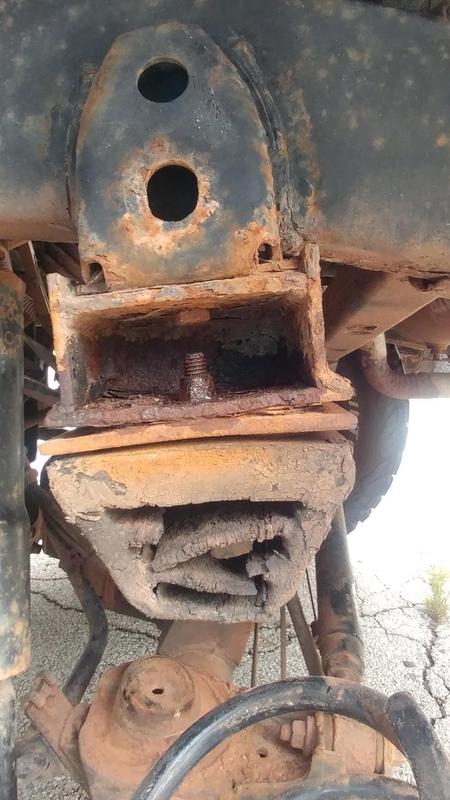

and the left suspension air bag had a hole near the top so it got replaced too
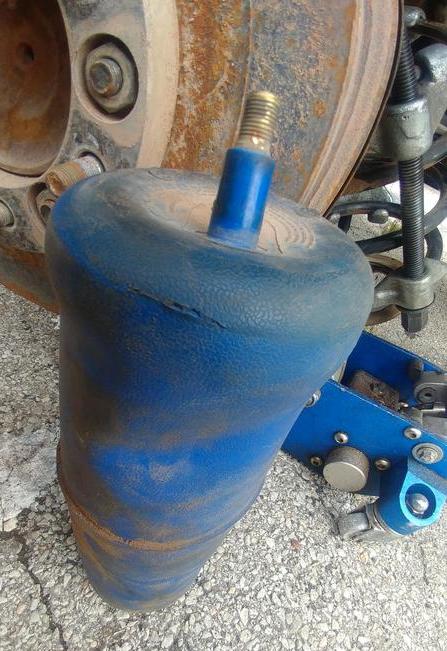
Lots of utah sand got cleaned out of the spring mount
It rained a lot all morning and then got really sunny in the afternoon. Awning for the win!
Today was replace the left bump stop
and the left suspension air bag had a hole near the top so it got replaced too
Lots of utah sand got cleaned out of the spring mount
The following users liked this post:
old87yota (06-29-2022)
06-27-2022 | 11:29 AM
#4351
Registered User
Joined: Feb 2010
Posts: 705
Likes: 123
From: St. Louis MO
I got a couple of drips on the ground last time I tried filling up my aux tank, looked under, and one of the fuel filler hoses had cracked. It was a 2" ID 90 degree elbow, bought specifically for that use as a fuel filler hose, not some rubber hose unsited for fuel. But it only lasted a bit over a year before cracking. So I bought a replacement, Gates brand this time, we'll see how it lasts.
While I was messing with it, I dropped the whole tank down too. Last year, after letting it sit chock full of fuel for a few weeks, I'd gotten a few drips on the pavement. I assumed either the fuel gauge sender or the fuel pump assembly gaskets were leaking, but it all looked dry, no stains on top. Maybe a slight ooze around the fuel pump wiring? I just snugged up the screws and stuck the tank back in.
I put 10 gallons in it this morning and no drips.
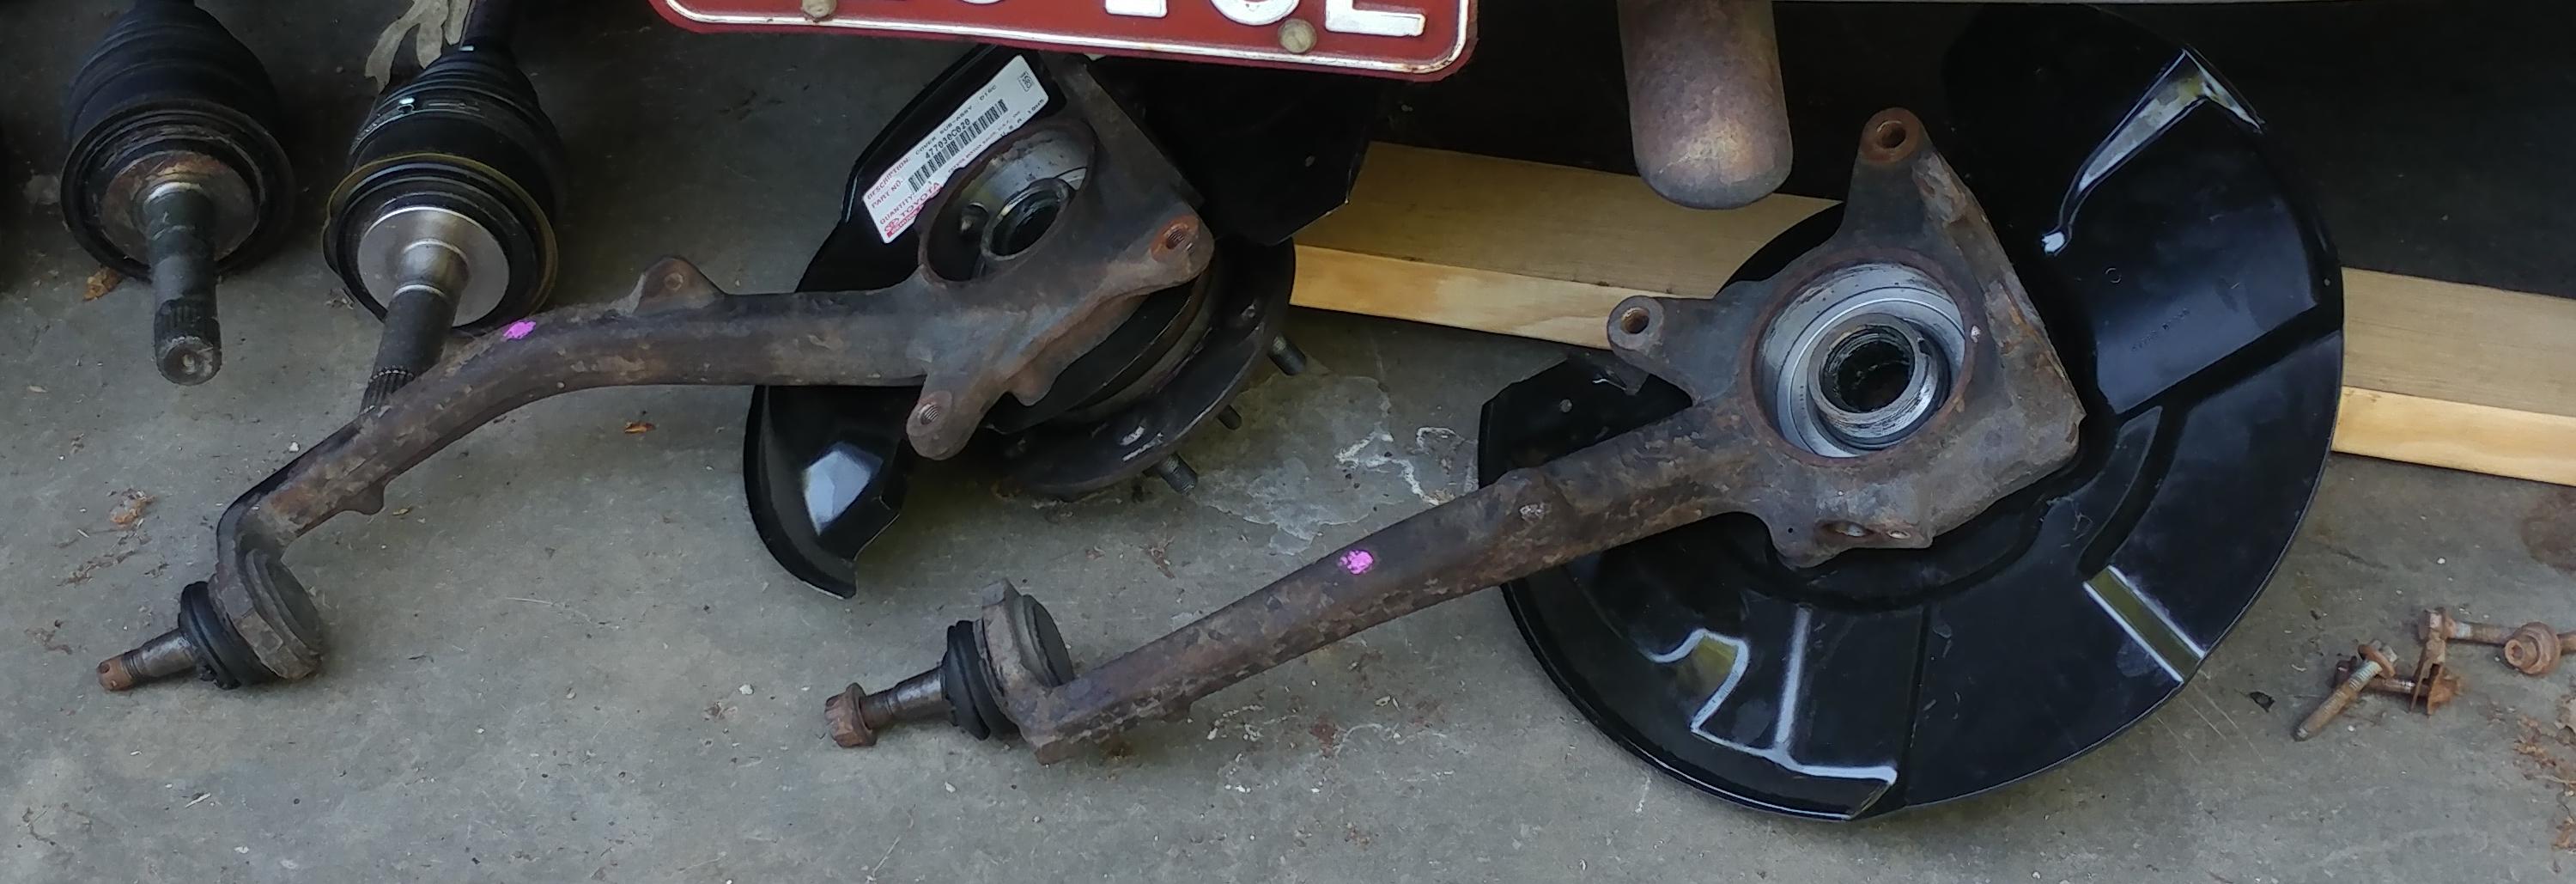
Oh, and apparently there are long awaited parts sitting at home waiting for me. I dropped off the junkyard ABS front uprights and the non-ABS manual hub donor parts (and some new bearings) at a machine shop almost 2 months ago after the first shop struggled with their press and gave up on it. This shop is busier. WAY busier, but that's because they actually get stuff done.
So manual hubs going on the 99 soon. And I'll raise the front ride height about an inch. I've been keeping it just shy of "eating the CBV boots ride height" so far.
While I was messing with it, I dropped the whole tank down too. Last year, after letting it sit chock full of fuel for a few weeks, I'd gotten a few drips on the pavement. I assumed either the fuel gauge sender or the fuel pump assembly gaskets were leaking, but it all looked dry, no stains on top. Maybe a slight ooze around the fuel pump wiring? I just snugged up the screws and stuck the tank back in.
I put 10 gallons in it this morning and no drips.
Oh, and apparently there are long awaited parts sitting at home waiting for me. I dropped off the junkyard ABS front uprights and the non-ABS manual hub donor parts (and some new bearings) at a machine shop almost 2 months ago after the first shop struggled with their press and gave up on it. This shop is busier. WAY busier, but that's because they actually get stuff done.
So manual hubs going on the 99 soon. And I'll raise the front ride height about an inch. I've been keeping it just shy of "eating the CBV boots ride height" so far.
Last edited by Jomoka; 06-27-2022 at 11:33 AM.
The following users liked this post:
octanejunkie (12-11-2022)
06-27-2022 | 12:38 PM
#4352
Thread Starter
Contributing Member
Joined: Sep 2005
Posts: 8,212
Likes: 479
From: mo
96 4Runner 321,644 miles
Picked up some parts for...somebody....??? I can't think of where these things could possibly fit...
Working on the not-awning side of the truck for the passenger bump-stop today, waiting for more shade now.
Picked up some parts for...somebody....??? I can't think of where these things could possibly fit...
Working on the not-awning side of the truck for the passenger bump-stop today, waiting for more shade now.
 06-28-2022 | 06:45 PM
#4354
Thread Starter
Contributing Member
Joined: Sep 2005
Posts: 8,212
Likes: 479
From: mo
 06-29-2022 | 06:58 PM
#4355
Thread Starter
Contributing Member
Joined: Sep 2005
Posts: 8,212
Likes: 479
From: mo
96 4Runner 321,644 miles
Ended up with Anytone AT-779UV gmrs radios, the only one I could find that will fit in the 99's ash tray spot...it's quite small. 20 watt, came set up for dual band but was easy enough to change to gmrs. It is a part 95e radio, not ham, so that was unexpected. At a smidge under $100 per and good reviews we figured it'd be reasonable.
Now I've got to figure out where in the heck to put it...
Laird bb4505cns 5dbi antenna w/spring, I need to find a good nmo mount and bracket, plus some coax.

As someone said, "It has a FUN button, what's not to like?"
Ended up with Anytone AT-779UV gmrs radios, the only one I could find that will fit in the 99's ash tray spot...it's quite small. 20 watt, came set up for dual band but was easy enough to change to gmrs. It is a part 95e radio, not ham, so that was unexpected. At a smidge under $100 per and good reviews we figured it'd be reasonable.
Now I've got to figure out where in the heck to put it...
Laird bb4505cns 5dbi antenna w/spring, I need to find a good nmo mount and bracket, plus some coax.
As someone said, "It has a FUN button, what's not to like?"
06-30-2022 | 11:48 AM
#4356
Thread Starter
Contributing Member
Joined: Sep 2005
Posts: 8,212
Likes: 479
From: mo
Hmmmmm? Loathe to cut the trim, but....hmmmmm...
So far this is the best place I can think of. There is the matter of the mic cord hanging down, but maybe I can come up with some sort of retractable keeper to minimize the dangle. Coax and power cord would magically find its way under the headliner (or is that above?).
Another place is vertically along the transmission tunnel nearer the dash on the passenger side.
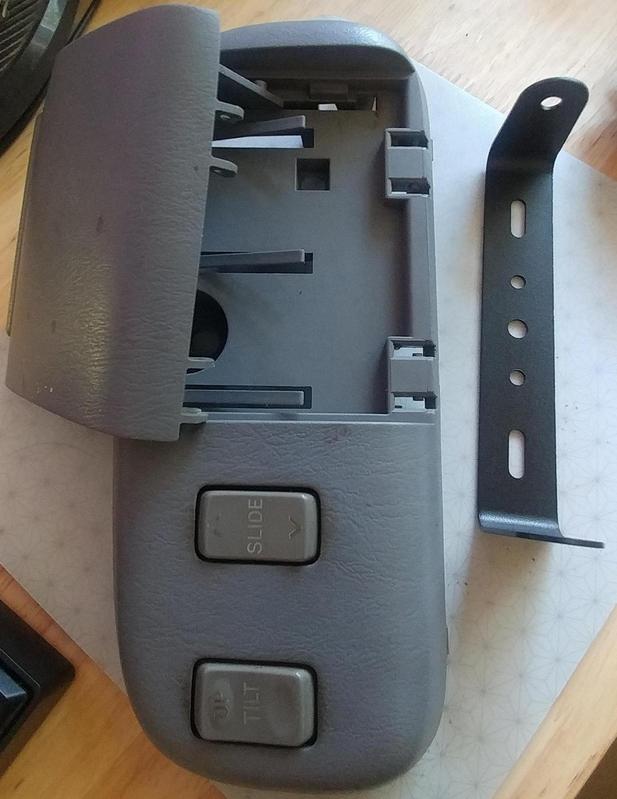
Has anyone installed one of these little guys in their truck? Pics? I'm keeping the cb and the radio. It's possible to relocate the switches in the plate above the aftermarket gauges (where the ashtray used to be) in the center bezel and install it there.
Open to ideas, as always.
So far this is the best place I can think of. There is the matter of the mic cord hanging down, but maybe I can come up with some sort of retractable keeper to minimize the dangle. Coax and power cord would magically find its way under the headliner (or is that above?).
Another place is vertically along the transmission tunnel nearer the dash on the passenger side.
Has anyone installed one of these little guys in their truck? Pics? I'm keeping the cb and the radio. It's possible to relocate the switches in the plate above the aftermarket gauges (where the ashtray used to be) in the center bezel and install it there.
Open to ideas, as always.
07-01-2022 | 02:52 PM
#4357
Registered User
Joined: Feb 2010
Posts: 705
Likes: 123
From: St. Louis MO
Anytone GMRS (AT779UV) installed on the '99. I just did it the easy way. t had a mini CB radio sitting where the ashtray was, with a PL259 cable leading to an antenna on the passenger side near the hatch. I left the cable in place, replaced the CB antenna with the new antenna (had to drill out the mount some), and took the CB out of the dash and put the Anytone in its place. I had to widen the opening slightly, the Anytone was slightly too wide for the existing opening. Then a tiny bit of wiring to tap into the power outlets there to power the thing, and it's ready to go.

Hoping for more range and more clarity than we ever got from the CB's.
Hoping for more range and more clarity than we ever got from the CB's.
The following users liked this post:
old87yota (07-01-2022)
07-01-2022 | 05:10 PM
#4358
Thread Starter
Contributing Member
Joined: Sep 2005
Posts: 8,212
Likes: 479
From: mo
96 4Runner 321,688 miles
And the Anytone at799uv in mine...
No turning back...

Making room for the radio bracket


Bracket added
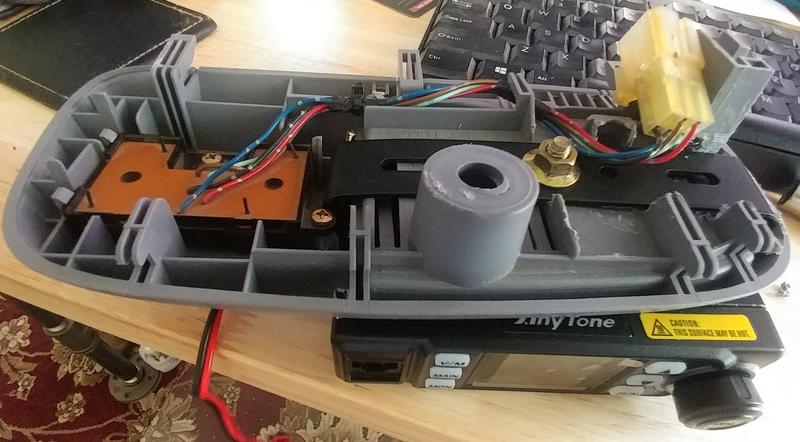
And there...

still have to do the wiring and coax and antenna and mount.
And the Anytone at799uv in mine...
No turning back...
Making room for the radio bracket
Bracket added
And there...
still have to do the wiring and coax and antenna and mount.
Last edited by habanero; 07-01-2022 at 05:16 PM.
 07-03-2022 | 02:36 PM
#4360
Thread Starter
Contributing Member
Joined: Sep 2005
Posts: 8,212
Likes: 479
From: mo
96 4Runner 321,688 miles
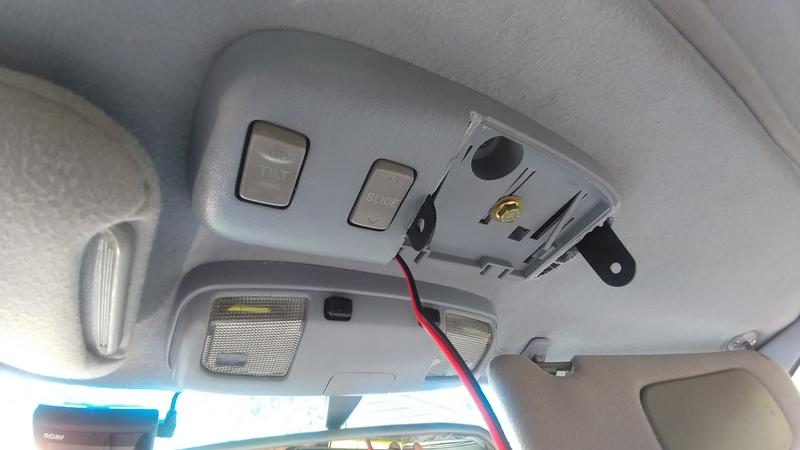
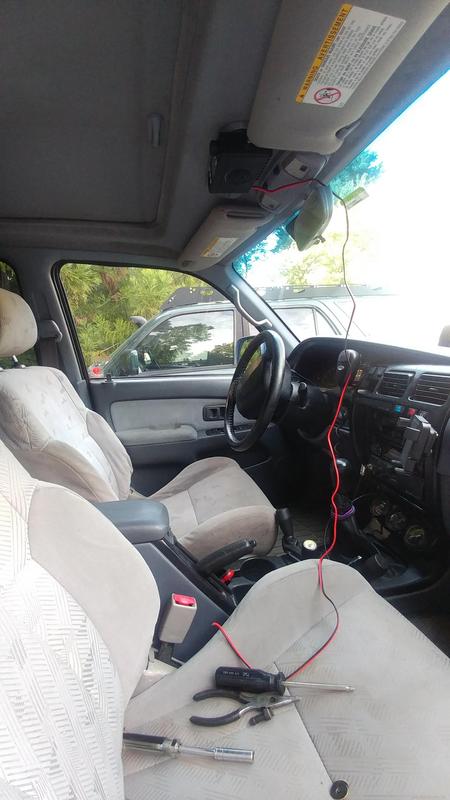
Radio installed and wiring done. Trim isn't back on because haven't installed coax yet. Currently training the mic cord to not be in front of the radio face by hanging it on the rearview. It's already begun to see the error in its ways.
Spent some time thinking on where to put the antenna. Found my old cb antenna mount from when I had it on the rear corner and an idea.
Got the where sorted, pulled the cowl,
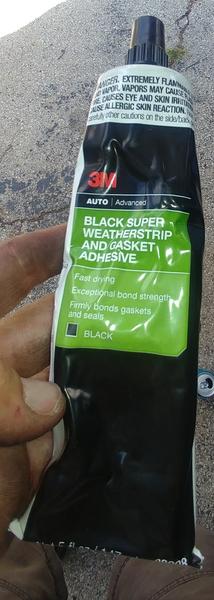
The strip along the top of the cowl was coming unglued so I used the best gorilla snot around-
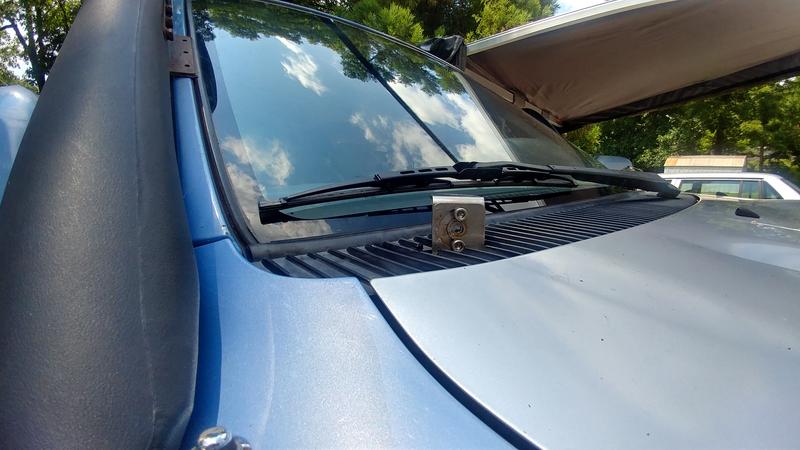
I set a large socket on top of the mount to check that the hood can be opened without interference.
and talked to the mount with a small sledge. Many times. So many times.
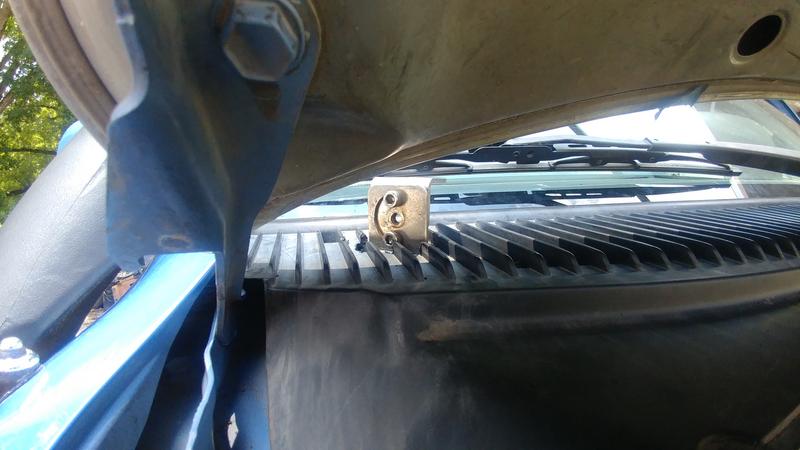
I still have to drill out the hole for the antenna, the nmo mount is bigger than it is currently.
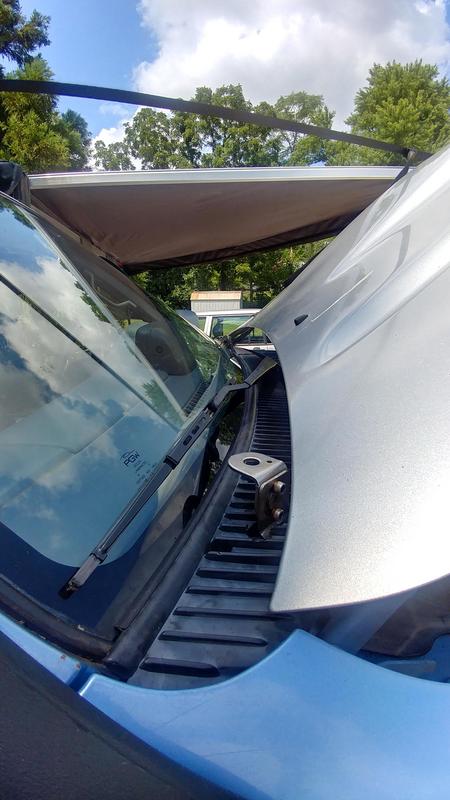
The hardest part besides where to put the antenna was cutting the cowl. That actually came out pretty good, no regerts.
I mean, of course it came out pretty good
Thinking about RF radiation from the antenna that close to the windshield, maybe that is not such a good spot for an antenna. I don't normally have a passenger, my radio is 20 watts max, the antenna 5dbi. Online RF calculators say I'm good and my poor passenger will survive (the radio part, anyway), but you've gotta do your research. The cb antenna would be better there and no ham that close, if I'm understanding correctly. I don't talk much on the radio except simplex on our trips.
Apparently the other thing to think about is the FM antenna in close proximity. I don't use that antenna much, and not at the same time as the radio, most times it's switched off and out of sight.
Radio installed and wiring done. Trim isn't back on because haven't installed coax yet. Currently training the mic cord to not be in front of the radio face by hanging it on the rearview. It's already begun to see the error in its ways.
Spent some time thinking on where to put the antenna. Found my old cb antenna mount from when I had it on the rear corner and an idea.
Got the where sorted, pulled the cowl,
The strip along the top of the cowl was coming unglued so I used the best gorilla snot around-
I set a large socket on top of the mount to check that the hood can be opened without interference.
and talked to the mount with a small sledge. Many times. So many times.
I still have to drill out the hole for the antenna, the nmo mount is bigger than it is currently.

The hardest part besides where to put the antenna was cutting the cowl. That actually came out pretty good, no regerts.
I mean, of course it came out pretty good
Thinking about RF radiation from the antenna that close to the windshield, maybe that is not such a good spot for an antenna. I don't normally have a passenger, my radio is 20 watts max, the antenna 5dbi. Online RF calculators say I'm good and my poor passenger will survive (the radio part, anyway), but you've gotta do your research. The cb antenna would be better there and no ham that close, if I'm understanding correctly. I don't talk much on the radio except simplex on our trips.
Apparently the other thing to think about is the FM antenna in close proximity. I don't use that antenna much, and not at the same time as the radio, most times it's switched off and out of sight.
Last edited by habanero; 07-04-2022 at 04:00 AM.


