
habanero's 1996 4Runner Build-Up Thread
 10-30-2020 | 04:33 PM
#4021
Thread Starter
Contributing Member
Joined: Sep 2005
Posts: 8,212
Likes: 479
From: mo
96 4Runner 316,048 miles
Transmission, crossmember, transmission mount, inspection plate, starter, clutch slave, etc. Bolted in. Marlin's seal is in the coupler housing.
Tomorrow will be warmer, time to start fiddling with shift levers to see how much tunnel needs cutting and gasket sealer to finally finally put the box and t-case together.
I will have to re-route the speed sender wiring to get it out of harm's way, but that's it....
for now...
Pic of the day. Shift rail ear modification...
PS. I didn't write stuff on there, but it is accurate. No 'N' on there...that would be between the 'L' and the 'H'
Last edited by habanero; 10-30-2020 at 04:35 PM.
10-31-2020 | 05:39 PM
#4022
Thread Starter
Contributing Member
Joined: Sep 2005
Posts: 8,212
Likes: 479
From: mo
96 4Runner 316,048 miles
Well, today was interesting. I picked up and shook the transfer case to make sure there was no metal loose in there from pulling the 'pill' out. There, unfortunately, was. All three shift keys had made a break for it.
This time my husband and I worked together. Pulling the case open, figuring out (he has more experience with that side of the car and kind of knew what to look for to get the keys back in place even though he hadn't messed with a 4Runner transfer case before- thank goodness!) and replacing the keys, dry-testing, sealing it back up. It went a lot more smoothly with 4 hands and his knowledge. I have to order new output shaft seals (have been leaking) for front and rear, and new nuts for the same, but those things can go on later.
Next, the taco box went onto the transfer case. The two studs, nuts, longer bolts, lock washers and flat washers are used here.
I also learned that you really do have to grind the shift rail ear flat with the other so the rad designs shift actuator doesn't bind on it. Got the dremel back out and took off another millimeter of metal after protecting the case from stuff falling in.
Pic of the day:
Next up: figuring how much to take off the tunnel and if I'll have to clearance some of it.
Last edited by habanero; 10-31-2020 at 06:37 PM.
The following 2 users liked this post by habanero:
chuckles89 (11-02-2020),
coopster (10-31-2020)
11-03-2020 | 05:44 PM
#4023
Thread Starter
Contributing Member
Joined: Sep 2005
Posts: 8,212
Likes: 479
From: mo
96 4Runner, still 316,048 miles
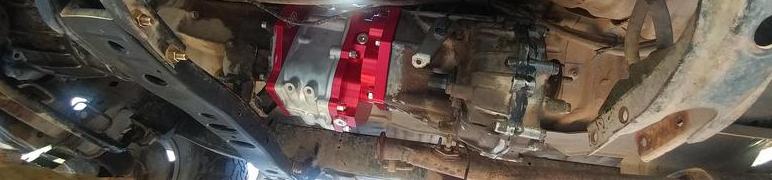
Got the taco/transfer case combo up in and bolted to the transmission. It went pretty well with both my husband and I finessing it in. Even with 2 of us it wasn't a cake walk. At least I installed the coupler far enough down onto the transmission output shaft, more on that later.
The oe transfer case fits in front of the cross member that supports the front of the gas tank. The transfer case does sit a little below the cross member, but the way my skids are designed back there I might still be okey! *crosses fingers.....also crosses toes*
I also did a bunch of measuring and covered the transmission so nothing would fall into it
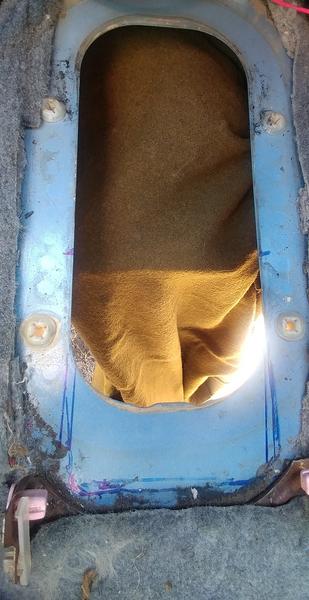
then did a little....editing.....
Got the taco/transfer case combo up in and bolted to the transmission. It went pretty well with both my husband and I finessing it in. Even with 2 of us it wasn't a cake walk. At least I installed the coupler far enough down onto the transmission output shaft, more on that later.
The oe transfer case fits in front of the cross member that supports the front of the gas tank. The transfer case does sit a little below the cross member, but the way my skids are designed back there I might still be okey! *crosses fingers.....also crosses toes*
I also did a bunch of measuring and covered the transmission so nothing would fall into it
then did a little....editing.....
Last edited by habanero; 11-03-2020 at 05:49 PM.
The following 2 users liked this post by habanero:
chuckles89 (11-03-2020),
old87yota (11-04-2020)
11-05-2020 | 05:46 PM
#4024
Thread Starter
Contributing Member
Joined: Sep 2005
Posts: 8,212
Likes: 479
From: mo
OE transfer case output shaft seals replaced front and rear (just the two that tend to leak), tail housing fipg'd, new nuts on. Transfer cases still both need oil and the wiring extended.
Before I installed the new-to-me gas tank (BIG thanks to Mighty Mouse) I pulled the sending unit out of my old tank because it was fairly new. I was going to straighten out the bottom of the bracket that holds the fuel pump but it turned out the entire bracket was far more bent than I'd thought.
Instead I simply moved my sending unit and fuel pump over to the bracket that came with the other tank. It was dark by the time I returned the neighbor's rogue dog, but I still got the tank up in the truck.
I still have to tighten a few clamps and connect some hoses and a couple of bolts and the wiring before I can call it finished. Also have to decide on a skid of some kind.
Next up: finish installing the tank and extend wiring- then it will be time to address the shifters.
The following users liked this post:
old87yota (11-08-2020)
11-06-2020 | 07:06 PM
#4025
Thread Starter
Contributing Member
Joined: Sep 2005
Posts: 8,212
Likes: 479
From: mo
Tank all connected to a variety of hoses and one wiring plug and ready to go. Transmission shifter housing fipg'd and bolted in. Now I'm looking at the relationship of the trans shifter vs the other shifters.
Still have to put oil in and extend wiring and configure said shifters and have driveshafts made.
Still have to put oil in and extend wiring and configure said shifters and have driveshafts made.
The following users liked this post:
old87yota (11-08-2020)
11-09-2020 | 04:05 PM
#4026
Thread Starter
Contributing Member
Joined: Sep 2005
Posts: 8,212
Likes: 479
From: mo
96 4Runner
Wiring extended (4wd, hi-lo, speed sender) to the transfer case electrics.
Oil is in.
Started it with the cat missing. Sure got the neighbor's attention. Just wanted to see if it'd run.
Checked clearance for the triple sticks- yay 1" body lift- the mechanism clears the tunnel. If only the shifters themselves would play nice. The outer two will be shortened and possibly bent a little. The front and mid rear will get a talkin' to.
Front needs to be more forward, rear needs to be more centered.
The following 2 users liked this post by habanero:
BigBluePile (11-09-2020),
old87yota (11-15-2020)
The following users liked this post:
habanero (11-10-2020)
11-10-2020 | 12:27 PM
#4028
Thread Starter
Contributing Member
Joined: Sep 2005
Posts: 8,212
Likes: 479
From: mo
"Wait until your father gets home!"
schtick, but they didn't care.
It's windy, and rain is due, but it's warm too. Outside to do more stuff.

The following users liked this post:
old87yota (11-15-2020)
11-10-2020 | 03:05 PM
#4030
Thread Starter
Contributing Member
Joined: Sep 2005
Posts: 8,212
Likes: 479
From: mo
The taco box is 8 1/2" long

with the R150f manual trans it does fit in front of the cross member...about 3" in front, but that still counts!
I did have to remove the cross member to fit it into its spot. The tank was already out. I don't know if it needed to be other than I was replacing it with a 'new' tank, but I'll take all the space I can get!
Today my husband put some oomph into bending the trans shift lever, it now comes much closer to the dash. Next comes some more bending and cutting and crazy junk like that.
Was going to take a pic of 4 levers fighting for dominance, it's a mishmash, but the weather front showed up and we booked outta there as big fat cold raindrops fell.
And yes, that's a lot of fipg. I did NOT want anything to leak. Yep, I know that's not where it's supposed to go. My biggest mistake was trying to wipe up some of the excess. The excess migrated. A lot!
Last edited by habanero; 11-10-2020 at 03:08 PM.
The following 2 users liked this post by habanero:
chuckles89 (11-11-2020),
coopster (11-10-2020)
11-14-2020 | 04:05 PM
#4032
Thread Starter
Contributing Member
Joined: Sep 2005
Posts: 8,212
Likes: 479
From: mo

The following 2 users liked this post by habanero:
BigBluePile (11-15-2020),
old87yota (11-15-2020)
11-17-2020 | 05:30 PM
#4033
Thread Starter
Contributing Member
Joined: Sep 2005
Posts: 8,212
Likes: 479
From: mo
96 4Runner, 316,048 miles
Everyone seems to be playing in the sandbox nicely, I think I've arranged, bent, adjusted, sawed, everybody into complacency.
Emailed Rory over at RaDesigns and asked where I could source a 1/2 longer bolt for the lever to the bracket. He said he'd send me one, along with a spacer! Sweet! I wasn't expecting that.
I think that will be the final piece of the puzzle.
The 1" body lift I stuck on years ago (gift from my husband, who apparently can see into the future) is doing me a good.
Now I'm gonna start figuring out boots and stuff.
Driveshafts are ordered via Mighty Mouse.
There might be a pretty and shiny light at the end of this tunnel after all.
Pretty much the final position....so far....
The following 2 users liked this post by habanero:
BigBluePile (11-24-2020),
chuckles89 (11-17-2020)
The following users liked this post:
habanero (11-25-2020)
11-25-2020 | 03:51 PM
#4035
Thread Starter
Contributing Member
Joined: Sep 2005
Posts: 8,212
Likes: 479
From: mo
96 4Runner 316,048 miles
Today I remembered I don't sew,
but I did it anyway.
I used my transmission shifter boot, a 4wd shifter boot off an 02 4Runner, and 2 boots from 07 Chevy Impalas that had auto trans console shifters.
Removed the threading to separate my original 4wd shifter boot from the transmission shifter and to separate the other 3 boots from their wire holders.
The transmission boot remained on the wire bracket. All the other boots were hand sewn to the bracket, the transmission boot, and each other as needed.

And went for it.
The middle boot is the one out of the '02 4Runner. It is more sloped on one side than the other.
The sloped side went towards the left shifter because it sits farther away from the center shifter than the right shifter does.
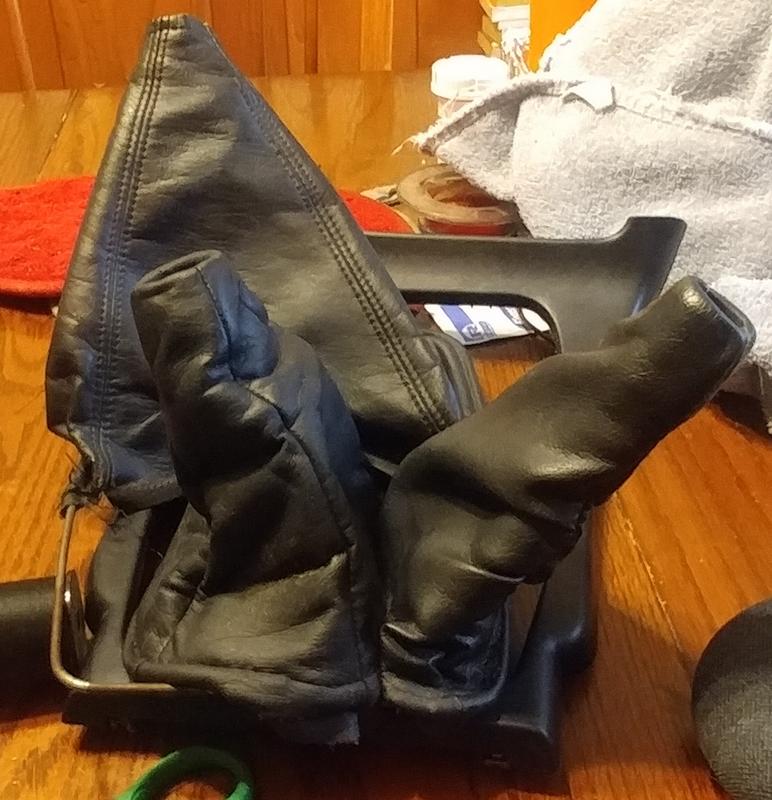
End result, a glove fit for a cow udder.
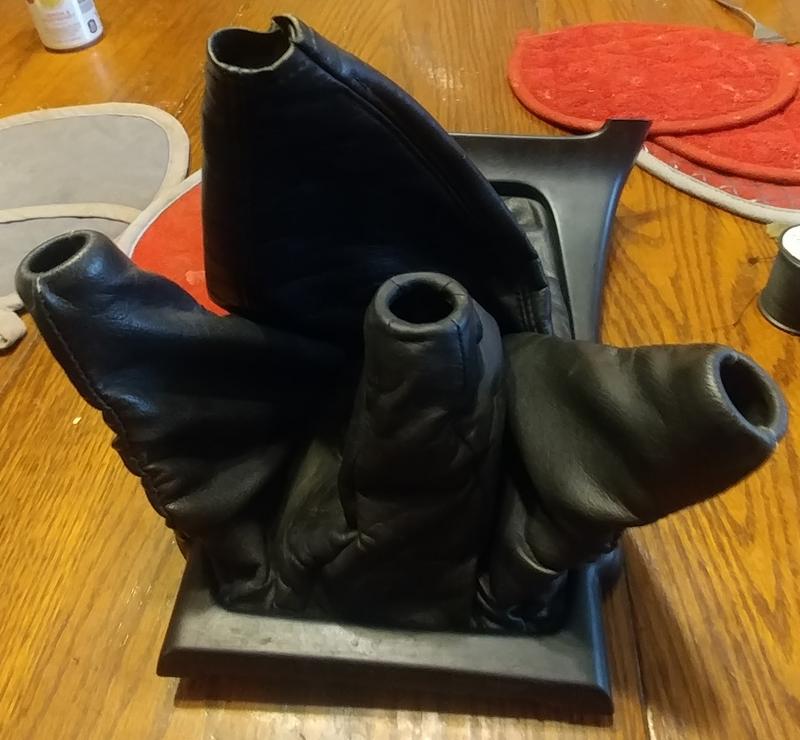
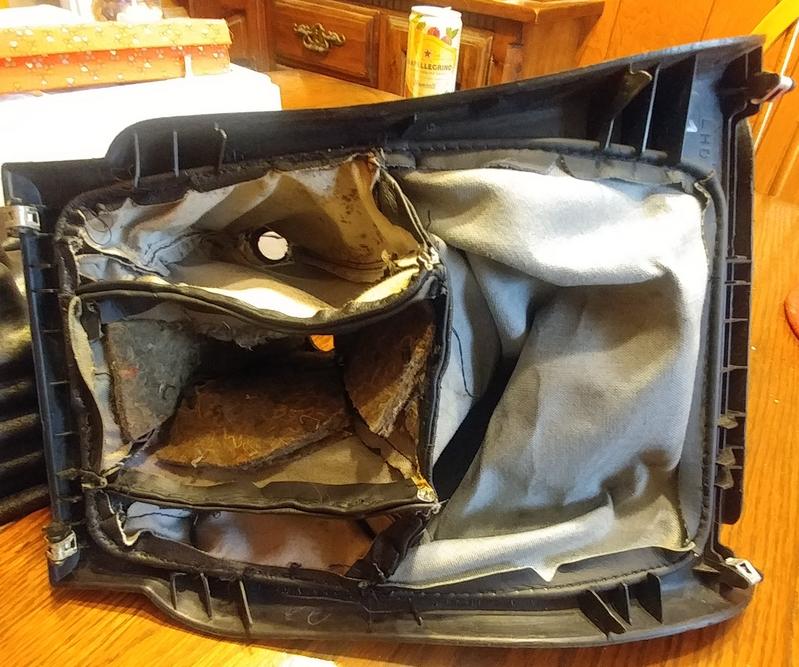
And what it looks like underneath.
I did a quick throw-together before I ran out of light, no levers touch in any gear so happy me is relieved.
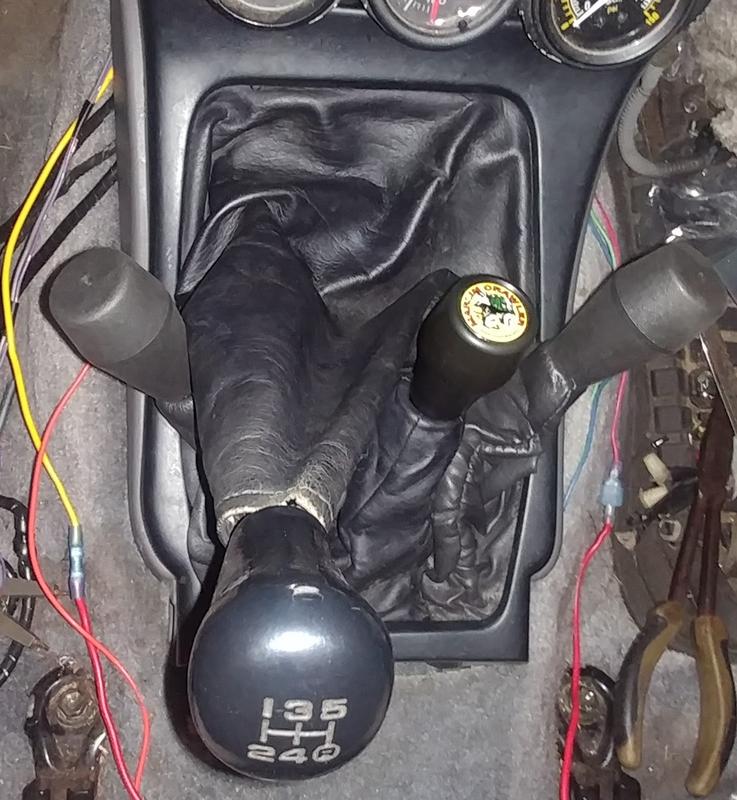
2nd
lo/ hi/ 2wd
I'll have to tear it all apart to bolt things down and get everything snuggled in, but I couldn't wait to see what all those boots looked like.
Spoiler alert: They looked like boots.
Today I remembered I don't sew,
but I did it anyway.
I used my transmission shifter boot, a 4wd shifter boot off an 02 4Runner, and 2 boots from 07 Chevy Impalas that had auto trans console shifters.
Removed the threading to separate my original 4wd shifter boot from the transmission shifter and to separate the other 3 boots from their wire holders.
The transmission boot remained on the wire bracket. All the other boots were hand sewn to the bracket, the transmission boot, and each other as needed.
And went for it.
The middle boot is the one out of the '02 4Runner. It is more sloped on one side than the other.
The sloped side went towards the left shifter because it sits farther away from the center shifter than the right shifter does.
End result, a glove fit for a cow udder.
And what it looks like underneath.
I did a quick throw-together before I ran out of light, no levers touch in any gear so happy me is relieved.
2nd
lo/ hi/ 2wd
I'll have to tear it all apart to bolt things down and get everything snuggled in, but I couldn't wait to see what all those boots looked like.
Spoiler alert: They looked like boots.
The following 4 users liked this post by habanero:
75w90mantraN (12-01-2020),
BigBluePile (11-25-2020),
chuckles89 (11-26-2020),
old87yota (11-30-2020)
11-26-2020 | 03:57 PM
#4037
Thread Starter
Contributing Member
Joined: Sep 2005
Posts: 8,212
Likes: 479
From: mo
Taco box install by someone who's never done it before.
I asked Marlin Crawler for a how-to, this is what they sent:
PREP:
Remove drivelines from transfer case.
Remove any shifters and or electrical wiring going to the transfer case
Transfer case shift lever is held in by a c-clip. It's a lot harder to put on than it is to take off.
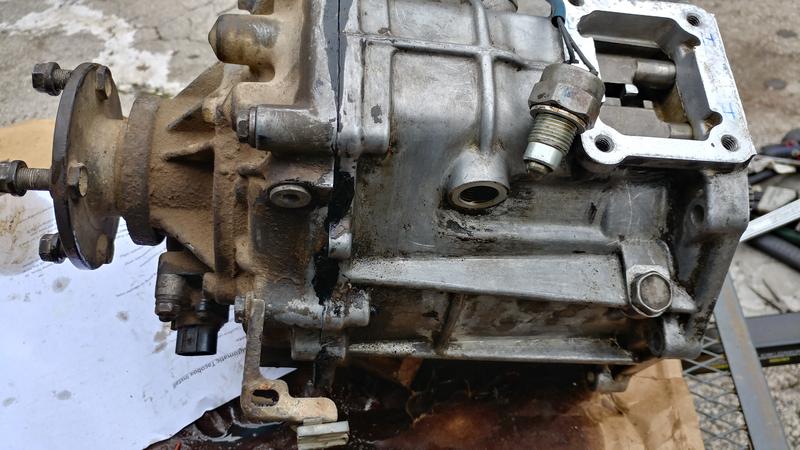
There were 3 switches on my transfer case. I used a sharpie marker on the two on either side so I'd remember which went where.
The one by the driveshaft flange on the back is the speed sender from a Tacoma (not stock)
Remove Transfer Case. Set Aside
Not terrible difficult, except I removed both the transmission and transfer case together because I had to replace the clutch as well (separate situation). Probably should have pulled the transfer case, then the transmission. It would have been a lot lighter!
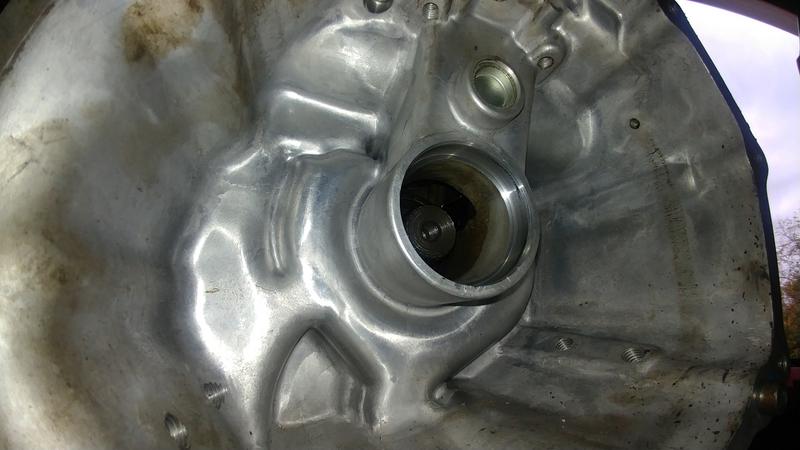
Remove seal from tail housing of transmission
I had already pulled it, then popped it into place for a pic
Remove tail housing of transmission (automatic only)
Didn't have to do this
Remove transmission output bearing (automatic only)
And didn't have to do this, either. Yay, manual trans!
I asked Marlin Crawler for a how-to, this is what they sent:
PREP:
Remove drivelines from transfer case.
Remove any shifters and or electrical wiring going to the transfer case
Transfer case shift lever is held in by a c-clip. It's a lot harder to put on than it is to take off.
There were 3 switches on my transfer case. I used a sharpie marker on the two on either side so I'd remember which went where.
The one by the driveshaft flange on the back is the speed sender from a Tacoma (not stock)
Remove Transfer Case. Set Aside
Not terrible difficult, except I removed both the transmission and transfer case together because I had to replace the clutch as well (separate situation). Probably should have pulled the transfer case, then the transmission. It would have been a lot lighter!
Remove seal from tail housing of transmission
I had already pulled it, then popped it into place for a pic
Remove tail housing of transmission (automatic only)
Didn't have to do this
Remove transmission output bearing (automatic only)
And didn't have to do this, either. Yay, manual trans!
Last edited by habanero; 11-26-2020 at 07:42 PM.
The following users liked this post:
chuckles89 (11-27-2020)
11-26-2020 | 03:58 PM
#4038
Thread Starter
Contributing Member
Joined: Sep 2005
Posts: 8,212
Likes: 479
From: mo
INSTALL:
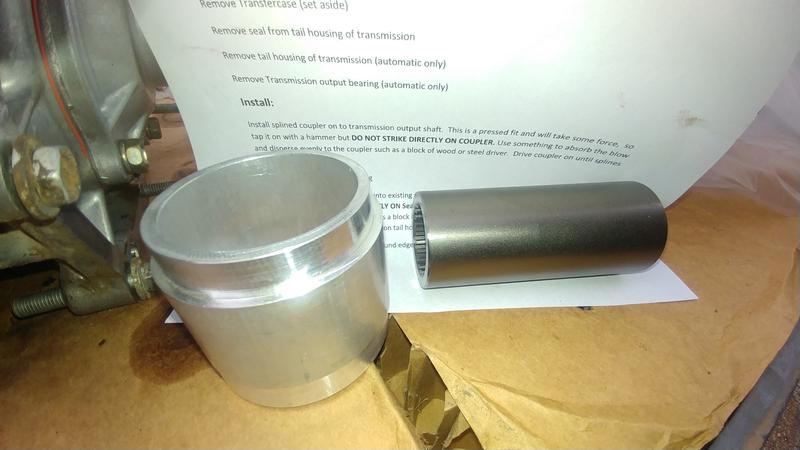
Install splined coupler on to transmission output shaft. This is a pressed fit and will take some force, so tap it on with a hammer but DO NOT STRIKE DIRECTLY ON COUPLER. Use something to absorb the blow and disperse evenly to the coupler such as a block of wood or steel driver. Drive coupler on until splines bottom out on shaft
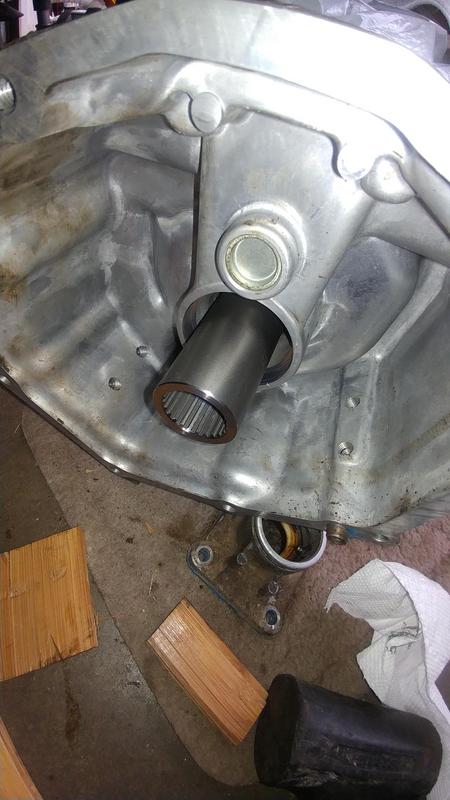
I had the transmission out because of the clutch job so set it up on wood blocks to keep the input shaft from touching the ground. I used two blocks of wood and a dead blow hammer. For lube I used anti-seize. I then had at it. Rotating the output shaft every now and again, trying to even out where I was hitting. They were not kidding about some force. It took quite some time to get the coupler onto the transmission output shaft. It seemed to work better if I did it for a bit, let it (and me!) rest, then have another go. I measured to see how far above the rim of the tail housing the top of the coupler could be and still fit onto the taco box- it was 1 1/2" in this case. I was unable to get it to bottom out by a millimeter or two, but it was far enough on to allow the taco box and transmission to be bolted together. That was a lot of work!!
Transmission output shaft
The skinnier tube with the splines is the transmission output to tacobox input coupler. The fat tube is the coupler housing. More about that guy soon. First we gotta get that dirty rotten coupler seated.
Coupler on the transmission output shaft...
Install splined coupler on to transmission output shaft. This is a pressed fit and will take some force, so tap it on with a hammer but DO NOT STRIKE DIRECTLY ON COUPLER. Use something to absorb the blow and disperse evenly to the coupler such as a block of wood or steel driver. Drive coupler on until splines bottom out on shaft
I had the transmission out because of the clutch job so set it up on wood blocks to keep the input shaft from touching the ground. I used two blocks of wood and a dead blow hammer. For lube I used anti-seize. I then had at it. Rotating the output shaft every now and again, trying to even out where I was hitting. They were not kidding about some force. It took quite some time to get the coupler onto the transmission output shaft. It seemed to work better if I did it for a bit, let it (and me!) rest, then have another go. I measured to see how far above the rim of the tail housing the top of the coupler could be and still fit onto the taco box- it was 1 1/2" in this case. I was unable to get it to bottom out by a millimeter or two, but it was far enough on to allow the taco box and transmission to be bolted together. That was a lot of work!!
Transmission output shaft
The skinnier tube with the splines is the transmission output to tacobox input coupler. The fat tube is the coupler housing. More about that guy soon. First we gotta get that dirty rotten coupler seated.
Coupler on the transmission output shaft...
Last edited by habanero; 11-26-2020 at 07:43 PM.
11-26-2020 | 04:00 PM
#4039
Thread Starter
Contributing Member
Joined: Sep 2005
Posts: 8,212
Likes: 479
From: mo
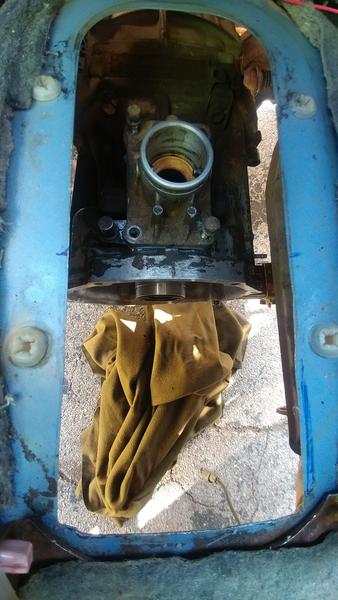
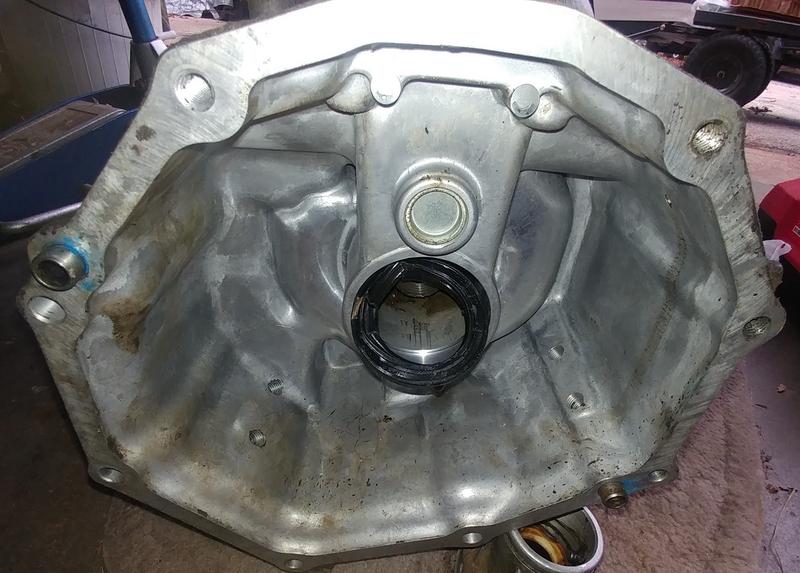
Transmission Tailhousing
Install smaller end of seal housing into existing seal location of transmission trailhousing. Tap it on with a hammer but DO NOT STRIKE DIRECTLY ON Seal Housing. Use something to absorb the blow and disperse evenly to the coupler such as a block of wood or steel driver. Drive seal housing until it is completely in contact with transmission tail housing.
Remember the pic up there with the fat coupler housing. It can really only fit into the transmission seal location (remember that busted seal pic at the beginning that's been removed from the tail housing?) one way. It taps in without too much difficulty with a block of wood to disperse blows.
Coupler housing on

Apply a very light layer of silicone around edge where seal housing and transmission tail housing meet.
I then applied some sealer as specified. It's grey and can sorta be seen in the pic above. I also applied some sealer to the bolt holes where the transmission mount goes since they go all the way into the case.
Install new transmission output seal into seal housing.
Ta-da!
EDIT: if you get a black seal like the one pictured, question it. This one allowed the taco box to rob the oil from the transmission. The second transmission (!!) had the correct seal, it was gold and black, no more oil transfer.

Install smaller end of seal housing into existing seal location of transmission trailhousing. Tap it on with a hammer but DO NOT STRIKE DIRECTLY ON Seal Housing. Use something to absorb the blow and disperse evenly to the coupler such as a block of wood or steel driver. Drive seal housing until it is completely in contact with transmission tail housing.
Remember the pic up there with the fat coupler housing. It can really only fit into the transmission seal location (remember that busted seal pic at the beginning that's been removed from the tail housing?) one way. It taps in without too much difficulty with a block of wood to disperse blows.
Coupler housing on
Apply a very light layer of silicone around edge where seal housing and transmission tail housing meet.
I then applied some sealer as specified. It's grey and can sorta be seen in the pic above. I also applied some sealer to the bolt holes where the transmission mount goes since they go all the way into the case.
Install new transmission output seal into seal housing.
Ta-da!
EDIT: if you get a black seal like the one pictured, question it. This one allowed the taco box to rob the oil from the transmission. The second transmission (!!) had the correct seal, it was gold and black, no more oil transfer.
Last edited by habanero; 11-11-2023 at 04:42 PM.
11-26-2020 | 04:00 PM
#4040
Thread Starter
Contributing Member
Joined: Sep 2005
Posts: 8,212
Likes: 479
From: mo
And here is where I have to depart the text for a bit.
This is NOT required to install the Taco box as described in the instructions
I didn't want to lose one of the cupholders I'd installed so, after some research, I went with
RaDesigns triple stick for chain-driven transfer cases. That's what the 4Runner has.
http://www.radesignsproducts.com/tri...in-sticks.html
To make the triple stick set-up work you have to remove a 'pill' from the transfer case that locks the shift rails together, giving you the J-shift that we don't want. This is easiest to be done before the next part of the Tacobox instruction is completed.
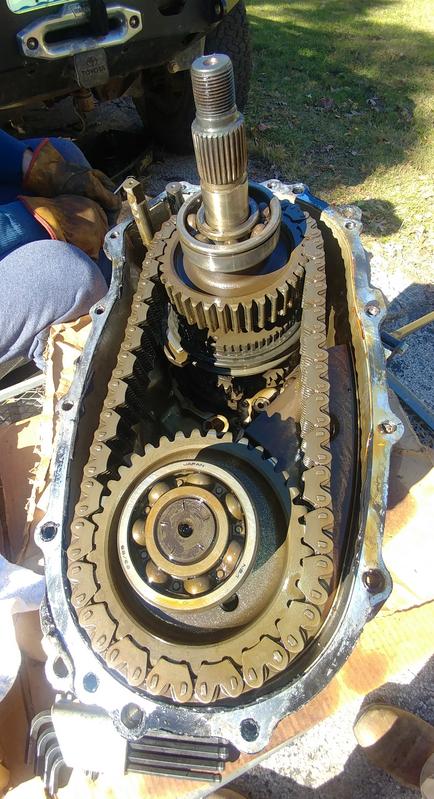
To get to this pill thing on the chain-driven 4Runner transfer case you have to open the case. When you do open the case you have to be aware and careful not to pull on the shaft, or you'll be putting up to 3 shift keys back in place.
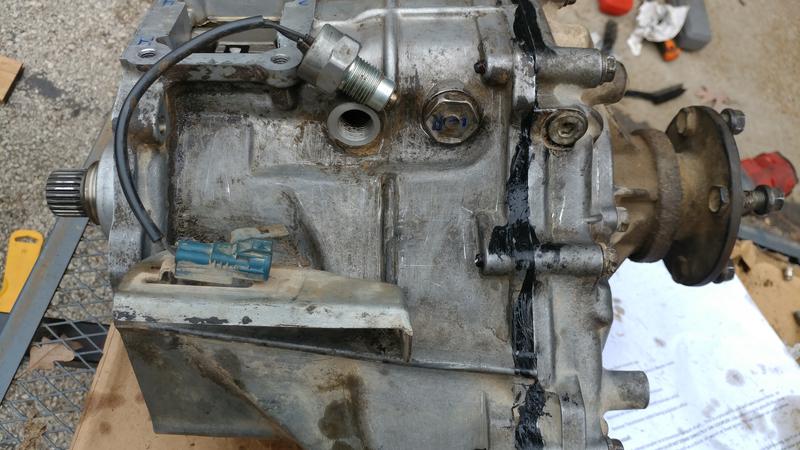
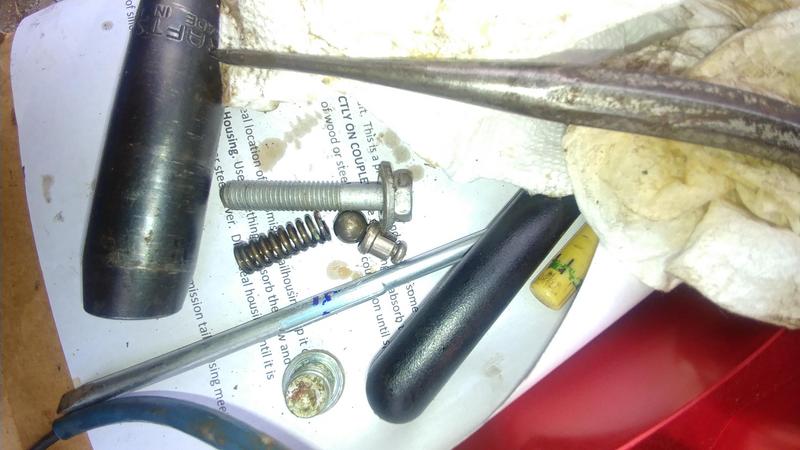
I removed the three switches, a plug, and the two allen-head plugs at the back . Those each hold a ball and spring that you don't want to lose and between them is the pill.
One allen head plug on either side, that's the rear flange in the pic

Here's the ball and spring (bolt not included and neither is the magnet I used to keep track of the ball)
I used the instructions from TR-10 through TR-12 in the FSM. Unstaked both flange bolts to pull the flanges, removed the extension housing, there's a c-clip in there and the speedo gear is sharp.
After I got the pill out (pushed out one side using screwdriver inserted into other side) I put new fipg on, torqued to spec, used new flange nuts and staked them.
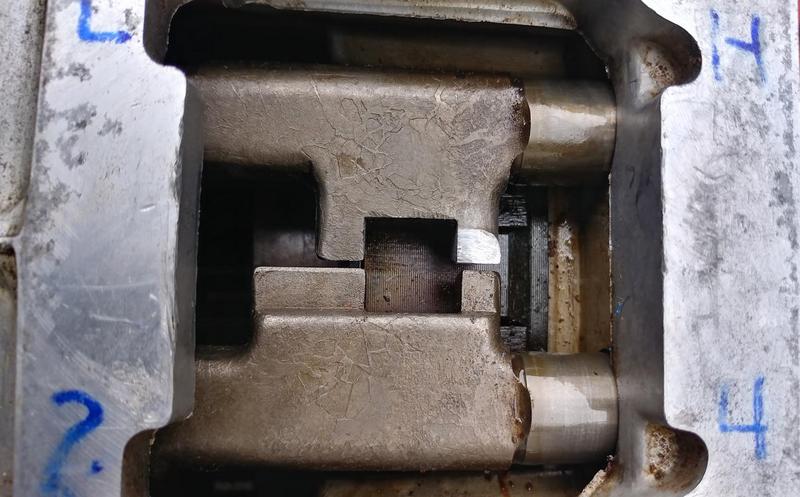
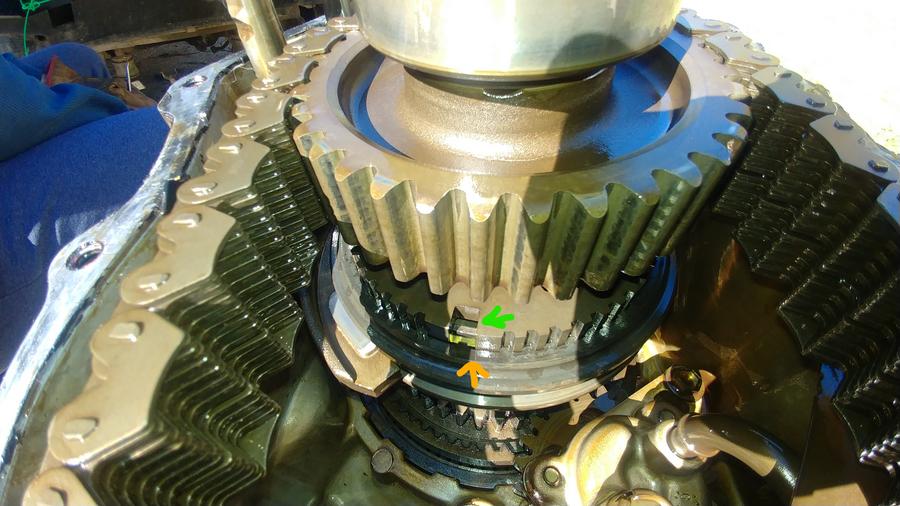
There are 3 small flat shift keys spaced evenly apart (green arrow shows the top of the hole where one goes). They should stay in place, but if one or more make a break for it they need to be put back together. They are keyed in and fit down into a hole made when the two parts are lined up. (orange arrow). Someone holding the retainer is very helpful. They have a single bump on one side and two bumps on the other. The single bump faces outwards, the two bumps towards the shaft. If the shaft doesn't get pulled and no shift keys fall out no worries.
The pill, metal, capsule shaped, about an inch long.
I'll try to remember more, but basically yes, to remove the j-shift for things like triple sticks you have to open the transfer case. I saw a pic where one guy tried doing it by cracking the case about 3/4" to get the pill out. You will likely dislodge the shifter keys that way.
Just open the case.
This is NOT required to install the Taco box as described in the instructions
I didn't want to lose one of the cupholders I'd installed so, after some research, I went with
RaDesigns triple stick for chain-driven transfer cases. That's what the 4Runner has.
http://www.radesignsproducts.com/tri...in-sticks.html
To make the triple stick set-up work you have to remove a 'pill' from the transfer case that locks the shift rails together, giving you the J-shift that we don't want. This is easiest to be done before the next part of the Tacobox instruction is completed.
To get to this pill thing on the chain-driven 4Runner transfer case you have to open the case. When you do open the case you have to be aware and careful not to pull on the shaft, or you'll be putting up to 3 shift keys back in place.
I removed the three switches, a plug, and the two allen-head plugs at the back . Those each hold a ball and spring that you don't want to lose and between them is the pill.
One allen head plug on either side, that's the rear flange in the pic
Here's the ball and spring (bolt not included and neither is the magnet I used to keep track of the ball)
I used the instructions from TR-10 through TR-12 in the FSM. Unstaked both flange bolts to pull the flanges, removed the extension housing, there's a c-clip in there and the speedo gear is sharp.
After I got the pill out (pushed out one side using screwdriver inserted into other side) I put new fipg on, torqued to spec, used new flange nuts and staked them.
There are 3 small flat shift keys spaced evenly apart (green arrow shows the top of the hole where one goes). They should stay in place, but if one or more make a break for it they need to be put back together. They are keyed in and fit down into a hole made when the two parts are lined up. (orange arrow). Someone holding the retainer is very helpful. They have a single bump on one side and two bumps on the other. The single bump faces outwards, the two bumps towards the shaft. If the shaft doesn't get pulled and no shift keys fall out no worries.
The pill, metal, capsule shaped, about an inch long.
I'll try to remember more, but basically yes, to remove the j-shift for things like triple sticks you have to open the transfer case. I saw a pic where one guy tried doing it by cracking the case about 3/4" to get the pill out. You will likely dislodge the shifter keys that way.
Just open the case.
Last edited by habanero; 12-08-2020 at 05:24 PM.


