
habanero's 1996 4Runner Build-Up Thread


 05-24-2020, 02:53 PM
#3942
Contributing Member
Thread Starter
96 4notrunner, 312,873 miles
Re-sealing the oil pan:
Not much today. Drained the engine oil, removed the 2 bolts that hold the wiring harness in front of the oil pan.
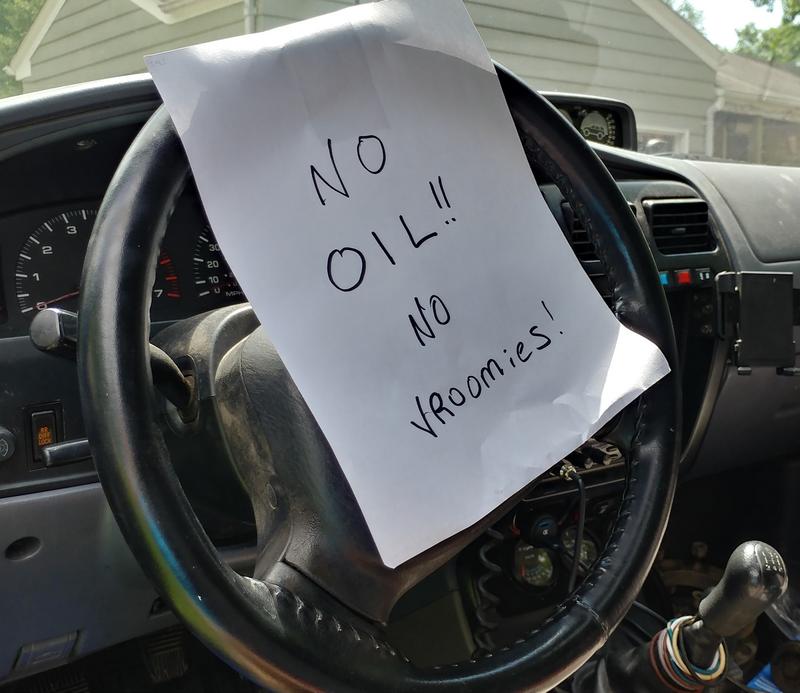
Now there's thunderboomers so I threw the oil plug back in and sealed the drain pan.
Alright, off to tie a 'NO OIL, NO GO!!' sign onto the steering wheel.
Of course I'll put oil in as soon as is feasible and with no front shoes it's not going anywhere, but I'm still gonna throw the scattered old brain a bone.
Re-sealing the oil pan:
Not much today. Drained the engine oil, removed the 2 bolts that hold the wiring harness in front of the oil pan.
Now there's thunderboomers so I threw the oil plug back in and sealed the drain pan.
Alright, off to tie a 'NO OIL, NO GO!!' sign onto the steering wheel.
Of course I'll put oil in as soon as is feasible and with no front shoes it's not going anywhere, but I'm still gonna throw the scattered old brain a bone.
Last edited by habanero; 05-25-2020 at 11:20 AM.
The following users liked this post:
old87yota (05-25-2020)
05-25-2020, 11:34 AM
#3943
Contributing Member
Thread Starter
96 4Runner still 312,873 miles
Oil pan fun.
Oil pan bolt & nut torque specs= 67 in-lbf.
Sealant part # per FSM 08826-00080, superseded by 00295-00103
That thing came off way too easy. There were 2 nuts and 17 bolts on mine (FSM says 4 nuts/15 bolts).
Undid those, used a utility knife to interrupt the seal. Got part of one side done and the pan fell off into my hand.
It was definitely leaking at the front and rear. What's left of the sealing material is mostly scraping right off with the plastic scraper.
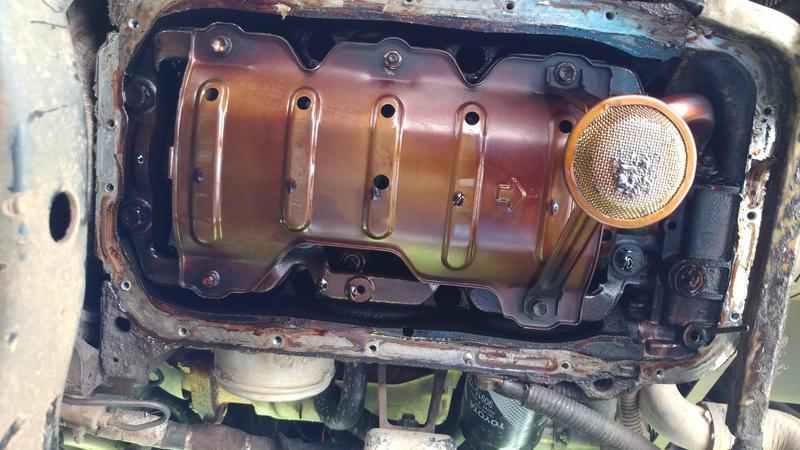
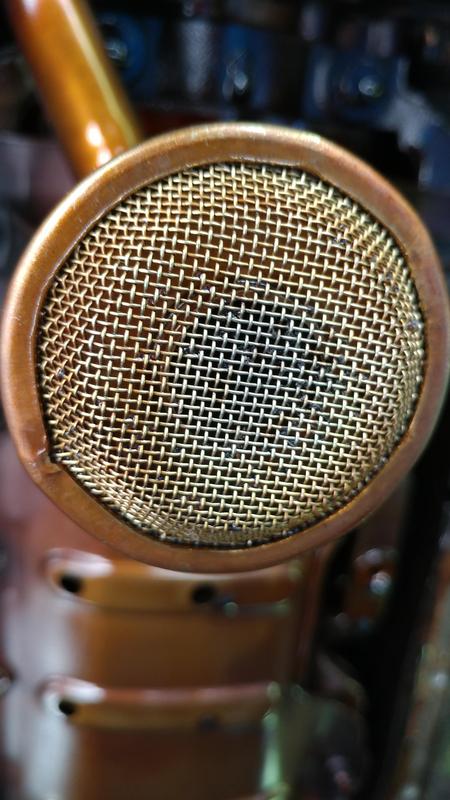
The other thing I did was to check the pick-up...
a couple of tiny metal shavings and several metal hairs, plus some hard oil deposits surrounding them. 24 years of detritus, most being bits of hard oil.
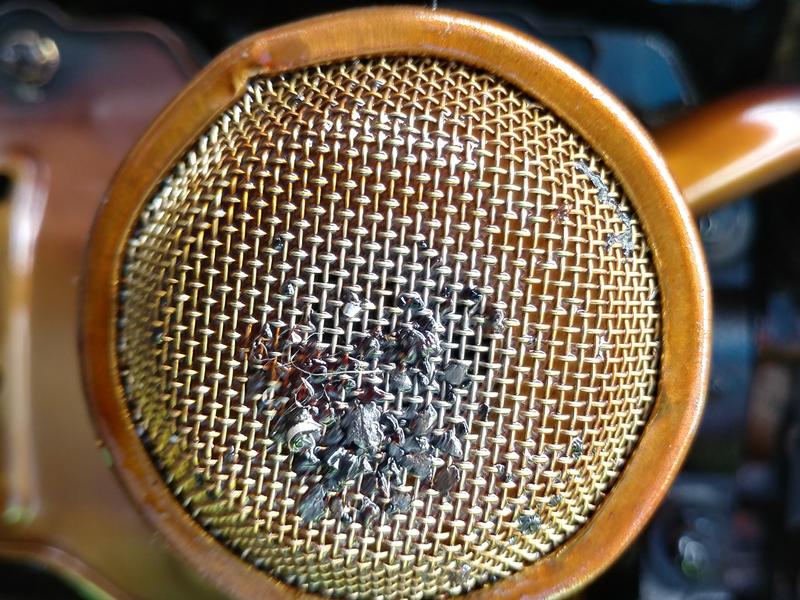
So I cleaned it up with a needle and magnifying glass, plus some packing tape
Got that far just in time for it to start storming again so we ate lunch.
Next comes the hard part of cleaning the oil pan and mating surfaces. The inside of the pan itself is very clean but for a little bit of oil deposits near the top above the oil level. The outside is a filthy dirty mishmash of oil and various dirts.
Oil pan fun.
Oil pan bolt & nut torque specs= 67 in-lbf.
Sealant part # per FSM 08826-00080, superseded by 00295-00103
That thing came off way too easy. There were 2 nuts and 17 bolts on mine (FSM says 4 nuts/15 bolts).
Undid those, used a utility knife to interrupt the seal. Got part of one side done and the pan fell off into my hand.
It was definitely leaking at the front and rear. What's left of the sealing material is mostly scraping right off with the plastic scraper.
The other thing I did was to check the pick-up...
a couple of tiny metal shavings and several metal hairs, plus some hard oil deposits surrounding them. 24 years of detritus, most being bits of hard oil.
So I cleaned it up with a needle and magnifying glass, plus some packing tape
Got that far just in time for it to start storming again so we ate lunch.
Next comes the hard part of cleaning the oil pan and mating surfaces. The inside of the pan itself is very clean but for a little bit of oil deposits near the top above the oil level. The outside is a filthy dirty mishmash of oil and various dirts.
Last edited by habanero; 05-25-2020 at 11:45 AM.
The following 2 users liked this post by habanero:
75w90mantraN (05-27-2020),
old87yota (05-25-2020)
05-26-2020, 09:27 AM
#3944
Contributing Member
Thread Starter
96 4Runner Driveway Rated 312,873 miles
Prepped everything, spent a bit of time wiping down the mating surfaces with rubbing alcohol (thank goodness I keep that stuff around all the time!) , cleaned the threads on the oil pan bolts, put things where they needed to be- the bolts, torque wrench, 10mm socket and the 2 extensions needed...
FIPG ready to go, timer set- you get 5 minutes to put the surfaces together. I just barely did and got a few bolts in, whew!
There is about 800 lbs of dirt on my everywhere.
Also, cleaned up a lot of the oil and now ready to install...
About to go back out and put the flywheel inspection plate back on (it's dry in there, yay!) and the wiring cover that holds the starter wire in front of the oil pan. Just wanted to check when the last oil change was....
2500ish miles ago....gonna throw a new filter on and complete the oil change a wee bit early.
Hey, no oil will be dripping all over the skid plate this time- and reaching the oil filter will be a breeze.
The following 2 users liked this post by habanero:
75w90mantraN (05-27-2020),
old87yota (05-26-2020)
05-29-2020, 08:37 AM
#3945
Contributing Member
Thread Starter
96 4Runner 312,873 miles
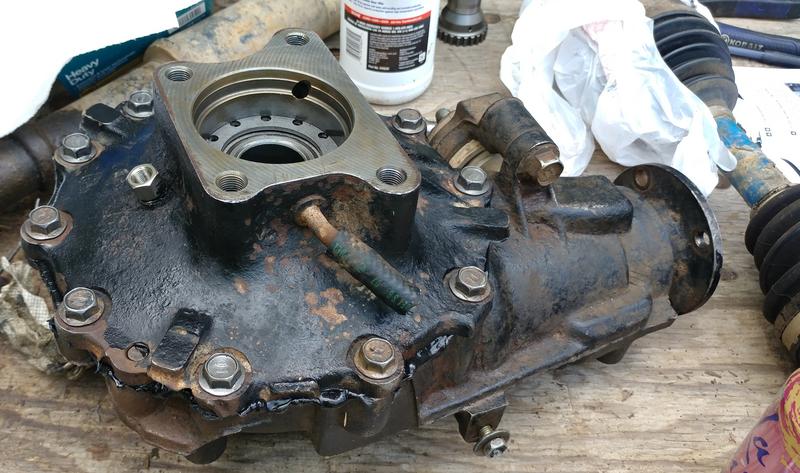
Slooowly pulling the front diff apart.
The add/diff tube has an E14 external torx socket. 4 bolts, 2 long and 2 short. There are two other bolts that you'd remove for just the diff tube, but we want the whole thing.
Those suckers were really on there, I found I had to secure the diff to my 'workbench' so I could put some oomph into bolt removal.

and here's the gear part of the add shaft. I'll pop that out later, first I took the clamshell apart. After I soaked the 2 guide pins with b'laster the hubby came up with a scary looking prybar contraption that worked well so we didn't test my weird idea. Ah, well. It worked, clamshell came apart.
To get the add shaft off the carrier it pops out with a c-clip just like the half-shafts have. With the carrier out I was able to get to the bottom of it with a screwdriver protected with a rag and pop it out. I took care but didn't worry too much as the carrier won't be part of the equation any more.
And then I bent the keepers out and used the impact to remove the ring gear bolts. A plastic hammer, a bunch of taps, it's off.
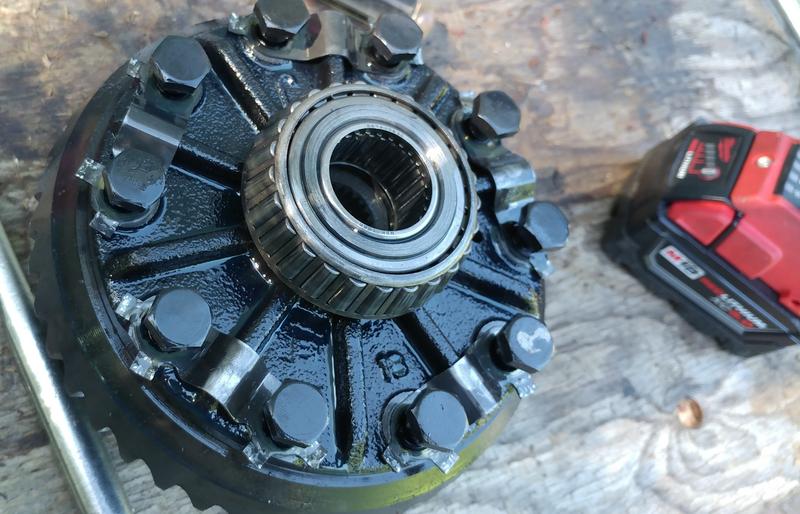
I've just ordered the one carrier bearing (one comes with the Arb unit) and both seals. You only have to damage the left seal, but I figured I'd get both. I should have done this part sooner, but am not in hurry mode.
Did I mention this whole thing is going to take awhile?
Slooowly pulling the front diff apart.
The add/diff tube has an E14 external torx socket. 4 bolts, 2 long and 2 short. There are two other bolts that you'd remove for just the diff tube, but we want the whole thing.
Those suckers were really on there, I found I had to secure the diff to my 'workbench' so I could put some oomph into bolt removal.
and here's the gear part of the add shaft. I'll pop that out later, first I took the clamshell apart. After I soaked the 2 guide pins with b'laster the hubby came up with a scary looking prybar contraption that worked well so we didn't test my weird idea. Ah, well. It worked, clamshell came apart.
To get the add shaft off the carrier it pops out with a c-clip just like the half-shafts have. With the carrier out I was able to get to the bottom of it with a screwdriver protected with a rag and pop it out. I took care but didn't worry too much as the carrier won't be part of the equation any more.
And then I bent the keepers out and used the impact to remove the ring gear bolts. A plastic hammer, a bunch of taps, it's off.
I've just ordered the one carrier bearing (one comes with the Arb unit) and both seals. You only have to damage the left seal, but I figured I'd get both. I should have done this part sooner, but am not in hurry mode.
Did I mention this whole thing is going to take awhile?
The following 3 users liked this post by habanero:
06-02-2020, 12:47 PM
#3946
Contributing Member
Thread Starter
96 4Runner 312,873 miles
Measuring the stock carrier and arb without a proper tool is muy dificil! The other thing I've run into is no press.
One is needed to remove bearings and races and replace them too- possibly more than once as far as the races go.
Today I went to see forum member and friend mighty mouse. He listened to my situation, said no problem and knew just the guy to take it to.
He pointed out that doing this the right way is rather important and having someone who has the experience do it would be a really good idea.
He's a sensible person and has always encouraged people, man or woman, to do all the things so if he's recommending having this set up I'm gonna listen.
So now the diff bits are off to the spa and I'll stick the tube on and seals in and reinstall it when it comes back.
A little disappointed in myself for not doing more of it, but it was nice to mess with it up til press work was needed.
At least it will be done right, rather than right-ish.
While all this was going on my replacement auxiliary reverse lights were delivered. Guess I'll see if I can fit back between the truck butt, a bunch of Japanese cedar tree limbs, and the fence to install them.
And last time I drove my truck I had a little friend with me. I didn't want him on my head anymore so this is how he traveled the last few blocks home where he was shooed to the front lawn....
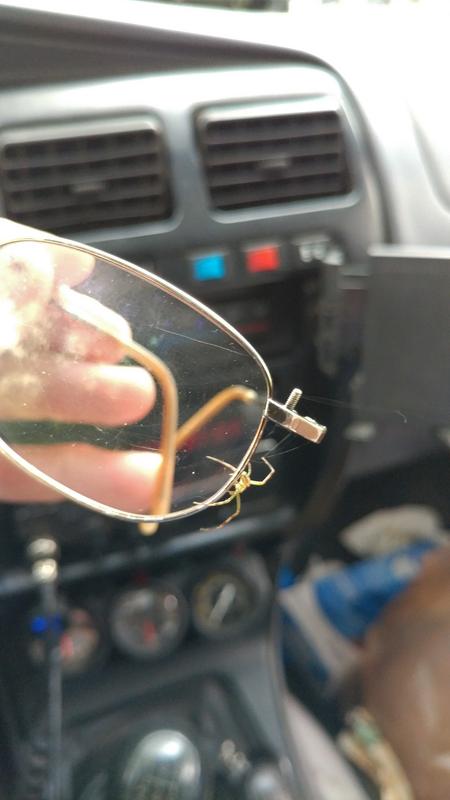
(taken while stopped at the stop sign, yes my glasses are in desperate need of replacement, and sorry- it's a pic and it involved the truck)
Measuring the stock carrier and arb without a proper tool is muy dificil! The other thing I've run into is no press.
One is needed to remove bearings and races and replace them too- possibly more than once as far as the races go.
Today I went to see forum member and friend mighty mouse. He listened to my situation, said no problem and knew just the guy to take it to.
He pointed out that doing this the right way is rather important and having someone who has the experience do it would be a really good idea.
He's a sensible person and has always encouraged people, man or woman, to do all the things so if he's recommending having this set up I'm gonna listen.
So now the diff bits are off to the spa and I'll stick the tube on and seals in and reinstall it when it comes back.
A little disappointed in myself for not doing more of it, but it was nice to mess with it up til press work was needed.
At least it will be done right, rather than right-ish.
While all this was going on my replacement auxiliary reverse lights were delivered. Guess I'll see if I can fit back between the truck butt, a bunch of Japanese cedar tree limbs, and the fence to install them.
And last time I drove my truck I had a little friend with me. I didn't want him on my head anymore so this is how he traveled the last few blocks home where he was shooed to the front lawn....
(taken while stopped at the stop sign, yes my glasses are in desperate need of replacement, and sorry- it's a pic and it involved the truck)
06-18-2020, 12:32 PM
#3947
Contributing Member
Thread Starter
Nothing exciting for the little blue truck yet, but the green one got a new Sherpa roof rack and light bar. Don't worry, there's already a locker. 
mid-install....

mid-install....
The following 3 users liked this post by habanero:
06-21-2020, 08:54 AM
#3948
Contributing Member
Thread Starter
96 4Runner 312,873 miles.....still....
Finally wired up the somewhat el-cheapo led pods for the auxiliary back-up lights.
House Tuning floods, 3" pods. One of the pods had a cracked keeper for which they gave a $15 refund. When I emailed they replied very quickly. The english was obviously second language or babelfish-type stuff, but we were able to communicate.
I can't do a picture of illumination because it's up against a tree....it will have to wait.
Last edited by habanero; 06-21-2020 at 09:19 AM.
The following users liked this post:
old87yota (06-21-2020)
06-30-2020, 06:11 AM
#3949
Contributing Member
Thread Starter
96 4Runner 312,873 miles
Anticipating return of front diff soon, until then doin' the piddly and also important stuff.
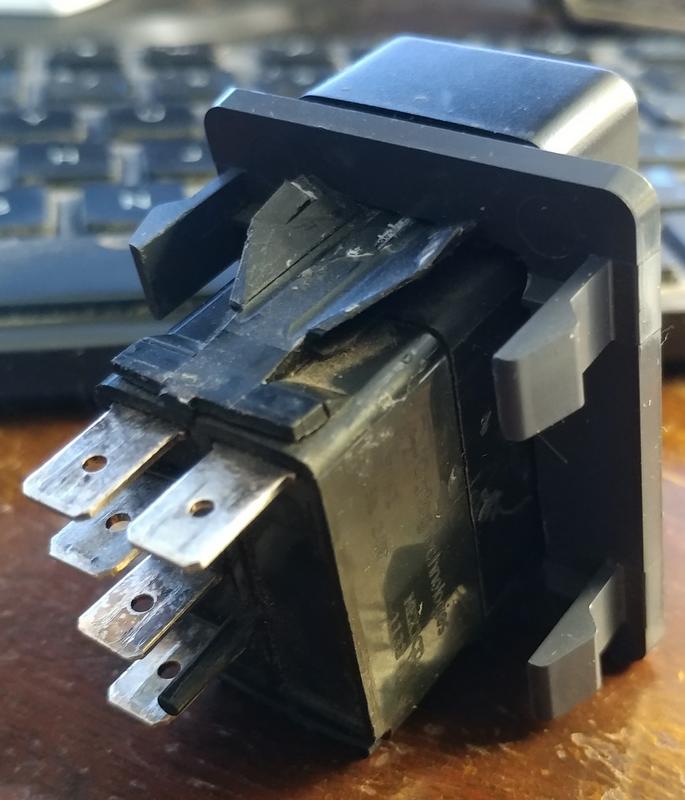
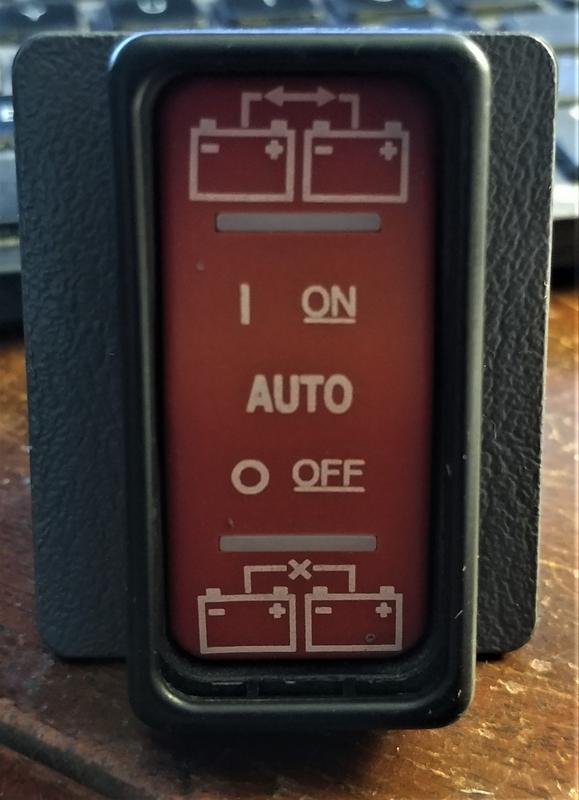
Worked a hole in a junkyard switch blank to accommodate my blue sea dual battery switch- the old blank had broken clips and the hole was not all that well done (by me!) anyway. This time I'd more success.
I also bought a 2 pack of connectors for Carlise switches- one for this and one for the Arb switch. They aren't great, but better than having to undo all the connectors and keep track of where they go every time I drop the panel....especially as there will now be two of them.
The Arb switch will fit into the switch blank where my garage door opener used to be. It may never come out again, but that's why connector.
Anticipating return of front diff soon, until then doin' the piddly and also important stuff.
Worked a hole in a junkyard switch blank to accommodate my blue sea dual battery switch- the old blank had broken clips and the hole was not all that well done (by me!) anyway. This time I'd more success.
I also bought a 2 pack of connectors for Carlise switches- one for this and one for the Arb switch. They aren't great, but better than having to undo all the connectors and keep track of where they go every time I drop the panel....especially as there will now be two of them.
The Arb switch will fit into the switch blank where my garage door opener used to be. It may never come out again, but that's why connector.
The following users liked this post:
old87yota (07-04-2020)
07-03-2020, 05:14 PM
#3950
Contributing Member
Thread Starter
96 4Runner 312,873 miles
The diff is back!
Yesterday I installed the add shaft (soft hammer, popped right in) and cleaned up the mating surfaces for the tube, then figured out where to put the new air manifold that I needed because now I have more lines than ports.
I still have to test the locker before install, after today's time spent finishing up moving air lines around on the air tank it's ready for the testing.
Everything is arranged and the air line for the locker has been run up to the front.
102 heat index, 62% humidity. Hot and super-sweaty, but it turned out to be better than when it cooled down enough for the crazy-bitey mosquitoes to attack in droves. Done for the day!
My RD90 came with a new style bulkhead fitting kit and no instructions as to how it goes. No worries, I found pics on Northridge4x4's site, they're hiding on this page:
https://www.northridge4x4.com/part/c...ad-fitting-kit
It looks like it can either be set up as an 'L' or straight out, depending on clearance.
Last edited by habanero; 07-03-2020 at 06:38 PM.
The following 2 users liked this post by habanero:
75w90mantraN (07-05-2020),
old87yota (07-04-2020)
07-04-2020, 02:17 PM
#3951
Contributing Member
Thread Starter
96 4Runner 312,873 miles
Bwahahahahahaha.....
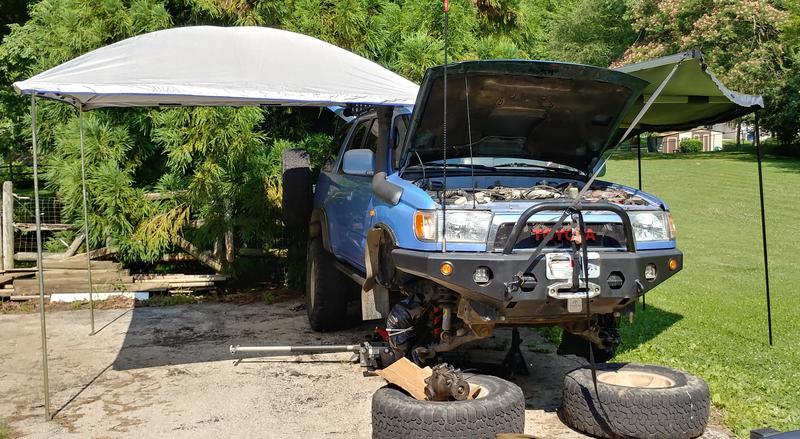
Had to work on both sides of the truck today so I used both the Bus Depot and the Overland Nomadic awnings because can.
Wiring's done.
Air is done but for two fittings I need to pick up at the store.
Locker has been tested several times today and works great. No hissing sounds. Time to put the tube and bracket back on and the new seals in and toss it into the truck.
Actually getting close to dinner time so diff may have to wait for tomorrow.
The tube side seal depth is supposed to be 5.5mm and there's no stop. The dust shield on the cv shaft is also darned close to 5.5mm and is the right size so I'm going to use it to set the correct depth.
Bwahahahahahaha.....
Had to work on both sides of the truck today so I used both the Bus Depot and the Overland Nomadic awnings because can.
Wiring's done.
Air is done but for two fittings I need to pick up at the store.
Locker has been tested several times today and works great. No hissing sounds. Time to put the tube and bracket back on and the new seals in and toss it into the truck.
Actually getting close to dinner time so diff may have to wait for tomorrow.
The tube side seal depth is supposed to be 5.5mm and there's no stop. The dust shield on the cv shaft is also darned close to 5.5mm and is the right size so I'm going to use it to set the correct depth.
07-05-2020, 05:28 PM
#3952
Contributing Member
Thread Starter
96 4Runner 312,873 miles
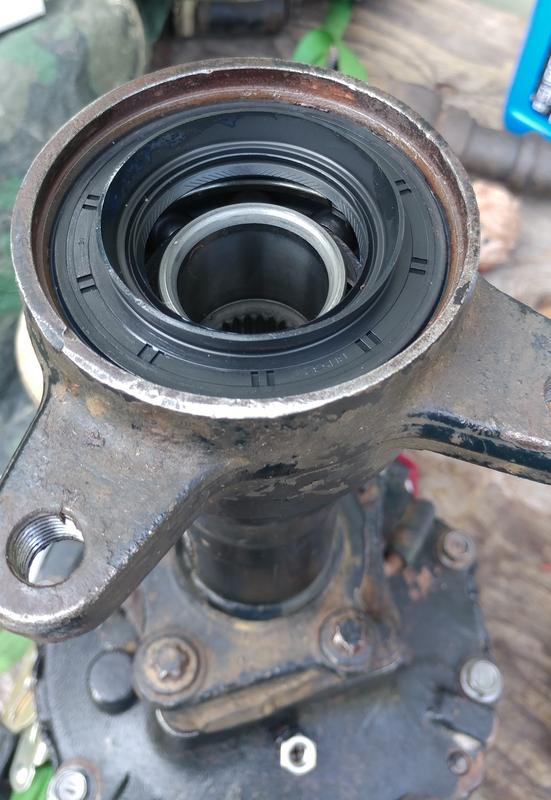
Today I installed the diff tube (58 ft lbs, E14 socket, Toyota FIPG 0029501281),
I'd thrown the seal into the freezer the day before. After cleaning the area up on the passenger side I found the shape of the seal was not the same as the one I installed on my original front diff years ago. The dust shield won't work this time. What did work was my oil filter cap wrench. I got everything set up and the diff was still strapped to the table from installing the tube. Grabbed the seal out of the freezer and stuck it in the tube as straight as possible, then gently tapped it the rest of the way with the cap wrench and rubber mallet. Toyota part# 9031147013
The driver side was smaller so I looked around and found a plastic orange juice concentrate can in the recycle bin. Same as the other, set it in by had as straight as I could, then gently tapped it the rest of the way with the oj can and rubber mallet. It actually managed to maintain a shape long enough to get the seal in. Toyota part# 9031147027
Chilling the seals seems to really help with this job.

It sits just below the lip on the diff tube. The other side is a similar set-up.
After that was done bike ride, weed whacking, mowing, and veggie garden got in the way. More tomorrow.
Today I installed the diff tube (58 ft lbs, E14 socket, Toyota FIPG 0029501281),
I'd thrown the seal into the freezer the day before. After cleaning the area up on the passenger side I found the shape of the seal was not the same as the one I installed on my original front diff years ago. The dust shield won't work this time. What did work was my oil filter cap wrench. I got everything set up and the diff was still strapped to the table from installing the tube. Grabbed the seal out of the freezer and stuck it in the tube as straight as possible, then gently tapped it the rest of the way with the cap wrench and rubber mallet. Toyota part# 9031147013
The driver side was smaller so I looked around and found a plastic orange juice concentrate can in the recycle bin. Same as the other, set it in by had as straight as I could, then gently tapped it the rest of the way with the oj can and rubber mallet. It actually managed to maintain a shape long enough to get the seal in. Toyota part# 9031147027
Chilling the seals seems to really help with this job.
It sits just below the lip on the diff tube. The other side is a similar set-up.
After that was done bike ride, weed whacking, mowing, and veggie garden got in the way. More tomorrow.
The following 3 users liked this post by habanero:
07-05-2020, 06:19 PM
#3953
Registered User
96 4Runner 312,873 miles
Today I installed the diff tube (58 ft lbs, E14 socket, Toyota FIPG 0029501281),
I'd thrown the seal into the freezer the day before. After cleaning the area up on the passenger side I found the shape of the seal was not the same as the one I installed on my original front diff years ago. The dust shield won't work this time. What did work was my oil filter cap wrench. I got everything set up and the diff was still strapped to the table from installing the tube. Grabbed the seal out of the freezer and stuck it in the tube as straight as possible, then gently tapped it the rest of the way with the cap wrench and rubber mallet. Toyota part# 9031147013
The driver side was smaller so I looked around and found a plastic orange juice concentrate can in the recycle bin. Same as the other, set it in by had as straight as I could, then gently tapped it the rest of the way with the oj can and rubber mallet. It actually managed to maintain a shape long enough to get the seal in. Toyota part# 9031147027
Chilling the seals seems to really help with this job.
It sits just below the lip on the diff tube. The other side is a similar set-up.
After that was done bike ride, weed whacking, mowing, and veggie garden got in the way. More tomorrow.
I put my diff seals in super crooked and in different depths and they seal great lolol
I made sure to put some lucas in with the oil

Shoot, lucas also made my t-case and trans stop leaking too
The following users liked this post:
habanero (07-06-2020)
07-06-2020, 06:13 PM
#3954
Contributing Member
Thread Starter
96 4Runner 312,873 miles
I'm gonna be real mad if anything leaks after all this work!
Something to keep in mind for future use, thanks.
Today I swapped the original vacuum pipes that sit on top of the front diff for a set we had downstairs. The previous owner had bypassed one of the tubes when it became blocked. Not a big deal as it was but I had the spare one on hand so why not?
I removed the front diff rear mount and set it in place before jacking the diff up in. Once positioned, I started the bolt that goes in from above, then tilted the diff enough to slide the bolt that goes in from below into place. That always takes a bit of time and patience.
Diff brackets installed, CVs in, left spindle back in place and left side lower ball joint bolted back on (59 ft lbs for the 96). Left manual hub, wheel adapter and wheel installed. Vacuum lines connected and diff breather in its place.
Tomorrow, sleeve the air line with hose in the engine bay, reinstall the right side stuff. I need to get some non-hypoid/limited slip oil as is recommended by ARB.
I forgot pictures and am a very greasy sweaty disgusting mess that will take a shower once the skin faucet settles the heck down. Eesh!
It's a wet heat...
Last edited by habanero; 07-06-2020 at 06:14 PM.
The following 2 users liked this post by habanero:
chuckles89 (07-08-2020),
old87yota (07-07-2020)
07-08-2020, 09:52 AM
#3955
Contributing Member
Thread Starter
96 4Runner 312,87almost4 miles
Everything's back together. It goes into 4wd and it locks and unlocks (tested while still up in the air). The line still needs to be cut and shortened and the solenoid added. It's wired up and works, but air line not attached- I need a connector because I'm not running an Arb compressor. My kit is the new style connector for 6mm instead of 5mm, the air line is thicker than before. The kit also came with a banjo fitting for the bulkhead so the air line could be run 90 degrees to the bulkhead fitting at the diff. I didn't use it because how it's routed works better coming straight out. I did sleeve the line in the engine bay, and the sleeve does fit over the compression nut- in case I have to remove it.
Everything's back together. It goes into 4wd and it locks and unlocks (tested while still up in the air). The line still needs to be cut and shortened and the solenoid added. It's wired up and works, but air line not attached- I need a connector because I'm not running an Arb compressor. My kit is the new style connector for 6mm instead of 5mm, the air line is thicker than before. The kit also came with a banjo fitting for the bulkhead so the air line could be run 90 degrees to the bulkhead fitting at the diff. I didn't use it because how it's routed works better coming straight out. I did sleeve the line in the engine bay, and the sleeve does fit over the compression nut- in case I have to remove it.
The following 2 users liked this post by habanero:
chuckles89 (07-08-2020),
old87yota (07-08-2020)
07-11-2020, 12:23 PM
#3956
Contributing Member
Thread Starter
96 4Runner 312,880 miles
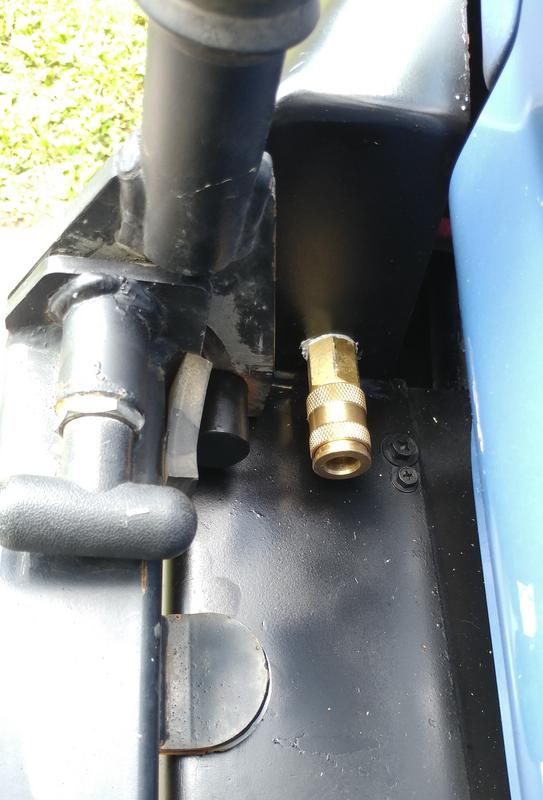
Today I relocated the air chuck for the OBA. I wanted to be able to access it easily without having to open anything on the truck.
After lots and lots of searching the frame, body, and bumper for a place that was mostly out of harms way and not too close to the tire in case of muckiness I chose a spot behind the tire carrier latch.
After lots of checks to make sure the latch could still close and the tailgate could clear it I drilled a hole, routed the air hose, added the v-style air chuck.
A hole
Finished
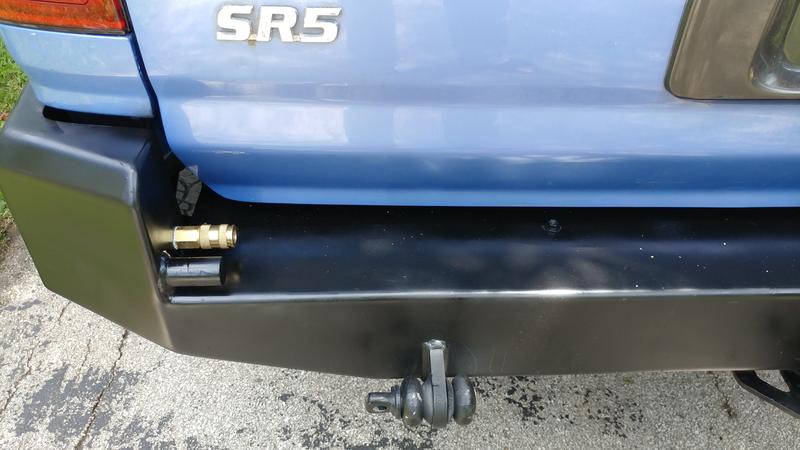
Clearance between chuck and tailgate while being opened
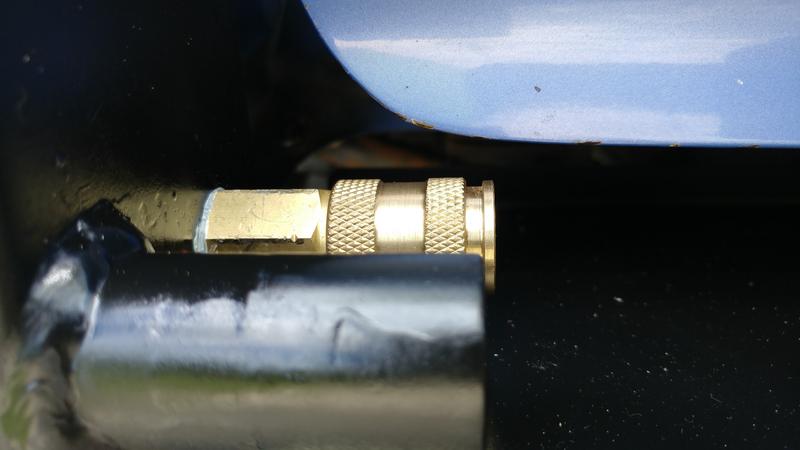
Clearancce between chuck and latch
Today I relocated the air chuck for the OBA. I wanted to be able to access it easily without having to open anything on the truck.
After lots and lots of searching the frame, body, and bumper for a place that was mostly out of harms way and not too close to the tire in case of muckiness I chose a spot behind the tire carrier latch.
After lots of checks to make sure the latch could still close and the tailgate could clear it I drilled a hole, routed the air hose, added the v-style air chuck.
A hole
Finished
Clearance between chuck and tailgate while being opened
Clearancce between chuck and latch
The following 2 users liked this post by habanero:
chuckles89 (07-11-2020),
coopster (07-11-2020)
07-11-2020, 12:37 PM
#3957
Contributing Member
Thread Starter
96 4Runner 312,880 miles
And the aux reverse lights. Same stated lumens as the halogens that were there, these diffused flood led cubes are brighter. They came with amber covers that I'll prolly use. Still need to work on aim, try to minimize eyeball attack for anyone who happens to be looking their way.
Not quite dark yet, but you'll get the idea...
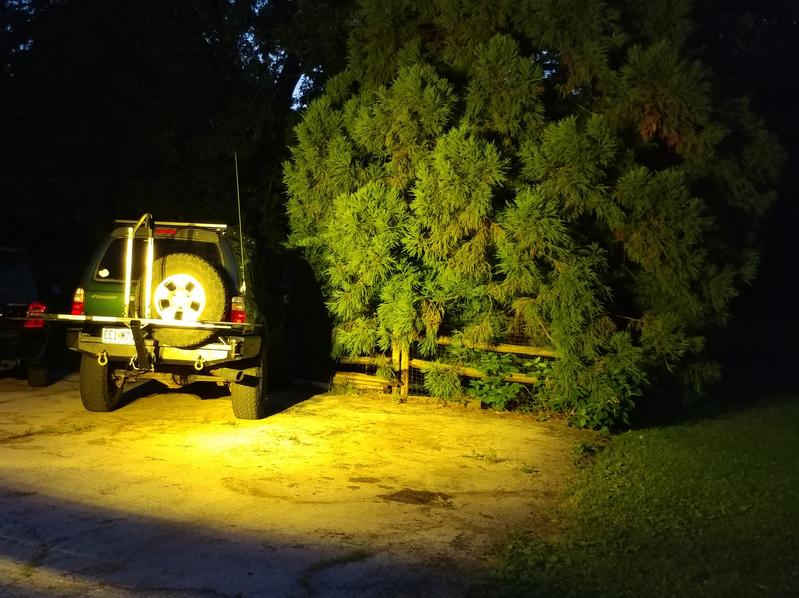
The following 2 users liked this post by habanero:
chuckles89 (07-11-2020),
coopster (07-11-2020)
07-13-2020, 06:13 PM
#3958
Contributing Member
Thread Starter
96 4Runner 312,880 miles
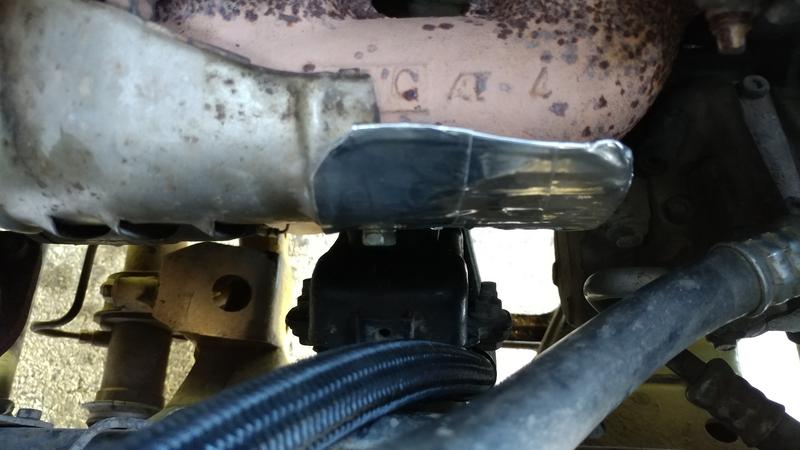
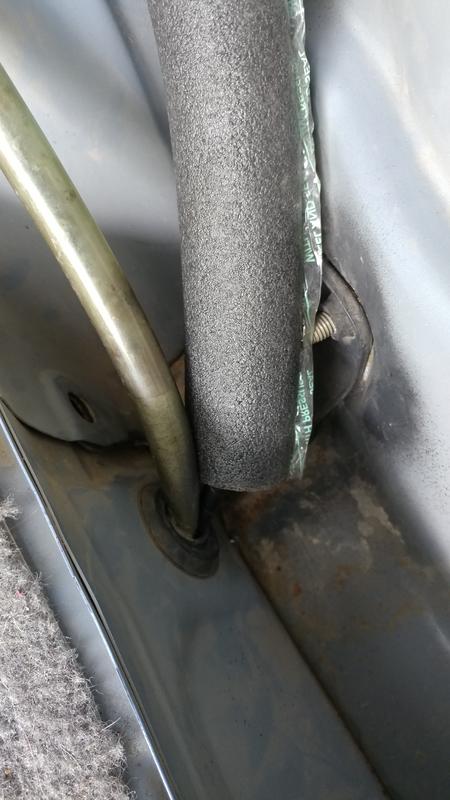
Made a heat shield to protect the already sleeved air line for the ARB using an old license plate and some aluminum tape. The rubber a/c hose is about the same distance away so life should be copacetic.
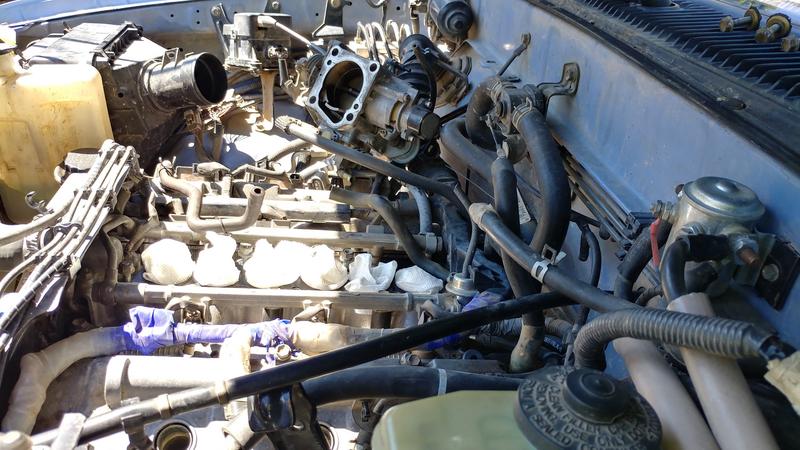
And I replaced the valve cover bolt grommets. The ones I'd gotten from Yota Shop when I did the head gaskets have degraded terribly. Gently tightening the bolts down gently helped a little but not enough. I've been putting up with slightly leaky burny oil smell for awhile now but the leak has increased to the point of un-ignorability.
Didn't even pop off the valve covers...getting to this point when you're doing what I did is quick.
Comparison of the old vs new grommets
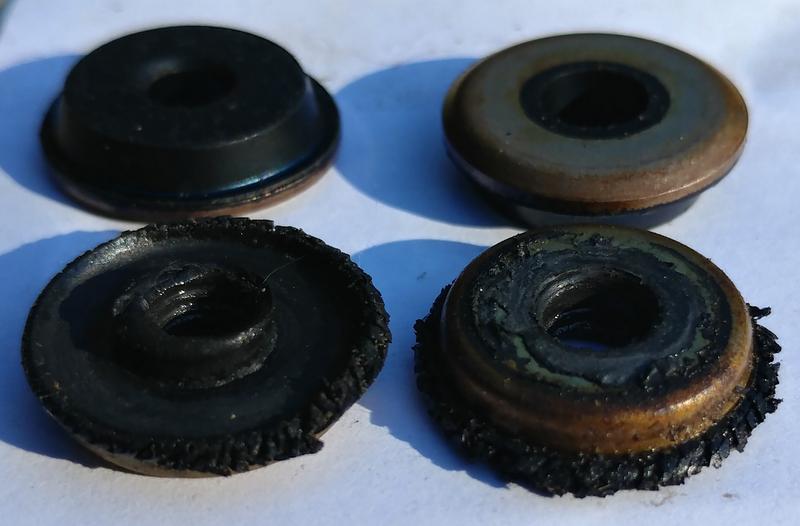
Old grommets with torque specs for vc bolts and plenums...
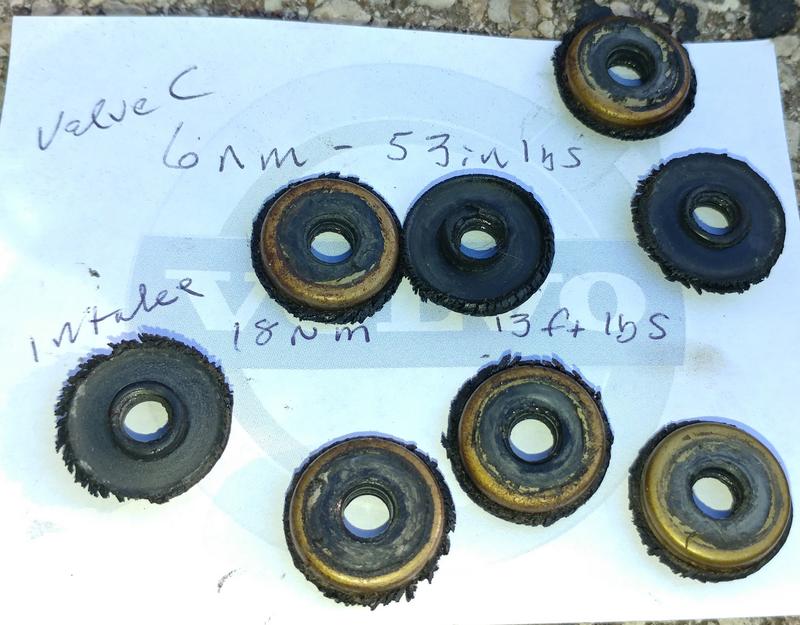
I also worked on mounting the solenoid for the front locker.
Because I'm not using an ARB compressor I needed another fitting for the solenoid to connect the line to my air tank.
Had trouble finding the part because instead of the old 5mm line the new stuff is 6mm.
Luckily East Coast Gear had what I needed for a reasonable price + ship and service was quick too.
Item: ARB Compressor 6MM Push Lock ARB- 170213SP
Tomorrow I'll test fit the cargo panel and slap it all together.
Made a heat shield to protect the already sleeved air line for the ARB using an old license plate and some aluminum tape. The rubber a/c hose is about the same distance away so life should be copacetic.
And I replaced the valve cover bolt grommets. The ones I'd gotten from Yota Shop when I did the head gaskets have degraded terribly. Gently tightening the bolts down gently helped a little but not enough. I've been putting up with slightly leaky burny oil smell for awhile now but the leak has increased to the point of un-ignorability.
Didn't even pop off the valve covers...getting to this point when you're doing what I did is quick.
Comparison of the old vs new grommets
Old grommets with torque specs for vc bolts and plenums...
I also worked on mounting the solenoid for the front locker.
Because I'm not using an ARB compressor I needed another fitting for the solenoid to connect the line to my air tank.
Had trouble finding the part because instead of the old 5mm line the new stuff is 6mm.
Luckily East Coast Gear had what I needed for a reasonable price + ship and service was quick too.
Item: ARB Compressor 6MM Push Lock ARB- 170213SP
Tomorrow I'll test fit the cargo panel and slap it all together.
The following users liked this post:
chuckles89 (07-13-2020)
07-14-2020, 12:13 PM
#3959
Contributing Member
Thread Starter
96 4Runner 312,880 miles
Spent time today mounting the solenoid to the passenger side cargo area...
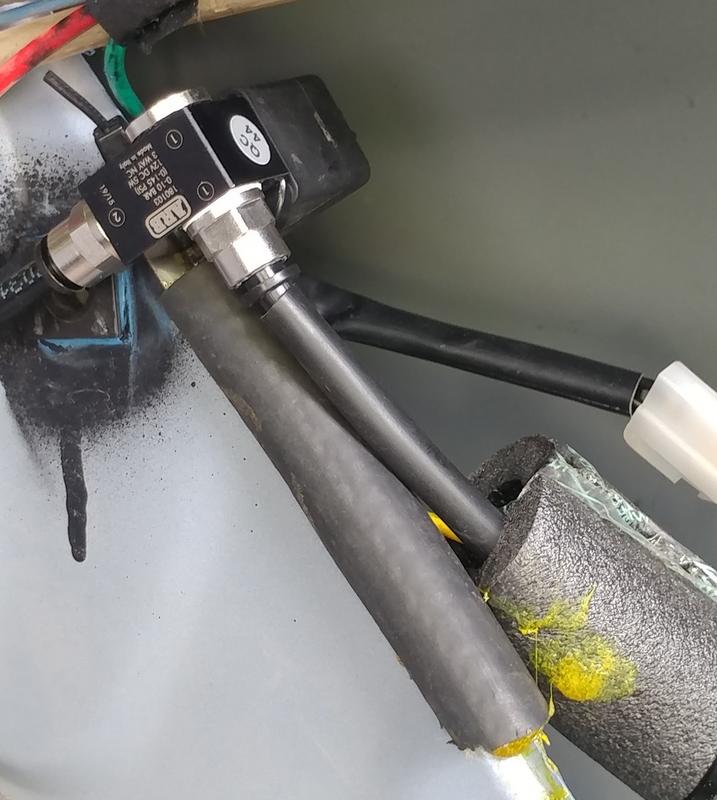
Gorilla snot to glue the piece of hose to the edge of the metal to protect the line, solenoid zip-tied to the protected edge
Line run through the same grommet as the rear passenger sunroof drain
To a water separator that's attached to the air tank in the spare area.
I am using a 105psi pressure switch for the compressor as called for by ARB.
Spent time today mounting the solenoid to the passenger side cargo area...
Gorilla snot to glue the piece of hose to the edge of the metal to protect the line, solenoid zip-tied to the protected edge
Line run through the same grommet as the rear passenger sunroof drain
To a water separator that's attached to the air tank in the spare area.
I am using a 105psi pressure switch for the compressor as called for by ARB.
07-14-2020, 01:08 PM
#3960
Contributing Member
Thread Starter
96 4Runner 312,880 miles
Important note!
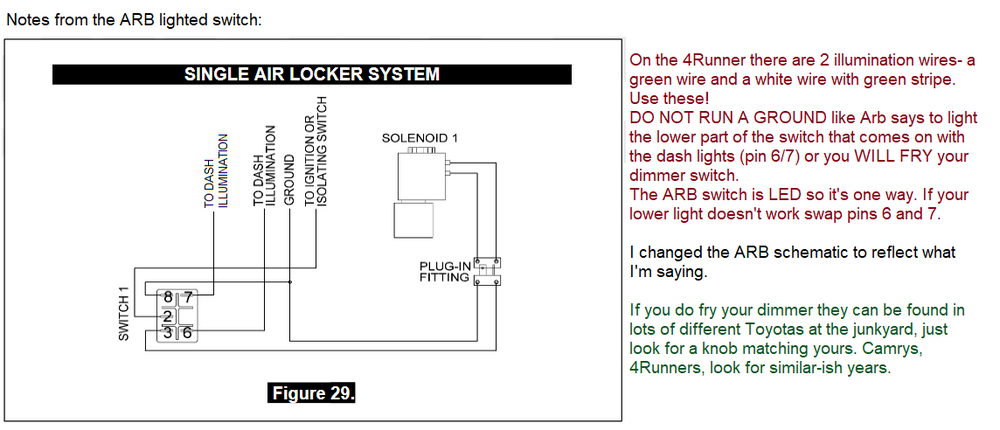
Important note!
The following users liked this post:
chuckles89 (07-14-2020)


