
habanero's 1996 4Runner Build-Up Thread
 12-25-2018, 01:59 PM
#3761
Contributing Member
Thread Starter
Orrr they'll show up Wednesday instead. Whatever. 
Happy holidays, happy winter solstice, happy everything!
Happy holidays, happy winter solstice, happy everything!


 12-26-2018, 09:41 AM
#3763
Registered User
I didn't know he made those bushings. Do you have a link by chance?
12-26-2018, 10:21 AM
#3764
Contributing Member
Thread Starter
12-26-2018, 10:23 AM
#3765
Registered User
12-26-2018, 04:55 PM
#3766
Contributing Member
Thread Starter
Can't say anything as I miss stuff all the time.
I received 2 pair of bushings this evening, for the '96 and the '99. Installed the pair for the '96 in the cleaned-up brackets tonight. The website has very good instructions, I deviated a bit- instead of using channel locks and some cardboard as suggested I used a big c-clamp with a socket and cardboard/ wood block which worked very well. It suggested hairspray to lube the bushings prior to putting them in. I actually have some on hand because it works excellently for bicycle handlebar grip installation.

The bushings do want to push back out a little, installing them will solve that. I just lightly clamped them together to keep them until tomorrow's install depending on the pending rain.
I received 2 pair of bushings this evening, for the '96 and the '99. Installed the pair for the '96 in the cleaned-up brackets tonight. The website has very good instructions, I deviated a bit- instead of using channel locks and some cardboard as suggested I used a big c-clamp with a socket and cardboard/ wood block which worked very well. It suggested hairspray to lube the bushings prior to putting them in. I actually have some on hand because it works excellently for bicycle handlebar grip installation.
The bushings do want to push back out a little, installing them will solve that. I just lightly clamped them together to keep them until tomorrow's install depending on the pending rain.
12-27-2018, 05:42 PM
#3767
Contributing Member
Thread Starter
96 4Runner 304,459 miles
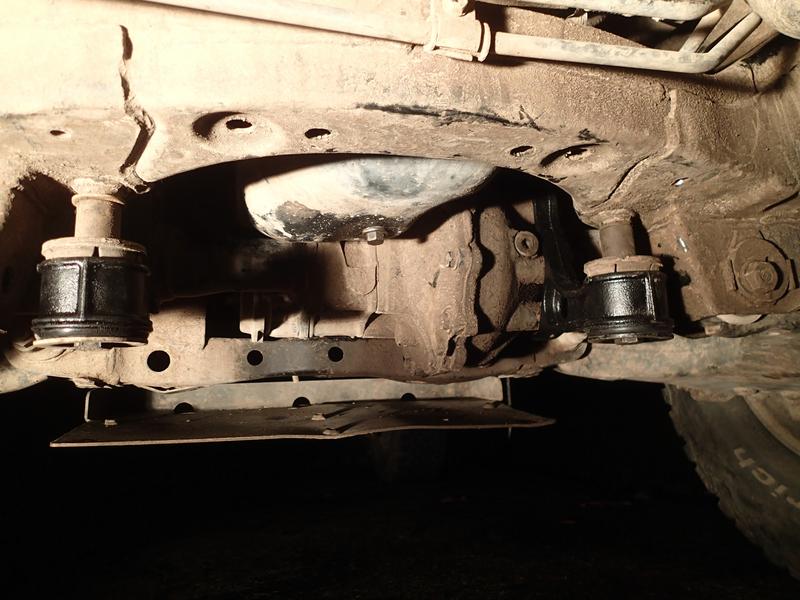
Installing the front diff bushing brackets on a wet but warm December day.
Is easy once you get the skid off.
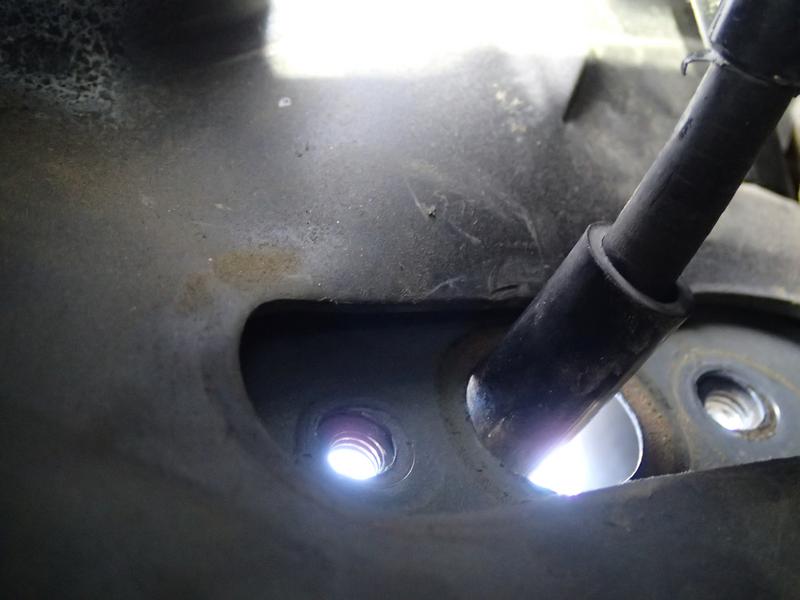
Left side, 3 bolts with 19mm heads. I didn't, but do these bolts before the one that goes through the bushing.
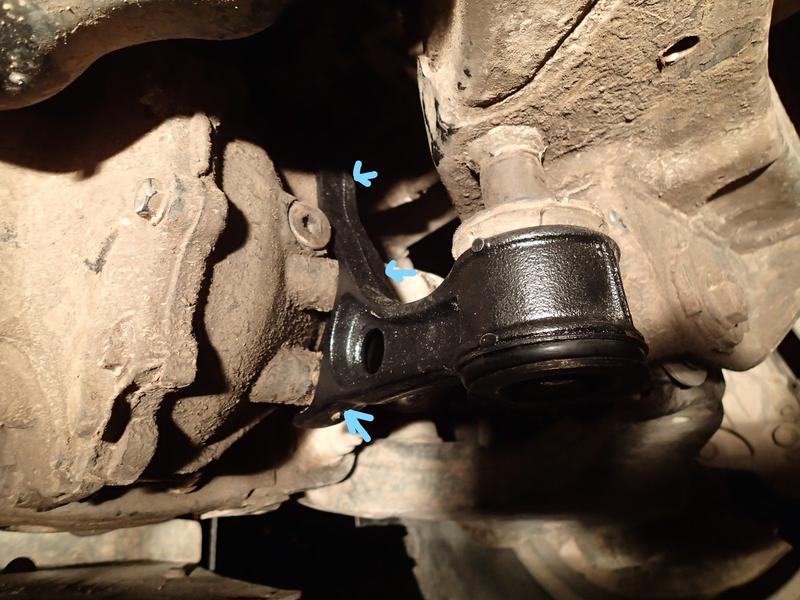
To remove the long bolt through the bushing you'll need a 19mm wrench for the nut on top of the crossmember and a 19mm socket for the bolt head at the bottom of the bushing. I have a diff drop bracket, but same goes for with or without.
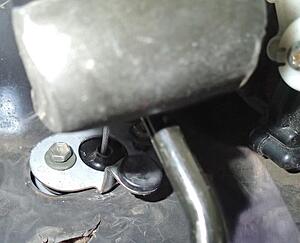
Right side, 2 bolts with 19mm heads. The upper one will need either a shorter socket or a wrench. I'm not super-strong so I used the old 2 wrenches keyed together trick which had enough leverage to pop the bolt loose.
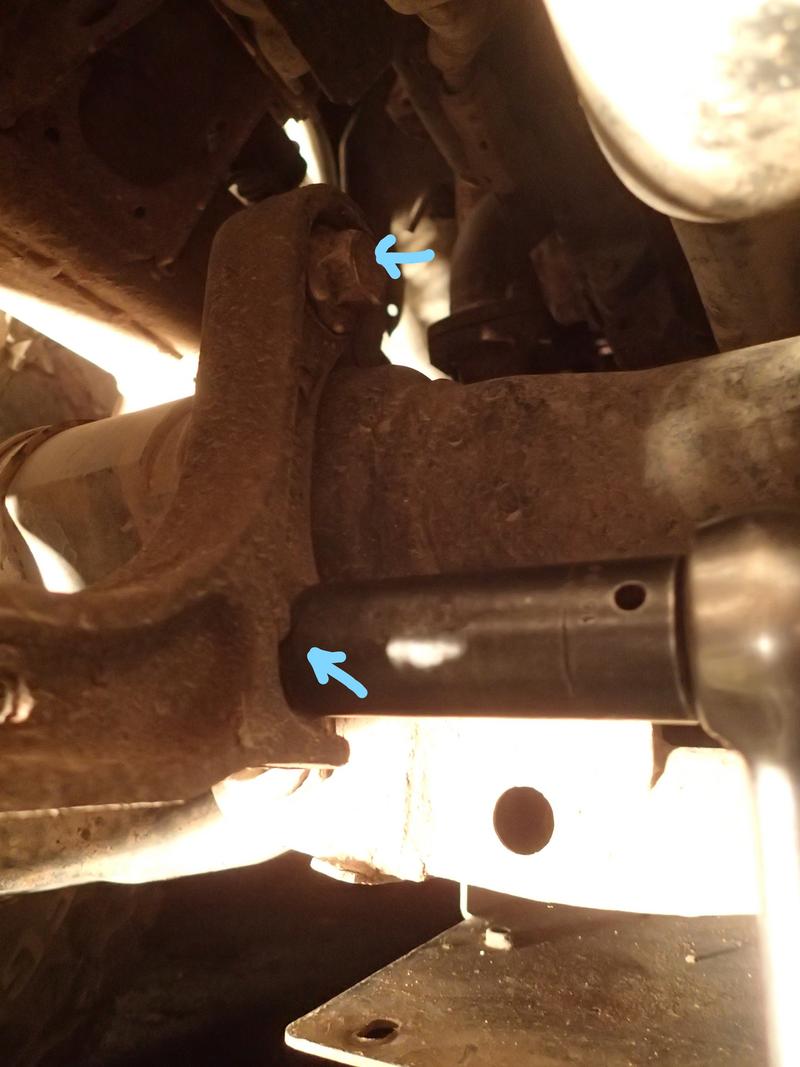
and a picture of the wrench on the nut at the top of the crossmember above the bushing
Installing the front diff bushing brackets on a wet but warm December day.
Is easy once you get the skid off.
Left side, 3 bolts with 19mm heads. I didn't, but do these bolts before the one that goes through the bushing.
To remove the long bolt through the bushing you'll need a 19mm wrench for the nut on top of the crossmember and a 19mm socket for the bolt head at the bottom of the bushing. I have a diff drop bracket, but same goes for with or without.
Right side, 2 bolts with 19mm heads. The upper one will need either a shorter socket or a wrench. I'm not super-strong so I used the old 2 wrenches keyed together trick which had enough leverage to pop the bolt loose.
and a picture of the wrench on the nut at the top of the crossmember above the bushing
The following users liked this post:
old87yota (12-27-2018)
12-29-2018, 05:18 PM
#3768
Contributing Member
Thread Starter
Today we had a junkyard date, my favorite kind!
I needed a couple little piddly bits, he needed a front dif with a 4.30. We headed out with little hope and lo and behold, the third stop yielded what we needed.
Pulling a front dif out of a 3rd gen 4Runner (this was an '00) kinda, well, bites.
This one had what looked to be a hard hit to the left front wheel, shattered rotor, sheared lower ball joint bolts, left cv pulled apart. that left only removing the wheel and tulip that had stayed in the dif when the cv separated.
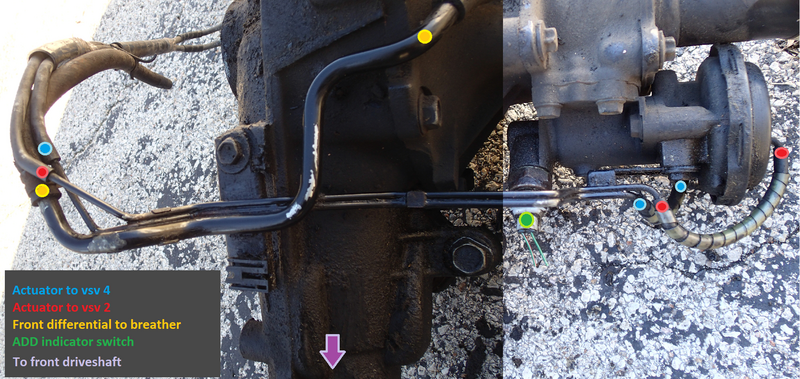
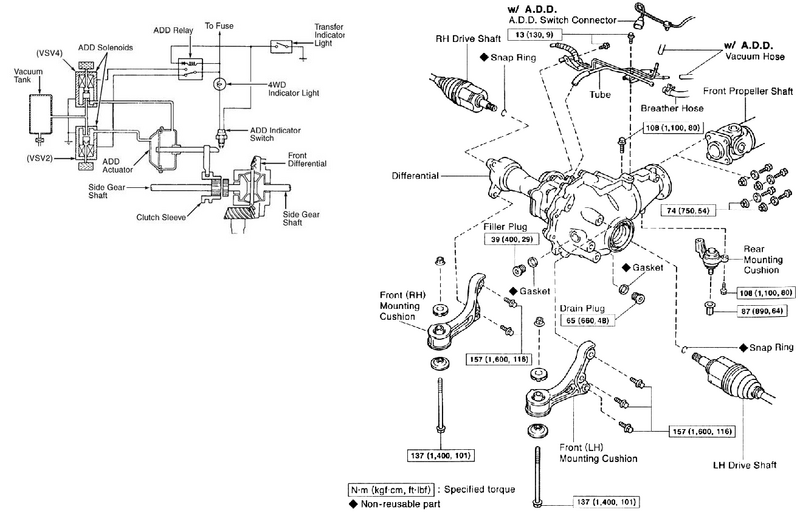
The dif, though, it was in oily but good shape. So there's one connector and three vacuum hoses to deal with, all on the top left-hand side of the dif.
You'll have to unbolt the lower ball joint bolts (4 each side) and pull the axle apart- or- remove the axle cap, the 34 or 35mm axle nut, and then the axle itself. IF you do it the quick way that we did you need to remove the tulip from the left (driver's) side of the dif. It will get in the way otherwise.
The front diff brackets need to come off, there's a quick how-to a few posts above this.
Remove the 4 front driveshaft bolts from the flange (nut on front, bolt on back- turn the shaft to access each bolt as needed)
Alright, now to remove the actual diff takes a bit of patience, it's tight quarters in there.
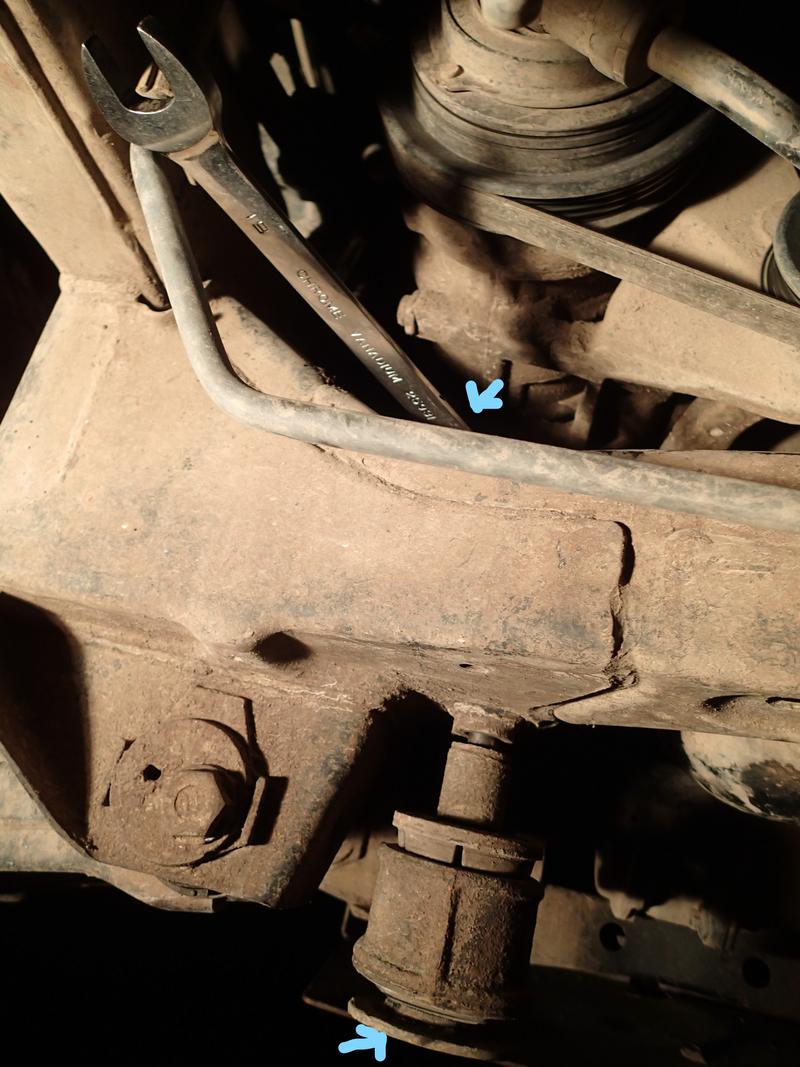
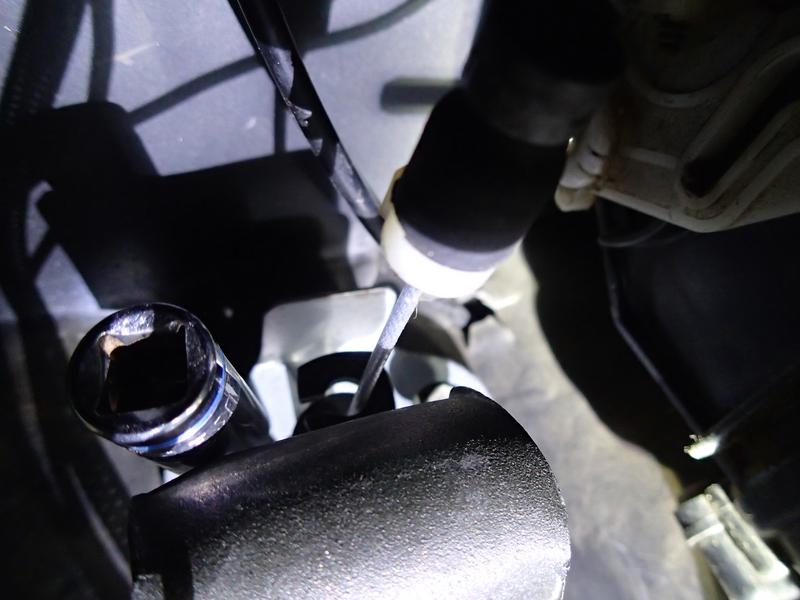
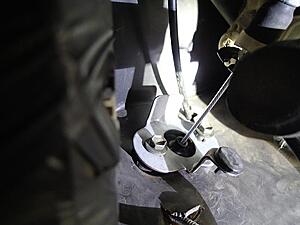
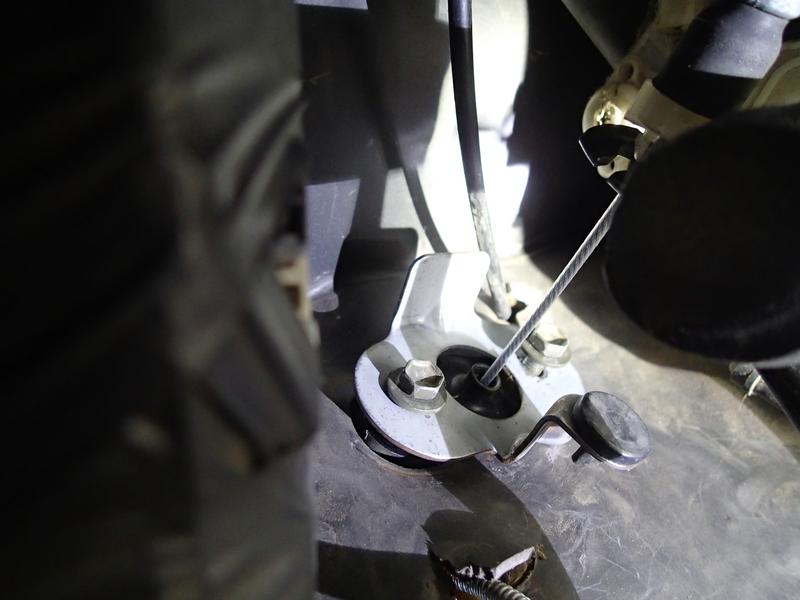
There is a 12mm hex nut...

that looks weird...though you can't see it because it's up in the cross member...
That you get to from the bottom side of the crossmember that the steering rack also happens to be bolted to.
Once that is removed you have the crazy task of getting the bolt clear of the crossmember while also clearing the transmission housing with the driveshaft flange and the oil pan too.
Here is a picture of said bolt (pink arrow) with said nut (yellow arrow) attached. Nut from below, bolt comes upwards and out of the crossmember

So the dif has to come up, twist, down-ish, to the left to clear the lump on the right front of the oil pan- and out.
This was sooooooo much easier to type than it is to do!
I needed a couple little piddly bits, he needed a front dif with a 4.30. We headed out with little hope and lo and behold, the third stop yielded what we needed.
Pulling a front dif out of a 3rd gen 4Runner (this was an '00) kinda, well, bites.
This one had what looked to be a hard hit to the left front wheel, shattered rotor, sheared lower ball joint bolts, left cv pulled apart. that left only removing the wheel and tulip that had stayed in the dif when the cv separated.
The dif, though, it was in oily but good shape. So there's one connector and three vacuum hoses to deal with, all on the top left-hand side of the dif.
You'll have to unbolt the lower ball joint bolts (4 each side) and pull the axle apart- or- remove the axle cap, the 34 or 35mm axle nut, and then the axle itself. IF you do it the quick way that we did you need to remove the tulip from the left (driver's) side of the dif. It will get in the way otherwise.
The front diff brackets need to come off, there's a quick how-to a few posts above this.
Remove the 4 front driveshaft bolts from the flange (nut on front, bolt on back- turn the shaft to access each bolt as needed)
Alright, now to remove the actual diff takes a bit of patience, it's tight quarters in there.
There is a 12mm hex nut...
that looks weird...though you can't see it because it's up in the cross member...
That you get to from the bottom side of the crossmember that the steering rack also happens to be bolted to.
Once that is removed you have the crazy task of getting the bolt clear of the crossmember while also clearing the transmission housing with the driveshaft flange and the oil pan too.
Here is a picture of said bolt (pink arrow) with said nut (yellow arrow) attached. Nut from below, bolt comes upwards and out of the crossmember
So the dif has to come up, twist, down-ish, to the left to clear the lump on the right front of the oil pan- and out.
This was sooooooo much easier to type than it is to do!
01-01-2019, 03:01 PM
#3769
Contributing Member
Thread Starter
96 4Runner 304,575 miles
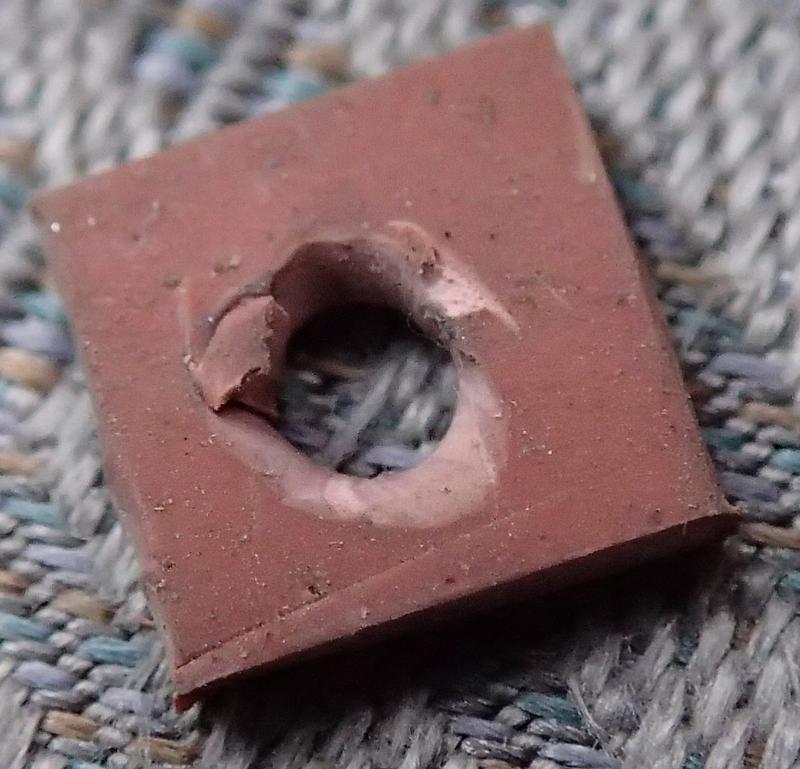
Putting this right here for when my Bored Tuesday fix fails- kwbooth had a terrific idea for a vent bearing (that stupid little square bit that breaks) using a Hillman- 0 08236 71581 1- Nylon Anchor Nuts for #6 & #8 screws
https://www.toyota-4runner.org/maintenance-detailing/146505-3rd-gen-center-ac-vent-fix-$0-92-tax.html
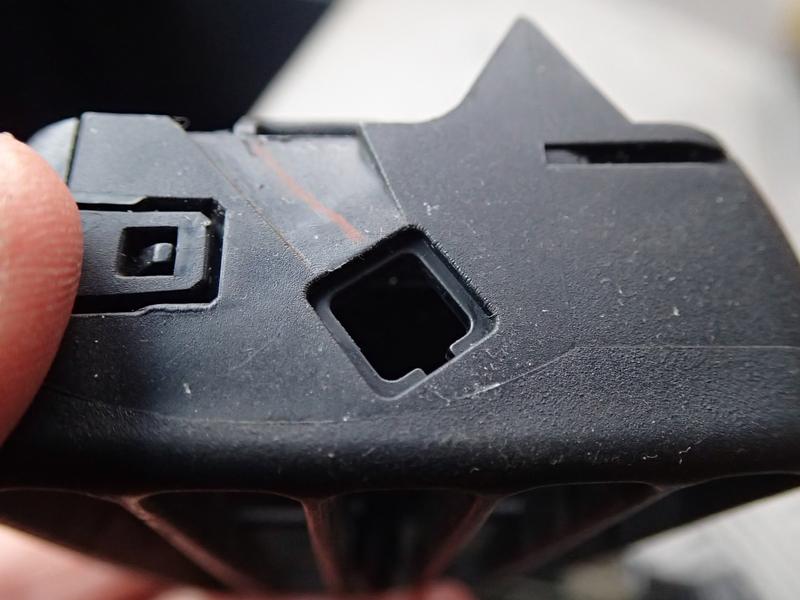
The common floppy center dash vents, one of mine is worse than the other
Fit on these posts:
Both have broken dash vent bearings-
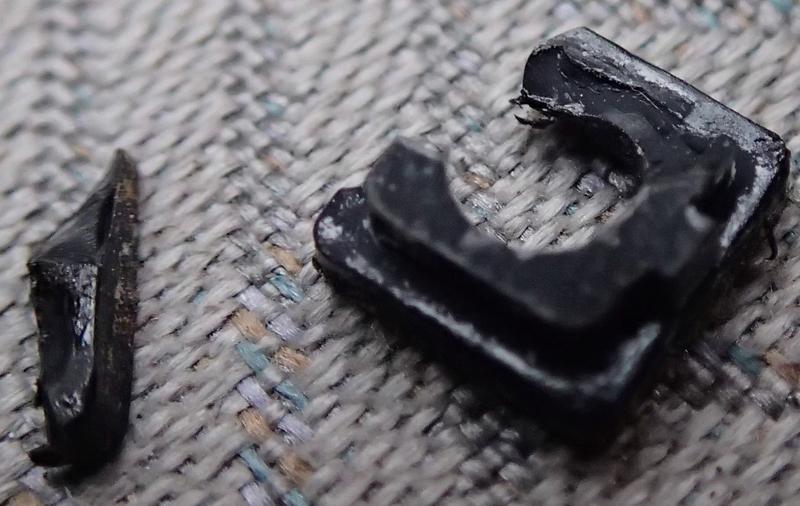
That fit into a square hole in one side of the vent
And the super-floppy vent is broken-
so I replaced the one vent with one plucked out of a broken center dash bezel at the junkyard
and still having the issue of a broken vent bearing on one and a missing one on the other.
today I made a little bearing of my own out of some left-over rubber gasket material. It's not great, but the vents aren't flopping any more so it's okay while it lasts. I will use the info from the link above when these fail.
The other Bored Tuesday thing I did is replace the missing lower engine fan shroud valance clip (should be one at each end) and attach it to the fan shroud.

One of the tabs at the bottom is missing but one is enough to do the job.
Putting this right here for when my Bored Tuesday fix fails- kwbooth had a terrific idea for a vent bearing (that stupid little square bit that breaks) using a Hillman- 0 08236 71581 1- Nylon Anchor Nuts for #6 & #8 screws
https://www.toyota-4runner.org/maintenance-detailing/146505-3rd-gen-center-ac-vent-fix-$0-92-tax.html
The common floppy center dash vents, one of mine is worse than the other
Fit on these posts:
Both have broken dash vent bearings-
That fit into a square hole in one side of the vent
And the super-floppy vent is broken-
so I replaced the one vent with one plucked out of a broken center dash bezel at the junkyard
and still having the issue of a broken vent bearing on one and a missing one on the other.
today I made a little bearing of my own out of some left-over rubber gasket material. It's not great, but the vents aren't flopping any more so it's okay while it lasts. I will use the info from the link above when these fail.
The other Bored Tuesday thing I did is replace the missing lower engine fan shroud valance clip (should be one at each end) and attach it to the fan shroud.
One of the tabs at the bottom is missing but one is enough to do the job.
01-05-2019, 04:32 PM
#3770
Contributing Member
Thread Starter
96 4Runner 304,585 miles
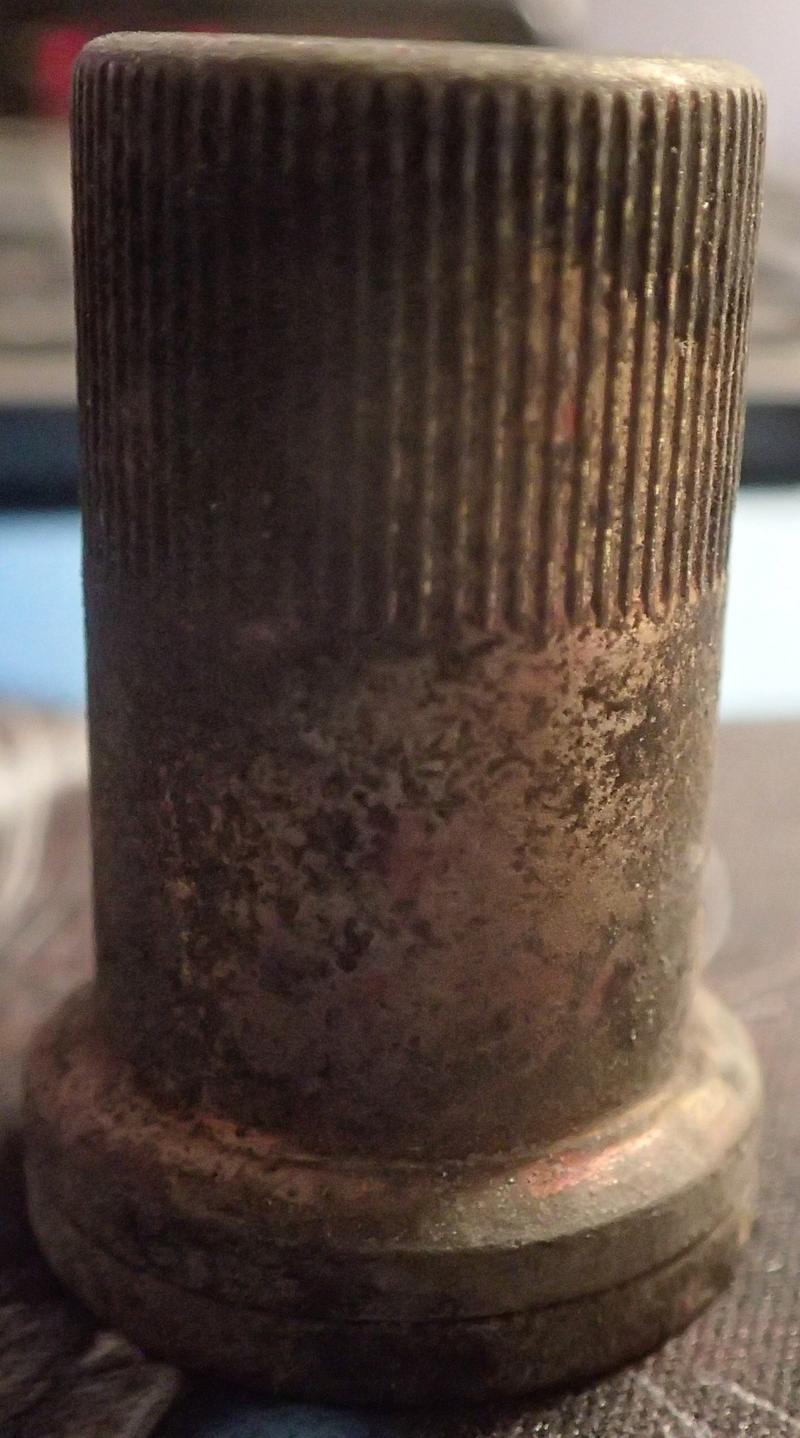
My wonderful hubby retrieved an accelerator cable for me sometime back for a project I was thinking out. When I was buttoning up the truck after the head gasket job I realized my own accelerator cable was too long to adjust any more, I was at the end of my adjustable thread rope.
The other day I remembered the 'new' accelerator cable and decided to see if it was shorter than the old one.
Easy enough. Remove the engine side of the cable from the throttle body- the orange arrows show the 14mm adjuster nuts that you'd use to tighten the cable, loosen and remove from bracket

there are a couple of retainers holding the cable in place in the engine bay, the cable just pushes free
Just above the gas pedal is the accelerator cable bracket. Unbolt the 2 bolts with 10mm socket
Follow the cable towards the right side of the screen and you can kind of see where then cable is connected to the gas pedal.
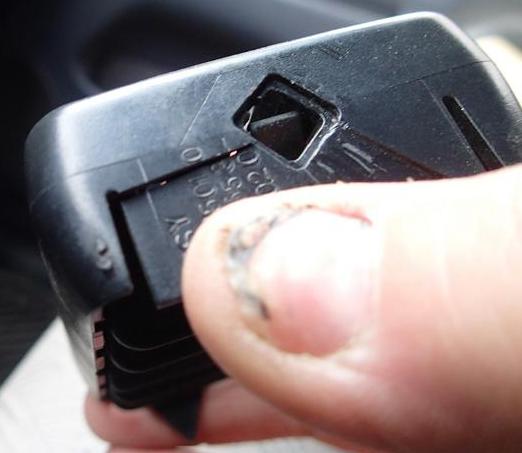
Remove the cable from the gas pedal keeper, there is a couple of tabs on the white plastic piece on the cable that fairly easily pinch together and push out towards you to release the cable

Comparing the cables, mine is about an inch longer than the junkyard one.
The next part is a lot easier if you have someone who can guide the cable into the cabin as you pull it out from your contorted position on the floorboard.
My wonderful hubby retrieved an accelerator cable for me sometime back for a project I was thinking out. When I was buttoning up the truck after the head gasket job I realized my own accelerator cable was too long to adjust any more, I was at the end of my adjustable thread rope.
The other day I remembered the 'new' accelerator cable and decided to see if it was shorter than the old one.
Easy enough. Remove the engine side of the cable from the throttle body- the orange arrows show the 14mm adjuster nuts that you'd use to tighten the cable, loosen and remove from bracket
there are a couple of retainers holding the cable in place in the engine bay, the cable just pushes free
Just above the gas pedal is the accelerator cable bracket. Unbolt the 2 bolts with 10mm socket

Follow the cable towards the right side of the screen and you can kind of see where then cable is connected to the gas pedal.
Remove the cable from the gas pedal keeper, there is a couple of tabs on the white plastic piece on the cable that fairly easily pinch together and push out towards you to release the cable
Comparing the cables, mine is about an inch longer than the junkyard one.
The next part is a lot easier if you have someone who can guide the cable into the cabin as you pull it out from your contorted position on the floorboard.
Last edited by habanero; 01-05-2019 at 04:58 PM.
01-05-2019, 04:45 PM
#3771
Contributing Member
Thread Starter
96 4Runner 304,585 miles
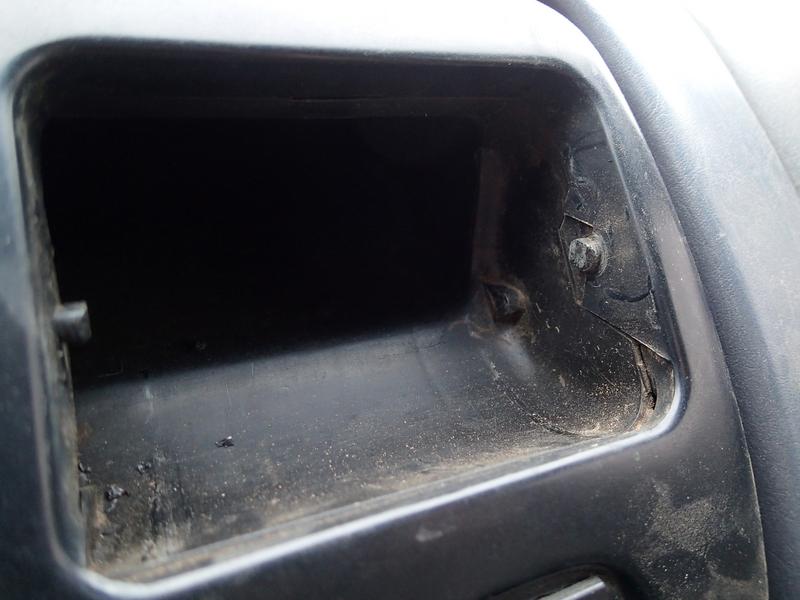
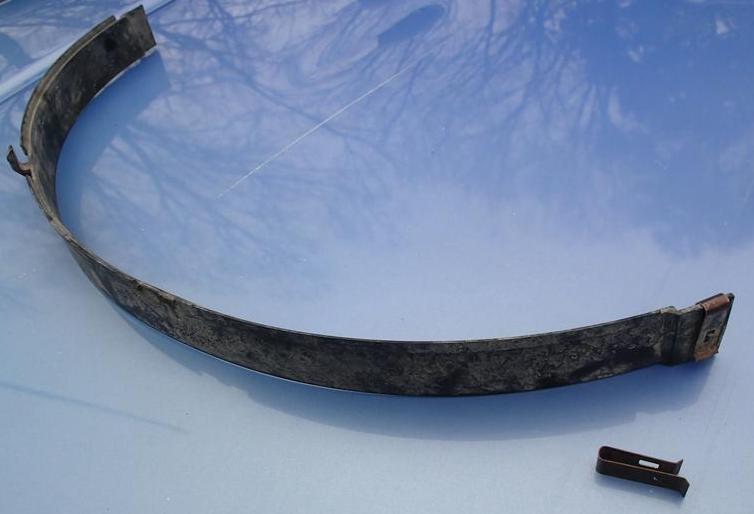
Thread the cable out of the firewall hole. It's nice to have someone guide it from the other side.
It just goes back the way it came in, adjust tension at the bracket before the throttle body.
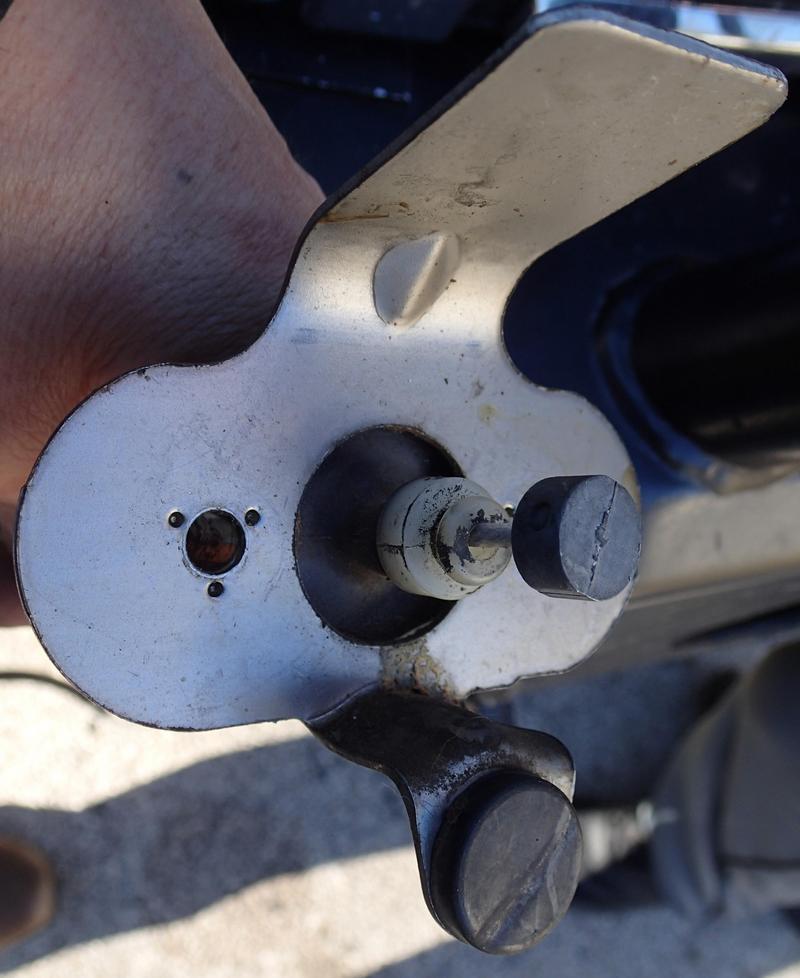
This is the orientation of the bracket as it would bolt onto the firewall. It's a pic of my old one which is missing the boot above the white keeper. That was part of the extra length, but not all of it.
The white plastic keeper behind the cable stop is keyed and only fits one way in the gas pedal bracket.
Thread the cable out of the firewall hole. It's nice to have someone guide it from the other side.
It just goes back the way it came in, adjust tension at the bracket before the throttle body.
This is the orientation of the bracket as it would bolt onto the firewall. It's a pic of my old one which is missing the boot above the white keeper. That was part of the extra length, but not all of it.
The white plastic keeper behind the cable stop is keyed and only fits one way in the gas pedal bracket.
Last edited by habanero; 02-24-2019 at 08:44 AM.
01-05-2019, 04:53 PM
#3772
Contributing Member
Thread Starter
While I was messing around today I snapped some pics of the front dif pipes because where they sit when the dif is installed it is very difficult to see what goes where.
and just 'cause
and just 'cause
01-05-2019, 05:03 PM
#3773
Contributing Member
Thread Starter
96 4Runner 304,585 miles
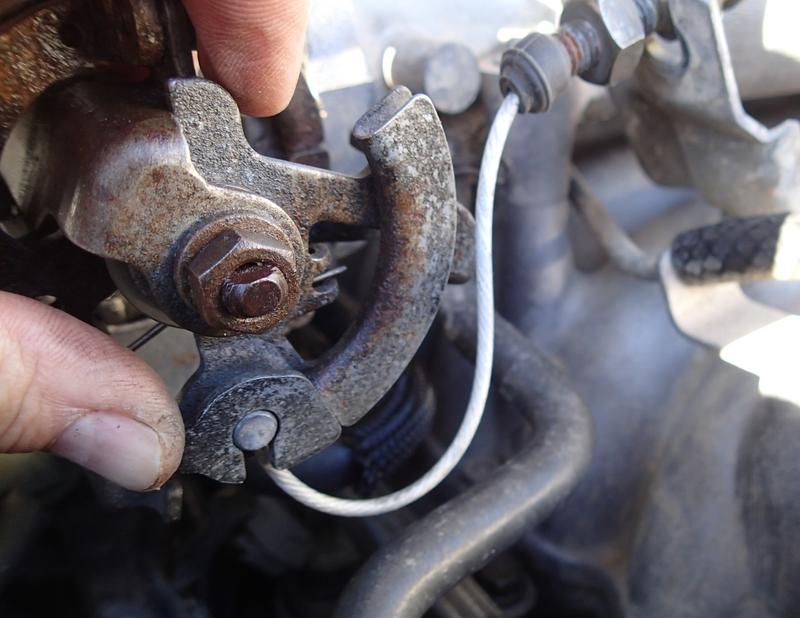
No pics, just checked to make sure the bell cranks on the rear brakes were loose and working. One was, the other was a bit stiff. The boot was full of dirt so it got cleaned up and lubed. I didn't take it apart as those bolts can break and I didn't want to make the job bigger at this time. It's working freely now.
No pics, just checked to make sure the bell cranks on the rear brakes were loose and working. One was, the other was a bit stiff. The boot was full of dirt so it got cleaned up and lubed. I didn't take it apart as those bolts can break and I didn't want to make the job bigger at this time. It's working freely now.
01-07-2019, 10:22 AM
#3774
Registered User
Join Date: Jan 2011
Location: exo-reality -wave if you see me; Front Range, CO
Posts: 667
Received 100 Likes
on
79 Posts
" I was at the end of my adjustable thread rope. " Hahaha! I see what you did there! Quite clever.
And as usual, very good job of adding to the Habanero-How-To manual. Thanks!
And as usual, very good job of adding to the Habanero-How-To manual. Thanks!
01-07-2019, 06:12 PM
#3775
Contributing Member
Thread Starter

Thanks right back at you, for the feedback.
 01-13-2019, 10:18 AM
#3776
Contributing Member
Thread Starter
Snow again! Some people give you patio furniture, I give you driveway furniture...

Hope all are safe and warm- I got home from work at 2:10 pm Friday and it was just starting to get slippery, didn't even have my hubs locked so no 4x and got home fine. It's not been driven since.
It went pretty bad in a hand basket shortly after, people taking 5-10 hours to make 20 mile drives. 10" is a lot for around here.
This stuff was of the heavy wet snowman making variety, making some hilly streets impossible for commuters to climb, and closing many of the main thoroughfares.
Spent awhile today clearing the truck off to be ready to go to work tomorrow, and locked the hubs so I'll be able to get out of the driveway. Shovel snow? I save that for the neighbors' driveways.
 01-14-2019, 04:15 AM
#3780
Contributing Member
Thread Starter
Thanks!
Please box the warm up and send it to us. Sounds like great weather.
Speaking of driveways, no worries, 4wd and off I went. It was a 3 second Monday wheeling adventure.
Sounds like you had some decent weather too. Nice.
We shoveled neighbor driveways and sidewalks (since we don't bother with our own), helped a couple of other neighbors to get unstuck, urban hiked to lunch and the grocery store for some Matzo meal for Matzoball soup for my cold which is my version of chicken noodle soup, sat around the fire pit on the patio and watched the dog try to steal the sled from the kid. Hilarity ensued. It was a good weekend, hope it was the same for all of you, too.
For people stuck driving in it on Friday- not so much:
The Missouri State Highway Patrol said it has responded to nearly 4,000 calls for help and rescued nearly 1,800 stranded motorists. State police recorded 878 crashes on interstates and highways. Fifty-seven people were injured and four died in those traffic accidents.
Please box the warm up and send it to us. Sounds like great weather.
Sounds like you had some decent weather too. Nice.
We shoveled neighbor driveways and sidewalks (since we don't bother with our own), helped a couple of other neighbors to get unstuck, urban hiked to lunch and the grocery store for some Matzo meal for Matzoball soup for my cold which is my version of chicken noodle soup, sat around the fire pit on the patio and watched the dog try to steal the sled from the kid. Hilarity ensued. It was a good weekend, hope it was the same for all of you, too.
For people stuck driving in it on Friday- not so much:
The Missouri State Highway Patrol said it has responded to nearly 4,000 calls for help and rescued nearly 1,800 stranded motorists. State police recorded 878 crashes on interstates and highways. Fifty-seven people were injured and four died in those traffic accidents.


