
habanero's 1996 4Runner Build-Up Thread
 08-10-2018, 04:05 AM
#3601
Contributing Member
Thread Starter

At least things usually work out. Mostly....
I was reviewing just the first lump of Elephant Hill, saw that I got out and checked that front right corner that I lost the upper a-arm nut off of 4 times because it was bugging me. I know I checked that stupid nut (as well as the upper and lower ball joints and sway bar link) and never did see anything wrong. Should've put a wrench to it rather than just eyeballs. Noted for next time- trust gut feelings and use a wrench(es) to confirm.
 08-10-2018, 01:19 PM
#3602
Contributing Member
Thread Starter
96 4Runner, still 303,289 miles
Replaced the broken front dif breather today. Just used one pulled from the junkyard that was in good shape. Instead of the original hose I used 5/16" and about twice as long to extend it up from the bottom of the inner fender. The new hose clipped into the 2 keepers just fine....
After trimming the new hose was about twice the length of the old one. The hose clamp came off the old hose at the metal line that comes off the top of the dif, just follow the old hose down. It's kinda tight in there- have fun.
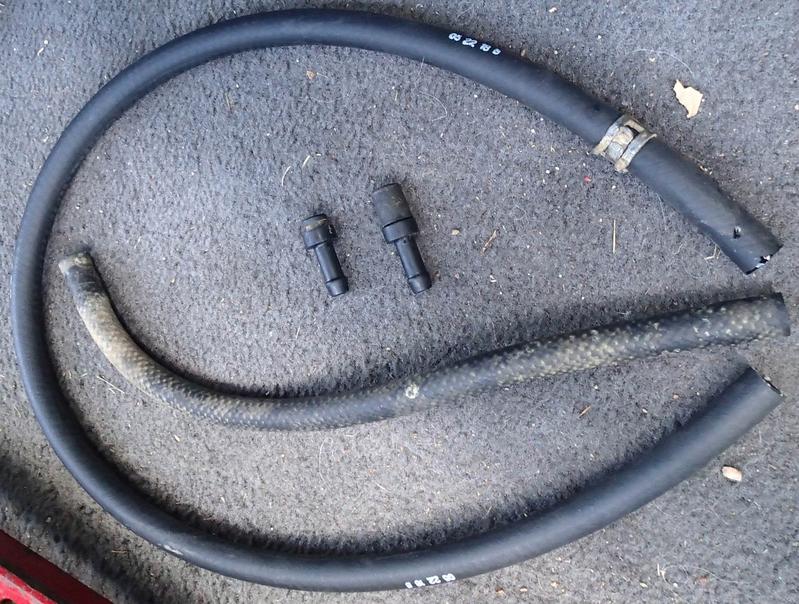
I hadn't really planned to do more than stick it in there somewhere- it ended up zip-tied to the big bracket by the intake, plus it's also being held by the two original keepers.
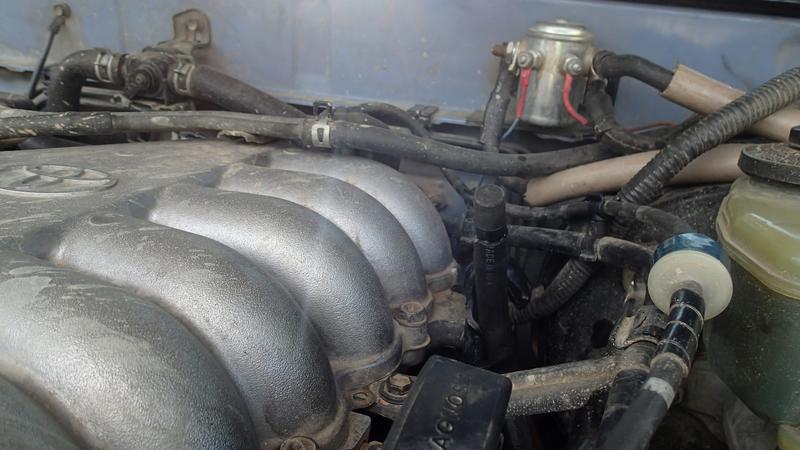
There's other breathers on the tranny for sure that are lower and they're not going to be as easy to move. I just did this one because of the broken breather.
Getting that little hose clamp back on was obnoxious and I have kinda big but scrawny hands.
Replaced the broken front dif breather today. Just used one pulled from the junkyard that was in good shape. Instead of the original hose I used 5/16" and about twice as long to extend it up from the bottom of the inner fender. The new hose clipped into the 2 keepers just fine....
After trimming the new hose was about twice the length of the old one. The hose clamp came off the old hose at the metal line that comes off the top of the dif, just follow the old hose down. It's kinda tight in there- have fun.
I hadn't really planned to do more than stick it in there somewhere- it ended up zip-tied to the big bracket by the intake, plus it's also being held by the two original keepers.
There's other breathers on the tranny for sure that are lower and they're not going to be as easy to move. I just did this one because of the broken breather.
Getting that little hose clamp back on was obnoxious and I have kinda big but scrawny hands.
08-12-2018, 04:29 PM
#3603
Contributing Member
Thread Starter
96 4Runner 303,299 miles
There was one 3rd gen at one of the junkyards that we hit that still had its suspension so I was able to get the washer and nut to replace the one I lost on the passenger side upper a-arm bolt.
Was going to snag both sides for in cases but that 4Runner had apparently also lost its passenger side washer and nut at some point- what was on there was not stock.
08-15-2018, 04:51 PM
#3604
Contributing Member
Thread Starter
96 4Runner 303,307 miles
Replace the flap for the air vent because a lot of dust gets into the car off-road without one.
So I have no idea when the flap left the building. There is no time I can remember one being there but being under the left (driver) rear bumper wing makes it one of those things you don't really think about. At least, until you get tired of dust baths! I did notice it was not there when putting my rear bumper on since it sits in the back left corner right above the vent. At that point I didn't know it was supposed to have a flap or I would have made one then when it would have been easy.
I used the blow gun to create giant clouds of dust shooting out the cargo area, dust was on everything and also behind the left cargo area panel.
Anywho, we were on a junkyard date (my favorite kind) when I spotted a newer style vent and decided it was time to deal with the flapless vent. The newer one has a smaller flap area and a wiring plug right next to it. It's yellow rather than the white my older one is.
This particular one is also missing its flap.
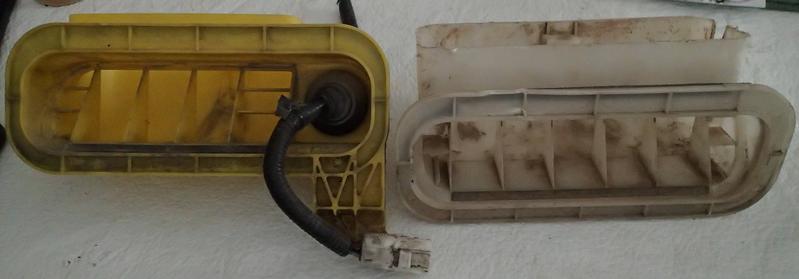
The hole in the old one accommodates the OBA bracket. I will have to do similar to the new one, just not as deep because of where it sits.
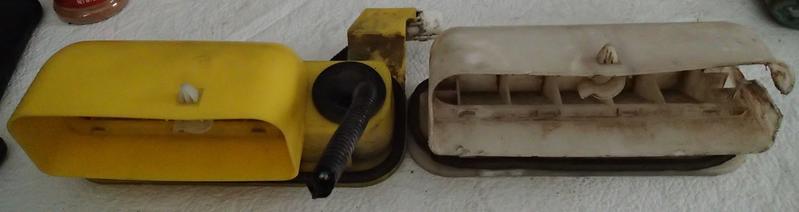
I found some 6x6" rubber gasket material and got to work on a pattern.
Dangerously cheesy.

Then used the pattern to make a rubber flap. Where those 3 posts are we are going to add arrow shapes.
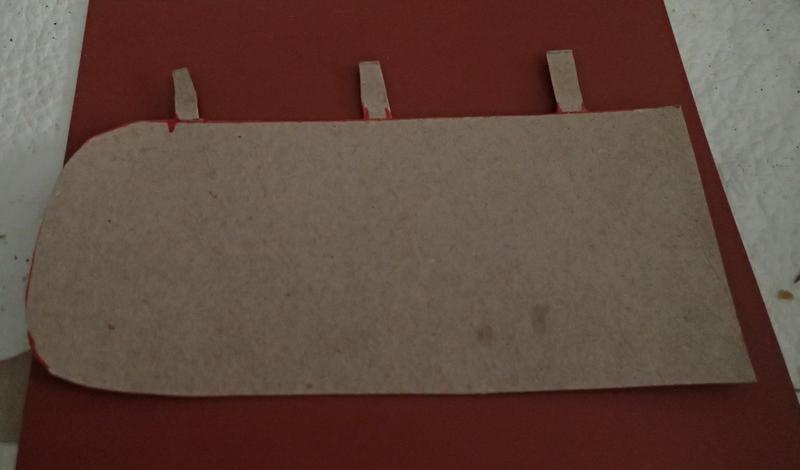
The arrows are inserted into the provided holes (good thing you can't see this part from anywhere in or out of the truck!)

And voila- flapper

The really really really really tricky part is removing the old vent and reinstalling the new one WITHOUT REMOVING THE BUMPER!
I absolutely do not recommend it. Some trimming of the vent was involved, maybe a few pretty words, and more patience than I knew I had. It would not have worked if it hadn't been a 4xInnovations bumper built for a 1" body lift and that was crazy tight. I didn't want to mess with the inevitable Missouri-style broken bolts from attempting to remove the bumper.
Other than that working on weeding out the vacation pics. It's been a bit hectic around here between vacation detritus, school starting and all the getting done of......well, I have no idea what I'm getting done, but attempts are being made!
Replace the flap for the air vent because a lot of dust gets into the car off-road without one.
So I have no idea when the flap left the building. There is no time I can remember one being there but being under the left (driver) rear bumper wing makes it one of those things you don't really think about. At least, until you get tired of dust baths! I did notice it was not there when putting my rear bumper on since it sits in the back left corner right above the vent. At that point I didn't know it was supposed to have a flap or I would have made one then when it would have been easy.
I used the blow gun to create giant clouds of dust shooting out the cargo area, dust was on everything and also behind the left cargo area panel.
Anywho, we were on a junkyard date (my favorite kind) when I spotted a newer style vent and decided it was time to deal with the flapless vent. The newer one has a smaller flap area and a wiring plug right next to it. It's yellow rather than the white my older one is.
This particular one is also missing its flap.
The hole in the old one accommodates the OBA bracket. I will have to do similar to the new one, just not as deep because of where it sits.
I found some 6x6" rubber gasket material and got to work on a pattern.
Dangerously cheesy.
Then used the pattern to make a rubber flap. Where those 3 posts are we are going to add arrow shapes.
The arrows are inserted into the provided holes (good thing you can't see this part from anywhere in or out of the truck!)
And voila- flapper
The really really really really tricky part is removing the old vent and reinstalling the new one WITHOUT REMOVING THE BUMPER!
I absolutely do not recommend it. Some trimming of the vent was involved, maybe a few pretty words, and more patience than I knew I had. It would not have worked if it hadn't been a 4xInnovations bumper built for a 1" body lift and that was crazy tight. I didn't want to mess with the inevitable Missouri-style broken bolts from attempting to remove the bumper.
Other than that working on weeding out the vacation pics. It's been a bit hectic around here between vacation detritus, school starting and all the getting done of......well, I have no idea what I'm getting done, but attempts are being made!
Last edited by habanero; 08-15-2018 at 05:01 PM.
08-15-2018, 07:18 PM
#3605
Registered User
Nice!
Less dust!
I need to put new rubber flappers on my vents on my 1987 Truck. They are located in the "B" pillar. Right now there are only a few pieces of dry, hard rubber just floating around in the vent somewhere.....

Less dust!
I need to put new rubber flappers on my vents on my 1987 Truck. They are located in the "B" pillar. Right now there are only a few pieces of dry, hard rubber just floating around in the vent somewhere.....
 08-16-2018, 05:32 AM
#3606
Contributing Member
Thread Starter
Less dust will be nice. When the OBA air filter that sits in the top back corner in the cargo area gets dusty enough to have to wash out- that's a lot of dust! Hopefully the B-pillar is easier access!
08-16-2018, 06:09 AM
#3607
Contributing Member
Thread Starter
96 4Runner 303,307 miles
Door open light in instrument cluster not working.
Quick repair before work.
I don't remember if I ever how-to'd removing the instrument cluster....
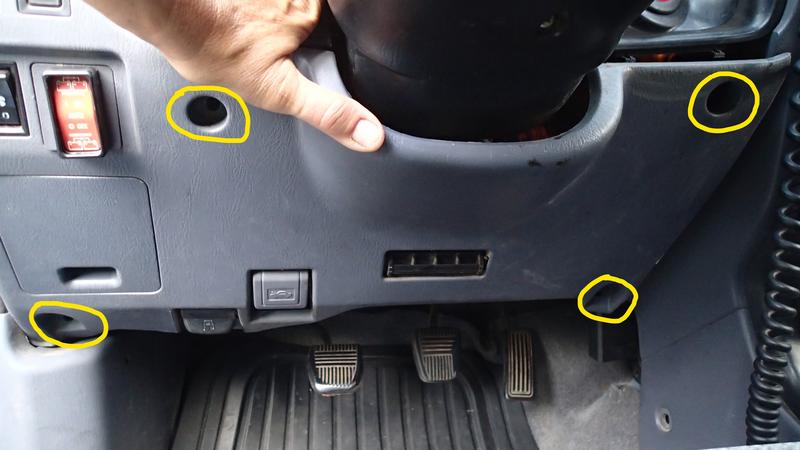
unbolt 4- 10mm bolts, let it sag down. Unclip any switches that are impeding your progress:
The ignition surround gently pops off next

Backside of ignition surround
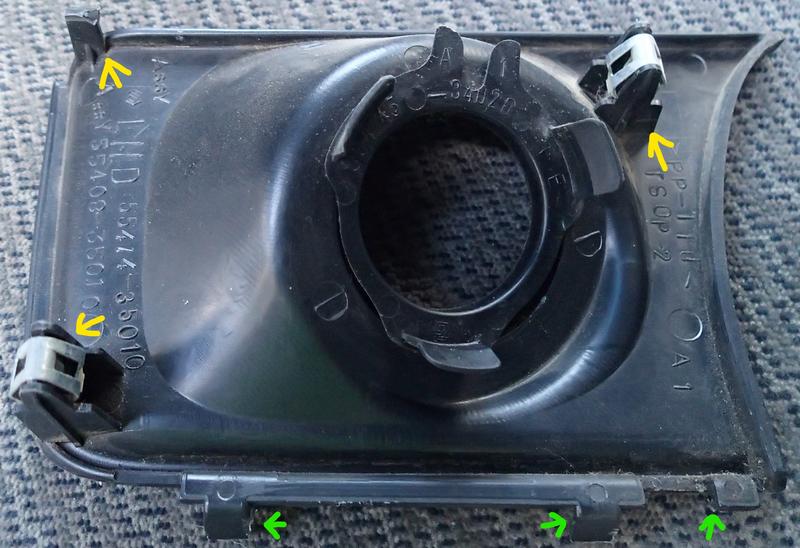
Next comes the cluster surround. 4 Phillips screws
2 up here
One down in this corner (the lower one holds the ductwork iirc, leave it alone)
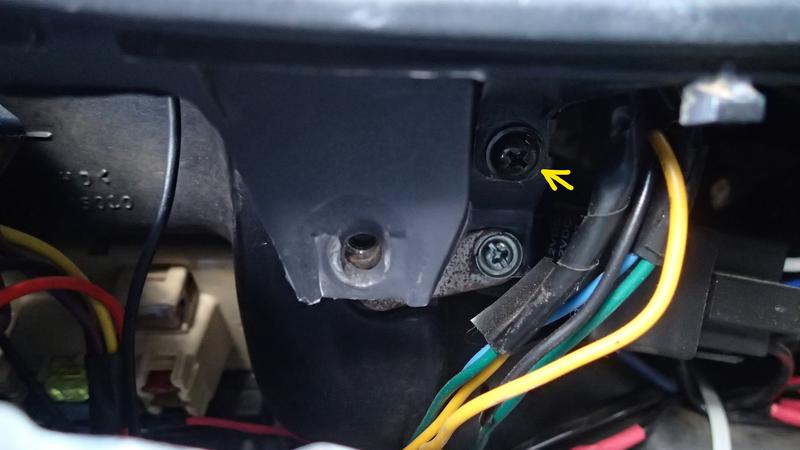
And one on this other corner
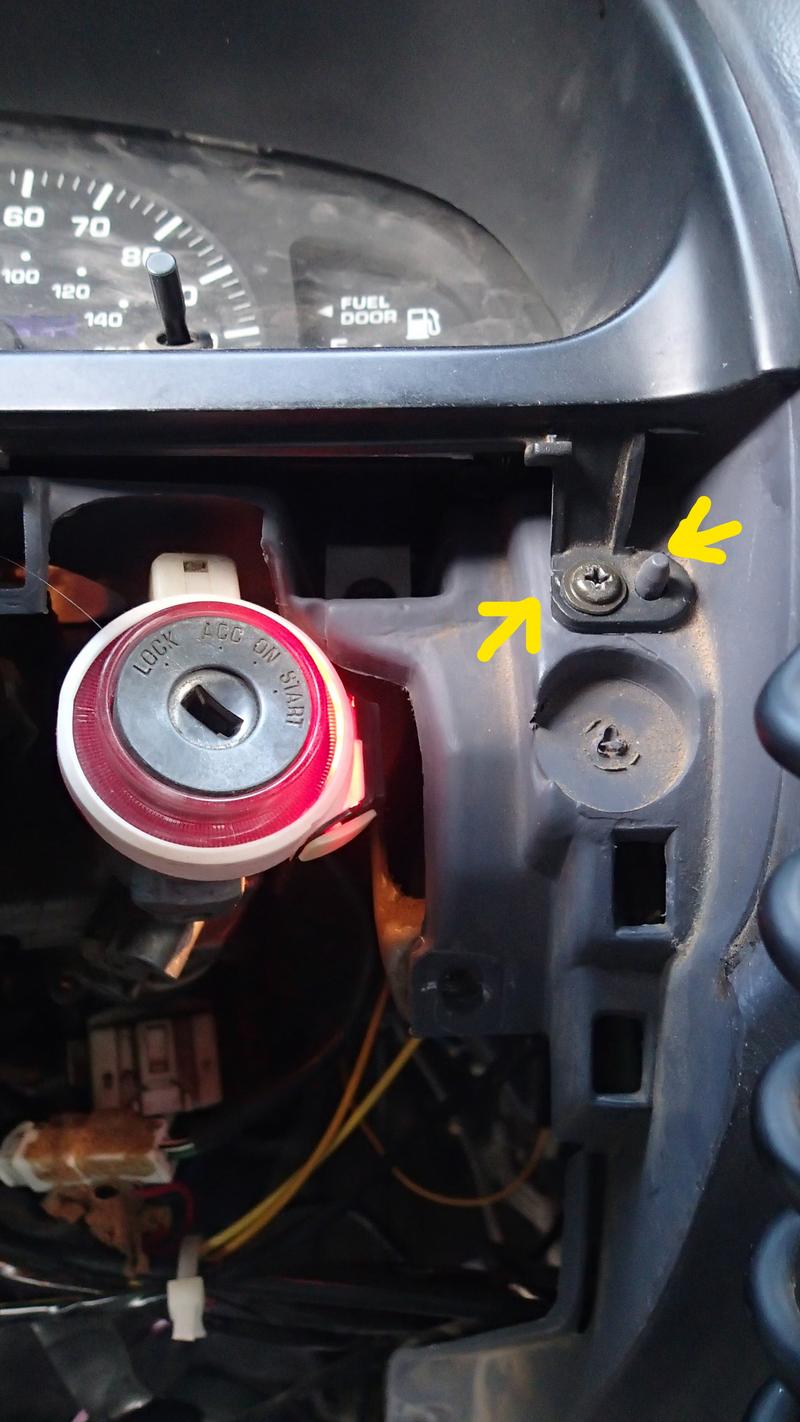
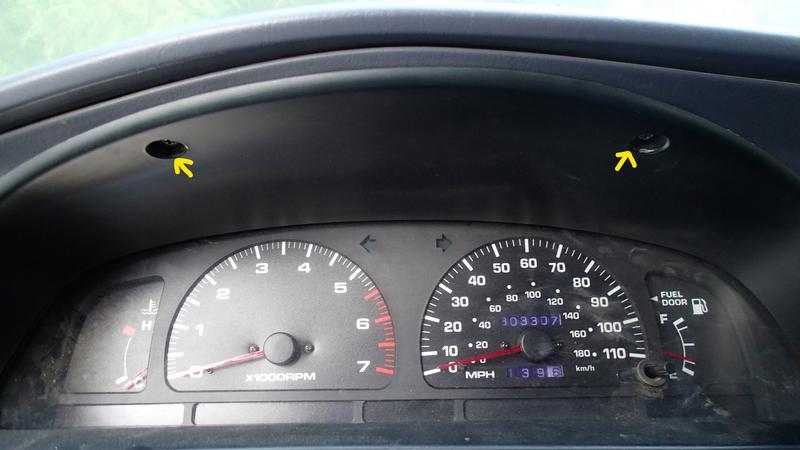
The cluster surround slides off the post shown in the above pic and also here near the dimmer:

I was able to swing the cluster surround out of my way after unplugging the dimmer switch.
If you ever need to remove the dimmer pop off the dimmer knob, unscrew the nut. Easy peasy.
Door open light in instrument cluster not working.
Quick repair before work.
I don't remember if I ever how-to'd removing the instrument cluster....
unbolt 4- 10mm bolts, let it sag down. Unclip any switches that are impeding your progress:
The ignition surround gently pops off next
Backside of ignition surround
Next comes the cluster surround. 4 Phillips screws
2 up here
One down in this corner (the lower one holds the ductwork iirc, leave it alone)
And one on this other corner
The cluster surround slides off the post shown in the above pic and also here near the dimmer:
I was able to swing the cluster surround out of my way after unplugging the dimmer switch.
If you ever need to remove the dimmer pop off the dimmer knob, unscrew the nut. Easy peasy.
Last edited by habanero; 06-22-2019 at 10:23 AM.
08-16-2018, 06:17 AM
#3608
Contributing Member
Thread Starter
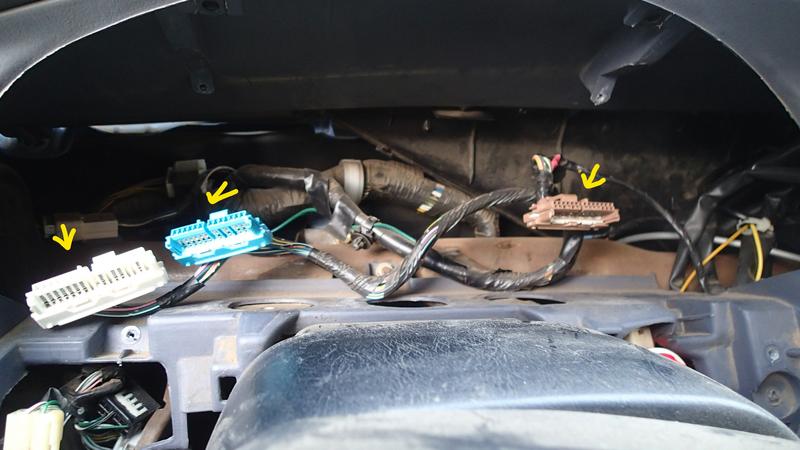
Time for the cluster:
unscrew 4 phillips screws

Cluster comes out, unplug to remove entirely (3 on mine)
unscrew 4 phillips screws
Cluster comes out, unplug to remove entirely (3 on mine)
08-16-2018, 06:27 AM
#3609
Contributing Member
Thread Starter
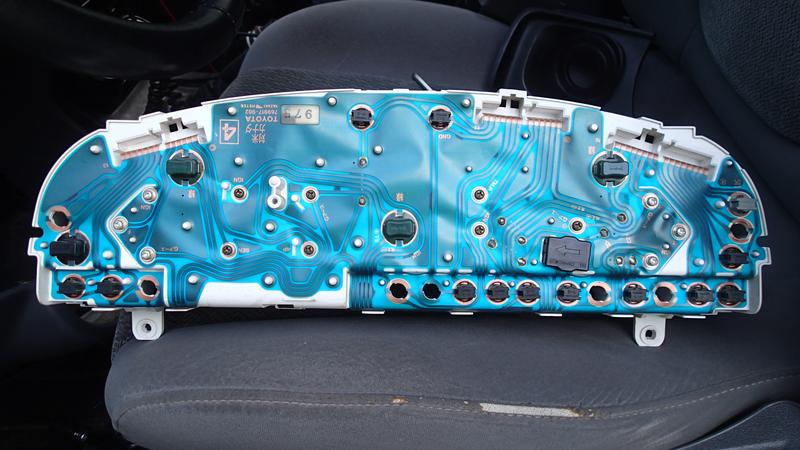
The light came on and went off intermittently
Looks like it's just a worn contact. Worn weirdly.
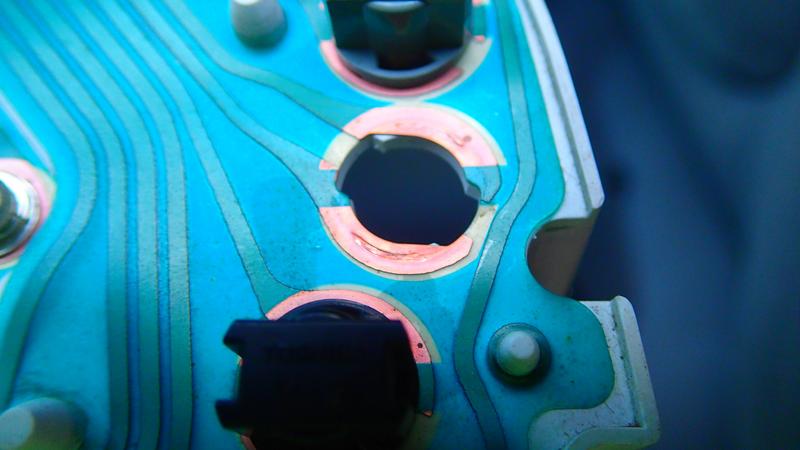
To remove the bulb twist and remove
The bulb's contacts were easily bent very slightly for better contact. All is good again.
I suppose I'll have to get some of the circuit board repair paint stuff as the cluster ages.
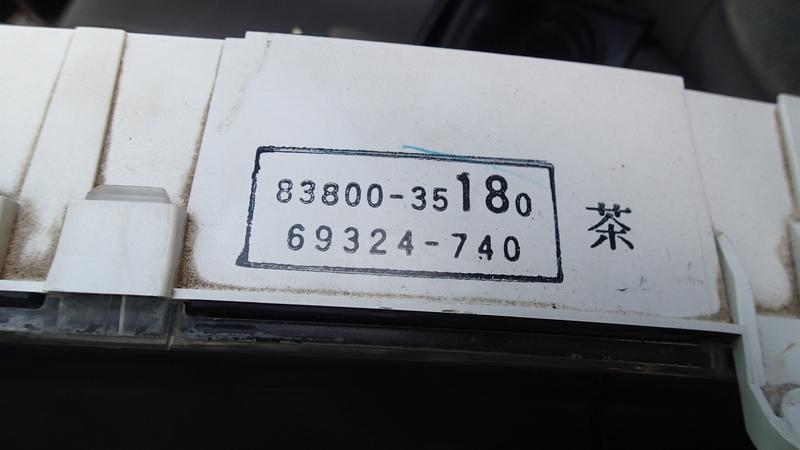
And for future reference, the part number on my particular cluster
Looks like it's just a worn contact. Worn weirdly.
To remove the bulb twist and remove
The bulb's contacts were easily bent very slightly for better contact. All is good again.
I suppose I'll have to get some of the circuit board repair paint stuff as the cluster ages.
And for future reference, the part number on my particular cluster
Last edited by habanero; 08-16-2018 at 06:38 AM.
08-18-2018, 05:33 PM
#3610
Contributing Member
Thread Starter
96 4Runner 303,315 miles
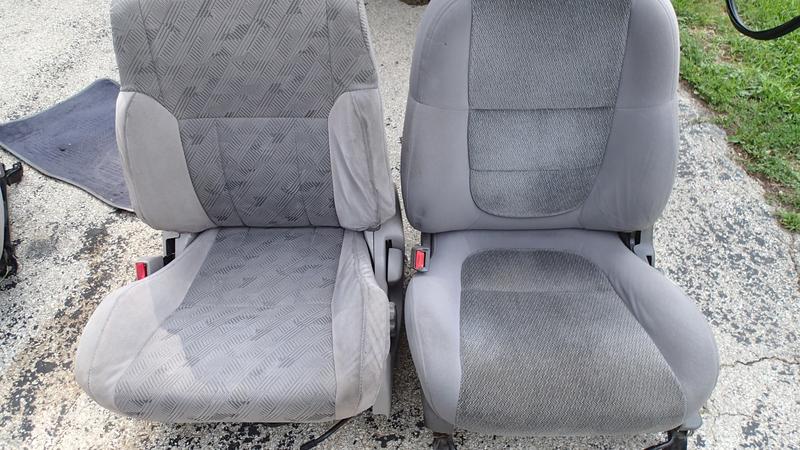
Junkyard run today! Finally found some 4Runner front seats that match the rear ones I put in a looooong time ago. Driver's left bolster is not great but not horrible. I stuffed some batting in there to help reshape it. It's a little lumpy but I'll take that over droopy. May have to look into one day replacing the foam.
'01 4Runner vs 95 Mazda seats I've had in there awhile. Mazda seats actually still look good and are pretty comfortable, but the driver's stitching is coming apart so I've been sorta on the look-out. Finding non-trashed 4Runner seats in grey is difficult around here! Pic is before the left bolster was...bolstered....
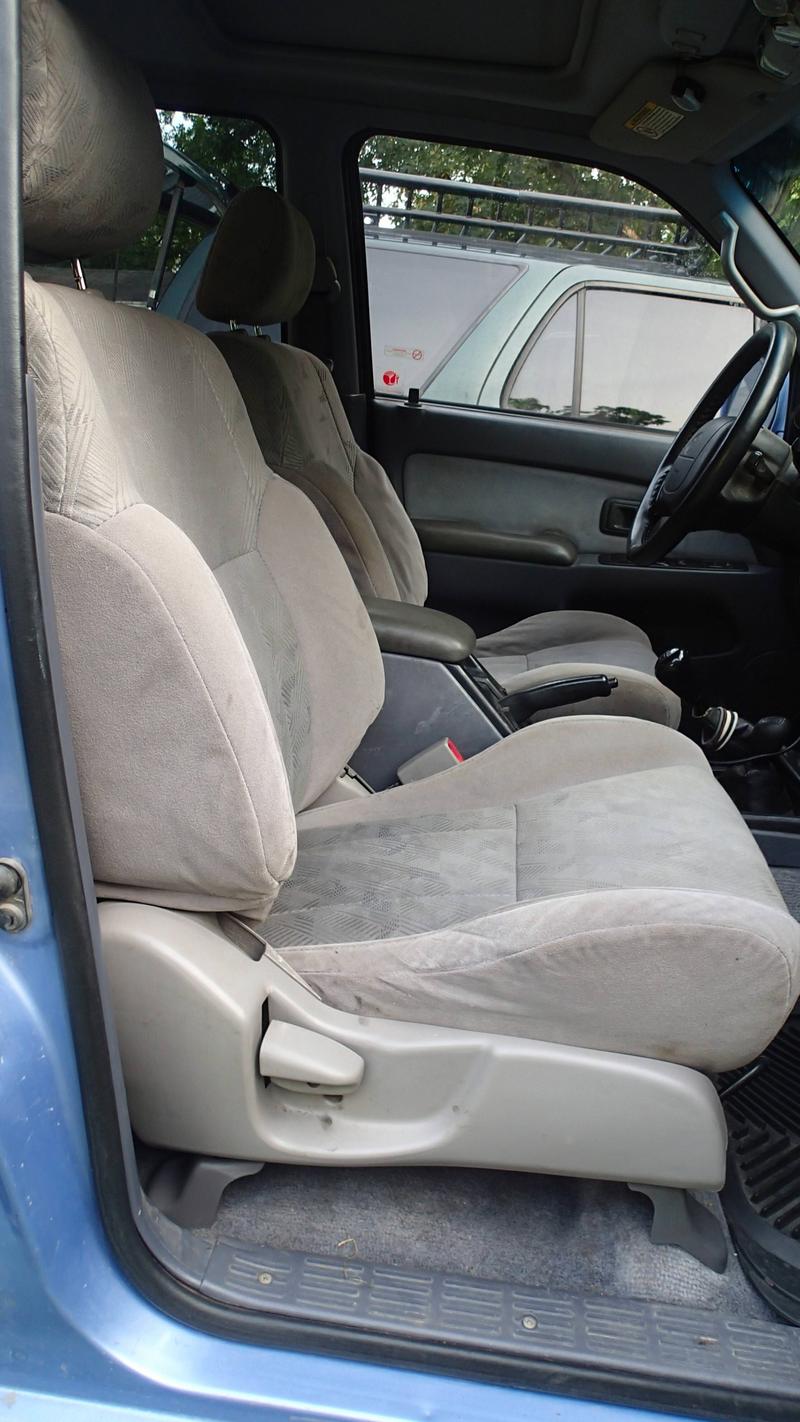
And in the truck with the stuffed bolster. My eyeball doesn't see the lumps like the camera does
While I was there I saw the seal (?) for the door was in decent shape for what I usually see. They threw that in with the price of the seats.
Super easy to remove- take out the door sill (4 phillips), the kick panel (pops off forward and a little up), and the lower b-pillar panel (pops off)
Pull off old one, push new one onto body lip, will fit without removing the upper trim. There is some of the sticky black goop that Toyota likes to use on some things, not a lot.
Mine
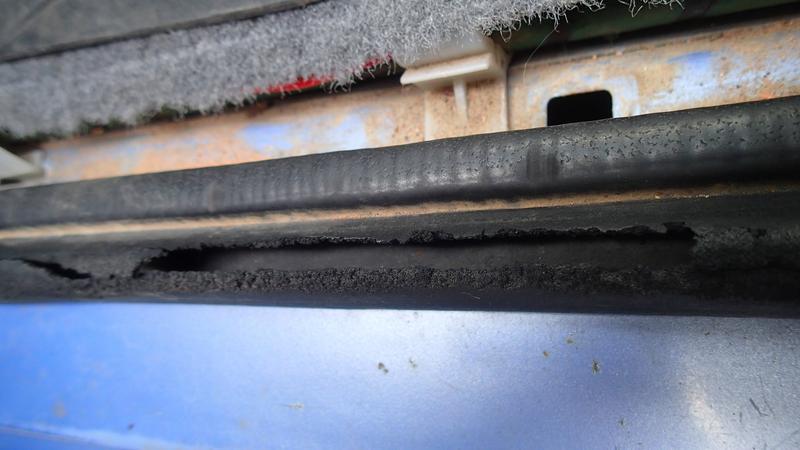
The new one:

Junkyard run today! Finally found some 4Runner front seats that match the rear ones I put in a looooong time ago. Driver's left bolster is not great but not horrible. I stuffed some batting in there to help reshape it. It's a little lumpy but I'll take that over droopy. May have to look into one day replacing the foam.
'01 4Runner vs 95 Mazda seats I've had in there awhile. Mazda seats actually still look good and are pretty comfortable, but the driver's stitching is coming apart so I've been sorta on the look-out. Finding non-trashed 4Runner seats in grey is difficult around here! Pic is before the left bolster was...bolstered....
And in the truck with the stuffed bolster. My eyeball doesn't see the lumps like the camera does
While I was there I saw the seal (?) for the door was in decent shape for what I usually see. They threw that in with the price of the seats.
Super easy to remove- take out the door sill (4 phillips), the kick panel (pops off forward and a little up), and the lower b-pillar panel (pops off)
Pull off old one, push new one onto body lip, will fit without removing the upper trim. There is some of the sticky black goop that Toyota likes to use on some things, not a lot.
Mine
The new one:
08-19-2018, 06:41 AM
#3611
Registered User
Nice seats!
08-19-2018, 02:17 PM
#3612
Contributing Member
Thread Starter
08-21-2018, 06:10 PM
#3614
Contributing Member
Thread Starter
Besides, it would have to be a really long u-shaped thermos for it to get in the way of 4th gear from my cupholder!

There under the clock.....you might be remembering the 99 or that I added part of the new-style center console to my 96, but not the cupholder part.
(Still going to agree the short-throw would feel 'sporty'...better save it for the hubby's Volvo 240 station wagon. For real. Vroooom!)

 08-21-2018, 06:53 PM
#3616
Contributing Member
Thread Starter
Completely agree old87yota!!!
08-22-2018, 04:52 AM
#3617
Registered User

And my old Volvo has a really long shifter on it, I think it's a bit over 2 feet? Reaches way up under the dash. It's a 1940's design that Volvo built in 1963.
08-22-2018, 05:51 AM
#3618
Contributing Member
Thread Starter
08-22-2018, 07:26 AM
#3619
Oh yeah, it wouldn't make much different for the pre-99 cupholder!
One thing I like with the short shifter is the 1-2 or 2-1 shift speed while in 4LO. I'm able to get into another gear quicker and not lose (or gain!) momentum on a hill.
But in general I agree that the longer throw is fun. I had a shifter extension on my 1st gen so it felt like an FJ60
One thing I like with the short shifter is the 1-2 or 2-1 shift speed while in 4LO. I'm able to get into another gear quicker and not lose (or gain!) momentum on a hill.
But in general I agree that the longer throw is fun. I had a shifter extension on my 1st gen so it felt like an FJ60
08-22-2018, 11:19 AM
#3620
Contributing Member
Thread Starter
Oh yeah, it wouldn't make much different for the pre-99 cupholder!
One thing I like with the short shifter is the 1-2 or 2-1 shift speed while in 4LO. I'm able to get into another gear quicker and not lose (or gain!) momentum on a hill.
But in general I agree that the longer throw is fun. I had a shifter extension on my 1st gen so it felt like an FJ60
One thing I like with the short shifter is the 1-2 or 2-1 shift speed while in 4LO. I'm able to get into another gear quicker and not lose (or gain!) momentum on a hill.
But in general I agree that the longer throw is fun. I had a shifter extension on my 1st gen so it felt like an FJ60
but still also agree with longer throw goodness.


