
VSC / TRAC defeating - is anyone closer?

 02-27-2005, 05:26 AM
#343
Contributing Member
Thread Starter

I did verify my previous suggestion of opening the ingnition wire (#D7). The same as pulling the fuse. It did shut everything down and reset all when power was restored without have to turn the truck off and back on.
I forgot to ask you this the other week: when you opened the ignition wire, did it shut down TRAC, VSC and the ABS, or only TRAC? I am hoping that it shut down at least TRAC and VSC.
Andreas
02-28-2005, 06:07 PM
#344
Contributing Member
Thread Starter
Gave the wife a taste of the ANDYMOD� tonight - she was impressed.
Even more impressed that the truck would be back to 'normal' tomorrow morning...
Andreas
Even more impressed that the truck would be back to 'normal' tomorrow morning...
Andreas
02-28-2005, 07:43 PM
#345
Contributing Member
Join Date: Sep 2002
Location: Santa Clarita, California
Posts: 4,749
Likes: 0
Received 0 Likes
on
0 Posts
i've been catching up with this thread lately. good work! i pulled the pressor sensor off the master cylinder today...oh boy, what new found freedom! i coulda opened up shop i was serving so many donuts. and now i see there's a handy way to install a switch, i'll read up on that some more now. 
03-01-2005, 06:54 AM
#347
Registered User
Join Date: Mar 2003
Location: Marysville
Posts: 669
Likes: 0
Received 0 Likes
on
0 Posts
You need (in the final writeup) to take pics and label the pins of what to cut and where...
Id be interested in hearing from more tech saavy ppl, in creating a dummy load for the traction control... Rob suggested finding out what the output for the wheel speed sensors are at normal operation and create a dummy load to switch to... that way we could turn off and on the dummy load at any time w/o having to turn off the rig.
or the Andymod works...
Originally Posted by aowRS
Coda,
Send it to me and I'll post it here for you - aowalter@comcast.net.
Congrats on moving forward!
Here goes:

Andreas
Send it to me and I'll post it here for you - aowalter@comcast.net.
Congrats on moving forward!
Here goes:
Andreas
03-01-2005, 07:00 AM
#348
Contributing Member
Thread Starter
Ducky,
I presume you are referring to Coda99's drawing? I really like his idea and intend to follow suit as soon as he has it ironed out.
I used my setup last night in the snow and it works great. I'll post a pic later of how I modified the rocker switch to look like a stock TRAC OFF switch.
Andreas
I presume you are referring to Coda99's drawing? I really like his idea and intend to follow suit as soon as he has it ironed out.
I used my setup last night in the snow and it works great. I'll post a pic later of how I modified the rocker switch to look like a stock TRAC OFF switch.
Andreas
03-01-2005, 07:06 AM
#349
Contributing Member

Join Date: Dec 2003
Location: boston, ma
Posts: 6,729
Likes: 0
Received 0 Likes
on
0 Posts
Originally Posted by aowRS
Scott,
I'll do a write-up on the ANDYMOD� when I get back on Monday - leaving in a few hours for Florida!
Andreas
I'll do a write-up on the ANDYMOD� when I get back on Monday - leaving in a few hours for Florida!
Andreas
anyway, if you want, i can host your writeup on my site.
regardless, please do the writeup!!

 03-01-2005, 08:04 AM
#350
Contributing Member
Thread Starter
Lee,
We were in Orlando from Thursday night until last night. Pretty sketchy weather!
As for a write-up, the ANDYMOD� is actually so easy that I'll give the steps here. As soon as I have a second, I'll grab a pic of the switch.
Parts:
- (1) On/Off rocker switch. I used one of the standard factory foglight rocker switches (Toyota part# 550-35976).
- 8' of 18 gauge automotive wire. This is for two lengths between the switch and the master cylinder.
- (2) female spade connectors to be used at the switch
- (2) barrel connectors, crimp-on style.
- Electrical tape
- Heat shrink tubing (optional)
- Zip ties
Tools:
- Wire cutters
- Wire stripper/crimper
- Razor blade
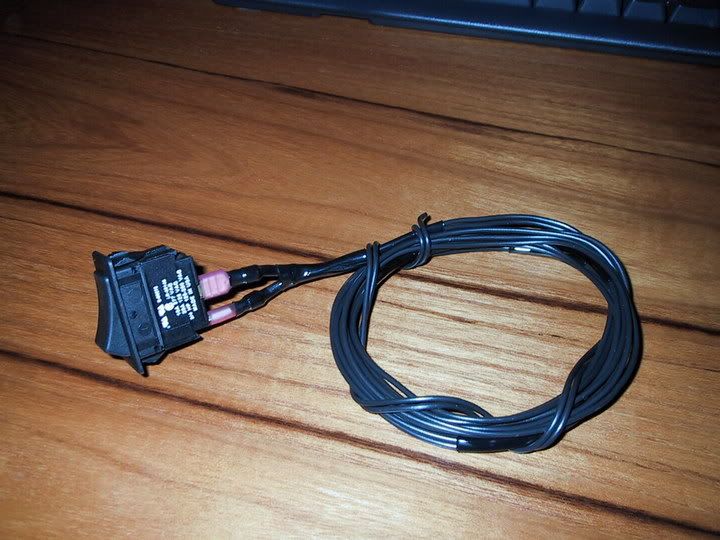
Before doing anything on the 4Runner, I made a wiring harness using the rocker switch, spade connectors, and wiring. The actual distance from where the switch mounts to where you will tie in to the ground wire is very short. I just used two 4' lengths of wire to make sure I had plenty of slack and also to make feeding it through the firewall grommet easier. If you go this route, you can chose to heat shrink the spade connectors and the wire, or use electrical tape.
Once you have the 'harness' made, take it and the barrel connectors to the truck. Pop one of the remaining factory switch blanks out and insert your harness into the void. It may help to pop the fuse access panel off. From there you will need to get the two wires through the firewall grommet (directly below the master cylinder). I found that inserting a long zip tie from the engine compartment side was sufficient to use as a 'fish' tool. You'll need something to guide the wires through the rubber grommet. Gently push your tool of choice through the grommet (above the existing factory harness) until you can see it from under the dash area. Tape your wiring harness to the tool and then gently pull from the engine compartment side. A flashlight comes in handy here.
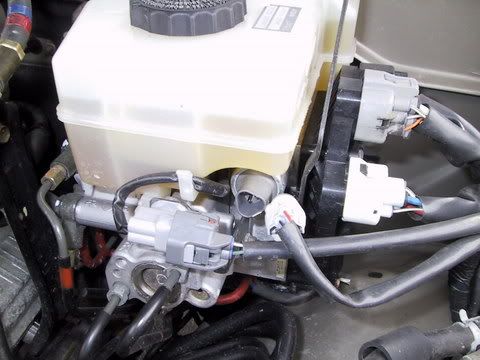
Once you have pulled the wires through the grommet, check to see if they come in contact with any sharp edges under the dash. In my case, I routed them cleanly and then zip tied them on to existing wire bundles. Now you are ready to identify and cut the correct wire at the master cylinder. Pull the pressure sensor connector out from the master cylinder and undo any tape that keeps it bound to the other harnesses. You will see red, black, and white wires right at the connector. The red wire is the ground wire and is used for this modification. Rather than spend 10 minutes explaining how to expose the wire, I'll just state that you will need to make your splice a few inches back from the connector. Carefully open up the black plastic covering and then the grey shielding that covers the three wires (razor blade). When you have exposed the wires enough, you will need to cut the red wire. Use the crimp-on barrel connectors to attach your new 'harness' to the exposed ends of the red wire. If you have not worked on automotive wiring before, or are unsure of stripping, crimping, etc., please do not attempt this. Once your harness is spliced in and covered (tape or heat shrink), you will want to get everything wrapped again properly. At this point you are almost done.
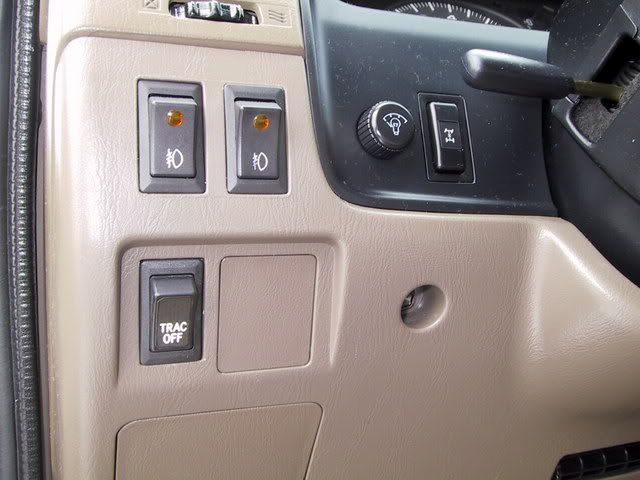
I situated my rocker switch so that the bottom half is pressed in when it is in the off position. This matches the orientation of my two other rocker switches. If you find that it is reversed, you can simply rotate the switch 180 degrees or switch the connectors on the back of the switch.
For what its worth, I made my own "TRAC OFF" label by scanning the factory TRAC OFF switch, darkening the image, and printing it on a standard mailing label. A few coats of satin polyurethane spray on the actual rocker portion, and it looks pretty damn nifty.
Make sure the pressure connector is plugged back in and start the truck. If the ABS, TRAC and VSC lights come on, then the switch is "On". It's up to you to determine how you want your switch oriented. Once you have it setup so that the switch is in the "Off" position, start the truck and make sure all of the system lights go out. At this point, flip the switch and watch that the lights come on. You have now interrupted the ground for the pressure sensor connector and can operate the truck without any TRAC or VSC intervention. Flip the switch to "Off" and restart the truck. All systems should be back to normal.
Harness:
Pressure sensor connector:
"TRAC OFF" switch:
Hope that helps!
Andreas
We were in Orlando from Thursday night until last night. Pretty sketchy weather!
As for a write-up, the ANDYMOD� is actually so easy that I'll give the steps here. As soon as I have a second, I'll grab a pic of the switch.
Parts:
- (1) On/Off rocker switch. I used one of the standard factory foglight rocker switches (Toyota part# 550-35976).
- 8' of 18 gauge automotive wire. This is for two lengths between the switch and the master cylinder.
- (2) female spade connectors to be used at the switch
- (2) barrel connectors, crimp-on style.
- Electrical tape
- Heat shrink tubing (optional)
- Zip ties
Tools:
- Wire cutters
- Wire stripper/crimper
- Razor blade
Before doing anything on the 4Runner, I made a wiring harness using the rocker switch, spade connectors, and wiring. The actual distance from where the switch mounts to where you will tie in to the ground wire is very short. I just used two 4' lengths of wire to make sure I had plenty of slack and also to make feeding it through the firewall grommet easier. If you go this route, you can chose to heat shrink the spade connectors and the wire, or use electrical tape.
Once you have the 'harness' made, take it and the barrel connectors to the truck. Pop one of the remaining factory switch blanks out and insert your harness into the void. It may help to pop the fuse access panel off. From there you will need to get the two wires through the firewall grommet (directly below the master cylinder). I found that inserting a long zip tie from the engine compartment side was sufficient to use as a 'fish' tool. You'll need something to guide the wires through the rubber grommet. Gently push your tool of choice through the grommet (above the existing factory harness) until you can see it from under the dash area. Tape your wiring harness to the tool and then gently pull from the engine compartment side. A flashlight comes in handy here.
Once you have pulled the wires through the grommet, check to see if they come in contact with any sharp edges under the dash. In my case, I routed them cleanly and then zip tied them on to existing wire bundles. Now you are ready to identify and cut the correct wire at the master cylinder. Pull the pressure sensor connector out from the master cylinder and undo any tape that keeps it bound to the other harnesses. You will see red, black, and white wires right at the connector. The red wire is the ground wire and is used for this modification. Rather than spend 10 minutes explaining how to expose the wire, I'll just state that you will need to make your splice a few inches back from the connector. Carefully open up the black plastic covering and then the grey shielding that covers the three wires (razor blade). When you have exposed the wires enough, you will need to cut the red wire. Use the crimp-on barrel connectors to attach your new 'harness' to the exposed ends of the red wire. If you have not worked on automotive wiring before, or are unsure of stripping, crimping, etc., please do not attempt this. Once your harness is spliced in and covered (tape or heat shrink), you will want to get everything wrapped again properly. At this point you are almost done.
I situated my rocker switch so that the bottom half is pressed in when it is in the off position. This matches the orientation of my two other rocker switches. If you find that it is reversed, you can simply rotate the switch 180 degrees or switch the connectors on the back of the switch.
For what its worth, I made my own "TRAC OFF" label by scanning the factory TRAC OFF switch, darkening the image, and printing it on a standard mailing label. A few coats of satin polyurethane spray on the actual rocker portion, and it looks pretty damn nifty.
Make sure the pressure connector is plugged back in and start the truck. If the ABS, TRAC and VSC lights come on, then the switch is "On". It's up to you to determine how you want your switch oriented. Once you have it setup so that the switch is in the "Off" position, start the truck and make sure all of the system lights go out. At this point, flip the switch and watch that the lights come on. You have now interrupted the ground for the pressure sensor connector and can operate the truck without any TRAC or VSC intervention. Flip the switch to "Off" and restart the truck. All systems should be back to normal.
Harness:
Pressure sensor connector:
"TRAC OFF" switch:
Hope that helps!
Andreas
Last edited by aowRS; 05-11-2005 at 03:30 PM.
03-01-2005, 12:37 PM
#352
Contributing Member
Thread Starter
Simon,
From my writeup:
The actual switch is what came with my 4Runner as a foglight switch from the factory. When I installed the Hella 4000s, I purchased two matching rocker switches from Toyota to activate the factory fogs and the new Hellas. I came across the old switch the other day as I was preparing to wire the TRAC mod. You can probably find these all day long at junk yards or just buy a new one from one of the online dealers I listed earlier in the thread. I'll see if I can find the part#.
Andreas
From my writeup:
For what its worth, I made my own "TRAC OFF" label by scanning the factory TRAC OFF switch, darkening the image, and printing it on a standard mailing label. A few coats of satin polyurethane spray on the actual rocker portion, and it looks pretty damn nifty.
Andreas
03-05-2005, 04:27 PM
#355

OK... After reading the entire thread, can I assume the same AndyMod will work on my '01 Sequoia? Has anybody done it to a Sequoia yet? Sorry if I missed it. Alot of reading in one sitting!!! Thanks
03-06-2005, 02:53 AM
#356
Contributing Member
Thread Starter
Here is a quote from a Sequoia owner I posted on the first page of this thread:
I think that if you identify the fluid pressue sensor connector on your master cylinder, you can probably duplicate the ANDYMOD� and have like results.
Let me know if you have any questions.
Andreas
"I unplugged a sensor on the brake master cylinder. This disabled the VSC and traction control but the ABS functions normally. On the Sequoia it was the sensor farthest forward and on the bottom of the master cylinder. If I was to wire in a toggle switch to one of the wires at the sensor I could select off or on."
Let me know if you have any questions.
Andreas
03-06-2005, 08:09 AM
#357
Contributing Member
Join Date: Feb 2004
Location: Surrey, BC, Canada
Posts: 320
Likes: 0
Received 0 Likes
on
0 Posts
Originally Posted by aowRS
Here is a quote from a Sequoia owner I posted on the first page of this thread:
I think that if you identify the fluid pressue sensor connector on your master cylinder, you can probably duplicate the ANDYMOD� and have like results.
Let me know if you have any questions.
I think that if you identify the fluid pressue sensor connector on your master cylinder, you can probably duplicate the ANDYMOD� and have like results.
Let me know if you have any questions.
03-06-2005, 09:06 AM
#358
See if the dealer can point out the fluid pressure sensor... take a pic and post it if you can, If dosen't look anything like the 4Runner from what I've seen. Can't figure out which one it is on my '01 Sequoia. Good Luck!
03-06-2005, 10:33 AM
#359
Contributing Member
Join Date: Feb 2004
Location: Surrey, BC, Canada
Posts: 320
Likes: 0
Received 0 Likes
on
0 Posts
Questions:
I'm reading further into the 2003 repair manual ... (component diagrams on pp 32-11; 32-37; and 32-57) what does "Skid Control" refer to? As in "Skid Control ECU Assembly" and "Skid Control ECU Connector". This ECU device is under the dash, behind the instrument panel junction box and one of the connectors has 4 inline connectors on it as if to suggest one for each wheel. In addition, there is a VSC Buzzer Connector linked to this ECU. I'll see if I can find reference to it in the wiring manual as I'm wondering if "skid control" is this TRAC system and pulling that connector effectively cripples the system? (Another question for the dealer I guess).
03-06-2005, 01:09 PM
#360
Contributing Member
Thread Starter
I would be very leery about asking any of these questions of the dealer. Think about it - you are asking the dealer to help you disable sefety-related systems on your truck. My guess is that most would not help in any way.
Take the time to comb through this whole thread. There are many wiring diagrams posted that are specific to the 3rd and 4th Gen 4Runners.
Andreas
Take the time to comb through this whole thread. There are many wiring diagrams posted that are specific to the 3rd and 4th Gen 4Runners.
Andreas


