
Standard 8000K H4 9003 HB2 Xenon HID Xenon Conversion Kit
 01-19-2012, 08:16 AM
#21
Registered User
Join Date: Jan 2012
Location: Georgia
Posts: 7
Likes: 0
Received 0 Likes
on
0 Posts
Sure you can put them in. Problem comes with the scattered light. Having a light 4 times brighter than a holgen coming towards you at night is bad when not focused. I know the lights on the third gen 4 runners suck and i can tell you on this truck without projectors you will have no usable light as you would have to point them down to the ground. (Of course some people dont care, that's another thing) I went through the pain of putting projectors in my truck and only get flashed when im coming over a hill at the same time another car is. Other than that My light pattern cuts off just below the mirrors on most cars unless they are in a lotus. Hid is totaly worth the upgrade but i would only recomend it if you put projectors in it. On a side note I say my install was a pain because I wanted to get fancy with my setup.

 01-25-2012, 11:51 AM
#23
Registered User
Join Date: May 2009
Location: Thunder Bay, Ontario, Canada
Posts: 113
Likes: 0
Received 0 Likes
on
0 Posts
Man I don't understand why people think it's hard, or unnecessary running projectors with hids... Bunch of lazy sketch bags out there..
Projectors are stupidly easy to retrofit...
Just finished FX-R projectors with 55w 4500k bulbs/ballasts, for a client.
MH1 projectors, 5000k bulbs, 35w ballasts - my setup.

MH1 projectors, 4500k bulbs, 35w ballasts - fiance's setup.
If you're going to do HIDS, do them the right way.. Plug and play hids are like using blocks on the front of a solid axle truck.. Only worse.
Projectors are stupidly easy to retrofit...
Just finished FX-R projectors with 55w 4500k bulbs/ballasts, for a client.
MH1 projectors, 5000k bulbs, 35w ballasts - my setup.
MH1 projectors, 4500k bulbs, 35w ballasts - fiance's setup.
If you're going to do HIDS, do them the right way.. Plug and play hids are like using blocks on the front of a solid axle truck.. Only worse.
01-25-2012, 03:09 PM
#24
Registered User
Thread Starter

Join Date: Sep 2009
Location: maine
Posts: 205
Likes: 0
Received 0 Likes
on
0 Posts
Nice pics!
I'm waiting on the package from TRS. Should be arriving tomorrow or friday. However i'm still waiting on this ebay package that might arrive either next week wensday or friday It's the 99 headlight. Stupid seller charged me 20 bucks for shipping and used the snail mail. So bull˟˟˟˟. i ordered and paid last week same time for both headlight and projectors on thursday!
I'm waiting on the package from TRS. Should be arriving tomorrow or friday. However i'm still waiting on this ebay package that might arrive either next week wensday or friday
It's the 99 headlight. Stupid seller charged me 20 bucks for shipping and used the snail mail. So bull˟˟˟˟. i ordered and paid last week same time for both headlight and projectors on thursday!
01-27-2012, 08:25 PM
#26
Registered User
Thread Starter
Join Date: Sep 2009
Location: maine
Posts: 205
Likes: 0
Received 0 Likes
on
0 Posts
guess what? I just got my package today!
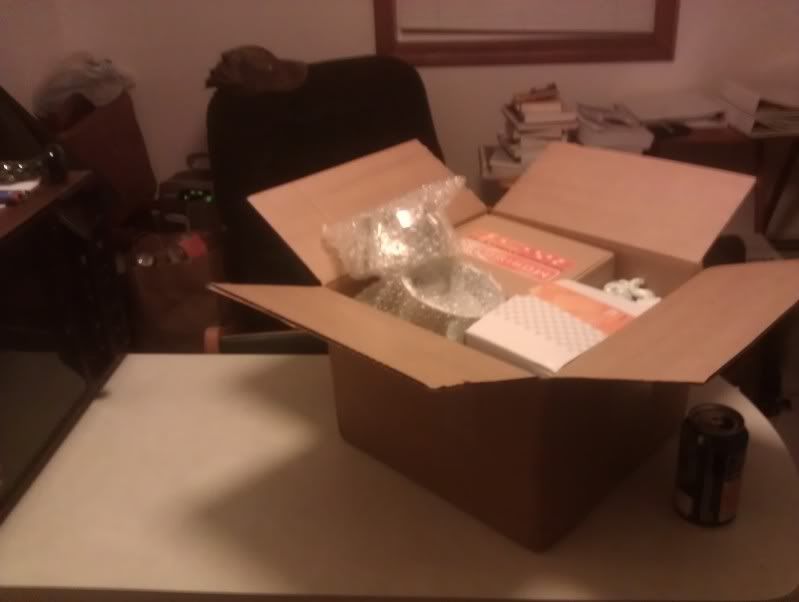
STill waiting for the headlight housing that i bought for 50 bucks off ebay. Hopefully next week i will it all done. I will do a write up on this
STill waiting for the headlight housing that i bought for 50 bucks off ebay. Hopefully next week i will it all done. I will do a write up on this
02-01-2012, 09:41 AM
#27
Registered User
Thread Starter
Join Date: Sep 2009
Location: maine
Posts: 205
Likes: 0
Received 0 Likes
on
0 Posts
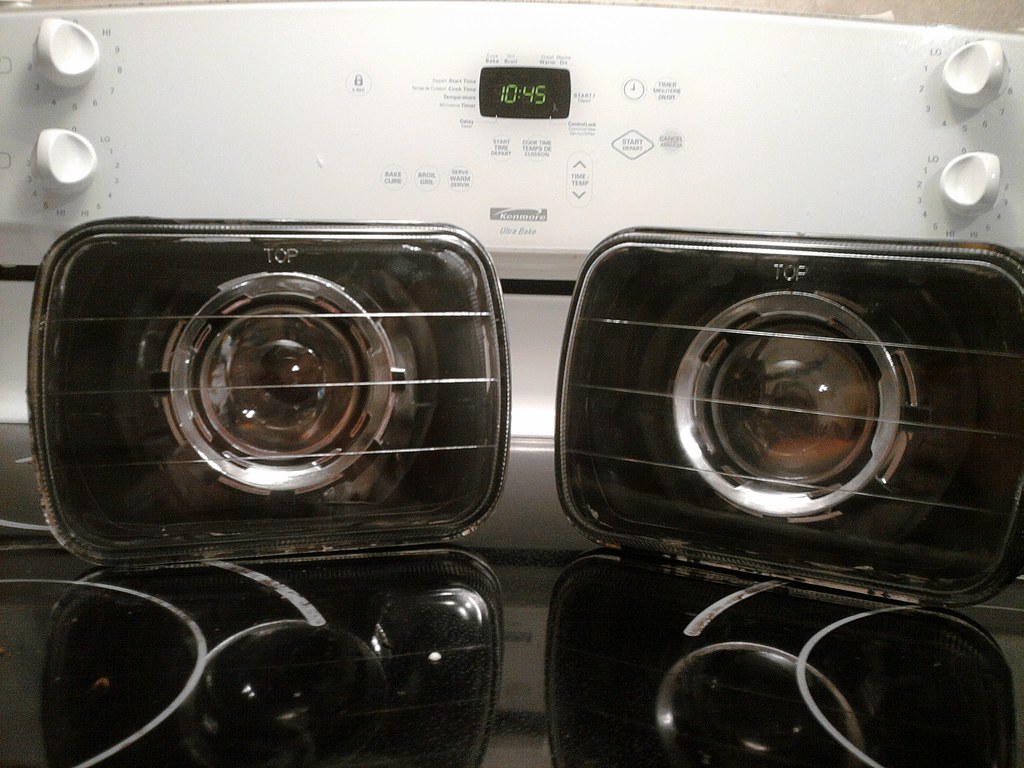
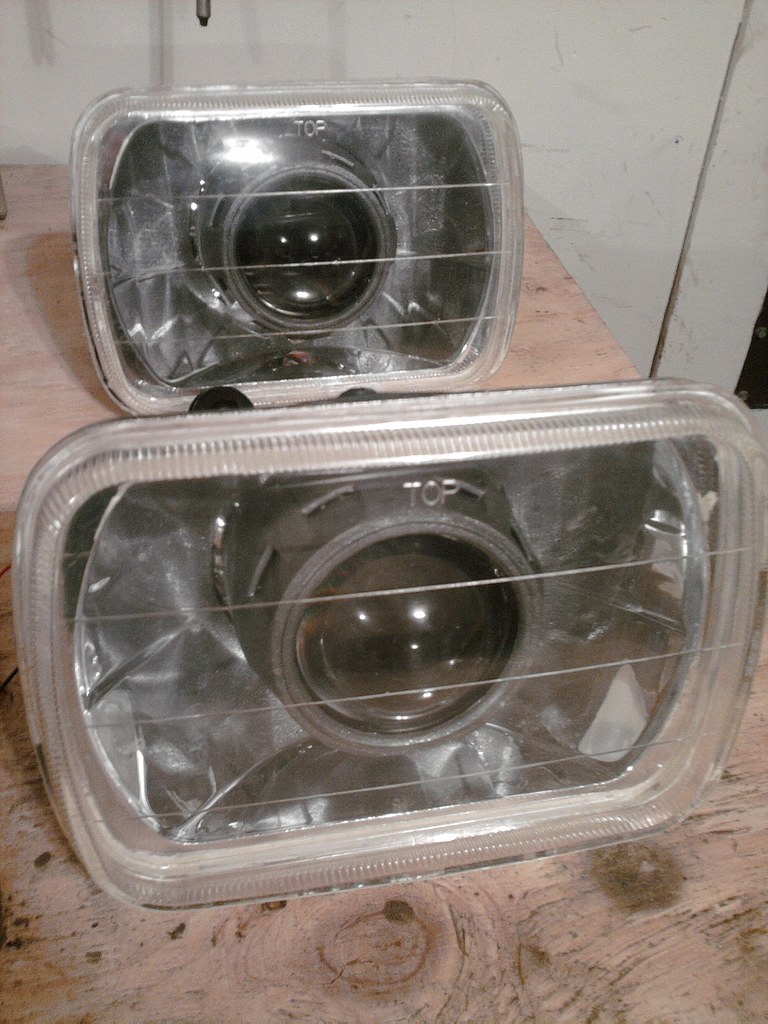
The project had a great start. I'm in the process of sanding down the chrome and preparing a cut. On Friday i'll work on the project some more. Here's some photos for ya. I will do a write up guide if any one is interested in doing retrofitting hid's for their car.


I had a dremel kit at my house. It was diggin in a little too much and this dremel did not have a speed control. So i ditched it and used hand sand papers. That took for ever and i had a hard time to get in the grooves. The light bulb turned on above my head, i looked under the sink in my kitchen and found this.
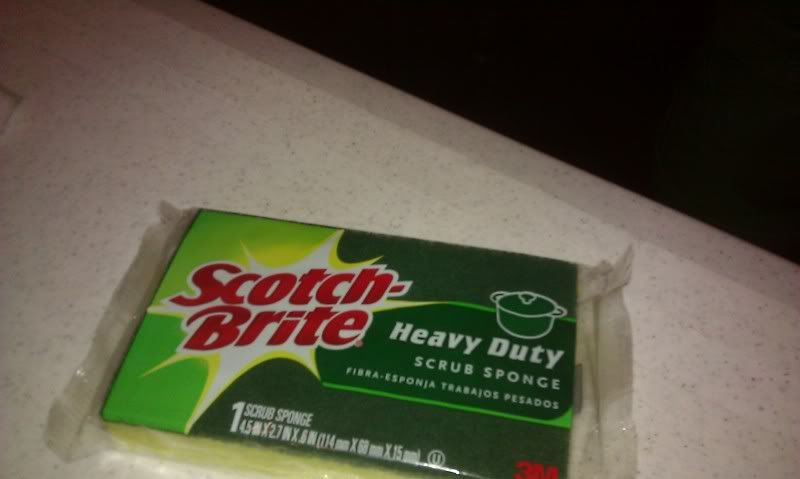
It was perfect for my task. I was able to get in the grooves and scuff up the chrome every where.
I had a dremel kit at my house. It was diggin in a little too much and this dremel did not have a speed control. So i ditched it and used hand sand papers. That took for ever and i had a hard time to get in the grooves. The light bulb turned on above my head, i looked under the sink in my kitchen and found this.
It was perfect for my task. I was able to get in the grooves and scuff up the chrome every where.
02-02-2012, 01:30 PM
#28
Registered User
Join Date: May 2009
Location: Thunder Bay, Ontario, Canada
Posts: 113
Likes: 0
Received 0 Likes
on
0 Posts
Why are you taking all the chrome off? The 4R lights look unreal with some chrome shrouds in the chrome housings.. Or are you going black everything?
02-02-2012, 03:09 PM
#29
Registered User
Thread Starter
Join Date: Sep 2009
Location: maine
Posts: 205
Likes: 0
Received 0 Likes
on
0 Posts
yeah i'm going black every thing. I dont care for the chrome and i will be eliminating all chrome off my truck. I have a few problem here with the installation. I'm not sure if i have it right and i really would like to have feedbacks on what i should do here.
The shrouds dont seem to sit properly... do i have it right or wrong? Pic below. It seems the lens should sit a little further out pass the shroud edges. I did put that black ring circle on the four "tabs" on the shroud before seating it on the projector. Did any one had to modify their shroud to make it sit in a little further?
http://i18.photobucket.com/albums/b1...6/IMAG0617.jpg
2. How is the projector supposed to be seated in the housing? Place the headlight on the table and have the projector level with the table in the housing? When i do that, the top left corner (screw hole) is touching the housing while other 3 holes/corners are not. Would this be right?
Here's some links to the photos i took. I posted many links so that you can see what i'm looking at right now.
front
http://i18.photobucket.com/albums/b1...6/IMAG0622.jpg
Back
http://i18.photobucket.com/albums/b1...6/IMAG0627.jpg
http://i18.photobucket.com/albums/b1...6/IMAG0630.jpg
http://i18.photobucket.com/albums/b1...6/IMAG0626.jpg
http://i18.photobucket.com/albums/b1...6/IMAG0624.jpg
http://i18.photobucket.com/albums/b1...6/IMAG0625.jpg
Angle shots
http://i18.photobucket.com/albums/b1...6/IMAG0629.jpg
http://i18.photobucket.com/albums/b1...6/IMAG0628.jpg
From viewing other people's photos, it seems the back of the projector is dead center in the circle where they cut out the projector. I figured this was what i'm supposed to have it placed but my friend says that it doesn't look right and needed to be placed the way it is in the photos above.
02-02-2012, 04:02 PM
#30
Registered User
Join Date: May 2009
Location: Thunder Bay, Ontario, Canada
Posts: 113
Likes: 0
Received 0 Likes
on
0 Posts
It looks like you'll be doing some grinding to the back of the housing on your lights for the projector to sit in far enough, your headlight lens should have enough room to go over the projector lens, but yes - the shrouds do sit past the projector lens as well, and I fear with the shroud you'll hit the headlight lens in your current configuration.
Your best bet is you take your stock light out of the truck, put the FXR equipped light in (maybe with a dab of crazy glue or quick dry epoxy, something easily broken off if you twist, but enough to hold the projector in place during handling) and adjust the projector till the headlight is where it should be, and the projector shows the step where it should.. Make a few guide lines and you should be kosher to finish bolting the projector in place.
As for where the projector should be in relation to the housing, your projector should come out at the same angle as your OEM bulb (H4, right?) Look at the OEM bulb orientation and line the projector up similar.. I really don't think it should be on an angle like you have it now.
Also for a quick rotational adjustment clue - the top most horizontal line in the reflector..
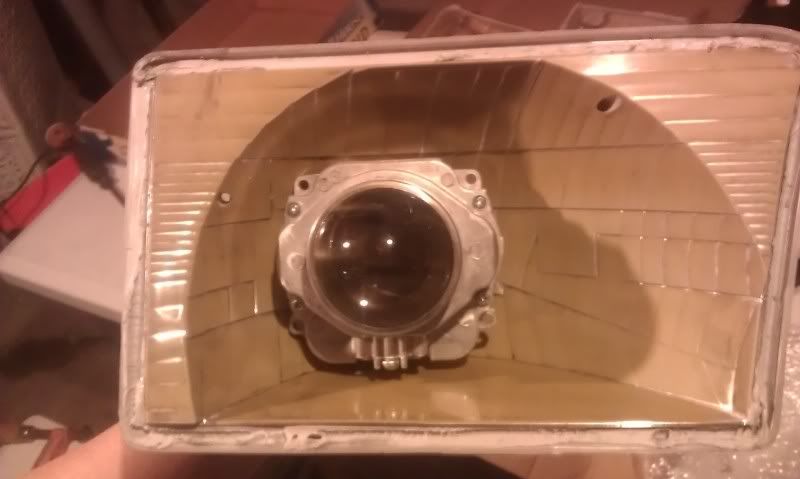
the one right above the projector in this shot - should, in most cases, be a really good indication on where you should set the horizontal adjustment of your projector. The most accurate way I've done is mount the bare reflector housing into the truck, set the rotation of the projector, dab or two of epoxy / crazy glue, then bolt the projector in place and epoxy to seal..
Also you should epoxy/crazy glue the shroud centric ring to the shroud itself, they like popping off sometimes. Usually the fit on the projector side is super tight, but the shroud itself likes coming apart.
Looks good so far! (I'd do gunmetal for paint in the housing, not all black, if it was me )
)
Your best bet is you take your stock light out of the truck, put the FXR equipped light in (maybe with a dab of crazy glue or quick dry epoxy, something easily broken off if you twist, but enough to hold the projector in place during handling) and adjust the projector till the headlight is where it should be, and the projector shows the step where it should.. Make a few guide lines and you should be kosher to finish bolting the projector in place.
As for where the projector should be in relation to the housing, your projector should come out at the same angle as your OEM bulb (H4, right?) Look at the OEM bulb orientation and line the projector up similar.. I really don't think it should be on an angle like you have it now.
Also for a quick rotational adjustment clue - the top most horizontal line in the reflector..
the one right above the projector in this shot - should, in most cases, be a really good indication on where you should set the horizontal adjustment of your projector. The most accurate way I've done is mount the bare reflector housing into the truck, set the rotation of the projector, dab or two of epoxy / crazy glue, then bolt the projector in place and epoxy to seal..
Also you should epoxy/crazy glue the shroud centric ring to the shroud itself, they like popping off sometimes. Usually the fit on the projector side is super tight, but the shroud itself likes coming apart.
Looks good so far! (I'd do gunmetal for paint in the housing, not all black, if it was me
)
02-03-2012, 07:34 AM
#31
Registered User
Thread Starter
Join Date: Sep 2009
Location: maine
Posts: 205
Likes: 0
Received 0 Likes
on
0 Posts
hmmm thanks for the tip exist.
Think i will just do that. Have my truck about 20 ft from my garage and mark the spots where the stock headlight shines at. Where i think the cut off will be. Then take out one of the unit and put the fx-r unit in and try to adjust where it should be placed at. After i think i have it placed where it should be, i will just mark the spots where it's placed and then try work on drilling the holes for the bolts. This is gonna be fun. o.0
I will report back here. Thanks exist
02-03-2012, 09:39 AM
#32
Registered User
Join Date: May 2009
Location: Thunder Bay, Ontario, Canada
Posts: 113
Likes: 0
Received 0 Likes
on
0 Posts
Try 25-30 feet if you can swing it, and tape the projector in place if you can, and then a small drop or two of epoxy after the tape... That should keep it in place so you can adjust accordingly.
Also look into using angle brackets for the bottom 2 mounts and bolt the projector to the flat part of the bottom of the reflector housing, makes it wayyyyyyyy stronger than all hanging off the back
Good luck!
Also look into using angle brackets for the bottom 2 mounts and bolt the projector to the flat part of the bottom of the reflector housing, makes it wayyyyyyyy stronger than all hanging off the back
Good luck!

Thread
Thread Starter
Forum
Replies
Last Post
kawazx636
The Classifieds GraveYard
34
10-06-2021 03:03 PM
RyanJ989
95.5-2004 Tacomas & 96-2002 4Runners
11
04-07-2021 09:41 AM
justdifferentials
Vendors Build-Ups (Build-Up Section)
0
09-05-2015 06:52 PM
klavender1
86-95 Trucks & 4Runners
7
08-15-2015 01:51 PM


