
Recoloring interior of 3rd gen 4runner...PICS included

 01-17-2009, 07:04 AM
#182
Registered User
Join Date: Jan 2009
Posts: 45
Likes: 0
Received 0 Likes
on
0 Posts
I'm going to be removing the dash in my 98runner soon to work on my defroster. one thing iv'e been worried about is the airbag. how do i remove it or disconnect it with out it going off in my face? 
01-17-2009, 07:59 AM
#184
Registered User
Thread Starter
Join Date: Oct 2003
Location: Austin / Houston TX
Posts: 461
Likes: 0
Received 0 Likes
on
0 Posts
Actually to be safe you can d/c the battery for 15-30 minutes so the SRS modules can discharge. I left it off for quite a while before I got to the airbag.
01-17-2009, 08:02 AM
#185
Registered User
Join Date: Jan 2009
Posts: 45
Likes: 0
Received 0 Likes
on
0 Posts
Ok thnx. Do you know anything about how to fix the defroster? It works well on the driver side but barely works on the passenger side. i think it might be detached or have a leak on that side but im not sure.
01-17-2009, 08:20 AM
#186
Contributing Member
Join Date: Mar 2003
Location: COTKU,Ontario,Canada
Posts: 11,334
Likes: 0
Received 0 Likes
on
0 Posts
hey tv! Long time no see... my "blacking" is progressing... slowly lol...
skogie I don't know about 98 but on 94 the defrost is one duct attached to the dash with plati-weld and connects to the heater box in the middle so if yours is the same detachment is unlikely... you may have a blockage in the duct caused by leaves getting through [I had them in mine don't ask me how they did it... or one member had a mouse nest in his plugging up the works... Good luck and be careful with the airbags...
skogie I don't know about 98 but on 94 the defrost is one duct attached to the dash with plati-weld and connects to the heater box in the middle so if yours is the same detachment is unlikely... you may have a blockage in the duct caused by leaves getting through [I had them in mine don't ask me how they did it... or one member had a mouse nest in his plugging up the works... Good luck and be careful with the airbags...
 01-17-2009, 09:48 AM
#188
Registered User
Join Date: Jan 2009
Posts: 45
Likes: 0
Received 0 Likes
on
0 Posts
I'm having trouble locating the defroster hosing. Do i need to remove the entire dash? or since my problem is on the passenger side should i be able to do it only removing the area near the glove compartment? tv, if you have any pics on hand that might show me where this stuff is that would be really helpfull
01-17-2009, 02:32 PM
#189
Contributing Member
Join Date: Mar 2003
Location: COTKU,Ontario,Canada
Posts: 11,334
Likes: 0
Received 0 Likes
on
0 Posts
Again I'm not that familiar with the 98 version but on the 94 all the ductwork stuff is way at the front of the dash up and behind just about everything so yeah you'll pretty much have to take the whole thing out... if you follow along this whole thread I think tv posted some pics of his dash taken apart which might give you some idea what is where.
01-21-2009, 10:21 AM
#190
Registered User
Join Date: Sep 2007
Location: Montana
Posts: 21
Likes: 0
Received 0 Likes
on
0 Posts
Before you go with a custom vendor for your carpet you might look into purchasing a aftermarket carpet and headliner. When I had my 96 Runner I was looking at switching my interior color from blue/gray to black but didn't have to guts to rip apart the dash. I did find a few sites that offer vehicle specific molded carpeting with reasonable guarantees. Keep in mind that if you do the headliner a COMPLETE kit will include 3 separate pieces, a headliner, seating area, and a "trunk" area. When I looked the kits were anywhere from $150-350. Which is cheap when you start going to interior guys who order the same products and install it for way too much. Also if you are looking to save some money and are feeling ambitious online vendors carry what we call interior refurbishing materials. Basically foam kits of different densities and resiliences that you can shape yourself with your tools or rented tools. Easiest way to do it is to breakdown your entire interior and disassemble the seats. Since you have a stock style base to go off of, experiment with what you can do with different shapes and densities. If you end up having to have that leather, a stock style new leather or suede layover will be less expensive with the cushion fabrication. Good luck my friend, and props for doing the dash on your own, I may end up doing the same on my new 97.
08-18-2009, 08:01 PM
#191
Registered User
Join Date: Jul 2008
Location: Chicago Area
Posts: 298
Likes: 0
Received 0 Likes
on
0 Posts
this interior looks so awesome. bit of a thread jack here. does anyone know if the dash on a 2002 limited is a type of vinyl or is it leather? i think the only things that are real leather r the seats, small pieces or door trim and the arm rest. i would like to do a "black n' tan" thing and leave all the leather tan and wood trim wood. but paint the rest black. already did black carpet. it looks great.
08-18-2009, 08:51 PM
#192
Registered User

Join Date: Jul 2006
Posts: 15
Likes: 0
Received 0 Likes
on
0 Posts
They are vinyl, the seats and the armrests and material on the panels are the only leather.
TV: That job looks great, I would love to do this to my Runner but I think my wife would kill me If I did it again. She had to drive us to homecoming in high school because I had my dash out of my Cavalier when I repainted the entire interior. Maybe I'll go over to my moms sometime and take some pictures and post them on here.
If I were to do it again I would probably buy the pieces from pick and pull and paint them so that I can take my time because that is the problem I had with the last is that I rushed it. Prep work is everything on this. If you take your time and leave enough time between coats and lightly sand and things will turn out great.
GAH Now I really want to do this again, Thanks for making me sleep on the couch.
08-18-2009, 08:55 PM
#193
Registered User
Join Date: Jul 2006
Posts: 15
Likes: 0
Received 0 Likes
on
0 Posts
Also for any of those looking to redo their headliner and carpet here is a good place to get material http://www.yourautotrim.com/
08-18-2009, 09:18 PM
#194
Contributing Member
Join Date: Mar 2003
Location: COTKU,Ontario,Canada
Posts: 11,334
Likes: 0
Received 0 Likes
on
0 Posts
Just an update I did a second coat of paint [actually a second pass of three very light coats] touching up all the problem areas I noted. That sandpaper-ish texture I noted previously wore off quite quickly with just a few passes of a polishing rag [ie a retired T shirt] after I'd let the paint cure for a month or so. The paint is now on it's second summer and shows no signs of fading at all and even after baking all day in the sun the surface is cooler to touch then before it was painted despite being black. Once I have access to a work shop again the rear panels are coming out for painting.
Last edited by aviator; 08-18-2009 at 09:22 PM.
08-28-2009, 09:40 AM
#195
Registered User
Join Date: Jul 2008
Location: Chicago Area
Posts: 298
Likes: 0
Received 0 Likes
on
0 Posts
so the flat vinyl spray looks fantastic but i think the flat krylon is too flat. i did one door in flat and one in "satin"
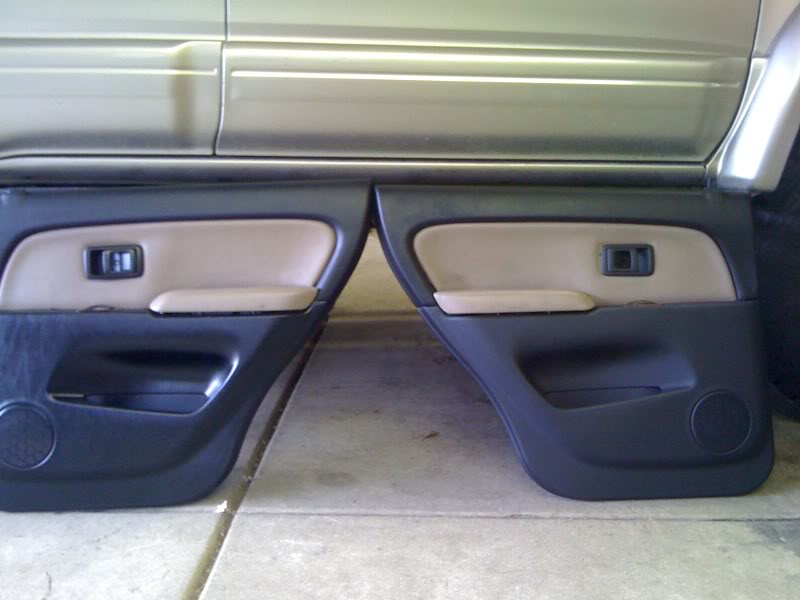
ill try to find my camera. iphone pix dont do either door justice.
which do you like?
ill try to find my camera. iphone pix dont do either door justice.
which do you like?
Last edited by SWPERIC; 08-28-2009 at 09:48 AM.
08-28-2009, 04:14 PM
#196
Contributing Member
Join Date: Mar 2003
Location: COTKU,Ontario,Canada
Posts: 11,334
Likes: 0
Received 0 Likes
on
0 Posts
the one on the right (left side rear door) looks better to me... the other one appears to have some visible spray pattern lines and it's too shiny... makes it look cheap.
08-28-2009, 07:59 PM
#197
Registered User
11-21-2010, 07:29 PM
#198
Contributing Member
Join Date: Nov 2006
Location: GSU/ATL/SD
Posts: 1,434
Likes: 0
Received 0 Likes
on
0 Posts
Bump to keep this handy.
I'm blacking out the interior this weekend. Anyone who wants to chime in with recent experience over the next week feel free. I'll be updating via a new thread once I start, but I'm going to wake up early one morning and see if I can get it all done in one day.
I'm blacking out the interior this weekend. Anyone who wants to chime in with recent experience over the next week feel free. I'll be updating via a new thread once I start, but I'm going to wake up early one morning and see if I can get it all done in one day.
11-21-2010, 07:48 PM
#199
Registered User
Thread Starter
Join Date: Oct 2003
Location: Austin / Houston TX
Posts: 461
Likes: 0
Received 0 Likes
on
0 Posts
Bump to keep this handy.
I'm blacking out the interior this weekend. Anyone who wants to chime in with recent experience over the next week feel free. I'll be updating via a new thread once I start, but I'm going to wake up early one morning and see if I can get it all done in one day.
I'm blacking out the interior this weekend. Anyone who wants to chime in with recent experience over the next week feel free. I'll be updating via a new thread once I start, but I'm going to wake up early one morning and see if I can get it all done in one day.
11-21-2010, 07:56 PM
#200
Contributing Member
Join Date: Nov 2006
Location: GSU/ATL/SD
Posts: 1,434
Likes: 0
Received 0 Likes
on
0 Posts
Just the person I was hoping was around. I'm mapping out my time I think I'll give it all of Saturday and Sunday. With everything out and laid in front of me I think 12 hours of painting and 24 hours of drying should be sufficient. If you don't mind I'd like to get some heads up on how to take off the dash. I was going to look into it more on Sunday but if you have time please PM or put here some details. Thanks!


