
OME, ARB+winch, BUD, Mod pics.
 10-14-2009, 10:21 AM
#1
Registered User
Thread Starter
Join Date: Apr 2008
Location: Marquette, MI
Posts: 484
Likes: 0
Received 0 Likes
on
0 Posts
OME, ARB+winch, BUD, Mod pics.
Ive been holding out on posting up pictures (really just being lazy)
But since I have some time now, I have time to post pics about my latest mods.
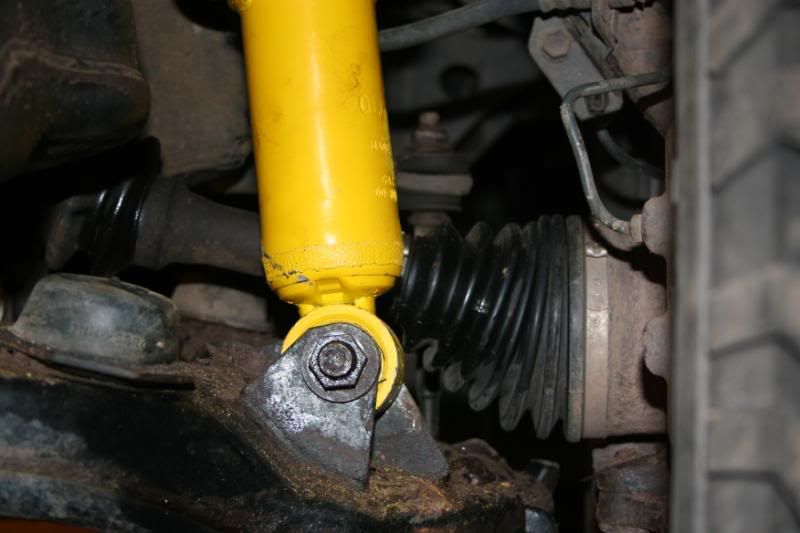
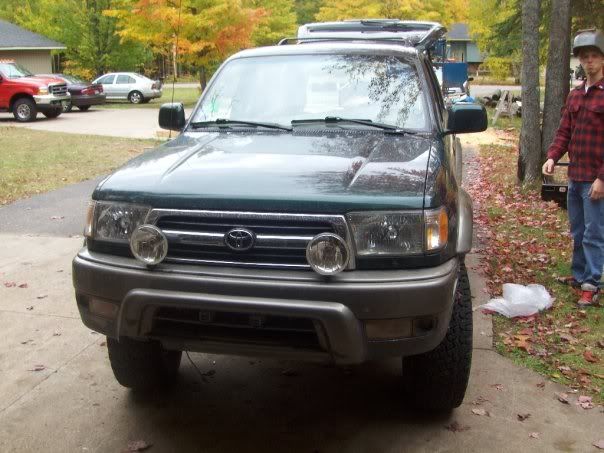
First we'll start with the OME lift. 882, 891 with N86 and N91S. I decided this setup was best for me, So I could carry A heavy load in the back, and Have the added lift up front without spacers, and so I could get an ARB+winch somewhere down the line without having to upgrade to 883's right away.
The install is actually really simple, the most important part is having a buddy, and some ingenuity.
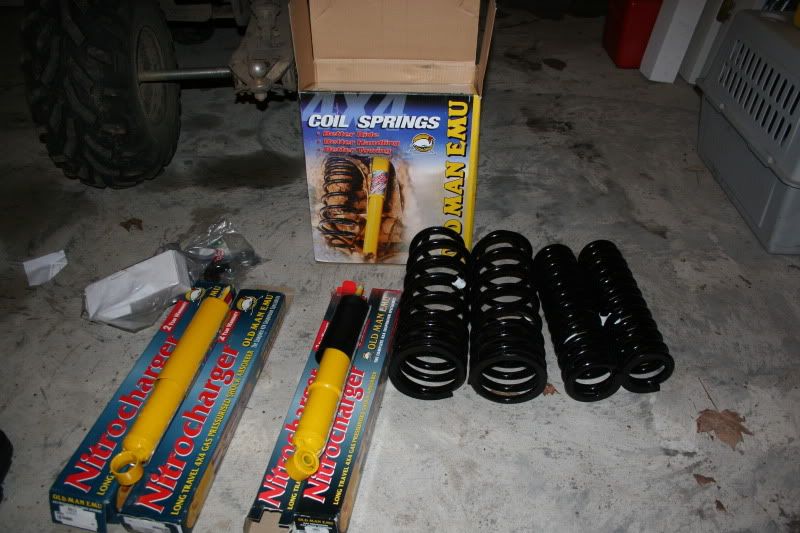
The goods
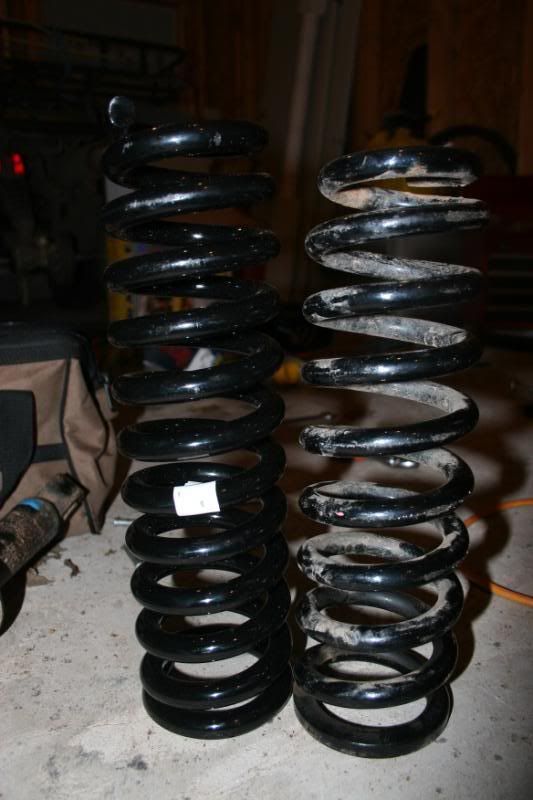
New 882 VS old stock
The Old stuff slides right out basically, after un doing the top bolts, and the bottom bolt. Easy.
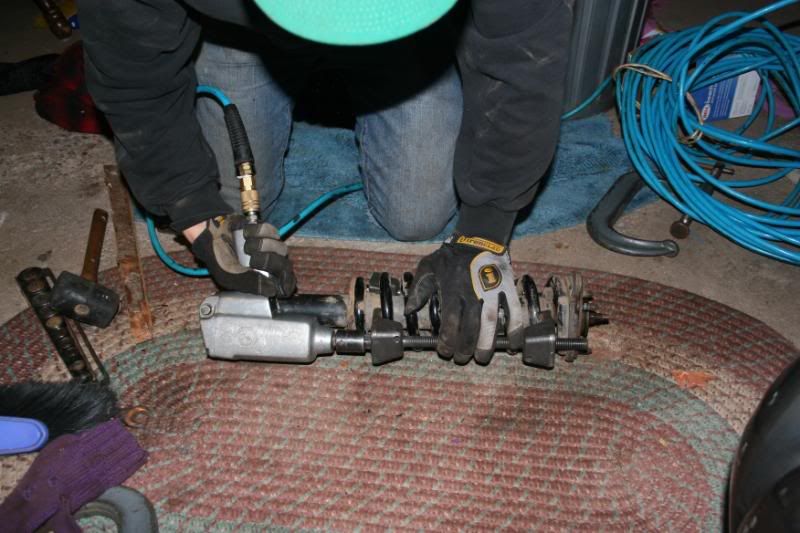
The scariest part of the install by far is the spring compressors. This is getting the stock spring off to get the old top plate. Not too bad, But getting the 882's onto the new shock was scary, you could see the Advance auto compressors flexing. I would take this to a shop and have them do it, much simpler ESPECIALLY if you don't have air tools. We also have to hammer out the little teeth once the 88s's were compressed on, chipping off some of the black paint.
Stock CV angle
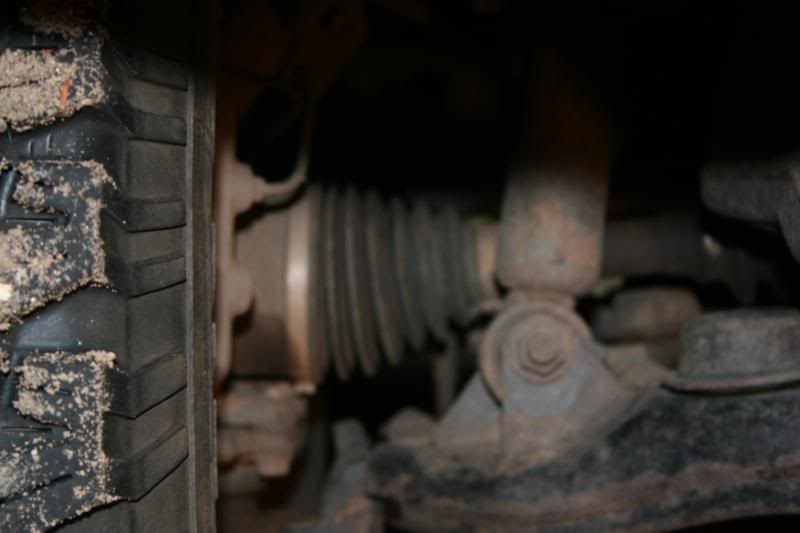
New CV angle
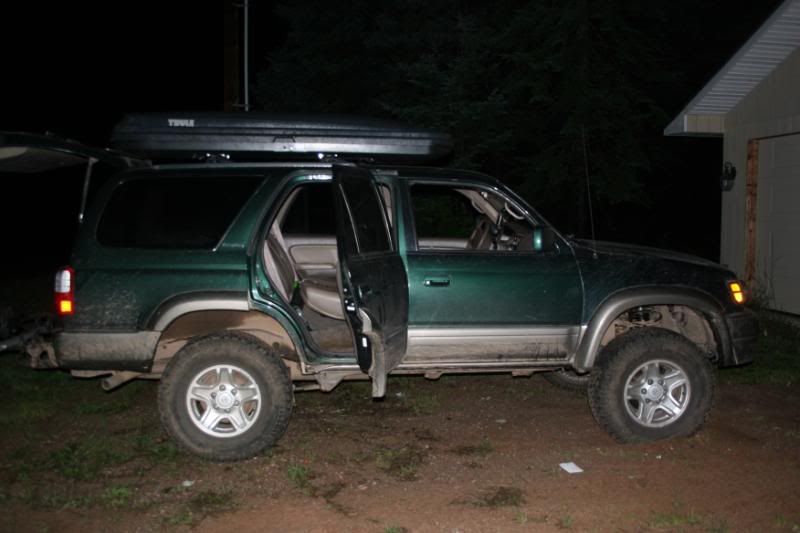
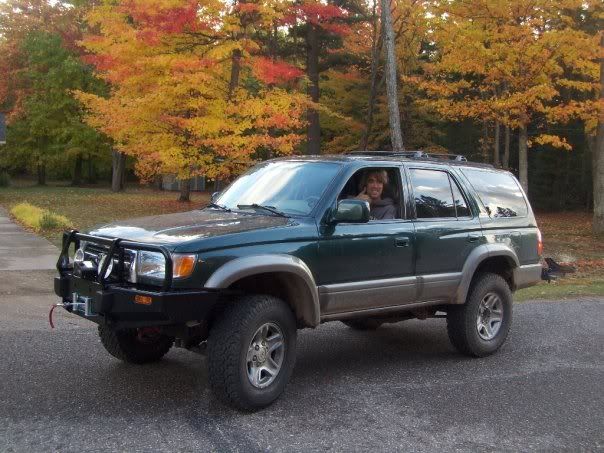
Completed with 265 75 BFG At's
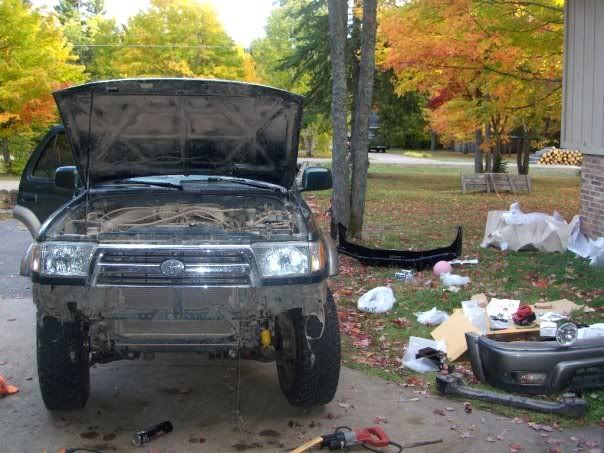
Now onto the ARB.
The ARB was a pain to get on. Took us 12 hours of work to get on. But there were some pains along the way.
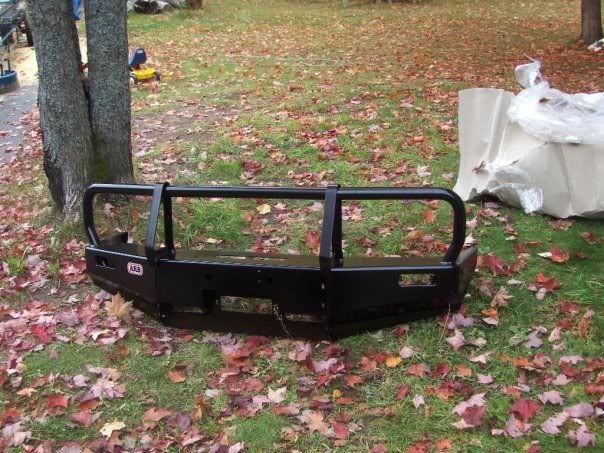
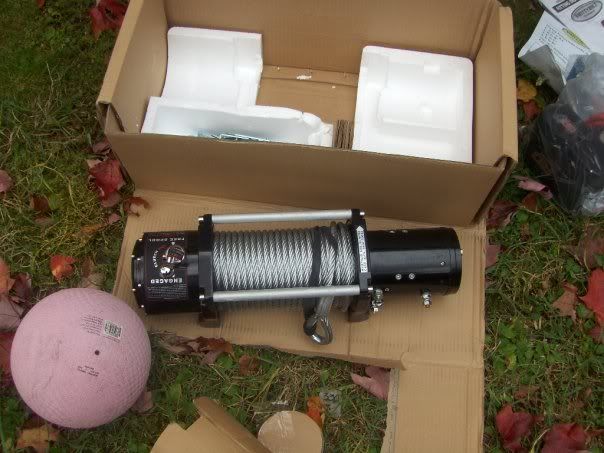
Pieces: ARB Tacoma Bar, and a Smittybuilt XRC10 Winch, Angle Iron .
Bumper
XRC10
What we started with
Old bumper removed, ARB unwrapped (that took a solid 15 minutes to un-wrap, that thing is Packaged well! And we broke every bolt removing the old bumper... What a pain. Remember the PB blaster!!
If you come on the forum often, you'll recall me asking how to straighten a bent frame for an ARB install, well no one knew how so here is what we did.
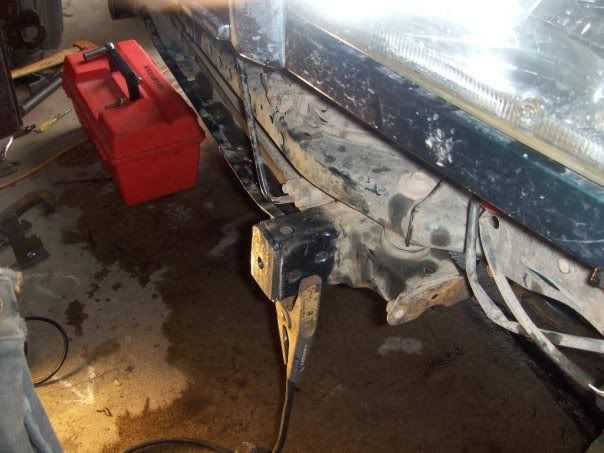
We started with this very bent hook
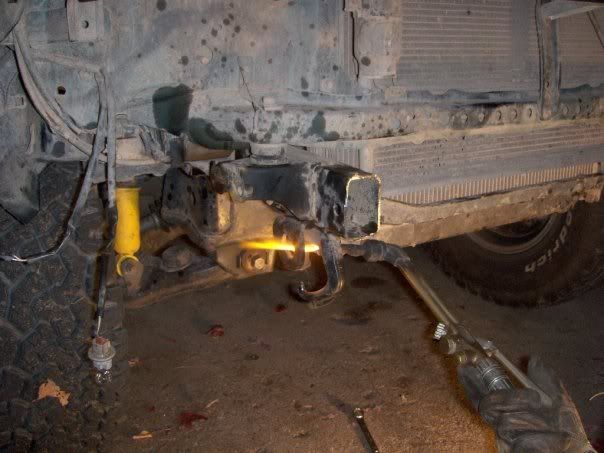
And tried to get it off, breaking both tack welds in the frame in the process... after a mild bit of cussing, and throwing tools, we got the torch out. Take that Stock crap!!
Once the hook was persuaded off, we were left with this:
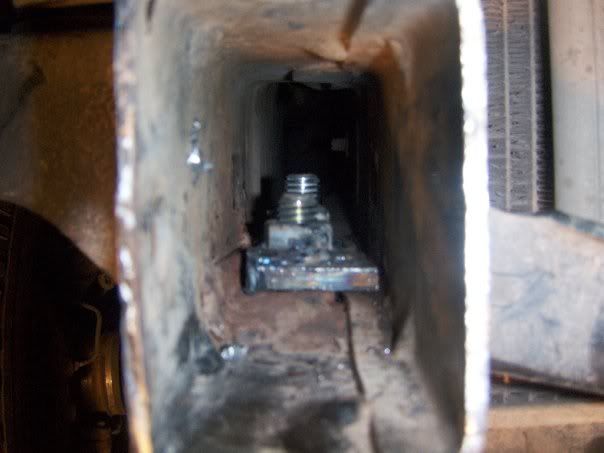
So we heated it up with the torch till it glowed, then pounded the protruding part flat enough. Then we were still short two tacked nuts, and the frame was still not flat (it would be near impossible to get it perfect) so we fabbed a steel plate to stick in the frame and tack it in, with the nuts tacked to it, which solved both problems, as the nuts will sit straight, and it will sit in the frame over the bent part, hopefully making it stronger. This is probably the most ghetto part of the install, but we didn't have any other ideas.
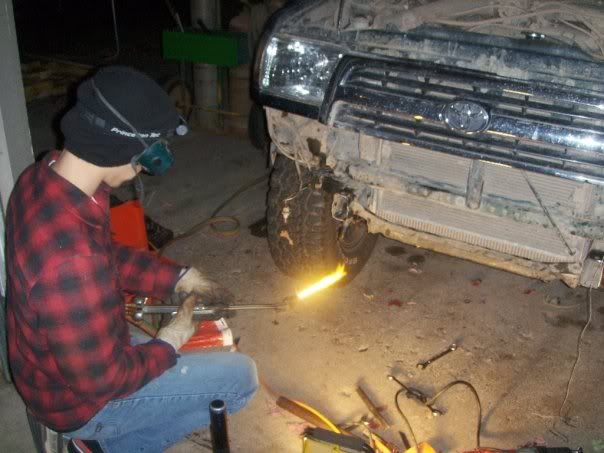
After that, we started fabbing the new endcaps, ALA end-cap mod:
http://www.nwtoys.com/tech/frame-endcap
We used quarter inch angle iron, cut down to size, and welded in. A wire feed welder would have been much better for this, and I will probably end up re-welding it at a later date.
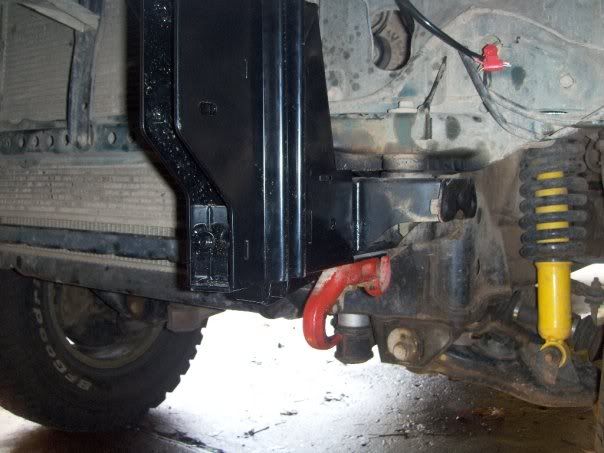
Once those were done, you just slide the mounting brackets on, bolt them down, and get the bumper installed. I chose to reuse the stock bolts on the one side so I could keep the hook I had, for use when I need to really pull on something, and don't want to run the risk of tweaking the bumper. Just another tool to use on the trail!
I haven't talked about installing the winch, I didn't get any pictures of this, but It really isn't too hard. You need to clock it, and it clocks perfectly so you can use the cutouts designed for the engagement lever in the bumper (which will be a huge pain to use if ever submerged, or in muck) After clocking, it basically bolts right up. I had to buy longer bolts for the Fairlead mount, as they didn't thread in as far as I liked. The wires that connect the solenoid to the winch are very short, and barely reach to the top of the bumper, and don't reach to where ARB has supplied a solenoid mount, so those will have to be lengthened.
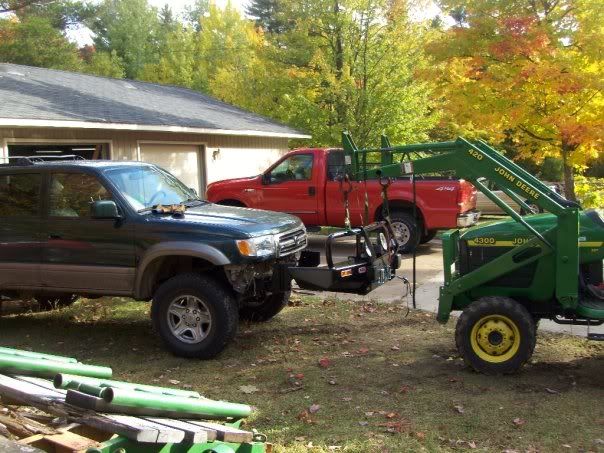
With the winch in the bumper, its REALLY HEAVY. We used my buddies tractor, and straps to get it close to the truck carefully. Then we pushed it into place, and bolted it on. Its a bit awkward to get the bolts on, but do-able. Id have a ratcheting wrench to do it.
Then once its on, and straight enough, Respool your winch line, and go and run into things!!
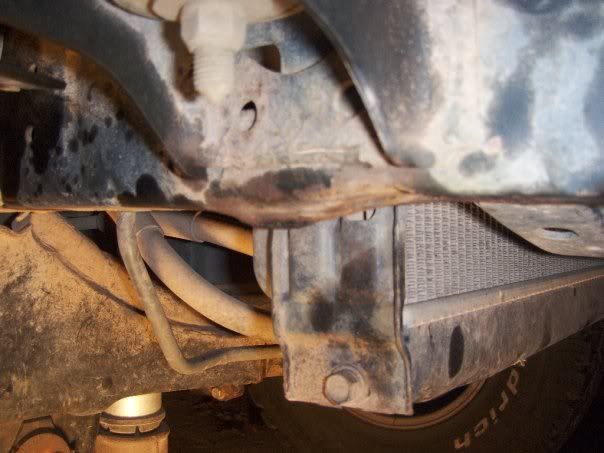
No pictures of the Budbuilts, they went on as they are supposed to, very easily, I was able to do it alone, by myself with only the stock jack. The hardest part is removing the bolts to the steering rack. Bud is a good guy, and I talked to him on the phone when I ordered. Would Highly recommend ordering from him!! And his products kick ass. I smashed into a rock trying this hard line I'd been eying for about a year, but didn't think the stock skids would hold up. It was a hard impact, I got out, expecting carnage, but the rock barely scraped the paint on the buds!
Notes:
With all the added weight in a short time (the bumper and skids went on in the same weekend) I can really notice it driving around town, much less power and the front springs are sagging a lot (time to upgrade to 883s with top spacer, but it was worth it, I can now confidently drive my rig almost anywhere.
The winch takes a lot of power, and my stock setup can't supply it. I can winch for maybe 30 seconds, less under load before my low battery alarm goes off with the truck on. So next on the list is a new batter, maybe a high capacity alt, or a dual bat setup. I must say though I have no idea how old the bat I have in it is.
One more note, Both CV's lost grease out of the ends within 40 miles of putting the lift on. Replaced with new ones from Advance Auto, and kept my old ones for spares. Some of the baffles? on the new ones touch and a groove is forming, not sure how I will fix that.
I'm tired of typing now, If you have any questions, comments, feel free to post.
But since I have some time now, I have time to post pics about my latest mods.
First we'll start with the OME lift. 882, 891 with N86 and N91S. I decided this setup was best for me, So I could carry A heavy load in the back, and Have the added lift up front without spacers, and so I could get an ARB+winch somewhere down the line without having to upgrade to 883's right away.
The install is actually really simple, the most important part is having a buddy, and some ingenuity.
The goods
New 882 VS old stock
The Old stuff slides right out basically, after un doing the top bolts, and the bottom bolt. Easy.
The scariest part of the install by far is the spring compressors. This is getting the stock spring off to get the old top plate. Not too bad, But getting the 882's onto the new shock was scary, you could see the Advance auto compressors flexing. I would take this to a shop and have them do it, much simpler ESPECIALLY if you don't have air tools. We also have to hammer out the little teeth once the 88s's were compressed on, chipping off some of the black paint.
Stock CV angle
New CV angle
Completed with 265 75 BFG At's
Now onto the ARB.
The ARB was a pain to get on. Took us 12 hours of work to get on. But there were some pains along the way.
Pieces: ARB Tacoma Bar, and a Smittybuilt XRC10 Winch, Angle Iron .
Bumper
XRC10
What we started with
Old bumper removed, ARB unwrapped (that took a solid 15 minutes to un-wrap, that thing is Packaged well! And we broke every bolt removing the old bumper... What a pain. Remember the PB blaster!!
If you come on the forum often, you'll recall me asking how to straighten a bent frame for an ARB install, well no one knew how so here is what we did.
We started with this very bent hook
And tried to get it off, breaking both tack welds in the frame in the process... after a mild bit of cussing, and throwing tools, we got the torch out. Take that Stock crap!!
Once the hook was persuaded off, we were left with this:
So we heated it up with the torch till it glowed, then pounded the protruding part flat enough. Then we were still short two tacked nuts, and the frame was still not flat (it would be near impossible to get it perfect) so we fabbed a steel plate to stick in the frame and tack it in, with the nuts tacked to it, which solved both problems, as the nuts will sit straight, and it will sit in the frame over the bent part, hopefully making it stronger. This is probably the most ghetto part of the install, but we didn't have any other ideas.
After that, we started fabbing the new endcaps, ALA end-cap mod:
http://www.nwtoys.com/tech/frame-endcap
We used quarter inch angle iron, cut down to size, and welded in. A wire feed welder would have been much better for this, and I will probably end up re-welding it at a later date.
Once those were done, you just slide the mounting brackets on, bolt them down, and get the bumper installed. I chose to reuse the stock bolts on the one side so I could keep the hook I had, for use when I need to really pull on something, and don't want to run the risk of tweaking the bumper. Just another tool to use on the trail!
I haven't talked about installing the winch, I didn't get any pictures of this, but It really isn't too hard. You need to clock it, and it clocks perfectly so you can use the cutouts designed for the engagement lever in the bumper (which will be a huge pain to use if ever submerged, or in muck) After clocking, it basically bolts right up. I had to buy longer bolts for the Fairlead mount, as they didn't thread in as far as I liked. The wires that connect the solenoid to the winch are very short, and barely reach to the top of the bumper, and don't reach to where ARB has supplied a solenoid mount, so those will have to be lengthened.
With the winch in the bumper, its REALLY HEAVY. We used my buddies tractor, and straps to get it close to the truck carefully. Then we pushed it into place, and bolted it on. Its a bit awkward to get the bolts on, but do-able. Id have a ratcheting wrench to do it.
Then once its on, and straight enough, Respool your winch line, and go and run into things!!
No pictures of the Budbuilts, they went on as they are supposed to, very easily, I was able to do it alone, by myself with only the stock jack. The hardest part is removing the bolts to the steering rack. Bud is a good guy, and I talked to him on the phone when I ordered. Would Highly recommend ordering from him!! And his products kick ass. I smashed into a rock trying this hard line I'd been eying for about a year, but didn't think the stock skids would hold up. It was a hard impact, I got out, expecting carnage, but the rock barely scraped the paint on the buds!
Notes:
With all the added weight in a short time (the bumper and skids went on in the same weekend) I can really notice it driving around town, much less power and the front springs are sagging a lot (time to upgrade to 883s with top spacer, but it was worth it, I can now confidently drive my rig almost anywhere.
The winch takes a lot of power, and my stock setup can't supply it. I can winch for maybe 30 seconds, less under load before my low battery alarm goes off with the truck on. So next on the list is a new batter, maybe a high capacity alt, or a dual bat setup. I must say though I have no idea how old the bat I have in it is.
One more note, Both CV's lost grease out of the ends within 40 miles of putting the lift on. Replaced with new ones from Advance Auto, and kept my old ones for spares. Some of the baffles? on the new ones touch and a groove is forming, not sure how I will fix that.
I'm tired of typing now, If you have any questions, comments, feel free to post.
Last edited by Yukon; 10-14-2009 at 11:01 AM.
 10-14-2009, 11:01 AM
#3
Registered User
Join Date: Jul 2004
Location: HB, CA
Posts: 384
Likes: 0
Received 0 Likes
on
0 Posts
Great setup, i've still yet to put a winch in my ARB. Just leave your truck running while you're winching, it's common practice and won't wreck your battery. Sorry to hear about all your stuck parts, I guess it's to be expected in your area.
Last edited by CYi5; 10-14-2009 at 11:03 AM.
10-14-2009, 11:02 AM
#4
Registered User
Thread Starter
Join Date: Apr 2008
Location: Marquette, MI
Posts: 484
Likes: 0
Received 0 Likes
on
0 Posts
Trending Topics
 10-14-2009, 12:06 PM
#11
Contributing Member
Christ, 12hrs to get the bumper on!?!? Damn well it looks like you had some issues though. Man I had to install the damn thing by myself. I just wrestled it on there, then went and iced my back for the next day hahaha.
Looking good.
Looking good.
10-14-2009, 12:56 PM
#12
Registered User

Join Date: Oct 2008
Location: Dallas, TX
Posts: 129
Likes: 0
Received 0 Likes
on
0 Posts
thats what i was thinking! when i first put the arb bumper on by itself it was heavy. then when i got the winch and tried to put it back on, i just about pooped my pants/ threw my back out all at the same time.
I too am having issues with the front sagging already and i've only had the lift/bumper/winch on for a few months. I thought about just getting topout spacers for the 882's to make up for the lost height vs getting 883's but wasn't sure yet. Let me know how the new springs work out if you do decide to go that route.
I too am having issues with the front sagging already and i've only had the lift/bumper/winch on for a few months. I thought about just getting topout spacers for the 882's to make up for the lost height vs getting 883's but wasn't sure yet. Let me know how the new springs work out if you do decide to go that route.
Last edited by jdmaccord6; 10-14-2009 at 01:00 PM.
 10-14-2009, 03:32 PM
#14
Registered User
-------------- PUBLIC SERVICE ANNOUNCEMENT----------------
Using a impact wrench on a spring compressor as seen above is a recipe for serious injury or worse. You should only turn the screws SLOWLY with a large breaker bar. The speed of running them in with a impact wrench makes the threaded rods heat up and loose their strength and will cause them to shear suddenly and without warning.

Using a impact wrench on a spring compressor as seen above is a recipe for serious injury or worse. You should only turn the screws SLOWLY with a large breaker bar. The speed of running them in with a impact wrench makes the threaded rods heat up and loose their strength and will cause them to shear suddenly and without warning.
 10-14-2009, 06:10 PM
#17
Contributing Member
-------------- PUBLIC SERVICE ANNOUNCEMENT----------------
Using a impact wrench on a spring compressor as seen above is a recipe for serious injury or worse. You should only turn the screws SLOWLY with a large breaker bar. The speed of running them in with a impact wrench makes the threaded rods heat up and loose their strength and will cause them to shear suddenly and without warning.
Using a impact wrench on a spring compressor as seen above is a recipe for serious injury or worse. You should only turn the screws SLOWLY with a large breaker bar. The speed of running them in with a impact wrench makes the threaded rods heat up and loose their strength and will cause them to shear suddenly and without warning.
10-15-2009, 06:21 AM
#19
Registered User

Join Date: Mar 2007
Location: Golden,CO
Posts: 37
Likes: 0
Received 0 Likes
on
0 Posts
As for the spring compressor, Slee Offroad uses a nice wall mounted unit, with a big hand crank wheel at the top. Seems ideal and was easy to use. No I have not lifted my 4runner yet, I just worked there for a while.


