
How to Lift Body when Sliders already present
 03-21-2004, 11:35 AM
#21
Contributing Member
Thread Starter
Join Date: Mar 2003
Posts: 5,020
Likes: 0
Received 0 Likes
on
0 Posts
Thanks roger!
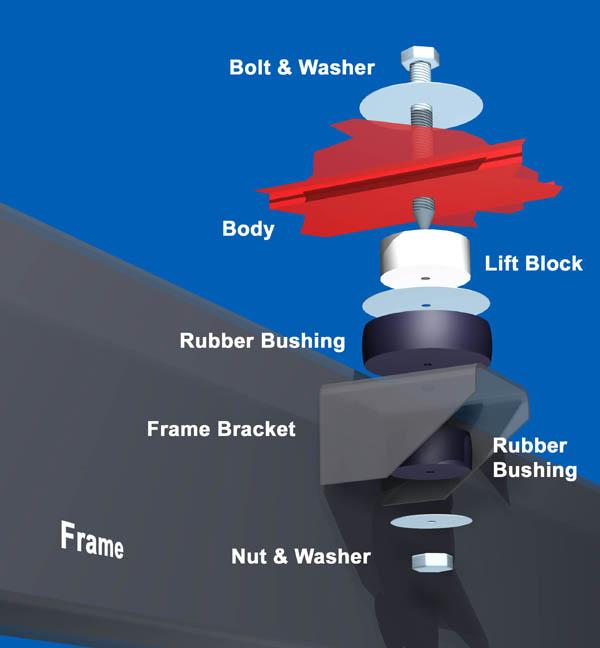
While I was waiting for a response I went ahead and removed the paneling and removed the nuts of the three bolts on the drivers side. I then lifted the drivers side and there is a 1.25 inch gap now between the body and the frame. But between the body and the frame is a washer that looks like a suction cup type of thing does that stay in there. B/c right now it is filling the space between the frame and rail, preventing me from sliding in the spacer.
Also when I removed the bolt. There is a piece of round pipe that was around the bolt that remain in there. It was wedged into the black suction cup thing. The diameter of this pipe is wider then the holes in the spacers. I went ahead and pulled it out. What is this for? Basically do I still need to keep this?

 03-27-2004, 04:59 PM
#23
Contributing Member
Thread Starter
Join Date: Mar 2003
Posts: 5,020
Likes: 0
Received 0 Likes
on
0 Posts
Ok I'm almost done. All the little "hockey pucks" are in and I lowered the truck back down on them. But the bolts aren't matching up right, so I will pull them out and try and rearrange them again, shouldn't take too long.  I don't know what you guys were talking about three hour install. I took me forever to get the old bolts off, and that steering wheel extension just wouldn't budge, and I didn't want to keep forcing it, afraid I might break it.
I'll wash her up and try to have pics up tomorrow.
Many thanks to you guys, and especially Roger. I must have e-mailed him two dozen times, and I think a phone call or two too.
I don't know what you guys were talking about three hour install. I took me forever to get the old bolts off, and that steering wheel extension just wouldn't budge, and I didn't want to keep forcing it, afraid I might break it.I'll wash her up and try to have pics up tomorrow.
Many thanks to you guys, and especially Roger. I must have e-mailed him two dozen times, and I think a phone call or two too.
03-27-2004, 05:47 PM
#24
Registered User
Join Date: Mar 2003
Location: Ann Arbor, MI
Posts: 2,785
Likes: 0
Received 0 Likes
on
0 Posts
if ur bolts aren't lining up, u might need to shift the body a little bit, or lower the body down.
Mike and I just finished mine, took 5 hours........ cuz we were trying to figure out how to lift the body. How did you do yours? We tried to stack books and 2x4's to get the bottle jack high enough, didn't work. Finally decided to slowly hi-lift the rear chrome bumper from the side with a 2x4 spreading the force. It was scary as hell, but worked. then we just stuck 2x4's between the slider and body and pushed down on the outside to lift the body.
Just one mistake that I hope nobody else does, don't ever try to lift the body with body mounts on both sides out. Cuz my body definitely shifted and scared the crap out of both of us, then the holes were totally off, luckly we were able to shift the body back in position. Then when all was done, the shifter was off. I adjusted it too much to the right. I tried to shift into reverse, it said reverse, but I started rolling forward cuz I was in neutral....... dangerous stuff.
Basically, this is a biotch to do, and I couldn't imagine doin it by myself. Hope yours goes a lot easier
03-27-2004, 06:31 PM
#25
Contributing Member
Thread Starter
Join Date: Mar 2003
Posts: 5,020
Likes: 0
Received 0 Likes
on
0 Posts
The bolt holes are all lined up, and I already lowered the truck down. I stuck a bolt through every hole to make sure everything is in place. But in the packet there are three different lengths of bolts I just have to match up the right length of bolt to the proper body mount bracket. I'm actually going to try and do it now, instead of tomorrow morning, should only take 5 min.
jacking that thing up was a B__itch. I bought a 3.5 ton floor jack that was designed for SUVs, but it was still short. So then I took a 2x4 and cut it into blocks and stacked three blocks and jacked with that. Very easy after that. I stuck a 2x4 in between the sliders and the body and pounded them in as far as I could with a hammer.
Thanks for reminding me though I still need to check the shifter, I guess I'll do that tomorrow.
wheres the pic Rob?
03-27-2004, 07:42 PM
#26
Contributing Member
Join Date: Apr 2003
Location: Albuquerque, NM
Posts: 2,549
Likes: 0
Received 0 Likes
on
0 Posts
Did you guys follow the directions roger sent? 
I think they clearly state to only loosen one side and take the other side out at a time to prevent the body from shifting. You should never have both sides out at once. :pat:
This could be a real dangerous job if not done correctly. However, when done correctly shouldn't take more than 3-4 hours tops, that includes modifying the bumper brackets to work with the new lift bracket.
I did this by myself in under 4 hours. It went very smoothly.
sdastg1, what problem are you having with the steering extension? Maybe I can help?
03-27-2004, 07:48 PM
#27
Contributing Member
Thread Starter
Join Date: Mar 2003
Posts: 5,020
Likes: 0
Received 0 Likes
on
0 Posts
The steering extension is done. Its just the bolts wouldn't come loose. I spent a good 2 hours, and every curse word I could think of just trying to get them off.
I only have two things left to do. I have:
2 long bolts- put on the front brackets
2 short bolts- put on rear mount brackets
3 regular bolts- I put those on the side
well the front ones on the side are too long. So I'm just waiting for a response from Roger on what to do next.
and the other thing is the shifter adjustment, I'll deal with that in the morning.
03-27-2004, 07:48 PM
#28
Replied to your e-mail and here, too:
Some of the 3rd gens have some funny length bolts, apparently yours is one of these (not to mention the '96s w/ missing body mounts). I can either send you a shorter bolt if you can tell me the length you need, or you can re-use one of the old stock bolts that is the right length or of course you can add a few extra washers on the end of the bolts w/o enough thread to keep the nut from bottoming out.
Sounds like you are talking about the splined clamp on the stock steering shaft, where you unbolt and let the shaft slide out while installing the lift. One way to get it to break loose is have it all bolted down at the rag joint then leave the clamp bolt loose and tap the splines with a small hammer as someone turns the wheels back and both. The force of steering plus the pull of the stretched rag joint together with the tapping usually pops the shaft free so you can install the spacer. The two short bolts in the rag joint (you don't want to try to - nor do you need to = remove the big stud-like bolts). usually come out easily.
Last edited by 4Crawler; 03-27-2004 at 07:53 PM.
03-27-2004, 07:57 PM
#29
Contributing Member
Join Date: Apr 2003
Location: Albuquerque, NM
Posts: 2,549
Likes: 0
Received 0 Likes
on
0 Posts
Yeah, Roger I meant to inform you of the wierd length bolts on my 2000.
I re-used 2 of the side bolts on the foward most side body mount, they worked fine.
I also used 2 washers on each of the rear bolts because the nut bottomed out on the threads early.
And I didn't even have to loosen the steering shaft clamp. I just put the extension in between. It went in easy. You know I also have the advantage of living in the desert, every bolt on my 4Runner comes apart like day 1, no rust here. I never even use penetrating oil.
03-27-2004, 08:02 PM
#30
Originally Posted by Albuquerque Jim
Yeah, Roger I meant to inform you of the wierd length bolts on my 2000.
I re-used 2 of the side bolts on the foward most side body mount, they worked fine.
I also used 2 washers on each of the rear bolts because the nut bottomed out on the threads early.
And I didn't even have to loosen the steering shaft clamp. I just put the extension in between. It went in easy. You know I also have the advantage of living in the desert, every bolt on my 4Runner comes apart like day 1, no rust here. I never even use penetrating oil.
I re-used 2 of the side bolts on the foward most side body mount, they worked fine.
I also used 2 washers on each of the rear bolts because the nut bottomed out on the threads early.
And I didn't even have to loosen the steering shaft clamp. I just put the extension in between. It went in easy. You know I also have the advantage of living in the desert, every bolt on my 4Runner comes apart like day 1, no rust here. I never even use penetrating oil.
And please inform me of any parts issues so I can understand the issues and get the right parts in the kits. I didn't get a lot of correct data when I first designed the kit, so there was a lot of mis-steps on the early bolt lengths. The current combination has been installed in many dozens of 3rd gens w/o any reported issues. Would 1/2" shorter be correct for the two pair of too-long bolts?
It may be a mid-generation revision like the Tacomas went throogh for the 2001 models when they changed the bolts for all the models and then added the double cab which is unique to itself. Took a little time to understand this change, but since then its not been a problem.
03-27-2004, 08:12 PM
#31
Contributing Member
Join Date: Apr 2003
Location: Albuquerque, NM
Posts: 2,549
Likes: 0
Received 0 Likes
on
0 Posts
All in all I was very happy with the kit though.
It could actually save you time by just telling people to re-use 2 of their existing bolts. Just make an addendum to the instructions you send out with the kit that explains the variation in stock configuration. And the rear bolts just need more threads. Or a slightly shorter bolt (1/4").
If you want me to measure the difference in the front side bracket bolts I can?
03-27-2004, 08:24 PM
#32
Originally Posted by Albuquerque Jim
All in all I was very happy with the kit though.
It could actually save you time by just telling people to re-use 2 of their existing bolts. Just make an addendum to the instructions you send out with the kit that explains the variation in stock configuration. And the rear bolts just need more threads. Or a slightly shorter bolt (1/4").
If you want me to measure the difference in the front side bracket bolts I can?
It could actually save you time by just telling people to re-use 2 of their existing bolts. Just make an addendum to the instructions you send out with the kit that explains the variation in stock configuration. And the rear bolts just need more threads. Or a slightly shorter bolt (1/4").
If you want me to measure the difference in the front side bracket bolts I can?
03-27-2004, 08:30 PM
#34
Originally Posted by Toyo_Runner96
the long ones go in the front, the short ones go in the rear.
03-27-2004, 08:39 PM
#35
Contributing Member
Thread Starter
Join Date: Mar 2003
Posts: 5,020
Likes: 0
Received 0 Likes
on
0 Posts
ok it works just like Jim says. Take the old middle bolts and use it up front along with the old nut. Had to hammer it a little b/c the old bolt was just a tad wider then the "puck". But still easy.
I have to stop working now, otherwise everyone in the house will start complaining, will pick up tomorrow
I have to stop working now, otherwise everyone in the house will start complaining, will pick up tomorrow
03-28-2004, 08:29 PM
#36
Registered User
Join Date: Mar 2003
Location: Ann Arbor, MI
Posts: 2,785
Likes: 0
Received 0 Likes
on
0 Posts
Ok last question, how tight are the bolts for the steering extension supposed to be? I would think u would want them pretty darn tight so they don't come loose while driving? And what about the bolt of the shifter? Pretty tight too?
03-28-2004, 08:36 PM
#37
Originally Posted by Toyo_Runner96
Ok last question, how tight are the bolts for the steering extension supposed to be? I would think u would want them pretty darn tight so they don't come loose while driving? And what about the bolt of the shifter? Pretty tight too?
http://www.4crawler.com/4x4/ForSale/...ingAdjustments
based upon the FSM table of standard fasterner torques. Not sure what size the bolt is on the shifter, but if its 8mm, then that same torque to apply, if larger, then the ~30 ft.lb. spec for the 10mm bolt would apply.
03-28-2004, 08:49 PM
#38
Contributing Member
Thread Starter
Join Date: Mar 2003
Posts: 5,020
Likes: 0
Received 0 Likes
on
0 Posts
I don't have a torque wrench, so I just tightened the ˟˟˟˟ out of it with hand tools. Steering is fine, she turns from side to side, nice and smooth.
I closed all the body panels back up today, and put the brackets for the TJM, and the tow points back on. I started her up and put her in reverse and went back about 2 feet and the forward 2 feet. There was a car behind me so I couldn't pull out of the garage. Just wondering does this mean that my shifter is fine, or do I need to adjust it still? I didn't have a chance to shift the 4wd, but it is sitting lower inside the housing.
I was cleaning up and I found the radiator brackets, so I gotta put those in tomorrow too.
03-28-2004, 08:54 PM
#39
Originally Posted by sdastg1
I don't have a torque wrench, so I just tightened the ˟˟˟˟ out of it with hand tools. Steering is fine, she turns from side to side, nice and smooth.
I closed all the body panels back up today, and put the brackets for the TJM, and the tow points back on. I started her up and put her in reverse and went back about 2 feet and the forward 2 feet. There was a car behind me so I couldn't pull out of the garage. Just wondering does this mean that my shifter is fine, or do I need to adjust it still? I didn't have a chance to shift the 4wd, but it is sitting lower inside the housing.
I was cleaning up and I found the radiator brackets, so I gotta put those in tomorrow too.
I closed all the body panels back up today, and put the brackets for the TJM, and the tow points back on. I started her up and put her in reverse and went back about 2 feet and the forward 2 feet. There was a car behind me so I couldn't pull out of the garage. Just wondering does this mean that my shifter is fine, or do I need to adjust it still? I didn't have a chance to shift the 4wd, but it is sitting lower inside the housing.
I was cleaning up and I found the radiator brackets, so I gotta put those in tomorrow too.
03-28-2004, 08:56 PM
#40
Contributing Member

Join Date: Nov 2003
Posts: 2,315
Likes: 0
Received 0 Likes
on
0 Posts
When I installed RB's 1 1/2" BL on my 99' everything went very smooth and the bolt lengths were just right. I do have to agree living in a dry climate sure makes it easy to work on your rig. It took me about an hour to install everything!


