
Terrys87 88 4Runner Restoration/Build thread
 04-25-2011 | 02:46 AM
#142
Thread Starter
Joined: Aug 2008
Posts: 11,787
Likes: 25
From: Anderson Missouri
Mark seems like he would be a great guy.Hes done alot and when he gets stuck, he keeps after it til he gets the problem solved. I follow his build alot.
One thing while you are out there, you have more acces to the junk yards then what the mid west has. i doubt Tennessee has a much better selection then what we do here in Missouri.
I would of liked to kept that truck above. I really didnt have intetnions of getting rid of it, but we just couldnt get the 4 of us in it. Should of seen it before I got it. We can all fit into the extended cab.
I like doing these projects and am able to keep it fairly reasonable. A guy I know, his brother does repos, and he said the Cash for Clunkers really brought the repo business up. They can just drive on by my house, if I dont put another dime in them, it paid for.
I am going to post thread on what I am into this project sometime today, so others can see it is resonable and maybe give them incentive.
Whoops got off track. Hope you have a great time with Mark. Let him know I enjoy his build and he has a fan club out here.
04-25-2011 | 02:52 AM
#143
Thread Starter
Joined: Aug 2008
Posts: 11,787
Likes: 25
From: Anderson Missouri
Got some more work done on the Runner. I like to clean up the area Im working in and as I had the front tire off I got some of the rust out. Also got the pinstripe off. I used a Stripe Remover and it helped, but more or less smeared it. Went over it with some wet 320 and it came off fairly easy.
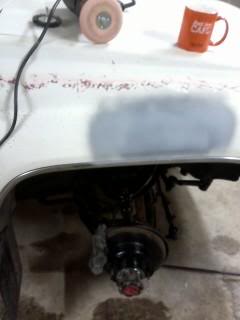
Here is the Passenger side mostly done. Still have alot of final sanding to do and prepping, but getting closer.

Here is the Passenger side mostly done. Still have alot of final sanding to do and prepping, but getting closer.
04-27-2011 | 02:04 AM
#146
Thread Starter
Joined: Aug 2008
Posts: 11,787
Likes: 25
From: Anderson Missouri
Thanks Twisted and Jason.. I been busting my butt trying to get the body work done. It is going slower than I would of liked. Tomorrow is my day off and maybe things will go better. I am hoping a week from now I get to paint it. I have a shop lined up to use.
We have gotten a lot of rain and have flooded alot of roads around here, that they cancelled school for the kiddos, so I have been playing Mr.mom and the weather has slowed me down alot.
I am so ready for summer or to get here. I ran into some hail and got a little damage. Least it happened before I got it painted.
04-28-2011 | 06:05 AM
#148
Thread Starter
Joined: Aug 2008
Posts: 11,787
Likes: 25
From: Anderson Missouri
Heloo 92.. That hail damage wasnt bad, but it is a setback. I am hoping to paint it this coming Wednesday- Friday, but I got to work this weekend and will be out of town for a day, so it is going to be close. I am begining to wonder if it will happen, but Im not giving up.
04-28-2011 | 06:54 AM
#150
Thread Starter
Joined: Aug 2008
Posts: 11,787
Likes: 25
From: Anderson Missouri
I want to do a break down on what has been done and what still needs to be done. I am allowing about $3000 for this build. It isnt going to happen over nite as that it started on January 10th of this year.
I bought a wrecked 86 4Runner with no front end or tranny/transfer case for $400.
I used the gas tank and backhatch off of it so buying those two things paid for it over out of salvage or other areas. I have used parts of it for my other trucks, starter, alternator, light switch assembly and nuts and bolts. The motor I could sell and pay for it, but I want to keep it for some other futurer project or I might need it.
What I have spent so far.
$500 for my 88.
$400 for parts truck.
$200 for head work and needed parts
$100 for paint, sandpaper,bondo, odds and ends.
$100 for Cluster Guage.
$100 for Valance, headlight, and other small thigs I might have missed.
$100 Tune up.
Still to spend/Do
$200 Paint
$200 Tires
$50 Alighnment
$150 Carpet
$200 Interior/Seats, Door Panels.
$0 Transfer Case, I have one in shed.
$200 Brakes,Fluids, bearings getting maintenance caught up.
$150 for Front bumper assembly.
$150 Clutch
$150 Shocks
Some of this might fluctuate where I spend more in one area, I hope to save in another area. I will be doing the work myself which will save alot. I will have to shop for deals, ebay, craigslist, local ads, and since this isnt a daily driver yet, Im not in no hurry.
Hope this inspires others and it can be done. Im sure I have missed somethings and will update it as I find them. As I see it to buy a used car that would be dependable would cost me around $3000 and who really knows the condition of it anyways.
Im wanting it to where I can take this and the wife can take her 91 extended cab and we can go on mild trails with the kids, be a daily driver, camp in them as I have a cap for the truck and a pull behind camper.
I have put 2000 miles on it since getting it running on short trips to work and errands without any problems. It is getting 18-20 miles per gallon if my math is right. Has 268xxx miles. This coming winter I want to do a complete motor rebuild for it even though Im not worried about the motor that is in it.
Sometimes I can only spend $25 a week on it, but it is still cheaper than 1 years worth of car payments and I enjoy it.
Last edited by Terrys87; 07-01-2011 at 05:10 AM.
04-28-2011 | 06:58 AM
#151
Thread Starter
Joined: Aug 2008
Posts: 11,787
Likes: 25
From: Anderson Missouri
Jerry... Thanks, Im really going to work at it. Trying to keep the neighbors happy, they have seen me with wrecks before so they have been giving me a break. Got some retired folks and they dont like yard ornaments laying around.
04-28-2011 | 12:20 PM
#152
Thread Starter
Joined: Aug 2008
Posts: 11,787
Likes: 25
From: Anderson Missouri
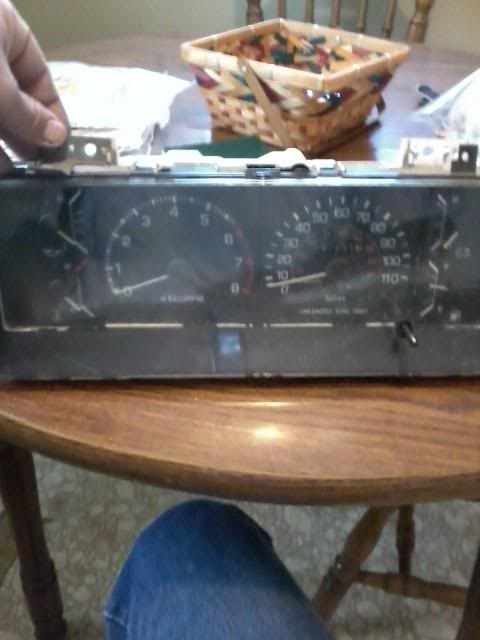
I wanted to put my SR5 Guage in and got to looking at it and wanted it cleaner. Remove the tabs that screw the cluster to the dash to get the lense off.
SR5 Guage Swap info.. https://www.yotatech.com/forums/f116...06/index2.html
I used a lense cleaner to clean it up.
I am quite happy with the results. The label says to allow up to 24 hours for the lense coating to dry. Will have to wait and see final results. Either way I am stuck with it. I have it tilted to avoid a glare while taking the picture. No matter how hard I tried, just couldnt get a good pic without the glare.
SR5 Guage Swap
Here is the Guage. I will address the cracks later.

Remove this screw and the bracket faces forward and same for other side.
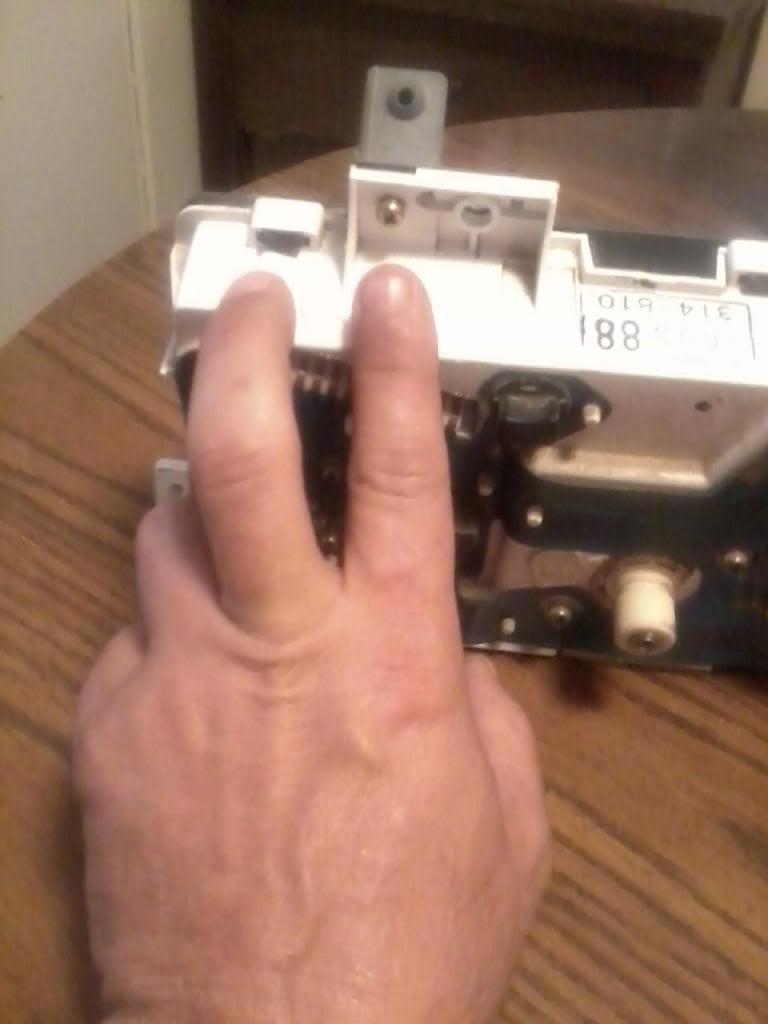
You have 4 tabs on top and 4 on bottom. I find it easier to start on one end and get the first one loose and then pry it slightly with a flat blade and then do the next tab. Same for the bottom.

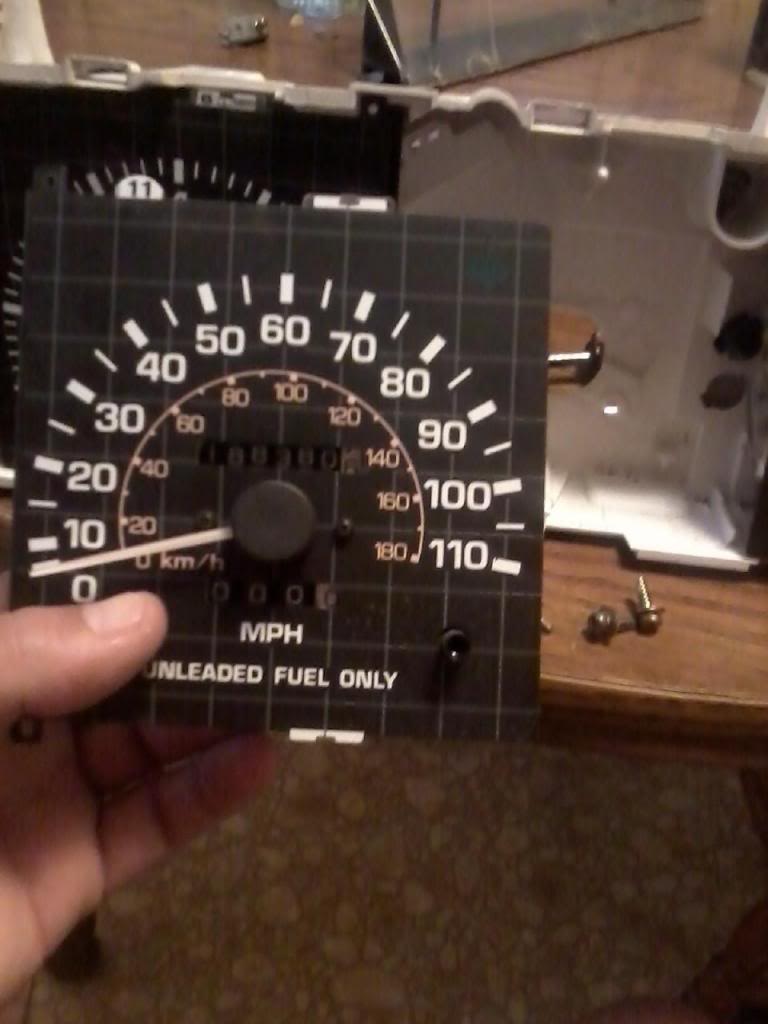
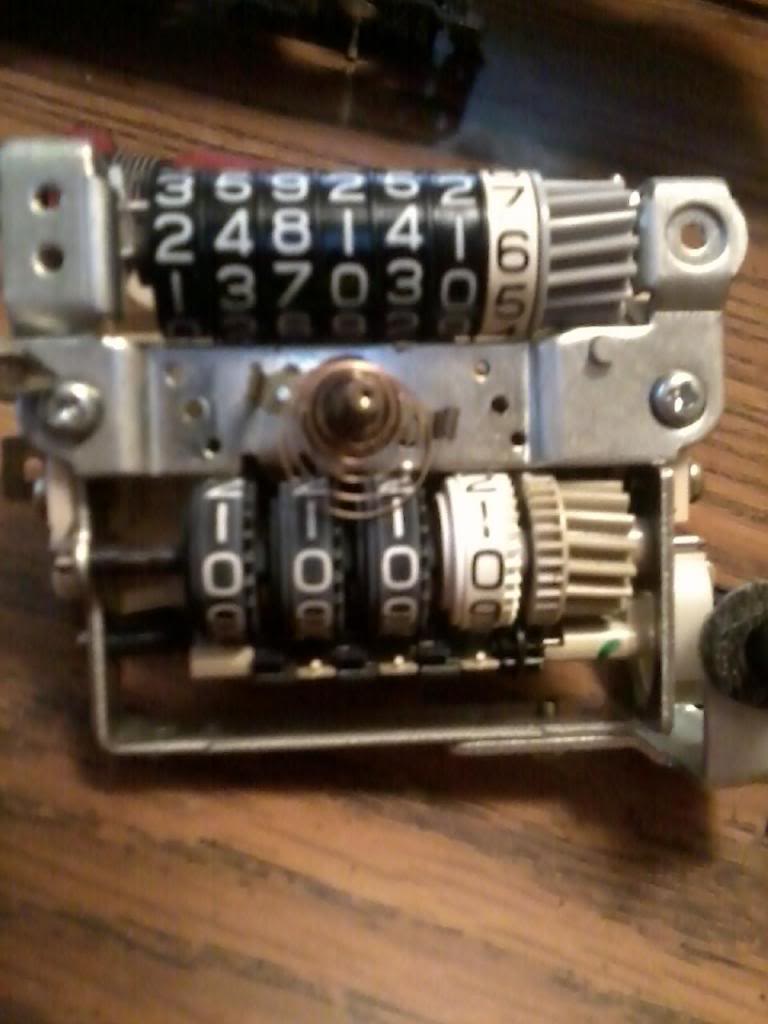
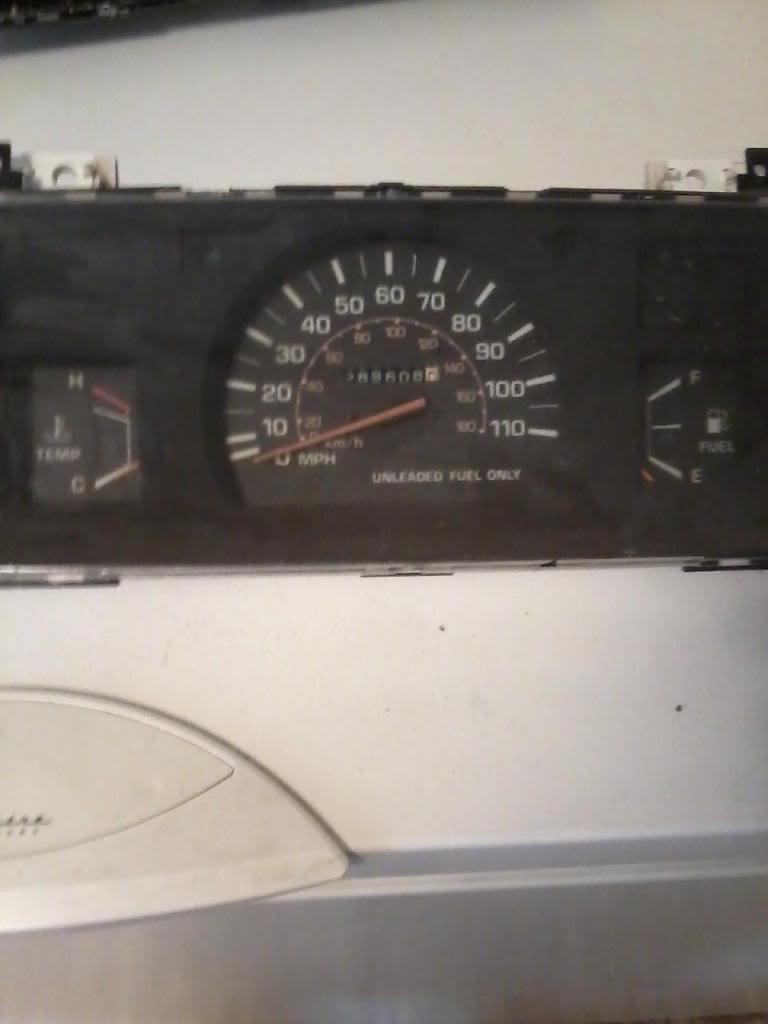
These 4 screws hold the Speedometer in the cluster. Will need to remove cluster to correct the mileage.

Here is whole assembly out. Also the Tripometer needle is taken out by spinning the whole handle to the left.
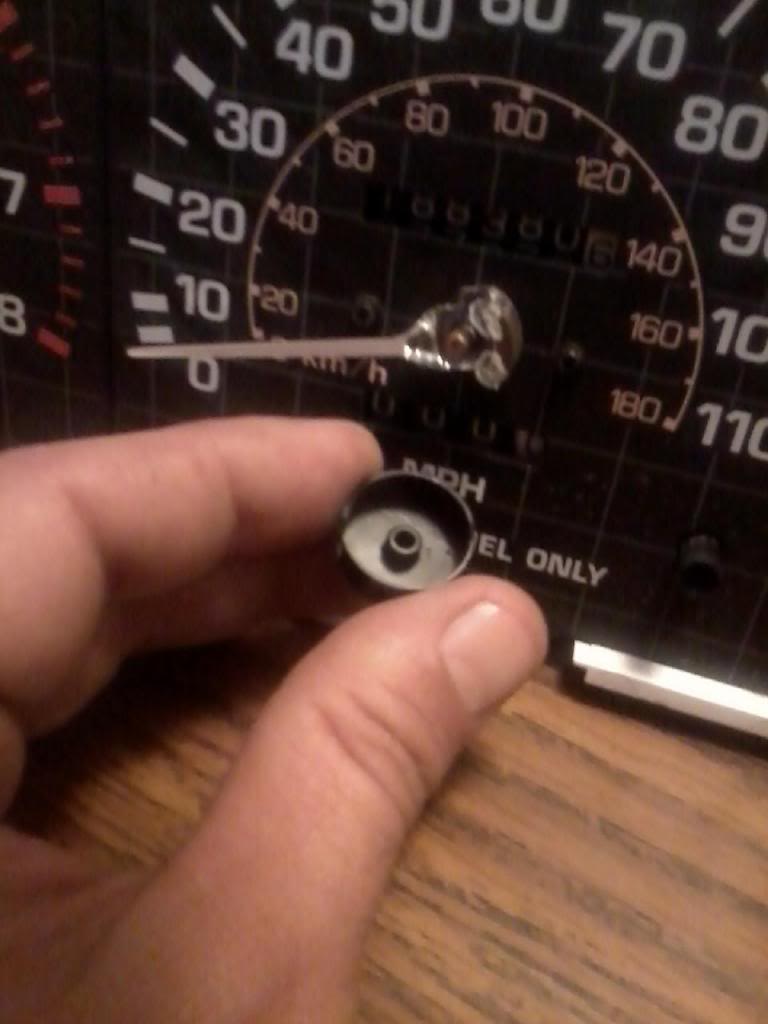
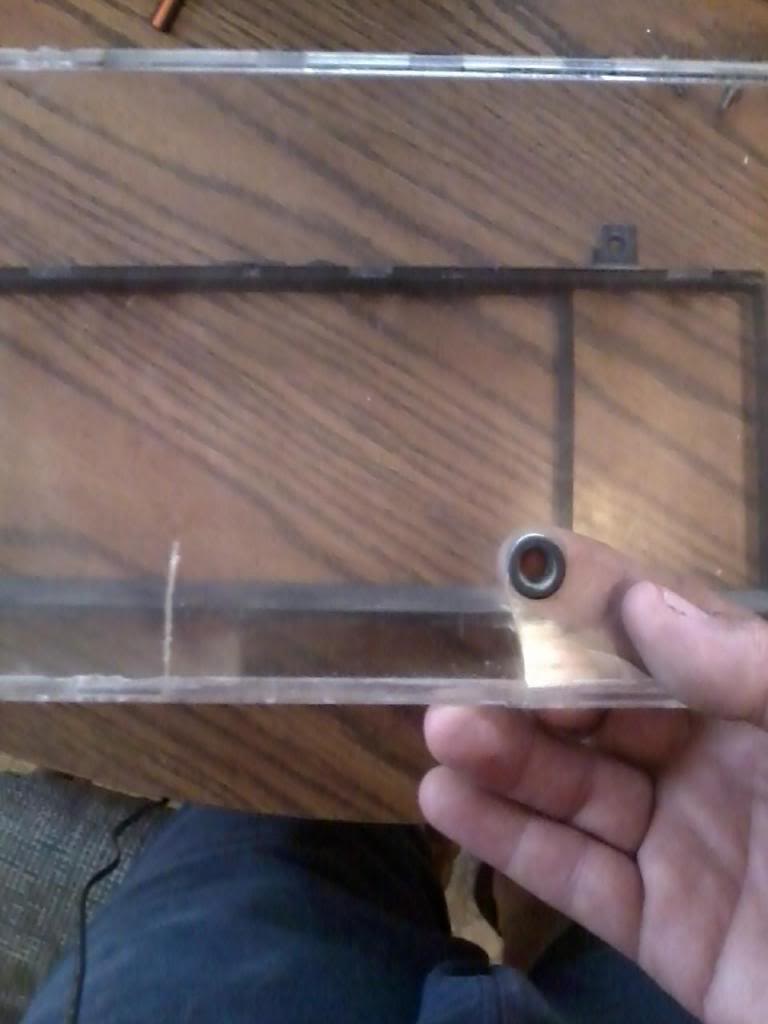
On this style of needle the round cover over the needle can and will pop off. It is just pushed back on.
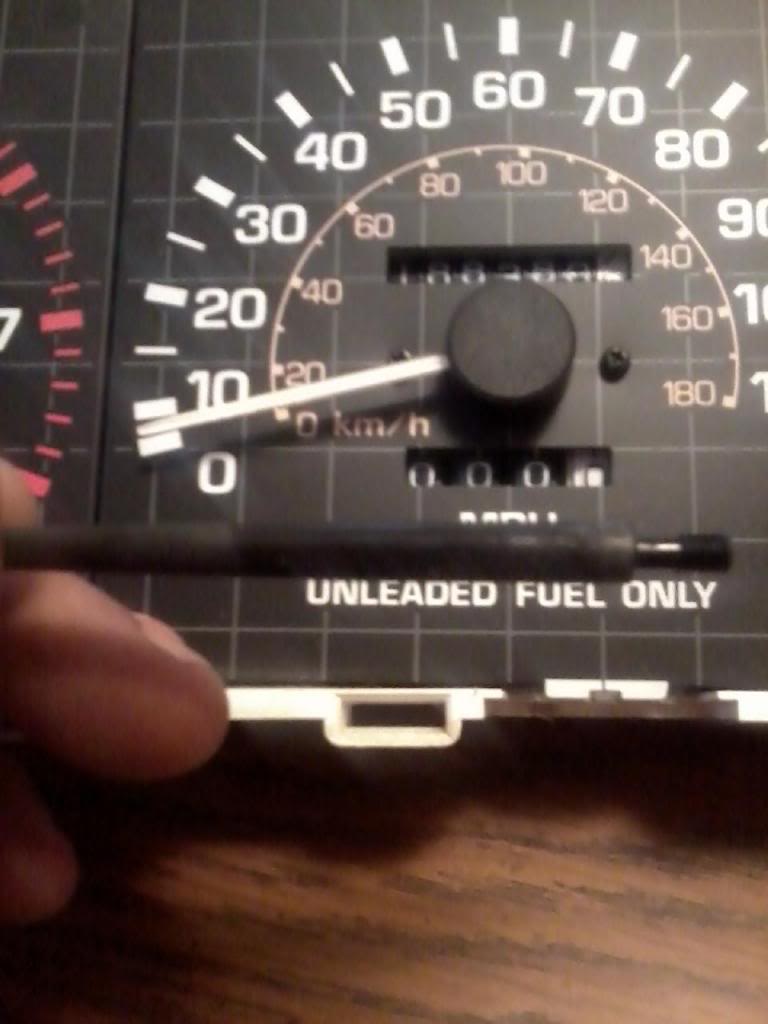
Here is cover I am talking about.
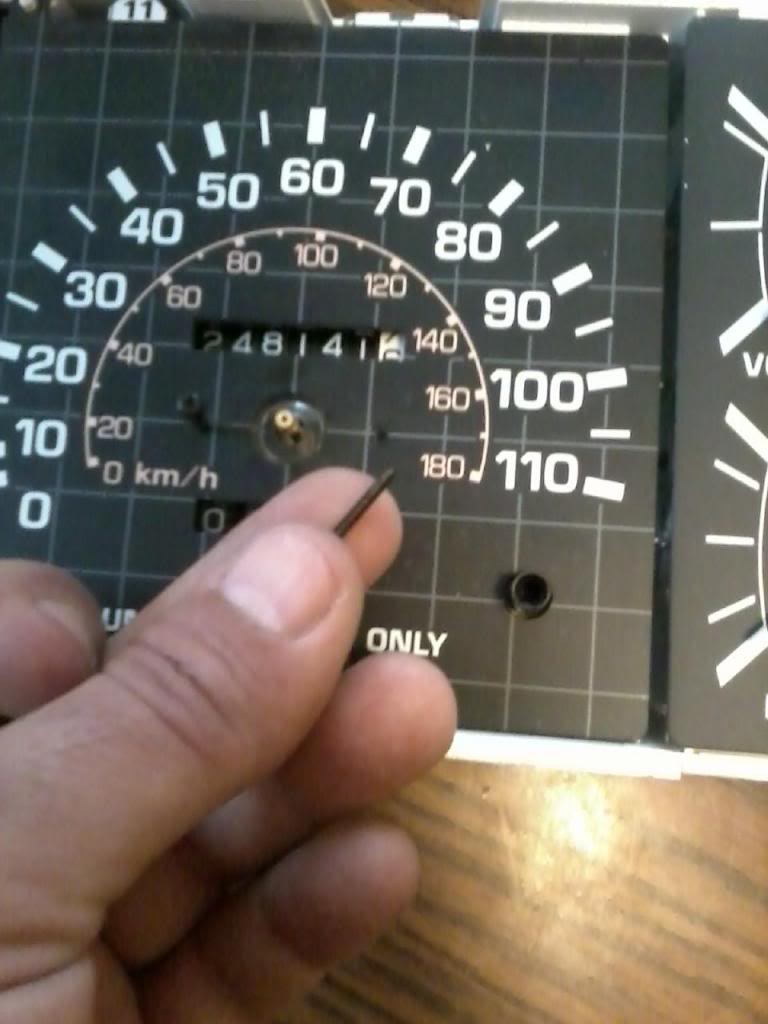
I loosen the two screws showing just a little to make it easier to correct the mileage. Start at the far right or the lowest number and work your way to the highest number and then retighten the screws.
Reinstall the plastic cover.

Then the faceplate and the two screws holding it.
FIXING CRACKED FACEPLATE
I got Toms SR5 guage from him yesterday and wanted to get the mileage corrected and the face plate is cracked. Figured it would be something that I could do inside the house. Besides the wife doesnt mind and care when she is at work and doesnt know I am doing it inside the house
Here is his SR5 Guage. Has three cracks in it. The clock below is one I got from him as well and will see if I can install it at a later time. I have seen a clock in a truck before and always thought that someone took it from another Toyota model and put it in. But Tom had this in a parts truck and now I am wondering if it wasnt an option. I seen the same clock as well. I figured that since the clock option was always by the heater control, Toyota wouldnt offer it elsewhere.
Cracked faceplate.
Standard guage.
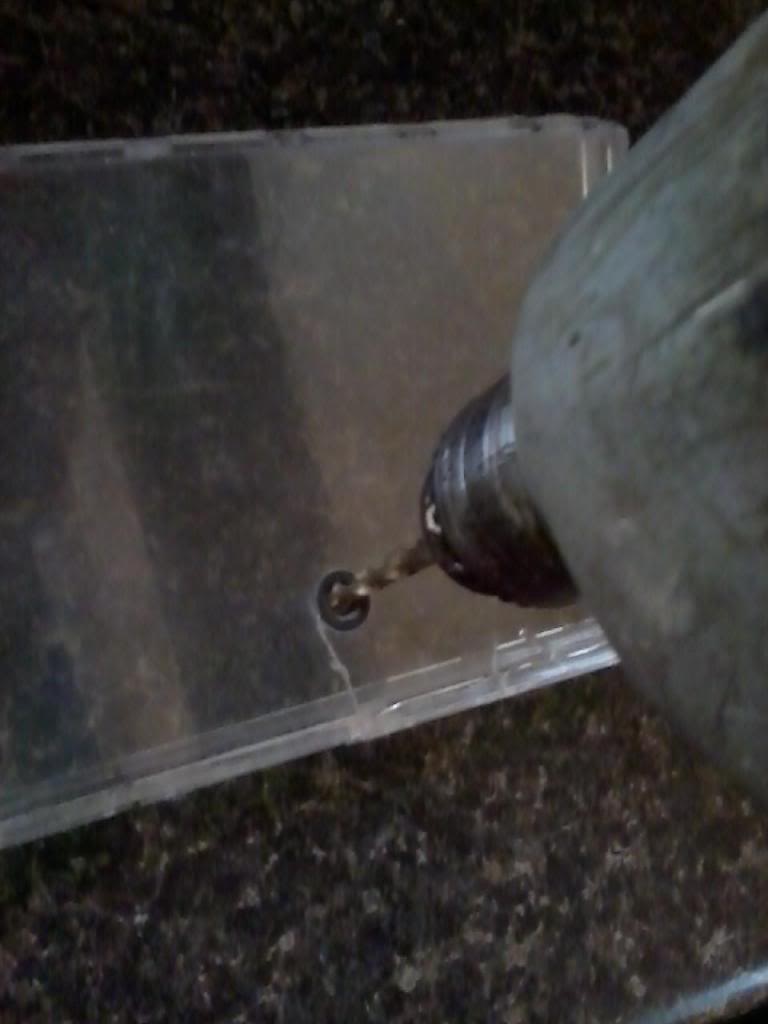
The SR5 Guage just has two lines that run on the ends of it. I gently took a flat blade screwdriver and seperated the plastic from the black part on both covers. The SR5 plastic has a little rubber grommet and the hole for the tripometer is quite large. I just put the two covers on top each other and used the grommet as a guide and drilled the hole.
The two covers are stacked on top of each other with the SR5 on top. Doesnt look like it but it is there. I then drilled the hole and when I got the hole I did several test fits and seeing which way I needed to enlarge the hole for the tripometer handle to reconnect and have plenty of room to operate.
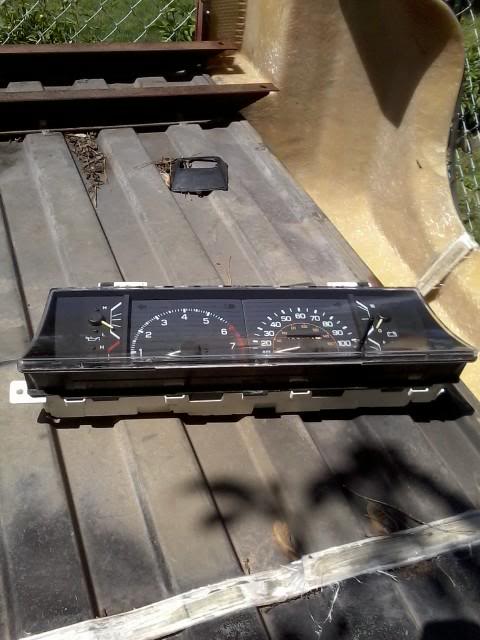
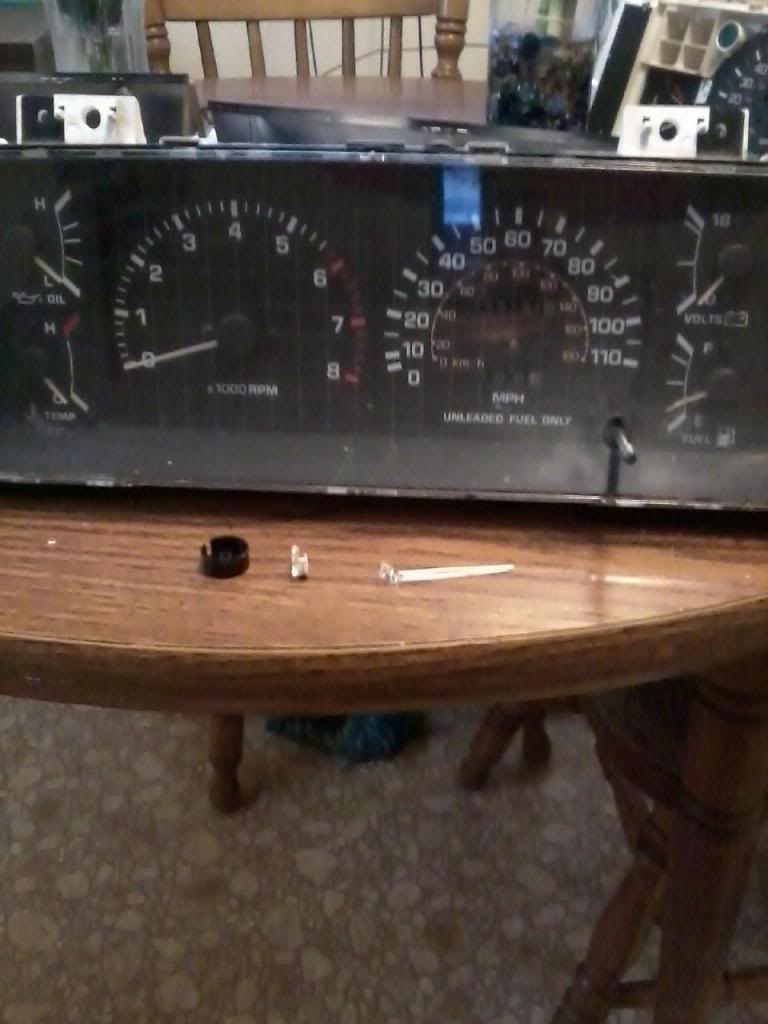
Here it is with the Standard Cover on a SR5 Gauge. I just used Super Glue to reseat the cover on. I also got the mileage corrected while working on the guage assembly. One set back is while trying to get the needle off, it broke. It was being stubborn. I worked it gently for 30 minutes and it still wouldnt come until SNAP. I am not worried. I do have another guage, but Jason is sending me one that is bad but the speedometer is good. One small setback.
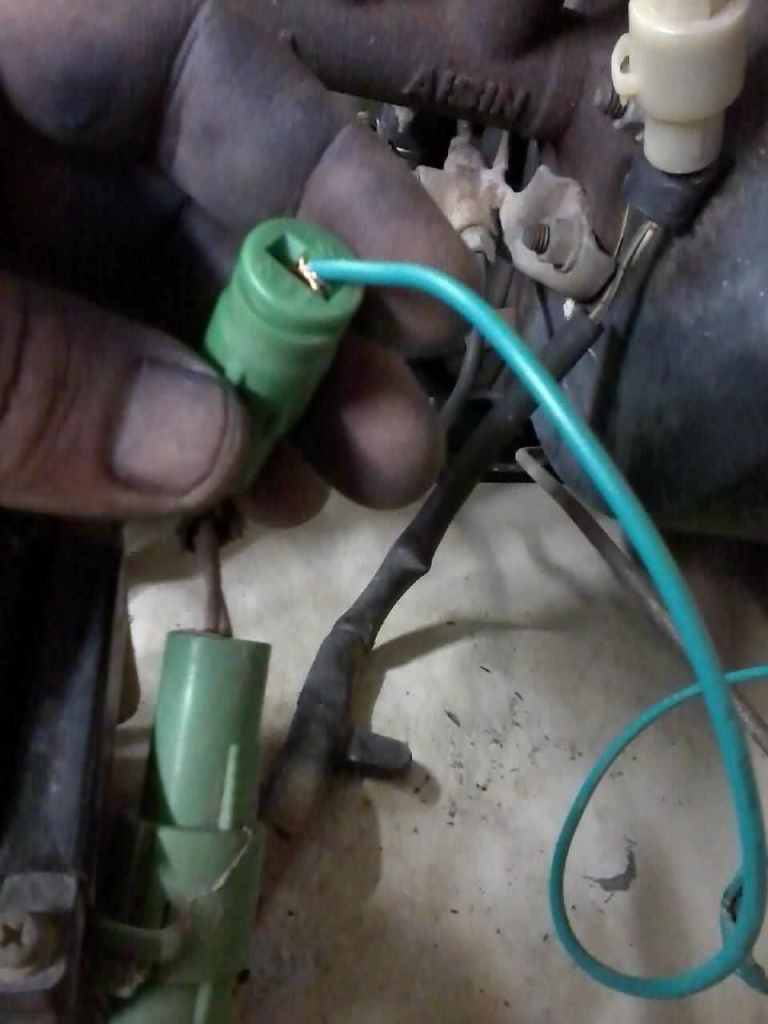
This truck didnt come with the SR5 guage so I added it. If your truck is not Plug and Play like some are, you need to run a wire from the negative side of the coil to the little "p" to make the tach work.

Then what I did so as not to short out the electrical run beside it. I placed a piece of electrical tape over the little "p" and crimped a wire to the smallest connector that I could find.

I then ran a wire to the negative side of the coil, on a carburator coil it is a little different then a standard coil you are most used to seeing. This is a temporary connection til I can come up with a better connection for it later on.
I have mentioned that I dont care for the SR5 guage that has the hashmarks on the face. The needle will break on you when you try to remove it. Here is some videos on how to do it without breaking the needle.
SR5 Guage Swap info.. https://www.yotatech.com/forums/f116...06/index2.html
I used a lense cleaner to clean it up.
I am quite happy with the results. The label says to allow up to 24 hours for the lense coating to dry. Will have to wait and see final results. Either way I am stuck with it. I have it tilted to avoid a glare while taking the picture. No matter how hard I tried, just couldnt get a good pic without the glare.
SR5 Guage Swap
Here is the Guage. I will address the cracks later.

Remove this screw and the bracket faces forward and same for other side.

You have 4 tabs on top and 4 on bottom. I find it easier to start on one end and get the first one loose and then pry it slightly with a flat blade and then do the next tab. Same for the bottom.

These 4 screws hold the Speedometer in the cluster. Will need to remove cluster to correct the mileage.

Here is whole assembly out. Also the Tripometer needle is taken out by spinning the whole handle to the left.

On this style of needle the round cover over the needle can and will pop off. It is just pushed back on.

Here is cover I am talking about.

I loosen the two screws showing just a little to make it easier to correct the mileage. Start at the far right or the lowest number and work your way to the highest number and then retighten the screws.

Reinstall the plastic cover.

Then the faceplate and the two screws holding it.

FIXING CRACKED FACEPLATE
I got Toms SR5 guage from him yesterday and wanted to get the mileage corrected and the face plate is cracked. Figured it would be something that I could do inside the house. Besides the wife doesnt mind and care when she is at work and doesnt know I am doing it inside the house
Here is his SR5 Guage. Has three cracks in it. The clock below is one I got from him as well and will see if I can install it at a later time. I have seen a clock in a truck before and always thought that someone took it from another Toyota model and put it in. But Tom had this in a parts truck and now I am wondering if it wasnt an option. I seen the same clock as well. I figured that since the clock option was always by the heater control, Toyota wouldnt offer it elsewhere.
Cracked faceplate.
Standard guage.

The SR5 Guage just has two lines that run on the ends of it. I gently took a flat blade screwdriver and seperated the plastic from the black part on both covers. The SR5 plastic has a little rubber grommet and the hole for the tripometer is quite large. I just put the two covers on top each other and used the grommet as a guide and drilled the hole.

The two covers are stacked on top of each other with the SR5 on top. Doesnt look like it but it is there. I then drilled the hole and when I got the hole I did several test fits and seeing which way I needed to enlarge the hole for the tripometer handle to reconnect and have plenty of room to operate.

Here it is with the Standard Cover on a SR5 Gauge. I just used Super Glue to reseat the cover on. I also got the mileage corrected while working on the guage assembly. One set back is while trying to get the needle off, it broke. It was being stubborn. I worked it gently for 30 minutes and it still wouldnt come until SNAP. I am not worried. I do have another guage, but Jason is sending me one that is bad but the speedometer is good. One small setback.

This truck didnt come with the SR5 guage so I added it. If your truck is not Plug and Play like some are, you need to run a wire from the negative side of the coil to the little "p" to make the tach work.
Then what I did so as not to short out the electrical run beside it. I placed a piece of electrical tape over the little "p" and crimped a wire to the smallest connector that I could find.
I then ran a wire to the negative side of the coil, on a carburator coil it is a little different then a standard coil you are most used to seeing. This is a temporary connection til I can come up with a better connection for it later on.
I have mentioned that I dont care for the SR5 guage that has the hashmarks on the face. The needle will break on you when you try to remove it. Here is some videos on how to do it without breaking the needle.
Last edited by Terrys87; 05-28-2015 at 04:31 AM.
04-28-2011 | 12:24 PM
#153
Thread Starter
Joined: Aug 2008
Posts: 11,787
Likes: 25
From: Anderson Missouri
I got started on repairing some hail damage that I got two days ago.
I am trying to keep all of my photos to 480x640, but as you can tell on previous post it doesnt all ways work out that way. Seems like my phone changes on me.
Hail damage is on hood and side.
I am trying to keep all of my photos to 480x640, but as you can tell on previous post it doesnt all ways work out that way. Seems like my phone changes on me.
Hail damage is on hood and side.
Last edited by Terrys87; 04-28-2011 at 12:42 PM.
04-28-2011 | 02:46 PM
#155
Thread Starter
Joined: Aug 2008
Posts: 11,787
Likes: 25
From: Anderson Missouri
Needs some help.
I will be going with a white and want to use the same white on body and top.
I have been Googling about painiting fiberglass. The only information I can find on the net apply to Corvettes or boats type of painting.
I am looking on Yotatech and I looked at slackers build for some tips. These tops have a rough texture so I dont want to lose that as my top is in excellent shape.
I want to do this right. I am sure there is more then a good cleaning and priming.
I found this link. https://www.yotatech.com/forums/f116...er-top-221434/
Last edited by Terrys87; 04-28-2011 at 03:11 PM.
04-28-2011 | 05:02 PM
#156
Thread Starter
Joined: Aug 2008
Posts: 11,787
Likes: 25
From: Anderson Missouri
Thanks Twisted.. I am hoping between next Wednesday to Friday to paint. Still have a ton of sanding to do and I will be gone this weekend and coming Tuesday. I still hoping, will just have to wait and see.
05-02-2011 | 06:33 AM
#159
Thread Starter
Joined: Aug 2008
Posts: 11,787
Likes: 25
From: Anderson Missouri
Hello Jason and mfwimg82.. Thanks for the tips. I feel really confident in doing the top now. I was hoping to paint this week, but I was out of town for the weekend and will be out again tomorrow.
I just dont see it happening as I still have to block sand and wet sand it. I havent given up, as I would really like to see this in paint.
I just dont see it happening as I still have to block sand and wet sand it. I havent given up, as I would really like to see this in paint.
05-02-2011 | 06:39 AM
#160
Thread Starter
Joined: Aug 2008
Posts: 11,787
Likes: 25
From: Anderson Missouri
I got in late last nite and got my SR5 guage in. The tachometer is about 1000 RPM off and I still need to get the Oil Pressure Sending Unit to connect the Oil Guage up. I like to know what is going on under the hood. Having factory hook ups is a lot nicer then having to put in guages elsewhere in the truck.
The tach I think just needs to be adjusted and seems to be fairly easy. I have seen in it in a thread somewhere on here. Just got to find it.
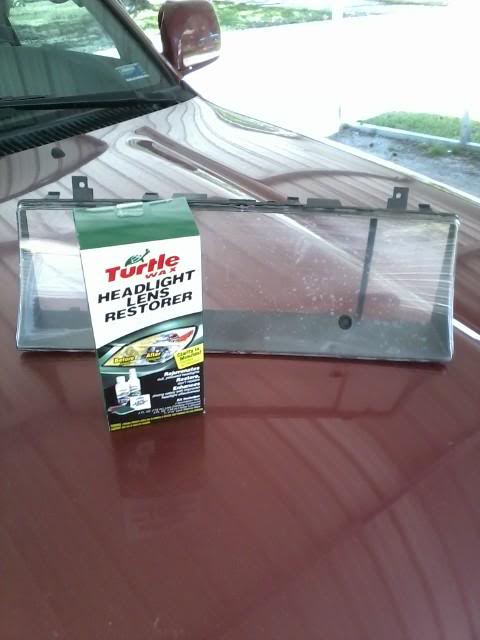
I was really happy how the Lense Restorer worked out. You have to let it dry for at least 24 hours, but it turned out really well. It looks better the what the pic is showing, just my camera that makes the lense look cloudy.

The tach I think just needs to be adjusted and seems to be fairly easy. I have seen in it in a thread somewhere on here. Just got to find it.
I was really happy how the Lense Restorer worked out. You have to let it dry for at least 24 hours, but it turned out really well. It looks better the what the pic is showing, just my camera that makes the lense look cloudy.
Last edited by Terrys87; 05-05-2011 at 03:47 PM.


