
Terrys87 88 4Runner Restoration/Build thread
 01-22-2017, 11:02 PM
#1421
Super Moderator
Staff
Thread Starter
iTrader: (1)
Join Date: Aug 2008
Location: Anderson Missouri
Posts: 11,788
Likes: 0
Received 25 Likes
on
22 Posts
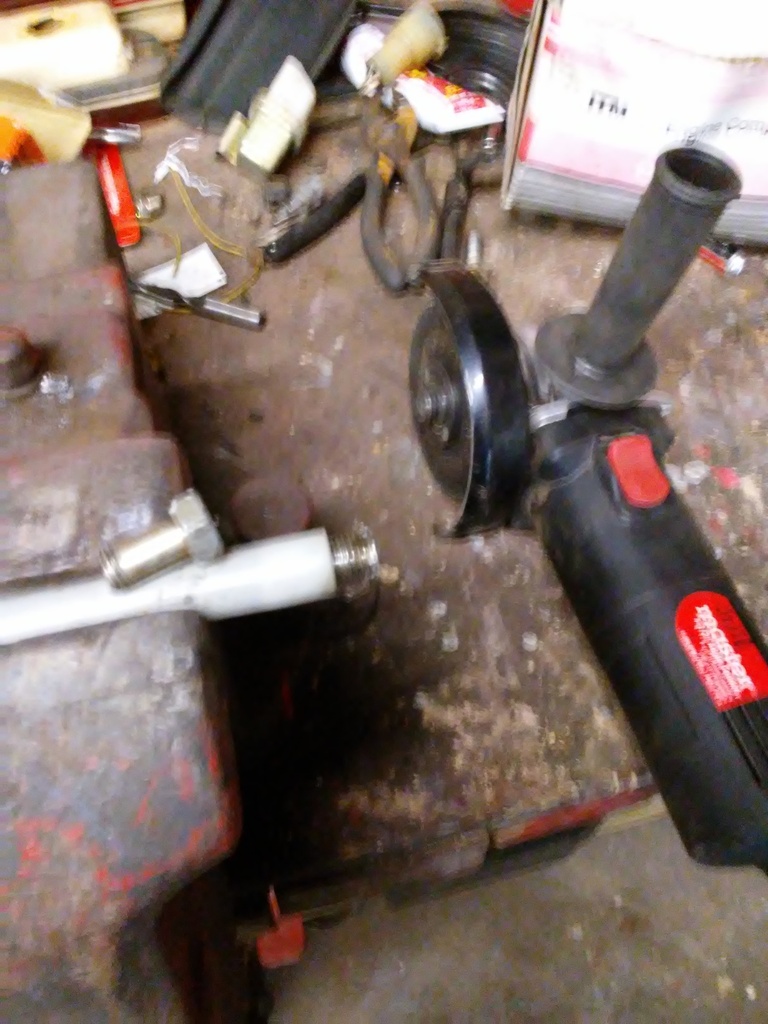
Hello 92ehatch... What I do is take a course thread bolt and thread it into the broken plastic support pipe and then I cut the head off of the bolt and thread it into the other end of the broken of the plastic Or I will use a bolt with course threads and has a smooth shank above the threads and glue it into the plastic pipe. Below is not the best picture but hope it will give an idea of how I do it.
Copied....
Not the best picture, but in the top picture you can see I just found a bolt that threaded into the two broken pieces and cut the head off twisted them together. I have done this before and it works great.
Broken

Twisted into one fixed piece.
 e
e
Copied....
Not the best picture, but in the top picture you can see I just found a bolt that threaded into the two broken pieces and cut the head off twisted them together. I have done this before and it works great.
Broken
Twisted into one fixed piece.
e
 01-22-2017, 11:17 PM
#1422
Super Moderator
Staff
Thread Starter
iTrader: (1)
Join Date: Aug 2008
Location: Anderson Missouri
Posts: 11,788
Likes: 0
Received 25 Likes
on
22 Posts
Hello Co 94 Pu... The silver vertical tank has painted many trucks. It is a 20 gallon air tank. I have never had any problems with it or running out of air when painting. It has worked great. When painting, you are on and off the trigger that it has time to build up pressure. Also when my paint cup runs out, it has plenty of time to build back up when you have to do a refill. I did have to add gauges and way to adjust air pressure for painting and then to be able to increase it for the Impact wrench. It will run an Impact Wrench but just for short periods of time.
In the top left of the picture above you can see the bottom half of a vertical tank that is a 30 gallon air compressor. I used it to paint the last two trucks I have done. Eventually I want to get a big air compressor but those are not in the budget anytime soon so will have to make due with the 30 gallon. Either compressor has done great for what I have needed them to do when painting.
I worked part time in a body shop and it is nice having the tools to do some collision work, but most of those tools can be improvised. The first truck I had to do hail damage repair on the cab roof didnt take me long to understand why they will replace a hood. Getting all of those dents out can be a big job. When one is in primer, they are easily over looked but will show up quick with the first light coat of paint. I am not sure if I will ever get good enough to paint one black. Black has to be perfect.
I eventually want to learn to do a better job of hammer and dolly and also to shrink metal. There is a skill to it and it does take practice. Sorry to hear about the mail box incident. I am hoping that with my kids that they see what is involved with repair work that they will not hit my mail box or any other damage.
01-22-2017, 11:34 PM
#1423
Super Moderator
Staff
Thread Starter
iTrader: (1)
Join Date: Aug 2008
Location: Anderson Missouri
Posts: 11,788
Likes: 0
Received 25 Likes
on
22 Posts
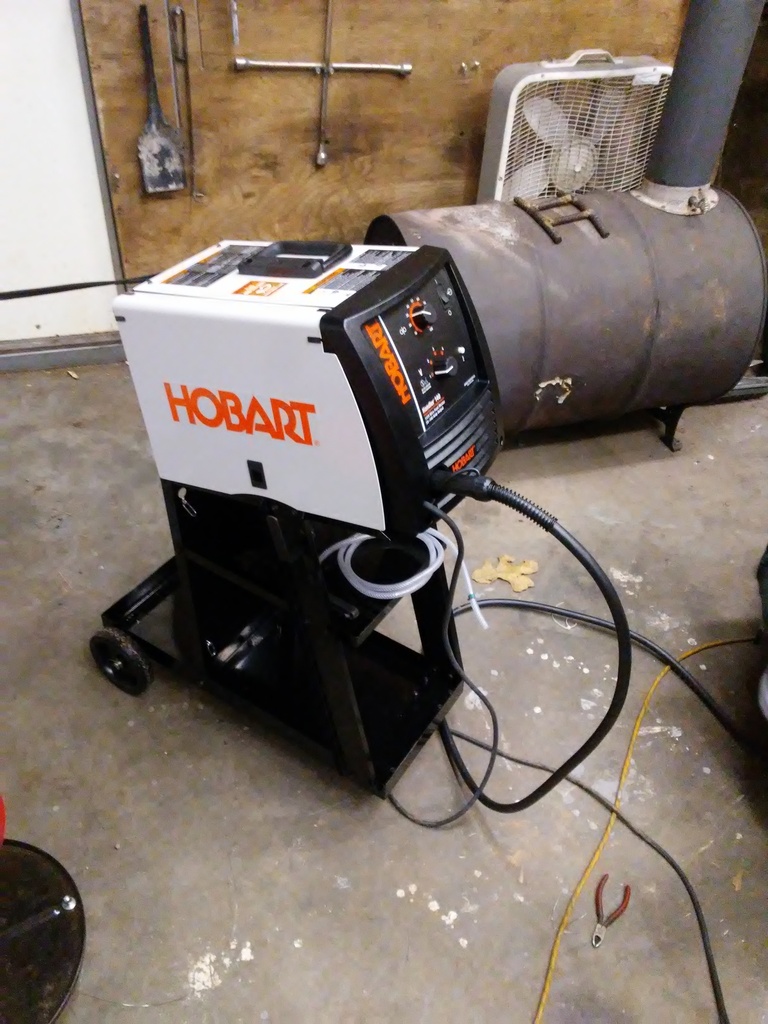
I bought myself a welder for Christmas and it has been in the box ever since. I was waiting on getting the funds for a stand for it. I did some searching for the best stand and surprisingly, Harbor Freight had one that had the best reviews. I got the stand the other day and finally got the welder on it. The reviews did say that the door on the side of the welder will not open and some just put a sheet of plywood under the welder for the door to clear the sides of the cart.
I have a cheap Harbor Freight welder and it did half of the jobs I wanted it to do but was not able to do sheet metal repair with it. This Hobart I think will do what I want to be able to when I learn how to get it dialed in and get some practice with it. I am still saving up to get the gas bottle for it so that I dont have to use the Flux Core wire. It will be a while longer before I can get the gas and switch over to gas shielding. Really am liking this welder and looking forward to learning and doing a lot with it. Mostly so I can do some patch panel repair on my 76.
This truck has been an excellent project for Justin to learn on. Here is Justin just getting used to the mask and when it does auto darkening, and getting used to pulling the trigger on the welder. I let him burn thru a lot of wire and it did not take him long to figure out how to adjust the wire speed. I did show him that you can use a welder to cut metal by cranking it all the way up and letting it burn the metal in two. We temporarily installed the old core support for him to practice on and I too need to practice welding.
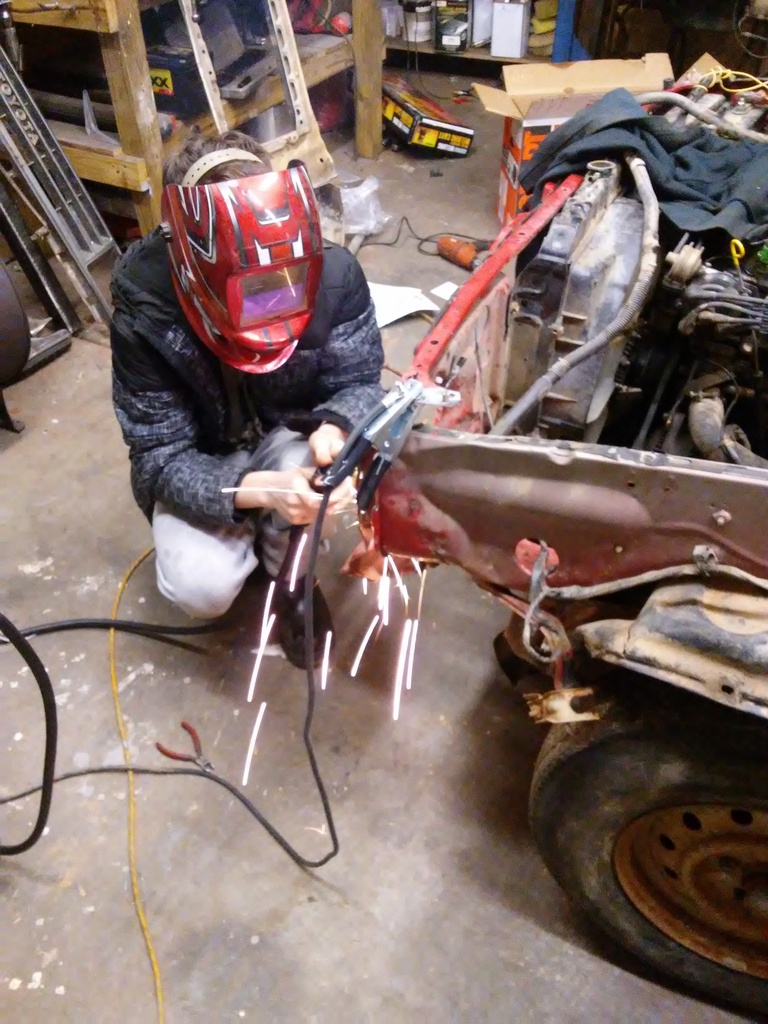
Here is a hole that he filled in. I showed him that a welder will not weld over paint and that it needs to be bare metal to get it going. It did not take him long to figure out wire speed and getting the mask set up to the way he liked it where it would auto darken to his liking. I told him to start searching Youtube for information on stitch welding, for patch panels and not to warp sheet metal and other things that he can learn on the internet. I told him that one day he could get good enough to build his own bumpers or other things. Eventually I will get a tube bender and a chop saw. I do have cutoff saw that will work, just have to improvise. He is really starting to like all of the different projects this truck has provided. Electrical, mechanical and now some welding.
Not a good example of a weld but it did teach him some of the things involved with welding and is one of his first practice welds. I also let him know he could get a bad sunburn if not completely covered up.
You cant really see it but the worse part of the damage was on the drivers side inner fender. I did have to do some relief cuts to get some kinks out of the inner fender. We had to pull a lot of the inner fender back to where it should be and with the bare bones basic tools we were able to get it to where we needed it to be. We will have to do some stitch welding to cover up the relief cuts but really liked how we were able to get it back into shape.
I have a cheap Harbor Freight welder and it did half of the jobs I wanted it to do but was not able to do sheet metal repair with it. This Hobart I think will do what I want to be able to when I learn how to get it dialed in and get some practice with it. I am still saving up to get the gas bottle for it so that I dont have to use the Flux Core wire. It will be a while longer before I can get the gas and switch over to gas shielding. Really am liking this welder and looking forward to learning and doing a lot with it. Mostly so I can do some patch panel repair on my 76.

This truck has been an excellent project for Justin to learn on. Here is Justin just getting used to the mask and when it does auto darkening, and getting used to pulling the trigger on the welder. I let him burn thru a lot of wire and it did not take him long to figure out how to adjust the wire speed. I did show him that you can use a welder to cut metal by cranking it all the way up and letting it burn the metal in two. We temporarily installed the old core support for him to practice on and I too need to practice welding.

Here is a hole that he filled in. I showed him that a welder will not weld over paint and that it needs to be bare metal to get it going. It did not take him long to figure out wire speed and getting the mask set up to the way he liked it where it would auto darken to his liking. I told him to start searching Youtube for information on stitch welding, for patch panels and not to warp sheet metal and other things that he can learn on the internet. I told him that one day he could get good enough to build his own bumpers or other things. Eventually I will get a tube bender and a chop saw. I do have cutoff saw that will work, just have to improvise. He is really starting to like all of the different projects this truck has provided. Electrical, mechanical and now some welding.
Not a good example of a weld but it did teach him some of the things involved with welding and is one of his first practice welds. I also let him know he could get a bad sunburn if not completely covered up.

You cant really see it but the worse part of the damage was on the drivers side inner fender. I did have to do some relief cuts to get some kinks out of the inner fender. We had to pull a lot of the inner fender back to where it should be and with the bare bones basic tools we were able to get it to where we needed it to be. We will have to do some stitch welding to cover up the relief cuts but really liked how we were able to get it back into shape.
Last edited by Terrys87; 01-22-2017 at 11:38 PM.
01-23-2017, 03:03 AM
#1424
Registered User

Join Date: Jan 2015
Location: Hendersonville NC
Posts: 652
Likes: 0
Received 0 Likes
on
0 Posts
That welder is essentially the same thing i have except mine will not accept a gas bottle. I love mine (auto arc) and comparing it to the Lincoln at work mine functions way better.
01-23-2017, 05:38 AM
#1425
Contributing Member
Have I mentioned how lucky your son is?
 01-23-2017, 08:26 AM
#1426

Safety gear
Great stuff you two!
But you sometimes make me feel like "a wet blanket". A head cover is very important, particular for a teenager who doesn't want to shave his head. Also be very mindful of clothing, everything from socks on up should be as free of plastics as you can and preferred leather. I can't tell you how many times I've set myself on fire and not even noticed or ruined a pair of pants "because it's just a quick little grind". Very proud to say I was TOLD to back off or go put on coveralls the last time we were in the shop since I didn't remember to change clothes first.
But you sometimes make me feel like "a wet blanket". A head cover is very important, particular for a teenager who doesn't want to shave his head. Also be very mindful of clothing, everything from socks on up should be as free of plastics as you can and preferred leather. I can't tell you how many times I've set myself on fire and not even noticed or ruined a pair of pants "because it's just a quick little grind". Very proud to say I was TOLD to back off or go put on coveralls the last time we were in the shop since I didn't remember to change clothes first.
01-26-2017, 05:57 AM
#1427
Super Moderator
Staff
Thread Starter
iTrader: (1)
Join Date: Aug 2008
Location: Anderson Missouri
Posts: 11,788
Likes: 0
Received 25 Likes
on
22 Posts
Hello 92ehatch... Without the gas, I am really impressed at how it is working. I looked at all the the brands and from what I seen they were all about the same from reviews. I just happened to catch mine on sale and it was the deciding factor. I am curious if the gas will make a big difference but really think I just need to get some welding time in would make the biggest difference.
Thanks Hab... It has been giving us a lot more time together. Maybe he will get good enough at welding that I can have him to do the welding. He is liking it and working with the different speeds and voltage and liking what it does.
Thanks Co94 Pu... Man are you right. We have both done some dancing around with getting sparks in our shoes or on our hands. We are wearing gloves but they are not long enough to cover some exposed skin where the jacket may slide up. I already got him in trouble with mom for some damaged cloths. With each new tool comes with all the accessories. I want to get another hood so we dont have to keep changing each other settings and welding gloves, and a jacket.
01-26-2017, 06:02 AM
#1428
Super Moderator
Staff
Thread Starter
iTrader: (1)
Join Date: Aug 2008
Location: Anderson Missouri
Posts: 11,788
Likes: 0
Received 25 Likes
on
22 Posts
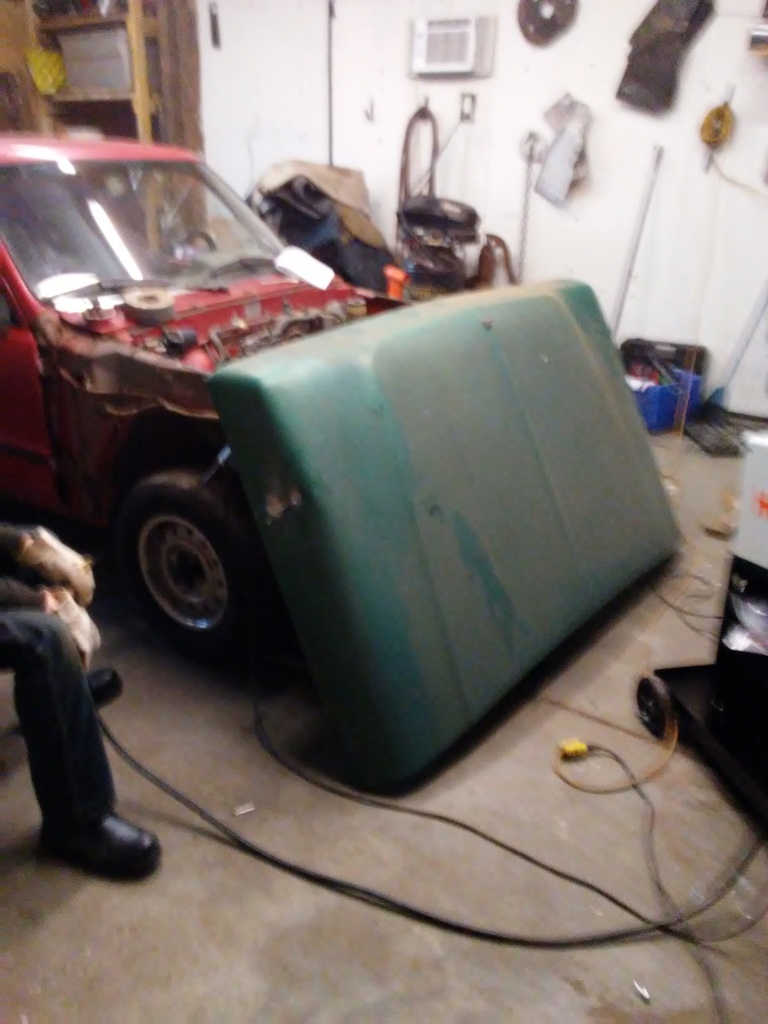
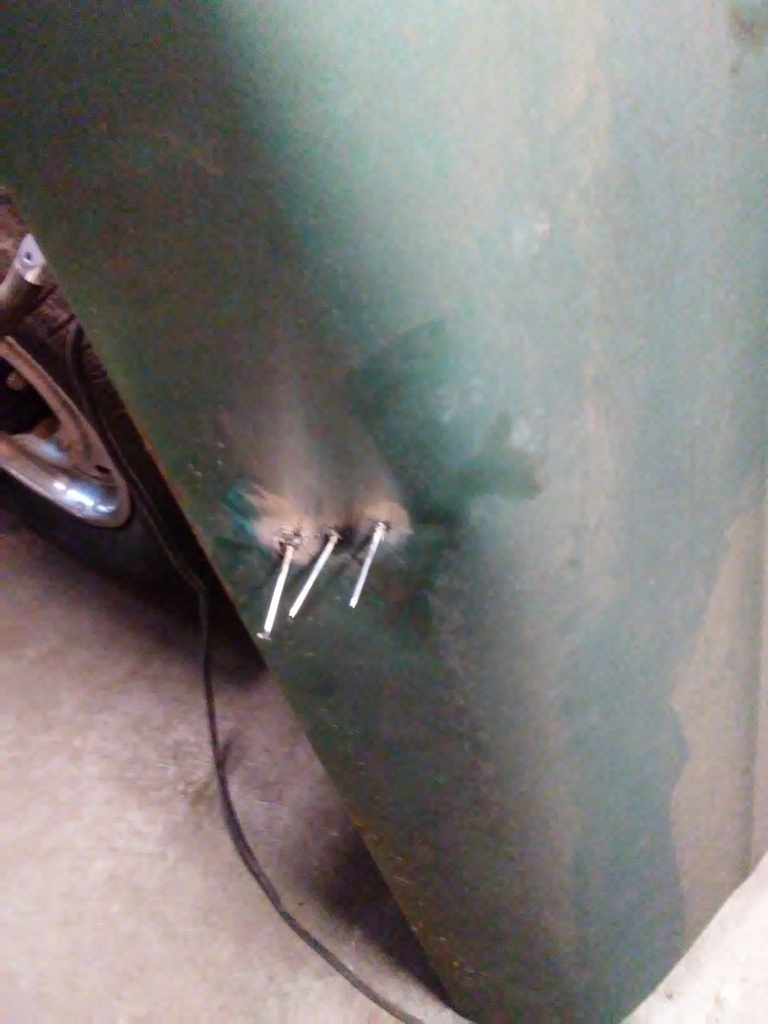
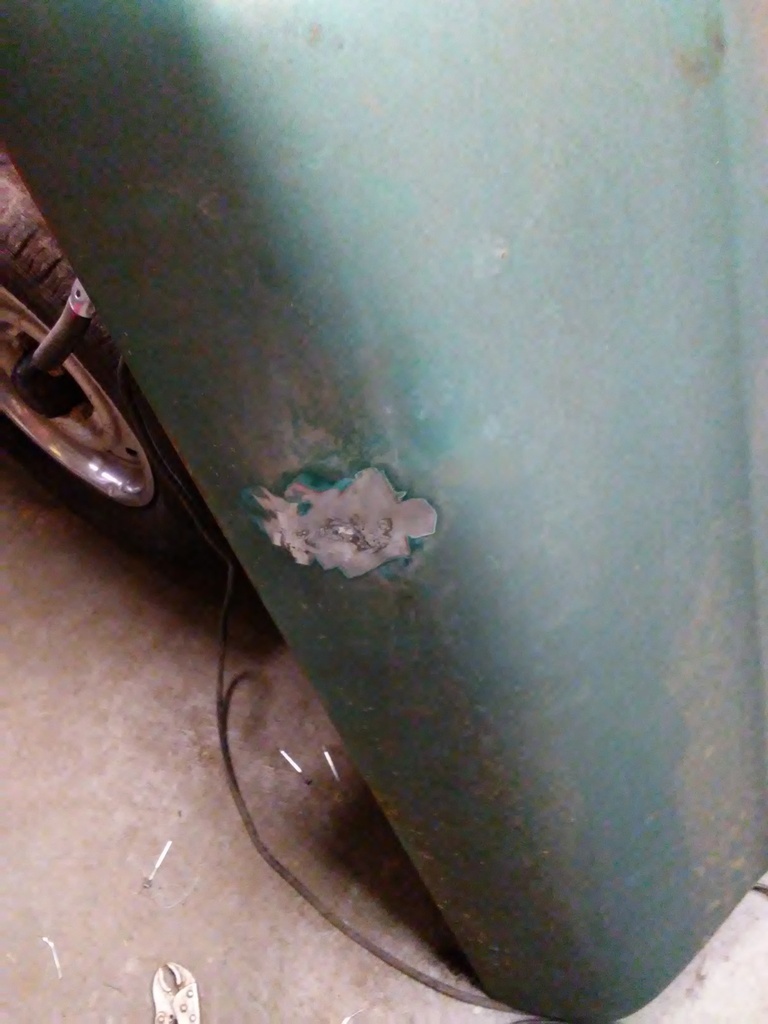
I want a stud gun for pulling dents but add it to the list of a 1000 other tools I would like to have. When I helped Jason in Tn paint his truck, he showed me to weld nails to dents and pull them with a pair of vise grips and a hammer. Better then drilling a hole and using a dent puller with a screw that leaves a hole. My 76 has a big dent in the hood. It is the only large dent and the rest are door dings. We got good enough to weld a nail and get the dent out. I need to get good enough to weld in some floor pans, two cab mounts, and a cab corner.
Dent in hood. We practiced on the two wheel drives hood before doing my 76 hood.
Nails welded on.
Most of the dent out and very little filler will be needed.
Dent in hood. We practiced on the two wheel drives hood before doing my 76 hood.

Nails welded on.

Most of the dent out and very little filler will be needed.
 01-26-2017, 06:51 AM
#1429
Registered User
iTrader: (1)
Join Date: Oct 2010
Location: N of Okechobee Florida
Posts: 1,002
Likes: 0
Received 4 Likes
on
4 Posts
Nice job Terry! My favorite part is the fab and body work. Wrenching, not so much. A lot of times some heat in the right spot will bring a dent out as well bringing it right back to factory specs. That usually my first effort to try and save time and material. The Hobart welders are great with gas. Try an 020 gauge wire. Help with the thin body panels. Have fun with your son. Mine are grown and gone and hardly do their own oil changes anymore. Tony
01-26-2017, 11:22 AM
#1430
Super Moderator
Staff
Thread Starter
iTrader: (1)
Join Date: Aug 2008
Location: Anderson Missouri
Posts: 11,788
Likes: 0
Received 25 Likes
on
22 Posts
Thanks Tony..I too would rather do body work. I am glad I can do engine work but doing body work makes a big appearance difference. Engine work sometimes doesnt make such a big difference even though it does take as much patience. Thanks for the tip on .020, as I am more interested in doing patch work on sheet metal. Some reason I am looking forward to the day I can replace a rear quarter panel or some major rust repair. My welding is not up to speed just yet for anything major.
I have two teenage boys and they can keep the wife busy. I keep telling her to enjoy these days as they will be over before she knows it and they grow up quick. I can see the empty nest syndrome being here before we know it. Time flies and no going back. Great seeing you around again.
I have two teenage boys and they can keep the wife busy. I keep telling her to enjoy these days as they will be over before she knows it and they grow up quick. I can see the empty nest syndrome being here before we know it. Time flies and no going back. Great seeing you around again.
01-26-2017, 11:28 AM
#1431
Super Moderator
Staff
Thread Starter
iTrader: (1)
Join Date: Aug 2008
Location: Anderson Missouri
Posts: 11,788
Likes: 0
Received 25 Likes
on
22 Posts
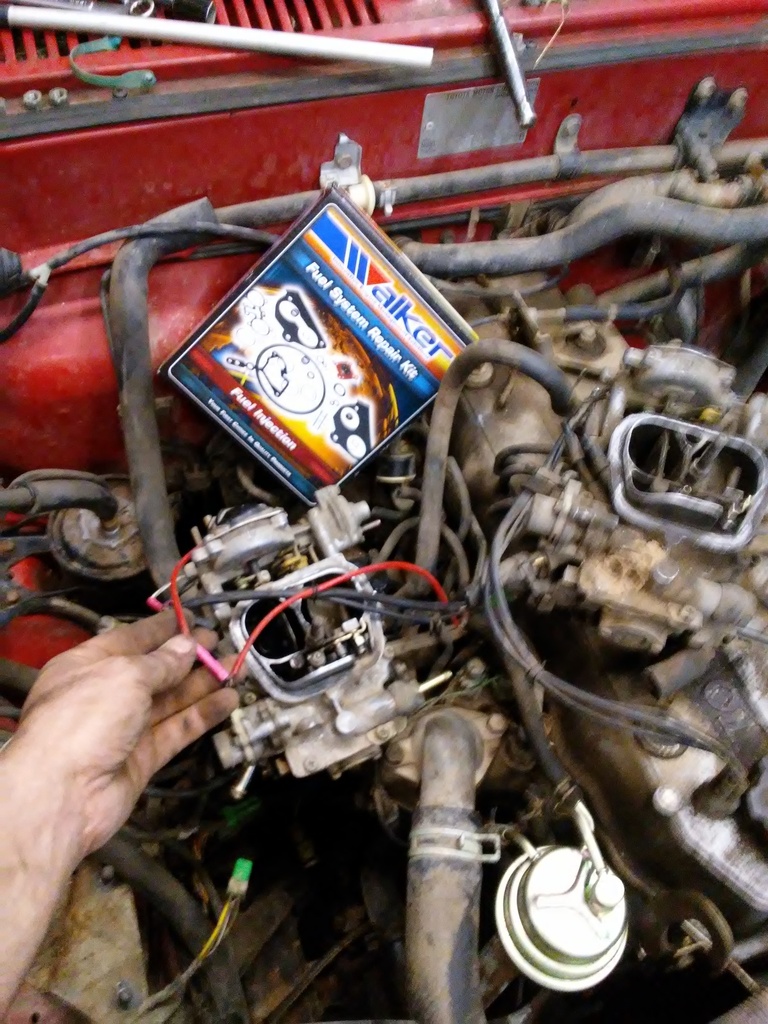
I have had 2 success and maybe 3. First I got the starter problem fixed. Wound up being a plug disconnected but not after I had already unhooked everything and dragged the harness out. On an EFI motor, the starter wire is part of the Injector Harness, on a carbed truck, the starter wire is part of the transmission harness. Still it is fixed and working as should be.
The other problem was the carburetor, I bought a rebuild kit and a friend of mine had an extra carburetor and let me have it. I took the kit back and got some carb cleaner, Sea Foam, Anti-freeze and a quart of oil. Truck is running great. As far as the major oil leak, it has currently stopped and I cant get it to leak. I wonder if it was just some oil that was spilled some where and just got blown off of the motor. Still seeing if I have a major leak. I do have a new oil pump and plenty of gaskets but really hoping I dont have to tear into the motor.
The original carb had some hacked up wiring. My replacement carb wire was not hacked up.
 01-26-2017, 11:31 AM
#1432
Super Moderator
Staff
Thread Starter
iTrader: (1)
Join Date: Aug 2008
Location: Anderson Missouri
Posts: 11,788
Likes: 0
Received 25 Likes
on
22 Posts
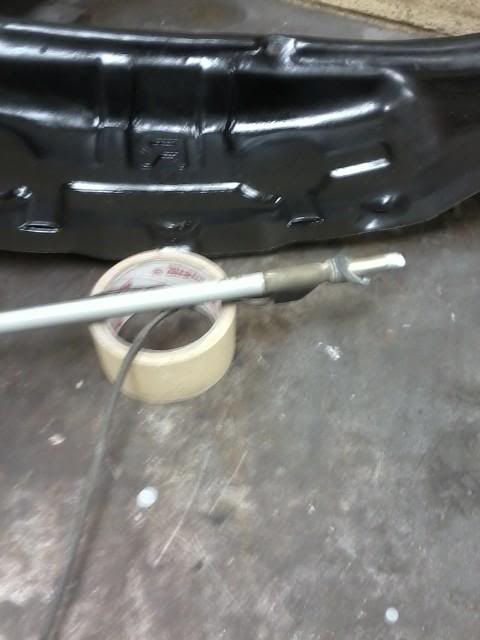
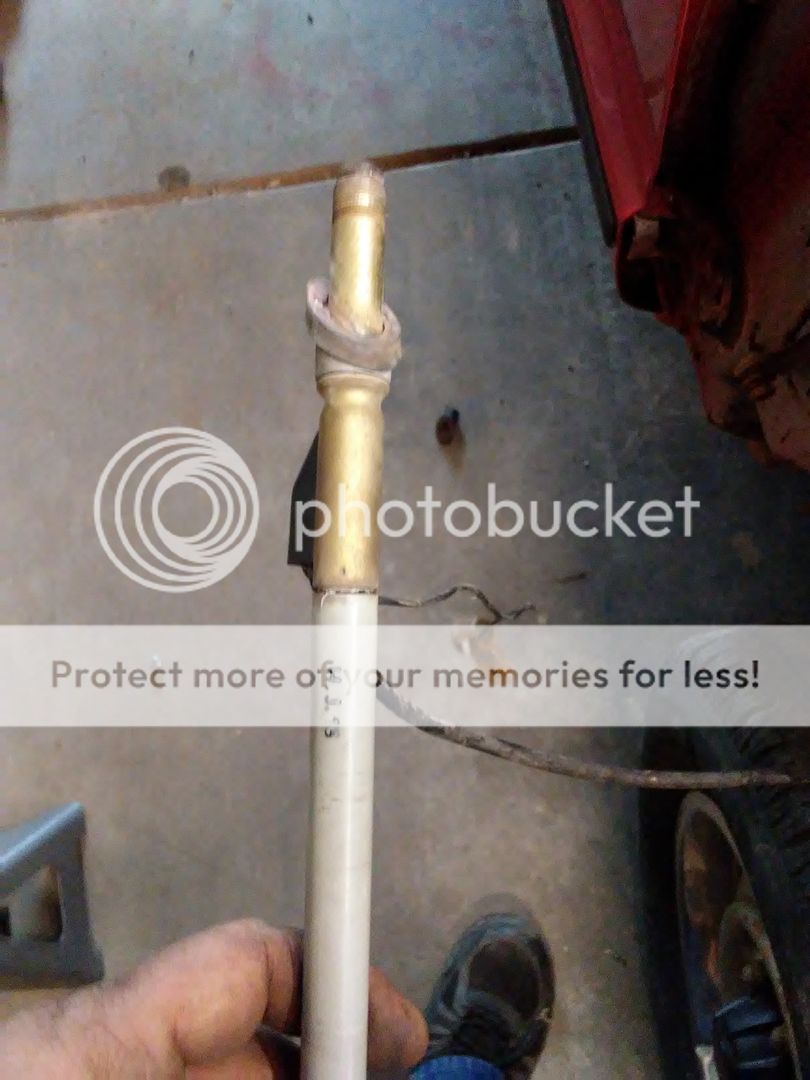
How I fix the broken antenna. I use a 14mm bolt or similar size and thread it into the broken pvc tube.

Then I cut the head off.
Then thread the other piece back into the threaded piece. I have never had one to fail after I have done this repair. I see numerous trucks with antennas tilted back and it is from the pvc being broke.

Then I cut the head off.

Then thread the other piece back into the threaded piece. I have never had one to fail after I have done this repair. I see numerous trucks with antennas tilted back and it is from the pvc being broke.
 01-26-2017, 12:32 PM
#1433
Super Moderator
Staff
Thread Starter
iTrader: (1)
Join Date: Aug 2008
Location: Anderson Missouri
Posts: 11,788
Likes: 0
Received 25 Likes
on
22 Posts
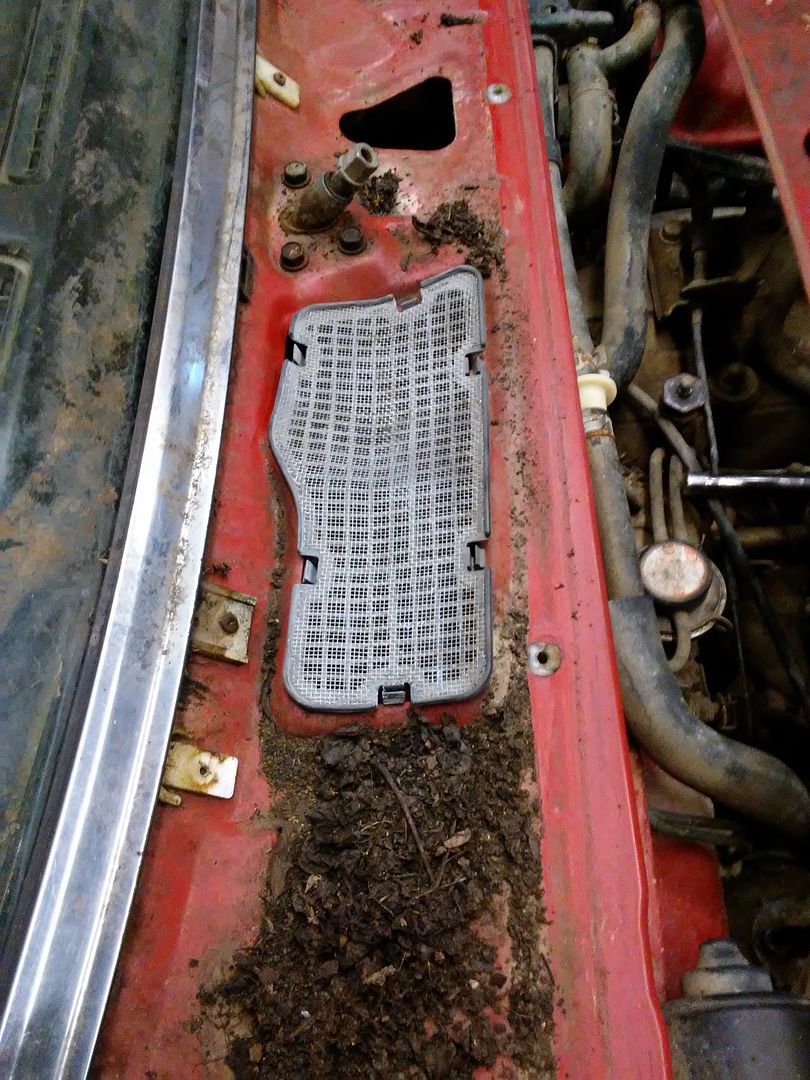
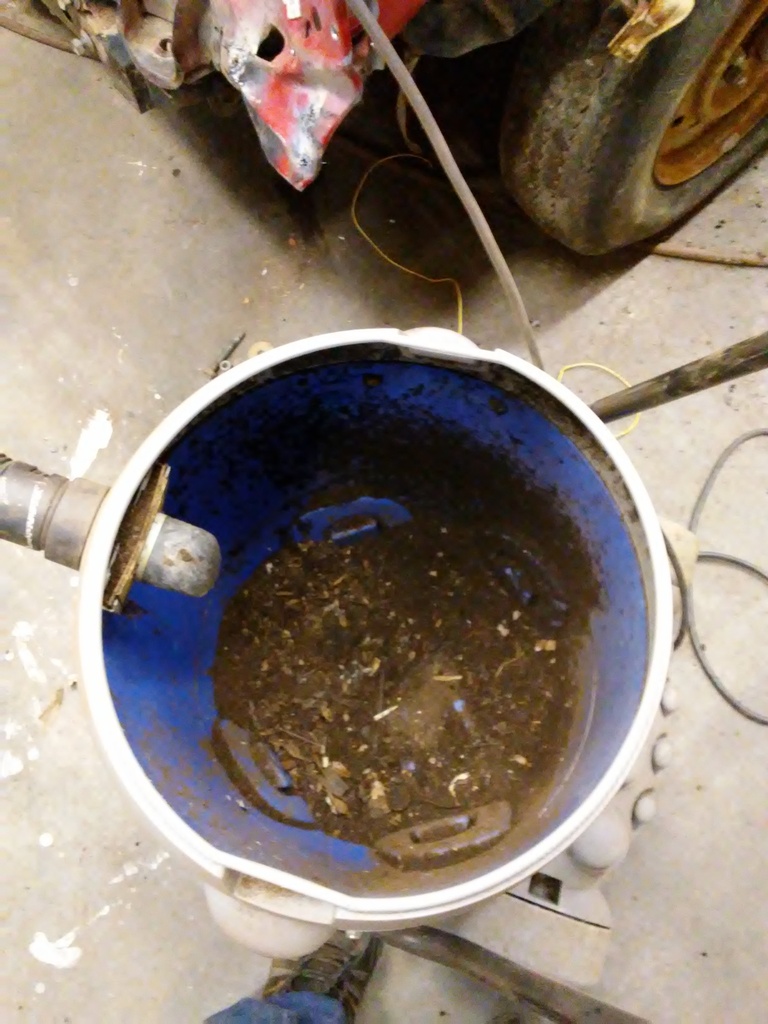
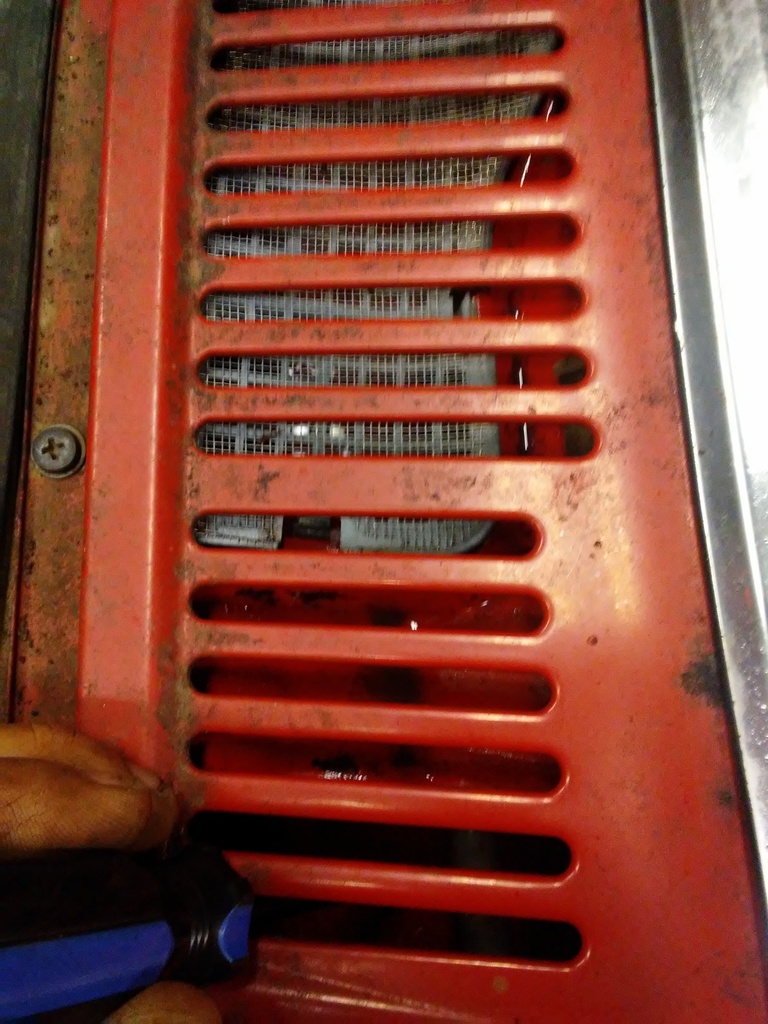
The Cowl can get very dirty in these trucks. Especially if they dont have the screens. Some trucks do not come with a screen in them, some of the screens do not have a fly screen over them, and some have the fly screen on them like I have in the picture below. Anytime I find a set of these in the salvage yard, I always grab the screen with the fly screen on them. I have created a thread on cleaning the Ventilation System on these trucks. >>> https://www.yotatech.com/forums/f116...trucks-286766/ A truck without AC is going to have a dirty Heater Core. I have not seen the core in this truck but to clean the heater core as I know it will be dirty, I will need to remove the entire dash. You dont have to do this if you have AC.
The Cleaning the Ventilation thread will still apply to trucks with and without AC as the blower is going to be dirty. Even though this truck looks like it is junk and has been sitting for a long time, the dirty system is on trucks that have been well cared for. I have seen a few members on here that have nice trucks and I got and they were surprised at how dirty their systems were.
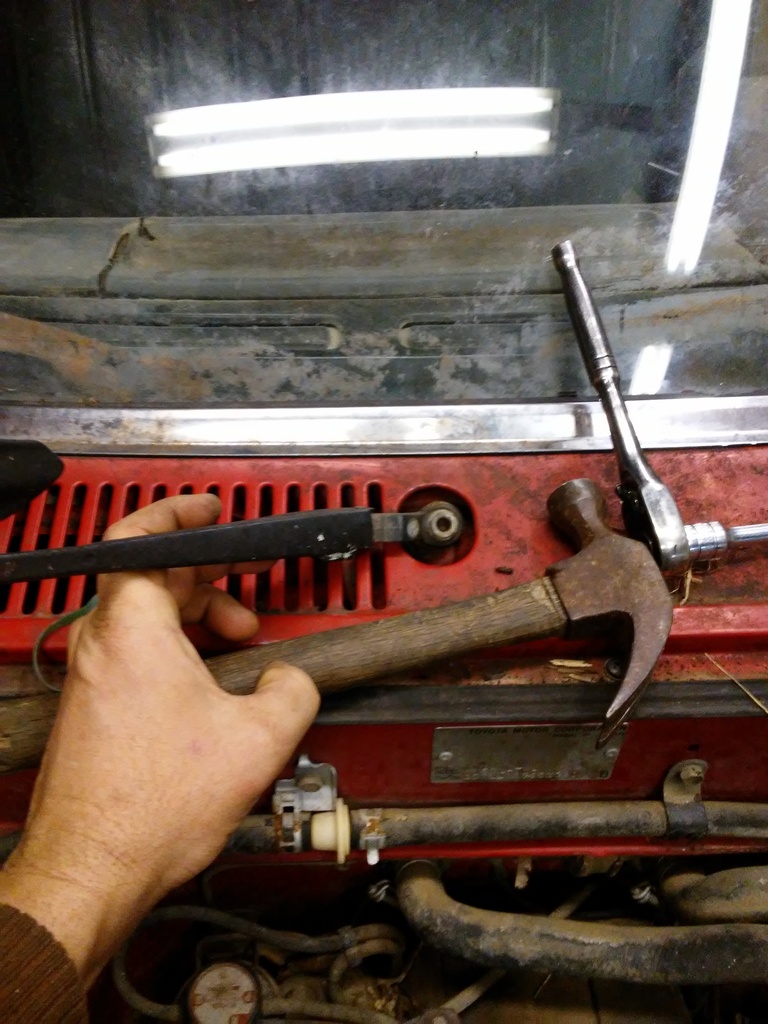
To get the Cowl off you have to remove the wiper blades. These can be difficult at times as they get frozen on. I gently lift on the wiper blade and with light taps of the hammer it will break them loose. Loosen the bolt a few turns and tap the bolt to prevent damage to the threads. I have the hood off and getting to the 3 screws is easy. With the hood on, you will need to use a very stubby screw driver or a 90 degree angle screw driver.
This truck does not have the Cowl Screens on it but even with screens it can get dirty and if bad enough, it can cause rot inside the Cowl and cause what some might think is a windshield leak.

Here is a Cowl Screen with the fly screen on it. Grab these anytime you see them in the bone yard. Hard to find and better then the screen with out the screen.
This is like 5 pounds of debris that I cleaned out using the vacuum, air hose, and then washed it out with a water hose. This is typical of what you are going to find.
Here it is clean and with both screens in place. The third hole I have never found a screen for as far as I know Toyota did not provide one. I seen a member on here somewhere that found a third screen somewhere. Slacker sells a vent less Cowl that would solve this problem.

Here is the Cowl back on. You can look thru your Cowl and see if yours has them or not. Any 2 wheel or 4 wheel will interchange.
I knew I seen the extra cover somewhere. Thanks Nervo19
The screens that Nervo19 is showing is the screens without the finer mesh screen over it that I was talking about earlier. Those are hard to find in most cases.
The Cleaning the Ventilation thread will still apply to trucks with and without AC as the blower is going to be dirty. Even though this truck looks like it is junk and has been sitting for a long time, the dirty system is on trucks that have been well cared for. I have seen a few members on here that have nice trucks and I got and they were surprised at how dirty their systems were.
To get the Cowl off you have to remove the wiper blades. These can be difficult at times as they get frozen on. I gently lift on the wiper blade and with light taps of the hammer it will break them loose. Loosen the bolt a few turns and tap the bolt to prevent damage to the threads. I have the hood off and getting to the 3 screws is easy. With the hood on, you will need to use a very stubby screw driver or a 90 degree angle screw driver.

This truck does not have the Cowl Screens on it but even with screens it can get dirty and if bad enough, it can cause rot inside the Cowl and cause what some might think is a windshield leak.

Here is a Cowl Screen with the fly screen on it. Grab these anytime you see them in the bone yard. Hard to find and better then the screen with out the screen.

This is like 5 pounds of debris that I cleaned out using the vacuum, air hose, and then washed it out with a water hose. This is typical of what you are going to find.

Here it is clean and with both screens in place. The third hole I have never found a screen for as far as I know Toyota did not provide one. I seen a member on here somewhere that found a third screen somewhere. Slacker sells a vent less Cowl that would solve this problem.

Here is the Cowl back on. You can look thru your Cowl and see if yours has them or not. Any 2 wheel or 4 wheel will interchange.

I knew I seen the extra cover somewhere. Thanks Nervo19
This guy was selling these on eBay. He was asking $35 but I sent him an offer of $20 shipped. My truck had the two smaller screens but not the big one. I haven't touched the 4Runner this weekend so I haven't installed them. I think this is the first auction for these things I've noticed and they were for sale at just the right time. I'll be selling the two smaller ones:

Last edited by Terrys87; 01-27-2017 at 06:12 AM.
01-28-2017, 08:29 AM
#1434
Registered User

Join Date: Jun 2015
Location: WI
Posts: 147
Likes: 0
Received 0 Likes
on
0 Posts
.............. I did some searching for the best stand and surprisingly, Harbor Freight had one that had the best reviews. I got the stand the other day and finally got the welder on it. The reviews did say that the door on the side of the welder will not open and some just put a sheet of plywood under the welder for the door to clear the sides of the cart........
 I agree they sell some garbage but I don't see how anyone could go wrong with a non-mechanical item that has great reviews!!! Glad the stand worked out!
Here it is clean and with both screens in place. The third hole I have never found a screen for as far as I know Toyota did not provide one. I seen a member on here somewhere that found a third screen somewhere. Slacker sells a vent less Cowl that would solve this problem.

The screens that Nervo19 is showing is the screens without the finer mesh screen over it that I was talking about earlier. Those are hard to find in most cases.
The screens that Nervo19 is showing is the screens without the finer mesh screen over it that I was talking about earlier. Those are hard to find in most cases.
Right hand (the one you need I think) - 55756-89111 ~ $13.29 (MSRP = $19.57)
Middle - 55756-89109 ~ $6.77 (MSRP = $9.97)
Left hand - 55756-89108 ~ $6.77 (MSRP = $9.97)
These were for an 88 but I didn't know frame code. I'm assuming it won't matter because these are the exact same part number as my 91 pickup. Hope it might help. Order at own risk
 Here is the IPB so you can reference yourself...
http://www.japan-parts.eu/toyota/us/...d-glass#55756A
01-28-2017, 12:37 PM
#1435
Registered User
As it turns out the set of three Terry shows from my thread are for 89-95 pickups and 90-95 4Runners. The part numbers do seem to be the same. They don't fit the 1st gen 4Runner. Even though the guy listed them on eBay that they did. Believe me I tried to make them fit. I'll sell them to anybody that wants them. I think maybe the 1st gen only had two screens because that's what originally came on mine. I was excited to get the third screen because there's a hole for one. My originals did had screen on them too. I think it would be easy to epoxy screen material on there if you wanted. LOL I was just back in there yesterday because after all the truck is put back together I found the weather stripping that goes between the cowl and body. I tore the garage up in October looking for it. SMH.
That red paint under the cowl is pretty!
That red paint under the cowl is pretty!
01-28-2017, 02:38 PM
#1436
Part numbers
A little bit of info regarding part numbers.
55756-89111 break the ten digit part number in had, the first gives a "generic" number for an assembly or part type(I'm not certain how the parts counter / Toyota names these), the second five digits will be specific to the vehicle by build date.
You can go to your favorite OEM supplier and search for the first five digits and it will give you the full ten digit part number for your application once you've entered a VIN or filled out the vehicle selection forms.
sometimes the search will turn up a slightly different prefix number, due to a part number replacement ( means the part has been superceded by a new number due to a different supplier or similar )
With either the five digit part number or the Toyota naming convention the parts counter will be able to find what you need much more readily.
...
If you have intact outer screens I would suggest protecting them with a shot of paint with a uv blocker. Also the should be repairable with generic screen without issues. It's not clear in the photo but the picture Terry took looks like there is a gap in the rim to feed it under or its sonic welded, I would avoid epoxy and use something that remains flexible it will be easier to replaced you get a year later that way.
...
Thanks for those under cowl pictures Terry it was a big help in showing what just a little bit of effort can do for appearance.
01-28-2017, 11:08 PM
#1437
Super Moderator
Staff
Thread Starter
iTrader: (1)
Join Date: Aug 2008
Location: Anderson Missouri
Posts: 11,788
Likes: 0
Received 25 Likes
on
22 Posts
Hello duckhead... I have tons of tools from Harbor Freight and I would say 95% of them have done great for what they have been used for. I am really grateful for them as buying Matco, Snap On, Craftsman and others would take me years to get if HF was not available.
The mesh screens are hard to find. One of the things I look for when in the yards. Fuse box covers are another item I am always grabbing when I see them. When I come across a new truck in the yards, I have a small list of hard to find parts and am always getting them. Some of the parts may seem minor but getting good parts is getting hard.
I work on several trucks that I dont post on here and some are nice condition or even great condition trucks. The cowls in these trucks let so much debris into them. I will eventually get into the blower assembly and since this truck does not have AC, I will eventually have to pull the dash to get to the heater core and it is going to be a mess. I try to show several fixes that can make these trucks back to the way they once were and most just require a little time and not much cost in them. Thanks for the information and link.
Hello nervo19...After looking at the screens, I can see the difference between the generations of them. I should of seen that the first time but was not paying close attention. I like red and if this truck was an Extra Cab, I would be keeping it for myself. I really like the bed on this truck and the tail gate. I am too tall for a standard cab but this truck I think will clean up nicely when I get to the body on it. It is actually a great little truck and I do like the red on it.
Hello Co 94 PU.. Thanks for the information on the part numbers. Cleaning the cowl is a no cost fix and can save some future damage. Eventually I will get to the blower and heater core. Since yours will have AC, it wont be nearly as hard to clean as one with out AC. Cleaning the cowl, blower motor, and evaporator can make the interior smell fresh again and makes a big difference on the heating and cooling of the interior. Also when I am cleaning the ventilation system I do the plastic pipes the move the air. Those get dirty too. Other then needing to replace the blower resistor, it is a cheap fix that just takes time. And recharging the AC system on these trucks if you do go that far into it. These fixes really help the comfort of these trucks.
01-28-2017, 11:20 PM
#1438
Super Moderator
Staff
Thread Starter
iTrader: (1)
Join Date: Aug 2008
Location: Anderson Missouri
Posts: 11,788
Likes: 0
Received 25 Likes
on
22 Posts
I have heard of horror stories of welding Toyota sheet metal. It is true. It is so thin. I am using .030 flux wire. Eventually I want to get the gas and go to .020 but I am not having much luck in finding .020 locally in flux core. I may have to break down and buy the bottle sooner then later. I want the bottle but it is really not in the budget at this time as I am working on other issues but it may get moved up the list really quick as from all the reading and talking to others .030 just takes to much heat.
Also not being the most experienced at welding is probably a big part of the problem Justin and me have been spending a lot of time just watching Youtube videos, and other sources of information on welding and then practicing on metal I have laying out in the shop. I wish I could just go out and spend the few minutes getting the welds done that I need to and go on to the next fix but it isnt going to be that easy.
I did get some gel to keep the tip from sticking to the wire. I got a new welding hood on order and finding out fast that I need other things such as welding gloves and welding jacket. You get one new tool and then need all of the accessories that go with it. Slowly but surely I will get those items.
I did get a new bumper, bracket and grill on order and hope those arrive in next week and can start getting the front end back on if all goes as planned. It should start to look like a truck again soon.
01-29-2017, 12:29 AM
#1439
Good day (morning?) Terry,
i have a tip for the sheet metal!
find an old aluminum pan or some bar to use as a heatsink behind your weld. It will help prevent the blow through by absorbing and dissipate the heat, it also won't bound to the steel. It might be tricky to get access in some places and the shapes are tricky also so you will need more than one and various radiuses.
When tacking there are permanent and temporary types, you want low current for both generally but the wire speed makes the difference. Permanent tacks are shallow puddles with complete penetration. Temporary tacks will be the big ball type that just barely penetrate so you can break them off with a hammer and or chisel.
To make better looking and stronger uncontaminated welds with flux core you want to keep the exposed wire length as short as possible to the cup as there just isn't a lot of gas present. Try to keep the wind off of it also.
Pretty and solid welds can be done with it, it's just easier to crank up the gas flow on a bottle and know you can weld in a gale.
Finally shop around for an air powered needle scaler. hit the weld while it's still hot to remove slag and other impurities. You want to hammer, grind, or brush out all the little pockets of air and scale to prevent rusting from the inside out.
01-29-2017, 04:46 AM
#1440
Registered User
Join Date: Jan 2015
Location: Hendersonville NC
Posts: 652
Likes: 0
Received 0 Likes
on
0 Posts
From what i understand they do not make flux core smaller than. 030.
i used 30 for my whole truck.
my settings are lowest power and 28ish wire feed.
your gap must be tight! Whether butt welding or lap welding. Your metal must be clean, stupid clean. Any extra resistance creates more heat, more heat blows a hole.
the flux will coat the tip and cause this as well. When welding i would lay a super quick tack, the timing is learned not taught. The next part is important,. Either move on to your next tack while the tip o your wire is still glowing or cut the tip off to ensure good clean wire for your next tack.
if you let that glob cool it will blow a hole on your next tack.
keep your wire stick out about 3/4 inch. More and it is more resistant and pops off, too short and it clogs the tip with slag and causes a poor connection, which creates more heat which doesn't work well.
disclaimer:I'm not a professional welder but this is what i learned from my own trial and error.


