
Terrys87 88 4Runner Restoration/Build thread
 12-06-2012, 11:11 PM
#941
Hey, mista, mista.... someone put a pipe bomb in hole #1.... WATCH OUT!  hehehe.
WOW, looks great.... And yes, Richard is right... looks similar to the red I chose(Ford Engine Red).........
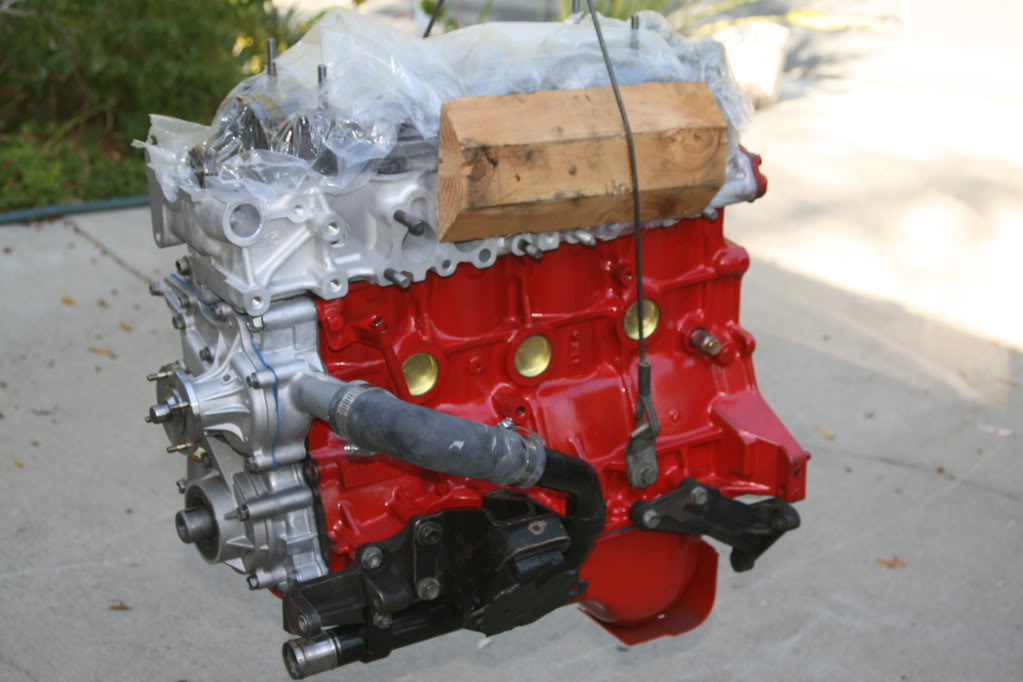
Course... now I went "Alumicote' on the 'Rebuilding the Rebuild' , lol..>>
hehehe. WOW, looks great.... And yes, Richard is right... looks similar to the red I chose(Ford Engine Red).........
Course... now I went "Alumicote' on the 'Rebuilding the Rebuild' , lol..>>
Last edited by ChefYota4x4; 12-06-2012 at 11:16 PM.
 12-07-2012, 03:18 PM
#943
Man Terry, you've been busy!!! You almost need to wear shades just to look at your tranny, it's so shiny!!! I like the red also for your engine block color choice. I had planned on doing mine red as well, but the color didn't match the color of the cap and ended up looking too orange for my liking, so I ended up going black. Really nice work!... now youv'e set the bar even higher for your 86' 4runner, lol.
12-08-2012, 09:08 AM
#945
Super Moderator
Staff
Thread Starter
iTrader: (1)
Join Date: Aug 2008
Location: Anderson Missouri
Posts: 11,788
Likes: 0
Received 25 Likes
on
22 Posts
dang Terry. I checked out the link you put and i just kept reading and reading. I know i've gone through your thread once when i first joined. but maybe i wasn't paying attention the first time around. so far i've read a lot of stuff i don't remember lol
I might do what you did with your broken rear L-trims. Also i had no idea you could adjust the odometer! that's crazy. i wonder how many people mess with those things before they sell their cars....
I might do what you did with your broken rear L-trims. Also i had no idea you could adjust the odometer! that's crazy. i wonder how many people mess with those things before they sell their cars....
Wow Terry. It's been a while since I have been able to peruse your thread. I'm just approaching finals so It'll be a few more weeks before I can catch up. But looks like your going hard and cant wait to see all the progress you have been making.
I'm pretty excited to be in my last year of school, because then my runner won't be just for summer projects any more. Next winter I'm hoping for big things a comin.
Peace.
I'm pretty excited to be in my last year of school, because then my runner won't be just for summer projects any more. Next winter I'm hoping for big things a comin.
Peace.
Thanks Cyberhorn..I try my best to detail an engine as I want it to look just as good on the inside as the outside. What started out as a transfer case fix has blown up into alot bigger project and time then what I had planned, but hoping the results are well worth it in the end.
[
QUOTE=ksti;52009998]Ya, The red is perfect, good choice, but I have to admit, I like the custom wooden exhaust manifold on Mark's
 [/QUOTE]
Thanks ksti.. I got a laugh out of the wooden headers myself, wonder what the flow rate is on them, looks to be a little restrictive on 3 cylinders,haha. I had 2 different colors of red and I asked her which one she wanted and that is the one she chose. I think it will look better then what I orginally had on it.
12-08-2012, 09:26 AM
#946
Super Moderator
Staff
Thread Starter
iTrader: (1)
Join Date: Aug 2008
Location: Anderson Missouri
Posts: 11,788
Likes: 0
Received 25 Likes
on
22 Posts
I have been busy and seems like I am going 90mph and going nowhere. I have been busy chasing down parts and tools. Found a guy parting a runner so I got a reciever hitch for my 86. I will update it later as I need to get it cleaned up and to pickup the pieces that mount to the frame. It is about finished except for bigger funds that will have to wait such as rear bumper, seats, and carpet.
I also got a coil and igniter for my 85 pickup that I plan on starting a build thread on January 11th as that has been when I have started my other builds. Trying to get Mistys runner and mine finished before I start another one. I gather the parts when I come across them at a good deal.
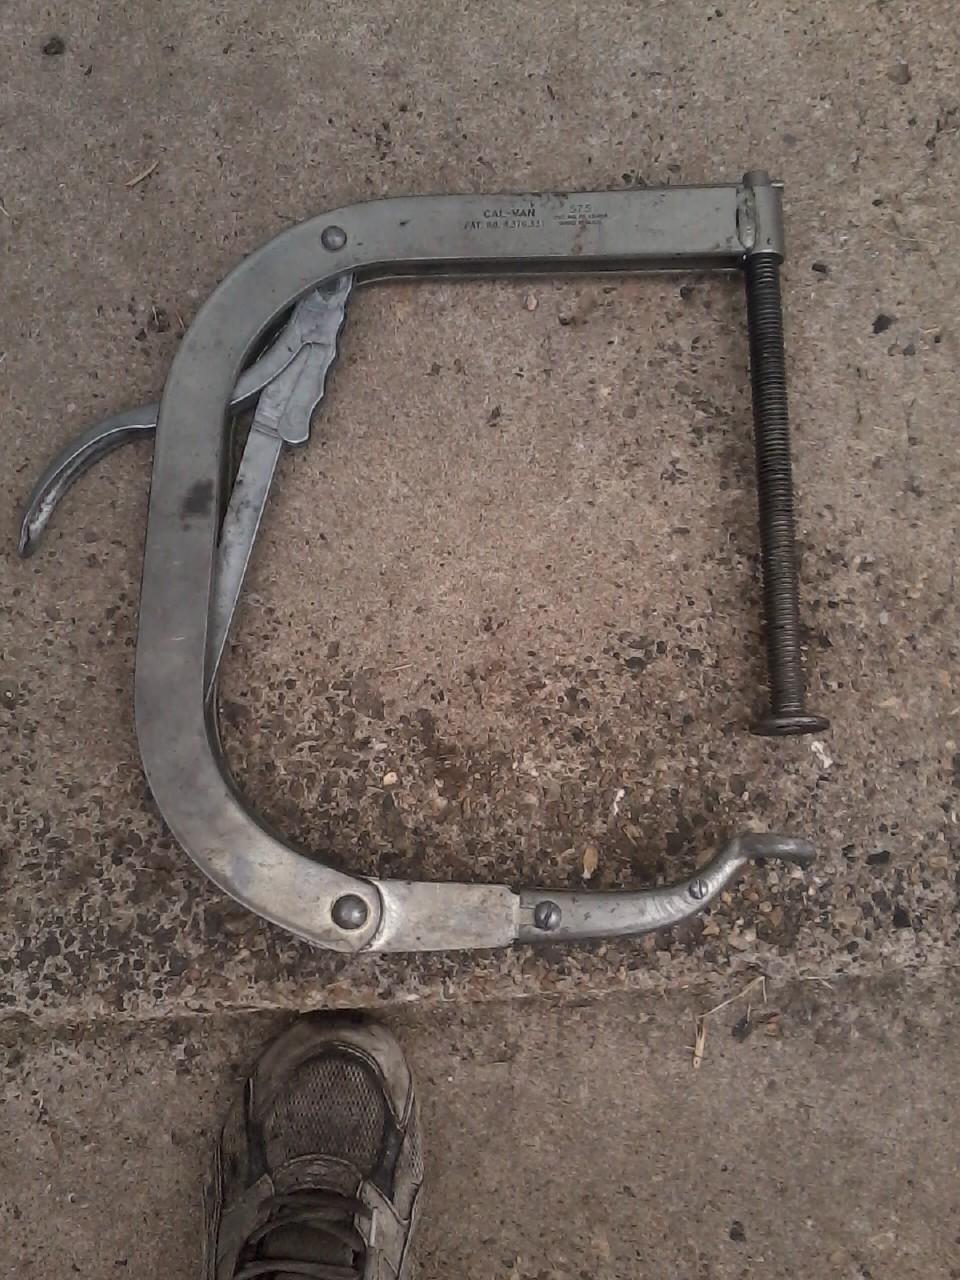
Getting a head gasket was part of the hold up and the other one which surprised me was finding a valve spring compressor. My old machine shop would put the valve guide seals in. This one didnt which started this snow flake into a snow ball. Was orgianlly going to do just the rear main seal.
Been years since I changed valve guide seals and nothing to it if you have the compressor. I was surprised at how hard it was to find one. If I ever find one of these, I am going to get it. Will start looking on ebay and elsewhere for one. The big name parts store rent a little cheesey one that looks like a gear puller. Dont waste your time with one of those.
Surprised I havent seen any questions pop up on the home page about this, but may because most machine shops do it for you. Im not sure.
Tool I spent alot of time looking for. I am renting it for $10 a day from a tool loan place.
Valve Spring Compressor
I also got a coil and igniter for my 85 pickup that I plan on starting a build thread on January 11th as that has been when I have started my other builds. Trying to get Mistys runner and mine finished before I start another one. I gather the parts when I come across them at a good deal.
Getting a head gasket was part of the hold up and the other one which surprised me was finding a valve spring compressor. My old machine shop would put the valve guide seals in. This one didnt which started this snow flake into a snow ball. Was orgianlly going to do just the rear main seal.
Been years since I changed valve guide seals and nothing to it if you have the compressor. I was surprised at how hard it was to find one. If I ever find one of these, I am going to get it. Will start looking on ebay and elsewhere for one. The big name parts store rent a little cheesey one that looks like a gear puller. Dont waste your time with one of those.
Surprised I havent seen any questions pop up on the home page about this, but may because most machine shops do it for you. Im not sure.
Tool I spent alot of time looking for. I am renting it for $10 a day from a tool loan place.
Valve Spring Compressor
12-08-2012, 09:26 AM
#947
Registered User
Looking good man I like the red. Tell misty I expect to see some pics of her getting her hands dirty on this project lol. Hope you have a productive couple days shouldn't be long now.
12-08-2012, 09:28 AM
#948
Super Moderator
Staff
Thread Starter
iTrader: (1)
Join Date: Aug 2008
Location: Anderson Missouri
Posts: 11,788
Likes: 0
Received 25 Likes
on
22 Posts
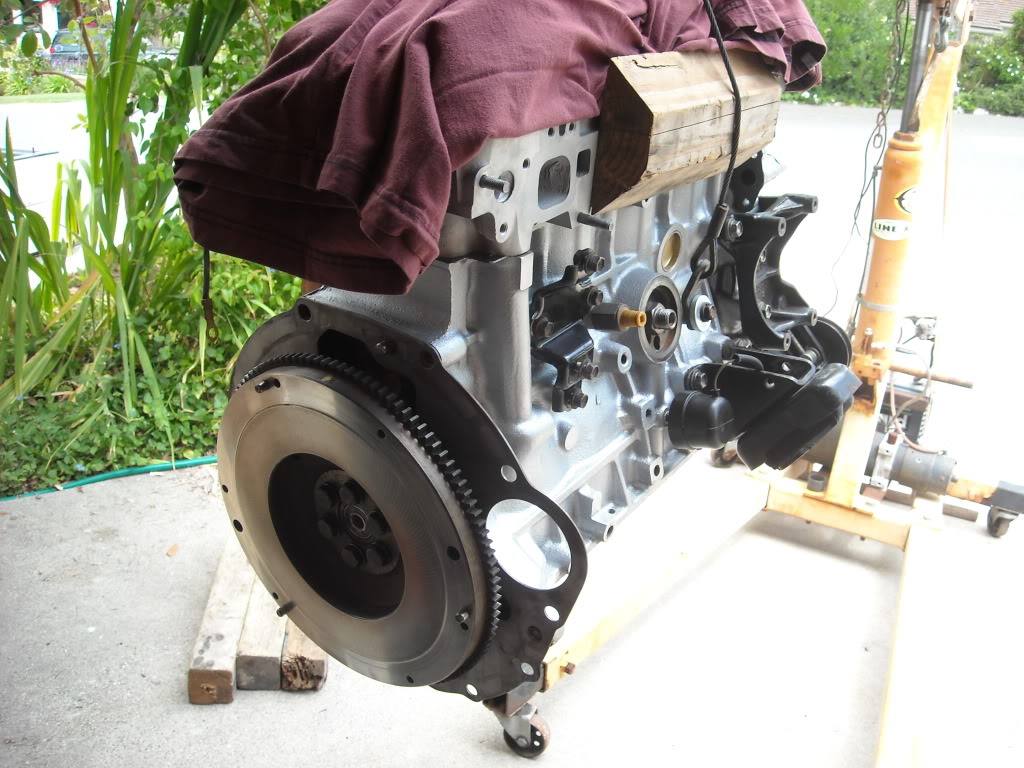
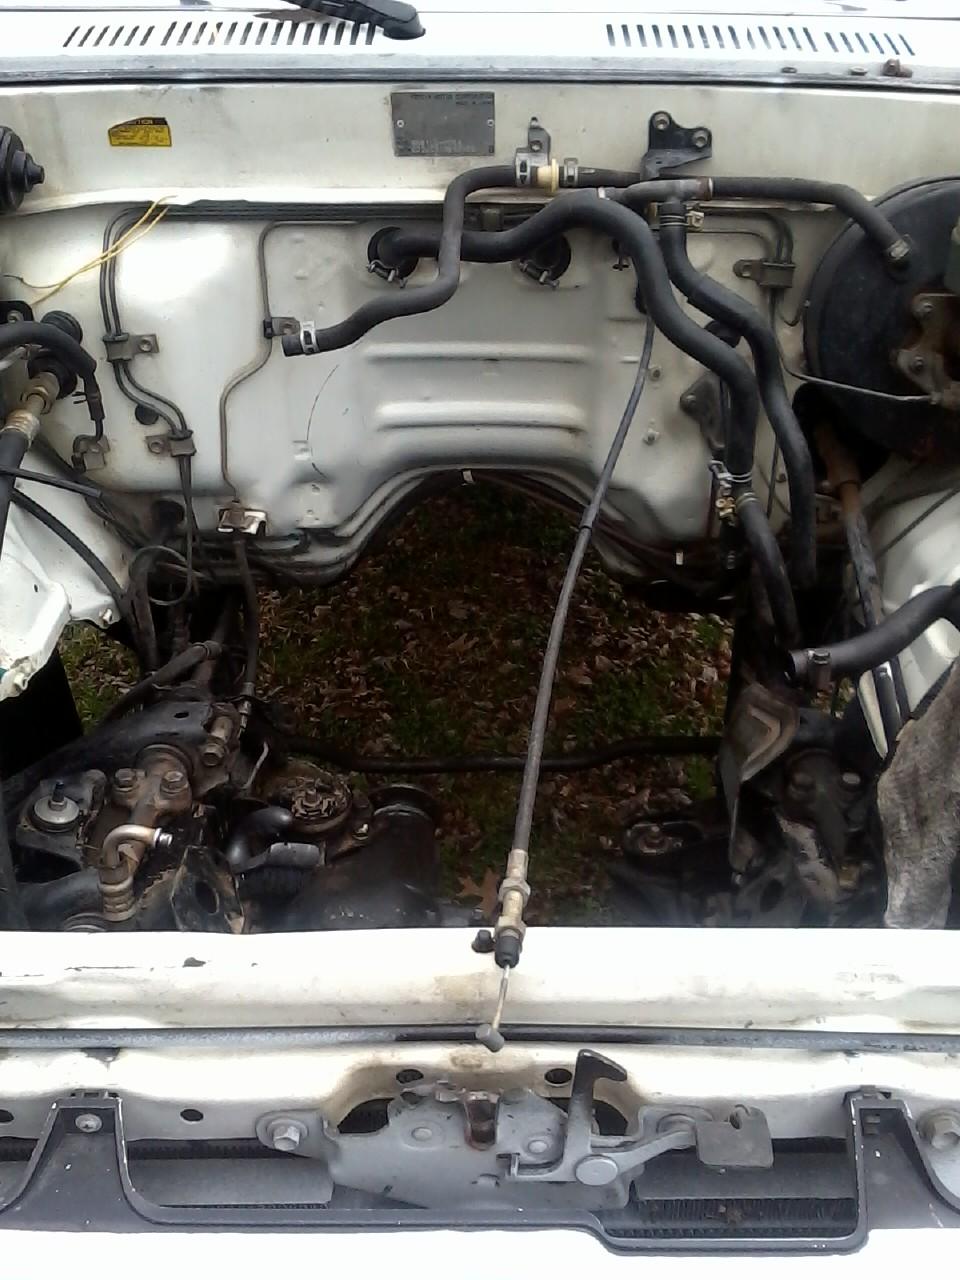
I finally got the rear main seal in and have been detailing the engine bay. Still have more detailing that I want to do. Alot of scrubbing went in to this area. Getting it there slowly.
12-08-2012, 09:29 AM
#949
12-08-2012, 09:34 AM
#950
Super Moderator
Staff
Thread Starter
iTrader: (1)
Join Date: Aug 2008
Location: Anderson Missouri
Posts: 11,788
Likes: 0
Received 25 Likes
on
22 Posts
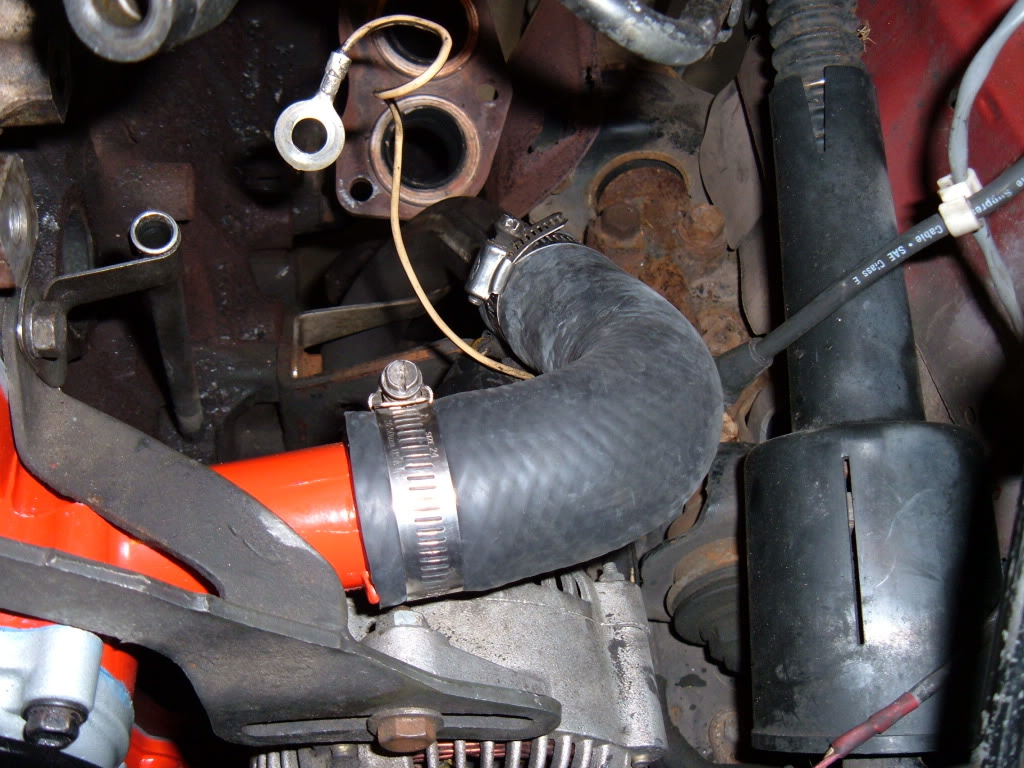
This can be a difficult part to find so want to note it for who may need it. I got this off of another thread that I posted on. I will be replacing this hose soon.
I use Gates Rubber hose PN# 20801, around $10. It comes is a "S" shaped form, but when you cut the lower part off, it looks identical to the orginal and has the larger opening coming off of the water pump and the smaller end for the horseshoe pipe.
 [/QUOTE]
I use Gates Rubber hose PN# 20801, around $10. It comes is a "S" shaped form, but when you cut the lower part off, it looks identical to the orginal and has the larger opening coming off of the water pump and the smaller end for the horseshoe pipe.
[/QUOTE]
12-08-2012, 09:43 AM
#951
Registered User
If I had the power to do so I would immediately revoke her ownership and take possession myself lol. She needs to get out there and get her hands dirty and learn a little along the way but I can't get Regina to help me much either..
 12-08-2012, 10:26 AM
#953
Contributing Member
Join Date: Nov 2010
Location: Columbia River Gorge, Oregon...east side
Posts: 5,125
Likes: 0
Received 2 Likes
on
2 Posts
Last edited by rworegon; 12-08-2012 at 10:31 AM.
12-09-2012, 06:16 AM
#954
Super Moderator
Staff
Thread Starter
iTrader: (1)
Join Date: Aug 2008
Location: Anderson Missouri
Posts: 11,788
Likes: 0
Received 25 Likes
on
22 Posts
12-09-2012, 06:47 AM
#955
Super Moderator
Staff
Thread Starter
iTrader: (1)
Join Date: Aug 2008
Location: Anderson Missouri
Posts: 11,788
Likes: 0
Received 25 Likes
on
22 Posts
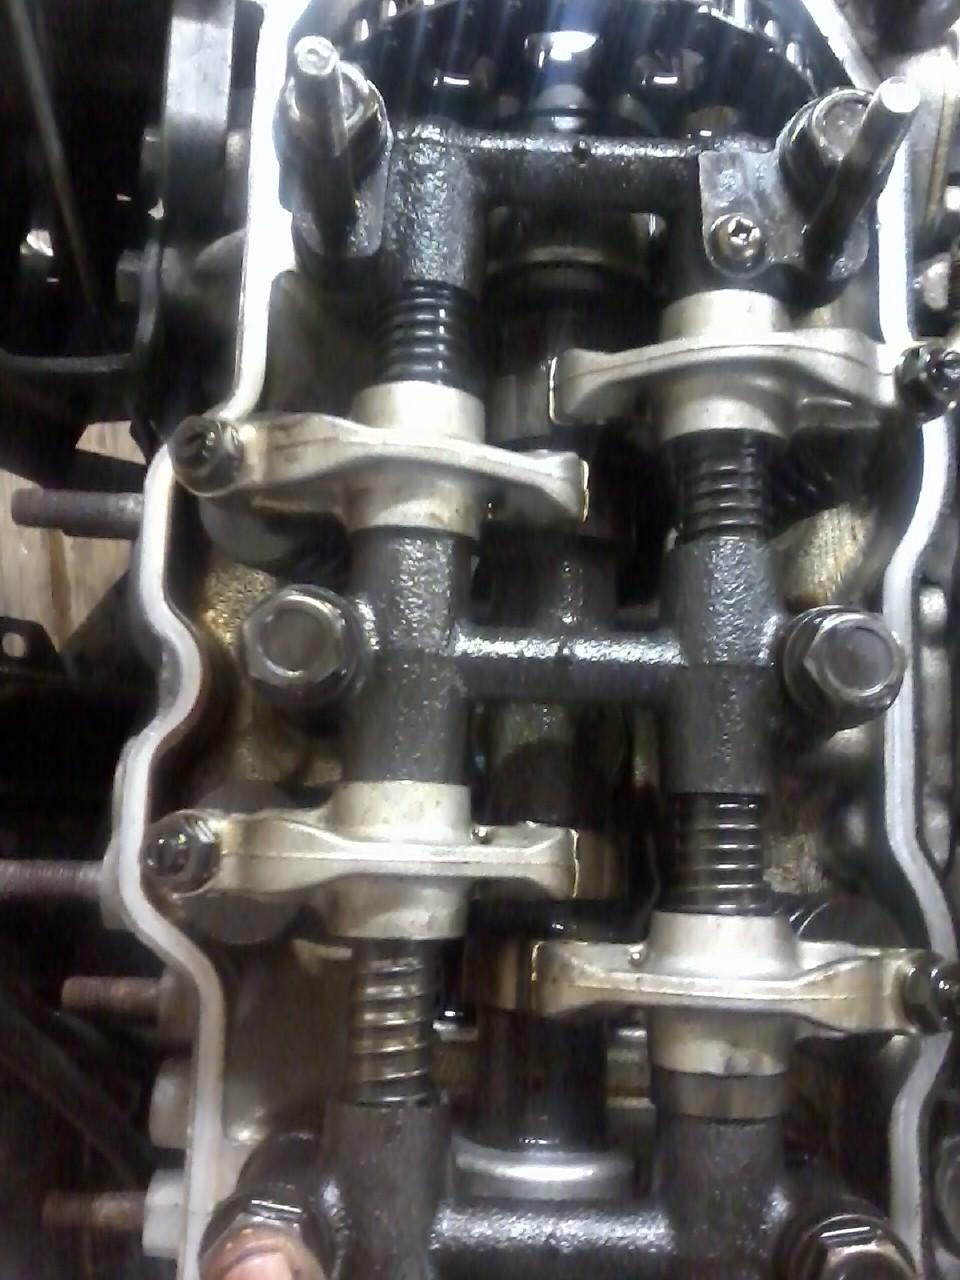
I got my valve seals replaced. I would really suggest using the C-clamp style compressor instead of the one that looks like a gear puller as it squeezes the spring from top to bottom. I am afraid that it could distort the spring. It is a poor design.
There is a pneumatic style C-clamp style compressor and I have never used on of them, but I do like the manual one as you have better control.

The biggest problem I see with valve seal is they are supposed to be soft and rubbery. Over time I have seen them turn into glass like material. My old machine shop would install them for you and this one doesnt. My fault for not checking or asking.
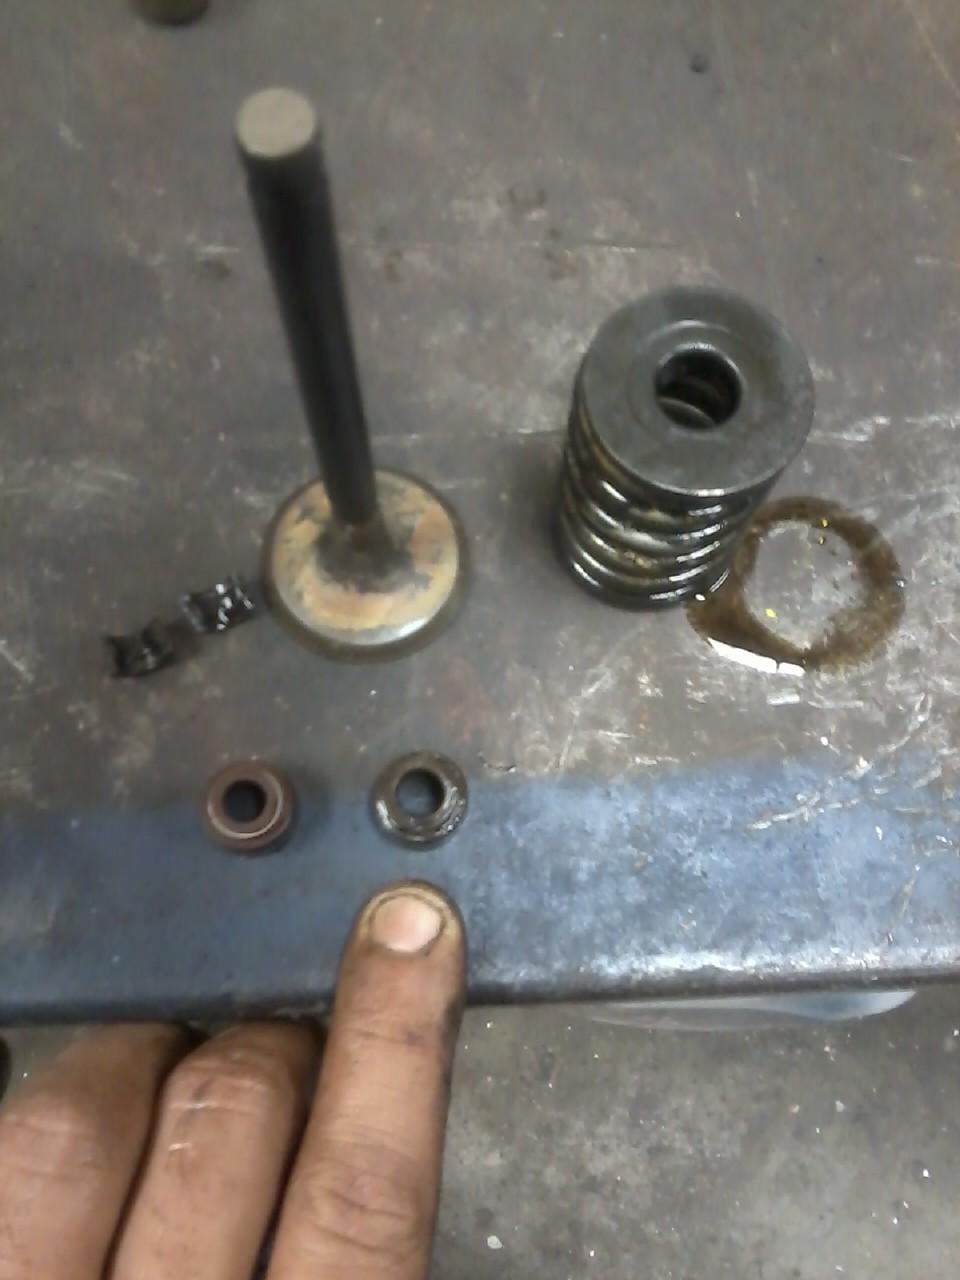
Sometimes the spring and valve keepers like to stick together and not release. When I run into that situation, instead of clamping harder, what I do is put a socket over the keepers and a very gentle tap with a hammer usually breaks them free and keeps them from flying across the room. If you lose one of these valve keepers, they really arent as easily obtainable as you might think. At the very least it will hold up the job. One reason I keep a junk head around just incase I ever need a keeper.
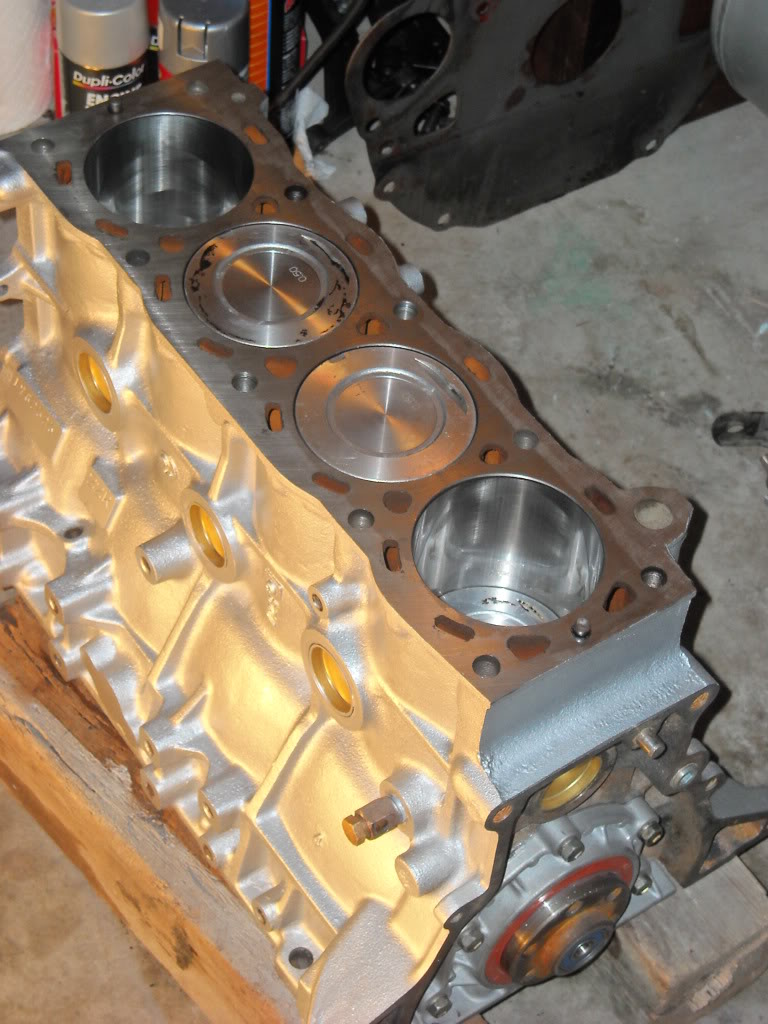
This is the vey first time that I have been into the very bottom of this motor. From its past that I know about, it was abused and neglected. Anytime a get a new (new to me) car or motor, one of the first few things I do is drain the oil and feel for grit or anything unusual in the oil and pull the valve cover to see if there is sludge build up.
An old timer told me this and I have been doing it for 10 years and never a problem is if I suspect alot of build up in a motor is to drain the oil and put 2 quarts of cheap oil and fill the rest with diesel fuel and let it idle for 20 to 40 minutes depending on how bad it looks from previous inspection and drain the oil, refill with cheap oil and run again to get the diesel out and then I fill with Castrol oil as that is my preferred brand. After that I just do my regular oil changes as they should be.
When I pulled the pan, I had maybe a teaspoon of any sludge in the bottom of the pan and was really happy with how clean the motor was inside from the lower block to the head.

Head was really clean that I feel helped clean itself thru regular maintaince. I been doing the diesel treatment for several years and never a problem. This is the first motor that I have been back into after working on one and was actually a confidence builder in how I maintain my trucks.
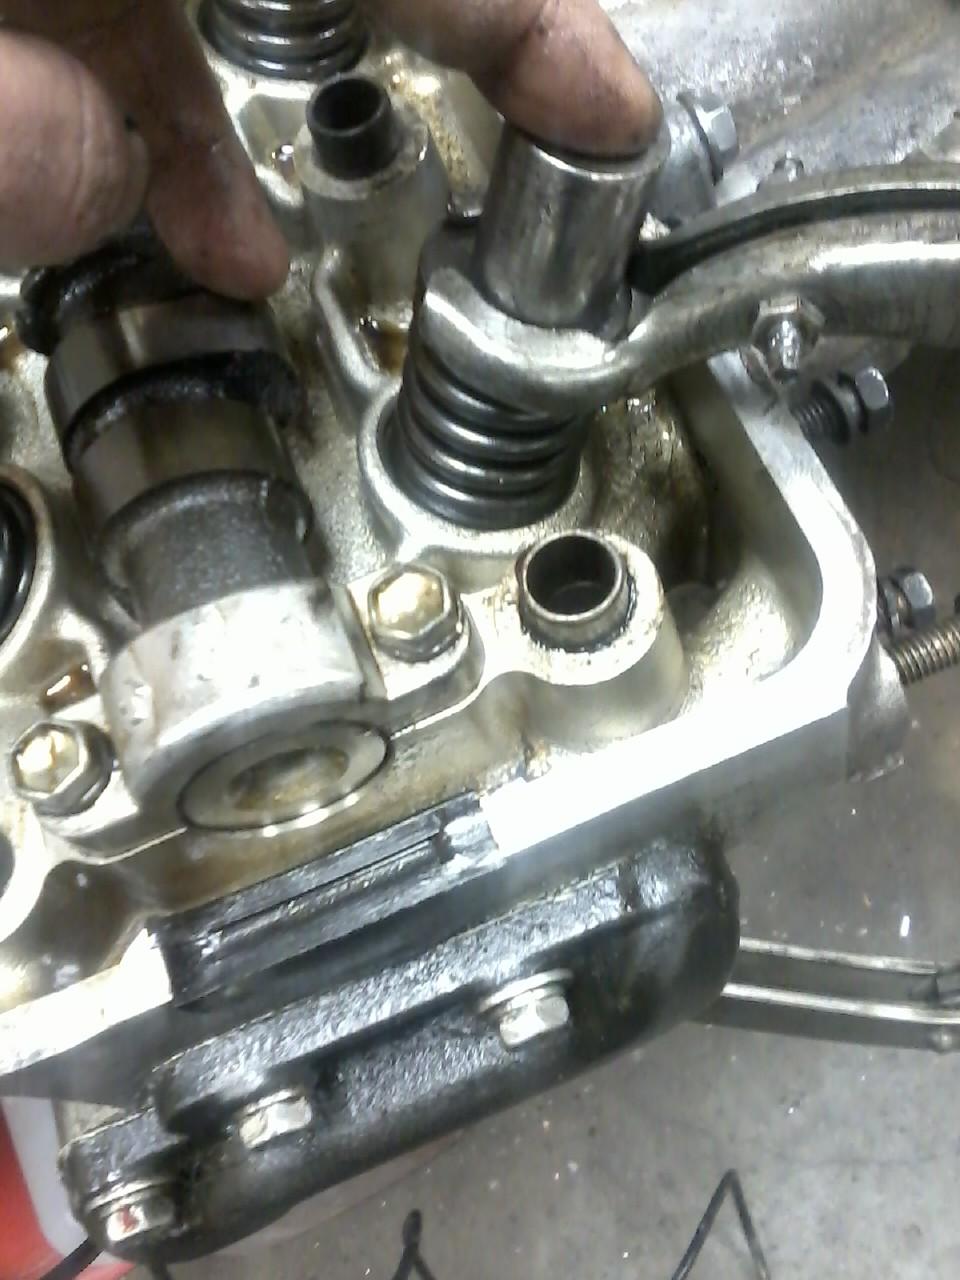
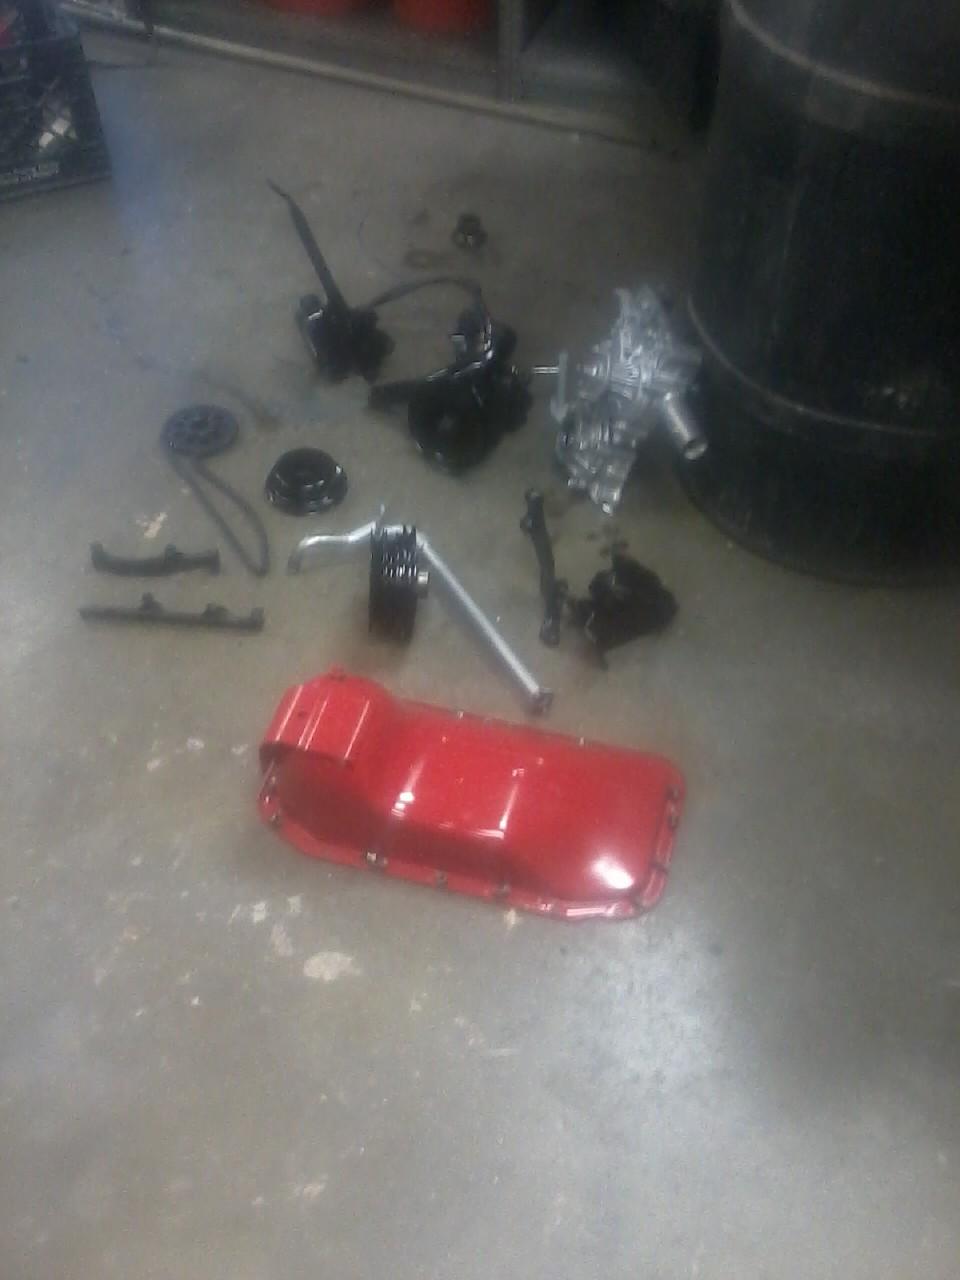
Spent alot of time cleaning the surfaces where sealant/gaskets will be going and cleaning parts. I think I am finally going to start reassembling. Still wish I would of did the valve guide seals the first time, as this is taking alot longer then I had planned and this wouldnt have been such a deep tear down, but that is the way things go.
Head, block, and most parts are done.
There is a pneumatic style C-clamp style compressor and I have never used on of them, but I do like the manual one as you have better control.
The biggest problem I see with valve seal is they are supposed to be soft and rubbery. Over time I have seen them turn into glass like material. My old machine shop would install them for you and this one doesnt. My fault for not checking or asking.
Sometimes the spring and valve keepers like to stick together and not release. When I run into that situation, instead of clamping harder, what I do is put a socket over the keepers and a very gentle tap with a hammer usually breaks them free and keeps them from flying across the room. If you lose one of these valve keepers, they really arent as easily obtainable as you might think. At the very least it will hold up the job. One reason I keep a junk head around just incase I ever need a keeper.
This is the vey first time that I have been into the very bottom of this motor. From its past that I know about, it was abused and neglected. Anytime a get a new (new to me) car or motor, one of the first few things I do is drain the oil and feel for grit or anything unusual in the oil and pull the valve cover to see if there is sludge build up.
An old timer told me this and I have been doing it for 10 years and never a problem is if I suspect alot of build up in a motor is to drain the oil and put 2 quarts of cheap oil and fill the rest with diesel fuel and let it idle for 20 to 40 minutes depending on how bad it looks from previous inspection and drain the oil, refill with cheap oil and run again to get the diesel out and then I fill with Castrol oil as that is my preferred brand. After that I just do my regular oil changes as they should be.
When I pulled the pan, I had maybe a teaspoon of any sludge in the bottom of the pan and was really happy with how clean the motor was inside from the lower block to the head.
Head was really clean that I feel helped clean itself thru regular maintaince. I been doing the diesel treatment for several years and never a problem. This is the first motor that I have been back into after working on one and was actually a confidence builder in how I maintain my trucks.
Spent alot of time cleaning the surfaces where sealant/gaskets will be going and cleaning parts. I think I am finally going to start reassembling. Still wish I would of did the valve guide seals the first time, as this is taking alot longer then I had planned and this wouldnt have been such a deep tear down, but that is the way things go.
Head, block, and most parts are done.
Last edited by Terrys87; 12-09-2012 at 06:55 AM.
12-09-2012, 10:16 AM
#956
Super Moderator
Staff
Thread Starter
iTrader: (1)
Join Date: Aug 2008
Location: Anderson Missouri
Posts: 11,788
Likes: 0
Received 25 Likes
on
22 Posts
I have helped dakotawho on some PMs on doing a cab swap. He has gotten most of it done. 17 year old kid gave it a try and did it. There is hope for our future yet. He was determined and did it. Give the guy a hand. https://www.yotatech.com/forums/f199...thread-253076/ At 17 I am not sure I would of been brave enough to do something like that.
Last edited by Terrys87; 12-09-2012 at 01:41 PM.
12-09-2012, 03:49 PM
#957
Oooooooooooh, valve seals.... FUN, WEEEEEEEE! hahaha. TWO TIMES IN A ROW NOW, .... I've lost one of those split spacers/shims.... GRRRRRRRR! Took over an hour one time.... but found them both times. lol.....
Nice painting, etc... Things gonna be SICK! Already is looking great!
lol..... Nice painting, etc... Things gonna be SICK! Already is looking great!
12-10-2012, 07:26 AM
#958
Super Moderator
Staff
Thread Starter
iTrader: (1)
Join Date: Aug 2008
Location: Anderson Missouri
Posts: 11,788
Likes: 0
Received 25 Likes
on
22 Posts
Thanks Mark...I am giving it my best shot to have it to be a loong time again to have to work on it. Those keepers can shoot aways when they want out of there.lol
12-10-2012, 07:38 AM
#959
Super Moderator
Staff
Thread Starter
iTrader: (1)
Join Date: Aug 2008
Location: Anderson Missouri
Posts: 11,788
Likes: 0
Received 25 Likes
on
22 Posts
I should start assembling tonite. Dont know when I will get it in the truck as it is 24 degrees right now and I just cant get the shop warm for that. It will have to sit if doesnt warm up even for as bad as we need it.
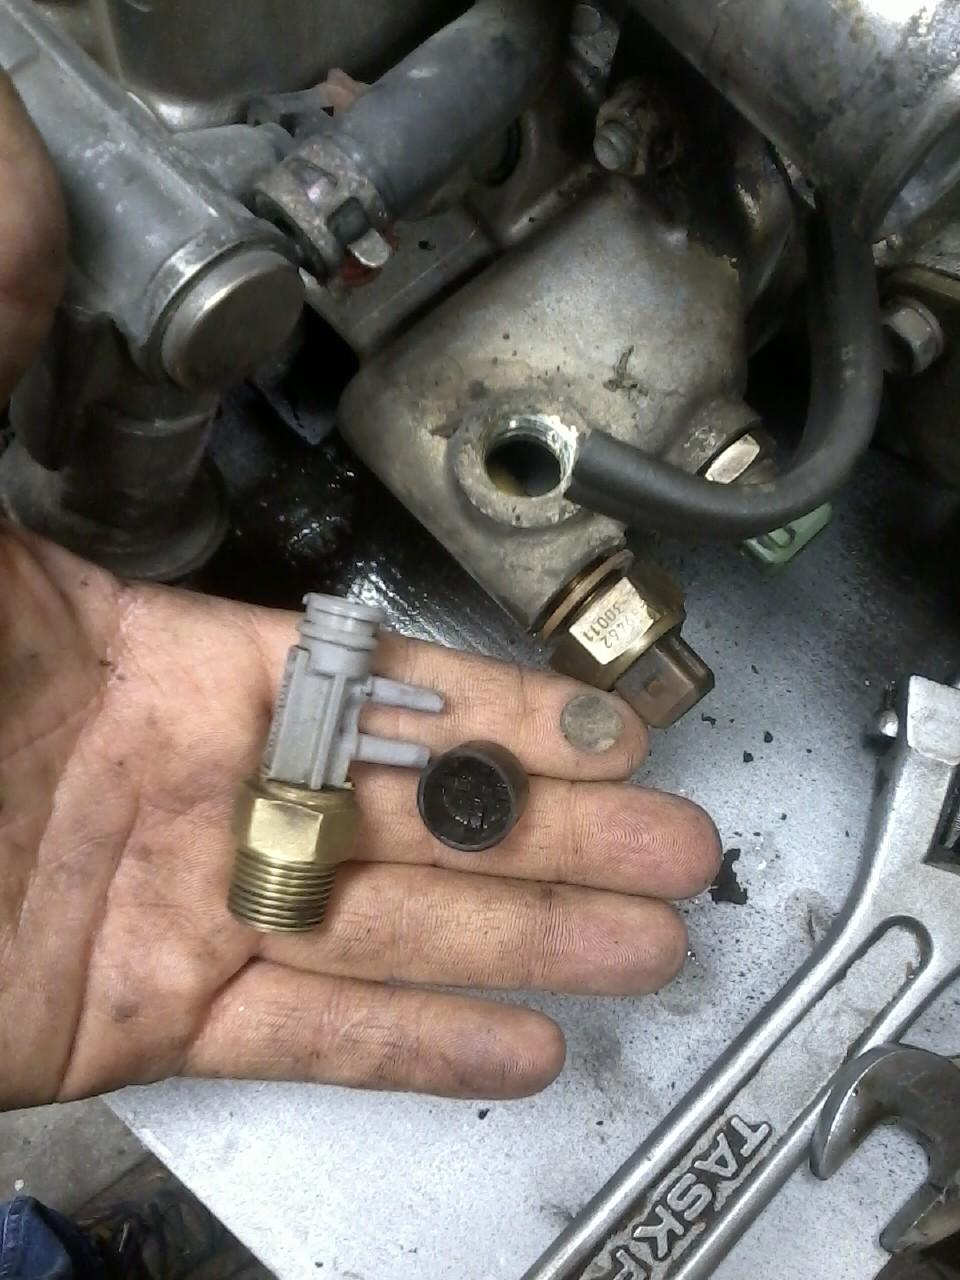
Cleaned Temp Sensor. Have seen this to cause the guage to read max when it was still cold.
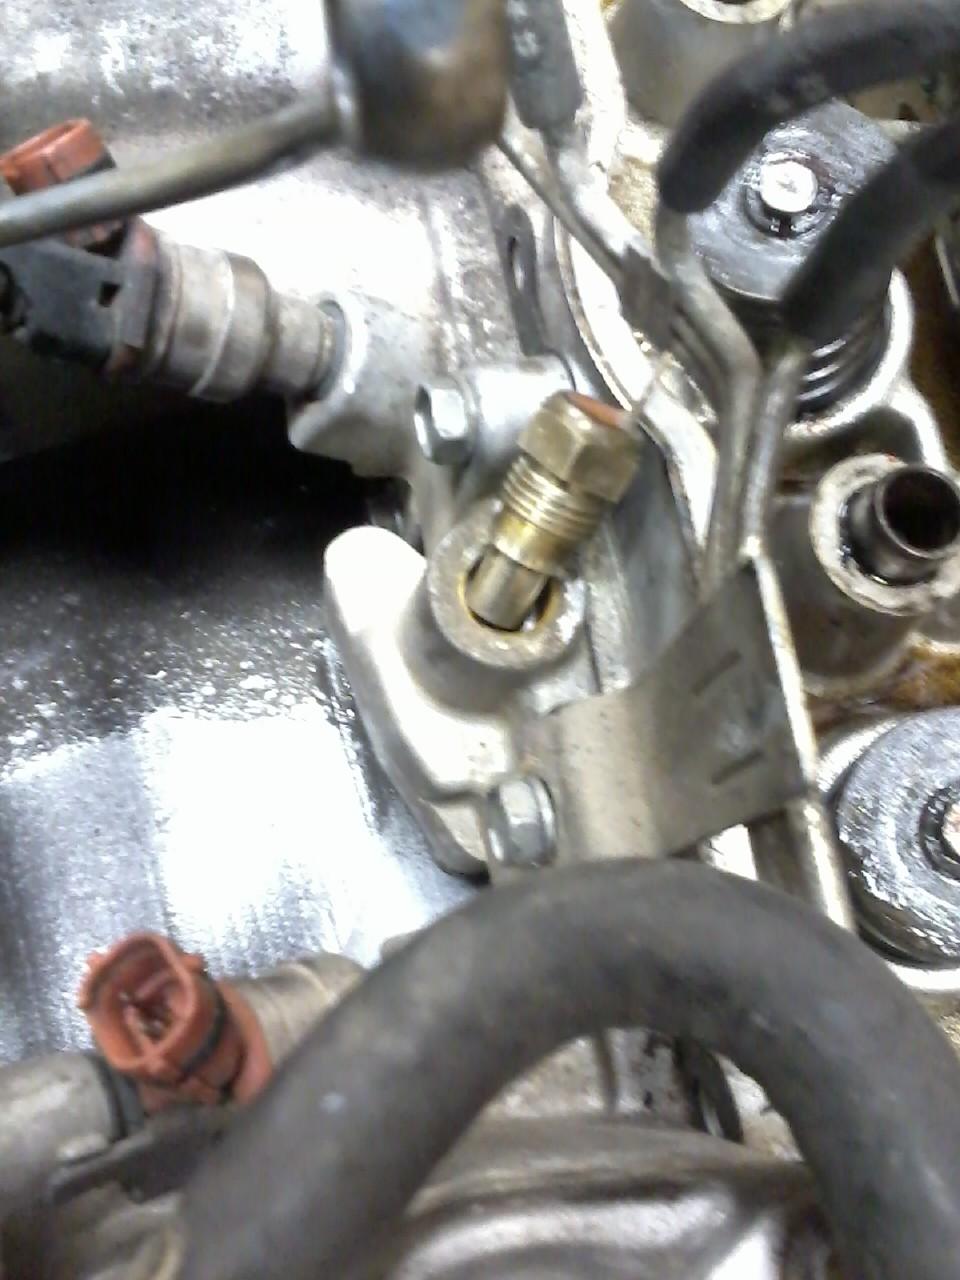
Showing how dirty the sensors can get. The left is the Timing Cold Start Switch (cleaned) which controls the Cold Start Injector. I need some plumbers tape to finish reinstalling. The right one is the Thermo Switch that is still dirty. I have seen worse. Just to show the difference in clean and dirty.

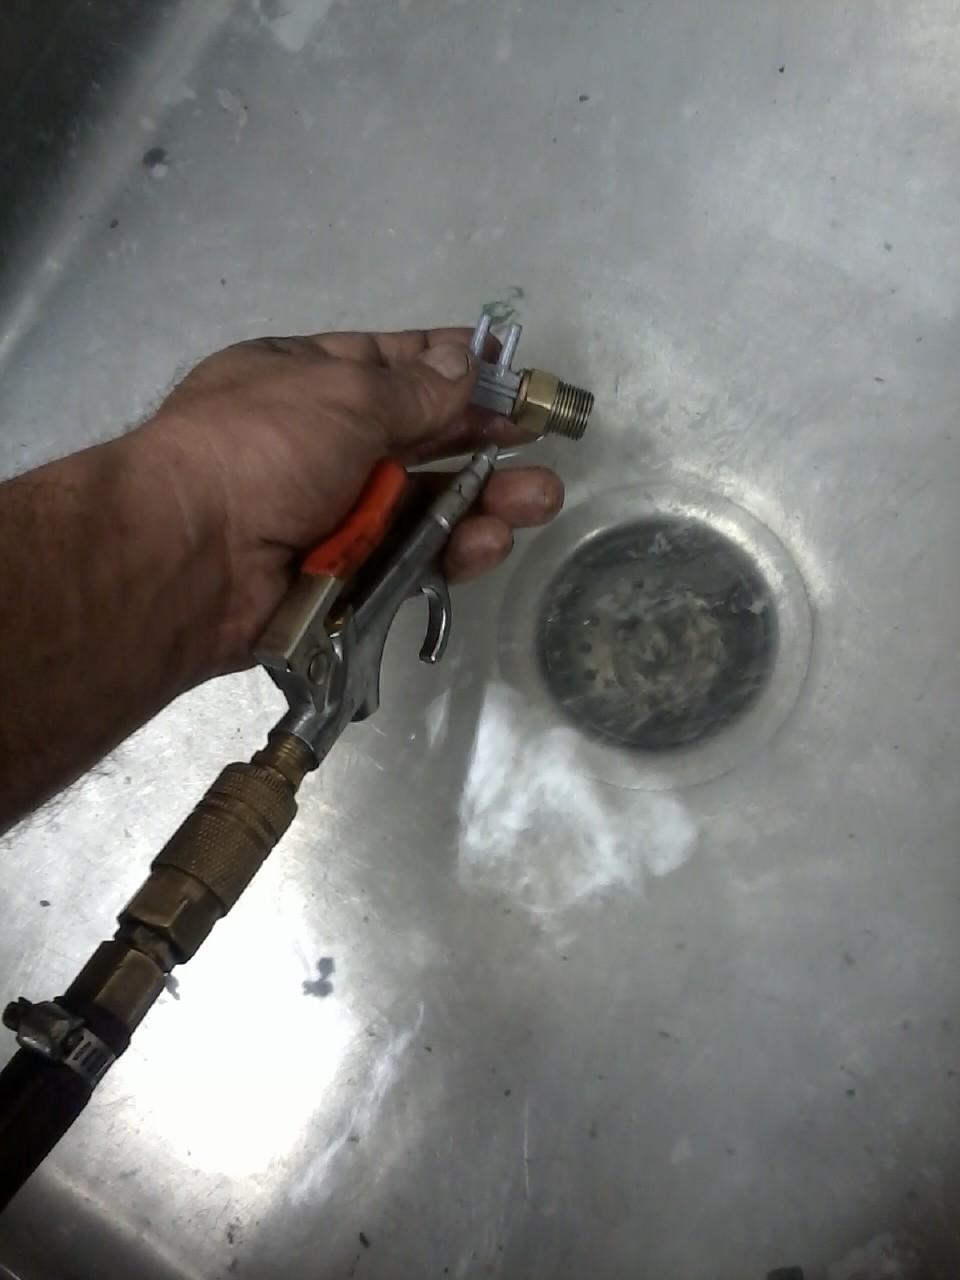
How I clean some parts using air and water. I have even used a 5 gallon bucket before. Works great. Giving it a good scrubbing. Submerge part and air hose in water.
Disassembled and cleaned. Has a little filter in it. Just cleaned it with an air hose. I want all the sensors working as best as possible.
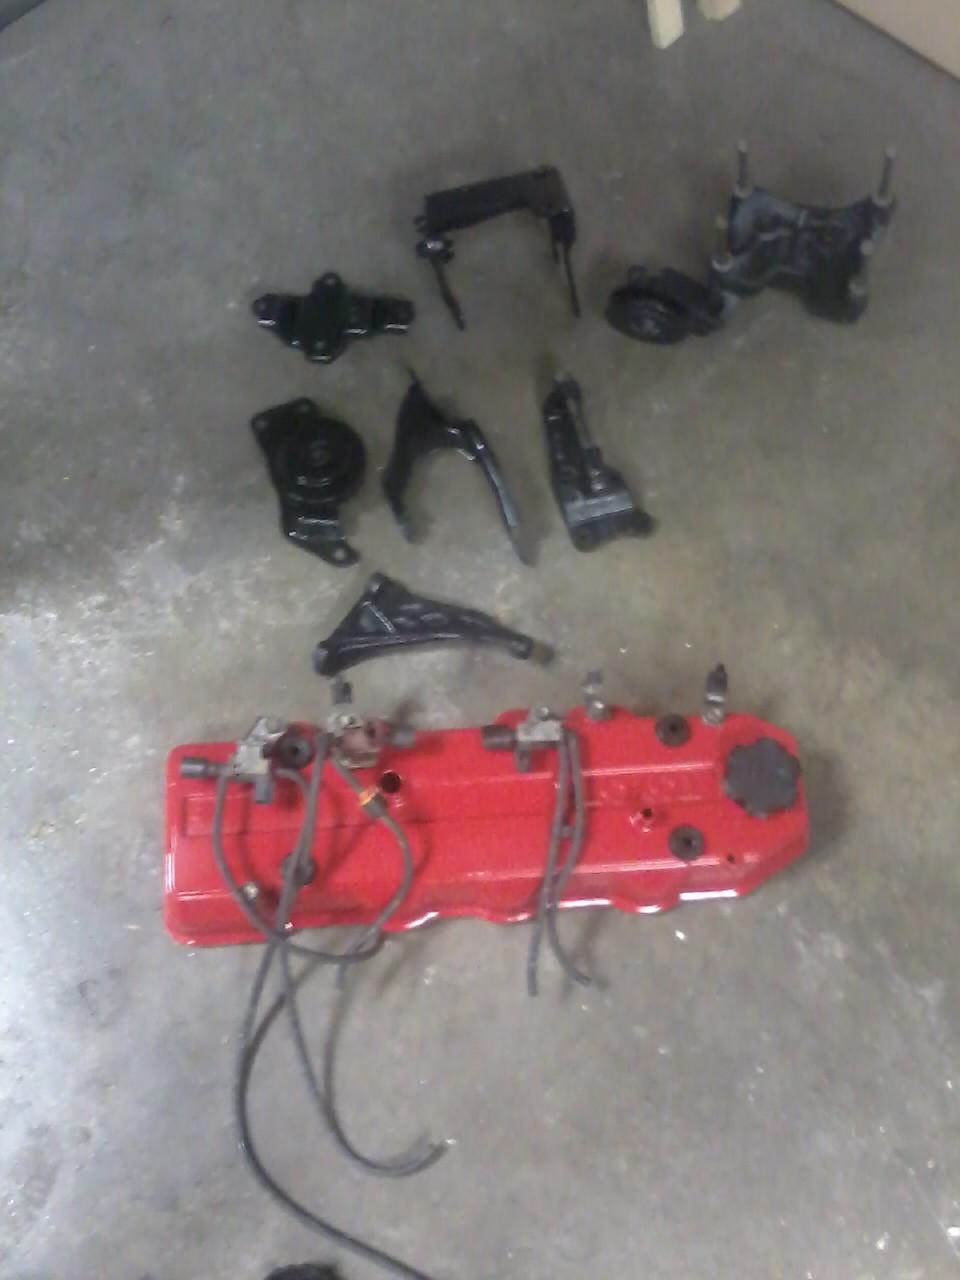
More parts cleaned and painted. Also cleaned alot of bolts on a bench grinder with a wire wheel and cleaned out alot of the bolt holes. Cleaning takes ALOT of time but is something that is real important.
Cleaned Temp Sensor. Have seen this to cause the guage to read max when it was still cold.
Showing how dirty the sensors can get. The left is the Timing Cold Start Switch (cleaned) which controls the Cold Start Injector. I need some plumbers tape to finish reinstalling. The right one is the Thermo Switch that is still dirty. I have seen worse. Just to show the difference in clean and dirty.
How I clean some parts using air and water. I have even used a 5 gallon bucket before. Works great. Giving it a good scrubbing. Submerge part and air hose in water.
Disassembled and cleaned. Has a little filter in it. Just cleaned it with an air hose. I want all the sensors working as best as possible.
More parts cleaned and painted. Also cleaned alot of bolts on a bench grinder with a wire wheel and cleaned out alot of the bolt holes. Cleaning takes ALOT of time but is something that is real important.
Last edited by Terrys87; 02-27-2014 at 08:19 AM.


