
Terrys87 88 4Runner Restoration/Build thread
 08-15-2012, 01:04 AM
#881
Super Moderator
Staff
Thread Starter
iTrader: (1)
Join Date: Aug 2008
Location: Anderson Missouri
Posts: 11,788
Likes: 0
Received 25 Likes
on
22 Posts
The PO butchered up the Injector Harness, I could save it in a pinch, but will try to find a different harness. Finding a 85 harness wont be easy, so am hoping an 86 or 87 will interchange. Anybody know about the interchangeability?
I am sure an 88 wont and maybe an 89 and up will. I am going to eventually look up the part numbers up and see if there is a difference. Being an 85, and some of the changes I am worried it may be just a little different.
I found alot more splices and unhooked wires then I want to deal with at this time. Probably why this truck got parked in the begin with and started getting used for parts after that.
 08-16-2012, 12:04 PM
#882
Super Moderator
Staff
Thread Starter
iTrader: (1)
Join Date: Aug 2008
Location: Anderson Missouri
Posts: 11,788
Likes: 0
Received 25 Likes
on
22 Posts
Started a 6 this morning and at 1 it was to hot to work. Took the 88 pickup to get t inspected and he was gone the doctor saying he would be open tomorrow. Did alot to it and got a few small thigs to button up on it, but it will pass. Wahoo!!
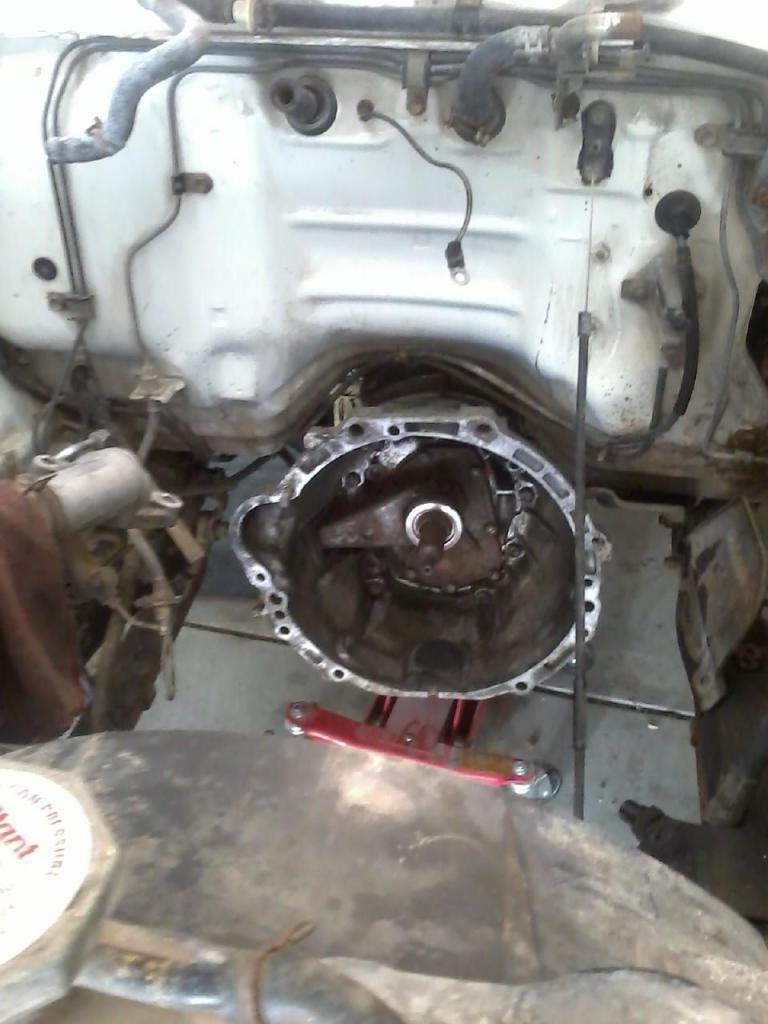
Got the tranny out of the back of this truck and cleaned it up. It was dirty and took it to the car wash for a bath. Picture didnt turn out, but it is alot cleaner. Usually I change the seals to the shafts but since I dont know if this tranny is good, I am not putting any more into it then I just have to. Not even going to hook up the front shaft til I know if it is or not.
I have heard both, yes and no, that a older style 22r can be adapted to a 22re. I am going to say no as the intakes are not interchangeable. I could take a 22r harness and replace it and make it work, but I have this motor sold and will just rebuild a motor that I have.
Got tranny cleaned and in.
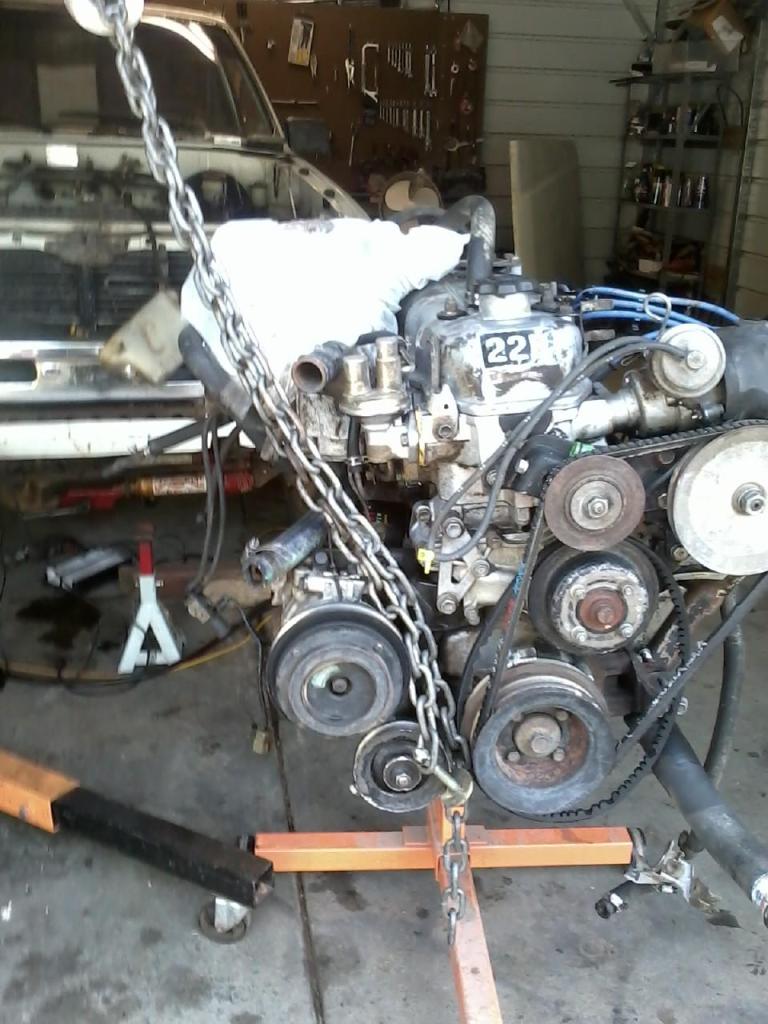
If you have oil build up like this you may have a leak. Seems like the PO would of fixed it, at least the valve cover kit that is $10. This is the 84 22r.

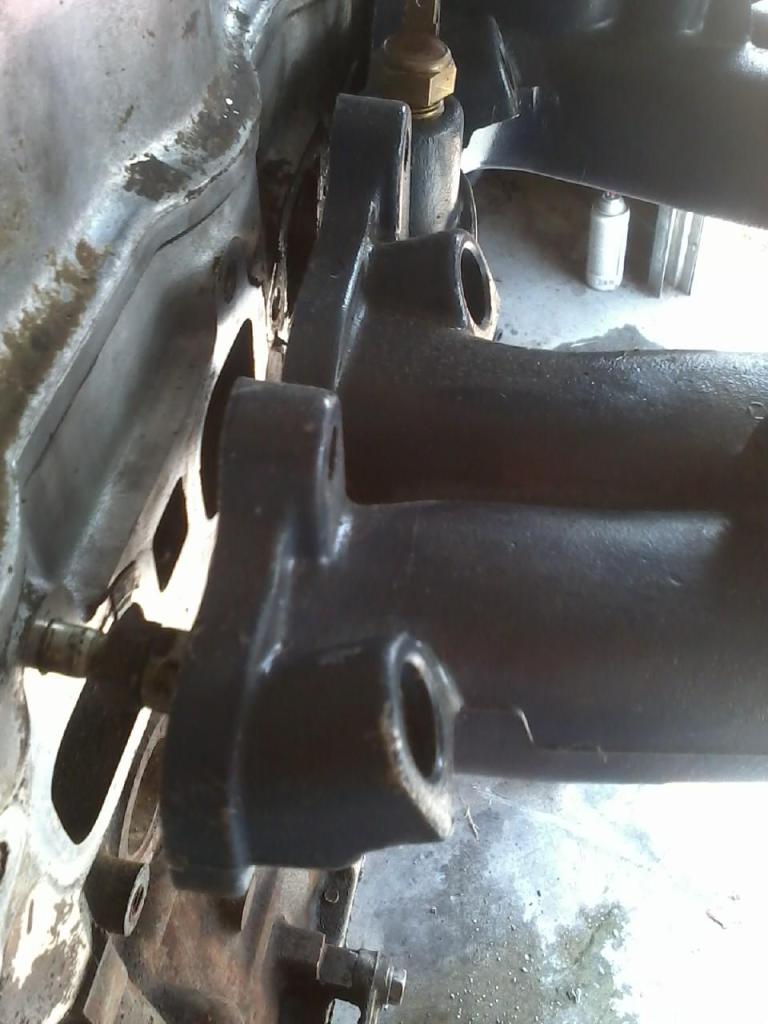
Alot of cleaning done. One way I know what comes off and goes on what order is Luxuries first ( AC and Power steering ) when coming off the motor and Necessities last.
When putting a motor together, the way I remember it is Necessities first (water pump and alternator ) and Luxuries last. I dont even put on the AC and Power Steering when first starting a motor so as if I have any leaks or something that I can go back and fix them. Hope this will help some one out there on their build.
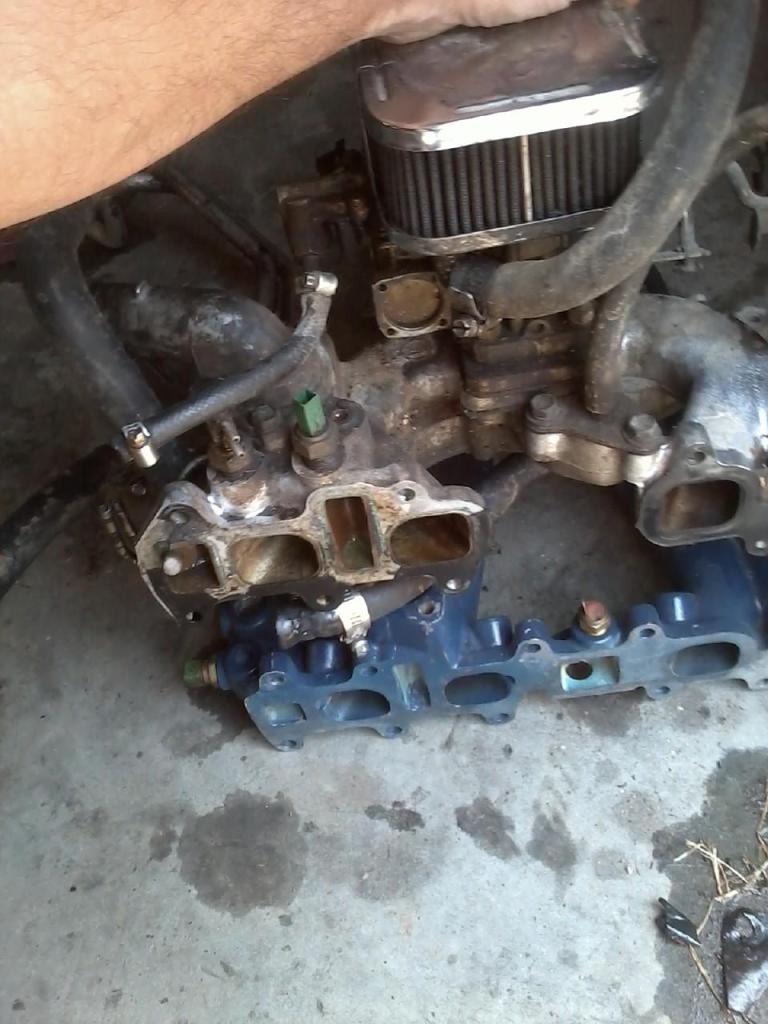
Here is a intake manifold that I used for my 86 Runner and something wasnt right on it and had to use another. The first stud up by the fuel pump lines up but nearly all of the rest dont as you get furhter to the back of the motor.
Old and New Style Block Differences.
I got my Timing Chain on and had to replace the Timing Cover due to it being worn. I tried to use a early model 22r and they wont interchange. Thought I would put some info up to help others identify what they may have.
84 and older. 22r has no dimples/circles and the number "2" on it. Twistedyota got it right on the height thing, see the last picture for a good example. I also tried to mark which bolt holes for removing the timing cover on down the road when I have to do a chain again. Hope it wont burn off but it if does I tried to come up with an easier way. Never can remember which bolts they are.
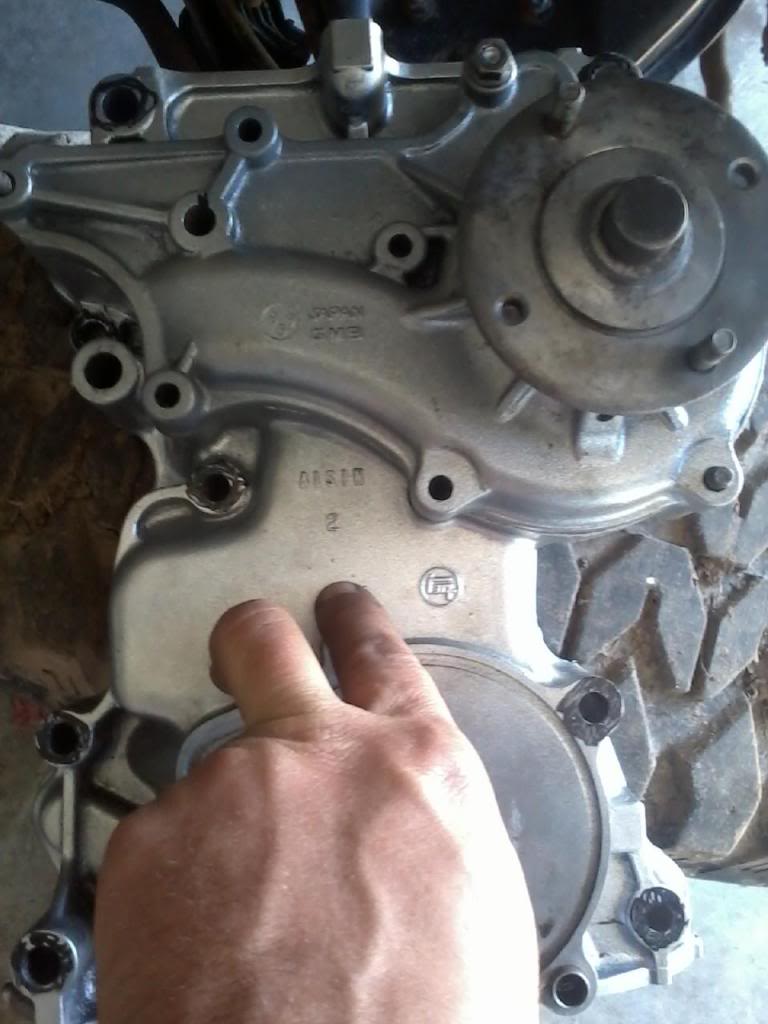
22re has "6k" and dimples/circles. 85 and up.
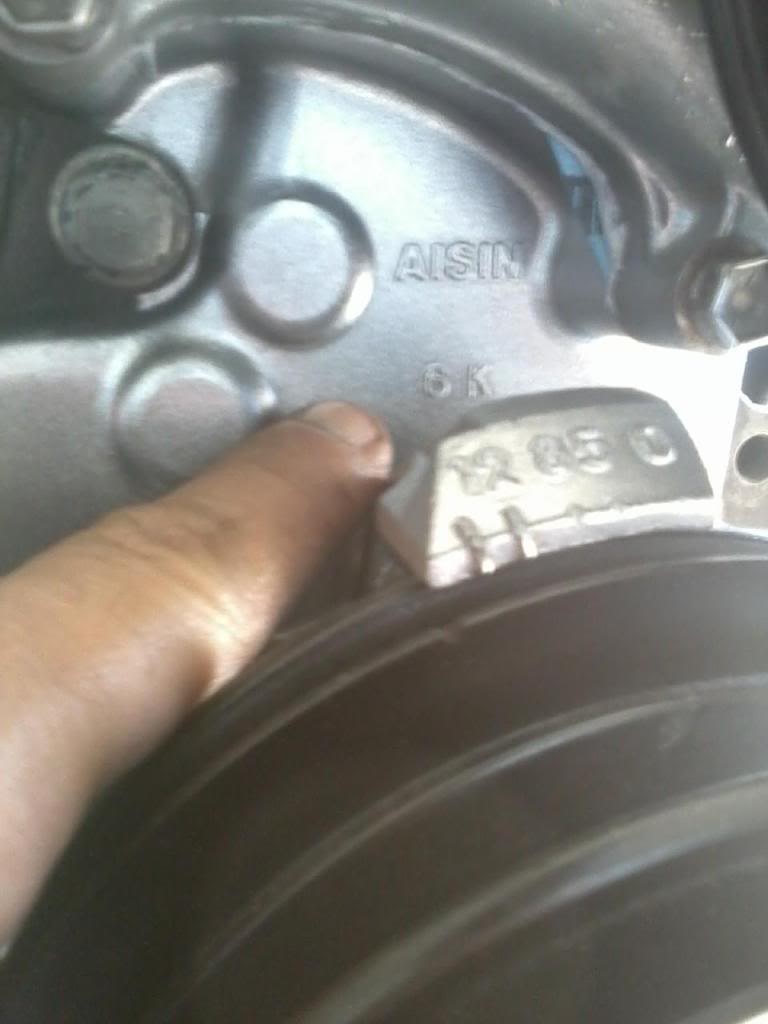
Here is what I am talking about on the 1/8th inch height. I used a lockwasher to help show how much of a difference. This cover is 22r. Seems like the oil pump bolts were to short. Hope this will save some one some trouble. It is an early model 22r timing cover on a newer 22re block.
Got the tranny out of the back of this truck and cleaned it up. It was dirty and took it to the car wash for a bath. Picture didnt turn out, but it is alot cleaner. Usually I change the seals to the shafts but since I dont know if this tranny is good, I am not putting any more into it then I just have to. Not even going to hook up the front shaft til I know if it is or not.
I have heard both, yes and no, that a older style 22r can be adapted to a 22re. I am going to say no as the intakes are not interchangeable. I could take a 22r harness and replace it and make it work, but I have this motor sold and will just rebuild a motor that I have.
Got tranny cleaned and in.
If you have oil build up like this you may have a leak. Seems like the PO would of fixed it, at least the valve cover kit that is $10. This is the 84 22r.
Alot of cleaning done. One way I know what comes off and goes on what order is Luxuries first ( AC and Power steering ) when coming off the motor and Necessities last.
When putting a motor together, the way I remember it is Necessities first (water pump and alternator ) and Luxuries last. I dont even put on the AC and Power Steering when first starting a motor so as if I have any leaks or something that I can go back and fix them. Hope this will help some one out there on their build.
Here is a intake manifold that I used for my 86 Runner and something wasnt right on it and had to use another. The first stud up by the fuel pump lines up but nearly all of the rest dont as you get furhter to the back of the motor.
Old and New Style Block Differences.
I got my Timing Chain on and had to replace the Timing Cover due to it being worn. I tried to use a early model 22r and they wont interchange. Thought I would put some info up to help others identify what they may have.
84 and older. 22r has no dimples/circles and the number "2" on it. Twistedyota got it right on the height thing, see the last picture for a good example. I also tried to mark which bolt holes for removing the timing cover on down the road when I have to do a chain again. Hope it wont burn off but it if does I tried to come up with an easier way. Never can remember which bolts they are.
22re has "6k" and dimples/circles. 85 and up.
Here is what I am talking about on the 1/8th inch height. I used a lockwasher to help show how much of a difference. This cover is 22r. Seems like the oil pump bolts were to short. Hope this will save some one some trouble. It is an early model 22r timing cover on a newer 22re block.
Last edited by Terrys87; 10-04-2015 at 09:54 AM.
08-16-2012, 12:14 PM
#883
That's what I was worried about. I read that more than anything... People saying, "YOU CAN tap and thread, there's room in there... And on some you just switch the studs around... But it's 'NOT' plug and play as everyone thinks when going older 22RE swap"........
WOW that engine was FILTHY! hahaha.... GREAT CLEAN UP, holy crapoli!
Sorry that isn't working out, man... But you'll find a way, always do!!!
WOW that engine was FILTHY! hahaha.... GREAT CLEAN UP, holy crapoli!
Sorry that isn't working out, man... But you'll find a way, always do!!!
08-16-2012, 12:38 PM
#884
Registered User
wow that is a dirty engine, pushes old 79 behind bush whistling innocently
actually terry thank you for the picture of the engine with the accessories on it mine came to me partly disassembled an i had no idea what it looked like with the power steering an ac assemblies on it
actually terry thank you for the picture of the engine with the accessories on it mine came to me partly disassembled an i had no idea what it looked like with the power steering an ac assemblies on it
08-16-2012, 01:11 PM
#885
Super Moderator
Staff
Thread Starter
iTrader: (1)
Join Date: Aug 2008
Location: Anderson Missouri
Posts: 11,788
Likes: 0
Received 25 Likes
on
22 Posts
Hello Mark.. I had heard several stories and even asked a guy that has worked on these alot longer then I have and he thought they would. I thinking on this is that it probably is possible on the newer motors as some were fuel injected and others were carbed. My guessing on that and was probably thought that it would work on the older style.
Your welcome Cyberhorn.. If you need some better pics just let me know. I had gotten a queston thru a PM and my " Necessities first and Luxuries last" came to mind. I used to get hung up on what went back on first as far as belts, pulleys and accessories and that came to mind. I really think that will make you putting your engine back together alot easier I think. It isnt to bad to put your Power Steering and AC in after the motor is in. You wont have to undo anything.
One thing I wanted to add is with AC, you have some bolts that use the AC bracket as a spacer, not sure if you have AC or not, but just be aware that if you dont have the spacer to watch the length of bolt you use. Any questions I have a motor that I can take pics of to clarify a little better.
Last edited by Terrys87; 08-16-2012 at 01:27 PM.
08-16-2012, 01:21 PM
#886
Super Moderator
Staff
Thread Starter
iTrader: (1)
Join Date: Aug 2008
Location: Anderson Missouri
Posts: 11,788
Likes: 0
Received 25 Likes
on
22 Posts
Just got done talking to wifey and we have figured that this truck will go on the slow build. It will be getting done, just not as fast as I would like to have, as I really need a truck. I have a trailer and it has worked for us great when we didnt have a truck in the past. Just really like throwing things in the back and going. I have pulled trailers for years so no biggie to me.
I am jumping out of bed in the morning and going back to get my 86 Runner from my dads house if all goes accordiing to plans. It is the one I really want to be doing for myself and Misty would like her Runner back. It runs and just needs a windshield put in. I bought paint for a previous project and I have sealer and hardner so all I really need is paint to get my 86 Runner going and looking good.
The 88 pickup will still be going as fast as I can as I dont have to fund that build. I really enjoy spending someone elses money. Hopefully the 86 Runner will jump from 100th on the list to the top tomorrow.
08-20-2012, 08:09 AM
#887
Registered User
This is a Toyota factory splice. Anytime I come across one of these, I remove the splice and solder it together. You will find it when one wire feeds two others. There is on in the rear light harness, some next to the computer in the passenger kick panel, but the ones that cause problems is the ones in the fuel injector harness.
When the motor is out is a good time to remove the wrapping from the harness and fix it right. It is a poor job from the factory. This clip is what kept my 86 Runner from starting. They will even pass a resistance check but wont let the injector operate. They connect injectors #1 and #3 together and #2 and #4 together.
I have ran into this issue as well. Rebuilt the engine, dropped it in and no go. Took me a month to figure out that it was those little splices in the injection harness. Thought I was the only one with that problem!!!
08-21-2012, 12:53 AM
#888
Super Moderator
Staff
Thread Starter
iTrader: (1)
Join Date: Aug 2008
Location: Anderson Missouri
Posts: 11,788
Likes: 0
Received 25 Likes
on
22 Posts
Hello Rockguy76..I despise those little clips, but they did help me learn the system alot better. Took me awhile to figure out the same problem on my 86 runner when it wouldnt start. I found where they put some more of those clips. They are on the tail light assemblies. Just found them today. Urgghh!!! I will be getting rid of those soooon.
Last edited by Terrys87; 08-21-2012 at 12:59 AM.
08-21-2012, 12:57 AM
#889
Super Moderator
Staff
Thread Starter
iTrader: (1)
Join Date: Aug 2008
Location: Anderson Missouri
Posts: 11,788
Likes: 0
Received 25 Likes
on
22 Posts
This is going to be my Front axle info post. I have been going and updating my 88 Runner Build on the 1st page.
Cone washer removal.
http://www.youtube.com/watch?v=3djqDPYI9tM
Seals
http://www.youtube.com/watch?v=qevb7w9pUdk
I like this video for solid axles.
http://www.youtube.com/watch?v=_3CI4...eature=related
Toyota Junk Yards...https://www.yotatech.com/forums/f123...-yards-149035/
Rear Dome link... https://www.yotatech.com/forums/f199.../index198.html
Rear Seal Replacement... https://www.yotatech.com/forums/f116...90/index2.html
Vacuum Line link.>>>>> http://www.pirate4x4.com/forum/showthread.php?t=579557
Steering gear box links.
http://128.83.80.200/TACO/box.html
https://www.yotatech.com/forums/f116...cement-194025/
Brake upgrade... http://www.expeditionportal.com/foru...4Runner-Brakes
Last edited by Terrys87; 11-16-2012 at 03:21 PM.
08-21-2012, 07:11 AM
#890
Registered User
Ooooooo thanks terry. You found me some videos for future reference! These are definitely gonna come in handy.
Last edited by Redeth005; 08-21-2012 at 07:47 AM.
08-21-2012, 10:51 AM
#891
Terry, .... YOU ROCK! Wow, I must have stopped before getting to that video when I watched around 200! hahaha. GREAT one, and that guy was just really good at that! I need practice at doing videos.... I've gotten better, but yeah, practice, lol.
ericthecarguy does great ones too, a youtube channel.
That almost makes me want to just post that link rather than doing a new one... Even though I have my tripod ready, and everytiiiing ...
... 
OK, but the first video that comes up after that first one you posted ends? HE TICKS ME OFF! hahaha... The Canadian dude with the interesting FOAXhawk.... anyway... Smashing the sides of the Hub body to remove the cones..... using an air chisel on the lock and adjuster nuts inside the hub... HE MUST BE RELATED TO MY PO! hahahaha.
ericthecarguy does great ones too, a youtube channel.
That almost makes me want to just post that link rather than doing a new one... Even though I have my tripod ready, and everytiiiing
... OK, but the first video that comes up after that first one you posted ends? HE TICKS ME OFF! hahaha... The Canadian dude with the interesting FOAXhawk.... anyway... Smashing the sides of the Hub body to remove the cones..... using an air chisel on the lock and adjuster nuts inside the hub... HE MUST BE RELATED TO MY PO! hahahaha.
08-21-2012, 10:24 PM
#892
Super Moderator
Staff
Thread Starter
iTrader: (1)
Join Date: Aug 2008
Location: Anderson Missouri
Posts: 11,788
Likes: 0
Received 25 Likes
on
22 Posts
Terry, .... YOU ROCK! Wow, I must have stopped before getting to that video when I watched around 200! hahaha. GREAT one, and that guy was just really good at that! I need practice at doing videos.... I've gotten better, but yeah, practice, lol.
ericthecarguy does great ones too, a youtube channel.
That almost makes me want to just post that link rather than doing a new one... Even though I have my tripod ready, and everytiiiing ...
OK, but the first video that comes up after that first one you posted ends? HE TICKS ME OFF! hahaha... The Canadian dude with the interesting FOAXhawk.... anyway... Smashing the sides of the Hub body to remove the cones..... using an air chisel on the lock and adjuster nuts inside the hub... HE MUST BE RELATED TO MY PO! hahahaha.
ericthecarguy does great ones too, a youtube channel.
That almost makes me want to just post that link rather than doing a new one... Even though I have my tripod ready, and everytiiiing
... OK, but the first video that comes up after that first one you posted ends? HE TICKS ME OFF! hahaha... The Canadian dude with the interesting FOAXhawk.... anyway... Smashing the sides of the Hub body to remove the cones..... using an air chisel on the lock and adjuster nuts inside the hub... HE MUST BE RELATED TO MY PO! hahahaha.
I know of a couple of other mechanics that do that. I am new into the Toyota four wheel hubs. Seems like I have been getting into them alot more lately and have to do Mistys on my days off. I have seen on some of the trucks that I have gotten where they have banged on them. I do not like that at all..
I have found with some PB Blaster soaking on them and been a few times where I started soaking them and 5 minutes later I was working on them. What I do and I have had some bad ones is bring the nut flush with the stud and just start tapping on them and you dont need brute force. It has taken me 30 minutes to get one to finally break loose, but once the first one breaks loose, the rest will come out quick. If one wont come out after 10 or so lite whacks, move to the next one. It is the vibrations that finally breaks them loose in my opinion.
Doing it this way, I have never damaged a stud or nut. It just takes patience. I say lite whacks or should say taps, I mean just hard enough not to do damage. I do have a 2 or 3 lb hammer but it is lite taps.
I dont like how they do some of theirs, but it does show the steps needed. I used to just have to set down with a manual and that isnt always as clear. Been stuck before trying to get thru one small step, but it can hold up the whole show when it does happen.
08-21-2012, 10:41 PM
#893
Super Moderator
Staff
Thread Starter
iTrader: (1)
Join Date: Aug 2008
Location: Anderson Missouri
Posts: 11,788
Likes: 0
Received 25 Likes
on
22 Posts
Mistys truck has a bearing making a noise and her right front hub seems to be out of round so I get to add that to the list of things I want to get done on my up coming days off. Finally got the shop all straightend back out and got all of the things to 85 put into tote bins when I finally do get back on it that I know where they are at. Tote bins makes life so much easier.
I will be getting back on the 86 Runner now that I got the 85 pickup at a good place for stopping on it and got everything so when I do start back on it. When I have a week of tight funds I have plenty that I can do on it that will speed things up on it and are needed.
I have my "Freebies" such as using materials I already have, like changing drive line fluids, rattle can painting parts, repairing a few other small things, flushing all lines with an air hose or getting the orginal 1985 fluids out of it. Then I have "Cheapies" repairing the things that dont cost much, like cleaning my gas tank. I am sure it needs some attention as all of the other projects I have done have been in bad shape, replacing all of the light bulbs and checking what electrical circuits I can that just needs a battery like the clock,lights,wipers,ect..
There are always things that can be done that cost nothing or a little that add up in the long run to make it a more enjoyable and dependable truck to drive.
http://www.youtube.com/watch?v=uhPfT...0&feature=plcp[/QUOTE]
Last edited by Terrys87; 10-04-2012 at 05:38 PM.
08-22-2012, 12:29 AM
#894
TRUE NUFF! "always things that can be done that don't break ya!"... LOVE THAT! That's how I've kept mine pretty clean(not showroom, but pretty nice haha).
Updated the thread, Buddy... CV's were INDEED a bit of a PITA(well, the one I got out, as I didn't have much time to begin with. Had to pull the warn's(THEY'RE PRISTINE!) and then drop the shock hoop bolt/nut and knock out 2 studs helped a lot and then dropped the bottom BJoint 4-bolts.... Pushed down and KERPLUNK onto the box I had flipped for that occasion(with a pillow I use for this stuff/axle splines, delicate stuff, ya know?).... the other side will go quicker. MUCH! lol.
I explained that I did LOTS of video already... But wanna wait til I have everything I need and do some in the daylight tomorrow(redo's of stuff I did already on the other side, just to show how how to get it out front A-to-Z, ya know? ) Plus, I have to edit/chop out/splice stuff together and then it'll be good for helping someone, I know it. I'm also going to finish the video's of assembling and then installing the Aisin Hubs on there.
Hope you're well, Terry
haha). Updated the thread, Buddy... CV's were INDEED a bit of a PITA(well, the one I got out, as I didn't have much time to begin with. Had to pull the warn's(THEY'RE PRISTINE!) and then drop the shock hoop bolt/nut and knock out 2 studs helped a lot and then dropped the bottom BJoint 4-bolts.... Pushed down and KERPLUNK onto the box I had flipped for that occasion(with a pillow I use for this stuff/axle splines, delicate stuff, ya know?).... the other side will go quicker. MUCH! lol.
I explained that I did LOTS of video already... But wanna wait til I have everything I need and do some in the daylight tomorrow(redo's of stuff I did already on the other side, just to show how how to get it out front A-to-Z, ya know?
) Plus, I have to edit/chop out/splice stuff together and then it'll be good for helping someone, I know it. I'm also going to finish the video's of assembling and then installing the Aisin Hubs on there. Hope you're well, Terry
08-22-2012, 09:43 AM
#895
Registered User
Yea I'm thinking about doing the SuperBrightLEDs Dash replacement light video sometime this week when I scrape up some time. Was gonna do it yesterday but didnt plan on running into that problem with my truck yesterday.
10-29-2012, 12:24 PM
#896
Registered User
Hi Terry, I apologize for jacking your thread. Can you take a look at your 1988 4Runner's gold colored VSV and tell me the part number on it please? I would also like to know the color of the plug and the colors of the 2 wires in that plug. Thank you!

10-29-2012, 01:02 PM
#897
Registered User
Hi Terry. Damn can't believe the last time I dropped by was 2 months ago. Whats up with the trucks? Haven't seen u drop by on my thread for a while either so I thought is drop by to say "Hi"
11-01-2012, 05:42 AM
#898
Super Moderator
Staff
Thread Starter
iTrader: (1)
Join Date: Aug 2008
Location: Anderson Missouri
Posts: 11,788
Likes: 0
Received 25 Likes
on
22 Posts
Hello Green88.. I missed your post. I will look at the runner when the wife gets home with it and let you know what I find on it. It will be later today and I will PM you on it as well.
Hello Redeth005...I understand as time does fly by and just doesnt seem like at times. Been following your thread and see you have been busy as well.
Hello Redeth005...I understand as time does fly by and just doesnt seem like at times. Been following your thread and see you have been busy as well.
11-20-2012, 05:11 PM
#899
Super Moderator
Staff
Thread Starter
iTrader: (1)
Join Date: Aug 2008
Location: Anderson Missouri
Posts: 11,788
Likes: 0
Received 25 Likes
on
22 Posts
Just got back home. The 88 had to be brought home on a flatbed. Misty was coming home from the store and stopped for a car in front of her and either the left rear brake has locked up or the differential is locked up. It has been running great and hasnt been giving any signs of trouble. It wont move at all. It is definitely in the rear end, just not sure which one. I am hoping it is in the brakes. Having one to lock up like this is a first for me.
Really only major problem I have ever had with it, but it does have 307,000 miles on it now and otherwise runs really well. Worse case scenario I just change out the whole rear axle, but dont think it will be nearly that bad. We arent really hard on our trucks and I keep my maintaince up on them so I think it will be a fairly reasonable fix.
It is a good thing I have my 86 running now though. Guess it all worked out just in time. She only has to drive 4 miles to work and I will be stuck in the 3rd Gen for a little bit.
11-20-2012, 06:18 PM
#900
Registered User
yikes!
ok my money is on a clogged slave cylinder fluid went in an couldnt get back out a flake of rust or something came loose in the lines or a bit of rubber line MAYBE a stuck ebrake lever but thats more rare
ok my money is on a clogged slave cylinder fluid went in an couldnt get back out a flake of rust or something came loose in the lines or a bit of rubber line MAYBE a stuck ebrake lever but thats more rare


