
Terrys87 88 4Runner Restoration/Build thread
 08-09-2012, 11:09 AM
#841
Super Moderator
Staff
Thread Starter
iTrader: (1)
Join Date: Aug 2008
Location: Anderson Missouri
Posts: 11,788
Likes: 0
Received 25 Likes
on
22 Posts
Hello Mark..I thought of asking my machine shop if he can tap a whole for the knock sensor as it looks like a place for it, but I am not holding my breath. I am afraid something else will pop up and it will just be one thing after another. Then it really adds up when trying to make something that shouldnt be in there, I think I will just go ahead with the rebuild. Sounds as if I got the motor sold already and that will save me having to go back into at a later time. Was just hoping it would of worked til fall or winter.
Since this is going to be one of my keepers, I would of been doing it anyways. I just like doing motor work when it is too cold to paint. I wont be repainting this truck til next spring as it looks good as it is, but it does have some runs and is flaking off in a few places. I will have it as nice as new eventually, it is just at the bottom of the list. I will be doing my brothers truck and my runner first. After these two are done, I am wanting to fix one to sell when the wife isnt working next summer to make up for her lost wages.
The motor in the back of one of the pictures below was going to be rebuilt for Mistys as I just did a top end rebuild hers. It runs great and hasnt smoked in a while and am thinking it was so hot the oil just got thin and made it by the valve seals, it was over a hundred degress and I was running it hard that day. I really think it will hold off for another month or two and will be okay.
My wife works in the school system and what these kids come from is bad. Our nieghbor who is finally getting her house forclosed on is not going to get mother of the year award anytime soon. Her kids get a dollar menu once a day if they are lucky. The daughter used to eat with us on most days, mom cant afford food but always has money for booze and drugs but her dad finally got custody of her. The son just got his drivers permit and at 15 1/2 totaled her car while drunk and two different drugs in his system. I tried working with him and he has helped me on my trucks but I am afraid he is a lost cause.
I try to let some of the neighbor kids work on my trucks when they want. The brats today like running like running the impact wrench when they get the oppurtunity. They haven grabbed the concept of 10,12,14,17, and 19mm sockets or wrenches and the sizes just yet. We spent over an hour working on the bumper. That is a 15 minute job for me from start to finish. I really have to make my self to let them learn at their own speed and slow down. Hoping the time spent with them today will pay off in the tomorrows. They did over kill with the impact when a ratchet would of worked quicker. It is starting to pay off as I can put them on some small jobs and they are getting the hang of it.
 08-09-2012, 11:15 AM
#842
Super Moderator
Staff
Thread Starter
iTrader: (1)
Join Date: Aug 2008
Location: Anderson Missouri
Posts: 11,788
Likes: 0
Received 25 Likes
on
22 Posts
Hello Cyberhorn the Dragon.. I had thought of maybe doing some kind of resistor trick on the knock sensor. There has to be a way of bypassing the sensor, but it does have a purpose and I am thinking it would cause me more frustrations always having to mess with it. I am a little anal about it being done right. But when it is done right, it can make the difference from an enjoyable truck to a miserable truck. You would think I would of learned a lesson on fixing a parts truck. But when it is all said and done, the touger the project the more rewarding. That is what has taught me alot on these. I get myself in a situation and am determined to get myself out of it.
08-09-2012, 11:28 AM
#843
Super Moderator
Staff
Thread Starter
iTrader: (1)
Join Date: Aug 2008
Location: Anderson Missouri
Posts: 11,788
Likes: 0
Received 25 Likes
on
22 Posts
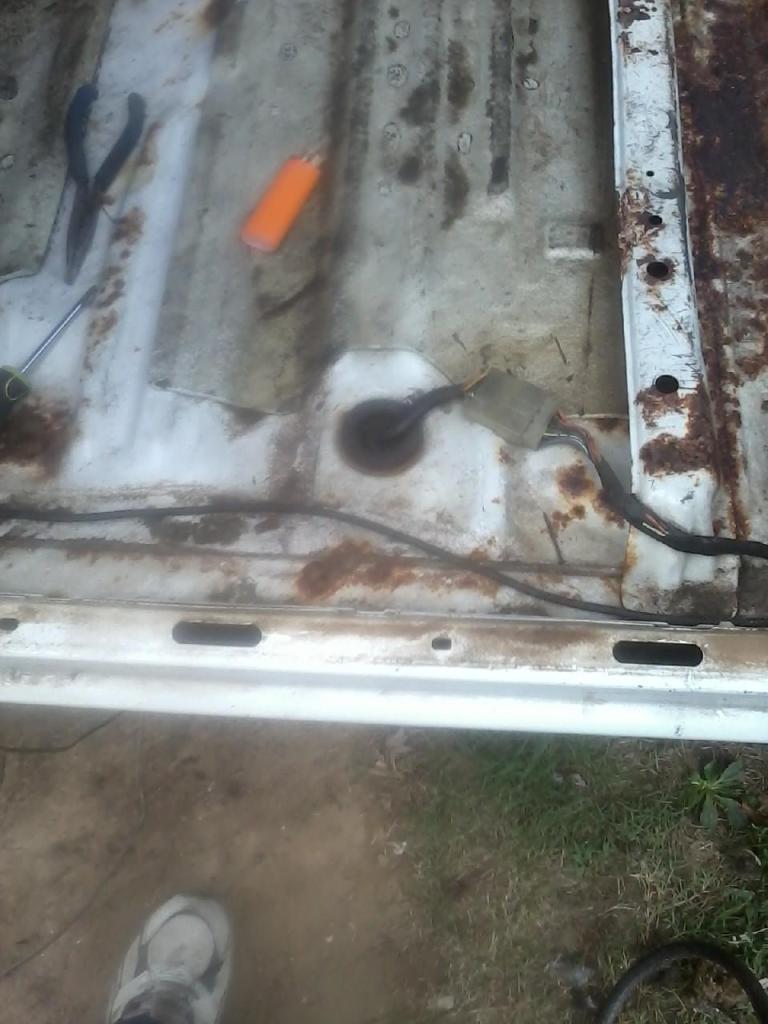
Did some repairs, and this is just to give an idea what I have run into on this truck. I should of posted some pics of how they had the dash mounted, that would have given a good idea of the poor work they have done on it. They used wire to hold the headlight in.
Got the headlght mount fixed. No biggie, but it took a minute to do it right. One thing when I part a truck, I keep all of the clips and things most wouldnt of thought of. It has paid off several times over.

These do get brittle and break off just going down the highway.

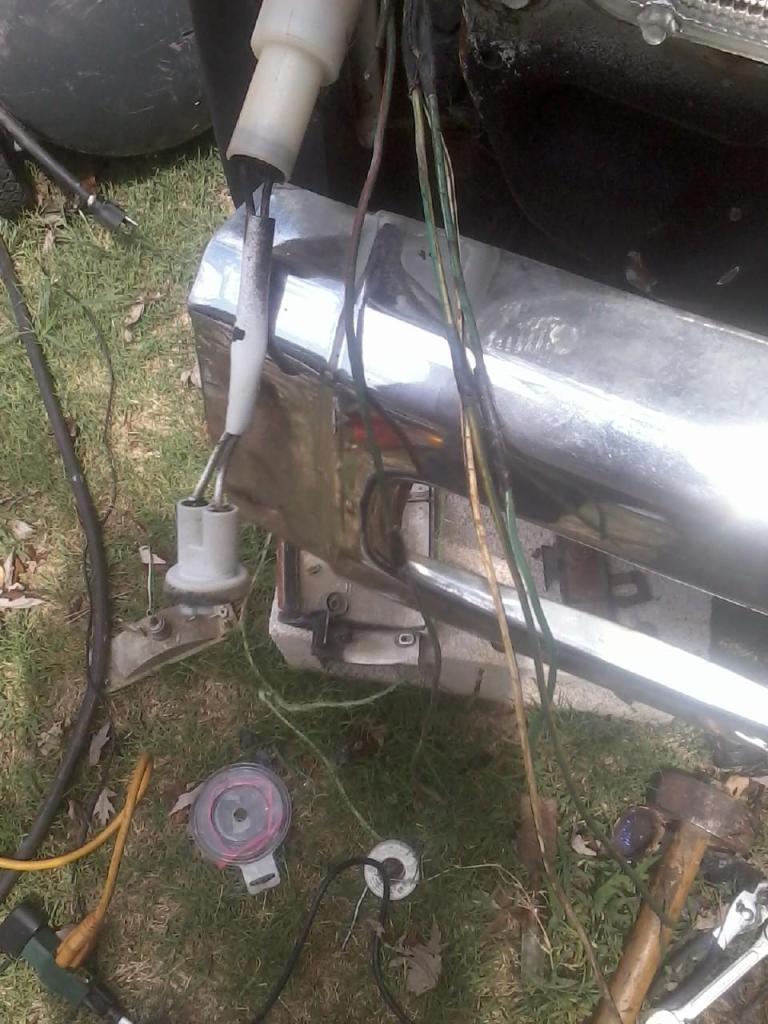
More bs wiring. They had several wire crimpers on and I dont know what they had on them. There are 3 sets of wires here. One to the blinker, one to the marker light and I am having to figure out what the other set goes to. I did the the drivers side done though, so got something accomplished.
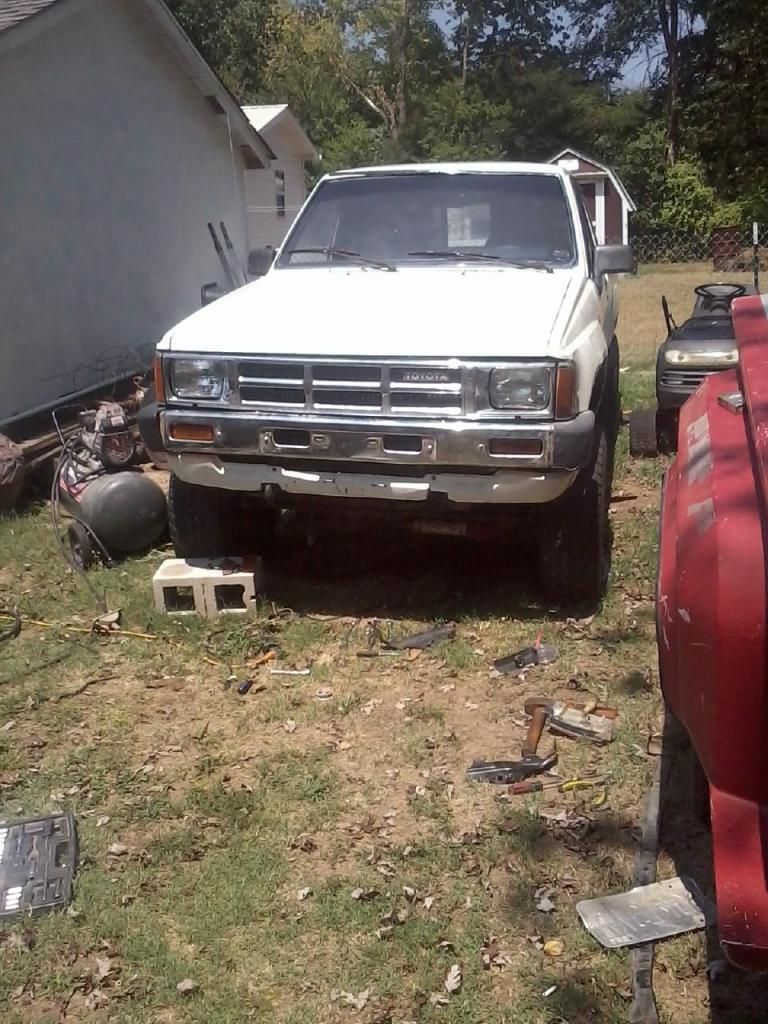
Spent some time getting the hood a little more alighend up. Not perfect, but now it will close with out over lapping the fender. Still have a pair of light wiring to straighten out, but it is hot out now. Kiddos did help get all of the bumper parts put on. Also the bumper mounts from a IFS and Solid axle are not interchangeable. I suspected that when trying to mount the bull bar off of the 84 on to Mistys runner.
Doest look like much, but getting the wiring and missing part all together is a time consuming project. Will replace bumper at a later time, but not nearly as bad as it was.

Got the headlght mount fixed. No biggie, but it took a minute to do it right. One thing when I part a truck, I keep all of the clips and things most wouldnt of thought of. It has paid off several times over.
These do get brittle and break off just going down the highway.
More bs wiring. They had several wire crimpers on and I dont know what they had on them. There are 3 sets of wires here. One to the blinker, one to the marker light and I am having to figure out what the other set goes to. I did the the drivers side done though, so got something accomplished.
Spent some time getting the hood a little more alighend up. Not perfect, but now it will close with out over lapping the fender. Still have a pair of light wiring to straighten out, but it is hot out now. Kiddos did help get all of the bumper parts put on. Also the bumper mounts from a IFS and Solid axle are not interchangeable. I suspected that when trying to mount the bull bar off of the 84 on to Mistys runner.
Doest look like much, but getting the wiring and missing part all together is a time consuming project. Will replace bumper at a later time, but not nearly as bad as it was.
Last edited by Terrys87; 08-09-2012 at 11:30 AM.
08-09-2012, 11:32 AM
#844
Yeah Cyberhorn... That V6 Knock Sensor/Pig Tail/Wiring trio is a doozy... AMAZED at how many problems people have. My buddy did a PERMANENT solution as well. His is not on the motor mount, can't remember where, I'll have to ask. But he 'tricked' the ECU as well. Never had a problem since for 80K+ Miles
GOOD JOB WITH THE KIDS, TERRY! S'all you can do!
GOOD JOB WITH THE KIDS, TERRY! S'all you can do!
08-09-2012, 11:36 AM
#845
Super Moderator
Staff
Thread Starter
iTrader: (1)
Join Date: Aug 2008
Location: Anderson Missouri
Posts: 11,788
Likes: 0
Received 25 Likes
on
22 Posts
Hello Ed.. I missed your post, sorry about that. I had thought of the same thing.
Forgot to mention in the post above, but some days I should of just stayed in bed. I had the soldering iron out and layed it down on the power cord. Doh!!! Another tool I get to replace.
Forgot to mention in the post above, but some days I should of just stayed in bed. I had the soldering iron out and layed it down on the power cord. Doh!!! Another tool I get to replace.
08-09-2012, 11:39 AM
#846
Super Moderator
Staff
Thread Starter
iTrader: (1)
Join Date: Aug 2008
Location: Anderson Missouri
Posts: 11,788
Likes: 0
Received 25 Likes
on
22 Posts
Hello Mark, You think if I could trick the ECU that all else would mount up ok? You guys got me to hoping that I might could still get this truck moving under it power maybe by tomorrow. That is if the wiring under the hood is messed up to bad. I will rebuild a motor at a later time if I can get this motor to work temporaily.
Last edited by Terrys87; 08-09-2012 at 11:58 AM.
08-09-2012, 02:02 PM
#847
Registered User
terry the sodiering iron cord is a low amp cord just grab a cheap extension cord cut the multi plugin end off an replace the cord some are sodiered internally some are just tiny ceramic wirenuts easy fix! dont replace it save some $
found out my drivers side turn signal pigtail got cut up when she took the bop to the nose so thats going on my to be fixed list they twisted the wires together an elect taped things
awesome work with the kids i know my two want to help but with me pounding an hammering i dont have anything they can help with ..yet LOL, just wait till i need a hand scrubbing things
chef: yeah that has to be about the WORST place they could have picked for a sensor "shakes head" any solid spot on the outside would work my roommate spent 2 hours at a junkyard to pull the one were going to use on the lady of the house's 90 an the junkyard owner was with him bashing the dead thrown rod engine to death to get the sensor out (frozen broken bolts an ect)
08-09-2012, 02:06 PM
#848
Registered User
i dont suppose next time you have the bumper end caps off you could take a picture my support bracket is all bent an twisted i have no idea where it should bend an where it shouldn't
08-09-2012, 05:18 PM
#849
Super Moderator
Staff
Thread Starter
iTrader: (1)
Join Date: Aug 2008
Location: Anderson Missouri
Posts: 11,788
Likes: 0
Received 25 Likes
on
22 Posts
Hello Cyberhorn.. I got the cord fixed, it just looked worse then what it was. I just couldnt believe I did such a thing. Old Firt Syndrome kicking in. lol
Thanks, it does make a huge difference. I will eventually replace the bumper assembly as I will want it perfect. I am still trying to figure out some of the wiring mess, did get some back to normal, so did make some progress.
Is this the bracket you were wanting a pic of. It is off of the 84 but same thing. If it is too bad, it does have a nut at the top and would be easily replaced. Glad yo mentioned that. I forgot that the passenger side on mine has a broken bolt on it and I will just replace it with the84. Thanks.
08-09-2012, 05:41 PM
#850
Super Moderator
Staff
Thread Starter
iTrader: (1)
Join Date: Aug 2008
Location: Anderson Missouri
Posts: 11,788
Likes: 0
Received 25 Likes
on
22 Posts
Still debating on the motor. Will do a few test tomorrow and see what I think of it. Wasnt going to let the day be a total loss. Started back on getting the interior stripped and cleaned. No more mouse evidence. I vacummed and then took an air hose and got intoall of the nooks and crannies. Pulled the blower motor and got all thru the ventilation system. Will start cleaning with bleach water.
Will pull the cowl, below the windshield and get under there as well. It is just about as far you can go. A little more cleaning and start reassembling. I will take alot of picture of the assembly so as to make it easier for someone that might need to swap out their heater core or need to work on their heater controls.

I pulled the door thresh hold and got the dirt and mud out. This what causes alot of rockers to rot out. There is a rubber plug at the back of the cab that can be taken out and using an air hose in these slots, you can get it cleaned out. Also at the bottom of the rocker there are some little "V" notches used for drains and you can see daylight thru them when cleaned. Using a piece of wire will clear the drain as well.
Here is the plug removed and where all the gunk will come out.

I am not going to pull the back panels as the backglass holds it. I will paint the rear panels when I get that junk window tint off. Not sure wat I am going to do about the head liner. Might just get a spray glue and put it back up or see about getting it replaced.

Will pull the cowl, below the windshield and get under there as well. It is just about as far you can go. A little more cleaning and start reassembling. I will take alot of picture of the assembly so as to make it easier for someone that might need to swap out their heater core or need to work on their heater controls.
I pulled the door thresh hold and got the dirt and mud out. This what causes alot of rockers to rot out. There is a rubber plug at the back of the cab that can be taken out and using an air hose in these slots, you can get it cleaned out. Also at the bottom of the rocker there are some little "V" notches used for drains and you can see daylight thru them when cleaned. Using a piece of wire will clear the drain as well.
Here is the plug removed and where all the gunk will come out.
I am not going to pull the back panels as the backglass holds it. I will paint the rear panels when I get that junk window tint off. Not sure wat I am going to do about the head liner. Might just get a spray glue and put it back up or see about getting it replaced.
Last edited by Terrys87; 01-11-2013 at 03:19 AM.
08-09-2012, 06:01 PM
#851
Registered User
yep! thats the bracket mine the bolt up in the engine compartment broke an the connecting rod to the front core support too (another thing to weld up) THANK YOU terry! now i know how bent mine is an which way is straight
08-09-2012, 06:13 PM
#852
Registered User
Damn that extra space on the back must be sweet. I know I sure needed it when I had my old truck I had a thin pickup truck subwoofer box in the back of my seats which I had to sacrifice my precious leg room. I think that was my trucks only downfall. Lol
08-10-2012, 02:26 AM
#854
Super Moderator
Staff
Thread Starter
iTrader: (1)
Join Date: Aug 2008
Location: Anderson Missouri
Posts: 11,788
Likes: 0
Received 25 Likes
on
22 Posts
MAN, NICE WORK! I'm gonna be honest.... that is one of THE MOST intimidating things to me.... "Under the Dash Spaghetti Soup Maze!" hahaha...
I am going to try and make a video in the next week showing how to take it all a part. I might leave the screws and bolts out and assemble it and do a video on what all you do to take it apart. It isnt near as bad when you know what steps are needed. I will stop at the heater core as I cant get it out without removing the support bar and dont want the steering column hanging on it and with one hand I wont be able to support it.
I try on my videos and they arent the best, but if you can see how it comes apart, you might not feel so intimidated about it. I used to be intimidated on it and the back hatch. Once you understand them they are nearly as bad as you would think. Just got to know the steps to take.
Even doing a wiring harness swap is setup nice once you know what order things go.
Gonna do some patch work on the floor for the rusting through spots?
I will be doing some grinding and cutting on the rust. I also need to pull the windshield and do some fixing on it as well. We got a rain storm the other nite and I had my own swimming pool in the floorboard.
08-10-2012, 02:34 AM
#855
Super Moderator
Staff
Thread Starter
iTrader: (1)
Join Date: Aug 2008
Location: Anderson Missouri
Posts: 11,788
Likes: 0
Received 25 Likes
on
22 Posts
Just came across my mind responding to Chefs post. I will be pulling my windshield at a later time as it has had the windshield replaced before. These windshields are glued in and mine has a leak where some rust has developed in the channel. I will be replacing my windshield as it has 2 bulls eyes on it.
I understand it is common practice when a company replaces one of these windshields is to add glue on top of the old glue. I wont do it for another month or so, but when I do have a new windshield put in I will pull the windshield and remove all of the glue and fix the channel. But from now on when I do have windshields replaced, I will have it out and all the glue removed so as they have to use new glue. I think this might have caused mine to leak.
Luckily for me I only have 3 miles to drive to get a windshield installed so I will take a chance of driving with out a windshield. May or may not be an option for some.
08-10-2012, 10:56 AM
#856
Registered User
 08-10-2012, 01:41 PM
#857
The guys here who did my windshield pulled EVERY SPEC OF OLD STUFF that they could... IT STILL LEAKED at first, a week later... Their 'BEST GUY' came out 3 months later when I remembered "Hey, it might rain again, better do this while your old brain remembers the companies name!...and GET THAT RECEIPT OUT!"... yeah, I talk to myself kinda mean some times...YOU WILL TOO, YOUNG'NS, just wait! HAHAHA)...... So months later, their BEST GUY came out and with a special spray bottle, figured it out in minutes... His guys had trouble with the sealant on one portion in the middle, by the rear view mirror(they HAD NOT removed enough of the old stuff... leaving a LILLLLLLLL tiny bit, but enough that it was not sealed ON THE BODY side of the sealant)... It was running down and leaking NEAR my sunroof seal... So I thought it was the sunroof. He pulled it all down, sprayed water and had me watch where it was coming in.. Then sprayed water hard with the hose on my sunroof... NOT A DROP... so he fixed it, FOR FREE(of course, it was their mess up... but MONTHS LATER! so that was cool they didn't argue)
08-12-2012, 01:29 PM
#860
Super Moderator
Staff
Thread Starter
iTrader: (1)
Join Date: Aug 2008
Location: Anderson Missouri
Posts: 11,788
Likes: 0
Received 25 Likes
on
22 Posts
Hello Cyberhorn, It has happened more then once here.lol
Hello Mark..That got me to laughing. I remember when me a a friend put a Honda 50 cc motor on a 250 Suzuki frame and had to wrap the throttel around our thumb to operate it. We rode it in the winter and froze our butts off.
Then we put Honda 350cc motor on a go cart frame. Dangerous. Fun times, guess we are lucky to be alive. Brakes were not at the top of our priorities.


