
Terrys87 88 4Runner Restoration/Build thread

 08-24-2011, 02:15 AM
#442
Super Moderator
Staff
Thread Starter
iTrader: (1)
Join Date: Aug 2008
Location: Anderson Missouri
Posts: 11,788
Likes: 0
Received 25 Likes
on
22 Posts
Thanks Chef..I just found one on Craigslist and if all goes well, I meet him after he gets off of work tomorrow. He has a rolled 85, and I am hoping to score some more parts as well. I appreciate the help. He says his interior is red and nice. I would like to hope his seats are nice. May be wishful thinking. My need your help again soon.
One of the business's I use burnt down today. He sold 5 gallons of thinner for $35 where most major autoparts stores want $25 for a gallon and sandpaper sheets for 25 cent each. Alot of autobody shops will feel his loss. Of all of the stores,it had to be one I really liked. I am to start on my friends 82 on Monday. Lukily I have enough supplies to get started.
If all goes well and I get the parts I need, this projects list should get a lot shorter. Also while I am down that way, it is where I bought my 88 from, the orginal owner wanted to see it when I got it done. Not sure if he will recognize it. January 11th of this year is when I got it and it seems so long ago, but it actually has come along ways since then.
I am hoping to have it finished before the end of the year. If I had ALL of the parts I need, I could have it done in a week.
08-25-2011, 05:38 AM
#443
Registered User

Just thought I'd check in. Nice thread with lots of good information. It doesn't even look like the same rig you brought home on page 1!
And because you're from Missouri, I have to ask: are you a Rams fan by any chance? I've been a fan since the Marshall Faulk days and 'm always happy to connect with other fans! In New England where I live, they're few and far between.
08-28-2011, 01:06 AM
#444
Super Moderator
Staff
Thread Starter
iTrader: (1)
Join Date: Aug 2008
Location: Anderson Missouri
Posts: 11,788
Likes: 0
Received 25 Likes
on
22 Posts
Chef..I thought I had answered about living in California, but it didnt post. I lived there for 5 years and really enjoyed it. I was young and single then and enjoyed the city life. Now that I am older I live in a rural town, but being raised on a farm is where I want to return to now. Guess I need to find a farm outside of San Diego.lol
Got married and now the wifey likes being near my parents and we gotten roots in the ground here now. California has great weather and for our hobby, you have alot better selection there. We had a bad winter last year and I sure didnt miss snow when I was out there. When it is cold outside, I just dont get anything done.
I was talking to Jason a while back and he even agreed, when you cross into California, you can almost feel the pace pick up. When I came back here, I took awhile to get back into a slower pace here.
08-28-2011, 01:17 AM
#445
Super Moderator
Staff
Thread Starter
iTrader: (1)
Join Date: Aug 2008
Location: Anderson Missouri
Posts: 11,788
Likes: 0
Received 25 Likes
on
22 Posts
Zelephant...Thanks, Page 1 doesnt really do it justice. This thing was alot worse then it looked. It has been nice to go back and see where I was and getting to the finish line is looking quite possible.
I always have been a Cowboys fan and then a Rams fan. I really liked them when they had Kurt Warner. He brought a lot of good to the team. Cowboys keep screwing up and hiring the like of TO and some of there shenanigans of in the past, I will start building up my Rams clothing.
My wife is a Packers fan. (other then that is a great wife,lol) and we have been to Dallas to watch a couple of games, but we would like to go to a Rams or Chiefs game this year as it is alot closer to us to watch. You can see better on TV, but the atmosphere at the game is great.
08-28-2011, 02:10 AM
#446
Super Moderator
Staff
Thread Starter
iTrader: (1)
Join Date: Aug 2008
Location: Anderson Missouri
Posts: 11,788
Likes: 0
Received 25 Likes
on
22 Posts
Hope you guys on the east coast are staying dry and safe. West coast have earthquakes, here in the midwest, we have tornadoes. Guess everybody gets a little something.
If everything goes right I will be ordering carpet here in a week. The house repairs have been putting this on the back burner for awhile, so I have been doing just detail work trying to get it finished.
My Steering Column cover was loose and screw holes were broken by PO. So I did a little fix for them. The broken mounts, I glued back togther. Another one was broken off so I just filed it down and used a lockwasher and compressed it to get it to hold the screw.

My old dash is craced really bad in the center and has some breakage on the end. I took the dash out of ol rusty, which is gray and tried to use a 3M repair kit on it and it is better then what I have but wasnt satisfied with how it turned out. I had seen some things that look easier to do on the net. Or I might just have my old one done by a professional later on. The dash is still better then what I have, so am happy with it.
Here is the kit and a before look of it.

Here is a finished and compared to the orginal dash.

I need to fix my heater control assembly and need to get my replacement working better before I swap it out. I want to do it all at once. I just painted the repaired dash that was gray and replaced my kick panels. They were cracked up bad. It tried to reuse them and just wasnt satisied with how they turned out. Painted my gray ones and they turned out great.
I will get some pics of the interior on here tomorrow.
Other thing was a friend of mine was going to help me convert the AC but we were not able to find the R12 to 134 converter. We did get some freon to come out, so the system is holding pressure so it is a good sign so far.
Past couple of days two differnet people asked about buying my 91 extended cab. They seem like serious buyers. I really dont want to sell it as I have alot of work into it and it has been a great truck. But if it sells, it will help finish this Runner and a nice start on my shop. Will have to wait and see
If everything goes right I will be ordering carpet here in a week. The house repairs have been putting this on the back burner for awhile, so I have been doing just detail work trying to get it finished.
My Steering Column cover was loose and screw holes were broken by PO. So I did a little fix for them. The broken mounts, I glued back togther. Another one was broken off so I just filed it down and used a lockwasher and compressed it to get it to hold the screw.
My old dash is craced really bad in the center and has some breakage on the end. I took the dash out of ol rusty, which is gray and tried to use a 3M repair kit on it and it is better then what I have but wasnt satisfied with how it turned out. I had seen some things that look easier to do on the net. Or I might just have my old one done by a professional later on. The dash is still better then what I have, so am happy with it.
Here is the kit and a before look of it.
Here is a finished and compared to the orginal dash.
I need to fix my heater control assembly and need to get my replacement working better before I swap it out. I want to do it all at once. I just painted the repaired dash that was gray and replaced my kick panels. They were cracked up bad. It tried to reuse them and just wasnt satisied with how they turned out. Painted my gray ones and they turned out great.
I will get some pics of the interior on here tomorrow.
Other thing was a friend of mine was going to help me convert the AC but we were not able to find the R12 to 134 converter. We did get some freon to come out, so the system is holding pressure so it is a good sign so far.
Past couple of days two differnet people asked about buying my 91 extended cab. They seem like serious buyers. I really dont want to sell it as I have alot of work into it and it has been a great truck. But if it sells, it will help finish this Runner and a nice start on my shop. Will have to wait and see
08-28-2011, 02:34 AM
#447
YotaTech Milestone-Two Millionth Post
hey man. see you are moving right along. so far nothing really exciting with the weather...rain and wind. more hype than substance where I live. alot worse the further east you go as per news reports. also some terrible tragedies with loss of life reported near where it made land-fall yesterday. funny thing is, i'm watching the local news right now with their outdoor weather report and the trees are perfectly still...and they are east of us. so not quite sure what that means, except that we are getting pounded and they are not.
anyway, that's the weather report. hope all is well with you.
anyway, that's the weather report. hope all is well with you.
08-28-2011, 05:04 PM
#449
Registered User
Zelephant...Thanks, Page 1 doesnt really do it justice. This thing was alot worse then it looked. It has been nice to go back and see where I was and getting to the finish line is looking quite possible.
I always have been a Cowboys fan and then a Rams fan. I really liked them when they had Kurt Warner. He brought a lot of good to the team. Cowboys keep screwing up and hiring the like of TO and some of there shenanigans of in the past, I will start building up my Rams clothing.
My wife is a Packers fan. (other then that is a great wife,lol) and we have been to Dallas to watch a couple of games, but we would like to go to a Rams or Chiefs game this year as it is alot closer to us to watch. You can see better on TV, but the atmosphere at the game is great.
I always have been a Cowboys fan and then a Rams fan. I really liked them when they had Kurt Warner. He brought a lot of good to the team. Cowboys keep screwing up and hiring the like of TO and some of there shenanigans of in the past, I will start building up my Rams clothing.
My wife is a Packers fan. (other then that is a great wife,lol) and we have been to Dallas to watch a couple of games, but we would like to go to a Rams or Chiefs game this year as it is alot closer to us to watch. You can see better on TV, but the atmosphere at the game is great.
I missed it when the Rams came to New England two years ago. I'm already telling a good friend who's a Patriots fan that we WILL go see them the next time STL is up here.
And my dad's a Pack fan, so it's all in the family! Hear a lot about them around here.
x2 on Irene being mostly hype. My power didn't even flicker.
And just in case you haven't seen it (unlikely), here's Corax's dash repair thread; might help:
https://www.yotatech.com/forums/f123...repair-230891/
08-29-2011, 12:42 AM
#450
Super Moderator
Staff
Thread Starter
iTrader: (1)
Join Date: Aug 2008
Location: Anderson Missouri
Posts: 11,788
Likes: 0
Received 25 Likes
on
22 Posts
Zelephant..You never know from one season to the next anymore. I use to could tell from a teams previous season about how they would do, nowadays, it can change overnite. I am hoping to get to a good game this year. We have gotten to a few and always had a great time.
Thanks for the link on the fiberglass. I have never worked with it and always wanted to try it out. I usually keep old parts, just to experiment with or see how they come apart. I got an old dash that it is really bad and it is going to be a winter project to learn on it.
I have been test fitting and detailing the interior so when I get my new carpet, everything should in alright. Tonite, I was working with the plastic cover that goes around the shifter and it wont let the transfer lever go into 4 Hi with out hitting the cover. I will get a picture of it when I get some better light.
If I turn the transfer stick around, the 2 shifter sticks hit each other when I put it in Reverse. Thats the way it was when I bought it and it didnt have the cover as the interior was torn up and missing alot of pieces. I am little by little getting it back together.
Anybody have any suggestions as to what is not right? The transfer case will not go into 4 Low which is a mechanical problem, and I have a replacement tcase so am not worried abut it. Just waiting to get the funds and time to pull the tcase and seals, but the stick still needs the room to move into 4 Hi range.
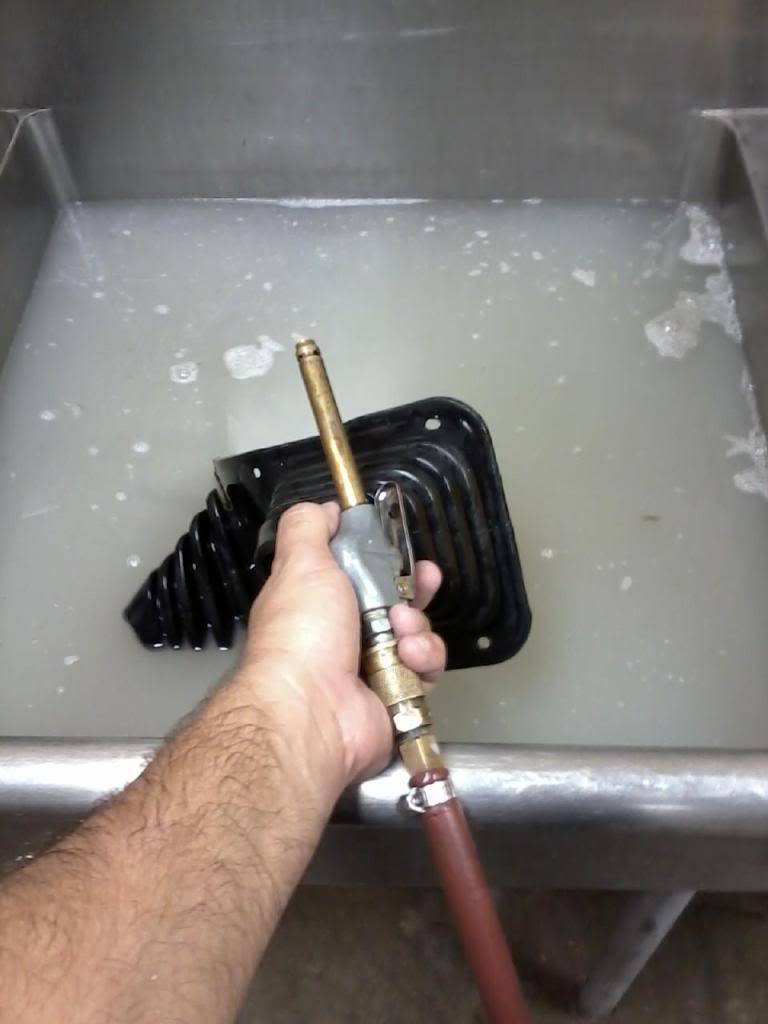
Just thought I would post a pic of my hi tech parts bubbler washer. In a pinch, I have even used a 5 gallon bucket with some detergent and an air hose. It actually works pretty good. Just hold hose and part under water. Just thought I would post this in case some one might could use the idea. Patent NOT Pending.lol
Thanks for the link on the fiberglass. I have never worked with it and always wanted to try it out. I usually keep old parts, just to experiment with or see how they come apart. I got an old dash that it is really bad and it is going to be a winter project to learn on it.
I have been test fitting and detailing the interior so when I get my new carpet, everything should in alright. Tonite, I was working with the plastic cover that goes around the shifter and it wont let the transfer lever go into 4 Hi with out hitting the cover. I will get a picture of it when I get some better light.
If I turn the transfer stick around, the 2 shifter sticks hit each other when I put it in Reverse. Thats the way it was when I bought it and it didnt have the cover as the interior was torn up and missing alot of pieces. I am little by little getting it back together.
Anybody have any suggestions as to what is not right? The transfer case will not go into 4 Low which is a mechanical problem, and I have a replacement tcase so am not worried abut it. Just waiting to get the funds and time to pull the tcase and seals, but the stick still needs the room to move into 4 Hi range.
Just thought I would post a pic of my hi tech parts bubbler washer. In a pinch, I have even used a 5 gallon bucket with some detergent and an air hose. It actually works pretty good. Just hold hose and part under water. Just thought I would post this in case some one might could use the idea. Patent NOT Pending.lol
Last edited by Terrys87; 08-29-2011 at 01:52 AM.
08-30-2011, 12:22 AM
#451
Super Moderator
Staff
Thread Starter
iTrader: (1)
Join Date: Aug 2008
Location: Anderson Missouri
Posts: 11,788
Likes: 0
Received 25 Likes
on
22 Posts
Dash Pad Replacement.
I am currently replacing my dash pad and will update my post on this as I go. It is fairly easy once you know the steps.
1.Remove Speedometer Bezel and there is a 10 mm nut that holds the left side of the dash pad in.
2. Take out the far right vent on passenger side. Mine cracked bad as it was brittle.There is another 10mm nut that holds the right side of the dash pad in.
3.Take out the glove box. 2 screws at the bottom, holds the glove box in. There is a black strip that has a cover attached to it. Just take a flat blade screwdriver and pop out the little tabs.
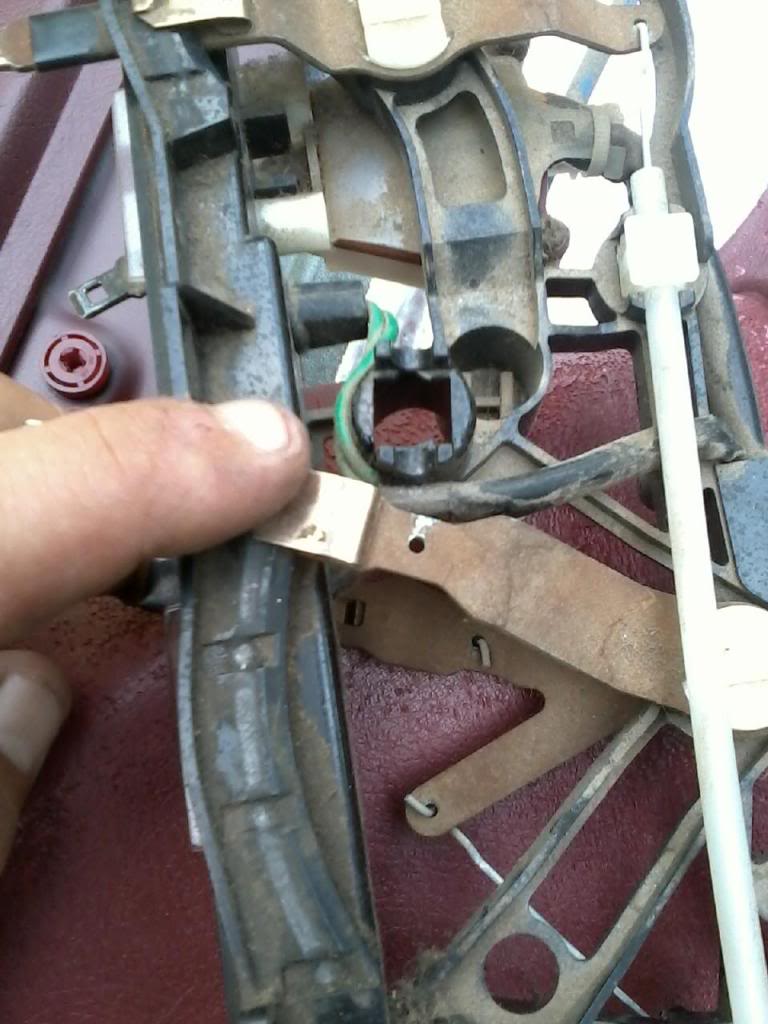
4. I will get a picture below but there is a little screw that holds part of the ventilation pipe in. Take the screw out and slide the 4-5inch vent pipe out of the way(first picture). Straight above it, there is another 10mm nut that has to be removed.
5.You have 5 screws at the bottom of the dash pad that you have to take out and it is done.
With the dash pad out of the way, it makes it easier to work on the heater control assembly. Mine is broken and it is still a pain to get to.
Notes for myself.
Black cable goes below heater core.
White/clear cable goes along top of dash to right side.
Blue cable goes to assembly under hood through firewall.
Great link to dash pad removal. https://www.yotatech.com/forums/f115...emoval-189633/
Great Thread by nvdesertrunner. https://www.yotatech.com/forums/f115...emoval-263039/
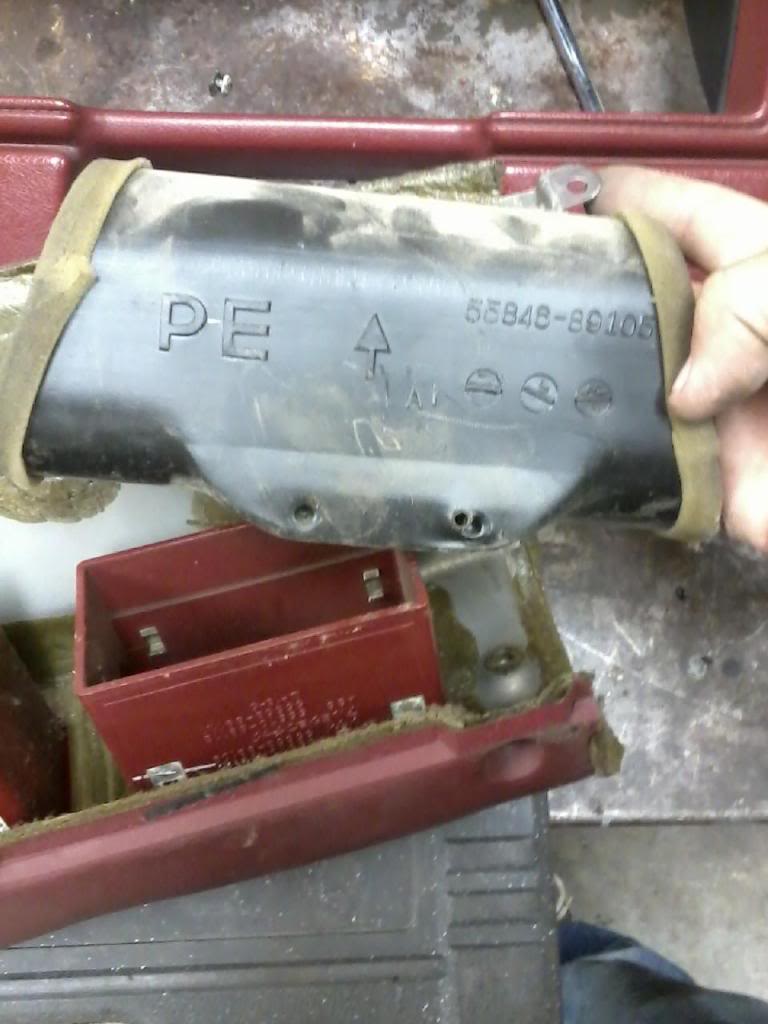
Duct that needs removed to get the center nut of dash pad. Once you remove it, straight up is the nut.
The bolt that holds the passenger side is where my finger is and the nut is for the center of the dash pad. Screwdriver tip is on the stud for where nut needs to go.

Youtube video I found that might help some.
dash removal of toyota truck 84 to 89 - YouTube
Video I made to get the passenger vent out.
Video to get the PE pipe out and the center dash pad nut.
Most likely broken part on heater control. Once the dash pad is off, there is a single screw that holds the double plastic vent that needs to be removed to make a little more room to get the heater control assembly out. I pulled the whole assembly and cables out together making sure not to get any sharp bends in the cable. I was able to pull the cables from the right side and then the right side of the assembly and the the left side of the assembly and then left cables.
Here is what I am replacing. The cracked one is original color. The back one was gray and I used interior paint on it. Both have Armorall on them.

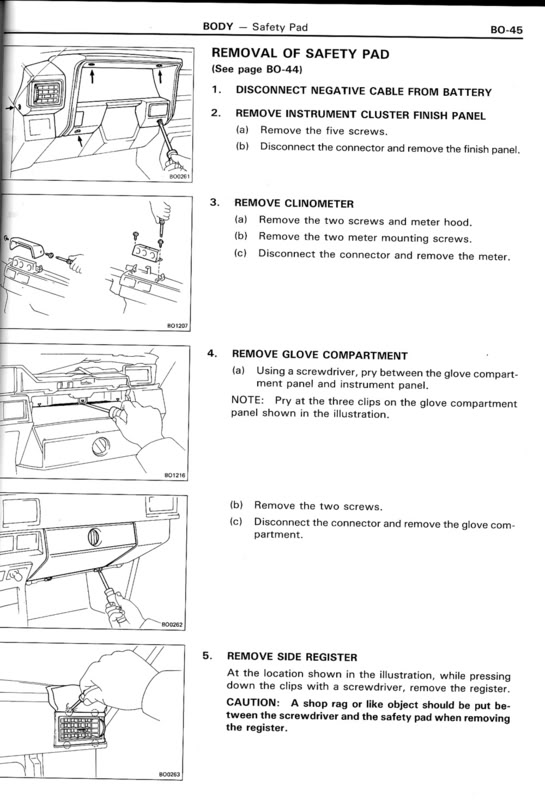
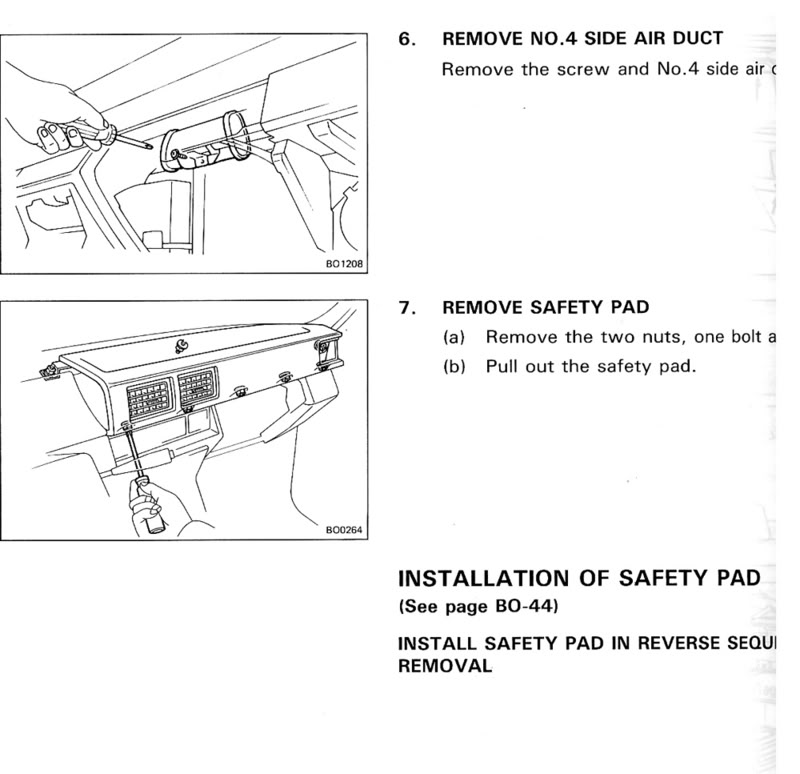
Factory Manual.
I am currently replacing my dash pad and will update my post on this as I go. It is fairly easy once you know the steps.
1.Remove Speedometer Bezel and there is a 10 mm nut that holds the left side of the dash pad in.
2. Take out the far right vent on passenger side. Mine cracked bad as it was brittle.There is another 10mm nut that holds the right side of the dash pad in.
3.Take out the glove box. 2 screws at the bottom, holds the glove box in. There is a black strip that has a cover attached to it. Just take a flat blade screwdriver and pop out the little tabs.
4. I will get a picture below but there is a little screw that holds part of the ventilation pipe in. Take the screw out and slide the 4-5inch vent pipe out of the way(first picture). Straight above it, there is another 10mm nut that has to be removed.
5.You have 5 screws at the bottom of the dash pad that you have to take out and it is done.
With the dash pad out of the way, it makes it easier to work on the heater control assembly. Mine is broken and it is still a pain to get to.
Notes for myself.
Black cable goes below heater core.
White/clear cable goes along top of dash to right side.
Blue cable goes to assembly under hood through firewall.
Great link to dash pad removal. https://www.yotatech.com/forums/f115...emoval-189633/
Great Thread by nvdesertrunner. https://www.yotatech.com/forums/f115...emoval-263039/
Duct that needs removed to get the center nut of dash pad. Once you remove it, straight up is the nut.
The bolt that holds the passenger side is where my finger is and the nut is for the center of the dash pad. Screwdriver tip is on the stud for where nut needs to go.
Youtube video I found that might help some.
dash removal of toyota truck 84 to 89 - YouTube
Video I made to get the passenger vent out.
Video to get the PE pipe out and the center dash pad nut.
Most likely broken part on heater control. Once the dash pad is off, there is a single screw that holds the double plastic vent that needs to be removed to make a little more room to get the heater control assembly out. I pulled the whole assembly and cables out together making sure not to get any sharp bends in the cable. I was able to pull the cables from the right side and then the right side of the assembly and the the left side of the assembly and then left cables.
Here is what I am replacing. The cracked one is original color. The back one was gray and I used interior paint on it. Both have Armorall on them.
Factory Manual.
Last edited by Terrys87; 06-03-2015 at 04:03 PM.
08-30-2011, 07:27 AM
#452
Super Moderator
Staff
Thread Starter
iTrader: (1)
Join Date: Aug 2008
Location: Anderson Missouri
Posts: 11,788
Likes: 0
Received 25 Likes
on
22 Posts
While I had the dashpad out, I thought would be a good time to change out my heater controls. I was wanting to take pics and make a How To on this but this repair is a royal PITA. I got it done, but dont feel I could put anything useful on here. Just got to get everything back together.
08-30-2011, 08:45 AM
#453
OMGOSH, I'm always so freaked out by tearing the dash apart! I need to get reading and find a good thread on replacing/repairing all my Cables in there! (especially the hot/cold gate/, etc.). And, if I go that far, that heater core IS coming out! lol.....
Loving it, Terry... keep kill'n it! lol
Loving it, Terry... keep kill'n it! lol
08-31-2011, 02:13 AM
#454
Super Moderator
Staff
Thread Starter
iTrader: (1)
Join Date: Aug 2008
Location: Anderson Missouri
Posts: 11,788
Likes: 0
Received 25 Likes
on
22 Posts
Hey Chef.. I hear the heater core is a bear to change. Hope I dont have to tie in to that. I would suggest that you get the control assembly with cables attached. All of my cables were operating smoothly before I hooked them to their connections and the connections were operating smooth.
But when they are all hooked toghter, they are still harder to operate then what I would like. I am just going to be gentle with them. It is kind of a poor design. The wire that attaches to the levers are weak. Also there is a pivot point that is quite common that likes to break. It is the one that controls direction of flow of air. I saved my old one for the cables and will be a winter project to see if I can come up with away to fix them.
The dash pad is easy. I will be updating the dashpad fix and get more pics of it.The problem I did have was taking the passenger vent out as it cracked and you have to get it out to get to a bolt to get the pad off.
08-31-2011, 12:02 PM
#455
Great work, Terry.... and thanks for the info!
BTW, I hit the yard yesterday for seats... Found a 95 Runner with perfect interior... I'm hoping they'll work, if not the Scion seats, as mine are freaking me out... can't recline anymore, the lumbar adjustment is TOTALLY bent sideways, ...not sure how this happened. Probably the 6x9 speaker box I have wedged up against it, .....then went to move the seat back a lil/recline too, and it bit the dust, once and for all! I would just have it redone, to be honest, wanna keep it orig.... but really, with this now happening? I think it wouldn't be cheap, if even possible! lol. I'd rather have carabeau seats or something at that point! lol. Maybe lexus? lol. Just don't want electric, right? So I guess Lexus are out! lol.
Anyway, just wanted to let you know, my buddy with the yard said, '90 AND UP WILL NOT WORK on your ignition... They're totally different"...... He will have replacement OE-M Quality or better lock cylinders with new keys for 35$ on Monday.... let me know if you're interested, k?
09-01-2011, 12:34 PM
#456
Super Moderator
Staff
Thread Starter
iTrader: (1)
Join Date: Aug 2008
Location: Anderson Missouri
Posts: 11,788
Likes: 0
Received 25 Likes
on
22 Posts
I just happen to be going to the town that I bought my runner from and checking out the boneyards in that area. I called the PO and got his voice mail. I was in the left turn lane getting ready to get gas and he asked where I was at, I said such and such intersection.
He happened to be a few cars ahead of me and met me at the gas station. He said he seen me earlier but had no idea that it was his dads old truck. Seemed really happy with how it has turned out. Told him about my build thread.
If everything works out I will be ordering my carpet in the next few days. Really looking forward to getting it in there.
Been looking into my air conditioning and am wondering it if it has the right compressor on it. There is no way of getting the connections on it as it is now. I am going to see if I can mount it in a different position.
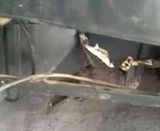
One finger shows the one with a missing cap. My other finger shows the other connection facing rearward with the cap on.. I have never worked on this compressor my self, so am hoping it is just on wrong.

He happened to be a few cars ahead of me and met me at the gas station. He said he seen me earlier but had no idea that it was his dads old truck. Seemed really happy with how it has turned out. Told him about my build thread.
If everything works out I will be ordering my carpet in the next few days. Really looking forward to getting it in there.
Been looking into my air conditioning and am wondering it if it has the right compressor on it. There is no way of getting the connections on it as it is now. I am going to see if I can mount it in a different position.
One finger shows the one with a missing cap. My other finger shows the other connection facing rearward with the cap on.. I have never worked on this compressor my self, so am hoping it is just on wrong.
Last edited by Terrys87; 09-01-2011 at 05:09 PM.
09-01-2011, 02:00 PM
#457
Super Moderator
Staff
Thread Starter
iTrader: (1)
Join Date: Aug 2008
Location: Anderson Missouri
Posts: 11,788
Likes: 0
Received 25 Likes
on
22 Posts
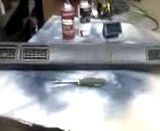
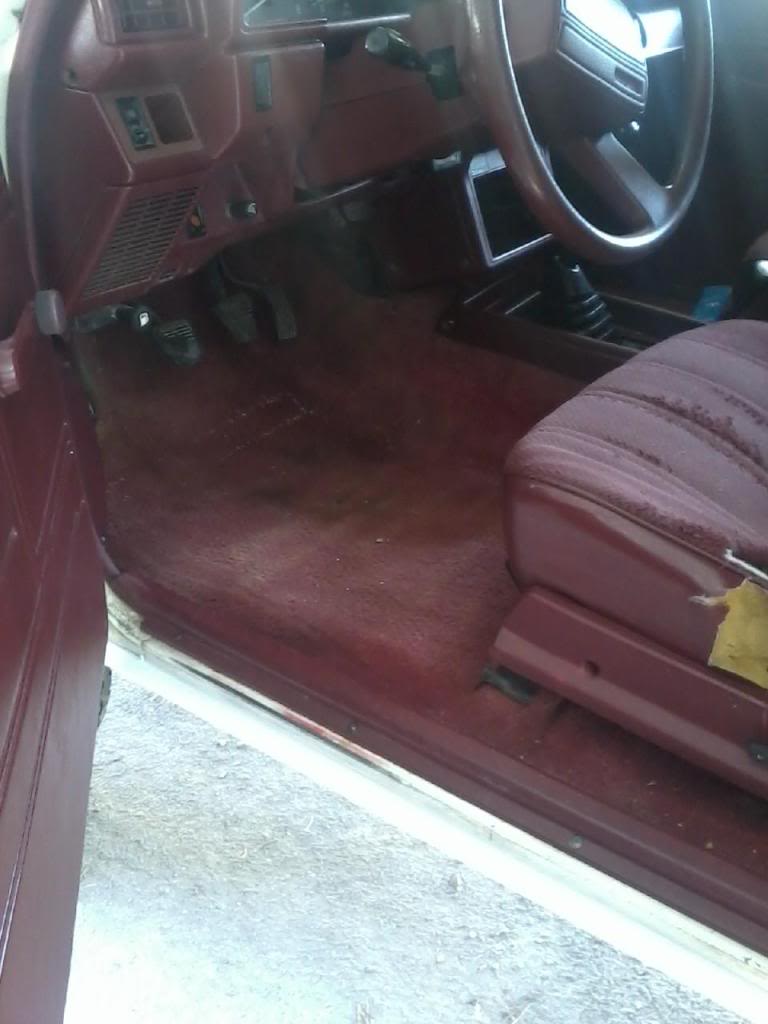
I was asked to post some interior shots of what i had been working on. No matter how hard I try, I cant keep the glare down???
Once I get new carpet it should make a big differnce.
Drivers Side, I painted the Plastic on the seat, Drivers Kick Panel, Steering Column and horn button. Will be replacing Steering wheel with something better at a later date.
Center, I painted the Dash Pad, Shifter Console, and trim that goes around stereo

Passenger Side, I painted the Door Sil,Kick Panel,Trim on seat, Nothing else was painted. Dash, Speedo cover,Main housing for stereo, Door Panels, Glovebox and Steering Wheel has just been Armoralled.

Once I get new carpet it should make a big differnce.
Drivers Side, I painted the Plastic on the seat, Drivers Kick Panel, Steering Column and horn button. Will be replacing Steering wheel with something better at a later date.
Center, I painted the Dash Pad, Shifter Console, and trim that goes around stereo
Passenger Side, I painted the Door Sil,Kick Panel,Trim on seat, Nothing else was painted. Dash, Speedo cover,Main housing for stereo, Door Panels, Glovebox and Steering Wheel has just been Armoralled.
Last edited by Terrys87; 09-01-2011 at 02:04 PM.
09-01-2011, 02:46 PM
#458
Super Moderator
Staff
Thread Starter
iTrader: (1)
Join Date: Aug 2008
Location: Anderson Missouri
Posts: 11,788
Likes: 0
Received 25 Likes
on
22 Posts
Could I get some of you guys to post pics of how your air condition compressor is mounted. I am trying to find the "Show off your Engine" thread and havent been able to find it.
Chef, I looked through your post and on your post #2502, both of your fittings are facing forward. I still looking for more pics of your compressor.
I am hoping maybe I can mount mine in a different position. It still has freon in it and some pressure, but maybe not enough to engage it.
Chef, I looked through your post and on your post #2502, both of your fittings are facing forward. I still looking for more pics of your compressor.
I am hoping maybe I can mount mine in a different position. It still has freon in it and some pressure, but maybe not enough to engage it.
09-01-2011, 03:48 PM
#459
You mean, you were spying through the Photobucket albums of mine and saw one that just isn't 'clear' enough? I'll gladly take you a video, if ya want?
Let me know.... I'm a lil overwhelmed lately, but not for that, cuz I'll be on my rig and work for the next few days, over seats, etc..
Ttysoon!
Let me know.... I'm a lil overwhelmed lately, but not for that, cuz I'll be on my rig and work for the next few days, over seats, etc..
Ttysoon!
09-01-2011, 03:51 PM
#460
PS> that looks completely wrong, dude! lol. Both high and low side face forward.... and I can't see how it's even hooked up if it's reversed... maybe it's from a transversely mounted engine? Must be, cuz the way the High side is set up, it's basically opposite of the low side, .... 2 gnarly allen bolts hold in each valve on top of the compressor.... both inlets face forward. You have to be able to change schrader valves, etc., ...and that seems IMPOSSIBLY with that set up. Better pics, maybe, for us?


