
Terrys87 88 4Runner Restoration/Build thread
 06-20-2011, 10:51 AM
#301
Super Moderator
Staff
Thread Starter
iTrader: (1)
Join Date: Aug 2008
Location: Anderson Missouri
Posts: 11,788
Likes: 0
Received 25 Likes
on
22 Posts
I have been working on the runner lately. Nothing to really show as it has just been detailing. It is a slow process. Touching up overspray on the bottom side is about done.
I have started sanding the Orange Peel and it is going to take awhile, not as bad as I thought it was going to be. Sure wish it would of went on smooth the first time. It would of been quicker and easier. Wont have to do the whole truck, but there is still quite a bit.
My Passenger seat cables are broken and the seat forward and reward adjustment handle is missing. I had a spare bracket from a worn out seat I had and it wouldnt work on it.Guessing a different year model or something. I have another bracket that I am going to try. I have seen these broken before and if this doesnt work,I still have a couple of ideas. I spent alot of time on it trying to get it to work. Should of jumped on another project.
Since I had the seats out, I cleaned the carpet. It is faded bad, but I got it alot cleaner and now have the odor out so did get some accomplishment. I am letting the Passenger seat dry and hoping it will fit the drivers seat until it comes clean and then I will swap them back. If not I will wait until my days off to clean the driver and swap in a grey truck seat for the meantime. No carpet and no passenger seat for now but will be getting it back togther soon.
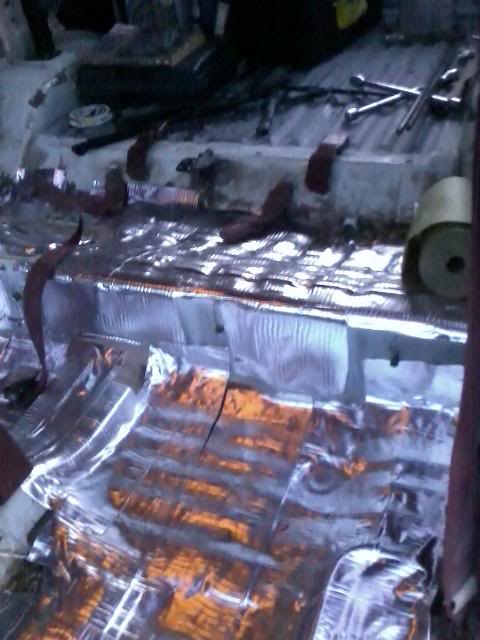
I put Peel and Seal in the back half of the truck to get a quieter ride and never put the top back on unitl I finished painting it. I did notice it is a lot quieter. Whe driving it since the top has been back n.
I did the rear passenger seats and when I replace the carpet from front to back I will do the front seat to the dash then. It seemed to help.
The bed floor has roll on liner.
I have started sanding the Orange Peel and it is going to take awhile, not as bad as I thought it was going to be. Sure wish it would of went on smooth the first time. It would of been quicker and easier. Wont have to do the whole truck, but there is still quite a bit.
My Passenger seat cables are broken and the seat forward and reward adjustment handle is missing. I had a spare bracket from a worn out seat I had and it wouldnt work on it.Guessing a different year model or something. I have another bracket that I am going to try. I have seen these broken before and if this doesnt work,I still have a couple of ideas. I spent alot of time on it trying to get it to work. Should of jumped on another project.
Since I had the seats out, I cleaned the carpet. It is faded bad, but I got it alot cleaner and now have the odor out so did get some accomplishment. I am letting the Passenger seat dry and hoping it will fit the drivers seat until it comes clean and then I will swap them back. If not I will wait until my days off to clean the driver and swap in a grey truck seat for the meantime. No carpet and no passenger seat for now but will be getting it back togther soon.
I put Peel and Seal in the back half of the truck to get a quieter ride and never put the top back on unitl I finished painting it. I did notice it is a lot quieter. Whe driving it since the top has been back n.
I did the rear passenger seats and when I replace the carpet from front to back I will do the front seat to the dash then. It seemed to help.
The bed floor has roll on liner.
 06-21-2011, 07:59 AM
#303
Super Moderator
Staff
Thread Starter
iTrader: (1)
Join Date: Aug 2008
Location: Anderson Missouri
Posts: 11,788
Likes: 0
Received 25 Likes
on
22 Posts
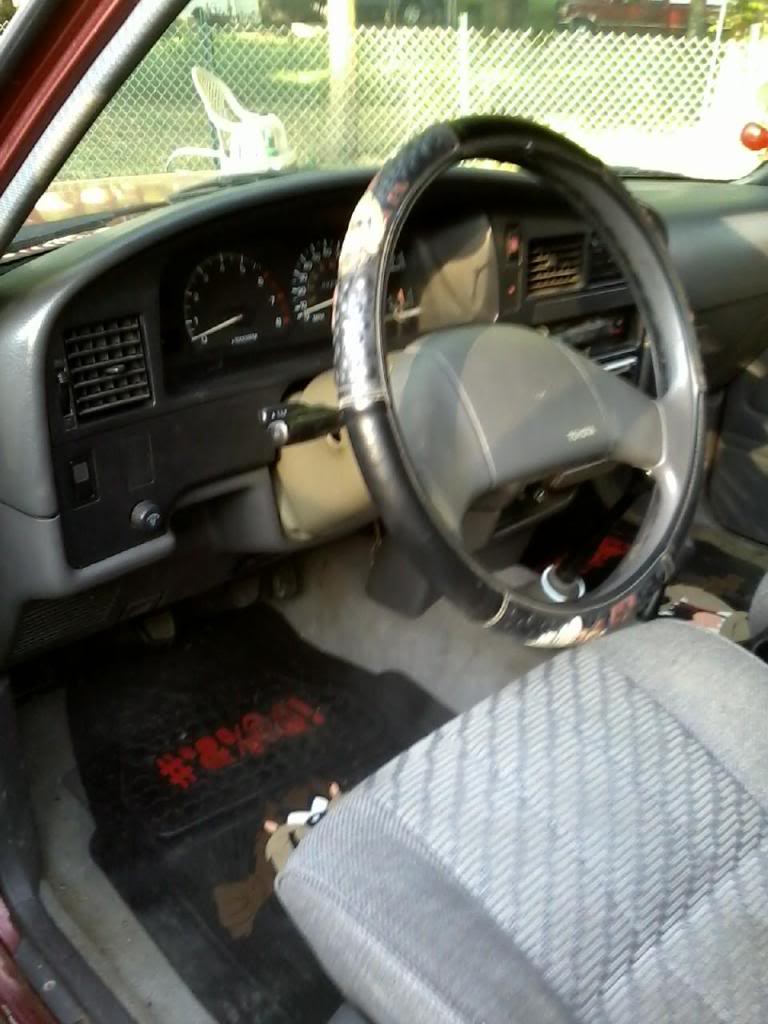
I got my seats back in. I only got the passenger seat cleaned and the mid section carpet cleaned. I tried using a shampooer at a carwash and scrubbing by hand and couldnt get them cleaned. Some Simple Green and the carwash and it looks a lot better.
The one on the left looked worse then the right one. Smells great in there now. The interior will get done eventually but it is the last thing that will get done. If I could find some matching carpet dye I would try it. I talked to my paint supplier at Orielly and he says they can mix it up. I will try that later on. It will eventually get new carpet.

I am trying to fix my passenger seat. The cables are broken and I dont have the adjusting handle to slide the seat back and forth. I tried to squeeze a small washer on the broken end to slip into the bracket. The washer keeps coming off. I am just looking for a fix on the cheap for now. Havent looked on YT yet. Got an idea or two that might keep it on for now, just got to look and see if it works. Will be on the lookout for a new seat bracket later.

The one on the left looked worse then the right one. Smells great in there now. The interior will get done eventually but it is the last thing that will get done. If I could find some matching carpet dye I would try it. I talked to my paint supplier at Orielly and he says they can mix it up. I will try that later on. It will eventually get new carpet.
I am trying to fix my passenger seat. The cables are broken and I dont have the adjusting handle to slide the seat back and forth. I tried to squeeze a small washer on the broken end to slip into the bracket. The washer keeps coming off. I am just looking for a fix on the cheap for now. Havent looked on YT yet. Got an idea or two that might keep it on for now, just got to look and see if it works. Will be on the lookout for a new seat bracket later.
06-21-2011, 08:11 AM
#304
Registered User
good luck terry somtimes those little fixes can be the most rewarding, I cant tell from the pic is it the cable its self thats broke or the sheathing on the out side? I ask because fixing a broken cable that is broke right at the end is not to hard I have done quite a few back in my dirt bikeing days I even fixed my E brake cable on my runner useing the same method.
06-21-2011, 08:18 AM
#305
Super Moderator
Staff
Thread Starter
iTrader: (1)
Join Date: Aug 2008
Location: Anderson Missouri
Posts: 11,788
Likes: 0
Received 25 Likes
on
22 Posts
How did you get the end to stay on? It gets alot of pressure. Wish I could weld or had a welder. JB weld is one I am going to try. Going to try a little crimp of some sort. May not be high tech, but if it works, I will do it.
06-21-2011, 08:32 AM
#306
Registered User
Join Date: Apr 2011
Location: Southern Ontario
Posts: 428
Likes: 0
Received 0 Likes
on
0 Posts
I have almost the exact same issue on my daily driver. There's no handle to move it forward or back, and the plastic piece that the cables pass into is broken, so I always have to grab both cables themselves in one hand and pull really hard on them to get it to release just so I can put a passenger in the back seat. I haven't found a fix for it either, so I'll have a vested interest in your progress. Keep up the good work Terry, it's looking better every time I check in.
06-24-2011, 04:33 PM
#307
Super Moderator
Staff
Thread Starter
iTrader: (1)
Join Date: Aug 2008
Location: Anderson Missouri
Posts: 11,788
Likes: 0
Received 25 Likes
on
22 Posts
Hey Chef..Sorry I missed your post earlier. Guessing you ar headed back for Arizona. Sounds like you had a good time on Lake Havasau.
Hello Dutch.. I dont have the handle either. I did find a cable on the grey parts truck but it didnt have a handle. I am going to use my old and new cable and try to come up with something that will work. I dont know about the handle yet. I need one to look at.
Thanks, I have done alot of work on it and need to get some pics up tomorrow. Ones I took today werent to good.
Got tied up at the hospital for the past couple of days. Kid broke his arm. He is doing fine now but he ruined his summer vacation. Things are starting to return to normal.
Before all of this happened, I got quite a bit done. Still need to wet sand the top, but will do that when I can get to it easier, I take it off to do it. Burned through the paint in a couple of areas. Took lots of elbow grease, but I am really happy how it turned out.
Will get pics tomorrow or possibly some later tonite. Just have to see how things go. Got some catching up to do on others builds.
06-24-2011, 05:31 PM
#308
Super Moderator
Staff
Thread Starter
iTrader: (1)
Join Date: Aug 2008
Location: Anderson Missouri
Posts: 11,788
Likes: 0
Received 25 Likes
on
22 Posts
Here is the front end done. Got all of the trim on and painted black. I need to find a front mud flap.
The 91 in the background is another truck I had done a few years ago. It gets used so not quite as nice when I first did it. Redid the head and gasket, 93 4Runner seats, SR5 guage,clock,body and paint work,clutch, and is the one I put the standad cab light in. Best upgrade I did for that was the extra light. Sure there is more things I have done on it.
Still have some things to do to it, just got to get around to it. It was clean till I got my dusty shoes in it. The interior is looks quite new, just a bad picture. I think I want to eventually paint the steering column cover back to gray instead of green. I think most turn green anyways.

Seats and SR5 Guage on 91
Will post pics of the 88 tomorrow when I get better pics. The ones I took today didnt turn out so well.
The 91 in the background is another truck I had done a few years ago. It gets used so not quite as nice when I first did it. Redid the head and gasket, 93 4Runner seats, SR5 guage,clock,body and paint work,clutch, and is the one I put the standad cab light in. Best upgrade I did for that was the extra light. Sure there is more things I have done on it.
Still have some things to do to it, just got to get around to it. It was clean till I got my dusty shoes in it. The interior is looks quite new, just a bad picture. I think I want to eventually paint the steering column cover back to gray instead of green. I think most turn green anyways.
Seats and SR5 Guage on 91
Will post pics of the 88 tomorrow when I get better pics. The ones I took today didnt turn out so well.
06-24-2011, 10:29 PM
#309
Registered User
Join Date: Apr 2011
Location: Southern Ontario
Posts: 428
Likes: 0
Received 0 Likes
on
0 Posts
Terry your trucks look great. You have no idea how much I wish I could get to the point where my project truck looks like an actual truck instead of just a project. Looking forward to more pics!
 06-25-2011, 04:07 AM
#311
Super Moderator
Staff
Thread Starter
iTrader: (1)
Join Date: Aug 2008
Location: Anderson Missouri
Posts: 11,788
Likes: 0
Received 25 Likes
on
22 Posts
Hello Dutch.. I wish I had a shop and get to do a frame up build again like you are doing. Your project is coming along great. I read where you saying about the book skipping around. Thanks to your bearing job, I wont need the book, I can just follow your thread. Great job on that.
Hello Gutted4.. Thanks and welcome to my thread. If you get a thread started, let me know. I like following restorations. It has taken me 6 months and realstically I got another 6 months to go or MORE. If you take your time and shop around the cost is alot cheaper then buying a new one and are able to do it yourself. These are easy to work on. Just got to jump in and do it. Alot of people on here will help you along. I checked to see if you had a thread, if I missed it let me know. Welcome aboard.
I will get better pics up of the back and sides. I want to get it cleaned up from wax being everywhere from the buffer. I got the interior out and cleaned and back in. It is really faded but is clean. When I pulled the center console, I must have loosed a wire in the plug that controls the rear window. I can wiggle the whole wire assembly and get iot to work, just cant find which wire it is. So it is something else I get to work on.
I didnt put Peel and Seel in the front part but will later. But with all of the interior in and and sound deadner in it is alot quieter in the cab now. Quite happy with the results.
Last edited by Terrys87; 06-25-2011 at 04:13 AM.
06-25-2011, 05:32 AM
#312
Super Moderator
Staff
Thread Starter
iTrader: (1)
Join Date: Aug 2008
Location: Anderson Missouri
Posts: 11,788
Likes: 0
Received 25 Likes
on
22 Posts
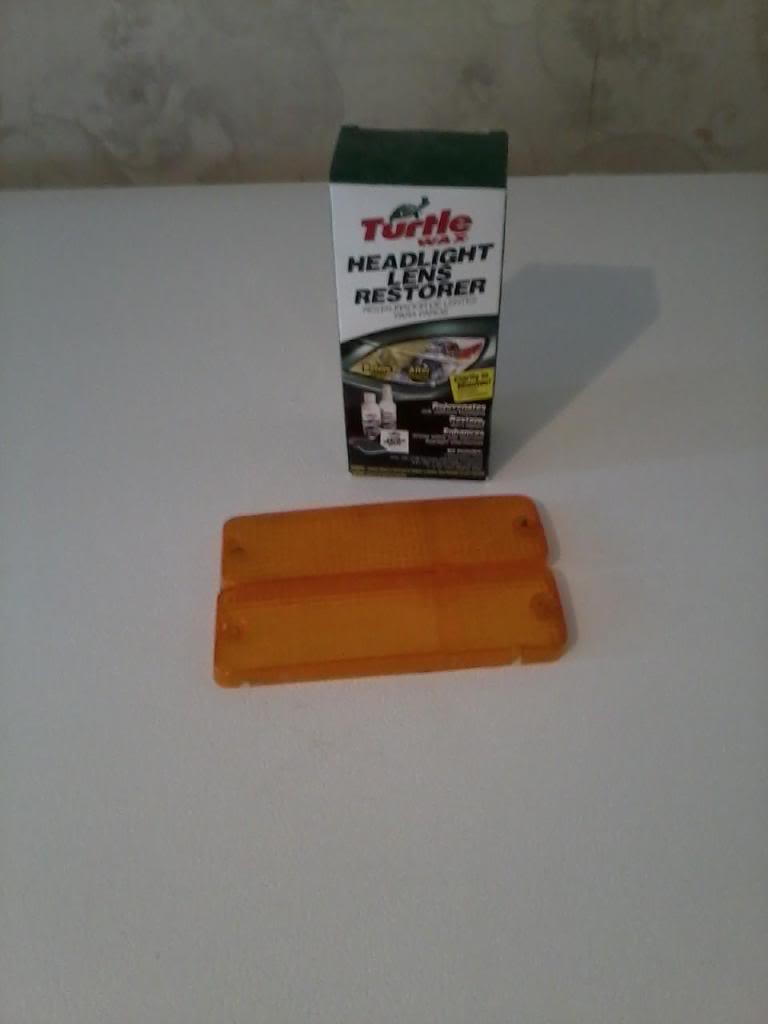
I used this to get my SR5 Guage lense looking good and since I still had some I used it on my blinker lenses as they were gettting dull and faded. My guage lense still looks great. I have it listed on my thread, if you are intrested, it listed on my first post as to where to find it.
06-25-2011, 07:53 AM
#314
Super Moderator
Staff
Thread Starter
iTrader: (1)
Join Date: Aug 2008
Location: Anderson Missouri
Posts: 11,788
Likes: 0
Received 25 Likes
on
22 Posts
Thanks jason.. I have been working at it. May not look like much, but there has been alot of detailing. Pretty much working from the windows down and front to back. Dont look at the top. Still have alot to do there.
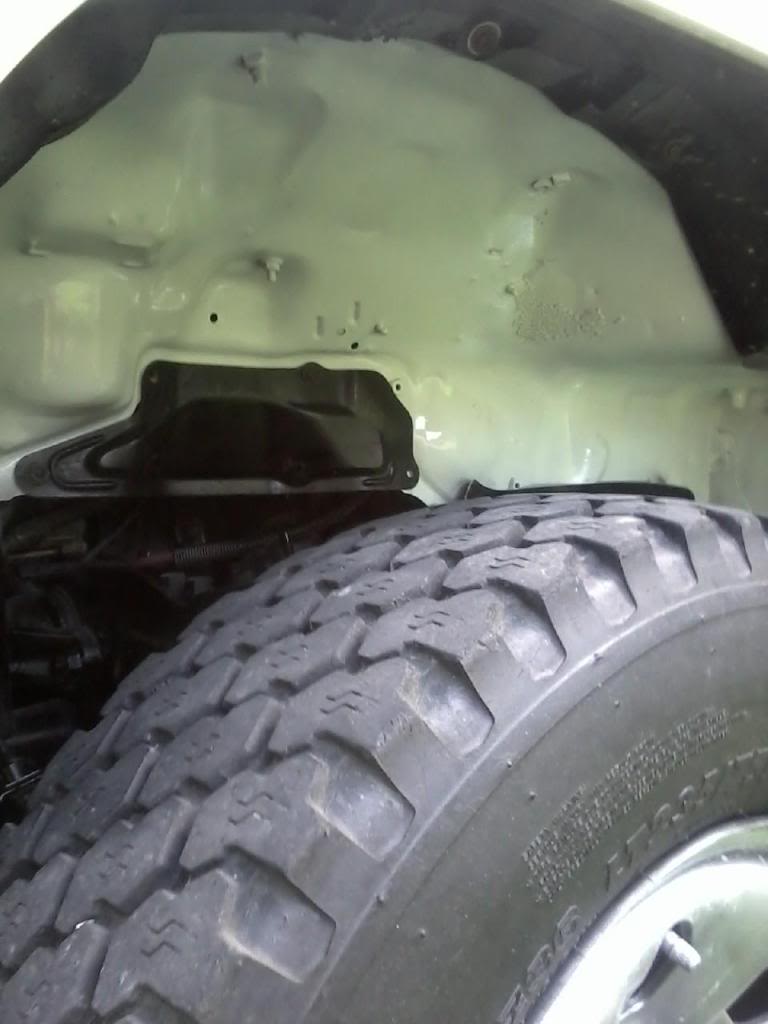
Worked underneath and here is a Wheelwell Shot.
Got the rear bumper on. It is banged up really good, but will have to work for now. If you look really close on the right side there is a missing bolt. It broke off, and one that looks like it is there wont tighten as it is stripped. I will eventually get it replaced.

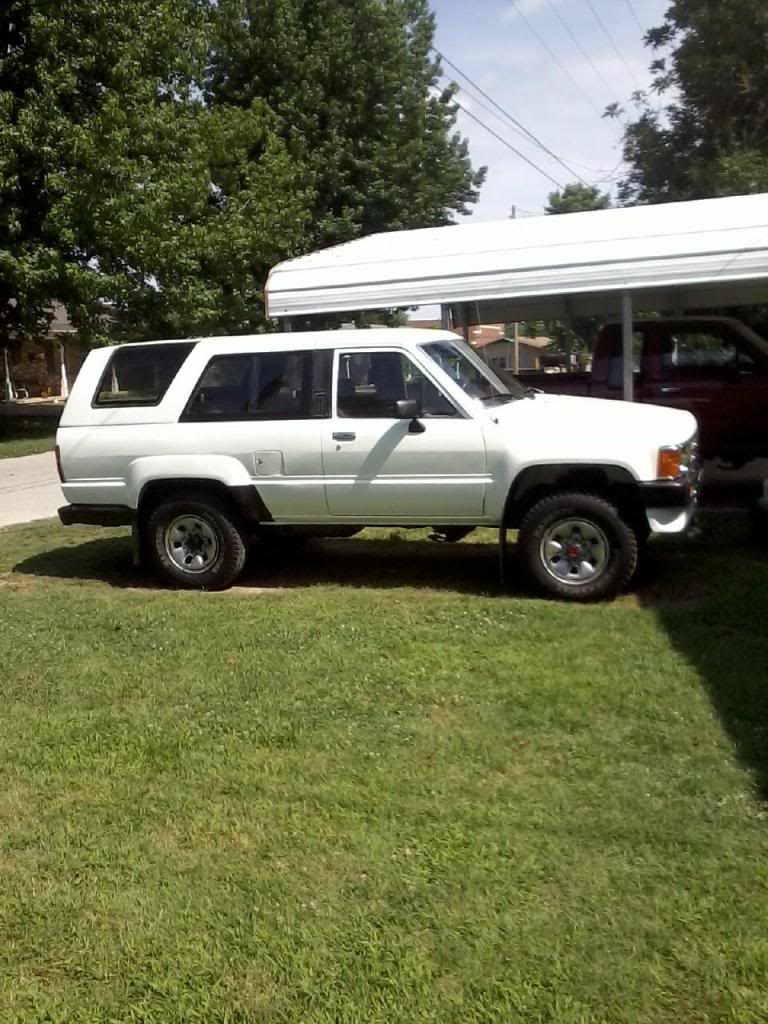
Here is a front shot with the orange marker lights done up.

Here is a sideshot.
Worked underneath and here is a Wheelwell Shot.
Got the rear bumper on. It is banged up really good, but will have to work for now. If you look really close on the right side there is a missing bolt. It broke off, and one that looks like it is there wont tighten as it is stripped. I will eventually get it replaced.
Here is a front shot with the orange marker lights done up.
Here is a sideshot.
Last edited by Terrys87; 11-08-2011 at 06:55 AM.
06-25-2011, 08:02 AM
#315
Super Moderator
Staff
Thread Starter
iTrader: (1)
Join Date: Aug 2008
Location: Anderson Missouri
Posts: 11,788
Likes: 0
Received 25 Likes
on
22 Posts
I still need to do the rear tail light covers and get the hitch area. I have spent alot of time on the interior getting it cleaned, but is just so faded, but it is decent enough for now.
Next week I plan on starting on getting my replacement transfer case cleaned up and new seals in it. Then I will have 4 LOW (wohoo!!) and it will be an even quiter ride.
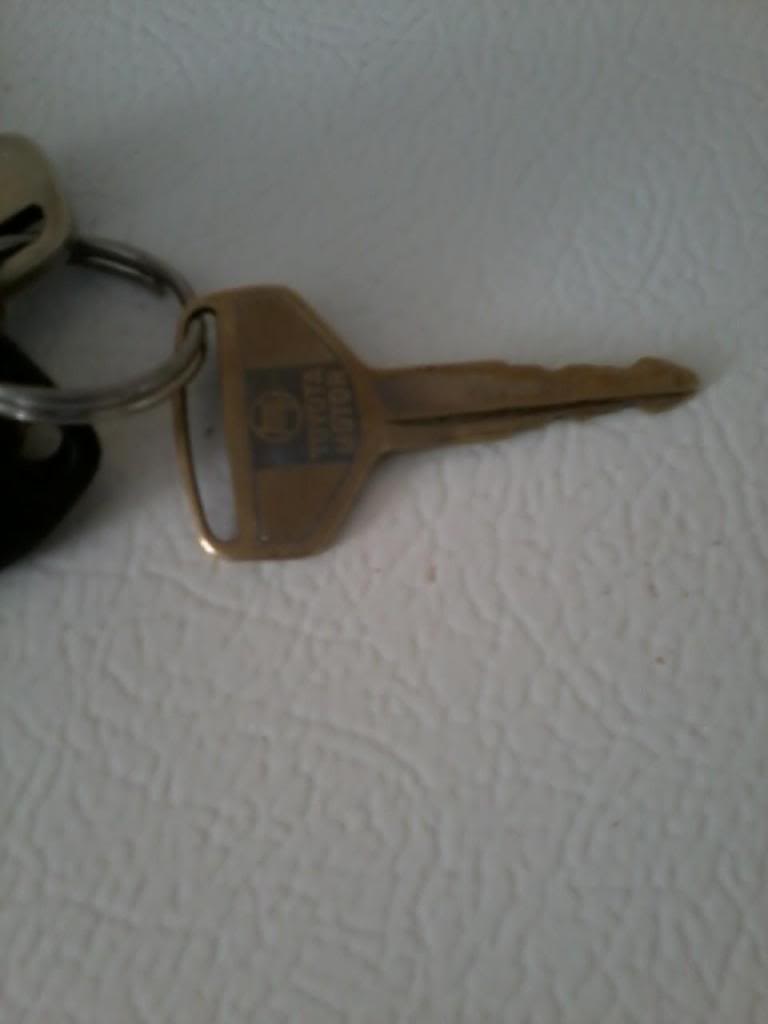
I stuck the original key lock in the back hatch thinking I would be able to use the key for the backgate. I wont operate the lock. It is just worn out.
Next week I plan on starting on getting my replacement transfer case cleaned up and new seals in it. Then I will have 4 LOW (wohoo!!) and it will be an even quiter ride.
I stuck the original key lock in the back hatch thinking I would be able to use the key for the backgate. I wont operate the lock. It is just worn out.
Last edited by Terrys87; 06-25-2011 at 08:08 AM.
06-25-2011, 12:56 PM
#317
Wow, needed a T-case, eh? That's really rare, even more so than my W56 I think, ...hmmmm. Well, I only interject myself in this because, well, .....my t-case rear seal is leaking like a pig! lol. Best wishes on that and hope it is as SMOOOOOOOOOTH as you are hoping!  Nice work as usual, Terry!
Nice work as usual, Terry!
06-25-2011, 02:24 PM
#319
Holy Cow, Terry, ....how did I miss that?? Sorry, .... very sorry bout his Arm. It's strange, ...I broke 6 bones by 14(TONS of dangerous sports, lol)... then another 32 by 32yrs old! lol..... I guess it just seems normal to me, but HOLY SMACKERAL, ....when my neighbors dog broke my daughters foot? AHHHHHHH! Freaks you out when your precious ones get hurt!
I WISH QUICK HEALING 4THE YOUNG ONE!!!!
I WISH QUICK HEALING 4THE YOUNG ONE!!!!
06-26-2011, 02:31 AM
#320
Registered User
Terry I have to admit I'm not a big fan of white, I totally understand why you went that way tho. That said that thing looks geat the details make it pop and I don't think you missed a thing. Might have to pay ya to do mine when the time comes. Sorry again about your son,


