
Terrys87 86 4Runner with a 2nd Chance
 03-28-2014, 07:38 AM
#1881
The 22r and 22re Throttle Cables are not interchangable. I swapped out the cables. Photobucket is being difficult so will go back and add some more pics later but what is working I am posting now.
There are two 10mm bolts that hold the Throttle cable to the firewall. On a 22r, the bracket for the cable attaches to the valve cover. On a 22re, it attaches to the Plenum. I suggest attaching it to the Plenum first and that helps get the cable situated.
I could not get a good picture of attaching the cable to the pedal assembly. The white clip sits in the pedal bar. Push from the back to the steering wheel and the clip will undo and there is a slot in the side of the pedal bar that lets the cable slide toward the passenger side to release it.
 03-28-2014, 12:35 PM
#1883
Super Moderator
Staff
Thread Starter
iTrader: (1)
Join Date: Aug 2008
Location: Anderson Missouri
Posts: 11,788
Likes: 0
Received 25 Likes
on
22 Posts
Thanks Gizler00...When I came to Yotatech, alot of questions I had werent always with a picture. I am trying my part to make it a little easier to understand. Sometimes a picture just does the trick.
I want to restore a 68-74ish Honda 50cc motor cycle someday. I loved them things when I was a kid. Another motorcycle I like is the 87-89 250R 3 wheeler. I was good on those. 72mph off of the show room floor and I had mine built as powerful as I could make it. Got clocked 85 on it one time, doing a wheelie at 60mph, then jumped the highway all at within a minute or two of riding. I didnt see him and he was ticked. Luckily he knew my dad and just got my rear chewed real good.
Hello Mark...I lucked out on this one, it came apart just like it should and glad it did, it is buried up in there and would of been a pain to get to repair it. See you changed your avatar. Looking good. You really did build this truck from the ground up.
Hello cyberhorn.. I got a feeling something is going to crack when I do get it to break free.
03-28-2014, 12:47 PM
#1884
Super Moderator
Staff
Thread Starter
iTrader: (1)
Join Date: Aug 2008
Location: Anderson Missouri
Posts: 11,788
Likes: 0
Received 25 Likes
on
22 Posts
I finished up the tank and got it in. Had to clear the "J" line on it as well. I try to mention on all of my builds just how bad these tanks get. I cleaned it and used Red-Kote on it and got it all back toghter.
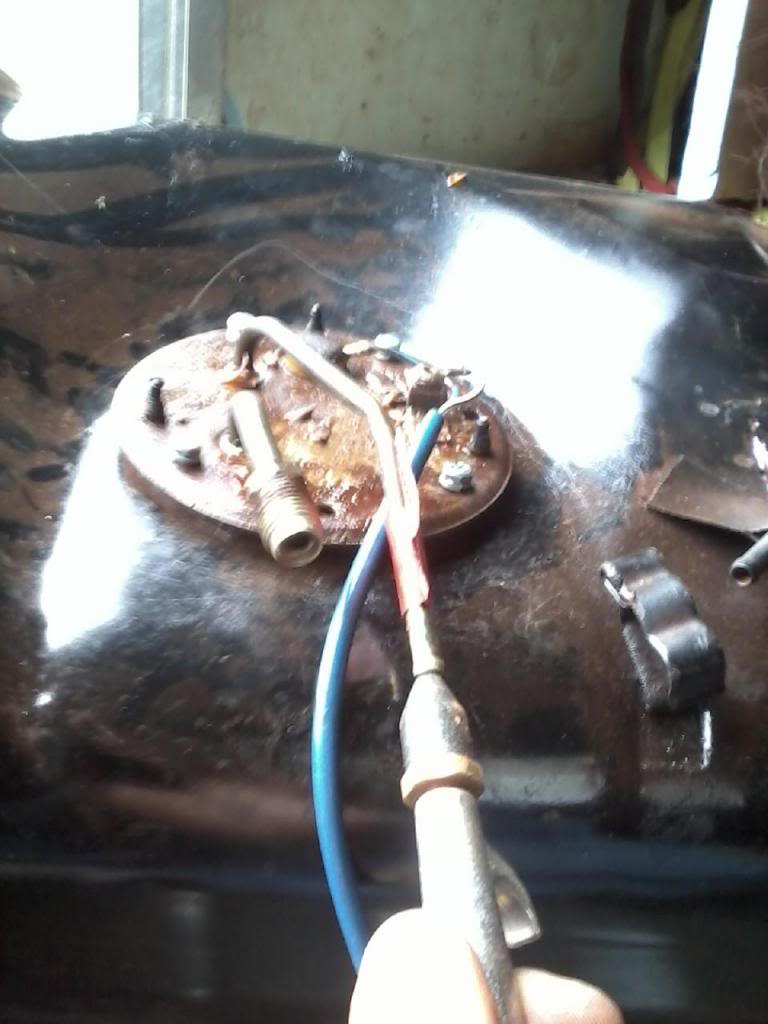
The dot lines up with the dent line just forward of my finger. The screws are offset a little bit. Also the wire coming out of the float unit should be pointing toward the drivers rear bumper.

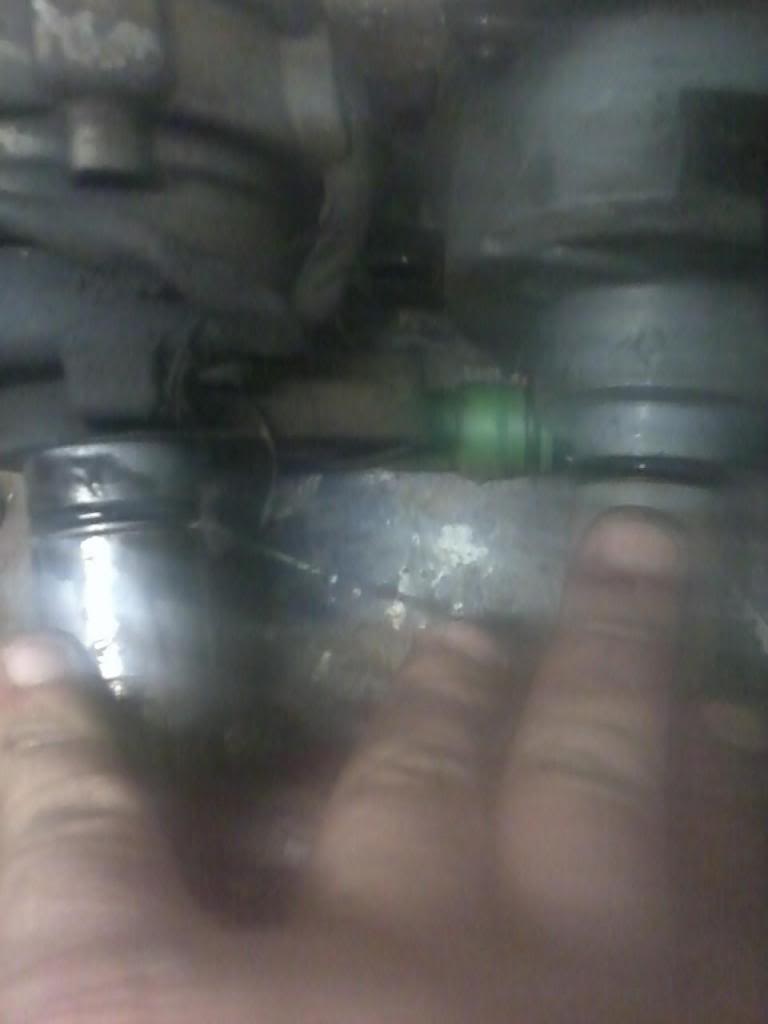
This line is closest to the frame and is the Return Line on the Fuel Pump Assembly, more of a note to myself.

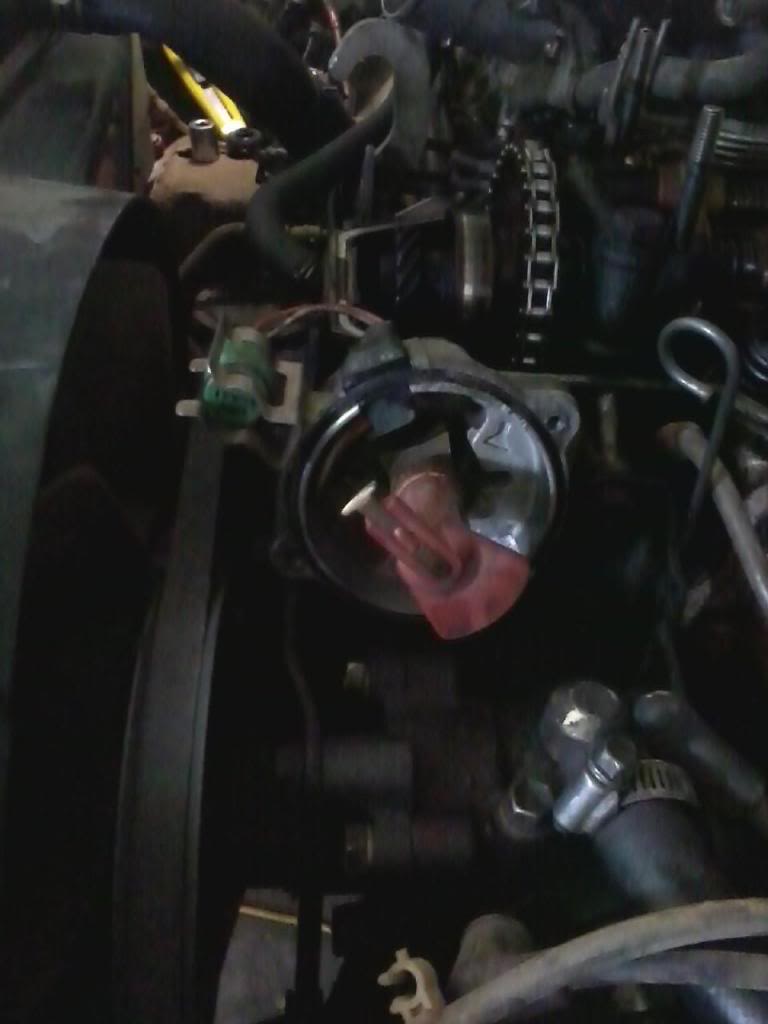
Not a good picture and I will update it later when I get back out to the shop. The distributors can have an oil leak. The one on the left, the O-Ring has shrunk so much that it isnt sealing anything. These are so old and brittle that they will just break on you. I had to swap distributors. 22rs have a Vacuum Advance and a 22re does not.
Got the timing set and dizzy in. Will order plug wires from ebay. $25 from ebay and $83 last time I checked Toyota. I will get a new cap, plugs, rotor button and oil filter from Toyota.
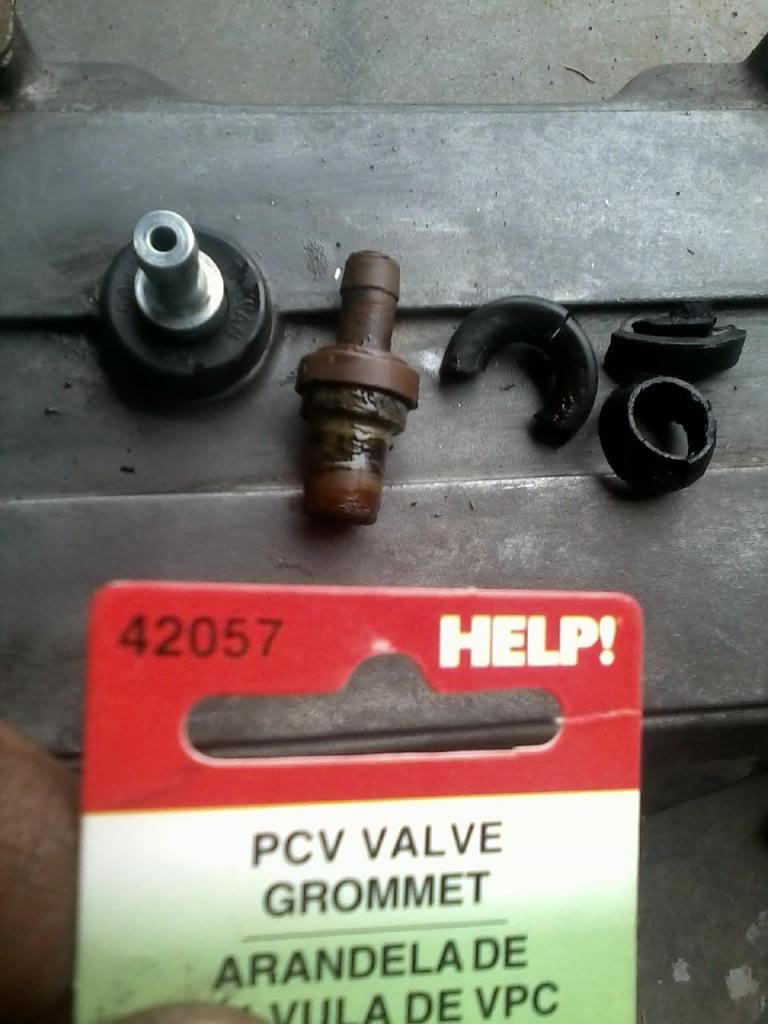
Replaced the PCV valve and Grommet. I do this anytime the valve cover is off. The grommet is usually so brittle and can be a bear to get out. I had to stand on it and pull the PCV out with channel locks and then the grommet broke while trying to get it out. The part number is for the grommet.
Got most of the Plenum back together and started on the air box. The bolt holes are marked where to drill them out.

I have 3 different manuals, FSM, Haynes, and Chilton. I will watch a video when possible.
Marks rear switch mod.

The dot lines up with the dent line just forward of my finger. The screws are offset a little bit. Also the wire coming out of the float unit should be pointing toward the drivers rear bumper.

This line is closest to the frame and is the Return Line on the Fuel Pump Assembly, more of a note to myself.

Not a good picture and I will update it later when I get back out to the shop. The distributors can have an oil leak. The one on the left, the O-Ring has shrunk so much that it isnt sealing anything. These are so old and brittle that they will just break on you. I had to swap distributors. 22rs have a Vacuum Advance and a 22re does not.

Got the timing set and dizzy in. Will order plug wires from ebay. $25 from ebay and $83 last time I checked Toyota. I will get a new cap, plugs, rotor button and oil filter from Toyota.

Replaced the PCV valve and Grommet. I do this anytime the valve cover is off. The grommet is usually so brittle and can be a bear to get out. I had to stand on it and pull the PCV out with channel locks and then the grommet broke while trying to get it out. The part number is for the grommet.

Got most of the Plenum back together and started on the air box. The bolt holes are marked where to drill them out.

I have 3 different manuals, FSM, Haynes, and Chilton. I will watch a video when possible.
Marks rear switch mod.
Last edited by Terrys87; 01-24-2016 at 01:17 PM.
03-30-2014, 12:03 AM
#1885
Super Moderator
Staff
Thread Starter
iTrader: (1)
Join Date: Aug 2008
Location: Anderson Missouri
Posts: 11,788
Likes: 0
Received 25 Likes
on
22 Posts
I got the skid pan for the tank cleaned and it was full of mud and dirt even after all of the cleaning I had done to it previously. Only way to really get it clean is to drop it from the tank. This one will go on to the truck I am doing the conversion on. Got the plug wires on order off of ebay as well. Will stop in at Toyota to get the distributor cap, rotor, and plugs. Hoping in the next few days to hear this truck run. I also need to get another radiator hose that goes on top. The top hose connects to the Thermostat at a different angle then a 22r does.
Got my dash pad for my runner painted. Just need to get it on now. The weather has been nice lately and starting to get a lot of small things done that have been needing it for a while.

Got my dash pad for my runner painted. Just need to get it on now. The weather has been nice lately and starting to get a lot of small things done that have been needing it for a while.
 03-30-2014, 12:10 AM
#1886
I got the skid pan for the tank cleaned and it was full of mud and dirt even after all of the cleaning I had done to it previously. Only way to really get it clean is to drop it from the tank. This one will go on to the truck I am doing the conversion on. Got the plug wires on order off of ebay as well. Will stop in at Toyota to get the distributor cap, rotor, and plugs. Hoping in the next few days to hear this truck run. I also need to get another radiator hose that goes on top. The top hose connects to the Thermostat at a different angle then a 22r does.
Got my dash pad for my runner painted. Just need to get it on now. The weather has been nice lately and starting to get a lot of small things done that have been needing it for a while.
Got my dash pad for my runner painted. Just need to get it on now. The weather has been nice lately and starting to get a lot of small things done that have been needing it for a while.
03-30-2014, 10:15 AM
#1888
Registered User
dash looks great terry
hey the electrolysis tank terry it could help with that engine disassembly getting rust off of the rocker shaft rails bolts ect
hey the electrolysis tank terry it could help with that engine disassembly getting rust off of the rocker shaft rails bolts ect
Last edited by Cyberhorn The Dragon; 03-30-2014 at 10:16 AM.
03-30-2014, 10:59 AM
#1889
Hey Terry,
I see your post and the link to the dizzy install. I posted that same video a while back and most said they set the time to 0 and then set the distributor. I personally set the timing to 5 degrees then insert the distributor, but I try to align the rotor to the mark inside the dizzy. then slide the dizzy in which set the timing correct all the time without opening up the valve cover.
Here's my link to show you what I'm talking about.
https://www.yotatech.com/52067002-post162.html
I'm wondering if that marking that looks like the rotor really is a guide to set the distributor, either way it seems to work with me. Set timing to 5degrees align rotor with the image mark then insert the dizzy.
03-30-2014, 12:55 PM
#1890
Super Moderator
Staff
Thread Starter
iTrader: (1)
Join Date: Aug 2008
Location: Anderson Missouri
Posts: 11,788
Likes: 0
Received 25 Likes
on
22 Posts
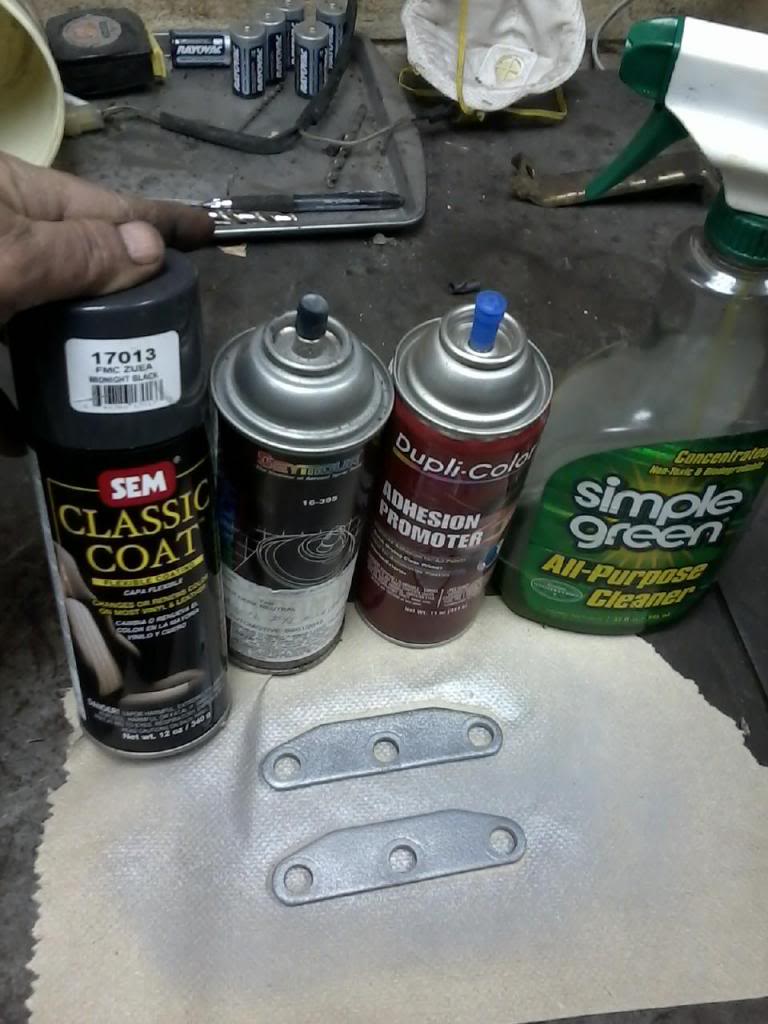
Hello Jacob13..I have been following your build and you are doing a great job. It is interior paint. The secret is to get the surface good and clean. I use a solution of water and Simple Green. Not much but, then make sure it is rinsed off real well. After it dries, use some Adhesion Promoter and if you are covering the same color of material, it only takes one or two coats. If you are using a different color then it can take three to five.
One brand is SEM, if SEM doesnt have your color, you can have it mixed up. It is about $23 for a can of aeresol. I get mine at Oriellys and I am sure other part stores that mix paint do it as well. Orielly and Auto Zone have a store that supports all of the other stores and does all of the mixing. Find that store in your area and I take in the kick panel for them to get the color off of or something that is roughly a 6 inch square. I can post a picture tonite of the Adhesion Promoter and the SEM I use on my runner. My 88 runner has a red interior and I have it custom mixed.
Hello cyberhorn...I am getting ready to put the electrolis tank to work here soon. I might see how well it cleans the rocker assembly but I have a few spare laying around. How is the weather in your area. It is finally getting nice here, wahoo!!!
Hello junk4u.. Seems like when I set mine to 0, I can not retard the timing far enough and am always having to pull the dizzy and am a tooth off when I do the 0 setting. On carbs it goes to 0. Usually when I get one running, there has been a few times that I have been spot on with the timing. Which reminds me that I loaned my Timing Light out and now I get to go get it.grrr...
03-30-2014, 05:48 PM
#1891
Registered User
Join Date: Apr 2013
Location: St joe missouri
Posts: 72
Likes: 0
Received 0 Likes
on
0 Posts
Hello Jacob13..I have been following your build and you are doing a great job. It is interior paint. The secret is to get the surface good and clean. I use a solution of water and Simple Green. Not much but, then make sure it is rinsed off real well. After it dries, use some Adhesion Promoter and if you are covering the same color of material, it only takes one or two coats. If you are using a different color then it can take three to five. One brand is SEM, if SEM doesnt have your color, you can have it mixed up. It is about $23 for a can of aeresol. I get mine at Oriellys and I am sure other part stores that mix paint do it as well. Orielly and Auto Zone have a store that supports all of the other stores and does all of the mixing. Find that store in your area and I take in the kick panel for them to get the color off of or something that is roughly a 6 inch square. I can post a picture tonite of the Adhesion Promoter and the SEM I use on my runner. My 88 runner has a red interior and I have it custom mixed.
03-30-2014, 11:47 PM
#1894
Super Moderator
Staff
Thread Starter
iTrader: (1)
Join Date: Aug 2008
Location: Anderson Missouri
Posts: 11,788
Likes: 0
Received 25 Likes
on
22 Posts
Hello Jacob13..I have used Bondo before and it is better then just looking at a crack. But it still shows where it is. I am slowly working with fiberglass and it has potential but you will lose the texture of the original dash pad but still better then looking at a crack. The pad I have above is one I found for $20. I do come across them every now and then and is something I am always keeping an eye out for. If you ever find a camper, where the overhead hangs past the windshield, those make great parts trucks and something to look for. Always low miles and the over head keeps the interior protected.
Several years ago, I had a truck stolen and wrecked and the dash was messed up in my truck. A place the specialized in vinyl repair did a great job on it. I am going to see about getting the dash that cracked on me this winter fixed thru one of those shops as soon as I can find one.
I use Duplicolors Adhesion Promoter but their interior spray is my least favorite. They normally are about $7 a can, SEM is about $17 and to have a custom mix is about $23. The color I am using is called Midnight Black but is gray to me and is close to Toyotas color. If you cant find the darkness you want, the local paint store can mix you up some. Tell them it is for interior use. I use both, off of the shelf for my 86 since I just pieced it together and looks new to me each time I am sitting in it. Mistys, I had to have it custom mixed and I still have the new look each time I get into it. The condition of your interior does have an effect on the enjoyment of your ride in my opinion.
2 cans would do your interior and 3 if you have a lot of color changing to do. Spray them in light coats, about 3 minutes in between each coat.
I replace my carpets with an aftermarket provider and it is great but is a lot of time to get it trimmed out like it should be. Interiors are cheap and easy to do with the exception of seats on a runner, a pickup a nice set of seats off of several cars and trucks will work.
Thanks kornhuskerwizard...Seems like it takes a hundred baby steps to get to a big step. I am at 50 baby steps now, lol.
Thanks Gizler00... I try add things that can make things a little easier. A picture is worth a thousand words.
Last edited by Terrys87; 03-31-2014 at 02:50 AM.
03-30-2014, 11:55 PM
#1895
Super Moderator
Staff
Thread Starter
iTrader: (1)
Join Date: Aug 2008
Location: Anderson Missouri
Posts: 11,788
Likes: 0
Received 25 Likes
on
22 Posts
I mentioned to Jacob13 about getting my truck stolen and a lesson I learned the hard way. I always kept my truck in the two bay attached garage with the keys in it. The garage door opener was in the truck and on the wall with a lighted button to open the garage door as well. I figured if it was in the garage and door was closed it was safe.
If you don't keep the keys in the ignition, you probably have a handy dandy key holder that is easily found and near the door or something similar. I have talked to many people and they never realized at how something like that can turn into a big mistake. From the outside of most houses, you can see which end your garage is on and then you provide a free ride for the crook.
Another lesson I learned. The house insurance doesn't cover the truck and that is another deductible you get to pay. I had to pay for the door that got kicked in and then the deductible for the truck insurance.
I found a set of block off plates for the exhaust manifold for the conversion. These can be hard to find and is something else I always grab when I get the chance. One small step to the bigger step of hopefully hearing this truck run later this week.
Paints
 03-31-2014, 01:14 PM
#1896
Registered User
Join Date: Apr 2013
Location: St joe missouri
Posts: 72
Likes: 0
Received 0 Likes
on
0 Posts
Hello Jacob13..I have used Bondo before and it is better then just looking at a crack. But it still shows where it is. I am slowly working with fiberglass and it has potential but you will lose the texture of the original dash pad but still better then looking at a crack. The pad I have above is one I found for $20. I do come across them every now and then and is something I am always keeping an eye out for. If you ever find a camper, where the overhead hangs past the windshield, those make great parts trucks and something to look for. Always low miles and the over head keeps the interior protected. Several years ago, I had a truck stolen and wrecked and the dash was messed up in my truck. A place the specialized in vinyl repair did a great job on it. I am going to see about getting the dash that cracked on me this winter fixed thru one of those shops as soon as I can find one. I use Duplicolors Adhesion Promoter but their interior spray is my least favorite. They normally are about $7 a can, SEM is about $17 and to have a custom mix is about $23. The color I am using is called Midnight Black but is gray to me and is close to Toyotas color. If you cant find the darkness you want, the local paint store can mix you up some. Tell them it is for interior use. I use both, off of the shelf for my 86 since I just pieced it together and looks new to me each time I am sitting in it. Mistys, I had to have it custom mixed and I still have the new look each time I get into it. The condition of your interior does have an effect on the enjoyment of your ride in my opinion. 2 cans would do your interior and 3 if you have a lot of color changing to do. Spray them in light coats, about 3 minutes in between each coat. I replace my carpets with an aftermarket provider and it is great but is a lot of time to get it trimmed out like it should be. Interiors are cheap and easy to do with the exception of seats on a runner, a pickup a nice set of seats off of several cars and trucks will work.
03-31-2014, 11:28 PM
#1897
Super Moderator
Staff
Thread Starter
iTrader: (1)
Join Date: Aug 2008
Location: Anderson Missouri
Posts: 11,788
Likes: 0
Received 25 Likes
on
22 Posts
Hello Jacob13...The theft was years ago and that guys is probably doing life now as he was a career criminal. They caught him. Just putting that out for others to think about when keeping their trucks in the garage.
No problem on asking questions, don't worry about that. I would think fiberglass would be better but is a lot more work to it. Ebay sells an overlay as well and one of my friends has one in his truck and I think it looks good in his. Some of these runner came with out a back seat as it was cheaper to sell it as a work truck then as a SUV, due to import taxes. No back seat is the reasoning behind that as I understand it. Mine and another guy I know didn't have one when we bought ours. People fabricated their own back seats.
84-89 should all interchange. They can be difficult to find. You will most likely need to get the rear seat belts and the latch that mounts on the side of the truck for the seat to latch on to. The panel will have an oval shape that shows where to cut it out at if it isn't already cut by a previous owner.
03-31-2014, 11:35 PM
#1898
Super Moderator
Staff
Thread Starter
iTrader: (1)
Join Date: Aug 2008
Location: Anderson Missouri
Posts: 11,788
Likes: 0
Received 25 Likes
on
22 Posts
Nothing really picture worthy but several small things. Got the gas tank skid plate on, manifold block off plates on, and most of the dash reassembled. Still need to repair one of the wires that goes to the computer and the stereo wiring is all hacked up.
I have a 4x8 trailer that I use for hauling a lot of parts since I am without a truck right now and had to get the tail lights working on it. I replaced them a few years ago and they just kept having problems. Hopefully got that fixed for good. It is also a great little work bench at times and when I paint a truck bed it is a great little rolling platform.
Tomorrow is supposed to be colder so I am going to get some insulation for the shop and will be by a boneyard and will see what they have in and might grab a few parts while in that part of the country.
These trucks are getting older. I stopped at my local Toyota dealer to get a tune up kit from them for the conversion and the only thing they keep in stock now is just the spark plugs. They are supposed to be in tomorrow as well. They use to keep all of that stuff there. Not any more. I kept the receipt to use to see if I can find the OEM parts on ebay. When the parts come in, I will do a comparison and see if they are what ebay sells as well.
04-03-2014, 01:44 AM
#1900


