
Terrys87 86 4Runner with a 2nd Chance

 10-03-2013, 02:00 PM
#1482
Super Moderator
Staff
Thread Starter
iTrader: (1)
Join Date: Aug 2008
Location: Anderson Missouri
Posts: 11,788
Likes: 0
Received 25 Likes
on
22 Posts
Here is the first coat of paint. I will get a better picture tomorrow out in the sun. Not showing the greatest inside with flourescent light.
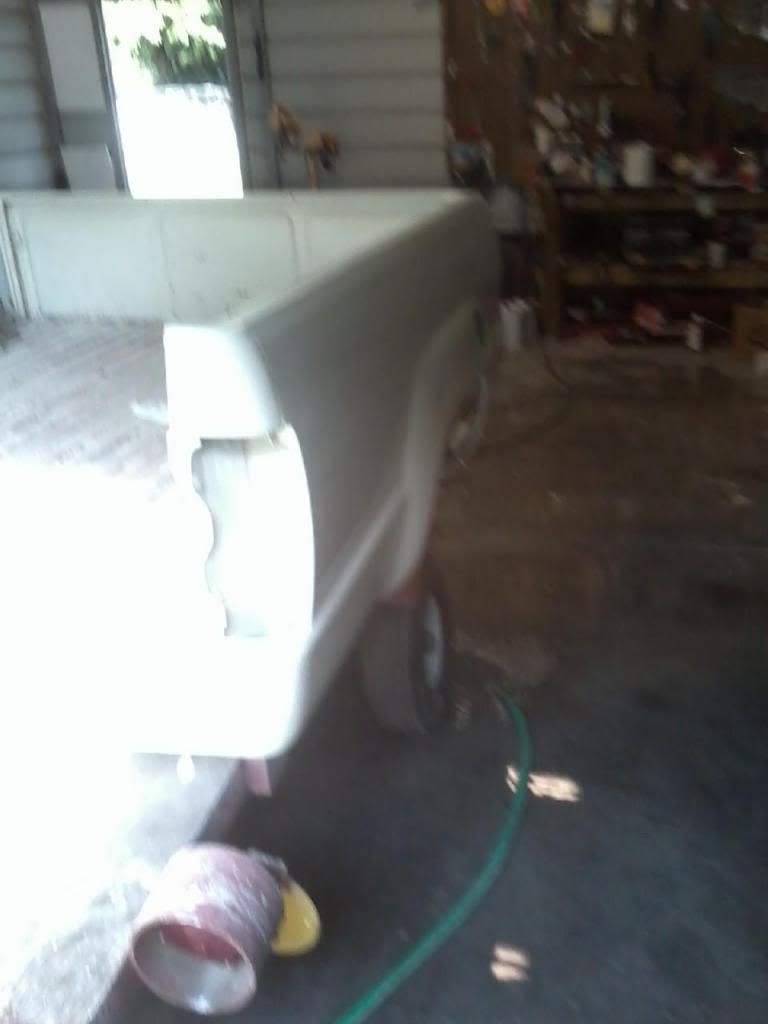
Here is the first two coats of clear coat. I did not get one single run in the paint. I do have one maybe two in the clear coat. Paint is the easy part, clear is the pain in the rear. It likes to run and orange peel. Other then the runs, so far so good. A run in clear coat is nothing to be worried about. It will usually buff out or is easy enough to re clear. Picture is bad.


Here is the first two coats of clear coat. I did not get one single run in the paint. I do have one maybe two in the clear coat. Paint is the easy part, clear is the pain in the rear. It likes to run and orange peel. Other then the runs, so far so good. A run in clear coat is nothing to be worried about. It will usually buff out or is easy enough to re clear. Picture is bad.
 10-03-2013, 02:05 PM
#1483
Super Moderator
Staff
Thread Starter
iTrader: (1)
Join Date: Aug 2008
Location: Anderson Missouri
Posts: 11,788
Likes: 0
Received 25 Likes
on
22 Posts
Lol Mark.. An oil change for me requires 15 trips to the store for something. No matter how far ahead I think. I had to go get some lint free towels and a guy there was on his second trip for something simple as well. Glad it is not just me.
10-03-2013, 02:47 PM
#1485
Super Moderator
Staff
Thread Starter
iTrader: (1)
Join Date: Aug 2008
Location: Anderson Missouri
Posts: 11,788
Likes: 0
Received 25 Likes
on
22 Posts
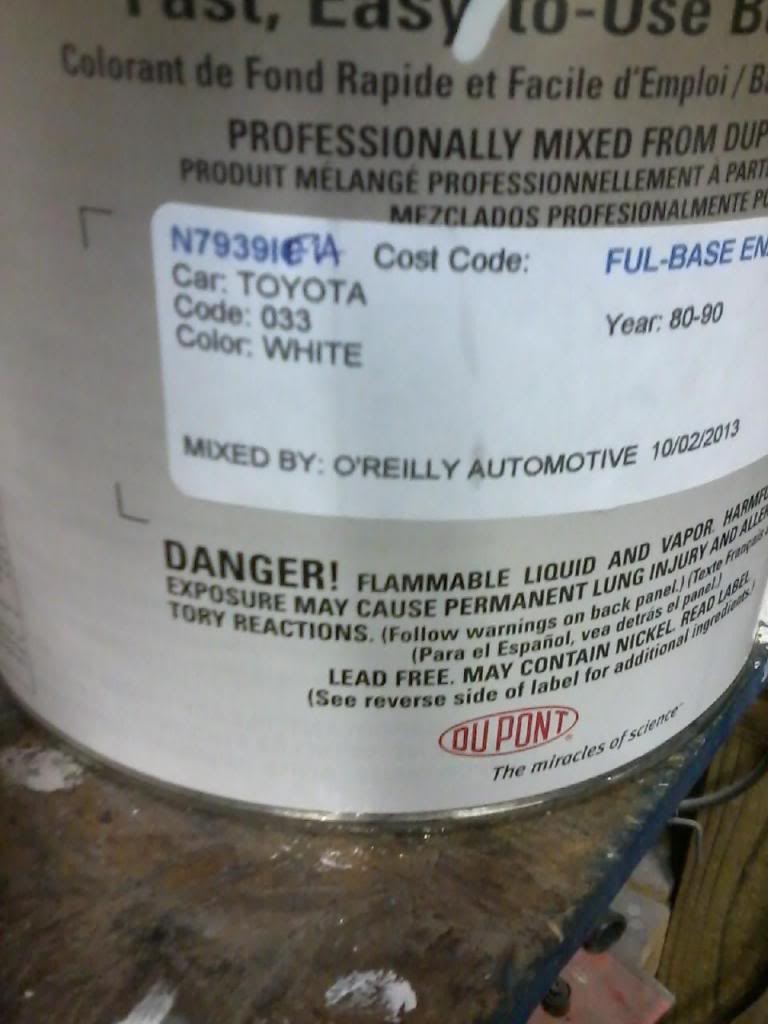
Hello Cyberhorn...The truck I am painting is the 86 Extra cab. I painted it back to the orginal color code of Toyota 033. It is like an eggshell white. The newer trucks used 041 called Toyota Super white. My Extra cab is an 85 it is the same color code as well. I know on the newer models. They may have same color code, but the paint shop also needs the year of the truck. I assume it is the same paint code but they do change it slightly.
10-03-2013, 02:51 PM
#1486
Super Moderator
Staff
Thread Starter
iTrader: (1)
Join Date: Aug 2008
Location: Anderson Missouri
Posts: 11,788
Likes: 0
Received 25 Likes
on
22 Posts
Got the bed done. Will see if I can get the cab done tomorrow but it isnt looking to good right now. I have to go to town and take care of a few things. Going to get an early start and hope for the best. It only takes about 10 minutes to get a coat on but some how it still takes a while to get one completely painted. I always allow 4- 5 hours for painting. Doing the bed, there is No Masking. Doing the cab, even as bare as it is, still alot of masking and that takes time.
I did have some excess clearcoat so where I had the frame cleaned an painted on mine, I cleared the gas tank an frame. No sense in just dumping the excess.

I did have some excess clearcoat so where I had the frame cleaned an painted on mine, I cleared the gas tank an frame. No sense in just dumping the excess.
 10-03-2013, 04:25 PM
#1487
Registered User
^^^^You need a new tire.
Your posts are always filled with great ideas. I'm going to use the paint pour with tape this weekend. On a wall, not a truck. Thanks for the great threads.
Your posts are always filled with great ideas. I'm going to use the paint pour with tape this weekend. On a wall, not a truck. Thanks for the great threads.
10-03-2013, 06:47 PM
#1488
Super Moderator
Staff
Thread Starter
iTrader: (1)
Join Date: Aug 2008
Location: Anderson Missouri
Posts: 11,788
Likes: 0
Received 25 Likes
on
22 Posts
Thanks Nervo... I think I learned that tip from a TV show. Redeth wanted me to try and post some info up for painting and I eventually am going to put all the post from a start to finish and try and take some of the fear out of painting. I have never had a run in paint. That is actually the easy part. It is the bodywork and clearcoat that is the most difficult.
I have never had to add air to that tire which is suprising. Two of the other tires that are usable wont hold air for more then a few days. That is my 85 truck with the bald tire. If I can get fire to the plugs, I think I can get it on the road soon. It is every bit of a basket case as my 86 Runner was. Trucks are easier to restore then Runners so it will be ok once I get it running.
I have never had to add air to that tire which is suprising. Two of the other tires that are usable wont hold air for more then a few days. That is my 85 truck with the bald tire. If I can get fire to the plugs, I think I can get it on the road soon. It is every bit of a basket case as my 86 Runner was. Trucks are easier to restore then Runners so it will be ok once I get it running.
10-03-2013, 06:54 PM
#1489
Super Moderator
Staff
Thread Starter
iTrader: (1)
Join Date: Aug 2008
Location: Anderson Missouri
Posts: 11,788
Likes: 0
Received 25 Likes
on
22 Posts
I have been checking in on the truck bed. Really happy with how the clear laid down. One small run and it will take about 5 minutes to get it smooth. Couldnt be happier with how all of that has turned out.
The one thing I am worried about is I am not sure it is as white as it should be. To me it is more of a tan color. I am hoping that it is the flourescent light that is giving it the tanish look to it. I am eagerly waiting for daylight to see its true color. If it isnt the white that I want, it will be getting sanded back down.
Here is the paint code that is on the truck. Will have to see it in daylight to see if it is what I wanted. Dupont has never let me down before.
 10-03-2013, 07:42 PM
#1490
Super Moderator
Staff
Thread Starter
iTrader: (1)
Join Date: Aug 2008
Location: Anderson Missouri
Posts: 11,788
Likes: 0
Received 25 Likes
on
22 Posts
I was going thru my 86 Runner thread and it was 1 year ago and 2 weeks since I painted it. Seems longer then that. I was actually suprised to see what else I had gotten done on it since then.
10-03-2013, 10:19 PM
#1491
Registered User
i thought you were going for a different color but white works! you could do the dk red two tone look lol anyhow if its the white im thinking it is a very pale cream just a touch of yellow an brown to 'warm' the white up
10-04-2013, 10:43 AM
#1492
Super Moderator
Staff
Thread Starter
iTrader: (1)
Join Date: Aug 2008
Location: Anderson Missouri
Posts: 11,788
Likes: 0
Received 25 Likes
on
22 Posts
Hello cyberhorn... I am actually working on two white extended cab trucks. One is nice and runs and one is not nice and doesnt run. Guess which one is mine?lol, Toms is an 86 with a 22r and mine is an 85 with a 22re. His is a true survivor truck and he wants to keep it orginal with a few of the factory options that it didnt come with.
My truck looks nearly identical to his with the exception of interior color, wheels and the solid axle. Literally my truck was headed to the crusher when I found it. I had two weeks to get it before it got turned into soup cans and razor blades. I still havent decided the color that I want to paint mine, but Misty and me have had several white trucks and with hers being white we want something different.
The first several trucks I painted were all red, and lately it seems I am painting all white. With the exception of yellow and blue all have been red and white. Guess which color of runner I have sitting in the back that my youngest says he wants to fix? A red one.lol
I like all of the factory colors but I am looking for a change. When I say the 86 Extra Cab, that is Toms, when I say the 85 Extra Cab, I am referring to mine. It can get confusing. When I get my 85 running, I will get a picture of the two trucks beside each other. I am having a difficult time on getting fire to my plugs. I think it is a broken wire issue and dont think I am to far off from getting mine running. I have to push mine around to get a picture of it. That is a pain.
Once I get mine running, I can take it to dads or take it to work on my lunch breaks and get things moving quick on it. I am going to hold off on painting mine til spring. I want to get it all put together and running well so that when I can do a paint job on it, I will need to pull the motor to paint the engine bay and since I am going to be that far into it, it will get tore down to the frame and painted. All that requires is disassembly and reassembly. All repairs will be done by then. My truck will be a nice daily driver, and I plan on it being done by this time next year, but my runner is the one that I will be putting all of the funds into trying to make it as nice as I can and what other things I can do to it, that will be a few years down the road til I consider it done.
10-04-2013, 11:05 AM
#1493
Super Moderator
Staff
Thread Starter
iTrader: (1)
Join Date: Aug 2008
Location: Anderson Missouri
Posts: 11,788
Likes: 0
Received 25 Likes
on
22 Posts
I primed, painted and clear coated Toms frame. Trying to get it ready to put the bed back on to save space. I can just cover the bed when I paint the cab. I was really concerened that it was to tanish in color, but after getting it out in the sunlight, it is more white then what it looked like in the shop. After looking in places on the truck where the paint was faded, it is maybe one or two shades off and maybe it if it was waxed would look really close. Wheww!!!
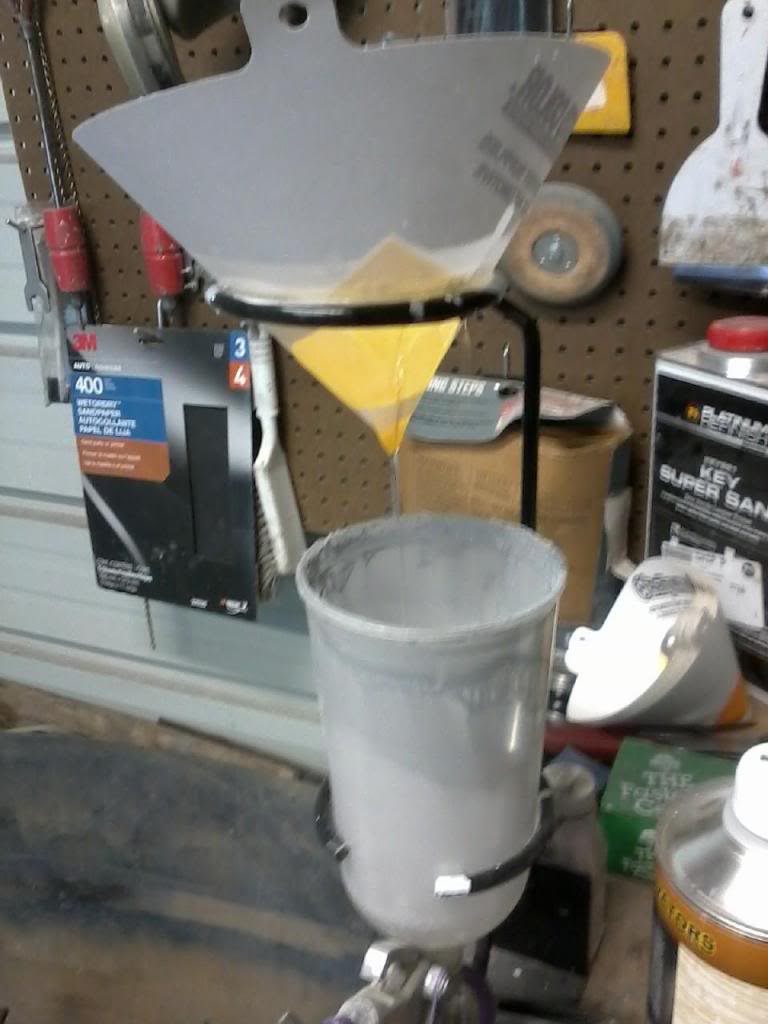
When painting, after mixing your paint and activator, always strain your paint. The paint shops mixes it well, but it still will want to clump up after setting for a small amount of time. Clear coat looks about like water. I never see clumps in it, but I still strain it just for good measure.
Frame cleaned, painted and clear coated. I will get the bottom sides of the frame later on. I use Rustoleum primer and any black rattle can spray I have laying around. Normally I rattle can the clear coat, but with the bed off it is easier and quicker to shoot it with the spray gun. Also this is Toms truck as the SR5 wheels, mine as gold rims.

To keep from loosing bolts and to give it a little cleaner look, it helps when reassembling and helps to look like it is more orginal in my opinion.
I asked about waxing. I have a nice buffer and it works great. I dont recommend one to someone without experience, it will burn a paint job quick. Actually safer using fine grit (2000) sandpaper then a buffer. Here is a cheap and a great tool I like and use most for a completed paint job or everyday use. Meguiars has products that start out at a 10 and steps down to a 1 if I recall right. Once you figure out their product, it does a great job. Just pay close attention when using rubbing compounds as it will feel gritty, but with this pad, and a good drill really not too much to worry about. It may take a little longer, but alot better then burning paint. I keep this pad wet or fairly damp when using it.
Cheap, effective and works great.

When painting, after mixing your paint and activator, always strain your paint. The paint shops mixes it well, but it still will want to clump up after setting for a small amount of time. Clear coat looks about like water. I never see clumps in it, but I still strain it just for good measure.

Frame cleaned, painted and clear coated. I will get the bottom sides of the frame later on. I use Rustoleum primer and any black rattle can spray I have laying around. Normally I rattle can the clear coat, but with the bed off it is easier and quicker to shoot it with the spray gun. Also this is Toms truck as the SR5 wheels, mine as gold rims.

To keep from loosing bolts and to give it a little cleaner look, it helps when reassembling and helps to look like it is more orginal in my opinion.

I asked about waxing. I have a nice buffer and it works great. I dont recommend one to someone without experience, it will burn a paint job quick. Actually safer using fine grit (2000) sandpaper then a buffer. Here is a cheap and a great tool I like and use most for a completed paint job or everyday use. Meguiars has products that start out at a 10 and steps down to a 1 if I recall right. Once you figure out their product, it does a great job. Just pay close attention when using rubbing compounds as it will feel gritty, but with this pad, and a good drill really not too much to worry about. It may take a little longer, but alot better then burning paint. I keep this pad wet or fairly damp when using it.
Cheap, effective and works great.
 10-04-2013, 11:15 AM
#1494
Registered User
OK paint question...If you have dirt or bugs or orange peel in the base coat do you sand it before applying the clear coats? If you sand, which grit? It looks like a lot of painters put clear coat on the same day as the base coat but maybe they're painting in booths.
I hope you're having the beautiful hot days, no humidity, we're having in VA. It's like California, but without the traffic! Perfect for painting.
I hope you're having the beautiful hot days, no humidity, we're having in VA. It's like California, but without the traffic! Perfect for painting.
10-04-2013, 02:28 PM
#1496
Registered User
frame looks good an clear top the tank can only help it preventing rust later on
ok so 86 isnt yours 85 is jut gotta watch the numbers
terry just to get it running have ya tried a jumper wire right to the battery to give voltage to the coil?
if the harness is broken maybe at the couple weak spots i noticed the fender pass through an the inner fender to the cab
ok so 86 isnt yours 85 is jut gotta watch the numbers
terry just to get it running have ya tried a jumper wire right to the battery to give voltage to the coil?
if the harness is broken maybe at the couple weak spots i noticed the fender pass through an the inner fender to the cab
10-07-2013, 01:46 AM
#1497
Super Moderator
Staff
Thread Starter
iTrader: (1)
Join Date: Aug 2008
Location: Anderson Missouri
Posts: 11,788
Likes: 0
Received 25 Likes
on
22 Posts
Hello Nervo... I have never had any dust issues. Reason being, I spend alot of time cleaning the shop for painting. I sweep it out first and then I take the air gun and blow out every nook and cranny and sweep it again. After that I wash the floor with the water hose and blow the shop out again and let the dust settle and it gets trapped in the water. You will be suprised at how fast the water dries off of the floor when painting.
You dont see it in the pictures, but I have two fans running to help pull the paint fumes out and that is part of the reason for the floor drying out so fast. It also helps keep the bugs from being able to lang on the paint. It is just a slight breeze, not much at all. If they do land, I have been able to remove them and do a light respray and you cant tell where they were as they were so small. In one of the above pictures in between paint and clear, you can see the floor drying. The dust that is on the floor is like a thin film of mud. You can see I have a water hose running all of the time I am painting in one of the pictures as well. I have never had a dust problem doing this way.
When painting, I mix my paint at 16-20 ounces at a time. For a truck bed 15 ounces works great. I was able to paint the bed, tailgate, and gas door all at once and 15 ounces was perfect. The paint was a 2:1 mix ratio. I mixed 10 ounces of paint to 5 ounces of activator. Clear Coat was 4:1 which I did 12 ounces to 3 of activater. I dont mix the whole batch at once. I still have to paint the cab but even if painting all at once, I still mix each coat one at a time. Check your mix ratio as it may be different.
As far as orange peel and fish eyes, I think that is only on acrylic enamel. I did one one time with acrlic enamel and never again. It is alot cheaper, but there is some trick to it that I dont know. The guy that taught me said that base coat/clear coat is best for what I do and I agree. The paint I use is Nasson. It is Dupont cheaper brand and for hobbist, it is great. The base coat, I have never had a run using it and it is very forgiving.
With sealer,paint and clear coat, it was around $325. There are several other brands and Dupont Chroma Base is the next step up. It is expensive as well as several other brands. You will be suprised at what paint can cost. Wow!!! I would suggest using Nasson. I get mine from Oriellys. It is a good quality of paint and for what you are wanting to do, think you will be quite satisfied with it. I sprayed Jason in tn runner and he used a different brand and I liked how well it worked. I can get that brand from him as well here shortly.
Clear coat is the one that is the one that I least like spraying. I have runs on it several times in painting different trucks. Also have had orange peel on it. But it is fixable. After painting, I wait an hour and then clear coat. The paint guys I talk to say that if you let the base dry to scuff it up again with 400 or 600 grit and put a coat of base and then clear coat it. When I paint, I have every intention of clearing the same day. I wait about an hour to clear it after painting.
As far as bugs, it is going to happen. This time I was lucky and only got 4 bugs. Two in the base and two in the clear. On the base I was able to blow them off with the paint gun. On a paint gun, pulling the trigger to the half way point only shoots air. I pulled about a 1/4 trigger and it was low enough air pressure that it blew the bugs off witout messing up the paint. From half trigger to full trigger, the gun starts shooting paint. I always pull full trigger and firm grip each time when painting.
On the clear coat, I took some masking tape and with the sticky side out, I was able to rub it close enough to get the bug to stick to the tape. The second one I had to use tweezers. It takes a steady hand and carefulness removing them this way.
When painting, in between each round, I mix up the next coat. Check for bugs, make sure I got good coverage, and make sure the floor is wet. I take a wide broom and spread the water in the area I am painting. It forces me to give each coat enough time to flash. I always start in the area that I started from in the begining and then go to the next piece.
I will shoot primer without a mask. It is heavy enough that it wont float in the air and cause breathing problems. After about 3 minutes of painting, you will have a fog in the air of paint particles and is a big source of dust problems. The biggest reason for having a fan going. Make sure you have a good seal. You will taste that stuff for 3 days and I know a retired painter that has an oxygen bottle for not using a mask over the years.
My compressor is only 25 gallon tank up to 125 psi. It is plenty capable of keeping up with painting. In between coats, it will build back up air pressure. My gun pressure only requires 35-45 psi. You have a tank guage and a pressure guage that. With the trigger fully pressed, adjust your pressure guage to the requirement of the paint gun. I will edit this post and add some pictures as well here in the next few days to show what I am talking about.
Before you start painting, do a complete mock painting. Do everything you would do as if you are painting. This makes sure that you have plenty of room, that the air hose is not going to bump into any panels, and is going to reach where you want it to. You need to do alot of squatting to get to the very bottom of the panels and this allows you to make adjustments and find what areas you need move around. When painting the top of the cab. I use milk crates for standing on. During my mock painting, I spray the cab and then step down and push my crate under the cab with my foot and continue on. This will help you figure out what works best for you. Act like the paint is wet and go thru the motions of moving you crate or what you are going to use when actually shooting paint. It may look and sound funny, but it could save you alot of repair work later.
Depending on what panel I am painting. I usually have the hose behind my back or draped around my neck. Holding the hose with my left hand and the gun with my right hand. This is where the mock painting comes in handy to know where I need to switch at and not bumping any panels.
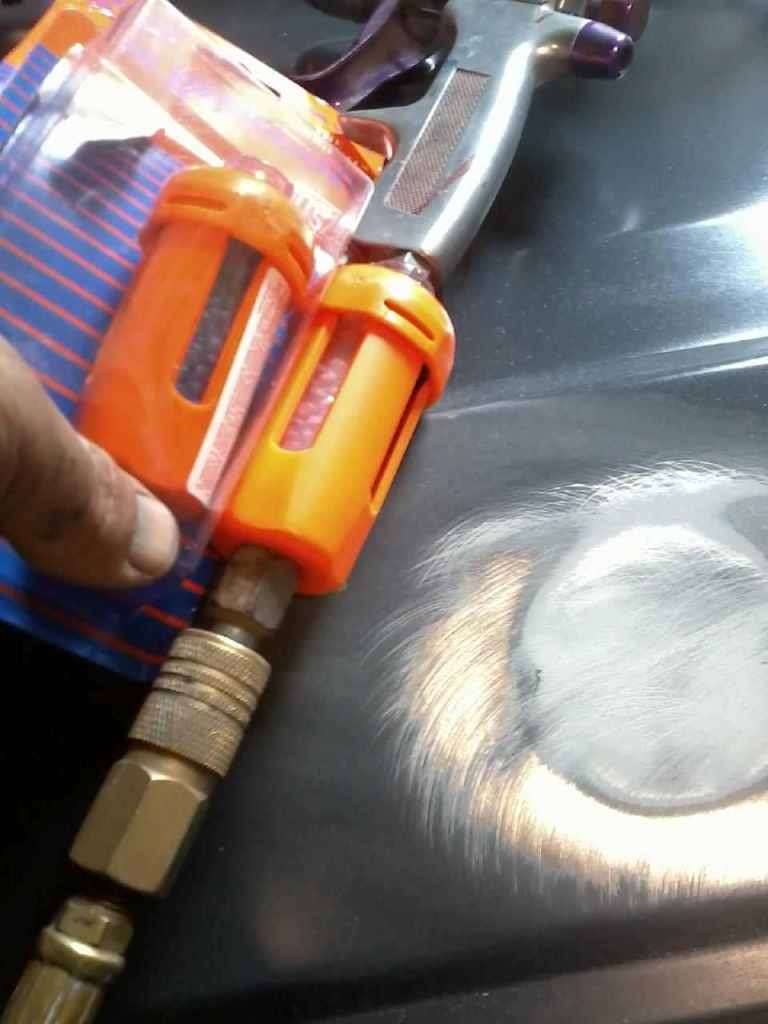
In between paint and clear coat. I drain the air air out of my tank and switch out my disposable water filter trap that I have attached to my air gun. The ones I use are orange and works great for me. Your tanks water trap alone isnt going to keep it out of the gun. This is great painting weather and less bugs in my area. Also the temperture stays more consistent. Try to pick a day that is going to stay about the same for painting and clear coating.
Paint isnt so bad in my opion, it is the clear. Make sure you use an activator for the temperture range that you are going to be clear coating in. It makes all the difference in the world in getting the smoothest clear coat down. I can PM you my number when you go to paint and answer any questions you may have when you do go to paint if you like. I am sure to think of some more tips and pics so keep checking this post as I will add more. Redeth is wanting so tips as well and I am eventually going to combine from start to finish in one post on here.
It has been some time, but you asked about the rock guards. The trucks and runners look the same, but mount completely different. I will find that picture some where and post them. The runners have a mounting tab in side the panel that you have to acess from inside. I know you said your was rusted out. You can adapt a trucks rock guard to replace the runners if you want them on. Just thought I would mention it to you.
It is a personal prefernence. Some like rockguards and other pieces to the color of the truck and some like black. If I am doing them to the color of the truck, I spray them with the gun. If it is going to be black, I use rattle can for things like that.
Make sure you strain all paint. The clear you dont really have to, I just do for good measure. My brother in law has painted some in a driveway and there a few good days you might could do that. The painting isnt so much to be concerned about. It is the body work. It will look good in primer, but any flaws will show when painted. It is still better then it was and you will most likely be your own worst critic. To me, there is a bigger satisfaction in doing paint work then motor work and is more rewarding in my opinion. It isnt anything you cant always go back and redo at a later time if you wanted to. I really think you will like the reward later on.
Masking is a pain in the rear. Try to remove as much as possible to avoid masking and overspray, is something else I would suggest.
Here is a link to one I painted before that might have some more tips befroe and after this link>>> https://www.yotatech.com/forums/f199...5/index14.html
Here is how I mask to avoid the overspray look in between the door andbody. It avoids over spray and gives a cleaner look when opening the door. When painting, I close the door nearly shut, but not latching, after painting the jams. I remove the pinch weld trim and mask the paper to the pinch weld. When I reinstall the pinch weld trim, you cant tell where there is two different paints.
Here is how I paint the inside of the door so as to make it blend in a little better with the exterior. I remove the trim and then run tape where the trim was on the inside. Then I paper against the exposed tape and run another strip of tape on top of that. Top has been taped again and still need to run tape down the left side.
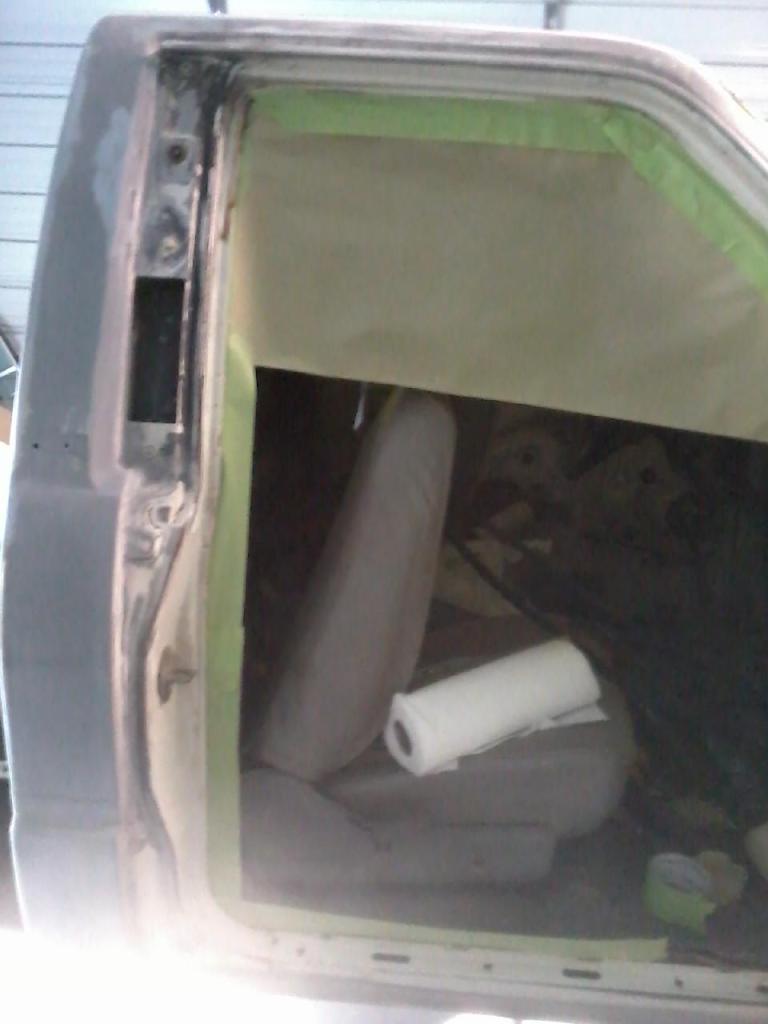
Not to worried about the center as it will have a door panel covering it and I will cover the seal as I just now seen that I didnt mask it off.

Water Seperator. Blue is good, Pink is not.
You dont see it in the pictures, but I have two fans running to help pull the paint fumes out and that is part of the reason for the floor drying out so fast. It also helps keep the bugs from being able to lang on the paint. It is just a slight breeze, not much at all. If they do land, I have been able to remove them and do a light respray and you cant tell where they were as they were so small. In one of the above pictures in between paint and clear, you can see the floor drying. The dust that is on the floor is like a thin film of mud. You can see I have a water hose running all of the time I am painting in one of the pictures as well. I have never had a dust problem doing this way.
When painting, I mix my paint at 16-20 ounces at a time. For a truck bed 15 ounces works great. I was able to paint the bed, tailgate, and gas door all at once and 15 ounces was perfect. The paint was a 2:1 mix ratio. I mixed 10 ounces of paint to 5 ounces of activator. Clear Coat was 4:1 which I did 12 ounces to 3 of activater. I dont mix the whole batch at once. I still have to paint the cab but even if painting all at once, I still mix each coat one at a time. Check your mix ratio as it may be different.
As far as orange peel and fish eyes, I think that is only on acrylic enamel. I did one one time with acrlic enamel and never again. It is alot cheaper, but there is some trick to it that I dont know. The guy that taught me said that base coat/clear coat is best for what I do and I agree. The paint I use is Nasson. It is Dupont cheaper brand and for hobbist, it is great. The base coat, I have never had a run using it and it is very forgiving.
With sealer,paint and clear coat, it was around $325. There are several other brands and Dupont Chroma Base is the next step up. It is expensive as well as several other brands. You will be suprised at what paint can cost. Wow!!! I would suggest using Nasson. I get mine from Oriellys. It is a good quality of paint and for what you are wanting to do, think you will be quite satisfied with it. I sprayed Jason in tn runner and he used a different brand and I liked how well it worked. I can get that brand from him as well here shortly.
Clear coat is the one that is the one that I least like spraying. I have runs on it several times in painting different trucks. Also have had orange peel on it. But it is fixable. After painting, I wait an hour and then clear coat. The paint guys I talk to say that if you let the base dry to scuff it up again with 400 or 600 grit and put a coat of base and then clear coat it. When I paint, I have every intention of clearing the same day. I wait about an hour to clear it after painting.
As far as bugs, it is going to happen. This time I was lucky and only got 4 bugs. Two in the base and two in the clear. On the base I was able to blow them off with the paint gun. On a paint gun, pulling the trigger to the half way point only shoots air. I pulled about a 1/4 trigger and it was low enough air pressure that it blew the bugs off witout messing up the paint. From half trigger to full trigger, the gun starts shooting paint. I always pull full trigger and firm grip each time when painting.
On the clear coat, I took some masking tape and with the sticky side out, I was able to rub it close enough to get the bug to stick to the tape. The second one I had to use tweezers. It takes a steady hand and carefulness removing them this way.
When painting, in between each round, I mix up the next coat. Check for bugs, make sure I got good coverage, and make sure the floor is wet. I take a wide broom and spread the water in the area I am painting. It forces me to give each coat enough time to flash. I always start in the area that I started from in the begining and then go to the next piece.
I will shoot primer without a mask. It is heavy enough that it wont float in the air and cause breathing problems. After about 3 minutes of painting, you will have a fog in the air of paint particles and is a big source of dust problems. The biggest reason for having a fan going. Make sure you have a good seal. You will taste that stuff for 3 days and I know a retired painter that has an oxygen bottle for not using a mask over the years.
My compressor is only 25 gallon tank up to 125 psi. It is plenty capable of keeping up with painting. In between coats, it will build back up air pressure. My gun pressure only requires 35-45 psi. You have a tank guage and a pressure guage that. With the trigger fully pressed, adjust your pressure guage to the requirement of the paint gun. I will edit this post and add some pictures as well here in the next few days to show what I am talking about.
Before you start painting, do a complete mock painting. Do everything you would do as if you are painting. This makes sure that you have plenty of room, that the air hose is not going to bump into any panels, and is going to reach where you want it to. You need to do alot of squatting to get to the very bottom of the panels and this allows you to make adjustments and find what areas you need move around. When painting the top of the cab. I use milk crates for standing on. During my mock painting, I spray the cab and then step down and push my crate under the cab with my foot and continue on. This will help you figure out what works best for you. Act like the paint is wet and go thru the motions of moving you crate or what you are going to use when actually shooting paint. It may look and sound funny, but it could save you alot of repair work later.
Depending on what panel I am painting. I usually have the hose behind my back or draped around my neck. Holding the hose with my left hand and the gun with my right hand. This is where the mock painting comes in handy to know where I need to switch at and not bumping any panels.
In between paint and clear coat. I drain the air air out of my tank and switch out my disposable water filter trap that I have attached to my air gun. The ones I use are orange and works great for me. Your tanks water trap alone isnt going to keep it out of the gun. This is great painting weather and less bugs in my area. Also the temperture stays more consistent. Try to pick a day that is going to stay about the same for painting and clear coating.
Paint isnt so bad in my opion, it is the clear. Make sure you use an activator for the temperture range that you are going to be clear coating in. It makes all the difference in the world in getting the smoothest clear coat down. I can PM you my number when you go to paint and answer any questions you may have when you do go to paint if you like. I am sure to think of some more tips and pics so keep checking this post as I will add more. Redeth is wanting so tips as well and I am eventually going to combine from start to finish in one post on here.
It has been some time, but you asked about the rock guards. The trucks and runners look the same, but mount completely different. I will find that picture some where and post them. The runners have a mounting tab in side the panel that you have to acess from inside. I know you said your was rusted out. You can adapt a trucks rock guard to replace the runners if you want them on. Just thought I would mention it to you.
It is a personal prefernence. Some like rockguards and other pieces to the color of the truck and some like black. If I am doing them to the color of the truck, I spray them with the gun. If it is going to be black, I use rattle can for things like that.
Make sure you strain all paint. The clear you dont really have to, I just do for good measure. My brother in law has painted some in a driveway and there a few good days you might could do that. The painting isnt so much to be concerned about. It is the body work. It will look good in primer, but any flaws will show when painted. It is still better then it was and you will most likely be your own worst critic. To me, there is a bigger satisfaction in doing paint work then motor work and is more rewarding in my opinion. It isnt anything you cant always go back and redo at a later time if you wanted to. I really think you will like the reward later on.
Masking is a pain in the rear. Try to remove as much as possible to avoid masking and overspray, is something else I would suggest.
Here is a link to one I painted before that might have some more tips befroe and after this link>>> https://www.yotatech.com/forums/f199...5/index14.html
Here is how I mask to avoid the overspray look in between the door andbody. It avoids over spray and gives a cleaner look when opening the door. When painting, I close the door nearly shut, but not latching, after painting the jams. I remove the pinch weld trim and mask the paper to the pinch weld. When I reinstall the pinch weld trim, you cant tell where there is two different paints.
Here is how I paint the inside of the door so as to make it blend in a little better with the exterior. I remove the trim and then run tape where the trim was on the inside. Then I paper against the exposed tape and run another strip of tape on top of that. Top has been taped again and still need to run tape down the left side.
Not to worried about the center as it will have a door panel covering it and I will cover the seal as I just now seen that I didnt mask it off.
Water Seperator. Blue is good, Pink is not.
Last edited by Terrys87; 10-07-2013 at 06:03 AM.
10-07-2013, 01:57 AM
#1498
Super Moderator
Staff
Thread Starter
iTrader: (1)
Join Date: Aug 2008
Location: Anderson Missouri
Posts: 11,788
Likes: 0
Received 25 Likes
on
22 Posts
Thanks Mark... Seems like everything in the world keeps coming up but I will get it. I looking forward to it and feels good to see one in better shape then it was.
Hello cyberhorn...I seen where some have run a wire straight to the coil. I was concerned that it might burn the igniter. I have a spare steering column and I am going to lay it in the floor and just make the electrical connections that way and see if it is in the column. Hoping that works to see where the break is at. If that doesnt work, I will follow RADs advice and start tracing wires. Do you think running a wire like that would hurt the igntier. I would like to get it running enough to move it around without pushing it all the time. I will get it fixed correctly, but for a temp fix, it would be great.
Hello cyberhorn...I seen where some have run a wire straight to the coil. I was concerned that it might burn the igniter. I have a spare steering column and I am going to lay it in the floor and just make the electrical connections that way and see if it is in the column. Hoping that works to see where the break is at. If that doesnt work, I will follow RADs advice and start tracing wires. Do you think running a wire like that would hurt the igntier. I would like to get it running enough to move it around without pushing it all the time. I will get it fixed correctly, but for a temp fix, it would be great.
10-07-2013, 02:18 AM
#1499
Super Moderator
Staff
Thread Starter
iTrader: (1)
Join Date: Aug 2008
Location: Anderson Missouri
Posts: 11,788
Likes: 0
Received 25 Likes
on
22 Posts
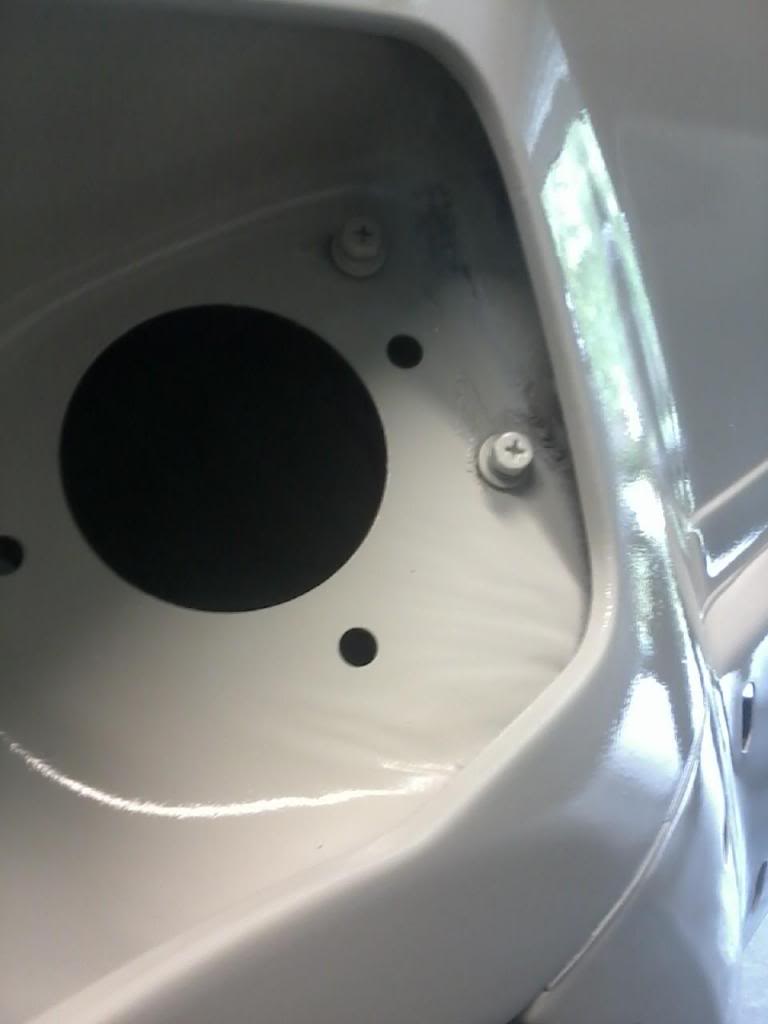
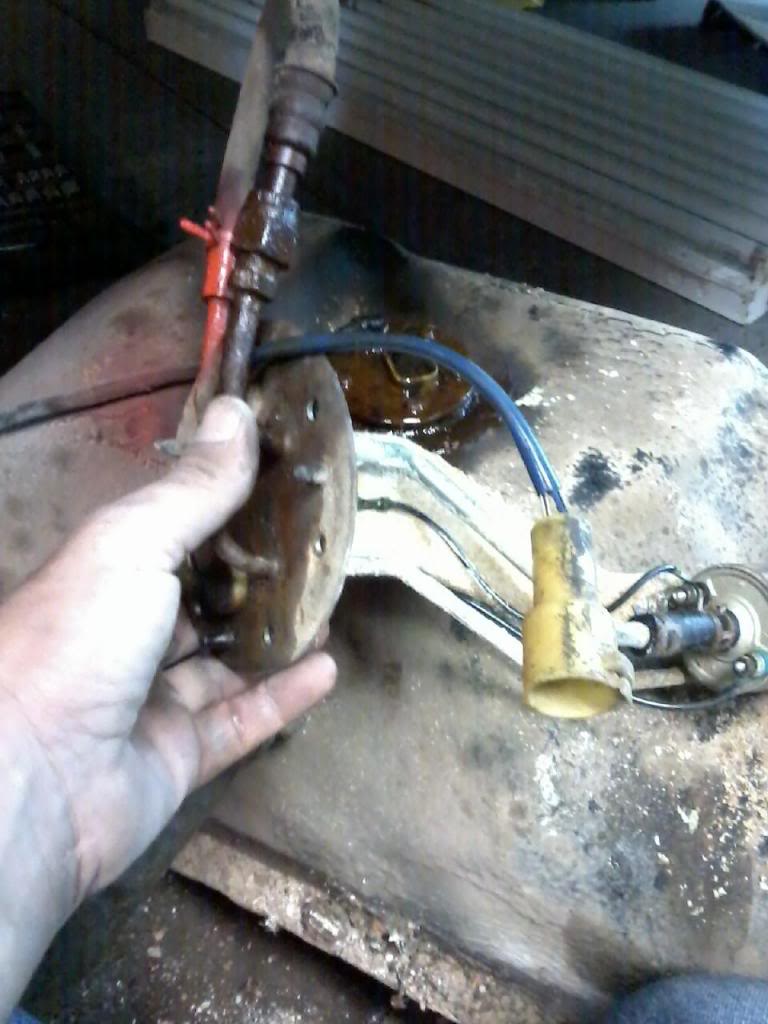
I am posting this picture up for Tom. The 14mm nut is stationary and the 19mm is the one that needs to turn. This is the metal line that will twist and possibly break on it. Be very careful when trying to seprate the two lines. If you cant get it to break free, I would just leave it attached.
There can also be bad looking rust on the pump assembly. It will clean up nicely with a wire tooth brush. If your fuel pump looks bad, I get mine off of ebay for around $30. Parts store wants $150ish and Toyota around $300. I have never had a problem with ebays pumps.
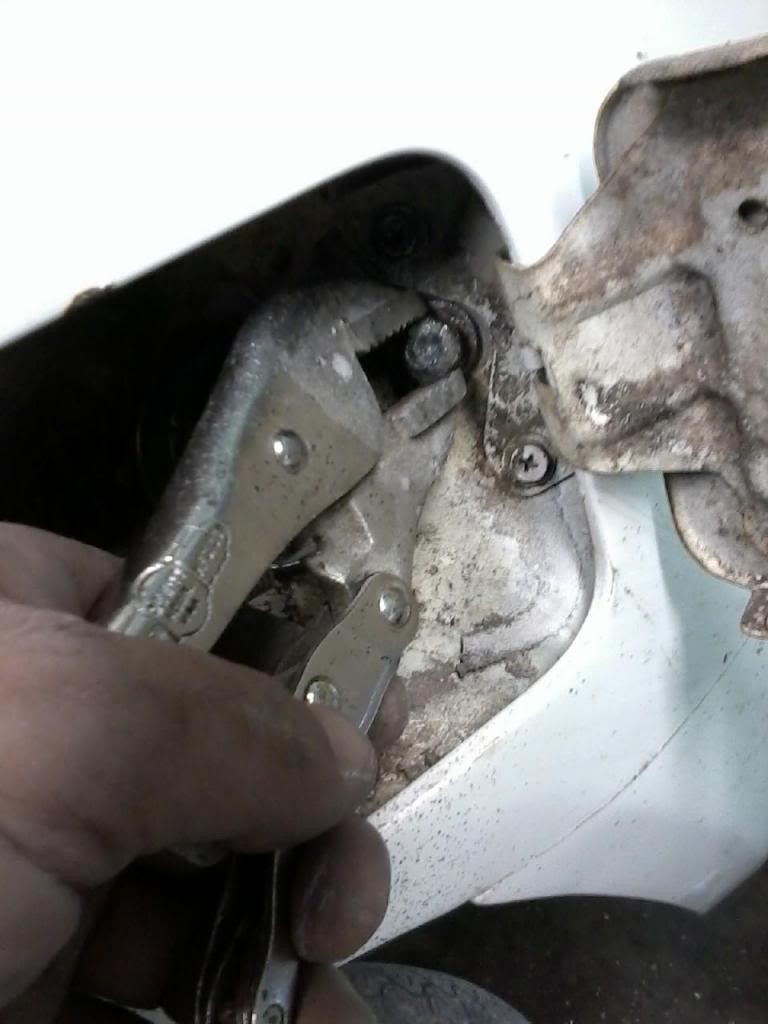
The bottom picture is usually how I have to break the screws/bolts loose in the same way as I do the gas cap door.
Copied.......

A big problem with the pickup assembly is the 14mm nut that attaches to the 19mm hose fitting is stubborn to come off. This can easily twist the metal pipe. Some of these pipes rust up bad and can break. This is a hard part to find and when found is expensive. Seems like around $150 on ebay. Dont get in no hurry trying seperate these two pieces. If I have to, I will clean it on the truck instead of taking the chance of breaking it assembly. The metal line is the supply side and is high pressure. Also the oprange is just a quick reference for me to remeber which line goes where. I will mark them better at a later time.
Getting this one screw out took along time. I have been working with it for some time. A while back when I got all of the bed bolts off, I was trying to lift the bed and it was being difficult. My youngest son would of said I earned my Der patch if he had been out there. I forgot about the fuel flll pipe. Doh!!!
There can also be bad looking rust on the pump assembly. It will clean up nicely with a wire tooth brush. If your fuel pump looks bad, I get mine off of ebay for around $30. Parts store wants $150ish and Toyota around $300. I have never had a problem with ebays pumps.
The bottom picture is usually how I have to break the screws/bolts loose in the same way as I do the gas cap door.
Copied.......

A big problem with the pickup assembly is the 14mm nut that attaches to the 19mm hose fitting is stubborn to come off. This can easily twist the metal pipe. Some of these pipes rust up bad and can break. This is a hard part to find and when found is expensive. Seems like around $150 on ebay. Dont get in no hurry trying seperate these two pieces. If I have to, I will clean it on the truck instead of taking the chance of breaking it assembly. The metal line is the supply side and is high pressure. Also the oprange is just a quick reference for me to remeber which line goes where. I will mark them better at a later time.

Getting this one screw out took along time. I have been working with it for some time. A while back when I got all of the bed bolts off, I was trying to lift the bed and it was being difficult. My youngest son would of said I earned my Der patch if he had been out there. I forgot about the fuel flll pipe. Doh!!!
 10-07-2013, 12:21 PM
#1500
Registered User
Join Date: Apr 2013
Location: NC
Posts: 15
Likes: 0
Received 0 Likes
on
0 Posts
Terry, paint master, Great write up about process and cleaning. You have to have patience when working on older cars, but you have to be a saint when it comes to body work on one.
Can't wait to see the end results, and a can of fix-a-flat would take care of that tire. haha
Can't wait to see the end results, and a can of fix-a-flat would take care of that tire. haha


