
Terrys87 86 4Runner with a 2nd Chance
 08-19-2013, 07:40 PM
#1421
Registered User
something like a closed cell foam sheet cut an shaped to the door both insulation and seal
http://www.ebay.com/itm/Closed-Cell-Poly-Vinyl-Foam-Sheet-5-THK-12-W-12-L-Charcoal-Plain-Backing-/221258453983?pt=LH_DefaultDomain_0&hash=item33840813df
http://www.ebay.com/itm/Closed-Cell-Poly-Vinyl-Foam-Sheet-5-THK-12-W-12-L-Charcoal-Plain-Backing-/221258453983?pt=LH_DefaultDomain_0&hash=item33840813df
 08-20-2013, 12:31 AM
#1422
Super Moderator
Staff
Thread Starter
iTrader: (1)
Join Date: Aug 2008
Location: Anderson Missouri
Posts: 11,788
Likes: 0
Received 25 Likes
on
22 Posts
Sorry Terry if this looks like I'm hijacking your thread, but I thought I would answer Corys question about the flapper.
Looking through the cowl inside it here's a picture that shows where air is sucked from the outside.
Again this shot is looking into the cowl:

From the inside of the truck with the blower/motor off you can see the flapper it leaks out because of the foam that seals the flap deteriorates like mine is.
Here's a picture of the flapper looking straight up and you can see the opening as the one from the prior picture.

I would like to figure out what to use to replace the foam, but I haven''t so far myself. I have purchased some weather stripping that seal windows and doors to replace the seals around the evaporator coil box, etc... Kind of helps seal the air from leaking around the box and only into the vents. I would really like to find something to replace the foam seal at the flapper to seal out the outside air and increase the air blowing, keep the air cooler by keeping out warmer air and keeping out the exhaust from the cars in front of you. Terry if you got an answer as what to use to repair/replace as a flapper seal, please let me know. Thanks and hope this help Cory.
Looking through the cowl inside it here's a picture that shows where air is sucked from the outside.
Again this shot is looking into the cowl:
From the inside of the truck with the blower/motor off you can see the flapper it leaks out because of the foam that seals the flap deteriorates like mine is.
Here's a picture of the flapper looking straight up and you can see the opening as the one from the prior picture.
I would like to figure out what to use to replace the foam, but I haven''t so far myself. I have purchased some weather stripping that seal windows and doors to replace the seals around the evaporator coil box, etc... Kind of helps seal the air from leaking around the box and only into the vents. I would really like to find something to replace the foam seal at the flapper to seal out the outside air and increase the air blowing, keep the air cooler by keeping out warmer air and keeping out the exhaust from the cars in front of you. Terry if you got an answer as what to use to repair/replace as a flapper seal, please let me know. Thanks and hope this help Cory.
Hello Cory... The flapper that junk is showing is where it determines where the air comes from. What is left on his flapper is what used to be a foam like material. Most likely on yours and the rest of ours, is that if you touch it, it will literally turn into dust. It is so dried and worn. To keep it from disintegrating further, I just scrub it off so as it wont get into the ventilation system. There is now way of saving it or reusing it. I have one setting on the shelf and can get you a better picture of it when I get home tomorrow.
I seen a thin rubber material that is sticky on one side and rubbery on the other. Just got to find where it is sold at.
The round pipe that junk is showing is under the cowl on the passenger side. I remember you cleaning all of the debi out of your cowl, it is what I call the stovepipe. It goes straight down to the flapper. The pipe itself doesnt go to the flapper but is where all of the debri gets down into the blower motor and ventilation system. Once it goes over that pipe, it gets everywhere.
08-20-2013, 12:33 AM
#1423
Super Moderator
Staff
Thread Starter
iTrader: (1)
Join Date: Aug 2008
Location: Anderson Missouri
Posts: 11,788
Likes: 0
Received 25 Likes
on
22 Posts
Thanks cyberhorn...That is what similar to what I have been thinking of. I dont know how to do a quote when the thread goes from one page to another.
08-20-2013, 12:39 AM
#1424
Super Moderator
Staff
Thread Starter
iTrader: (1)
Join Date: Aug 2008
Location: Anderson Missouri
Posts: 11,788
Likes: 0
Received 25 Likes
on
22 Posts
Just as a follow up to the cowl that junk is showing. On the far side of the cowl, where the fenders lay on top of the cowl, there is some drain holes. When debri gets washed out of the cowl, it will travel down to behind the mudflap and just sits there between the fender and cab floor and just causes rot. About once a year, I unbolt my mudflaps and am able to pull the plastic inner fender forward and get all of the debri out to prevent rust. I just did this on my 85 yesterday on the passenger side and should of gotten some pictures. I will see what the drivers side looks like and will try to get some pictures of it.
08-20-2013, 12:51 AM
#1425
Super Moderator
Staff
Thread Starter
iTrader: (1)
Join Date: Aug 2008
Location: Anderson Missouri
Posts: 11,788
Likes: 0
Received 25 Likes
on
22 Posts
Just posting this thread for future reference.>>>> https://www.yotatech.com/forums/f116/low-rough-idle-after-warm-start-22re-217438/
08-20-2013, 10:33 AM
#1426
Registered User
Re; the foam for the cowl, how thick does it have to be? Computer mouse pads are made from it and they are about 1/2" thick. Cheap and easy to get if they'd work.
08-21-2013, 06:02 AM
#1428
Registered User
Thanks for the post junk4u. I'm going to take a look at my flapper, I'm guessing same as all of you my foam is probably gone. The reason I am looking into this is that my AC is working, but just not as cold in the car as I would like. I think sealing up the cab and insulating will go a long way to helping the AC as much as possible.
 08-27-2013, 12:11 PM
#1430
Super Moderator
Staff
Thread Starter
iTrader: (1)
Join Date: Aug 2008
Location: Anderson Missouri
Posts: 11,788
Likes: 0
Received 25 Likes
on
22 Posts
Hello Nervo... The foam in the vent assembly is roughly a 1/4 inch thick or smaller. I got a mouse pad, spray glue and a vent assembly and will give it a try tonite on my lunch break and see how it works if all goes as planned.
Hello Cyberhorn... I see you on late at nite. It will be real late if I get to post it up but I will try to get an early start on it if all goes well.
Hello Cory... I will look at my runner tonite and see if there is any other areas that it could leak at and see if it could be a problem area that you might miss.
Hello mtn man dan... Welcome to Yotatech and I get to be the first post. I seen your profile and see you have an 86 runner as well. Not sure of the condition of yours but these are some great little trucks. Most likely yours has been neglected just like the rest of ours has been out here in Yotaland but they are easy to work on. I some how have stumbled into about every problem there is on these trucks and post alot of info on my 88 Runner in the link below in my signature, on the first page is where I try to show alot of the fixes on these trucks. Always like seeing new trucks on here. Feel free to post a picture on my thread here. I still have a year or so to go to where I would like mine to be at, but have enjoyed seeing where it was and to where it is at now. Lately it has been alot more enjoyable as each thing I do has been making it that much more the truck I envisioned it to be. Some of it has turned out better then what I had hoped and some not quite as much, but still a good experience all the way around. Welcome to YT again.
08-27-2013, 12:22 PM
#1431
Hi Terry,
Sorry to be jumping in here, but your post just popped up on my phone as a new post. I used foam stripping and it worked fine. You can check out my posting on my thread.
https://www.yotatech.com/forums/f199...7/index18.html
Here's a direct link to the post it self as a single view:
https://www.yotatech.com/52111022-post353.html
This seems to be good so far the best part was it's self adhesive. I used 1/4" thick and 1/2" wide. You can get 1/4" thick by 1" wide which maybe better than the 1/2", but when you see the posting you will see that what I have seems to be sufficient. Just waiting on my can tap so I can try out the R152a in the system as a substitute for R22 and r134a.
08-27-2013, 12:44 PM
#1432
Super Moderator
Staff
Thread Starter
iTrader: (1)
Join Date: Aug 2008
Location: Anderson Missouri
Posts: 11,788
Likes: 0
Received 25 Likes
on
22 Posts
Things just are not going as planned. By 10 in the morning it is just too hot. I had plans of painting the 86 extra cab last week on my days off and about 30 minutes in the shop I was dripping wet. This week is hotter and more humid. So it isnt getting painted this week either. I took this time to take care of a few other things so that when it does cool off I can work on the trucks.
One thing that is getting moved up the list this winter is going to be to get my shop where I can use it more often. This being to hot or to cold is for the birds. I just need to work on getting it more insulated and some temperture controls in there.
I have my 85 truck that if all goes well just needs a few hours from starting it and the heat has just ran me off from even trying to get it started. Literally just add the fluids, distributor, battery, and if all of my components are working, it should in theory start, but the heat is just ruining it for me.
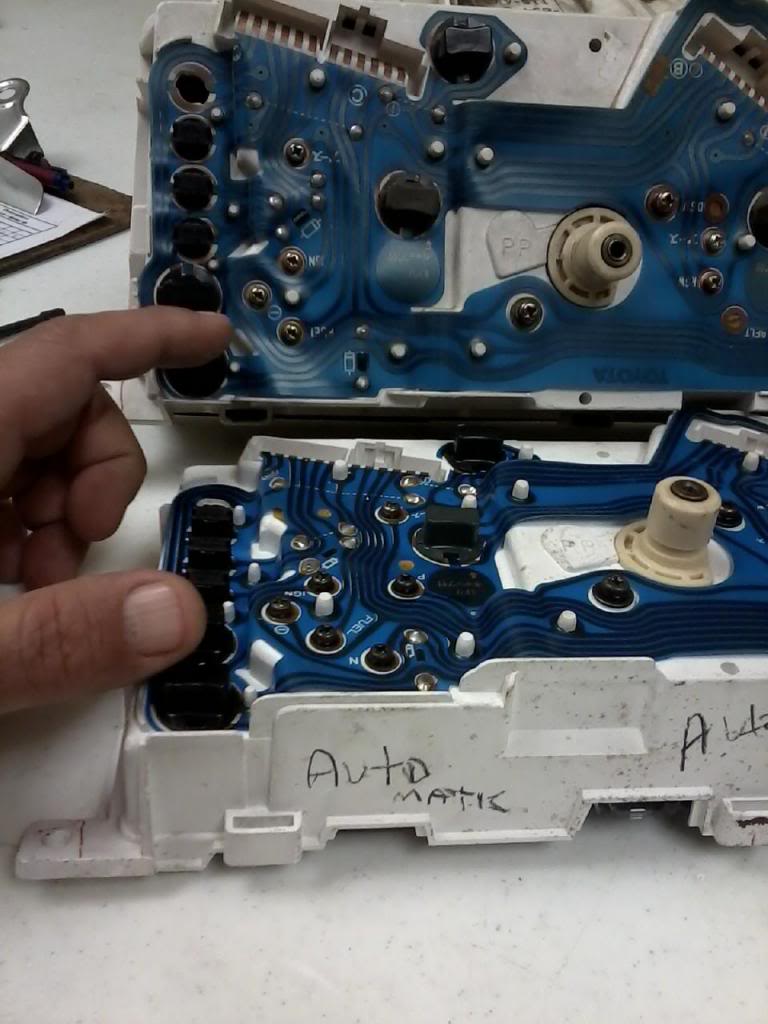
What I have been doing on my lunch break and to get something done is cleaning, painting parts,etc... One thing I thought I would try and do is to convert an SR5 guage that came in an automatic truck to a guage that could be used for a standard truck. This is one that I have for Toms 4runner that he wants to put into his runner that I will be working on at a later time. I am sure it would work for his runner but where the Amp guage is, there is an ECT guage. After taking it apart and following all of the electric leads, I dont feel it is possible. I have several more pictures that I am going to post later of the differences and other differences that I have found of the different styles. I will just edit this particular post.
I tried to take the Amp guage out of this bad cluster and put it in the automatic cluster. It wont work from my observations.
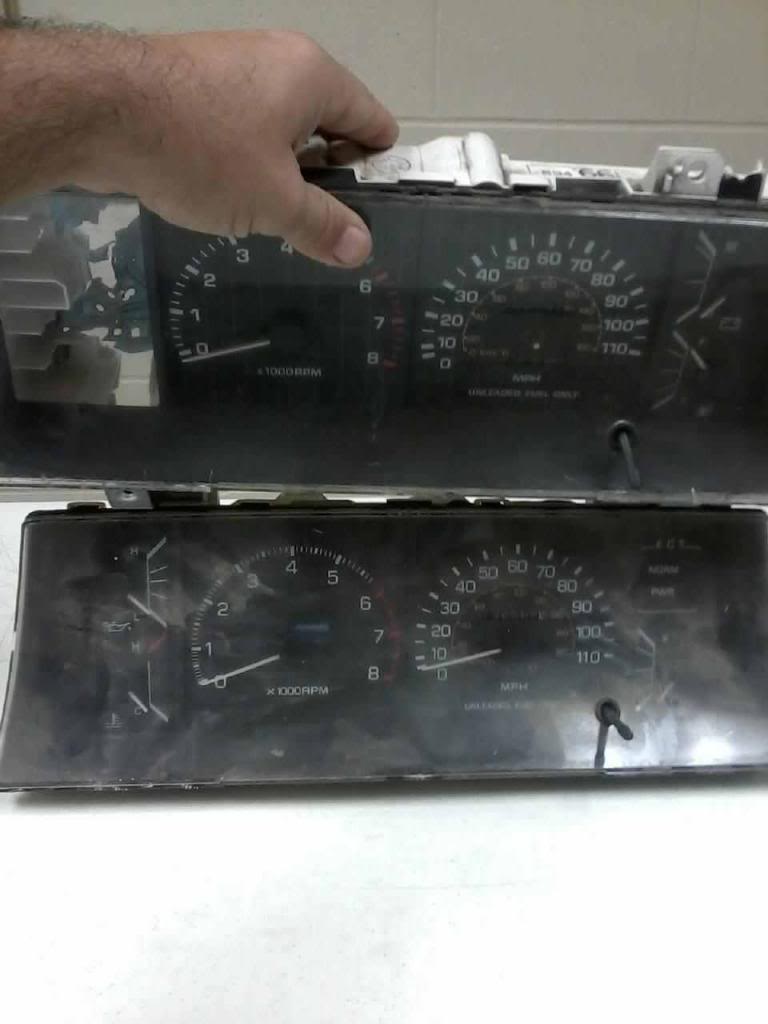
Some differences between the fuel guage and amp guage/ fuel guage and ECT guage. Left one is the ECT guage and is on top.

Number of screws and the blue electric leads sheet is different in sevral ways.
One thing that is getting moved up the list this winter is going to be to get my shop where I can use it more often. This being to hot or to cold is for the birds. I just need to work on getting it more insulated and some temperture controls in there.
I have my 85 truck that if all goes well just needs a few hours from starting it and the heat has just ran me off from even trying to get it started. Literally just add the fluids, distributor, battery, and if all of my components are working, it should in theory start, but the heat is just ruining it for me.
What I have been doing on my lunch break and to get something done is cleaning, painting parts,etc... One thing I thought I would try and do is to convert an SR5 guage that came in an automatic truck to a guage that could be used for a standard truck. This is one that I have for Toms 4runner that he wants to put into his runner that I will be working on at a later time. I am sure it would work for his runner but where the Amp guage is, there is an ECT guage. After taking it apart and following all of the electric leads, I dont feel it is possible. I have several more pictures that I am going to post later of the differences and other differences that I have found of the different styles. I will just edit this particular post.
I tried to take the Amp guage out of this bad cluster and put it in the automatic cluster. It wont work from my observations.

Some differences between the fuel guage and amp guage/ fuel guage and ECT guage. Left one is the ECT guage and is on top.

Number of screws and the blue electric leads sheet is different in sevral ways.

Last edited by Terrys87; 08-27-2013 at 01:06 PM.
08-27-2013, 01:02 PM
#1433
Super Moderator
Staff
Thread Starter
iTrader: (1)
Join Date: Aug 2008
Location: Anderson Missouri
Posts: 11,788
Likes: 0
Received 25 Likes
on
22 Posts
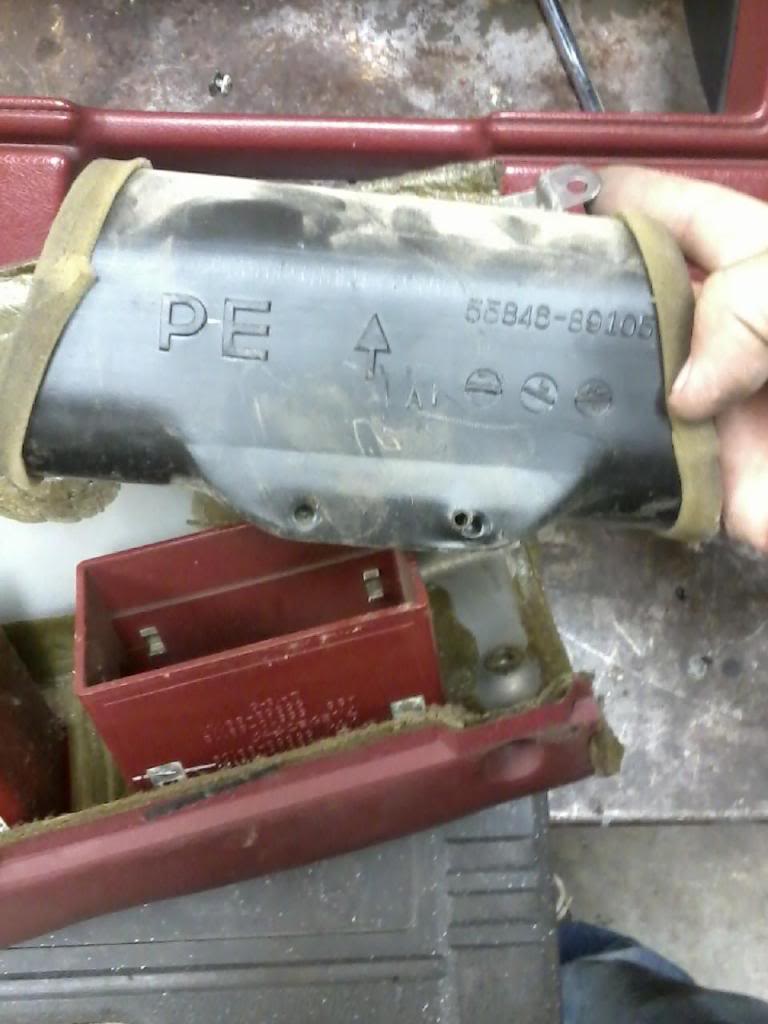
Cory.. Is the PE pipe in place in your truck? It is about a 4 inch long pipe, just behind the glove box. I have seen those missing in the past. Also another one that usually doesnt get put back in is the one just under the steering column.
A quick refernece for me to Removing the dash pad assembly.>>>https://www.yotatech.com/forums/f199...l#post51778558
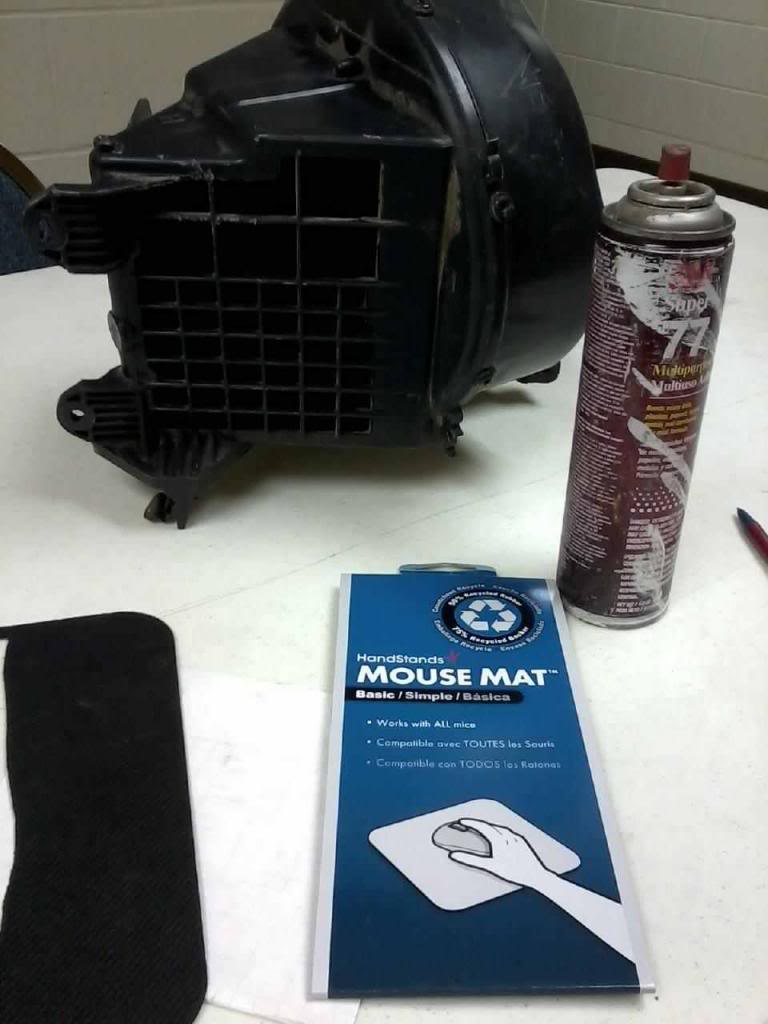
I went and pulled a spare ventilation assembly out of the shed. The flapper that goes over the heater core is supposed to have foam on it on both sides and it is possible place for air to leak.

This is the flap that directs air to the double vents in the center of the dashpad and uses the same foam as the other two vents. I forget which way the flap goes to direct it to the vents so will look at it see if it is a possible area. The same foam that is used above the blower is the same here as well. This foam turned to dust that is in my hand. One concern I have is that the mouse pad is going to be to thick at the pivot point, but will see if I can make it work. It is a start.

A quick refernece for me to Removing the dash pad assembly.>>>https://www.yotatech.com/forums/f199...l#post51778558
I went and pulled a spare ventilation assembly out of the shed. The flapper that goes over the heater core is supposed to have foam on it on both sides and it is possible place for air to leak.

This is the flap that directs air to the double vents in the center of the dashpad and uses the same foam as the other two vents. I forget which way the flap goes to direct it to the vents so will look at it see if it is a possible area. The same foam that is used above the blower is the same here as well. This foam turned to dust that is in my hand. One concern I have is that the mouse pad is going to be to thick at the pivot point, but will see if I can make it work. It is a start.
 08-27-2013, 01:23 PM
#1435
Super Moderator
Staff
Thread Starter
iTrader: (1)
Join Date: Aug 2008
Location: Anderson Missouri
Posts: 11,788
Likes: 0
Received 25 Likes
on
22 Posts
Hello junk4u.. That does look like it will seal up well. Just the edges is all that really needs it. Looks like you did a great job on that. I already bought the stuff so will see what I can find out as well and see if the other vents could cause some problems.
I also seen where you found alot of leaves in the blower. I try to point out how bad the ventilation systems get. They get baddd!!! Seen you used an air hose to blow alot of the debri out. I suggest removing your front mudflaps and pull the inner fender plastic forward a little bit to get the trash out of there as well.
One thing my mouse friend taught me after he destroyed my truck was how to get all of the ventilation system cleaned. But I have seen well taken care of trucks in as bad a shape as mine was, minus the little reminders of where his bathroom was. I cleaned or replaced alot of the vent pipes and now I have a really fresh smelling truck. I used bleach water for the interior and pipes and such and am no longer worried about health hazards in mine.
08-27-2013, 01:50 PM
#1436
Registered User
terry wouldnt you want the entire door covered to help insulate it?not just the edges?
from looking at the pictures junk posted id have to say 3/8 or 1/4 thick closed cell foam sheet would work great glued onto the door i
from looking at the pictures junk posted id have to say 3/8 or 1/4 thick closed cell foam sheet would work great glued onto the door i
08-27-2013, 03:48 PM
#1437
Registered User
Another material for padding that is 1/4" thick is "Fun Foam." I have a couple of sheets in black for dash work. It is adhesive on one side and you can buy it by the 8"x11" sheet at Michael's Crafts for 89 cents each. It's in the kids craft area.
https://encrypted-tbn1.gstatic.com/i...TltjUAgOL5GosE
https://encrypted-tbn1.gstatic.com/i...TltjUAgOL5GosE
Last edited by Nervo19; 08-27-2013 at 03:58 PM.
08-27-2013, 04:10 PM
#1438
Hey Cyberhorn, I agree with you, but I couldn't find a good material that would last a while for this job. The transfer of heat or cold can make a slight difference in temperature. I checked a few places here including 2 hobby shops and none had a good product. I figured I'd use this temporary till a product would show up. I talked to an HVAC shop and all they had was either to small or to think. I will keep looking for a good product to seal and insulate those flappers especially the heater core flapper which would transfer the most heat and post it if I do find one. I still have my 86 4Runner to work on including the AC which is a complete over haul including the heating core which leaked so that would need replacing if there is a hole in the core.
Last edited by junk4u; 08-27-2013 at 04:12 PM.
08-27-2013, 04:27 PM
#1439
Registered User
Hey Cyberhorn, I agree with you, but I couldn't find a good material that would last a while for this job. The transfer of heat or cold can make a slight difference in temperature. I checked a few places here including 2 hobby shops and none had a good product. I figured I'd use this temporary till a product would show up. I talked to an HVAC shop and all they had was either to small or to think. I will keep looking for a good product to seal and insulate those flappers especially the heater core flapper which would transfer the most heat and post it if I do find one. I still have my 86 4Runner to work on including the AC which is a complete over haul including the heating core which leaked so that would need replacing if there is a hole in the core.
http://www.ebay.com/itm/CCNS-Rubber-Neoprene-sponge-pad-mat-sheet-strip-1-4-self-adhesive-closed-cell-/290911139935?pt=LH_DefaultDomain_0&hash=item43bba7b85f
08-28-2013, 01:07 AM
#1440
Super Moderator
Staff
Thread Starter
iTrader: (1)
Join Date: Aug 2008
Location: Anderson Missouri
Posts: 11,788
Likes: 0
Received 25 Likes
on
22 Posts
I tried what Nervo suggested using a mouse pad and am very pleased with how it sealed up where the flapper rest against the plastic area. Great suggestion Nervo19, Thanks!!! I am sure there are several other materials that would work but I just grabbed a mouse pad (ok the wife did, not me,lol, I think she got it at Dollar General,), it is the thinnest pad they got.
I used a sheet of paper to get a rough outline of it and then traced it to the mouse pad and then started trimming the mouse pad with finer cuts until I was happy with the fit. I used 3M spray and would NOT suggest using it to permantly mount the pad to the flapper. The pad is too pourous for the pad to stick to the flapper. The 3m spray did work well for test fitting it to both sides of the flapper so it was great for that. Once you get one side cut to fit, you could trace the first mouse pad piece to another mouse pad and make that a much quicker fix.
I was unable to remove the flapper from the blower box and will post pics below for further illustration. I could not get the box to seperate at all or even getting the flapper to come out of the box even after the screws were out. With the flapper in the box, I was still able to get the pad to fix within about 30 minutes. I would suggest pulling the entire box assembly out to do this fix but it might be possible to do it with it in the truck.
It has been awhile since I have pulled the entire assembly out of a truck, but I dont recall it really being to difficult if my senile mind remembers right
Use a different glue then what I have posted in the picture. NOT 3M.
I tried to remove two screws to seperate this assembly and was unable to. The hole that I have the screwdriver going thru holds a resistor that should be in this picture. I have used the resistor out of this assembly to fix another truck. When working on this assembly, be very careful with the resistor that should be here. You will see it when you have yours out. It looks like a large spring, similar to what you might find to your brake or clutch return spring. This resistor has gotten hot and cold so many times that it is very BRITTLE. It will work for a very long time as it is, but just be gentle with it.
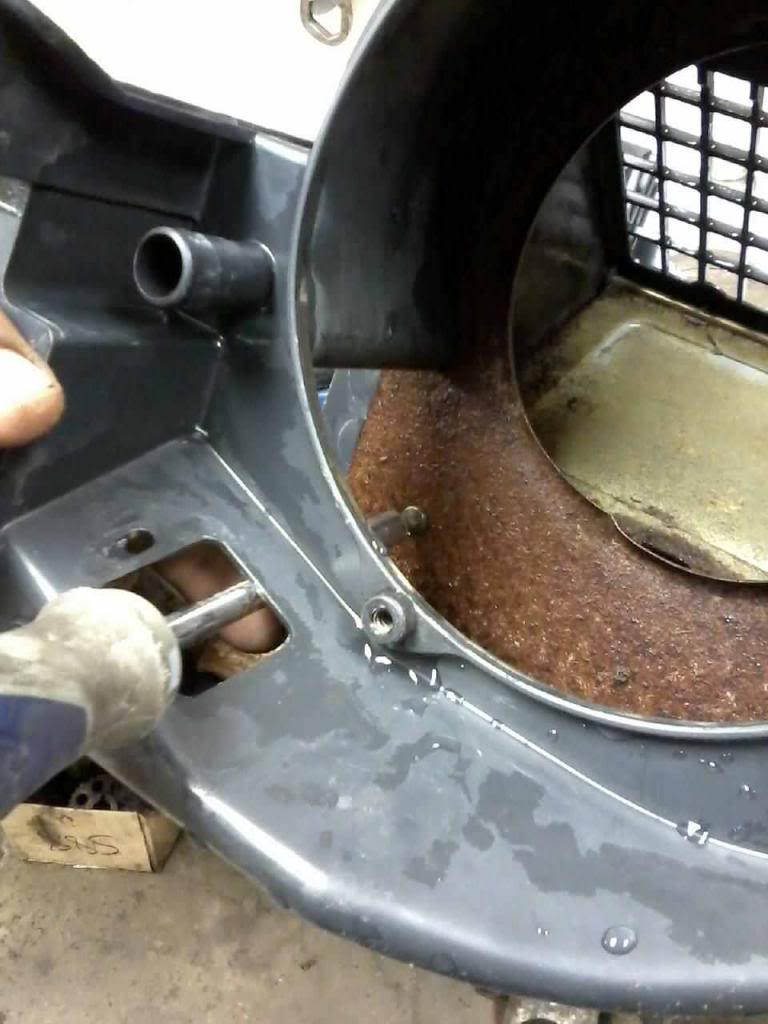
Even with these two screws removed that hold the flapper to the bar that it attaches to, I was unable to get the flapper out to put the padding on. It was a waste of time for me to remove the screws and try and get it out but now I know and it wasnt much more difficult to work on an outline/pattern.
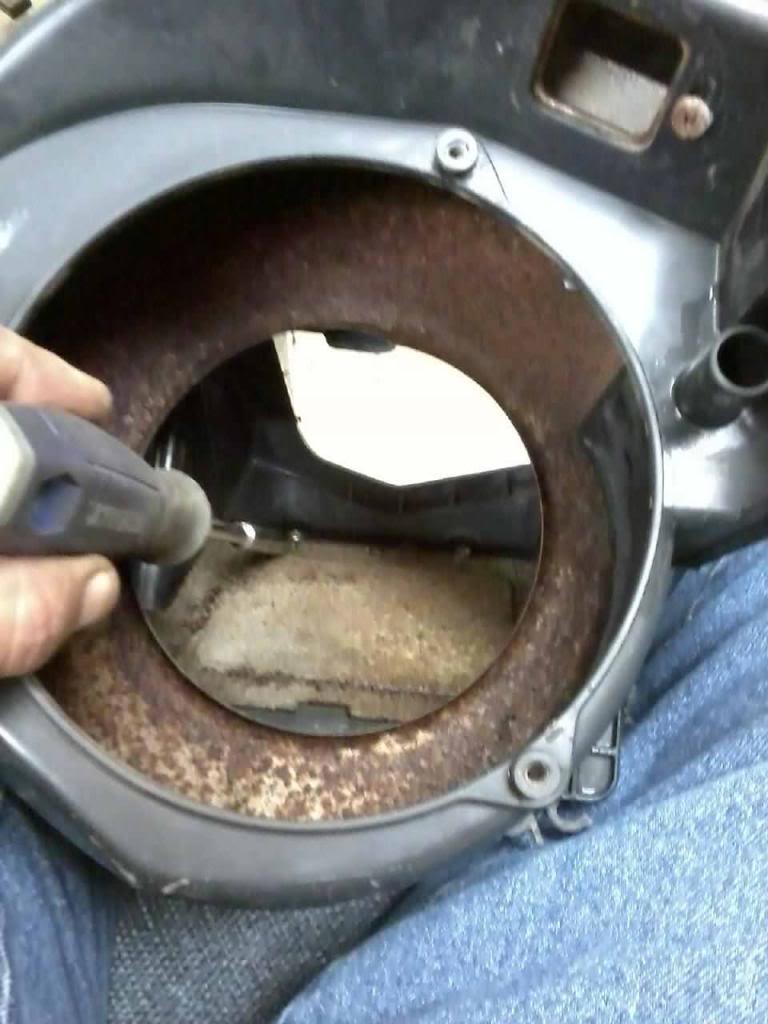
Here is where I was using a sheet of paper to get it roughly to the size I needed to trace to the mouse pad. I started a little large and trimmed it in small strips til it fit and tested perfectly. I will find a stronger glue when I go and seal the actual blower assemblies that is in my runners. I did what was mentioned about using a flashlight to look for leaks. Was really happy how this turned out and feel it will seal up any leaks and get rid of the dust that the orginal foam leaves behind. A great suggestion from all of you guys. Thanks!!!

I used a sheet of paper to get a rough outline of it and then traced it to the mouse pad and then started trimming the mouse pad with finer cuts until I was happy with the fit. I used 3M spray and would NOT suggest using it to permantly mount the pad to the flapper. The pad is too pourous for the pad to stick to the flapper. The 3m spray did work well for test fitting it to both sides of the flapper so it was great for that. Once you get one side cut to fit, you could trace the first mouse pad piece to another mouse pad and make that a much quicker fix.
I was unable to remove the flapper from the blower box and will post pics below for further illustration. I could not get the box to seperate at all or even getting the flapper to come out of the box even after the screws were out. With the flapper in the box, I was still able to get the pad to fix within about 30 minutes. I would suggest pulling the entire box assembly out to do this fix but it might be possible to do it with it in the truck.
It has been awhile since I have pulled the entire assembly out of a truck, but I dont recall it really being to difficult if my senile mind remembers right
Use a different glue then what I have posted in the picture. NOT 3M.

I tried to remove two screws to seperate this assembly and was unable to. The hole that I have the screwdriver going thru holds a resistor that should be in this picture. I have used the resistor out of this assembly to fix another truck. When working on this assembly, be very careful with the resistor that should be here. You will see it when you have yours out. It looks like a large spring, similar to what you might find to your brake or clutch return spring. This resistor has gotten hot and cold so many times that it is very BRITTLE. It will work for a very long time as it is, but just be gentle with it.

Even with these two screws removed that hold the flapper to the bar that it attaches to, I was unable to get the flapper out to put the padding on. It was a waste of time for me to remove the screws and try and get it out but now I know and it wasnt much more difficult to work on an outline/pattern.

Here is where I was using a sheet of paper to get it roughly to the size I needed to trace to the mouse pad. I started a little large and trimmed it in small strips til it fit and tested perfectly. I will find a stronger glue when I go and seal the actual blower assemblies that is in my runners. I did what was mentioned about using a flashlight to look for leaks. Was really happy how this turned out and feel it will seal up any leaks and get rid of the dust that the orginal foam leaves behind. A great suggestion from all of you guys. Thanks!!!

Last edited by Terrys87; 07-14-2014 at 02:21 PM.


