
Terrys87 86 4Runner with a 2nd Chance
 07-08-2013, 12:16 AM
#1281
Super Moderator
Staff
Thread Starter
iTrader: (1)
Join Date: Aug 2008
Location: Anderson Missouri
Posts: 11,788
Likes: 0
Received 25 Likes
on
22 Posts
Hello cyberhorn...I have been going thru the book seeing if anything I have missed. Got a few ideas that I am going to look at.
Hello Mark...The multimeter is coming out and going to get put to good use. I am scratching my head as well and am getting concerned about what is the problem now. When the problem first happend I wasnt to concerned.
Hello Mark...The multimeter is coming out and going to get put to good use. I am scratching my head as well and am getting concerned about what is the problem now. When the problem first happend I wasnt to concerned.
Last edited by Terrys87; 07-08-2013 at 12:27 AM.
 07-08-2013, 12:21 AM
#1282
Super Moderator
Staff
Thread Starter
iTrader: (1)
Join Date: Aug 2008
Location: Anderson Missouri
Posts: 11,788
Likes: 0
Received 25 Likes
on
22 Posts
I am reposting some of this stuff to help another guy that is having a similar problem and to add to my possible fix page.
Things I want to check that I havent just yet.
Pinch off the Fuel Return line......................... No real test in book.
Ohm out my Main Relay................................
Possibly start condering the ECU...................
Run resistance check on wire to injectors...... Not likely that they are bad.
Could not find a test for Fuel Dampner............
Ohm out all fuses........................................
Check for Voltage from the Main Fuse box.............Hadnt thought of that, Doh!!!
This is going to be my Fuel Injector notes page. The connections will pass a resistance check, but wont let voltage fire the injectors. Remove the clips and splice,solder,and shrink wrap wire connection. I then wrapped splice with electrical tape.
Good wiring diagram........... https://www.yotatech.com/forums/f115...e-help-178975/
Different Injectors.............https://www.yotatech.com/forums/f116...ectors-127606/
Correct Ground Locations.... https://www.yotatech.com/forums/f116...-guide-194413/
Pinout for ECU.... .............. http://media.photobucket.com/image/1...outdiagram.jpg
Add Ground to ECU by Trailgear.. Link I found on Trailgear no longer works. I just ran a ground wire from the external part of the case to a good ground on the body.
Redo wire connections.
Check all grounds........................................... .................................................. .........................Checked Grounds from above link.
Check wire harness ground on intake manifold.......................................... .......................................Checked Good
Check Solenoid Resistor. Haynes page 4-10 13.22a............................................ .............................Tested Good, supposed to have 2-3 Ohms, I have 3 Ohms.
Check EFI Main Relay Haynes page 4-9................................................. ........................................Tested Good Supposed to have 60-80, I have 71 Ohms.
Ohms for 86 Injectors are 1.5-3.0 all others are listed on Haynes page 4-2................................................. .....All tested 3 Ohms.
Run resistance checks on harness........................................... .................................................. ...Ran resistance test and passed, believe connections wont pass proper voltage.
#10 and #20 are apparently the ground pins on ECU. Hoping not have to go that far.
Here is something I found on Toyota Nation. Sounds alot like my problem.
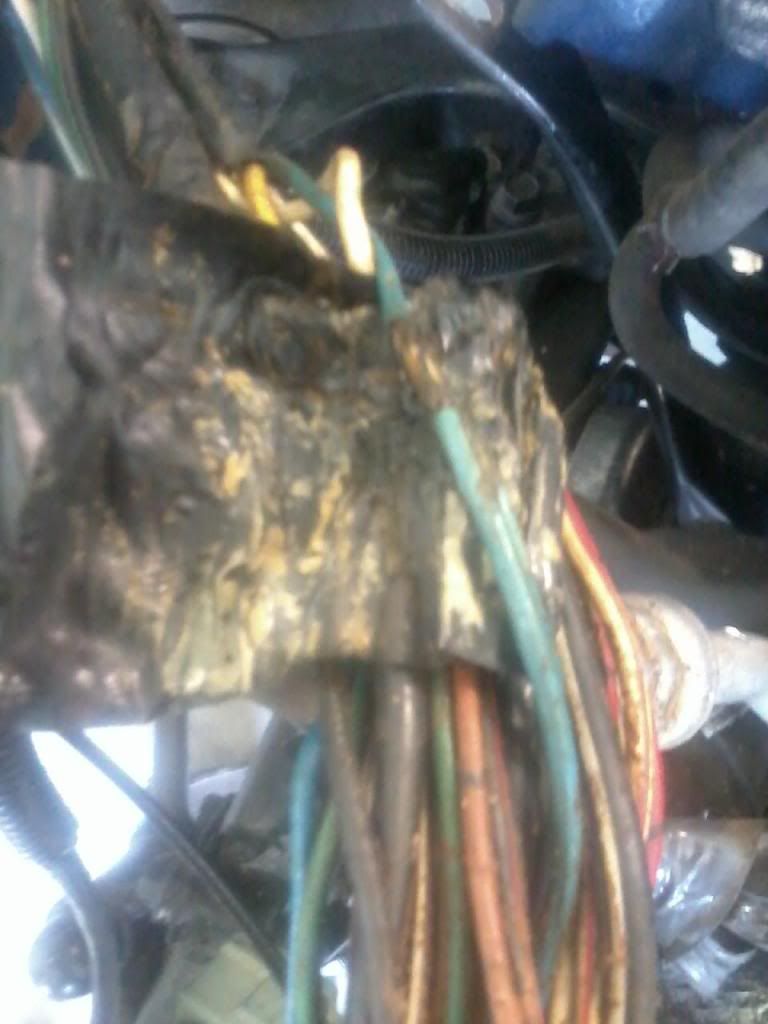
[quote]I found the problem!!! The ECU and Igniter are not component that fail very often, the problem is the wire. The main engine harness contains two wires from the ECU that are spliced and split into 4 wires at the injectors. For some reason Toyota decided to splice this circuit inside the largest portion of the wire bundle. The problem with this is that where the two wires (white with blue tracer, and white with red tracer) from the ECU are spliced with the four wires from the injectors(same colors as above), the insulation is removed exposing the copper conductor to potential corrosion and breakage. Upon inspection, these wires may appear to be fine, and may even ring out when tested with a continuity meter, but in my case, the corrosion had progressed beneath the wire insulation for 8-10 inches, and compromised the copper and it's ability to carry the pulse signal to ground through the ECU circuit.
The fix is to remove the tape and protective coating from the main harness between the intake manifold and the fuse box under the hood, you may notice green corrosion on the wires in question where the mechanical crimp splice is made. 10-12 inches of these wires may need to be removed and replaced with new copper conductors. Both sets of conductors from the injectors are common, so you'll need to figure out how to properly connect the two leads from the ECU to the 4 leads from the injectors. In my case I trimmed the wire back until I had good continuity to both ends, and soldered new leads on, encasing them in 3M scothcote electrical coating and heat shrink insulated tubing.
My 87 4Runner runs like a charm. I still can't believe Toyota engineered it that way, but this fix is much cheaper than replacing igniters and ECU's. Hope this helps anyone/everyone. [Quote}
Here is a problem. The crimp can look good but needs replaced.
Things I want to check that I havent just yet.
Pinch off the Fuel Return line......................... No real test in book.
Ohm out my Main Relay................................
Possibly start condering the ECU...................
Run resistance check on wire to injectors...... Not likely that they are bad.
Could not find a test for Fuel Dampner............
Ohm out all fuses........................................
Check for Voltage from the Main Fuse box.............Hadnt thought of that, Doh!!!
This is going to be my Fuel Injector notes page. The connections will pass a resistance check, but wont let voltage fire the injectors. Remove the clips and splice,solder,and shrink wrap wire connection. I then wrapped splice with electrical tape.
Good wiring diagram........... https://www.yotatech.com/forums/f115...e-help-178975/
Different Injectors.............https://www.yotatech.com/forums/f116...ectors-127606/
Correct Ground Locations.... https://www.yotatech.com/forums/f116...-guide-194413/
Pinout for ECU.... .............. http://media.photobucket.com/image/1...outdiagram.jpg
Add Ground to ECU by Trailgear.. Link I found on Trailgear no longer works. I just ran a ground wire from the external part of the case to a good ground on the body.
Redo wire connections.
Check all grounds........................................... .................................................. .........................Checked Grounds from above link.
Check wire harness ground on intake manifold.......................................... .......................................Checked Good
Check Solenoid Resistor. Haynes page 4-10 13.22a............................................ .............................Tested Good, supposed to have 2-3 Ohms, I have 3 Ohms.
Check EFI Main Relay Haynes page 4-9................................................. ........................................Tested Good Supposed to have 60-80, I have 71 Ohms.
Ohms for 86 Injectors are 1.5-3.0 all others are listed on Haynes page 4-2................................................. .....All tested 3 Ohms.
Run resistance checks on harness........................................... .................................................. ...Ran resistance test and passed, believe connections wont pass proper voltage.
#10 and #20 are apparently the ground pins on ECU. Hoping not have to go that far.
Here is something I found on Toyota Nation. Sounds alot like my problem.
[quote]I found the problem!!! The ECU and Igniter are not component that fail very often, the problem is the wire. The main engine harness contains two wires from the ECU that are spliced and split into 4 wires at the injectors. For some reason Toyota decided to splice this circuit inside the largest portion of the wire bundle. The problem with this is that where the two wires (white with blue tracer, and white with red tracer) from the ECU are spliced with the four wires from the injectors(same colors as above), the insulation is removed exposing the copper conductor to potential corrosion and breakage. Upon inspection, these wires may appear to be fine, and may even ring out when tested with a continuity meter, but in my case, the corrosion had progressed beneath the wire insulation for 8-10 inches, and compromised the copper and it's ability to carry the pulse signal to ground through the ECU circuit.
The fix is to remove the tape and protective coating from the main harness between the intake manifold and the fuse box under the hood, you may notice green corrosion on the wires in question where the mechanical crimp splice is made. 10-12 inches of these wires may need to be removed and replaced with new copper conductors. Both sets of conductors from the injectors are common, so you'll need to figure out how to properly connect the two leads from the ECU to the 4 leads from the injectors. In my case I trimmed the wire back until I had good continuity to both ends, and soldered new leads on, encasing them in 3M scothcote electrical coating and heat shrink insulated tubing.
My 87 4Runner runs like a charm. I still can't believe Toyota engineered it that way, but this fix is much cheaper than replacing igniters and ECU's. Hope this helps anyone/everyone. [Quote}
Here is a problem. The crimp can look good but needs replaced.
Last edited by Terrys87; 07-08-2013 at 12:26 AM.
07-08-2013, 12:27 AM
#1283
Registered User
which youve done and i absolutely did while my motor was out
the harness will have to be unwrapped to the AC clutch pigtail on it to gain best access to the above crimp connectors theres also a ground in the harness that is also crimped i removed it an soldiered it as well
the clamping off the fuel return line was my own thought if the regulator is bypassing all pressure clamping it off an trying to start the engine if it starts an runs kinda confirms the regulator is bad not a thing to leave that way of course but to test an see if thats the problem
Last edited by Cyberhorn The Dragon; 07-08-2013 at 12:29 AM.
07-08-2013, 12:33 AM
#1284
Super Moderator
Staff
Thread Starter
iTrader: (1)
Join Date: Aug 2008
Location: Anderson Missouri
Posts: 11,788
Likes: 0
Received 25 Likes
on
22 Posts
Tomorrow I plan on doing some more bodywork on the 86 Extra Cab until it gets to hot inside the shop. I am hoping to get the bed off and start getting behind the cab and getting it wrapped up. Shouldnt be much longer til the paint gun comes out if all goes as planned this week.
When it gets to hot, I plan on doing some more checks on the runner and find out what else it could be that is holding down. As soon as the store opens up and I can talk them, I plan on ordering carpet for the runner. Will order from stockinteriors.com
Then I plan on calling Engblder and getting my pistons,rings and bearings on order for the 85. Hoping all goes well tomorrow and get something accomplished. Sometimes it goes slow and then other times it takes off.
07-08-2013, 12:38 AM
#1285
Super Moderator
Staff
Thread Starter
iTrader: (1)
Join Date: Aug 2008
Location: Anderson Missouri
Posts: 11,788
Likes: 0
Received 25 Likes
on
22 Posts
Hello Cyberhorn.. Even the manual says just to use a stethoscope to see if you can hear it operating and even says that it isnt going to prove it is operating correctly. I do see what you mean about not having any back pressure to cause the fuel to go out the injectors. That was a GREAT idea. Thanks!!!!
I removed all of the crimp connectors when I first installed the harness. There are about 10 more connectors under the dash that I removed as well. That is a poor design and then Toyota just wrapped them with electrical tape. Even that is not the greatest.
The power coming off of the fuse box is something I completely missed. Looked thru the books and havent really found any test to do on it. Basically just going to make sure I got some power coming off of it.
07-08-2013, 12:52 AM
#1286
Registered User
Hello Cyberhorn.. Even the manual says just to use a stethoscope to see if you can hear it operating and even says that it isnt going to prove it is operating correctly. I do see what you mean about not having any back pressure to cause the fuel to go out the injectors. That was a GREAT idea. Thanks!!!!
I removed all of the crimp connectors when I first installed the harness. There are about 10 more connectors under the dash that I removed as well. That is a poor design and then Toyota just wrapped them with electrical tape. Even that is not the greatest.
The power coming off of the fuse box is something I completely missed. Looked thru the books and havent really found any test to do on it. Basically just going to make sure I got some power coming off of it.
I removed all of the crimp connectors when I first installed the harness. There are about 10 more connectors under the dash that I removed as well. That is a poor design and then Toyota just wrapped them with electrical tape. Even that is not the greatest.
The power coming off of the fuse box is something I completely missed. Looked thru the books and havent really found any test to do on it. Basically just going to make sure I got some power coming off of it.
07-08-2013, 10:13 AM
#1287
07-08-2013, 10:17 AM
#1288
Super Moderator
Staff
Thread Starter
iTrader: (1)
Join Date: Aug 2008
Location: Anderson Missouri
Posts: 11,788
Likes: 0
Received 25 Likes
on
22 Posts
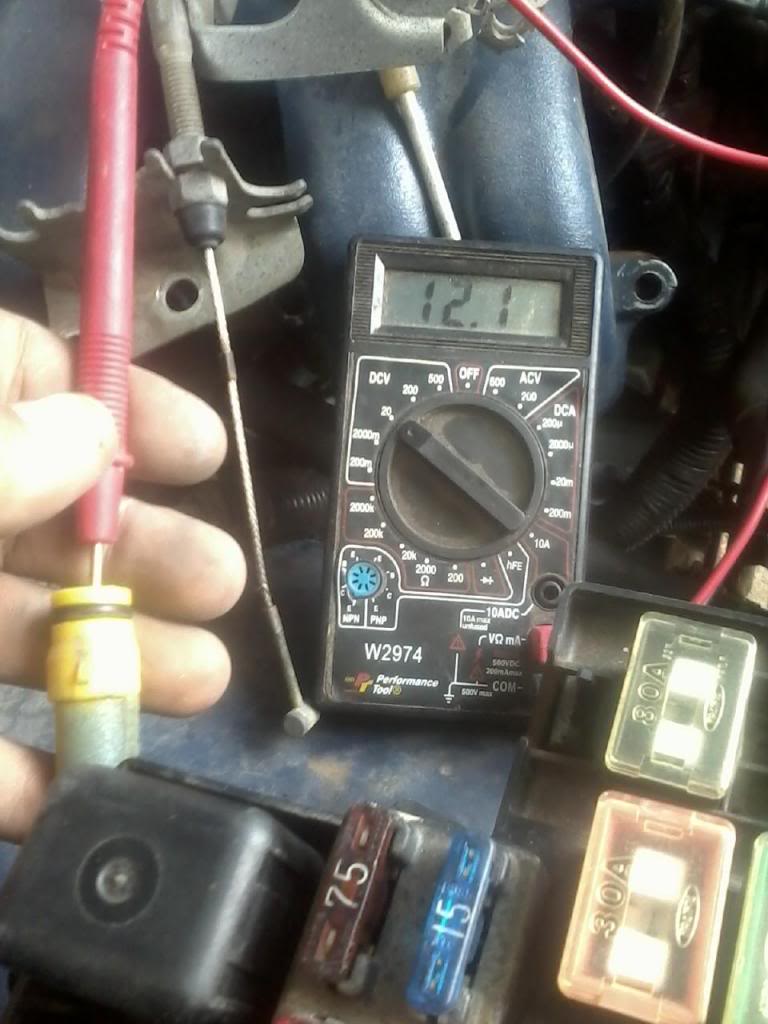
Still chugging along on my no start issue. I tested all fuses under the hood, even the 80 amp fuse, with a multi meter just to make sure I hadnt missed one by doing the visual check. I am still not sure where power is sent from the fuse box but it is 12 volts when the key is on and 0 volts when key is off.
I also checked my Main Relay and 2 others that I have as spares. All 3 checked in at 74 ohms. The tolerance is 60 +/- 20.
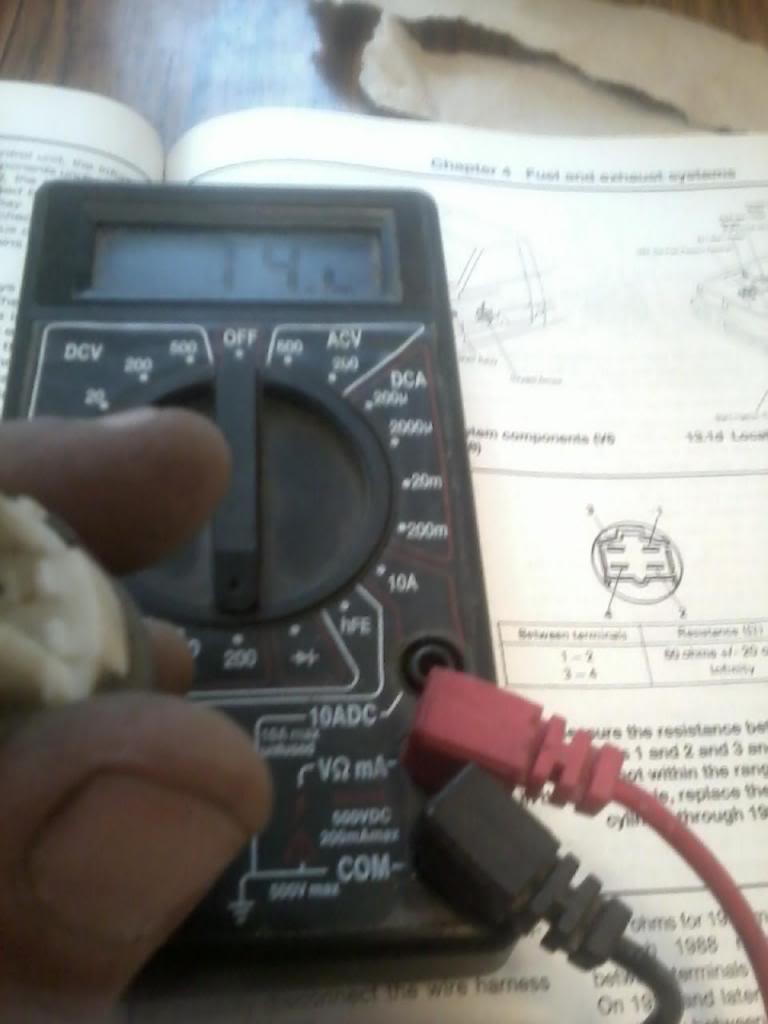

I also checked my Main Relay and 2 others that I have as spares. All 3 checked in at 74 ohms. The tolerance is 60 +/- 20.

Last edited by Terrys87; 07-08-2013 at 10:27 PM.
07-08-2013, 10:29 AM
#1289
Super Moderator
Staff
Thread Starter
iTrader: (1)
Join Date: Aug 2008
Location: Anderson Missouri
Posts: 11,788
Likes: 0
Received 25 Likes
on
22 Posts
Worked on the 86 Extra Cab as well. Got the bed pulled off and to show how bad the tanks can hold dirt and stones were inbetween the frame and metal gas lines.
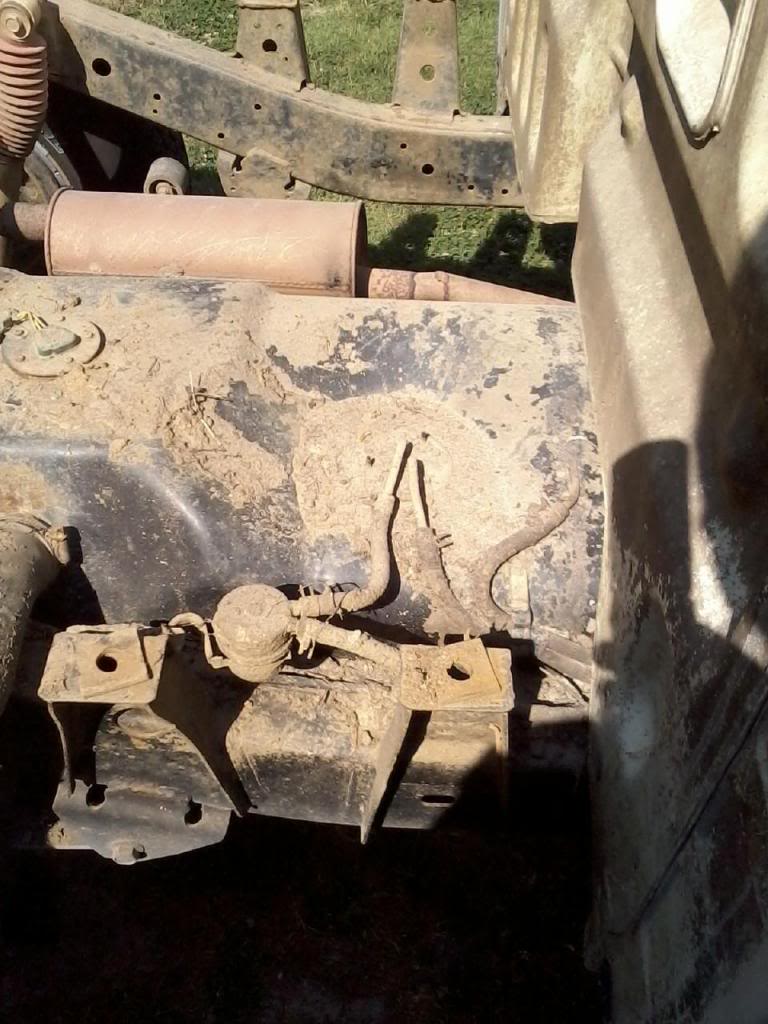
Took this picture for future reference. All carbed motors have this fuel filter by the tank, I think there is an exception and it was on the 82 model but could be wrong the 82 model. Also a reference for how the lines go. Seen this pop up on the main page awhile back and I didnt have a good pic.
Some dont know this filter is at the end of the pickup tube inside of the tank. I added this for future reference as well.
Copied...
Part number for a new intank filter is #77023-12050. On ebay it is called a TOYOTA FACTORY NIB FUEL FILTER SUCTION TUBE DIESEL. It was selling for $4.50 when I finally found it. I paid $15 at Toyota.

There is a drain hole inside the gas cap. This one is clogged. I unclogged it with a zip tie.

Have seen some bodyshops not pull the bed. I dont like seeing it done that way and gave the bed and back of the cab a good washing.
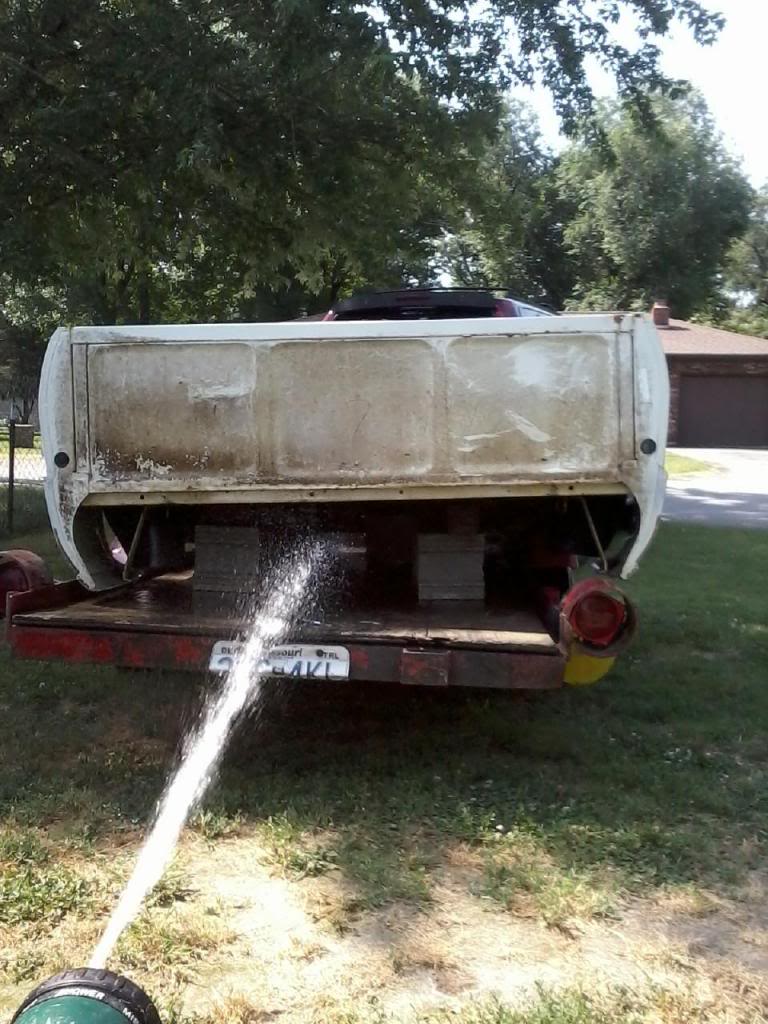
To remove the rear window, you work the seal down and push it out of the rear of the truck.

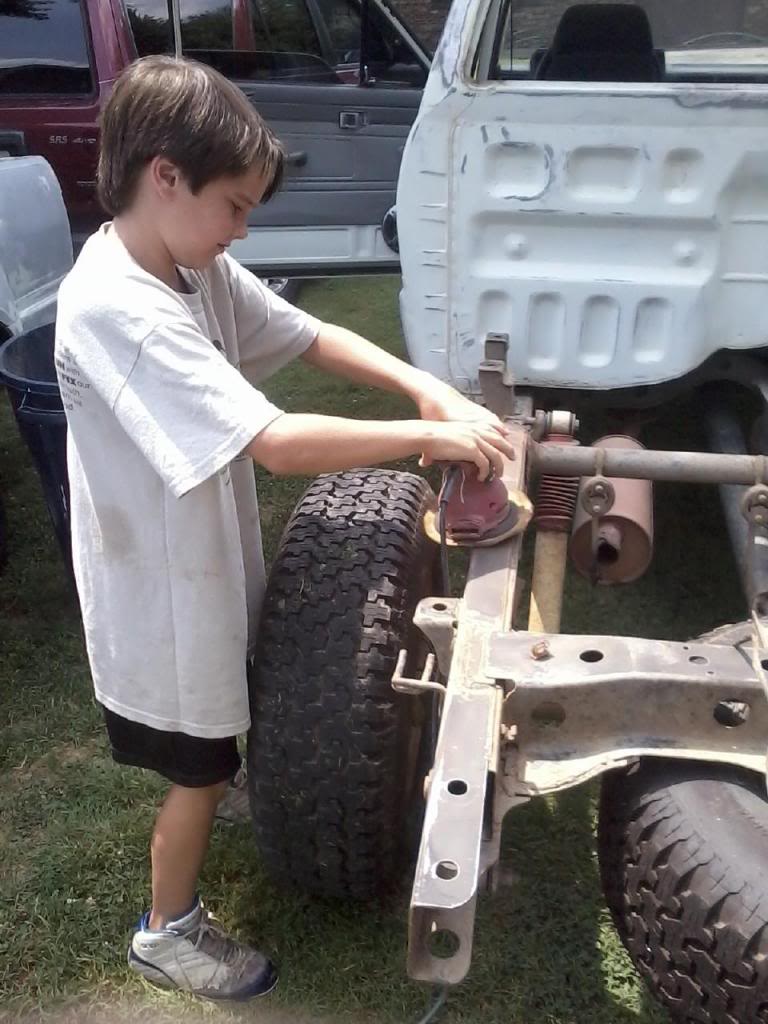
Had some help.

Letting the kids clean the frame. They cant do any damage on this and also a good way for them to learn how to use the tools. My dad thought child labor laws was a law to work my butt off. Their days are a coming.lol

Took this picture for future reference. All carbed motors have this fuel filter by the tank, I think there is an exception and it was on the 82 model but could be wrong the 82 model. Also a reference for how the lines go. Seen this pop up on the main page awhile back and I didnt have a good pic.

Some dont know this filter is at the end of the pickup tube inside of the tank. I added this for future reference as well.
Copied...
Part number for a new intank filter is #77023-12050. On ebay it is called a TOYOTA FACTORY NIB FUEL FILTER SUCTION TUBE DIESEL. It was selling for $4.50 when I finally found it. I paid $15 at Toyota.
There is a drain hole inside the gas cap. This one is clogged. I unclogged it with a zip tie.

Have seen some bodyshops not pull the bed. I dont like seeing it done that way and gave the bed and back of the cab a good washing.

To remove the rear window, you work the seal down and push it out of the rear of the truck.

Had some help.

Letting the kids clean the frame. They cant do any damage on this and also a good way for them to learn how to use the tools. My dad thought child labor laws was a law to work my butt off. Their days are a coming.lol

Last edited by Terrys87; 07-08-2013 at 10:37 AM.
07-08-2013, 10:38 AM
#1290
Woohoo kiddos! Haha. Man I always love seeing that... Nowadays with so many kids not wanting to touch anything but an iPhone digit... That makes me happy to see. Actually the younger they are you can usually still NAB them out of their iComa! Lol
07-08-2013, 10:49 AM
#1292
Super Moderator
Staff
Thread Starter
iTrader: (1)
Join Date: Aug 2008
Location: Anderson Missouri
Posts: 11,788
Likes: 0
Received 25 Likes
on
22 Posts
Hello Mark... The kiddos do help out alot and I spend alot of time with them. Wont be long and they will not want anything to do with mom and me and will have other intrest that will be hard to get their attention. I am trying as much as possible with them.
I have a few more things I want to check on the grimlin I have and if I dont get it, I will have to post a question on the main page. I have only had to get help from there and that was on a painting issue. If I have to ask a question on there, I want to give as much info as possible and not have to be told to go search. Dont really want to ask but I am runnign out of ideas.
I still want to see if the regulator is possibly not holding pressure and I cant find any way to test the Dampner. I still have the Plenum off and want to make sure I have all of my bases covered there before reassembling it.
Going to order my 85 motor parts and carpet for my runner. It may not run, but hopefully it will look good sitting still.lol
07-08-2013, 10:58 AM
#1293
Super Moderator
Staff
Thread Starter
iTrader: (1)
Join Date: Aug 2008
Location: Anderson Missouri
Posts: 11,788
Likes: 0
Received 25 Likes
on
22 Posts
Anybody with a gray interior, which would you say is most closest to your carpet. Thanks for your opinion, I am thinking the Dark Gray or the Medium Gray
LINK>>> http://www.stockinteriors.com/Carpet...&HideACC=False
LINK>>> http://www.stockinteriors.com/Carpet...&HideACC=False
Last edited by Terrys87; 07-08-2013 at 11:06 AM.
07-08-2013, 11:15 AM
#1294
Hey Terry, fairly certain of the damper being solely for the purpose of regulating the pressure to the rail somewhat. I can't say for sure but I would guess that if its having problems with basically get full pressure all the time just like with the regulator. But then reading what dragon said I'm not quite sure on the regulator either. I thought it basically went from full pressure 2 providing less pressure depending on the vacuum pressure on the rail. I guess that's why some of them had the fuel pressure regulator vacuum switching valve, to regulate the regulator? Lol. I know that it's more for hot soak on the vacuum switching valve. To this day I still don't understand that 100 percent and I know that roger has completely deleted it and ran without it for years. However I cannot see the vacuum switching valve causing a complete non start issue. I would assume they're designed so that when they blow they just no longer have any relationship with the fuel pressure regulator and innocence become passive. That's why when you breathe through the vacuum switching valve on certain tests, sometime providing voltage, there should be no air going through certain hoses.
07-08-2013, 12:15 PM
#1295
Registered User
the damper is removed by toyota on the later model 22re's as its redundant just un-needed they made a banjo bolt for that end of the rail from what ive read they were concerned the fuel pump kicking on an off might damage the injectors so the damper to ease the jolts
good on the kids for helping wish mine would more lol
wow at the dirt on the tank top almost a reason to get the top powdercoated or rhino lined
IMO the mist gray is close to my gray minus the stains an dirt lol
you could go darker for the longevity of the color as it fades over time

good on the kids for helping wish mine would more lol
wow at the dirt on the tank top almost a reason to get the top powdercoated or rhino lined
IMO the mist gray is close to my gray minus the stains an dirt lol
you could go darker for the longevity of the color as it fades over time
07-08-2013, 10:20 PM
#1296
Super Moderator
Staff
Thread Starter
iTrader: (1)
Join Date: Aug 2008
Location: Anderson Missouri
Posts: 11,788
Likes: 0
Received 25 Likes
on
22 Posts
Hello Mark...I was able to put a vacuum on the regulator and it would hold. Not sure how good of a test that is but it has to be a positive one. As far as the dampner, from what I have read it just smooths out surges. I think it is okay as well as that is where the fuel comes in and the regulator is where the fuel returns to the tank. So that tells me it is getting fuel thru the rail. I am not as understanding on how the vacuum switches fully operate as well.
Hello cyberhorn... I agree with you on the dampner. I think it is ok. I ordered the darker gray and will look up the code it was, I already forgot. That way I can have the fading factor to help keep it looking newer longer.lol
Hello cyberhorn... I agree with you on the dampner. I think it is ok. I ordered the darker gray and will look up the code it was, I already forgot. That way I can have the fading factor to help keep it looking newer longer.lol
07-08-2013, 10:40 PM
#1297
Super Moderator
Staff
Thread Starter
iTrader: (1)
Join Date: Aug 2008
Location: Anderson Missouri
Posts: 11,788
Likes: 0
Received 25 Likes
on
22 Posts
I am going to post all of my results so as to keep track of them here. Keep suggestions coming. I am studying what I can for more ideas.
Injectors looked clean. I cant see all 4 failing at once.
Swapped with spare AFM. Will run more test if suggested, but it will run on starting fluid.
Swapped coil and igniter. Will run more test if suggested but it will run on starting fluid. I feel the ignition is working.
Fuel pump is pumping. Also jumpered Fuel Pump and it would operate.
Changed Fuel Filter.
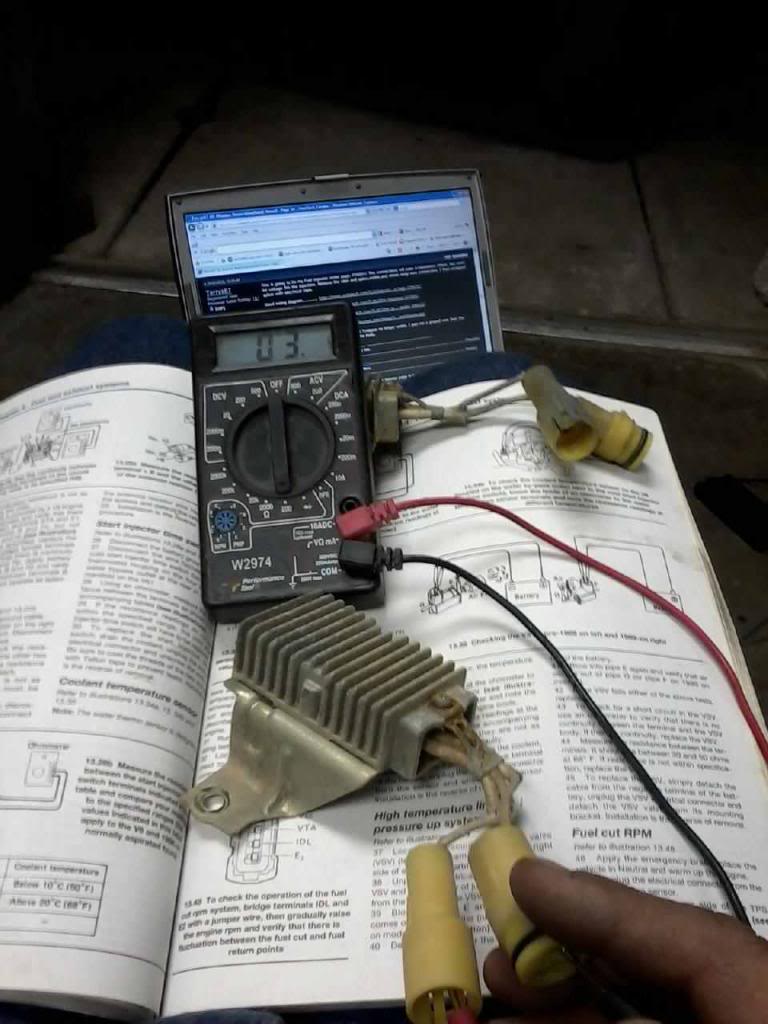
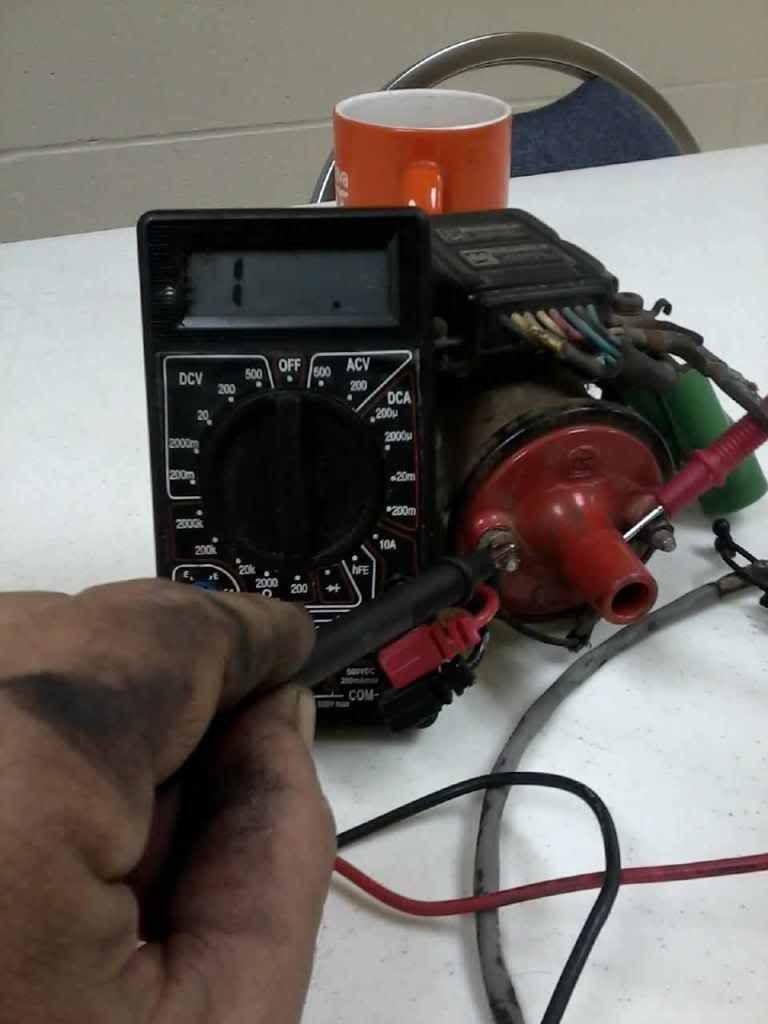
Ohmed out Main Relay. Mine you can hear and feel the relay operating. Ohmed out at 74, book has 60 +/_ 20. Two other relays had same results.
Visual and metered all fuses under hood. Will do kick panel later.
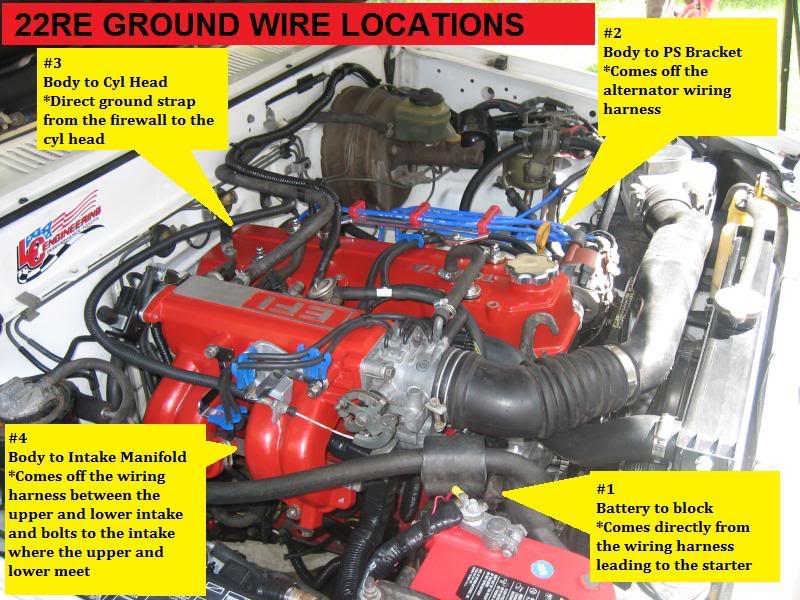
Have checked all grounds and they are good.
Checked Solenoid Resistor. Book says 2-3 Ohms, Mine was 3 Ohms same on another Solenoid Resistor. With key on I have 12 volts, key off I have 0 volts. I believe this is correct.
I trust my soldering and removed crimps in harness some time ago.
The Solenoid Resistor passed it test. So I will be giving some of the suggestions you guys have mentioned a try and also start looking into my fuel regulator and dampener. I have been looking at the Haynes and the FSM as well. I like having information from previous problems as a reference as to where to look in the manuals. That is my reference page in the back ground. It actuallys saves some time.
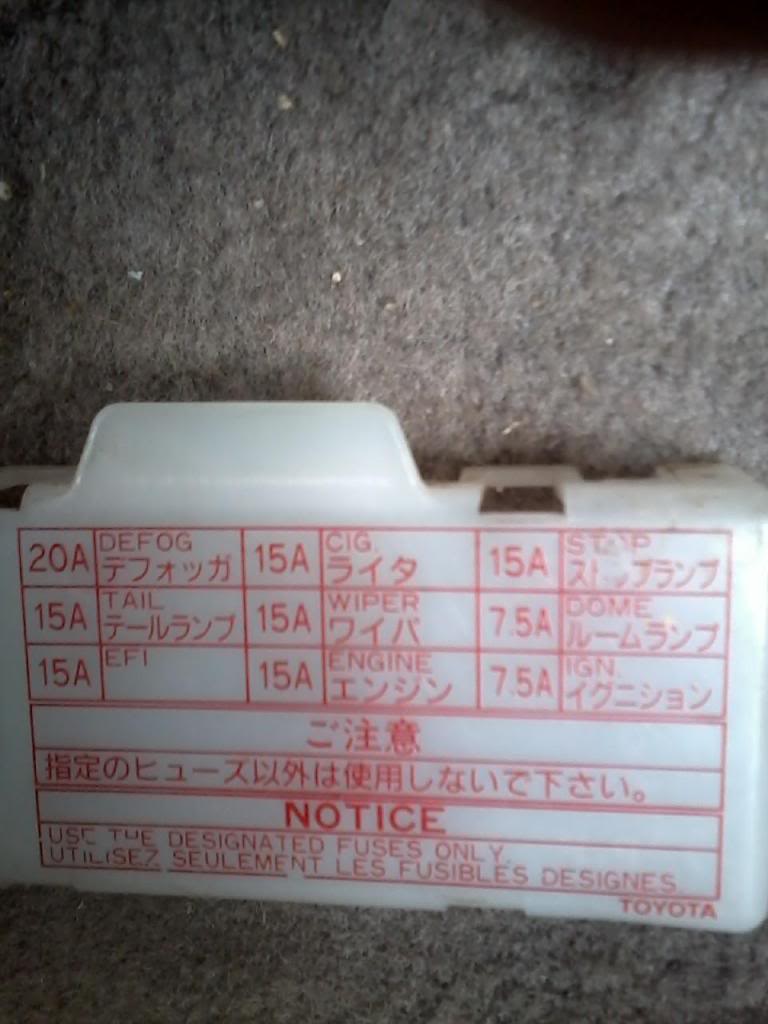
Check EFI Fuse
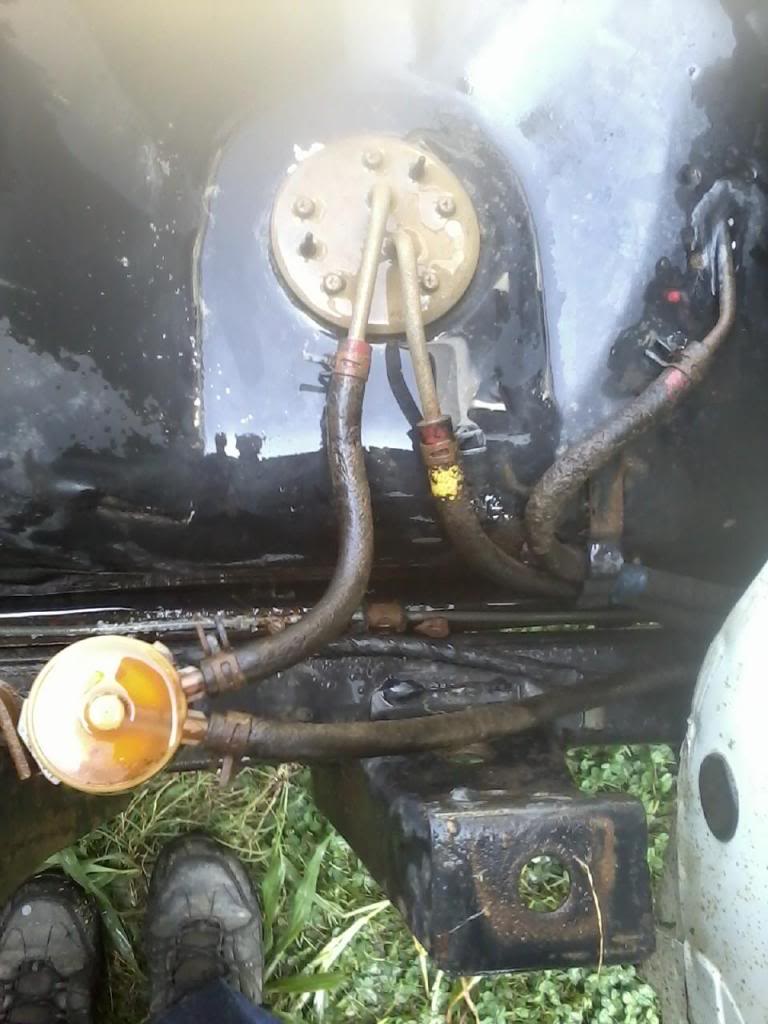
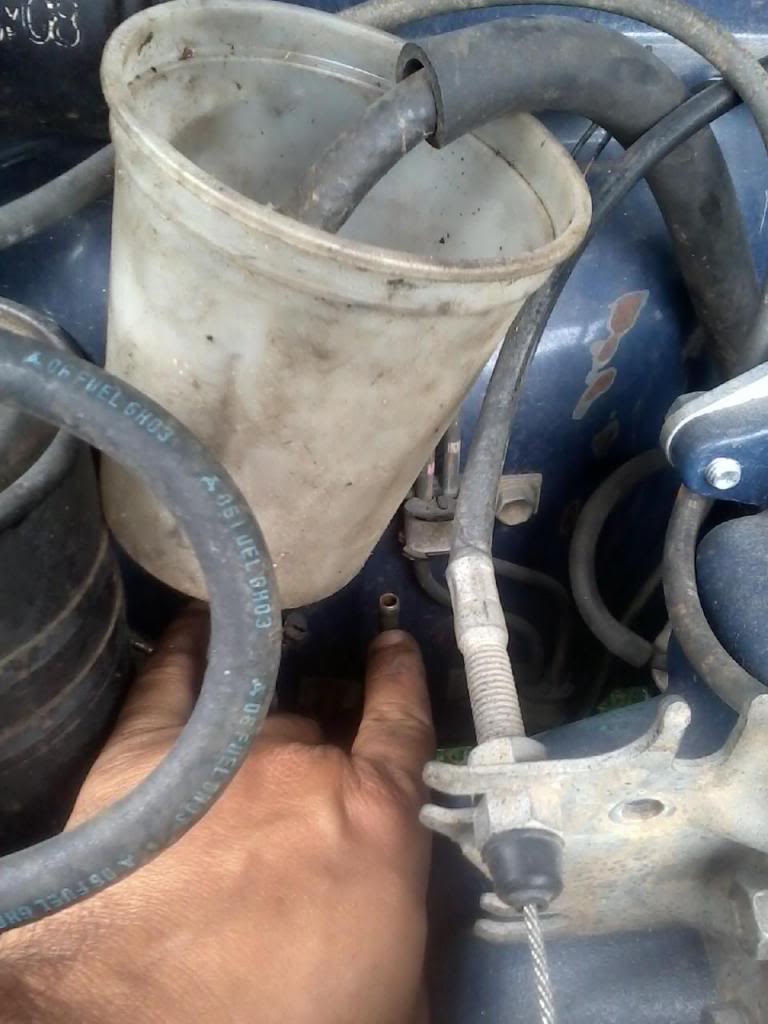
Here is how you do a Fuel Pump Bypass on the 85/86.
Jumper wire the Yellow Plug on Drivers side. ( Jumper wire should be in both contacts for testing, I just didnt have it in for picture purposes and mostly a referece for me at a later time.)

With the jumper wire in and the key turned on, I was able to fill the cup up in about a minute or so. The return hose goes to where my finger is pointing. This is the metal line that I suggest taking an air hose and seeing if it is clear all the way to the fuel pump bracket. I have seen this line and the "J" line on the bracket clogged several times.
Still chugging along on my no start issue.This comes off of the Fuse box and provides power to the Solenoid Resistor. I tested all fuses under the hood, even the 80 amp fuse, with a multi meter just to make sure I hadnt missed one by doing the visual check. I am still not sure where power is sent from the fuse box but it is 12 volts when the key is on and 0 volts when key is off.

I also checked my Main Relay and 2 others that I have as spares. All 3 checked in at 74 ohms. The tolerance is 60 +/- 20.

My $3 noid light. I wasnt able to find one anywhere and this worked great. It flickered each time I cranked it. I just couldnt get any pictures of it lighted.
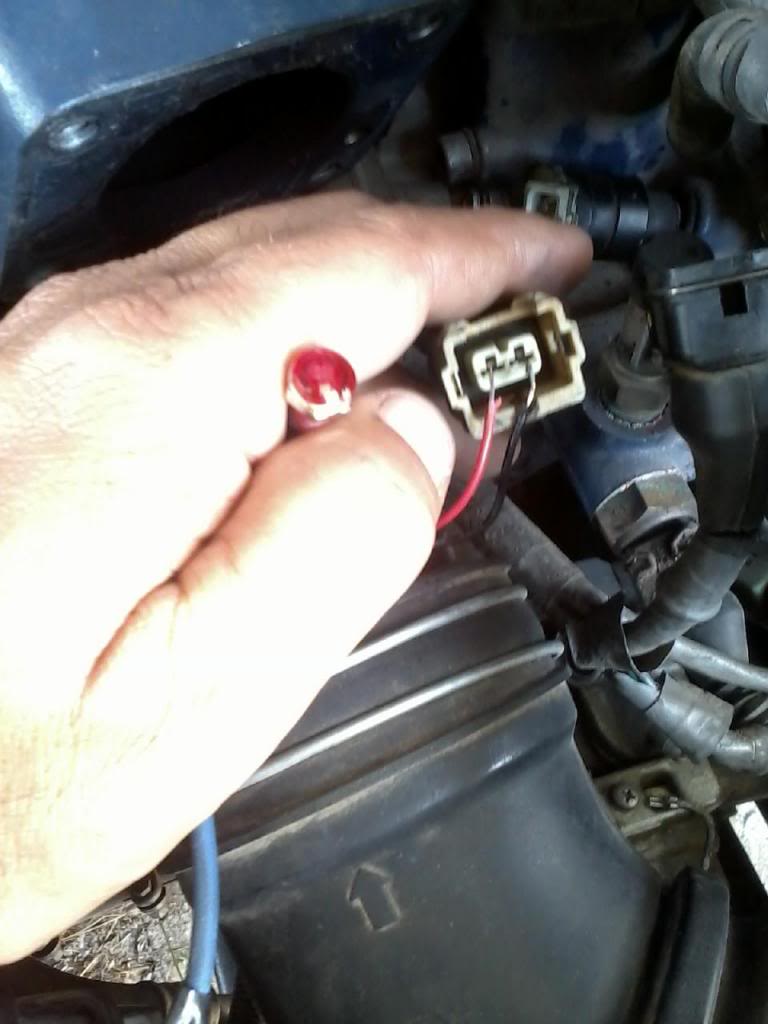
I used the 12 Volt red one. Radio Shack Part Number #276-0270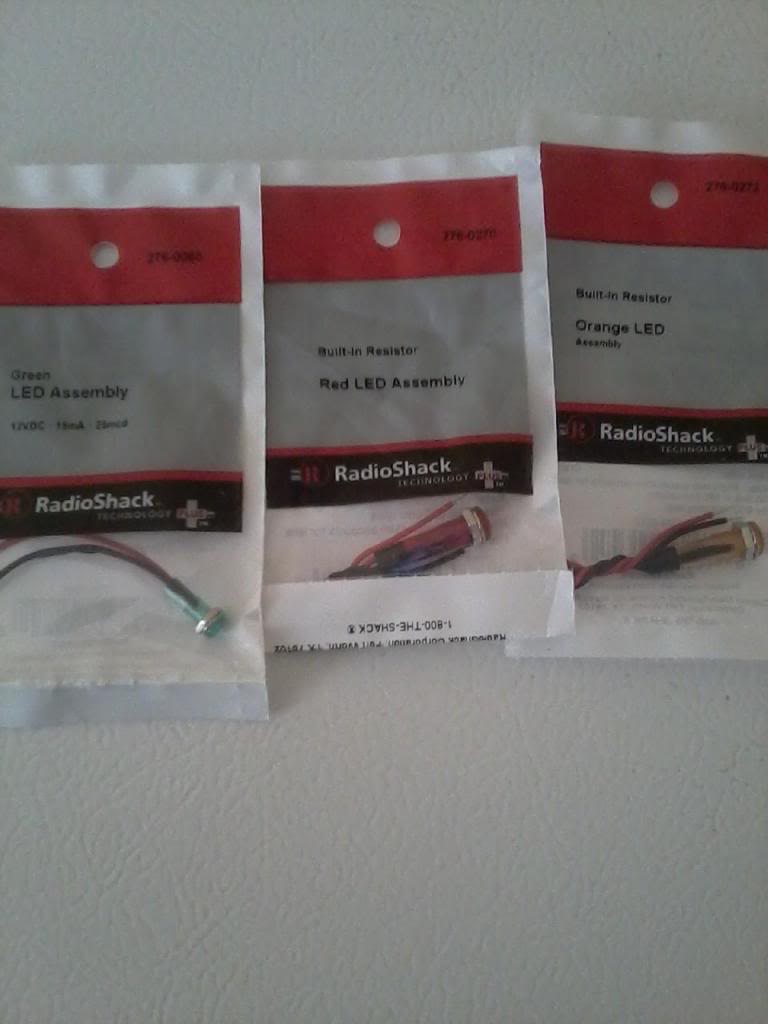
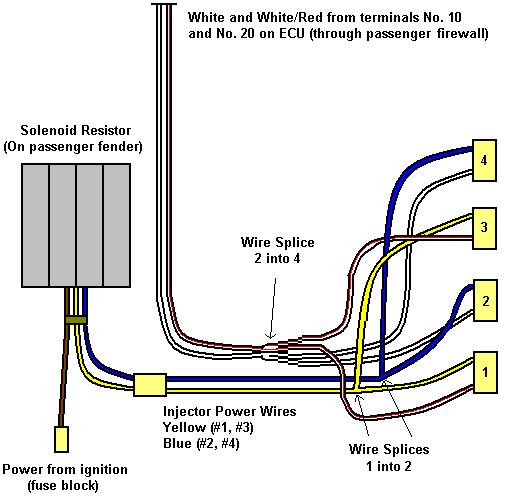
Here is a diagram of the electric system.
Steps I did to fix my injectors. I will try to make this from easy to hardest steps. All pages I am refering to are from the Haynes manual. I did download a FSM for more info.
1. I tried Starting Fluid just to see if it was electrical or fuel.
2.Check the Ground on the far rear of the intake nut.
3.Check all grounds. https://www.yotatech.com/forums/f116...-guide-194413/
4.Run Resistance check on Coil.
Haynes Pg 5-3
5.Check Solenoid Resistor. Pg 4-10 13.22b
6.Check EFI Main Relay Pg 4-9
7.Run Resistance checks on Fuel injectors. There are atleast 3 different types of injectors. Do Not put wrong ones in. Could ruin computer. Pg 4-2
Link to different injectors.. https://www.yotatech.com/forums/f116...ectors-127606/
8. I added a ground to the ECU. Will post a pic later. Link for mor info..http://api.viglink.com/api/click?for...13329207905461
9.Open wire harness and replace factory clips.https://www.yotatech.com/forums/f115...e-help-178975/
Injectors looked clean. I cant see all 4 failing at once.
Swapped with spare AFM. Will run more test if suggested, but it will run on starting fluid.
Swapped coil and igniter. Will run more test if suggested but it will run on starting fluid. I feel the ignition is working.
Fuel pump is pumping. Also jumpered Fuel Pump and it would operate.
Changed Fuel Filter.
Ohmed out Main Relay. Mine you can hear and feel the relay operating. Ohmed out at 74, book has 60 +/_ 20. Two other relays had same results.
Visual and metered all fuses under hood. Will do kick panel later.
Have checked all grounds and they are good.
Checked Solenoid Resistor. Book says 2-3 Ohms, Mine was 3 Ohms same on another Solenoid Resistor. With key on I have 12 volts, key off I have 0 volts. I believe this is correct.
I trust my soldering and removed crimps in harness some time ago.
The Solenoid Resistor passed it test. So I will be giving some of the suggestions you guys have mentioned a try and also start looking into my fuel regulator and dampener. I have been looking at the Haynes and the FSM as well. I like having information from previous problems as a reference as to where to look in the manuals. That is my reference page in the back ground. It actuallys saves some time.
Check EFI Fuse
Here is how you do a Fuel Pump Bypass on the 85/86.
Jumper wire the Yellow Plug on Drivers side. ( Jumper wire should be in both contacts for testing, I just didnt have it in for picture purposes and mostly a referece for me at a later time.)

With the jumper wire in and the key turned on, I was able to fill the cup up in about a minute or so. The return hose goes to where my finger is pointing. This is the metal line that I suggest taking an air hose and seeing if it is clear all the way to the fuel pump bracket. I have seen this line and the "J" line on the bracket clogged several times.


Still chugging along on my no start issue.This comes off of the Fuse box and provides power to the Solenoid Resistor. I tested all fuses under the hood, even the 80 amp fuse, with a multi meter just to make sure I hadnt missed one by doing the visual check. I am still not sure where power is sent from the fuse box but it is 12 volts when the key is on and 0 volts when key is off.
I also checked my Main Relay and 2 others that I have as spares. All 3 checked in at 74 ohms. The tolerance is 60 +/- 20.
My $3 noid light. I wasnt able to find one anywhere and this worked great. It flickered each time I cranked it. I just couldnt get any pictures of it lighted.

I used the 12 Volt red one. Radio Shack Part Number #276-0270

Here is a diagram of the electric system.
Steps I did to fix my injectors. I will try to make this from easy to hardest steps. All pages I am refering to are from the Haynes manual. I did download a FSM for more info.
1. I tried Starting Fluid just to see if it was electrical or fuel.
2.Check the Ground on the far rear of the intake nut.
3.Check all grounds. https://www.yotatech.com/forums/f116...-guide-194413/
4.Run Resistance check on Coil.
Haynes Pg 5-3
5.Check Solenoid Resistor. Pg 4-10 13.22b
6.Check EFI Main Relay Pg 4-9
7.Run Resistance checks on Fuel injectors. There are atleast 3 different types of injectors. Do Not put wrong ones in. Could ruin computer. Pg 4-2
Link to different injectors.. https://www.yotatech.com/forums/f116...ectors-127606/
8. I added a ground to the ECU. Will post a pic later. Link for mor info..http://api.viglink.com/api/click?for...13329207905461
9.Open wire harness and replace factory clips.https://www.yotatech.com/forums/f115...e-help-178975/
Last edited by Terrys87; 07-22-2013 at 10:14 PM.
07-08-2013, 10:42 PM
#1298
Super Moderator
Staff
Thread Starter
iTrader: (1)
Join Date: Aug 2008
Location: Anderson Missouri
Posts: 11,788
Likes: 0
Received 25 Likes
on
22 Posts
I got my carpet on order. Should make a big difference on the interior. Will take a few days to recieve it. Cant wait to see it installed. Ordered 8078 Dark Gray>>> http://www.stockinteriors.com/Carpet...&HideACC=False
Last edited by Terrys87; 07-08-2013 at 10:45 PM.
07-08-2013, 11:04 PM
#1299
Dang I'm sorry you're having to go through these troubleshooting procedures! As much as I learned I really hated that crap when it didn't lead to something. Obviously a no start issue is different than my miss..... So I think you'll come to closure on this a lot sooner than you're probably feeling right now.
That carpet looks about right... Little bit darker which is a good idea as it will not show as many stains. The Toyota grey type of charcoal color have quite a bit of blue in it compared to other manufacturers. That one appears two more so then say the medium grey. Nice choice man! I can't wait to see it in there either!
That carpet looks about right... Little bit darker which is a good idea as it will not show as many stains. The Toyota grey type of charcoal color have quite a bit of blue in it compared to other manufacturers. That one appears two more so then say the medium grey. Nice choice man! I can't wait to see it in there either!
07-08-2013, 11:28 PM
#1300
Registered User
this once found someone should put it in a main list of solved issues
now a noid light would help a lot right now it'd show if the injectors are trying which would then if they are point right at fuel being the issue if they arent then somethings wonky in the electrical maybe a bad wire like with my oil gauge couple inches up the harness near the sender it was badly corroded an gave out with a tug we fixed it an lo N behold my oil pressure gauge worked
finding a break in the harness Yikes continuity testing might have to happen we used a tack tip sharpened hooked up via extension wire to my meeter which beeped each time it made continuity via puncturing the wire one end taped to the far end of a run in my case behind the dash to the feed wire from the sender to the gauge its how we found it would beep near the fuse box but not at the connector by the block
narrowed it down a lot


