
Terrys87 86 4Runner with a 2nd Chance
 04-20-2013, 07:32 AM
#1061
Super Moderator
Staff
Thread Starter
iTrader: (1)
Join Date: Aug 2008
Location: Anderson Missouri
Posts: 11,788
Likes: 0
Received 25 Likes
on
22 Posts
I actually started doing a little work on the tail gate but no picture worth showing at this time. I do have some air tools and if you did bodywork on a daily basis, you might be better off using pneumatic tools. I dont care for the noise of the air compressor and my compressor is too small to run the tools constantly. It works great while painting as you are not constantly on the trigger and empting the tank.
I like the electric tools better as it is quieter and doesnt blow the dust around as bad. Just about any tool that you can get in air you can get in electric. New the tools arent bad, but I have found several at garage sales, pawn shops, and flea markets. They actually last along time.
I use each tool with different grits of sandpaper. The rolls are about $35 if you find a discount place or buy online. The sticky back works great on square or round sanders. I just stick it on. If the sticky gets weak, I put a light coat of the 3M 77 can on and it is some sticky stuff. Really bites if you spray yourself and have hairy arms. So I hear,lol.

 04-20-2013, 11:23 AM
#1063
Registered User
Great work on the gauges. You are not officially OCD until you paint the needles flourescent orange.
Good tip with the sandpaper. I'll be using it.
Good tip with the sandpaper. I'll be using it.
04-20-2013, 12:16 PM
#1064
Registered User
well 119 aint too bad for oil and temp if the gauge is dead
the rest of my gauges work i havent been out to work on her but will today a bit took kiddo to school carnival last night an Ow bad foot got stepped on a few times
the rest of my gauges work i havent been out to work on her but will today a bit took kiddo to school carnival last night an Ow bad foot got stepped on a few times
04-22-2013, 01:51 AM
#1065
Super Moderator
Staff
Thread Starter
iTrader: (1)
Join Date: Aug 2008
Location: Anderson Missouri
Posts: 11,788
Likes: 0
Received 25 Likes
on
22 Posts
Thanks kornhuskerwizard...It does do a great job on the lenses. It is scary the first time you do it. It is really blurry as you are actually using a form of sandpaper and scratching the lense. It is the last step that you use a sealer and it fills in all of the scratches. It makes a big difference. The next time I do it, I will show each step and what it looks like during the process.
LOL Nervo19...I am OCD. I have some non SR5 Guages and those needles are orange. When the SR5 guage needle broke, the first thing I thought of was taking the orange needles and painting them white. It wasnt to be. The needles are the same length, but there is a little bushing that slides over the post on the speedometer and the non SR5 guages have a bigger bushing. You busted me, I got a laugh out of that.
Redeth005 asked if I could post some details about doing bodywork and maybe show some others as well as what is involved. So I am hoping to add some tips that might help out. Everybody does it a little different and I know you are working on yours so if you see something that might help add it in.
Hows things coming along on your Runner. I forgot the link to your Photobucket and knew you were working on the rockers the last time. Post some photos on my thread if you like. It is always good to go down memory lane at a later time. Reminds you of where you were at one time.
Hello Cyberhorn... The water guage can be a little finicky at times. Once the truck is warm, I have some confidence in them, but they can jump up when first started. A few things that I have found and work on some of the guages is to tighten all of the screws on the back of the guages cluster. Some are quite loose. Another thing is to clean the ground down by the drivers kick panel and get the ground to touch bare metal instead of being bolted right over the paint.
You and me can have a contest on who heals up first. I go back for another appointment in two more weeks to get the plate removed. That hurts!!! Hopefully one of us will eventually heal. Who would ever thought some injury would take so long.
04-22-2013, 02:29 AM
#1066
Super Moderator
Staff
Thread Starter
iTrader: (1)
Join Date: Aug 2008
Location: Anderson Missouri
Posts: 11,788
Likes: 0
Received 25 Likes
on
22 Posts
My laptop is not getting the best reception but hopefully I can get some pics up. I took the tailgate to the truck to my dads place as it is warmer there. I want to start get something accomplished and get back into the feel of body work. I am going to try and show some different steps of how I get a body straight and some pics didnt come out but at a later time I want to get them all in order and more details. When I get them the way I want I can just copy and paste.
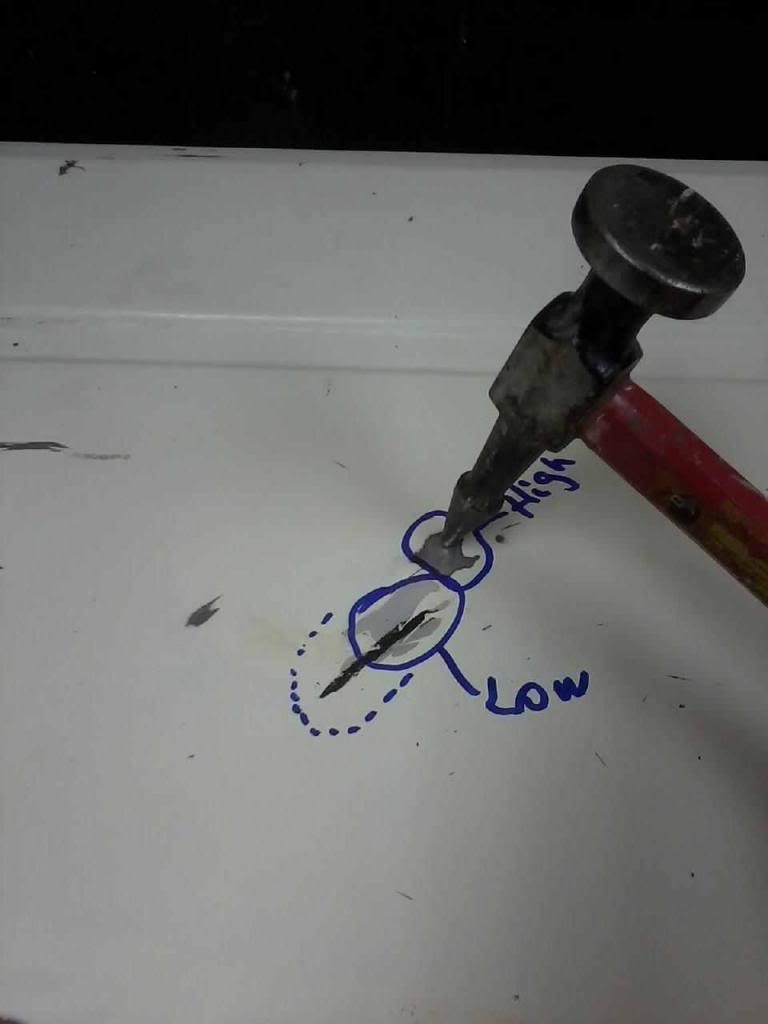
There are 3 dents in this tailgate. I couldnt get a good picture from the back side of me working the dent out but it was deep. Where the top cirlce is with the pecking hammer is to high. With just little taps I was able to knock it slightly lower to cover with filler.
Where the black line is, there is a crease. Looks like someone hit with a pole as it started as a half circle. Doesnt show on the picture but the dent is quite large.
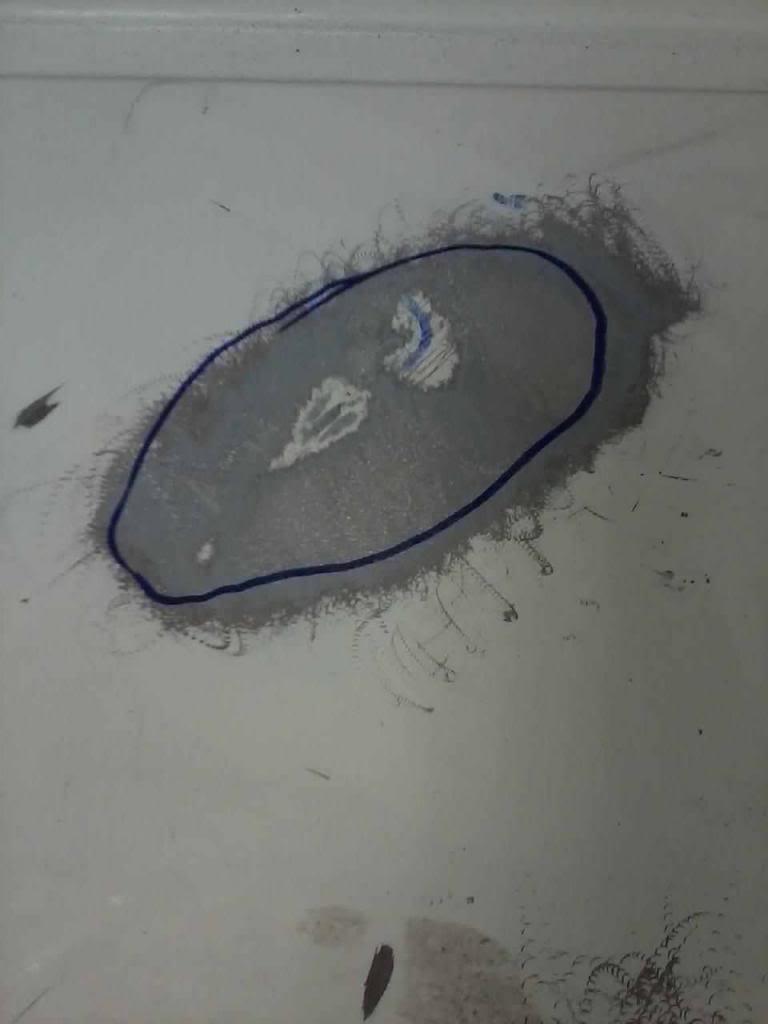
Here I took some 36 grit and got the paint off for the filler to stick. The paint shows the deepest spots. I did sand it out as well before applying filler.
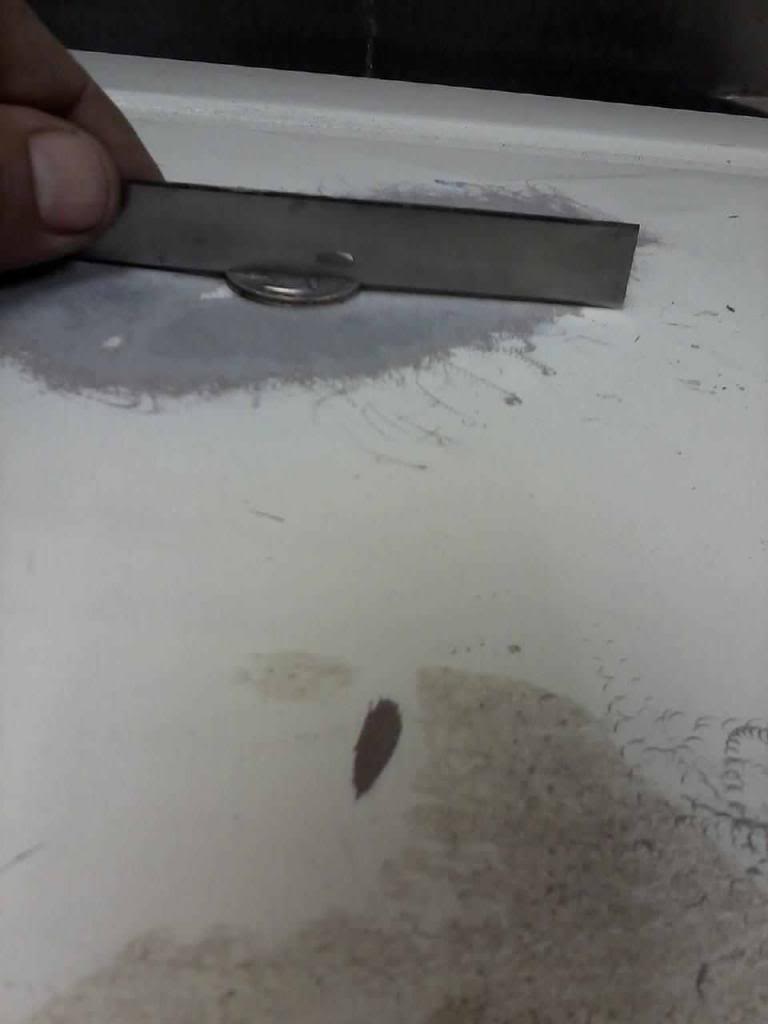
To show the deepest spots and how little filler I used, it is less then the thickness of a quarter. It will look like alot of filler was used but hopefully this gives an idea of how thin it actually is. There is a large gap between the long razor blade and the tailgate if you look closely.
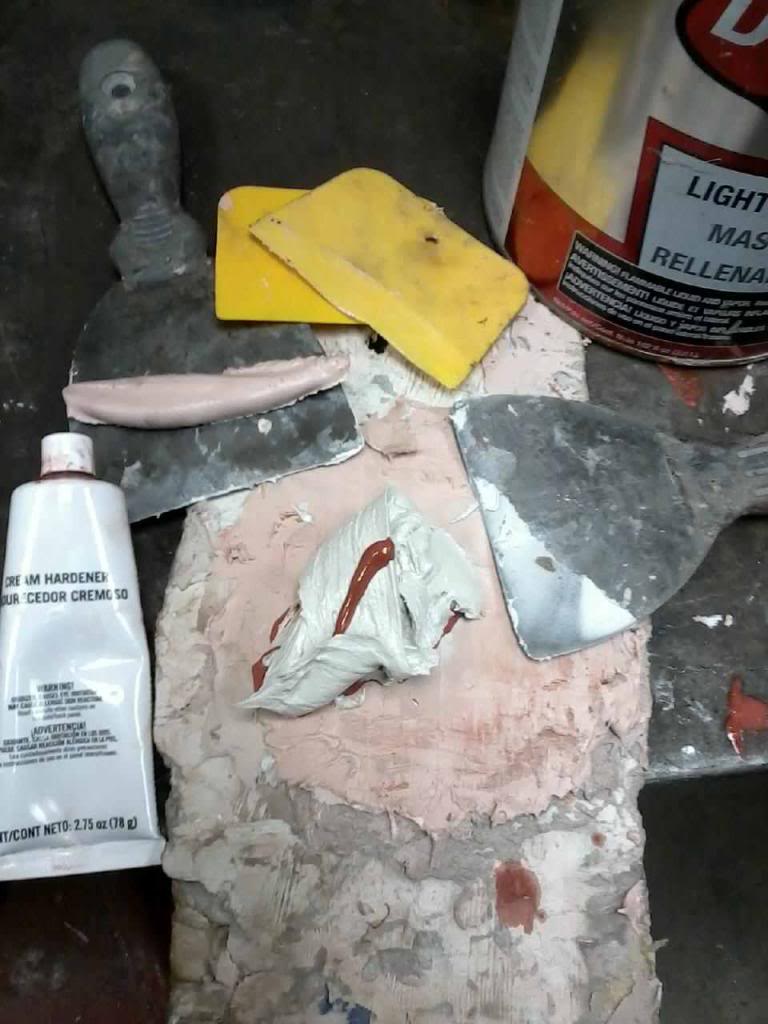
I use about the size of a goose egg of the gray filler and about 1 inch of red hardner. It is cool, I might add a drop or so more. If it is warmer tempertures, I use a drop or so less. The directions say you have about 5 minutes or so to apply it. I am alway lucky to have about a minute or two. Most will get sanded off.
After applying it, to make clean up alot easier, I scrape the excess bondo on to a yellow scraper and let it harden up on it. This was the second batch I mixed as the picture on the first batch didnt turn out. I scrape my mixing plate (cardboard) so it is smooth for the next batch. After awhile it still gets so thick, I have to use a grinder and get my mixing plate thin again.
I have heard of using a frisbee and they do sell a plate that you can mix on. The first truck I did, I just used this piece of cardboard and am still using it. I have used this piece of cardboard for over five years now so have actually became quite fond of it.
Here are all 3 dents filled. Looks like alot of filler, but most will get sanded off. The dent I showed is the deepest.
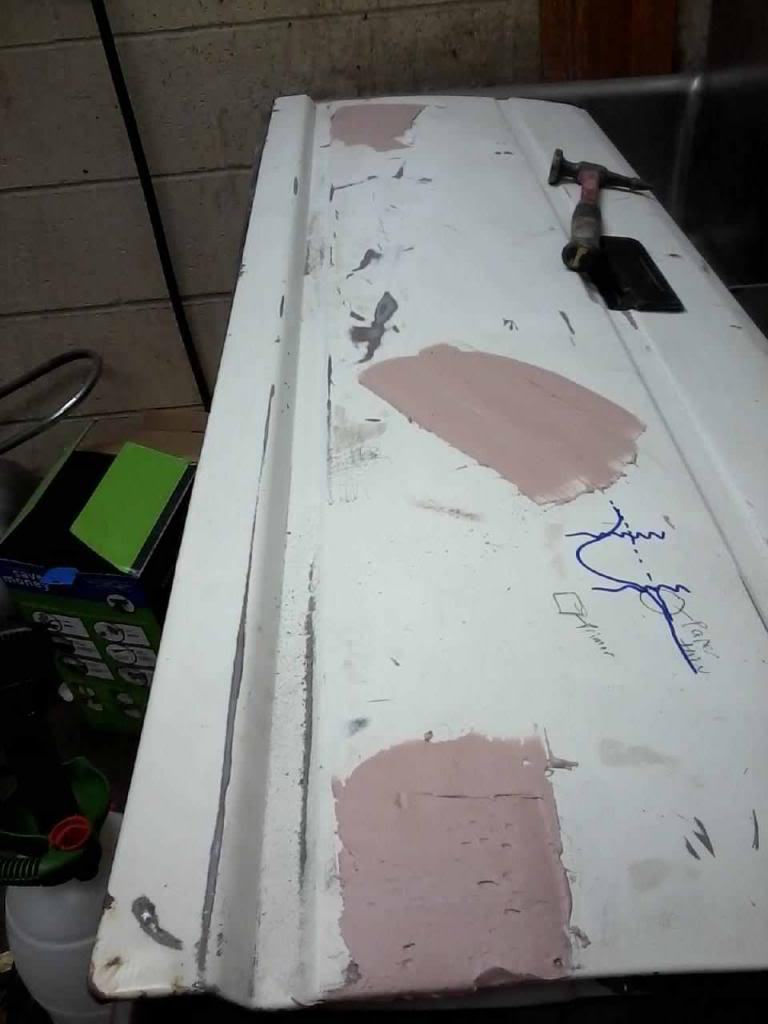
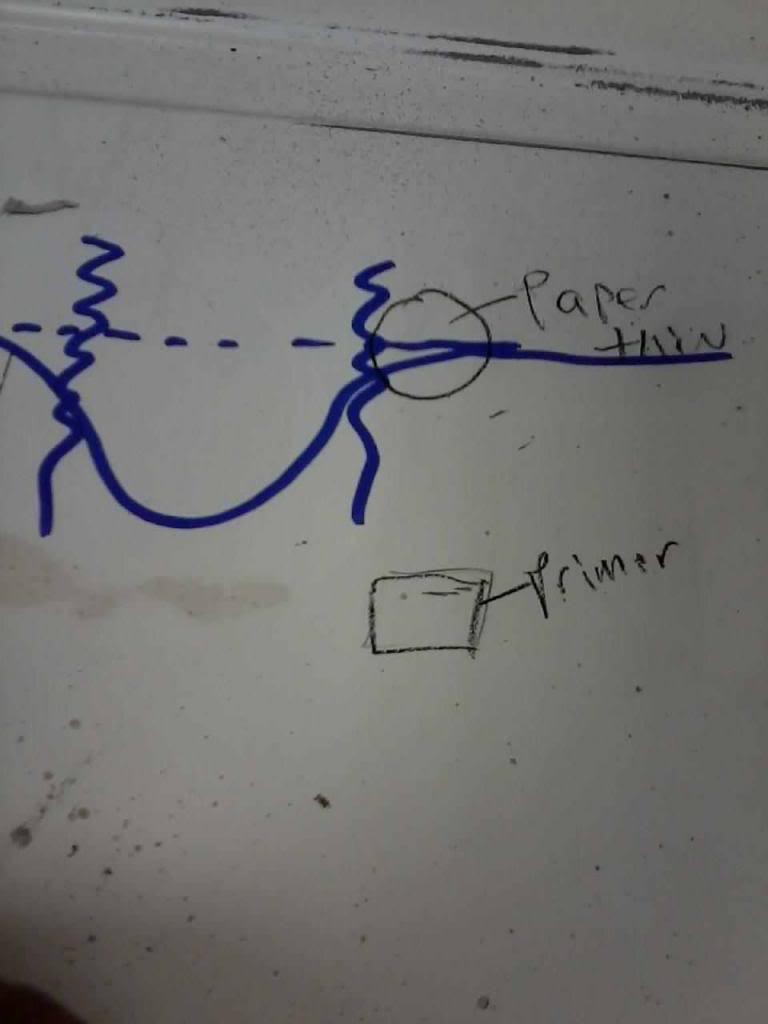
The dash line show where leve should be. To the outside of the ziggy lines is really thin. They call it feather edging when sanding it and when done the feather edge is what I would say looks more like a smear or a blur, where you cant really tell where the filler ends and the metal and paint blend in.
The little square is a shallow scratch and I will prime the whole tailgate and wet sand it off at a later time. The primer acts as a real thin filler for scratches like this one. It can not be very deep at all.
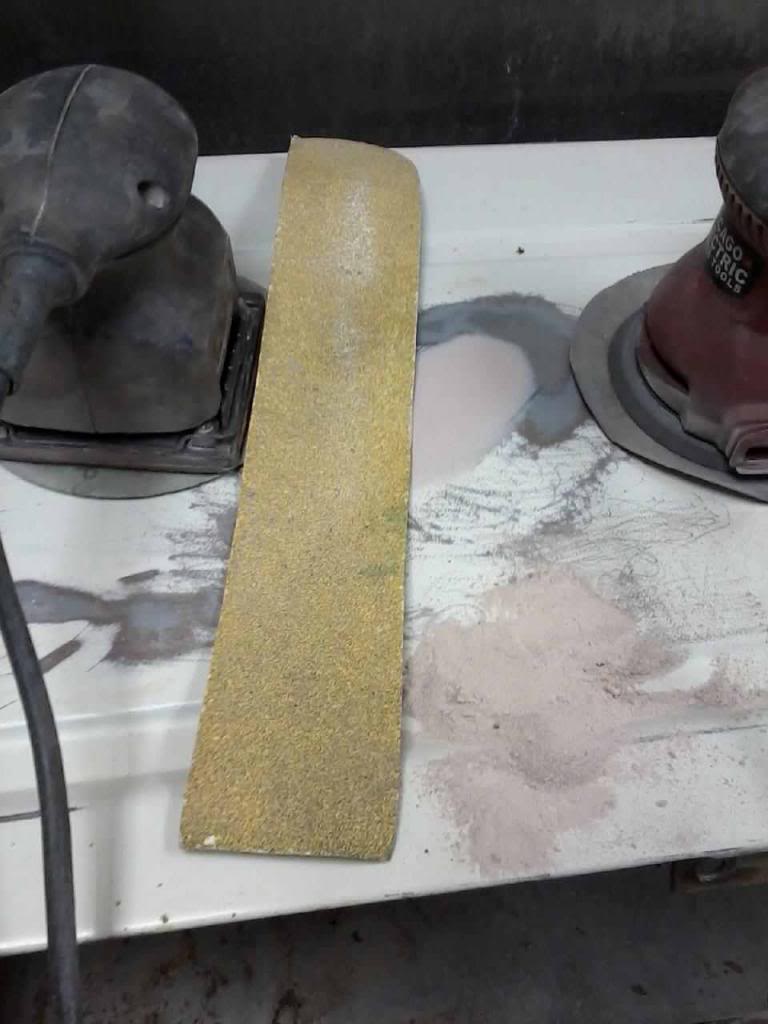
Here I used the electric tools to sand it down. I used the left sander of 36 grit just to get the rough stuff off and then went after it with 80 grit. I will need to get my long board which is the yellow strip to match the curve of the tailgate. I left it at my shop. Doh!!! but to show that if I was to prime and paint now, it would look like a big circle dent. There are still alot of steps to go to before prime and paint but to show how much filler and how much is sanded back off.
There are 3 dents in this tailgate. I couldnt get a good picture from the back side of me working the dent out but it was deep. Where the top cirlce is with the pecking hammer is to high. With just little taps I was able to knock it slightly lower to cover with filler.
Where the black line is, there is a crease. Looks like someone hit with a pole as it started as a half circle. Doesnt show on the picture but the dent is quite large.

Here I took some 36 grit and got the paint off for the filler to stick. The paint shows the deepest spots. I did sand it out as well before applying filler.

To show the deepest spots and how little filler I used, it is less then the thickness of a quarter. It will look like alot of filler was used but hopefully this gives an idea of how thin it actually is. There is a large gap between the long razor blade and the tailgate if you look closely.

I use about the size of a goose egg of the gray filler and about 1 inch of red hardner. It is cool, I might add a drop or so more. If it is warmer tempertures, I use a drop or so less. The directions say you have about 5 minutes or so to apply it. I am alway lucky to have about a minute or two. Most will get sanded off.
After applying it, to make clean up alot easier, I scrape the excess bondo on to a yellow scraper and let it harden up on it. This was the second batch I mixed as the picture on the first batch didnt turn out. I scrape my mixing plate (cardboard) so it is smooth for the next batch. After awhile it still gets so thick, I have to use a grinder and get my mixing plate thin again.
I have heard of using a frisbee and they do sell a plate that you can mix on. The first truck I did, I just used this piece of cardboard and am still using it. I have used this piece of cardboard for over five years now so have actually became quite fond of it.

Here are all 3 dents filled. Looks like alot of filler, but most will get sanded off. The dent I showed is the deepest.

The dash line show where leve should be. To the outside of the ziggy lines is really thin. They call it feather edging when sanding it and when done the feather edge is what I would say looks more like a smear or a blur, where you cant really tell where the filler ends and the metal and paint blend in.
The little square is a shallow scratch and I will prime the whole tailgate and wet sand it off at a later time. The primer acts as a real thin filler for scratches like this one. It can not be very deep at all.

Here I used the electric tools to sand it down. I used the left sander of 36 grit just to get the rough stuff off and then went after it with 80 grit. I will need to get my long board which is the yellow strip to match the curve of the tailgate. I left it at my shop. Doh!!! but to show that if I was to prime and paint now, it would look like a big circle dent. There are still alot of steps to go to before prime and paint but to show how much filler and how much is sanded back off.

Last edited by Terrys87; 04-22-2013 at 02:31 AM.
04-25-2013, 03:27 PM
#1068
Super Moderator
Staff
Thread Starter
iTrader: (1)
Join Date: Aug 2008
Location: Anderson Missouri
Posts: 11,788
Likes: 0
Received 25 Likes
on
22 Posts
Thanks Gizler00..Yesterday we had snow flurries and tomorrow we will be a little cold but after that I think the weather warms up and I plan on getting alot of bodywork done. I am thinking maybe Saturday to get started on it if all goes as planned.
04-25-2013, 03:31 PM
#1069
Super Moderator
Staff
Thread Starter
iTrader: (1)
Join Date: Aug 2008
Location: Anderson Missouri
Posts: 11,788
Likes: 0
Received 25 Likes
on
22 Posts
This used to be my least liked tool but now is my favorite tool. It is long enough to straddle most dents and is real good about showing the highs and lows. They make some cheaper long boards, but this one is made of fiberglass and is really a stout piece of equipment. I think I paid $35 for it from Oriellys paint store and is one tool I would suggest not skimping on.

 04-25-2013, 03:38 PM
#1070
Super Moderator
Staff
Thread Starter
iTrader: (1)
Join Date: Aug 2008
Location: Anderson Missouri
Posts: 11,788
Likes: 0
Received 25 Likes
on
22 Posts
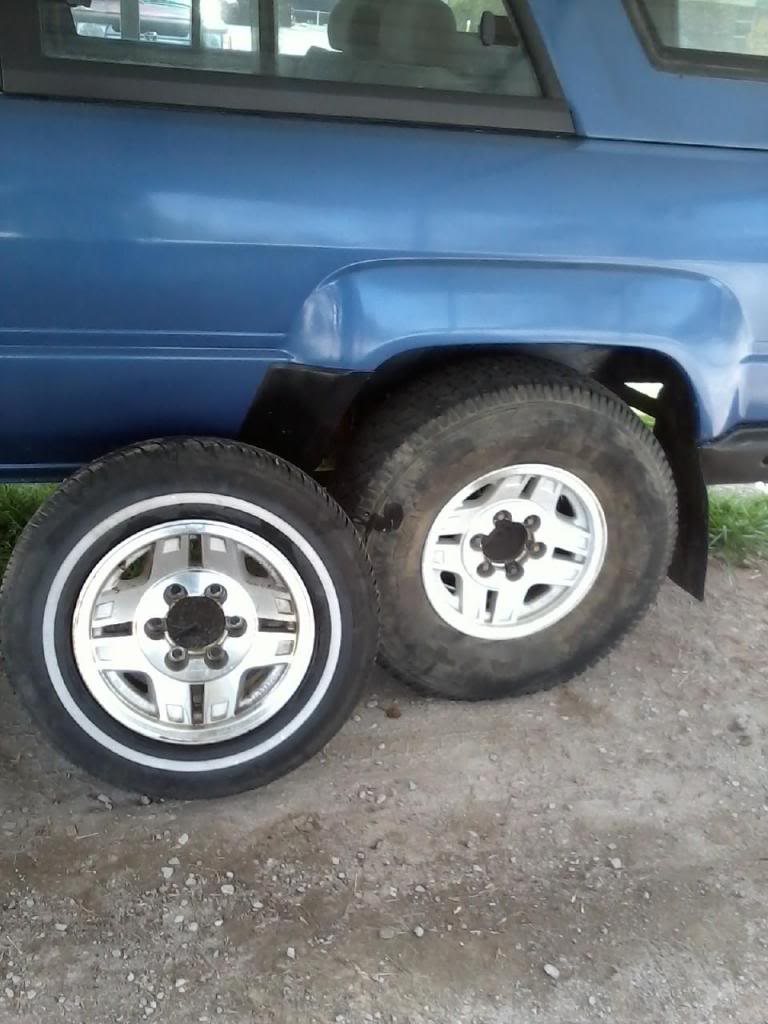
Would of been a nice day to get alot accomplished but I had to do alot of running around. I dropped the block off at the machine shop to get it worked on for the 85 and then I got to a boneyard and got another rim to replace the bleached rim I have.
I am not the best at doing rear brakes so after I get home from getting the 88 Runner a new front end alighnment, my dad is going to help me do the rear brakes on my Runner. The other day I was driving and the brake light came on. I added fluid and wasnt long until the brake light came on again. I got a bad leak on the drivers rear side again. Not sure what is going on under there.
I am thinking I need to look at the front wheel bearings on my runner. Running down the highway it is quite and then every now and then it gets a little noisey. When it is running right, it is a great little truck and is quiet. I need to do the Zuk mod and get shocks on it but each time I work on it, it just keeps getting funner to drive. Have been doing some small things to it.
New wheel and will practice on the bleached wheel for painting and see how it comes out. I need to get a center cap for the drivers side still.
 04-25-2013, 06:35 PM
#1073
Registered User
iTrader: (1)
Join Date: Oct 2011
Location: VA
Posts: 599
Likes: 0
Received 0 Likes
on
0 Posts
Well it's official... Page 1-43 complete! Man it's like a story haha you should be in a truck magazine or something...Bringing back the dead! In my eyes that thing would have already been a pepsi can or something. Keep up the great work....I'm just upset that I can't keep reading...I like the finished product so far but can't wait to see where you go from here!
Good work Terry, As always!
Good work Terry, As always!
04-27-2013, 01:30 AM
#1074
Super Moderator
Staff
Thread Starter
iTrader: (1)
Join Date: Aug 2008
Location: Anderson Missouri
Posts: 11,788
Likes: 0
Received 25 Likes
on
22 Posts
Hello tinigunner11... I have always had an intrest in bodywork and should of gotten into it along time ago. I actually like the fact it takes patience to do and get there. I am going to try to show how I was taught and maybe make it a little less intimidating to do.
Hello kornhuskerwizard...Lol...Now if I can just get the rim and tires switched and get another center cap, I think it would make a huge difference.
Thanks dakotawho...I really appreciate the compliment. Hope you enjoyed reading my thread and found something in it that might help you on your build. I could of bought a nice truck, but I wanted a challenge and something that I could build the way I would of maybe bought it. I knew all along that I would get it on the road and will eventually get it to where I want it.
But I did have some dark days. Once when the mouse chewed the harness up and trying to find a good harness and wondering if I could do that right. After I found a good harness, I then couldnt get it running or to keep running. It turned out to be the crimps in the wiring harness to the injectors, and they would pass resistance but wouldnt fire off. After having to go thru that, I have been able to help 3 other people to solve the same problem and that is rewarding in itself. Looking back, I am so glad that I did have some difficulty along the way as I have learned so much and other then rebuilding transmissions,rear brakes and some front end work, there really isnt much that intimidates me on these trucks anymore. I learned alot.
I have had spend a small fortune getting my 3rd Gen Runnerto get it up to speed, tires, tuneup, and a few other things and then just life has away of throwing some things at you that just comes along. I figure I got a year or so more to where I want it to be. I am currently working on getting a rolled 85 frame from a guy when he gets all of the parts off of it that he wants, so maybe I will be slipping an 85 frame under it. I will call it a FRAS (Frame Axle Swap) if all works out. Thinking of adding some silver SR5 stripes, and getting the interior done up real nice. Ideas still come to me every now and then, some come and some go, just will wait and see what happens.
I had some friends and family that thought I shouldnt have tackled something this bad, but I wanted the challenge and am so glad I did, It was in worse shape then what it shows in the picture and I bought it as a parts truck for my wife truck and then another parts truck and those cost are added to her truck. I really dont have much into this truck at all.
I remember standing in your shoes when you were doing the cab swap. How intimidating is that? Now looking back, I bet you are glad you did and doing another cab swap wouldnt bother you at all. How many have the determination and gumption to get thru that? Dont let the naysayers hold you back. Just press on and let your work speak for itself.
I am doing it for myself, but in the end I would like this truck to have been on of the junkiest trucks to being one of the nicest ones that I can possibly make it into. This is my truck and I still have alot I want to do to it. On a smooth highway and everything is running right ( need shocks and wheel bearings) and I am listening to the motor purr going down the highway, I still get a smile knowing that it was me that got this puppy on the road and because of my work. I almost would trust it to do a coast to coast run if I had to and is getting to be fun and enjoyable to drive with each time I fix something on it.
Hope my thread can show you what you can do with some determination, and glad you enjoyed reading it. It is still along ways from being to where I want it. If I could just get the wife and kids from eating, wanting hot water, air conditioning, TV,... things would move so much faster.lol
04-27-2013, 01:54 AM
#1075
Super Moderator
Staff
Thread Starter
iTrader: (1)
Join Date: Aug 2008
Location: Anderson Missouri
Posts: 11,788
Likes: 0
Received 25 Likes
on
22 Posts
I got to so some work on the tailgate. The rest of this week is looking like we are going to have some great weather so I am going to do my best and get as much bodywork done as I possibly can. I feel like I have been in hibernation.
When I come across a hail size dent or a deep scratch. Using a razorblade is on of the best body filler spreaders there is in my opinion. Saves alot of sanding. Usually if I spread with a razor blade, I can go straight to sanding with 320 grit as it doesnt take long to sand off the excess.

When I come across a hail size dent or a deep scratch. Using a razorblade is on of the best body filler spreaders there is in my opinion. Saves alot of sanding. Usually if I spread with a razor blade, I can go straight to sanding with 320 grit as it doesnt take long to sand off the excess.
 04-27-2013, 02:05 AM
#1076
Super Moderator
Staff
Thread Starter
iTrader: (1)
Join Date: Aug 2008
Location: Anderson Missouri
Posts: 11,788
Likes: 0
Received 25 Likes
on
22 Posts
Wont be long before the kiddos are out of school and something I have been wanting to do for sometime is to take both runners on a camping trip and sleep in them overnite and see what that is like.
My dad should be coming over to the house today to help me fix my rear brakes. Yesterday it was just cold and rainey and neither one of us really wanted to get out and mess with the brakes in that weather.
I drove Mistys Runner today and both trucks are running great. I need to replace a U-joint in it here in the next few days as well but it seems to get up to speed fairly quickly. Now I am wanting to take them to the Tulsa Midnite Drags and have a little competition and see whose is the quickest between the two runners. I think it will be a close run, so now I am looking forward to that this summer.
I did get an alighnment today on hers. The passenger front tire was wearing out on the inside. I asked her if she ran into something and she said NO.... I asked the alighnment guy if he seen anything and he said it just happens. He did say everything under there is in great shape, so she lucked out on that one,haha, but it was reassuring knowing that her front end is solid, so it was all good.
04-27-2013, 09:48 AM
#1077
Registered User
Redeth005 asked if I could post some details about doing bodywork and maybe show some others as well as what is involved. So I am hoping to add some tips that might help out. Everybody does it a little different and I know you are working on yours so if you see something that might help add it in.
Hows things coming along on your Runner. I forgot the link to your Photobucket and knew you were working on the rockers the last time. Post some photos on my thread if you like. It is always good to go down memory lane at a later time. Reminds you of where you were at one time.
Hows things coming along on your Runner. I forgot the link to your Photobucket and knew you were working on the rockers the last time. Post some photos on my thread if you like. It is always good to go down memory lane at a later time. Reminds you of where you were at one time.
I'm glad you're enjoying that nice truck of yours. I can totally relate. I enjoy driving my truck more and more every time I fix something on it too. Lol makes me feel proud of the work we've done over the course of this past year when all the fixing began.
04-29-2013, 12:34 AM
#1079
Super Moderator
Staff
Thread Starter
iTrader: (1)
Join Date: Aug 2008
Location: Anderson Missouri
Posts: 11,788
Likes: 0
Received 25 Likes
on
22 Posts
Hello Richard..I havent been on as much as I would of like to have been but things are starting to move finally. Getting some great weather and I want to take advantage of it while I can. I will try to show what I know on bodywork and hope to take some of the fear out of it.
I try to put some sense of humor into my threads. I have always had a dry sense of humor where I could sound serious but not be.
Hello junk4u.. I have heard of it and even seen some on youtube but have never had any luck with it. Last year we had 100 degree days and I tried several times and never had much luck with it. I watched a youtube video and it apparently does work at times. Maybe I am doing something wrong. I have talked to some old timers and they use a torc head to do it on the 40s and 50s cars, but they says it will ruin the paint to get it that warm. I wish it would work, it would save alot of time.
04-29-2013, 01:09 AM
#1080
Super Moderator
Staff
Thread Starter
iTrader: (1)
Join Date: Aug 2008
Location: Anderson Missouri
Posts: 11,788
Likes: 0
Received 25 Likes
on
22 Posts
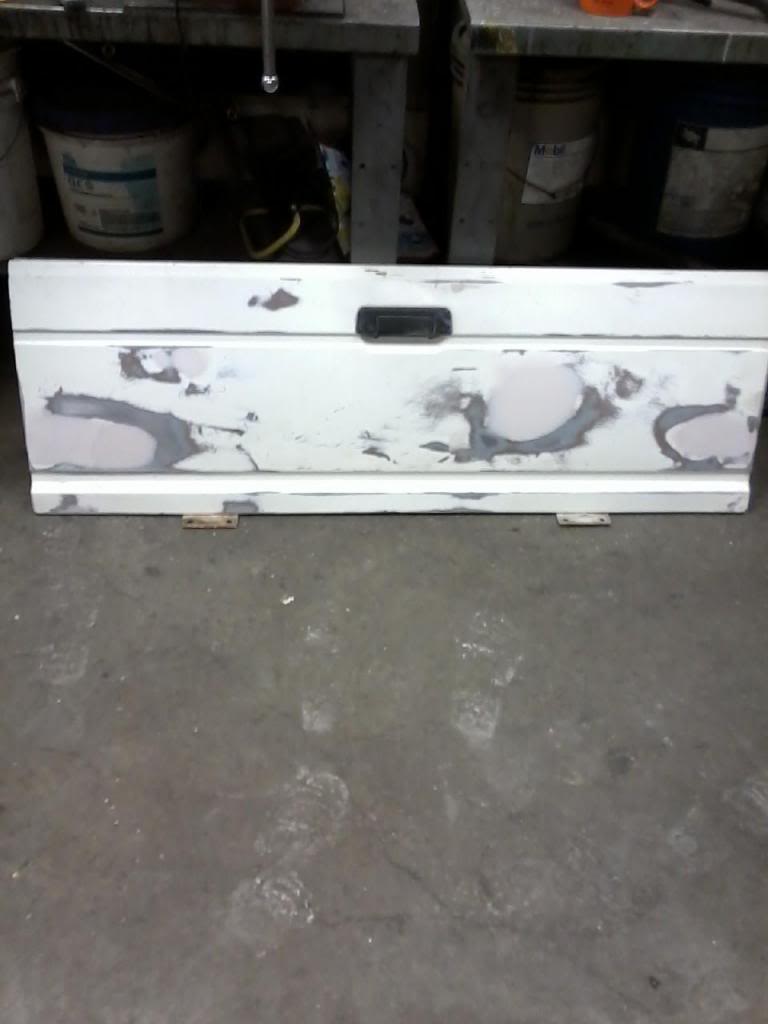
Here is the tailgate I want to use. It does have 3 small dings in it but it has no rust. I say it is in the rough stage. I still need to prime it and then I will wetsand it with 320 grit at a later time. I dont want to mix up primer for just this one piece. Wet sanding will smooth things out alot.
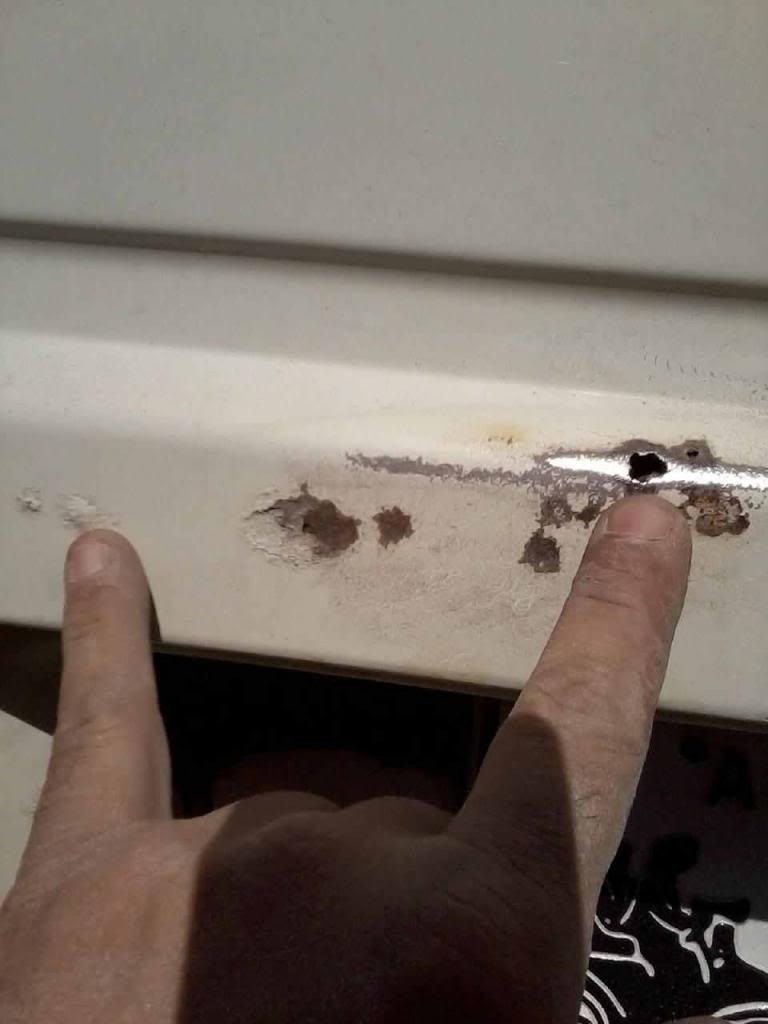
Here is the orginal tailgate. You can see the rust blisters and the holes that are in it. I sanded a blister to show what is behind it and it will be worse then what it looks like. I dont have the tools to put in a patch panel, so I would use fiberglass. Body filler over rust will only come back worse.
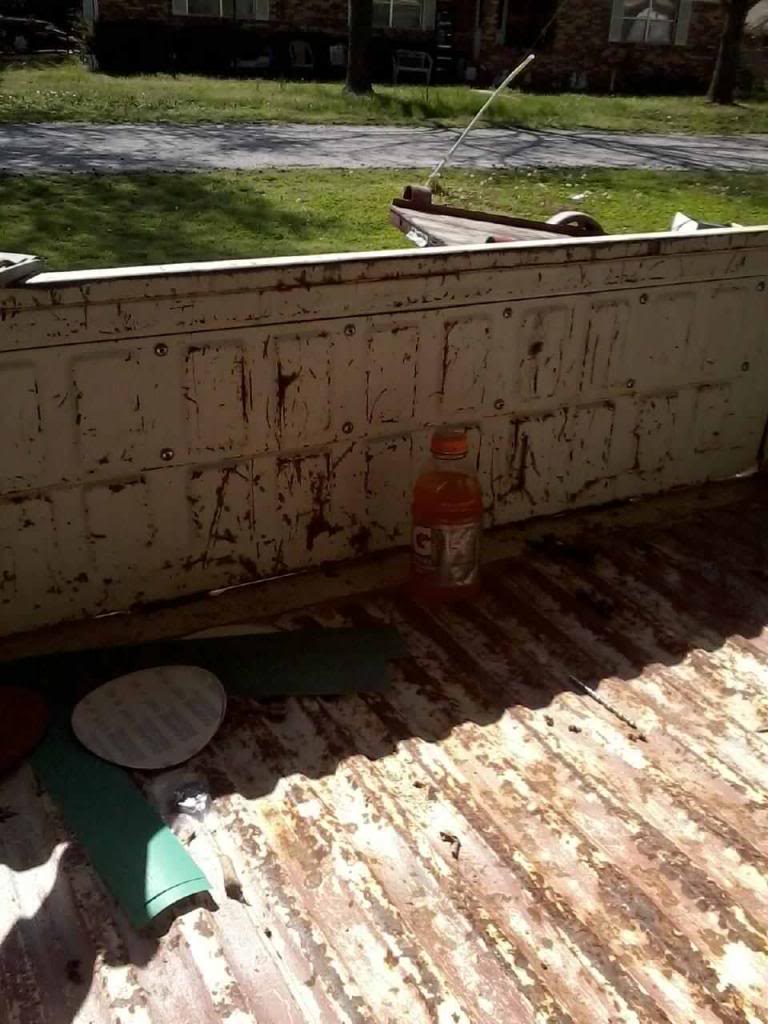
To prevent the tailgate from rusting out. Remove the top panel and vacuum out all of the debri in there. You will be surprised at what all is in there. I have worked on several tailgates and know what is lurking in there. It plugs the drain holes and then the water cant escape. When I take this tailgate off and put on the other one, I will try and get some good pice. You might be surprised. I drink the hard stuff..Gatorade.
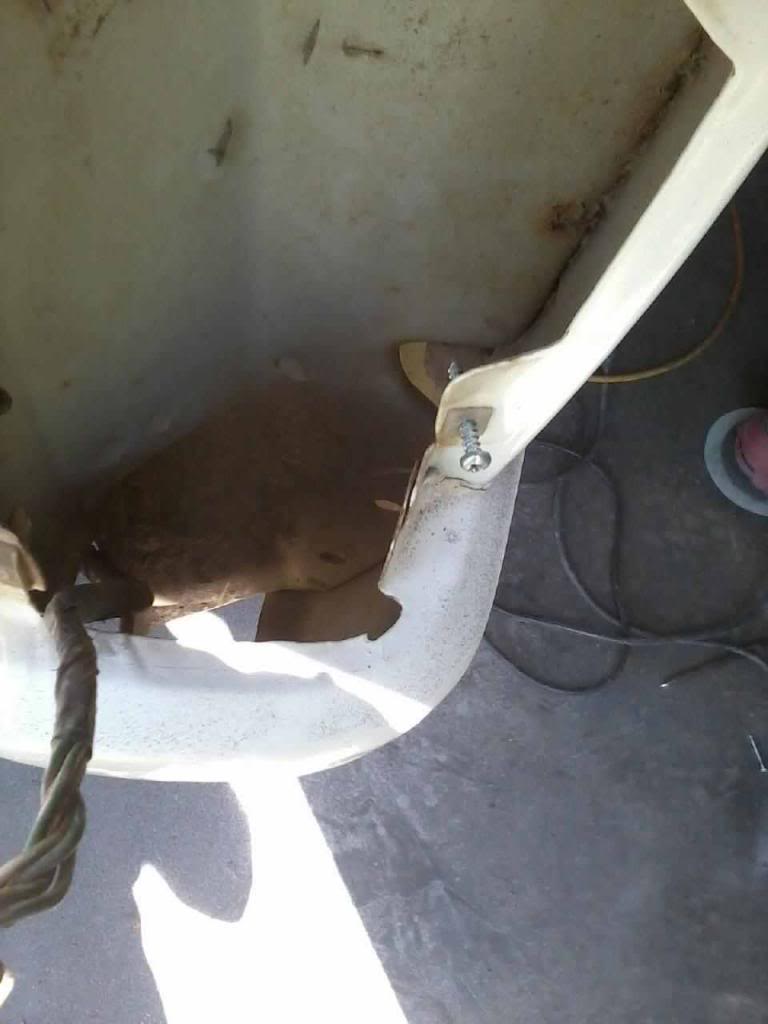
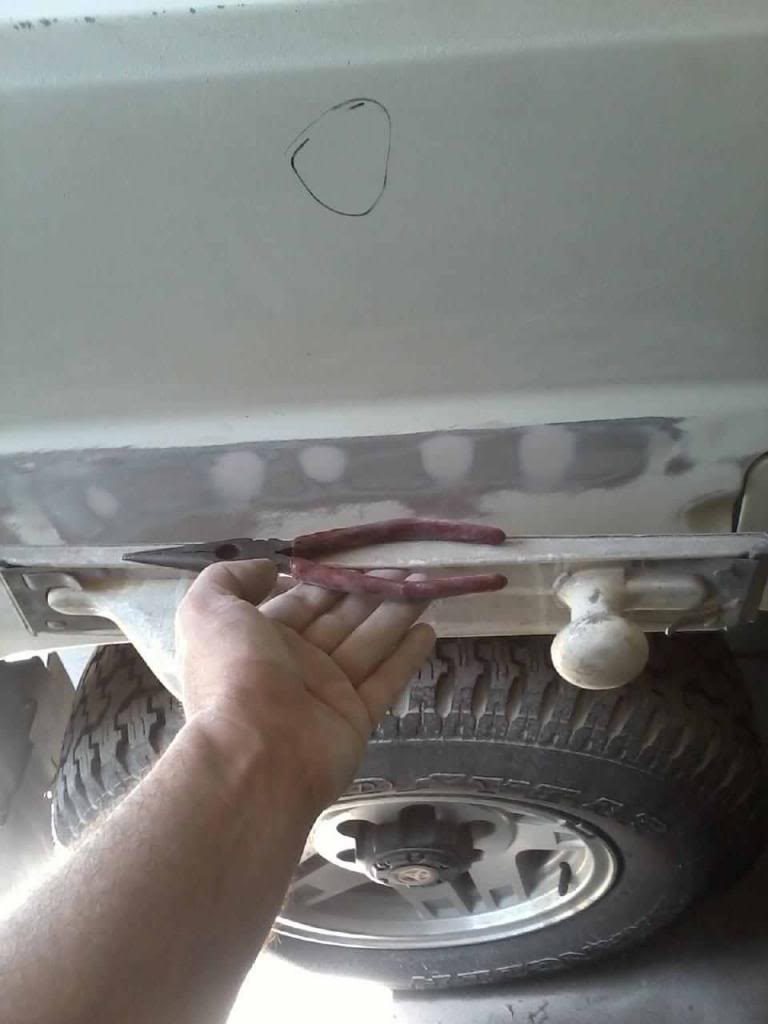
This picture is just to show what can get behind the tail light and I did clean it out so when I prime and paint, I wont get a dust cloud in the paint. I also install the screw to where they belong in some cases where I can. I will paint over them, but when I reinstall the tail light, I just run the screws under a wire brush on my grinder to and it will shine them back up. Keeps from losing screws. Seen several people trying to locate things upon reassembly and spend alot of time just chasing lost parts.
Here I am filling in the factory spot welds. Looks like alot of body filler, but it is better then trying to do each spot at a time in my opinion.I used a razor blade to not to add the least amount as possible. Most body filler gets wasted by sanding it back off. While waiting for body filler to dry. To keep me from getting impatient, I clean shop or clean some tools I find at yard sales or where ever. Got these rusted pliers for 50 cents. A few minutes on the wire wheel grinder and they great as new.
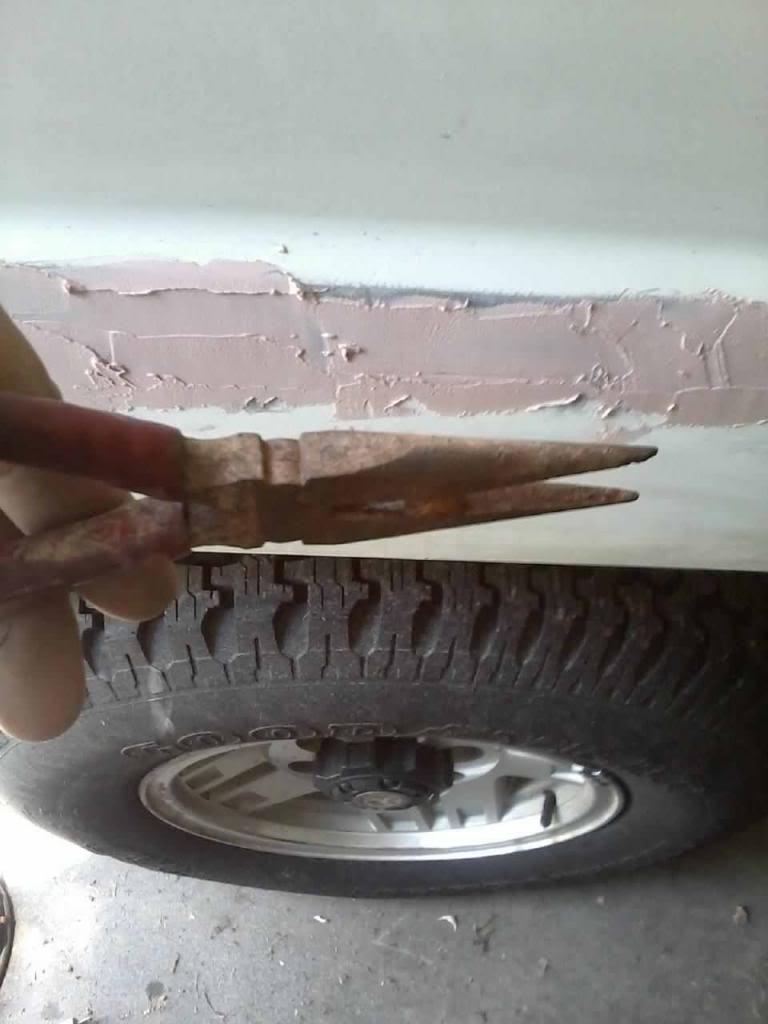
To show how much was sanded off and how the needle nose turned out. The long board will straighten alot of things out that is below the pliers.
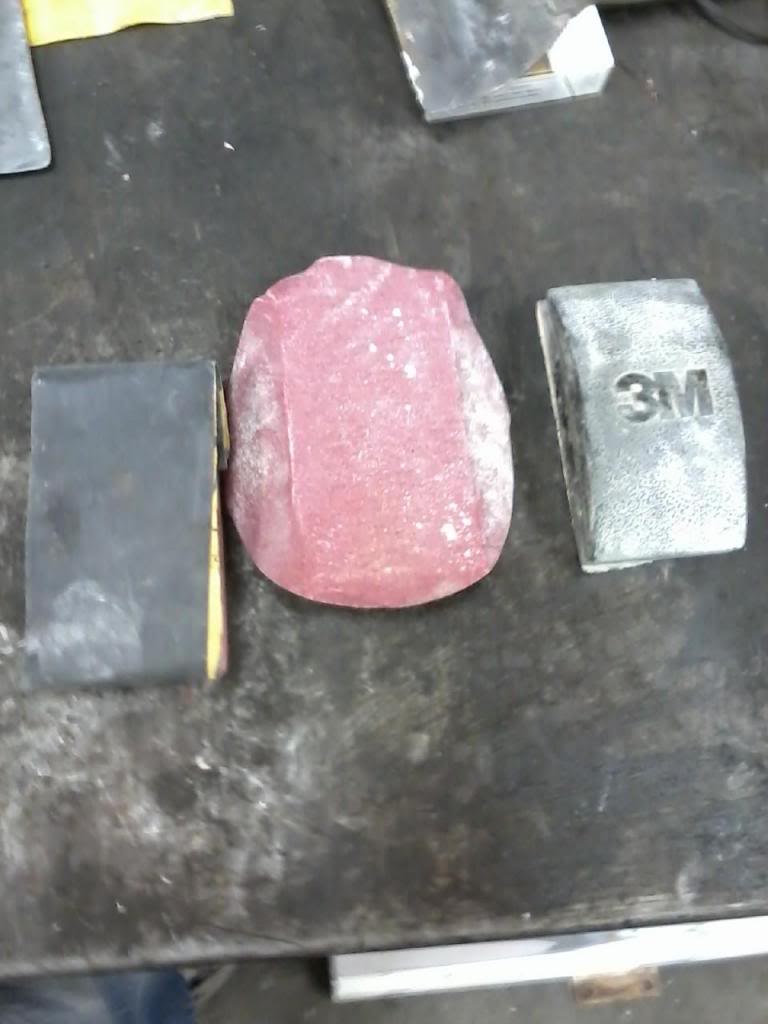
Here is some of the sanding blocks I used. I will use the round pads on a block. The left one does have some 320 grit wet paper on it and I will use sheets when I get to that stage. I like the round pads for most of the tools I use. So much quicker and easier to change. I will rotate the pad 90 degrees to get a little more use out of it.

Here is the orginal tailgate. You can see the rust blisters and the holes that are in it. I sanded a blister to show what is behind it and it will be worse then what it looks like. I dont have the tools to put in a patch panel, so I would use fiberglass. Body filler over rust will only come back worse.

To prevent the tailgate from rusting out. Remove the top panel and vacuum out all of the debri in there. You will be surprised at what all is in there. I have worked on several tailgates and know what is lurking in there. It plugs the drain holes and then the water cant escape. When I take this tailgate off and put on the other one, I will try and get some good pice. You might be surprised. I drink the hard stuff..Gatorade.

This picture is just to show what can get behind the tail light and I did clean it out so when I prime and paint, I wont get a dust cloud in the paint. I also install the screw to where they belong in some cases where I can. I will paint over them, but when I reinstall the tail light, I just run the screws under a wire brush on my grinder to and it will shine them back up. Keeps from losing screws. Seen several people trying to locate things upon reassembly and spend alot of time just chasing lost parts.

Here I am filling in the factory spot welds. Looks like alot of body filler, but it is better then trying to do each spot at a time in my opinion.I used a razor blade to not to add the least amount as possible. Most body filler gets wasted by sanding it back off. While waiting for body filler to dry. To keep me from getting impatient, I clean shop or clean some tools I find at yard sales or where ever. Got these rusted pliers for 50 cents. A few minutes on the wire wheel grinder and they great as new.

To show how much was sanded off and how the needle nose turned out. The long board will straighten alot of things out that is below the pliers.

Here is some of the sanding blocks I used. I will use the round pads on a block. The left one does have some 320 grit wet paper on it and I will use sheets when I get to that stage. I like the round pads for most of the tools I use. So much quicker and easier to change. I will rotate the pad 90 degrees to get a little more use out of it.

Last edited by Terrys87; 05-16-2013 at 05:03 PM.


