Terrys87 86 4Runner with a 2nd Chance
 11-16-2012, 04:32 AM
#841
Super Moderator
Staff
Thread Starter
iTrader: (1)
Join Date: Aug 2008
Location: Anderson Missouri
Posts: 11,788
Likes: 0
Received 25 Likes
on
22 Posts
I ordered Mistys Runner a set of Denso Plug wires. Cheaper then the parts store and the set I put on mine fit great. Better then that part store junk they sell. I also found an 1985 FSM manual on ebay for $35 and free shipping. Got it on order as well. I will keep my eyes out for a cheap FSM for IFS trucks. Every now an then one will pop up. Lukily I down loaded the FSM while they were available but having a hard copy will be so nice.
 11-16-2012, 09:45 AM
#842
Super Moderator
Staff
Thread Starter
iTrader: (1)
Join Date: Aug 2008
Location: Anderson Missouri
Posts: 11,788
Likes: 0
Received 25 Likes
on
22 Posts
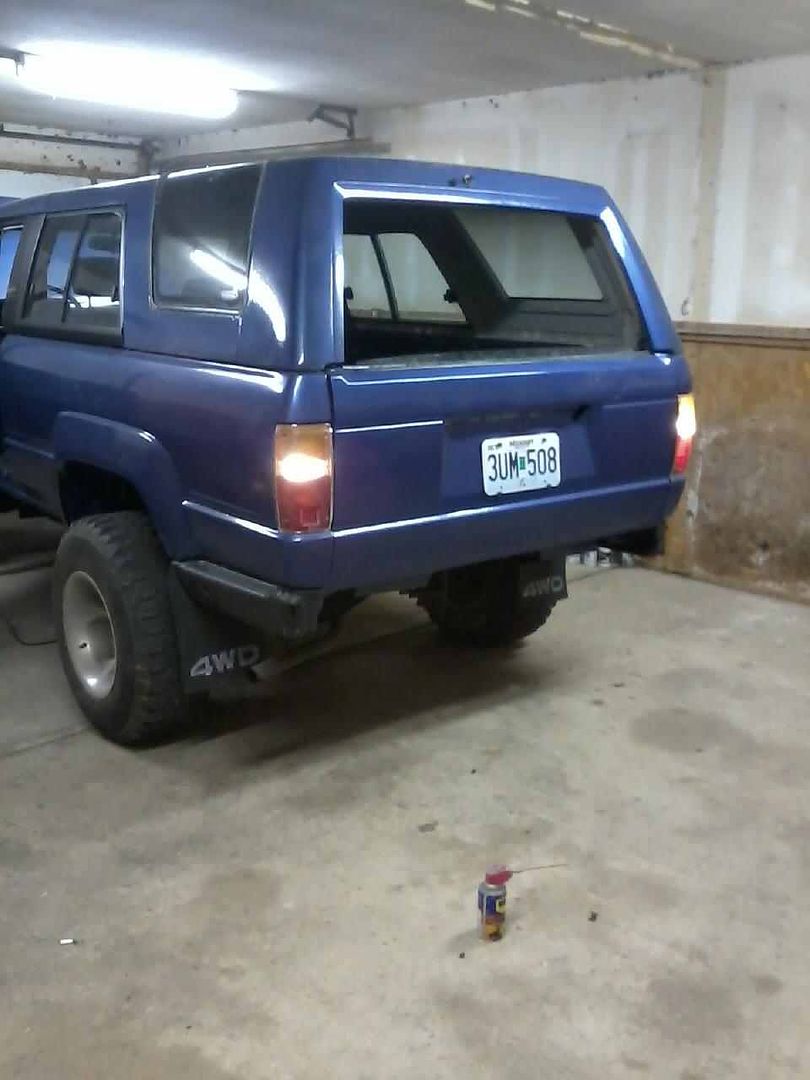
I got my antenna shaft on. One less part to keep up with. Will be awhile before I stick the stereo in but it is one small accomplishment. Also replaced my brake light, knew I was low on fluid and the light would not lite up. It was burnt out. Still wouldnt lite up with low fluid level in the brake resevoir. I had a spare resivoir cap and it lit. Added fluid and the light went out so another small fix. Also put in the missing 4WD bulb.
My Battery Charge lite is really dim when you turn the key on and not started and probably should of replaced it when I had it out. I am going to reset the odometer reading and will do it then.
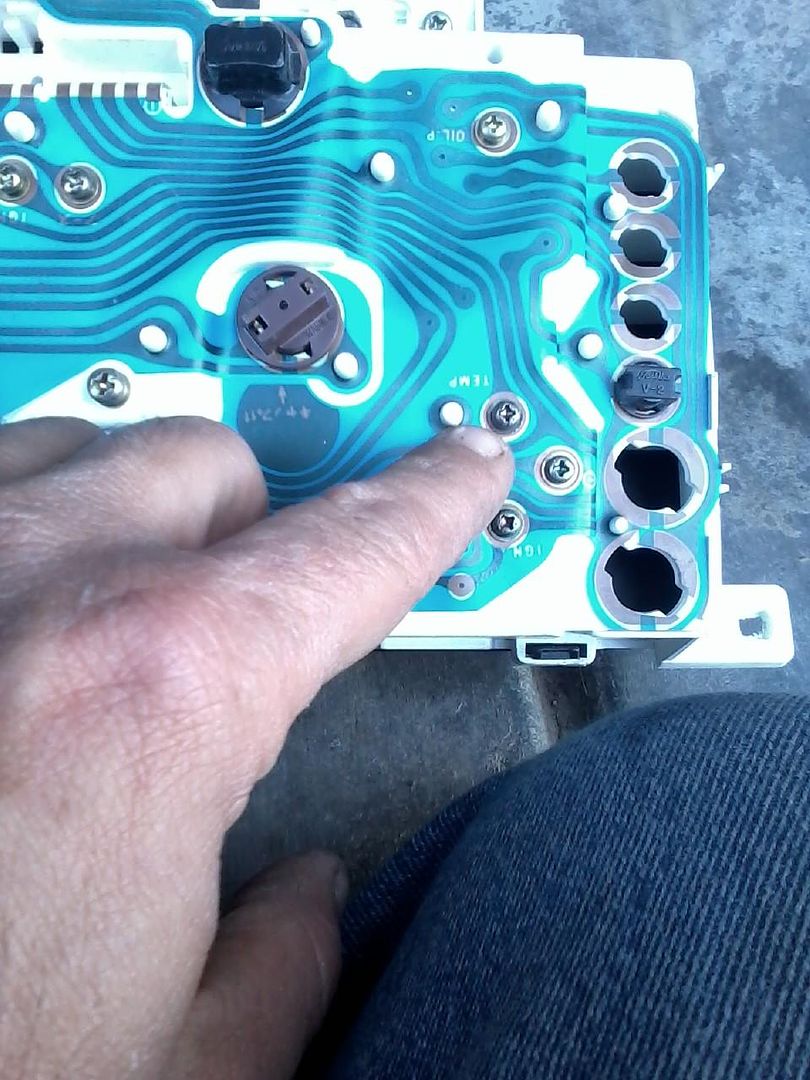
I tightened the screws up on the back of the cluster guage and cleaned the ground wire down by the kick panel fuse box. The temp guage seems to be a bit more steadier, dont know for sure. I also did it on the 88 pick up and that is where I will notice the difference if it really works on fixing the guages. If so I will add it to my 88 Runner thread.
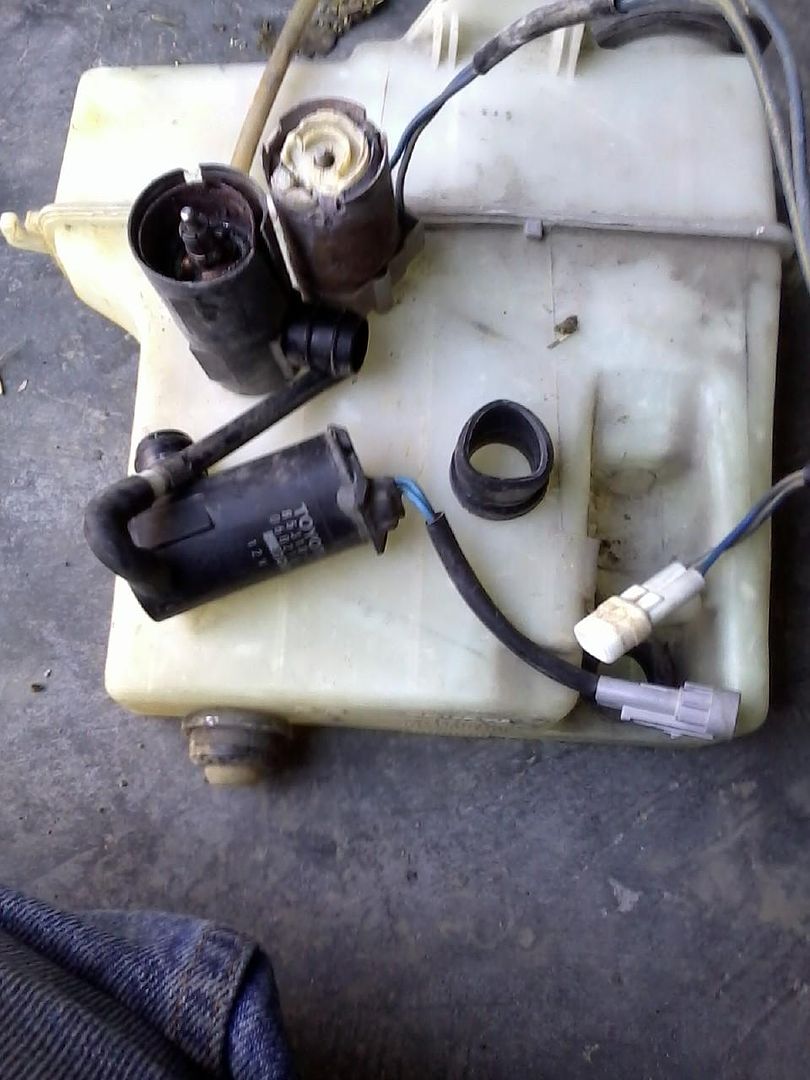
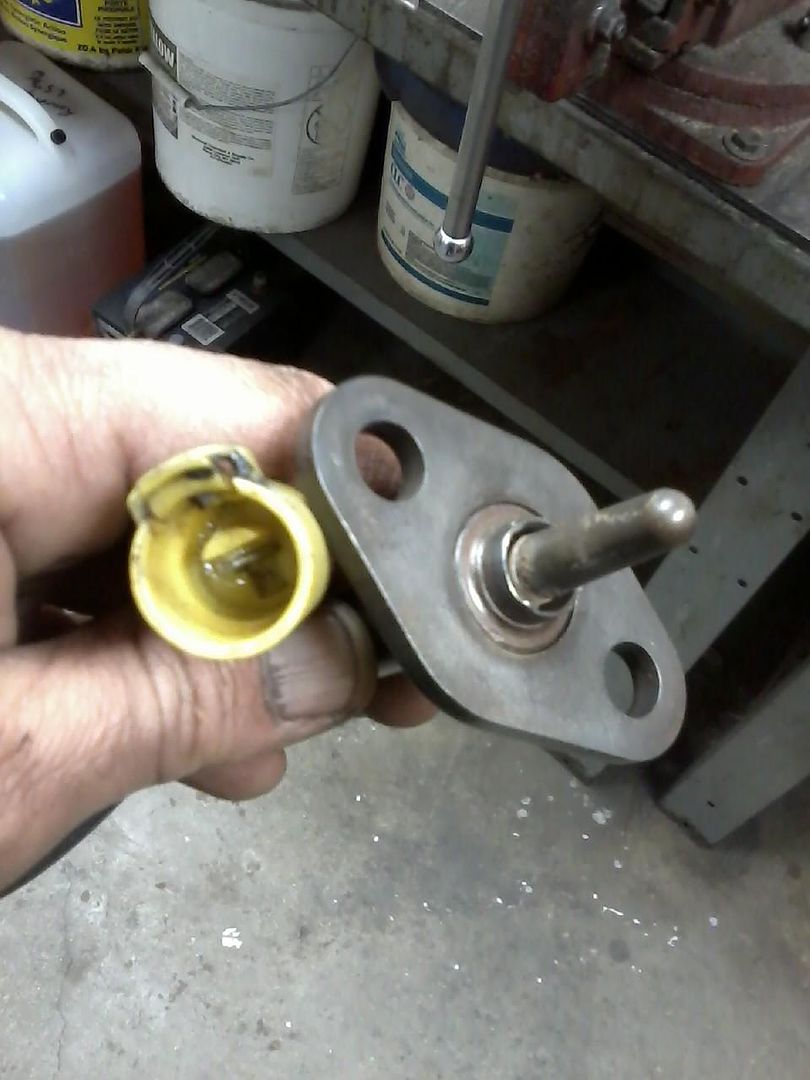
I have spent a little time on the 88 pickup. It had a washer bottle but the pump was corroded bad. I tried to find one in a boneyard off of a truck. No such luck. I found a newer Sienna van probably an 04-06 model if I was guessing and it fit the bottle. Just had to switch the plug from the old truck pump to the new van pump. Just involves a little soldering. Will start keeping newer model cars in mind for parts.
My Battery Charge lite is really dim when you turn the key on and not started and probably should of replaced it when I had it out. I am going to reset the odometer reading and will do it then.
I tightened the screws up on the back of the cluster guage and cleaned the ground wire down by the kick panel fuse box. The temp guage seems to be a bit more steadier, dont know for sure. I also did it on the 88 pick up and that is where I will notice the difference if it really works on fixing the guages. If so I will add it to my 88 Runner thread.
I have spent a little time on the 88 pickup. It had a washer bottle but the pump was corroded bad. I tried to find one in a boneyard off of a truck. No such luck. I found a newer Sienna van probably an 04-06 model if I was guessing and it fit the bottle. Just had to switch the plug from the old truck pump to the new van pump. Just involves a little soldering. Will start keeping newer model cars in mind for parts.
11-16-2012, 11:11 AM
#843
Hey Terry... thanks
Yeah, just so it's clear and concise... ;
1. Had a temp gauge that would take a while to 'come to' from it's coma... then SUDDENLY would pop up from dead-cold reading.
2. Eventually, it got really bad... So I'd have to 'SMACK ON THE CLUSTER PLEXIGLASS and it would pop up to 1/3rd or wherever it was... If I did it earlier, I could see it was lower, so it WAS reading... just not wanting to display it, lol.
3. I put in the donor(Took the Cluster apart, removed the gauge, completely, and replaced it with another from PYP), .... and it no longer seemed to stay stuck on cold.... Rather, this one seems to always be already on 1/3rd when it's cold with the key on..... It may move a lil bit... I'll test it today.... BUT, it's definitely not supposed to do that, ya know? It should start out dead-cold, then creep up... and it doesn't seem to do that.
4. My point in mentioning this is simple; Why would it POP UP out of nowhere from ZERO when I smack on the glass... before, if it wasn't in fact something wrong in the cluster or wiring nearby? And secondly, why would my new gauge installed in my original cluster not want to do much of anything.... whether I smack it or nothing?
** I'm thinking a combination of the first one being bad and my smacking the glass too often led to damage in my cluster of some kind... BUT I SEE NONE! The tape wires all seem to be in tact.... etc. I know I could always add a temp gauge... but MAN, I've tried so hard to replace things in a 'keeping that stock SR5 Look'! Ya know? My point, I guess, in part, is this; I HEAR YA on the grounds... I'll clean em up.... Already have the kick panel cover off anyhow... BUT, doesn't seem likely to me that that was my original problem, seeing as my smacking ON THE CLUSTER ITSELF was the ONLY thing to get the original gauge to come to life.. Ya know? I mean... i could rap good and firm on the top of the dash, above the cluster... NOTHING... When I took that rap directly to the glass... VOILA! And I mean a 'good smack'... not tapping it with my fingers like in an old movie about WW2 Pilots tapping lightly on their gauges.
I know this must be common... I've read lots of "My gauges don't work"... So I'm guessing part of the problem could be in the windings or whatever is in there in the gauges themselves? (kinda like the AFM windings get tweaked and unreliable or plain out busted?)
11-17-2012, 02:59 AM
#844
Super Moderator
Staff
Thread Starter
iTrader: (1)
Join Date: Aug 2008
Location: Anderson Missouri
Posts: 11,788
Likes: 0
Received 25 Likes
on
22 Posts
Hello Mark...I am going to have to wait and see if I got mine working like it should be. These are getting old, but I do like having a guage. Dont know why they ever went to idiot lights. If the ground wire and tightening the screws dont work, it is still good preventive maintainace. I will let you know if it works, but either way, it has to help somewhat.
11-17-2012, 03:17 AM
#845
Super Moderator
Staff
Thread Starter
iTrader: (1)
Join Date: Aug 2008
Location: Anderson Missouri
Posts: 11,788
Likes: 0
Received 25 Likes
on
22 Posts
Got a few small things done. For the amount of time I spent on it, sure seems I should of gotten more done. I did spend alot of time on my dome light. I will write more about that later. I got more done, just dont remember what it was.
My dash dimmer switch either worked fully bright or off. Got it replaced and working. I had to put a new plug on for my reverse lights and now have them working. I forgot to put the seperator in the passenger tail light. Should get that replaced here shortly.
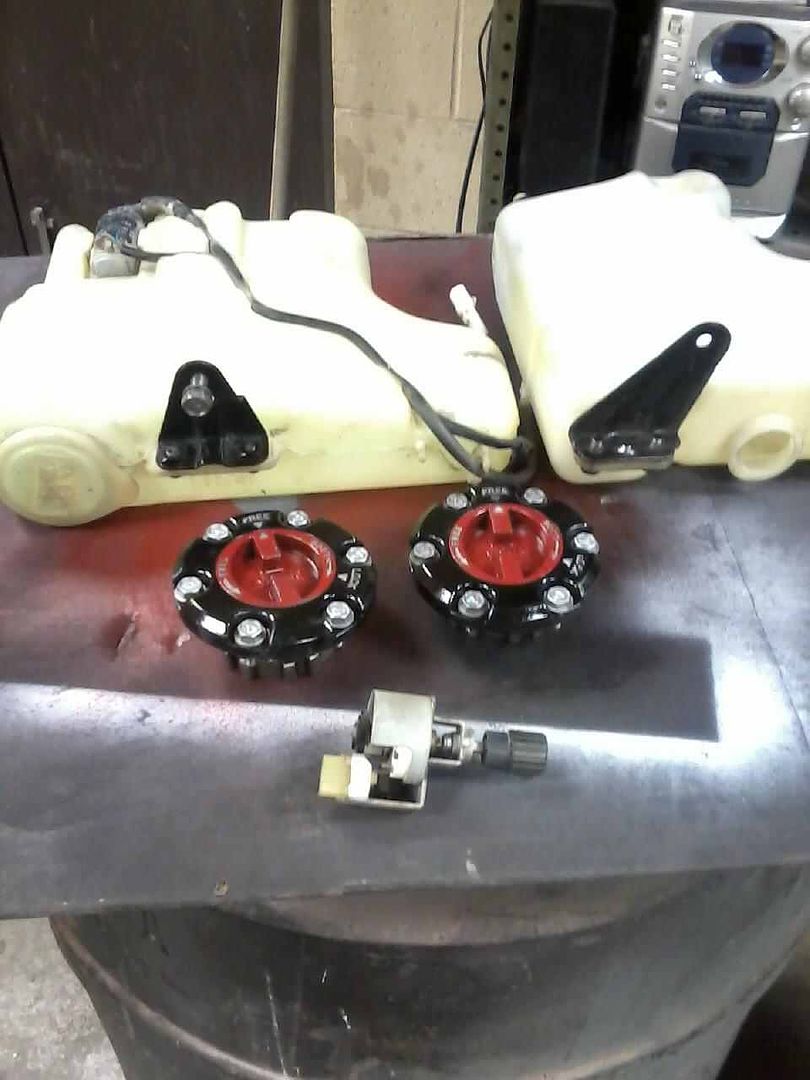
I pulled my hub dials off and gave them a fresh coat of paint. A PO used blue silicon for a gasket. I happen to have an old set of gaskets and will use them temporarily. I took my radiator overflow bottle and windshield bottle and got the insides of them cleaned and spent some time cleaning the outside of them as well.
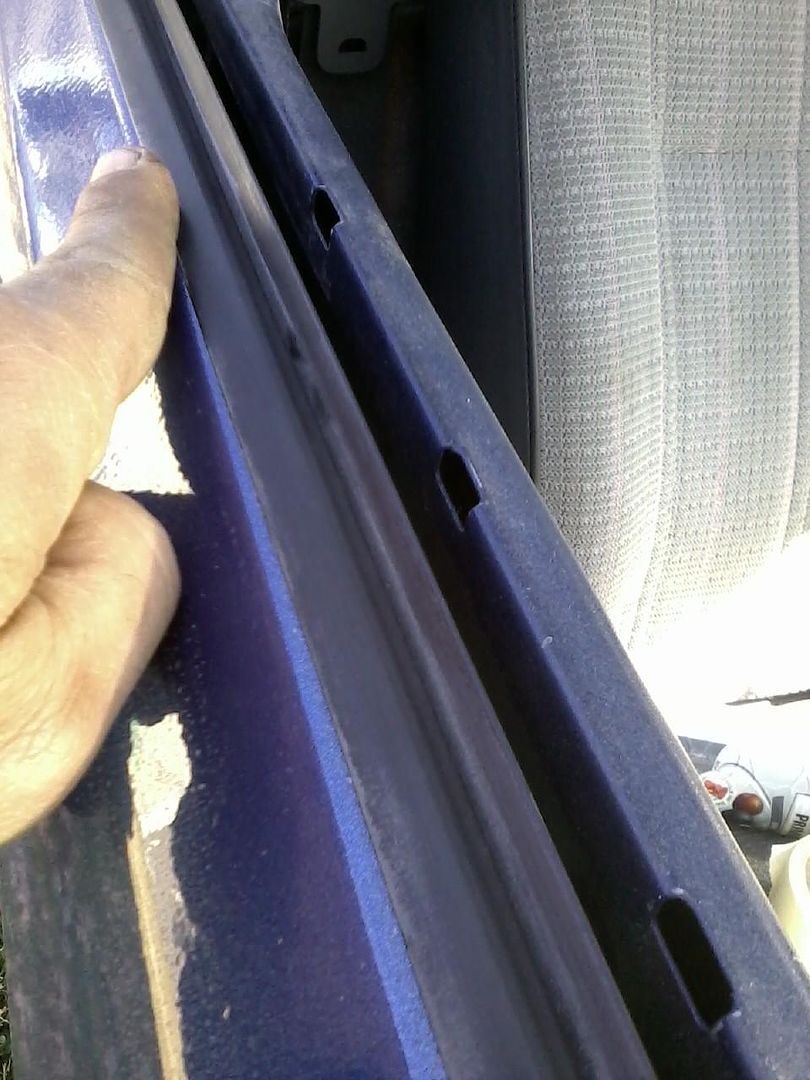
I almost have the exterior sealed up from water getting inside the doors and tailgate. I just need a few more clips. I tried getting some out of the boneyard when I was there but they are just so brittle. Will see what the dealer has to offer. Just need to get the drivers side done and it will be water tight. Still need to do the inside seals. The slots you see are the clips that are missing but get really brittle.
My dash dimmer switch either worked fully bright or off. Got it replaced and working. I had to put a new plug on for my reverse lights and now have them working. I forgot to put the seperator in the passenger tail light. Should get that replaced here shortly.
I pulled my hub dials off and gave them a fresh coat of paint. A PO used blue silicon for a gasket. I happen to have an old set of gaskets and will use them temporarily. I took my radiator overflow bottle and windshield bottle and got the insides of them cleaned and spent some time cleaning the outside of them as well.
I almost have the exterior sealed up from water getting inside the doors and tailgate. I just need a few more clips. I tried getting some out of the boneyard when I was there but they are just so brittle. Will see what the dealer has to offer. Just need to get the drivers side done and it will be water tight. Still need to do the inside seals. The slots you see are the clips that are missing but get really brittle.
11-17-2012, 07:46 AM
#846
Super Moderator
Staff
Thread Starter
iTrader: (1)
Join Date: Aug 2008
Location: Anderson Missouri
Posts: 11,788
Likes: 0
Received 25 Likes
on
22 Posts
Flushed the cooling system this morning and after getting all of the rusty antifreeze out I got a Code 4, Water Thermo Sensor. I cleared the code and took it on a long run and it hasnt come back. Truck was probably in shock of having a clean system. I did have the radiator professionally flushed but wanted to get the block and heater core stirred up before flushing.
On the long run, I did get a Code 5 which is O2 sensor which doesnt surprise me as I am sure the one that is in it is probably the orginal. No big deal, but it will have to wait before I can order one. When I do order one it will be from http://www.sparkplugs.com/product.aspx?zpid=17828 usually I find them to have the best price and can get orginal replacements from them.
On the long run, I did get a Code 5 which is O2 sensor which doesnt surprise me as I am sure the one that is in it is probably the orginal. No big deal, but it will have to wait before I can order one. When I do order one it will be from http://www.sparkplugs.com/product.aspx?zpid=17828 usually I find them to have the best price and can get orginal replacements from them.
11-18-2012, 07:32 AM
#847
Super Moderator
Staff
Thread Starter
iTrader: (1)
Join Date: Aug 2008
Location: Anderson Missouri
Posts: 11,788
Likes: 0
Received 25 Likes
on
22 Posts
Runner has been running great for the last 200 miles. I cleaned the Water Thermos Sensor and got that code to go away. I tried cleaning the O2 sensor and cleared the code, but after about 12 miles it came back on so it is gonna need replaced.
I cleaned inside of the frame with a high pressure hose and would guess I got about a 3 gallon bucket of sand out of it. I took an air hose to it along time ago and am hoping the water will get the rest of it out. I will check it out when things warm up later. I spent alot of time on it so hopefully I got it.
I also got my SR5 lights wired in permanent now. There is just one hot wire to it and it gets its ground from the mounting plate. One of the screws that holds it to the roof acts as the ground. I ran a ground wire from it over to the A pillar and down to the ground bolt by the fuse panel. It is working alot better.
I am going to need to replace the dome light that I pulled out of a pick up as the one I have apperently has gotten hot and melted in a place that isnt letting it make full contact with the rivets. I tried to fix it but it really was a waste of time.
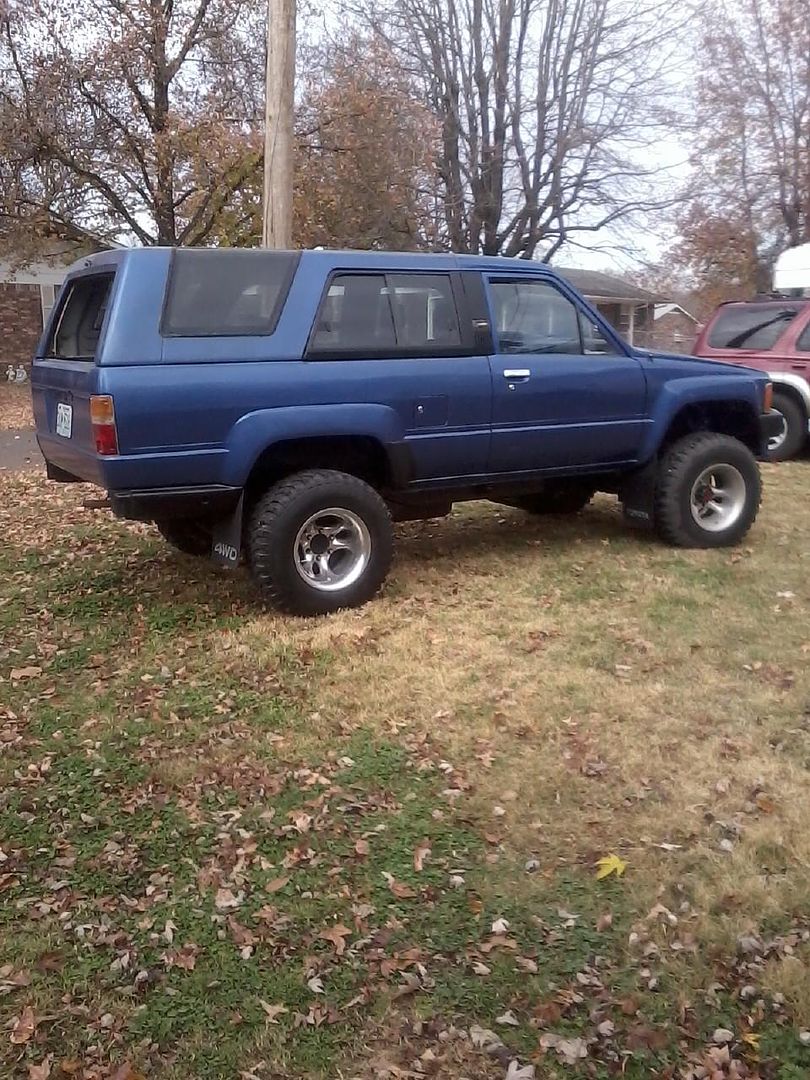
Trying to convince Misty that she needs my tires. They ride nice, but they are noisey. I like the loudness on other peoples trucks and the same with glass packs, cherry bombs and such, just not on mine. I have always liked the BFGs but that is going to be awhile before that happens.
I also think that either these tires are really heavy or Mistys runner is geared more to the way I like it. I will eventually compare the gears she has in hers and if they are different will get what she has. She has ran 31s before and it will get up and run for a 4 cylinder.
Mine runs alright but not nearly as quick as hers is. The problems that I want to fix that annoys me is the Check engine light (O2 sensor), noisey tires, and I am not comfortable in the front seats I have, so I will start looking for some good replacements. Mistys seats I have ridden several hours in and they never bothered me. It does ride like a 4 wheel drive and I think shocks and tires will fix that.
I have had it up to 70 mph and I know it has more in it but I dont want to push it to hard until I get more miles on it and let things still get broke in. Each fix or adjustment I have done is making it a little more enjoyable and funner to drive. Starting to get some confidence in it as of now. Still along ways to where I want it but it has come along ways from where it was so I am happy to have it at this point.
Everytime I have stopped for gas or junk food, I have someone to come and look at it get alot of compliment on it. Then they see the interior fairly stripped and can only imagine what they think then. I tell them it is a work in progress.
Cleaning didnt fix this O2 sensor, grrr, but it did work on the Thermo sensor.
I cleaned inside of the frame with a high pressure hose and would guess I got about a 3 gallon bucket of sand out of it. I took an air hose to it along time ago and am hoping the water will get the rest of it out. I will check it out when things warm up later. I spent alot of time on it so hopefully I got it.
I also got my SR5 lights wired in permanent now. There is just one hot wire to it and it gets its ground from the mounting plate. One of the screws that holds it to the roof acts as the ground. I ran a ground wire from it over to the A pillar and down to the ground bolt by the fuse panel. It is working alot better.
I am going to need to replace the dome light that I pulled out of a pick up as the one I have apperently has gotten hot and melted in a place that isnt letting it make full contact with the rivets. I tried to fix it but it really was a waste of time.
Trying to convince Misty that she needs my tires. They ride nice, but they are noisey. I like the loudness on other peoples trucks and the same with glass packs, cherry bombs and such, just not on mine. I have always liked the BFGs but that is going to be awhile before that happens.
I also think that either these tires are really heavy or Mistys runner is geared more to the way I like it. I will eventually compare the gears she has in hers and if they are different will get what she has. She has ran 31s before and it will get up and run for a 4 cylinder.
Mine runs alright but not nearly as quick as hers is. The problems that I want to fix that annoys me is the Check engine light (O2 sensor), noisey tires, and I am not comfortable in the front seats I have, so I will start looking for some good replacements. Mistys seats I have ridden several hours in and they never bothered me. It does ride like a 4 wheel drive and I think shocks and tires will fix that.
I have had it up to 70 mph and I know it has more in it but I dont want to push it to hard until I get more miles on it and let things still get broke in. Each fix or adjustment I have done is making it a little more enjoyable and funner to drive. Starting to get some confidence in it as of now. Still along ways to where I want it but it has come along ways from where it was so I am happy to have it at this point.
Everytime I have stopped for gas or junk food, I have someone to come and look at it get alot of compliment on it. Then they see the interior fairly stripped and can only imagine what they think then. I tell them it is a work in progress.
Cleaning didnt fix this O2 sensor, grrr, but it did work on the Thermo sensor.
11-18-2012, 10:04 AM
#849
Not as quick as hers, eh? I get that often.... Even redeth(he has a brand newly rebuilt 3.0) is shocked how my truck just takes off from stops and on through the gears.... right on up to 90mph.. I leave most older yotas at that point, hehehe. I know, I have a few engine mods... but most of the source of that, I'm largely sure, is the CAM. The valves don't hurt either.. BUT, the CAM does MUCH better on hills than it was before I swapped it out.
The gears DID also help... I'm only running 4.30's with 31's and 32's(I have both sets).... BUT, they're an improvement from 4.10's, and I gotta tell ya.... I'm not struggling up mostly any hills from L.A. to AZ.... And Jason will tell ya... that's amazing! hahaha.
STILL sucking on city mileage(at least I say it sux to have to fill it so often! lol)... But the hills and constant sitting 80% of the time at lights.. That's a huge part of it, I realize that too. On the highway, however.... well, you know, around 21-23mpg depending on incline/wind/etc. City? 14mpg average. lol.
lol.
The gears DID also help... I'm only running 4.30's with 31's and 32's(I have both sets).... BUT, they're an improvement from 4.10's, and I gotta tell ya.... I'm not struggling up mostly any hills from L.A. to AZ.... And Jason will tell ya... that's amazing! hahaha.
STILL sucking on city mileage(at least I say it sux to have to fill it so often! lol)... But the hills and constant sitting 80% of the time at lights.. That's a huge part of it, I realize that too. On the highway, however.... well, you know, around 21-23mpg depending on incline/wind/etc. City? 14mpg average.
lol.
 11-19-2012, 01:49 AM
#851
Super Moderator
Staff
Thread Starter
iTrader: (1)
Join Date: Aug 2008
Location: Anderson Missouri
Posts: 11,788
Likes: 0
Received 25 Likes
on
22 Posts
Thanks junk4u...I have been steadily just moving forward on it. Figure each step is a closer step to getting it done.
Hello Mark... I have gotten Mistys to 90 just to see what it would do. I could do 75, and maybe 80, but think that would be pushing it. I got to get my fuel guage working soon. I had been running around in it and when I set the tripometer, I hadnt taken into the account of the miles I had run before. It took nearly 12 gallons to fill it up, and to think I almost didnt stop for fuel. If I hadnt gotten fuel, I could of wound up walking.
Thanks Brandon...I am doing alot of small things that arent really showing, but I am going to keep getting something done. I seen your thread and it looks as if you have started. Looking good from what I had seen.
11-19-2012, 02:04 AM
#852
Super Moderator
Staff
Thread Starter
iTrader: (1)
Join Date: Aug 2008
Location: Anderson Missouri
Posts: 11,788
Likes: 0
Received 25 Likes
on
22 Posts
Misty drove my runner today and she doesnt want the tires. She doesnt want the noise as well. I still need to Peel and Seal my doors and get the shifter boot on and that would probably quiten things down alot.
With Christmas and Thanksgiving coming up and all the travel involved, I will be on my "Freebie Week" where I do things that dont require funds such as repairs, cleaning , and using parts I already have. I forgot about an old O2 Sensor that I have laying around so I will be trying that one soon,that is a Freebie and I will replace it with a new when I start doing regular maintaince on it.
I also have my "Cheapie Week" where I spend $15 or less on parts or materials that will keep me moving forward. So far I have plenty to keep me busy that I dont need to spend anything this week. I dont care for having to hold back on the funds, but it actually works out great. It makes you get the things done that you would normally put off.
I have been putting off getting my rims cleaned and looking at the back brakes. I got the drivers side brake hub off and that was the one that had the seal leak. I couldnt get the passenger side off so that will be a freebie job. I am sure I have several, just need to look around and see what needs done. There is always something.
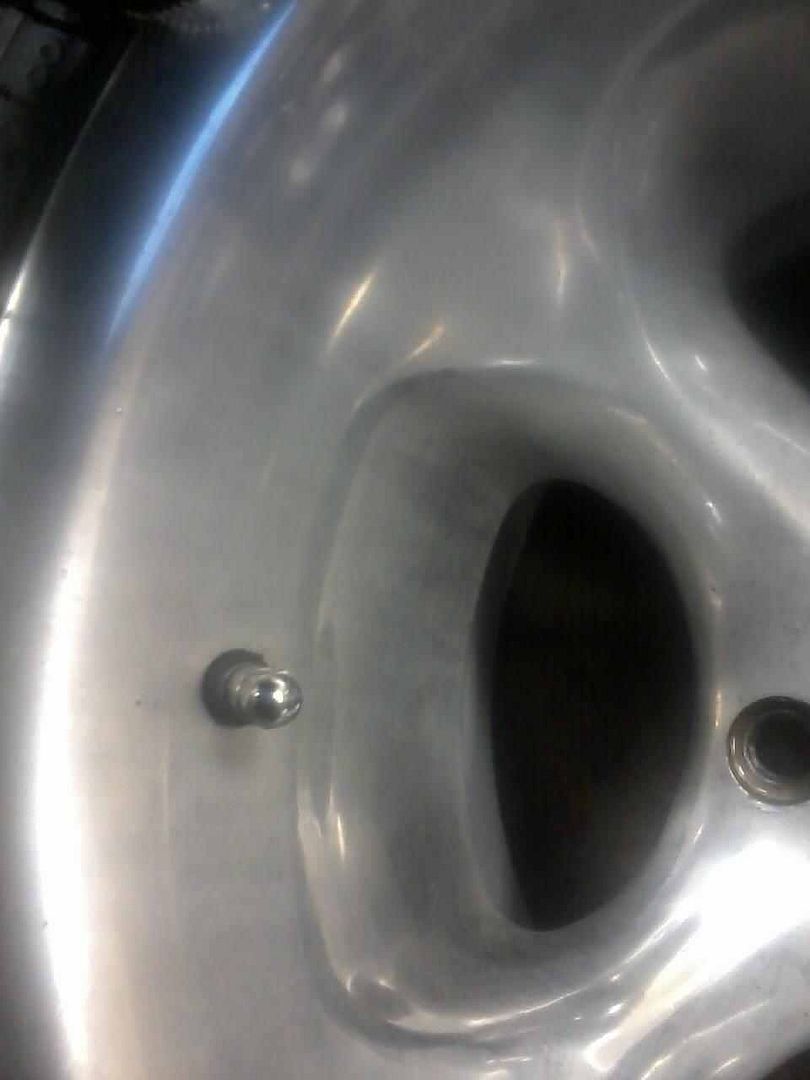
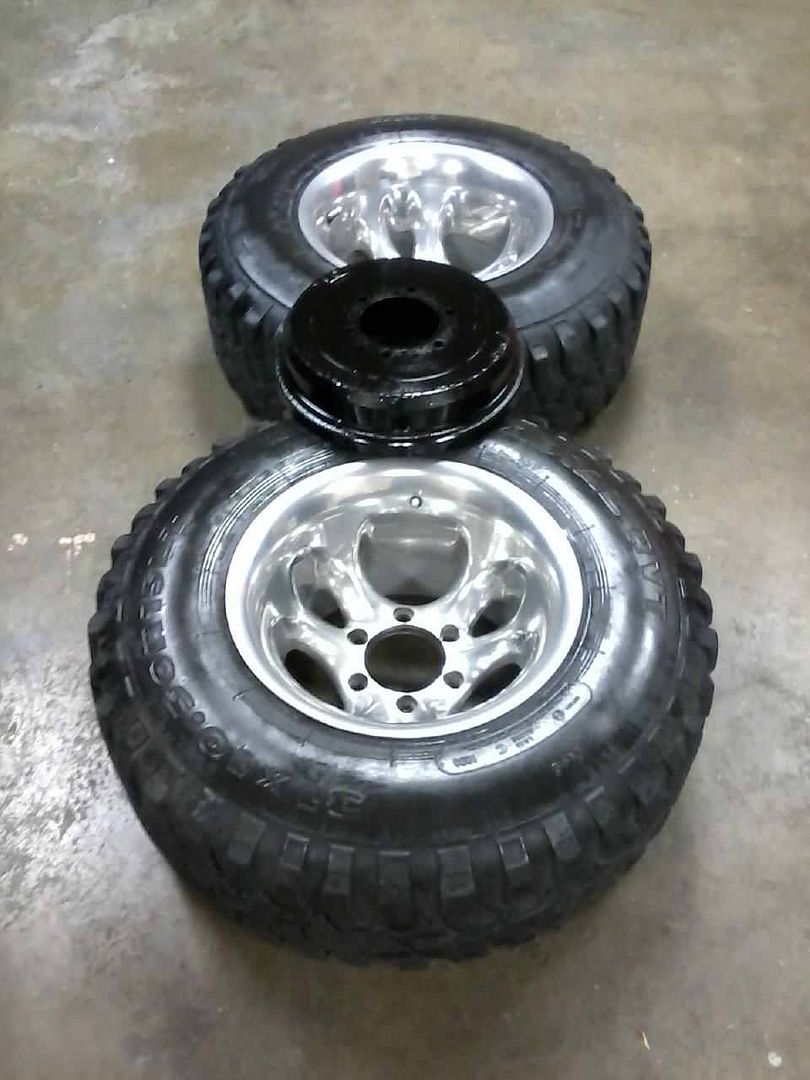
I worked on my back rims. The top one is halfway cleaned. It took alot of scrubbing. I had some Never Dull and Meguiars polish. The bottom one hasnt been touched. In previous pictures, the rims look good, but it did take alot of scrubbing to get them cleaned. I may still do some more on these at a later time, but this got them alot cleaner then before.
It may not look like in the picture but they were dirtyyyy.
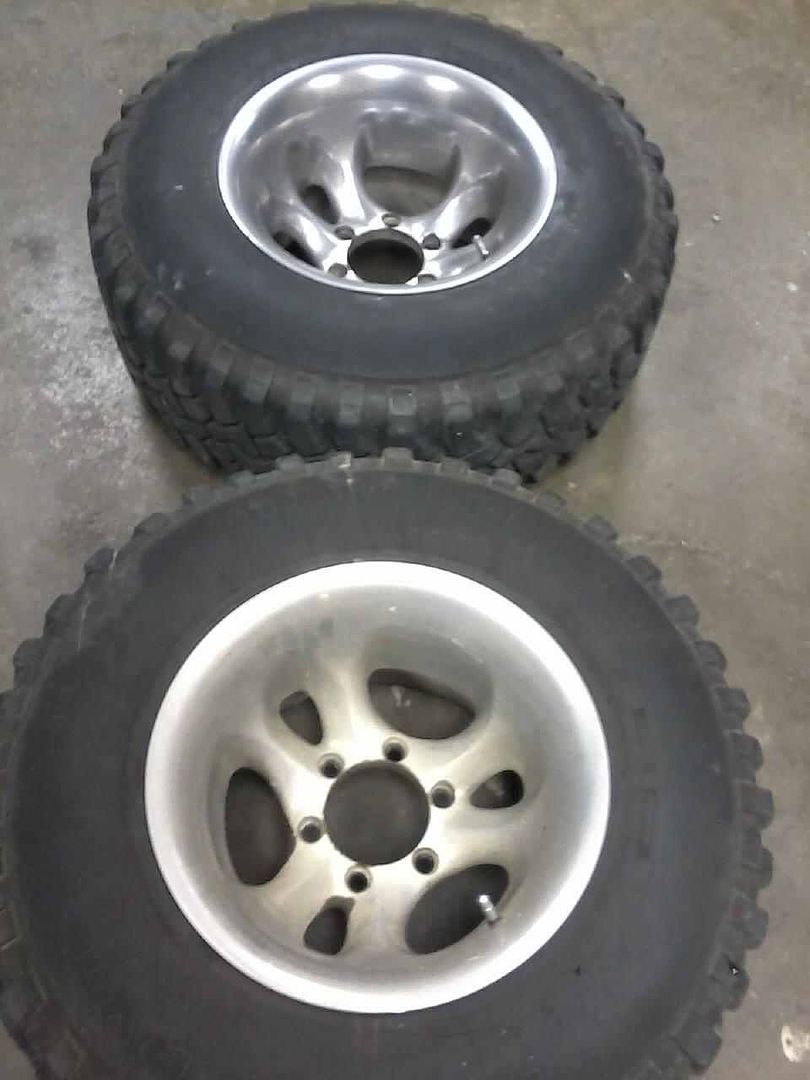
Here they are done. Now I still need to do the front tires and passenger hub. The hubs are rusty and a greasy mess. I will take the hubs in later and see if they need turned. Right now I just want to get everything cleaned up so when I get to that stage I can just do the brakes and go.
Alot of scrubbing involved.
Install Driver Visor
Inspect rear hubs
Tank Float
Tighten bolts
Wet Sand
Shifter Boots
Clean Under Carriage
Work on Exhaust Leak
Bleed Rear Brakes
Adjust Valves
4WD Indicator
Door Panels
Shine Bumper
Remove Lift
Fix Passenger Seat
Clean/Install Rear Panels
Dome Light
With Christmas and Thanksgiving coming up and all the travel involved, I will be on my "Freebie Week" where I do things that dont require funds such as repairs, cleaning , and using parts I already have. I forgot about an old O2 Sensor that I have laying around so I will be trying that one soon,that is a Freebie and I will replace it with a new when I start doing regular maintaince on it.
I also have my "Cheapie Week" where I spend $15 or less on parts or materials that will keep me moving forward. So far I have plenty to keep me busy that I dont need to spend anything this week. I dont care for having to hold back on the funds, but it actually works out great. It makes you get the things done that you would normally put off.
I have been putting off getting my rims cleaned and looking at the back brakes. I got the drivers side brake hub off and that was the one that had the seal leak. I couldnt get the passenger side off so that will be a freebie job. I am sure I have several, just need to look around and see what needs done. There is always something.
I worked on my back rims. The top one is halfway cleaned. It took alot of scrubbing. I had some Never Dull and Meguiars polish. The bottom one hasnt been touched. In previous pictures, the rims look good, but it did take alot of scrubbing to get them cleaned. I may still do some more on these at a later time, but this got them alot cleaner then before.
It may not look like in the picture but they were dirtyyyy.
Here they are done. Now I still need to do the front tires and passenger hub. The hubs are rusty and a greasy mess. I will take the hubs in later and see if they need turned. Right now I just want to get everything cleaned up so when I get to that stage I can just do the brakes and go.
Alot of scrubbing involved.
Install Driver Visor
Inspect rear hubs
Tank Float
Tighten bolts
Wet Sand
Shifter Boots
Clean Under Carriage
Work on Exhaust Leak
Bleed Rear Brakes
Adjust Valves
4WD Indicator
Door Panels
Shine Bumper
Remove Lift
Fix Passenger Seat
Clean/Install Rear Panels
Dome Light
Last edited by Terrys87; 11-20-2012 at 02:24 PM.
11-19-2012, 01:13 PM
#853
Super Moderator
Staff
Thread Starter
iTrader: (1)
Join Date: Aug 2008
Location: Anderson Missouri
Posts: 11,788
Likes: 0
Received 25 Likes
on
22 Posts
I got the tires on the back of the runner. They look like chrome. Was surprised at the difference. Spent alot of the day swapping heater cores out of the pick up. I had it out in 45 minutes. Took about 2 and half hours to put it back in, but alot of that time was trying to get the clock wiring working and the other wires working under there. I will update it tonite or possibly tomorrow.
Still need to do the front tires.
Still need to do the front tires.
Last edited by Terrys87; 01-11-2013 at 10:43 AM.
11-19-2012, 05:41 PM
#855
 11-20-2012, 12:27 AM
#857
Super Moderator
Staff
Thread Starter
iTrader: (1)
Join Date: Aug 2008
Location: Anderson Missouri
Posts: 11,788
Likes: 0
Received 25 Likes
on
22 Posts
Thanks Cyberhorn... I wasnt expecting such a change in them. I really thought they would have that dull aluminum look.
Hello RAD4Runner...The 2 inch lift makes it seem level. There is only about 2 inches between the bump stops. I havent done the ZUK mod yet. I have been checking out different springs for the ZUK mod. I did the Black Magics Springs on Mistys Runner and it has settled down alot, but it still has a slight rake to it that I keep hoping will go away, I dont want the rake and think when I cut my lift down, it will be more noticeable.
Hello Brandon... I am ready to take to some power line trails. I am wondering how it is going to do. I am hoping to take it in the next couple of weeks. Still have a few more issues to work out, but it is getting road worthy fairly quickly. I got it running just enough to pass inspection as I know what they check for. Luckily they dont test drive them and for very far. It would of failed miserably, but I wanted it to where I could run it to different shops. It is getting closer to being roadworthy. Might get to get some poser shots in a week or so.
11-20-2012, 12:30 AM
#858
Super Moderator
Staff
Thread Starter
iTrader: (1)
Join Date: Aug 2008
Location: Anderson Missouri
Posts: 11,788
Likes: 0
Received 25 Likes
on
22 Posts
Been working on my front wheels. These have a little more tarnish on them then the rear wheels had. They look alot better then when I started. I will have to wait and get one of them power balls that is used for polishing them. The elbow grease is getting low. It has been a work out. Anybody got any tips for getting this tarnish off?