
Terrys87 86 4Runner with a 2nd Chance
 10-22-2012, 11:56 PM
#761
Super Moderator
Staff
Thread Starter
iTrader: (1)
Join Date: Aug 2008
Location: Anderson Missouri
Posts: 11,788
Likes: 0
Received 25 Likes
on
22 Posts
Hello Mark..I found a guy on Clist that had one. He bought the truck from someone that had it shipped from California. He is fabbing his own bumper. It is in great shape. Wahoo, now I just need a rear bumper.
Hello Jason..Thanks.. I plan on getting something done on mine this week. I got the end cap brackets off of your parts truck and plan on getting the bumper shined up tomorrow. I will start splitting my time between the two trucks and Steves is about done so mine should start moving again soon.
Thanks Cyberhorn..I was really lucky that I found it. I need to get back with that guy and see if he has a rear one. He thought that he did so I am hoping it works out. Carpentry is not my strongest skill at all, nor my favorite, but we all get a dose of it from time to time. Hope it goes well for you.
Thanks Cyberhorn..I was really lucky that I found it. I need to get back with that guy and see if he has a rear one. He thought that he did so I am hoping it works out. Carpentry is not my strongest skill at all, nor my favorite, but we all get a dose of it from time to time. Hope it goes well for you.
 10-24-2012, 03:54 PM
#762
Super Moderator
Staff
Thread Starter
iTrader: (1)
Join Date: Aug 2008
Location: Anderson Missouri
Posts: 11,788
Likes: 0
Received 25 Likes
on
22 Posts
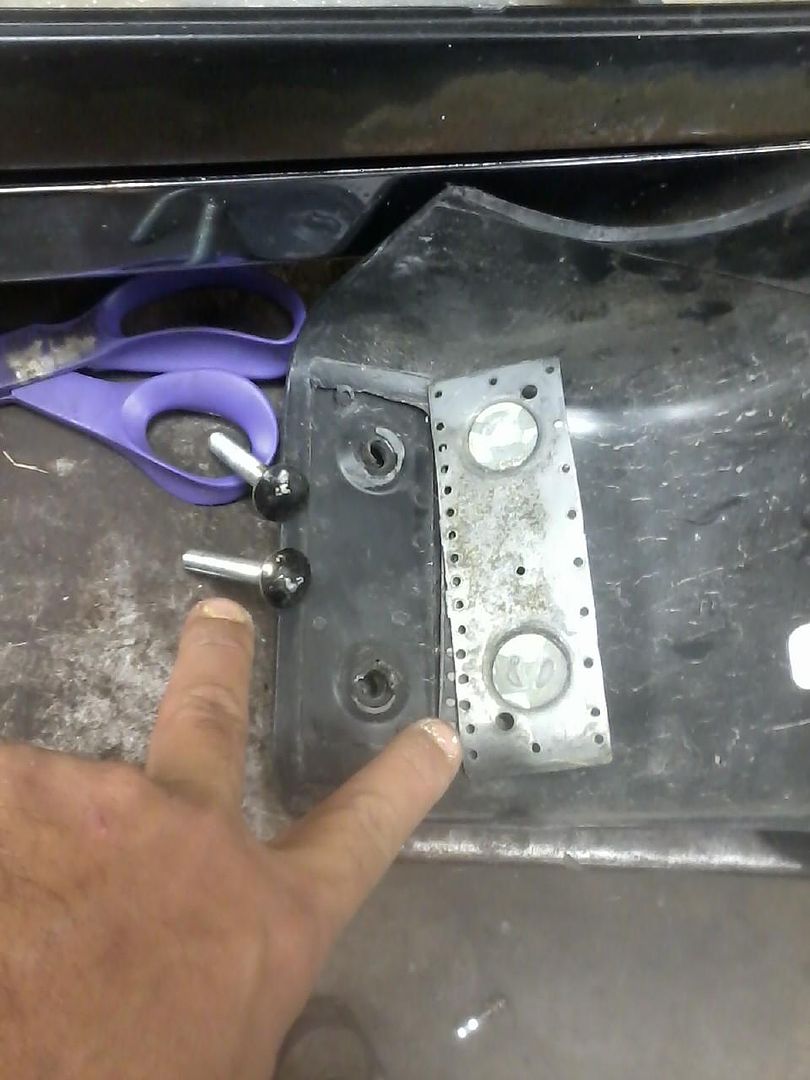
Been working on my new to me bumper. While at Jasons, I got the brackets that support the end caps. Got all of the nuts and bolts operating freely and will be getting them on tomorrow. Also cleaned and painted the bumper brackets and the filler pad.
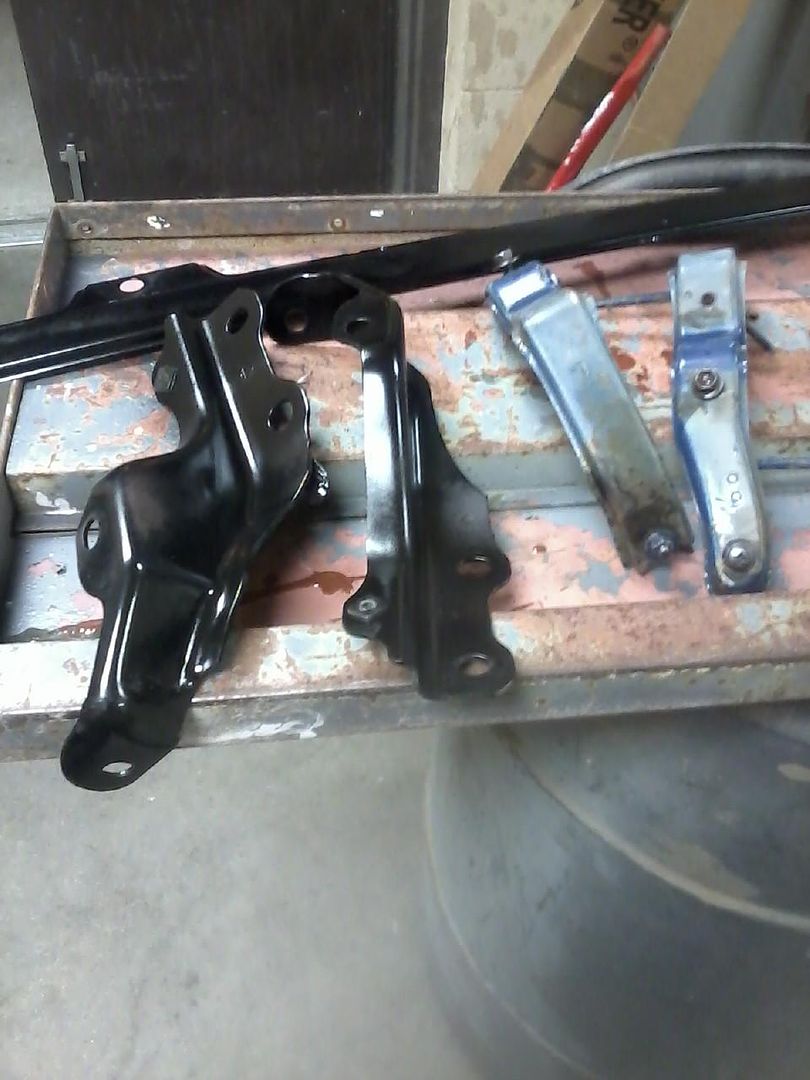
The tab that connects the end cap to the bumper usually gets broken off and then the end cap comes up missing. Now I just drill a whole and use carriage bolts that are just a little larger then what is in the rest of the bumper, that it looks like it is factory. Most wont know the difference and I would rather have the end cap with carriage bolts instead of it missing.
The right one is with it bolted loosely in place as I need to get some trim paint and mount the bumper tomorrow. The left side is the piece that usually seperates from the end cap. I just throw the metal tab away as I have tried several different glues and none really work that I have tried.
Last edited by Terrys87; 12-14-2012 at 05:30 AM.
10-24-2012, 08:40 PM
#763
Registered User
that is an awesome tip terry! as im gona likely get mine new (rather find used) im going to do that to them so they dont go falling off on the freeway or on some farm road
10-28-2012, 12:52 AM
#765
Super Moderator
Staff
Thread Starter
iTrader: (1)
Join Date: Aug 2008
Location: Anderson Missouri
Posts: 11,788
Likes: 0
Received 25 Likes
on
22 Posts
Thanks Mark and Cyberhorn... I have had the same problem of them breaking and falling off and with the carriage bolts, it could seem like it was done that way at the factory is what I am going for on that fix.
10-28-2012, 01:01 AM
#766
Super Moderator
Staff
Thread Starter
iTrader: (1)
Join Date: Aug 2008
Location: Anderson Missouri
Posts: 11,788
Likes: 0
Received 25 Likes
on
22 Posts
In the next few days, I should have the 88 truck build wrapped up and have been tinkering with my runner a little bit but nothing really picture worth. Am hoping Monday to get my new to me bumper on, get the brakes working as they should and when this runner was my parts truck, I used the Cold Start Timing Switch off of it for Mistys truck and I got one from Jason last week. This thread should start moving again here in a few more days. Got all of my painting done that I was hoping to get done other then the tailgate for the 88 truck build so will be doing more interior work and motor work during the winter months. Got alot planned out.
While getting the runner back in the shop, it has gotten cold here and had to pull out the torpedo heater and it helped but with the draft and non insulation, it was barely able to keep caught up. I did pull it apart and give it a cleaning and changed the plug. I used 1 gallon of farm red diesel and it is alot cheaper then kerosene and worked in the shop for about 4 hours and it didnt have any fumes or cause any problems. Just thought I would post this for others that may use these heaters. Red diesel works great. May need to change plug and give a good cleaning with an air hose as mine was dirty.
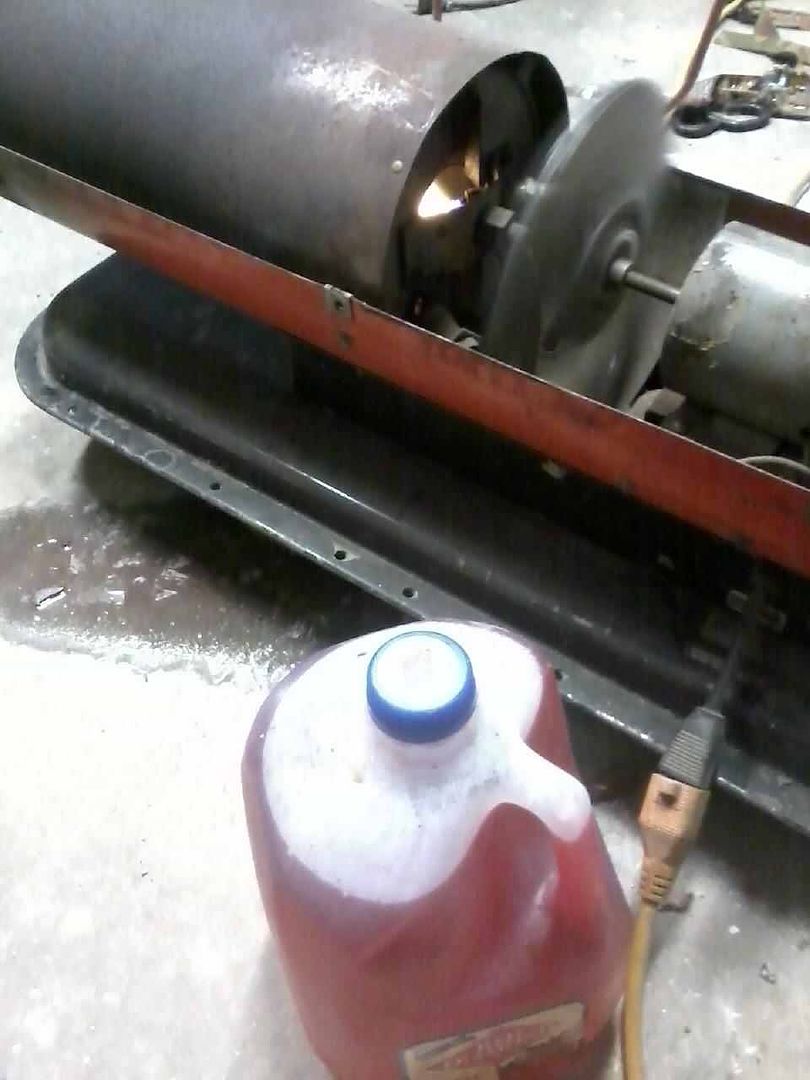
While getting the runner back in the shop, it has gotten cold here and had to pull out the torpedo heater and it helped but with the draft and non insulation, it was barely able to keep caught up. I did pull it apart and give it a cleaning and changed the plug. I used 1 gallon of farm red diesel and it is alot cheaper then kerosene and worked in the shop for about 4 hours and it didnt have any fumes or cause any problems. Just thought I would post this for others that may use these heaters. Red diesel works great. May need to change plug and give a good cleaning with an air hose as mine was dirty.
10-30-2012, 01:54 AM
#767
Super Moderator
Staff
Thread Starter
iTrader: (1)
Join Date: Aug 2008
Location: Anderson Missouri
Posts: 11,788
Likes: 0
Received 25 Likes
on
22 Posts
I got my Cold Start Timing Switched changed out, got my new to me bumper on, and the end cap support brackets on. Took alot longer then I expected as I had to get all of the sheet metal realigned for the lower part as it was bumped by the PO. Still have some more adjustments to do on the front end including the hood but am slowly but surely get there eventually. I also picked up a new inner seal for the rear axle. I am hoping to get it changed out in the next few days if all goes well.
My left front brake caliper is dragging so I thought I would just pull on out of the shed and do a quick swap. That isnt going to work. The replacement caliper is in bad shape, but years ago, I used to rebuild them. Not as bad as you may think. That is if you can still get the seal kits for them. I do have a little honer to clean the walls out with.
Here is the replacement caliper. Just 4 bolts hold it together.

Here it is disassembled. Just hone the cylinder and replace the seal is what used to come in the rebuild kits. The black o rings seal against the area where my finger is.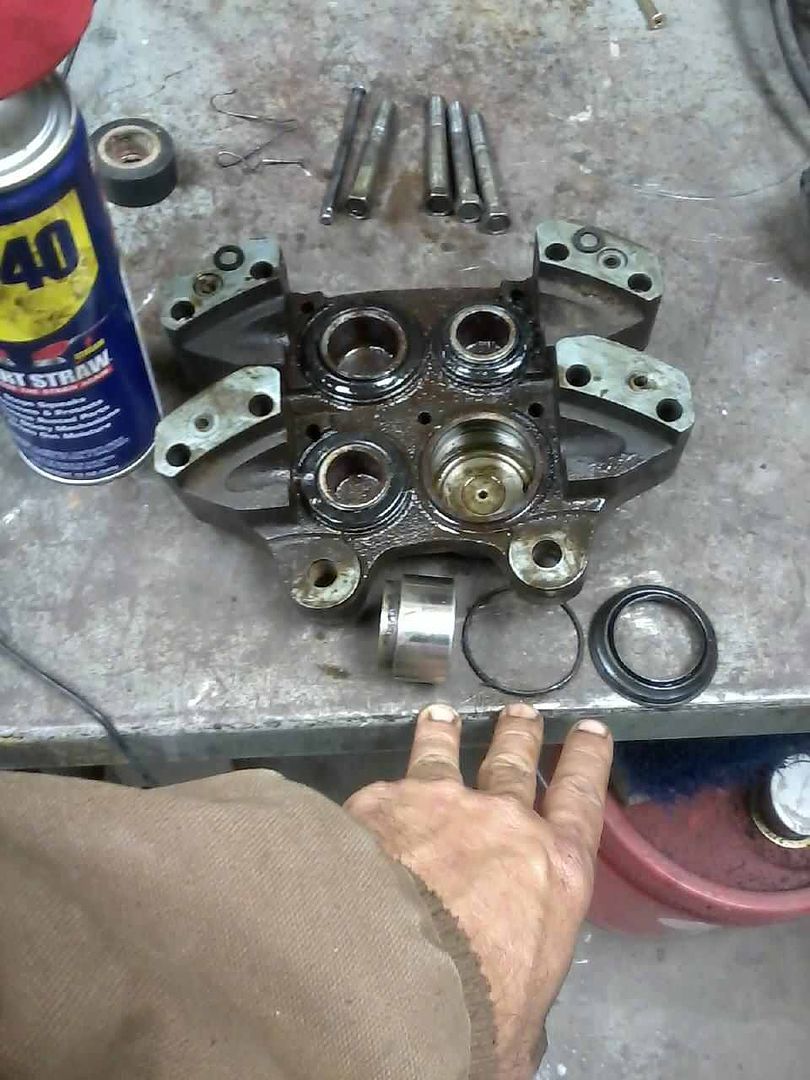
These little seals are all that seals the two pieces of the caliper together. I have the caliper soaking in WD40 and will hit them with an air hose again to get the pistons out. They look bad, but usually clean up nice with a little time and patience. My finger is showing how much it is plugged up. I try to once a year or so to flush all of the old brake fluid out to avoid alot of this mess.
My left front brake caliper is dragging so I thought I would just pull on out of the shed and do a quick swap. That isnt going to work. The replacement caliper is in bad shape, but years ago, I used to rebuild them. Not as bad as you may think. That is if you can still get the seal kits for them. I do have a little honer to clean the walls out with.
Here is the replacement caliper. Just 4 bolts hold it together.
Here it is disassembled. Just hone the cylinder and replace the seal is what used to come in the rebuild kits. The black o rings seal against the area where my finger is.
These little seals are all that seals the two pieces of the caliper together. I have the caliper soaking in WD40 and will hit them with an air hose again to get the pistons out. They look bad, but usually clean up nice with a little time and patience. My finger is showing how much it is plugged up. I try to once a year or so to flush all of the old brake fluid out to avoid alot of this mess.
Last edited by Terrys87; 12-14-2012 at 05:37 AM.
10-30-2012, 01:51 PM
#770
Super Moderator
Staff
Thread Starter
iTrader: (1)
Join Date: Aug 2008
Location: Anderson Missouri
Posts: 11,788
Likes: 0
Received 25 Likes
on
22 Posts
Hello Mark.. The V6 brakes are on the list and with all of the pulling I do, I need them. Just will need to wait a little bit. Trying to get the shortbed done and out of here and I am on the hunt for a fix and sell to get my runner upgraded and moving along alot quicker.
10-30-2012, 01:56 PM
#771
Super Moderator
Staff
Thread Starter
iTrader: (1)
Join Date: Aug 2008
Location: Anderson Missouri
Posts: 11,788
Likes: 0
Received 25 Likes
on
22 Posts
Pulled the rear axle to replace the inner seal. Here is a trick I do when I need a little more leverage to get a nut or bolt off.
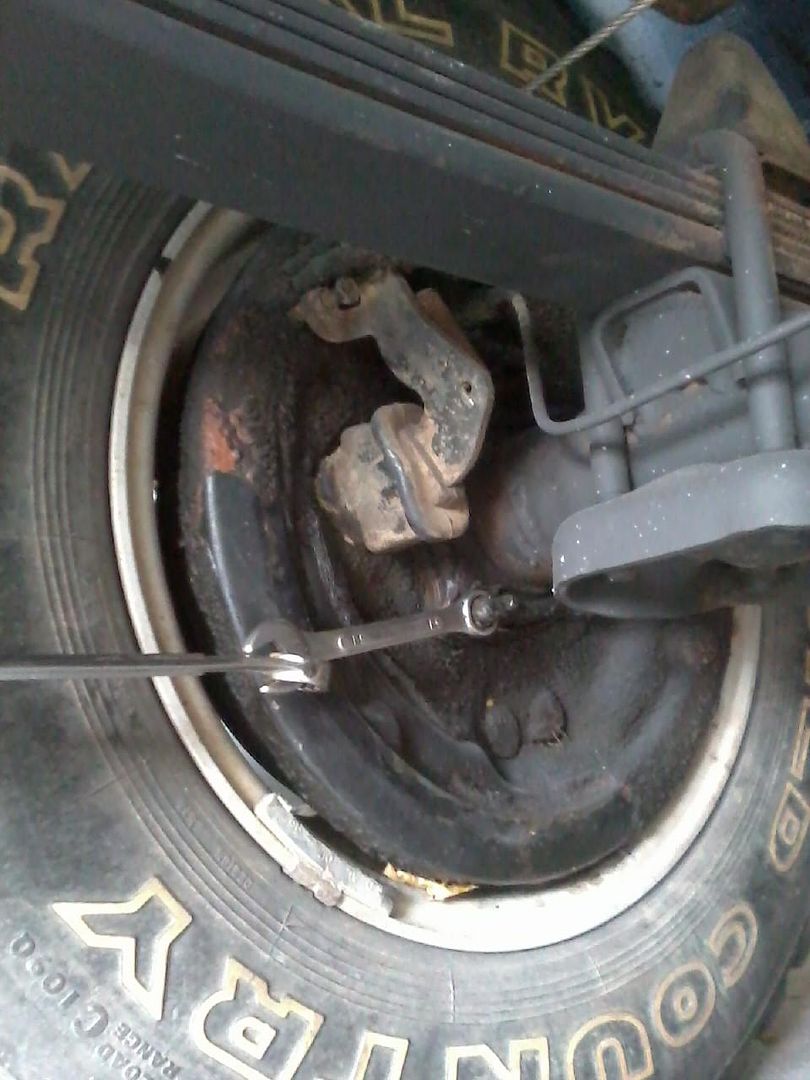
Just have 4 bolts to remove and the 2 brake lines and the whole axle comes out.
Just have 4 bolts to remove and the 2 brake lines and the whole axle comes out.
10-30-2012, 06:22 PM
#773
Ewwwwwww, yucky black stuff hahaha. Nice work........ Mine have been going for 200K(since last recorded seal replacement on receipts I have from the PO/Orig. owner).... They just wont fail! hahaha. OF COURSE, that'll have to happen while I'm up on Mt. Whitney at 14,000Ft. or so...Guess I'll take my Flintstones Shoes with me just in case
 lol.
lol.
Nice work, man... and I hear ya on the 'trying to make it happen.. just funds are needed'. Best wishes on that, Terry.
hahaha. Nice work........ Mine have been going for 200K(since last recorded seal replacement on receipts I have from the PO/Orig. owner).... They just wont fail! hahaha. OF COURSE, that'll have to happen while I'm up on Mt. Whitney at 14,000Ft. or so...Guess I'll take my Flintstones Shoes with me just in case lol. Nice work, man... and I hear ya on the 'trying to make it happen.. just funds are needed'. Best wishes on that, Terry.
10-31-2012, 09:48 AM
#774
Super Moderator
Staff
Thread Starter
iTrader: (1)
Join Date: Aug 2008
Location: Anderson Missouri
Posts: 11,788
Likes: 0
Received 25 Likes
on
22 Posts
Ewwwwwww, yucky black stuff hahaha. Nice work........ Mine have been going for 200K(since last recorded seal replacement on receipts I have from the PO/Orig. owner).... They just wont fail! hahaha. OF COURSE, that'll have to happen while I'm up on Mt. Whitney at 14,000Ft. or so...Guess I'll take my Flintstones Shoes with me just in case lol.
Nice work, man... and I hear ya on the 'trying to make it happen.. just funds are needed'. Best wishes on that, Terry.
hahaha. Nice work........ Mine have been going for 200K(since last recorded seal replacement on receipts I have from the PO/Orig. owner).... They just wont fail! hahaha. OF COURSE, that'll have to happen while I'm up on Mt. Whitney at 14,000Ft. or so...Guess I'll take my Flintstones Shoes with me just in case lol. Nice work, man... and I hear ya on the 'trying to make it happen.. just funds are needed'. Best wishes on that, Terry.
10-31-2012, 10:12 AM
#775
Super Moderator
Staff
Thread Starter
iTrader: (1)
Join Date: Aug 2008
Location: Anderson Missouri
Posts: 11,788
Likes: 0
Received 25 Likes
on
22 Posts
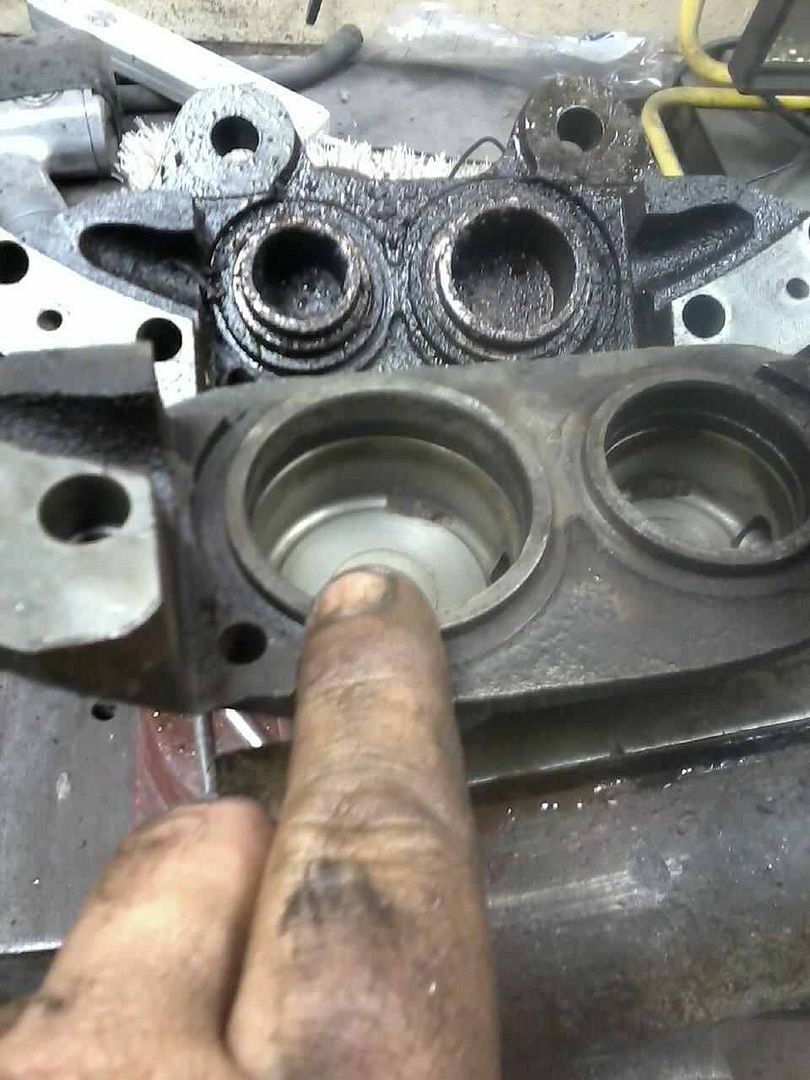
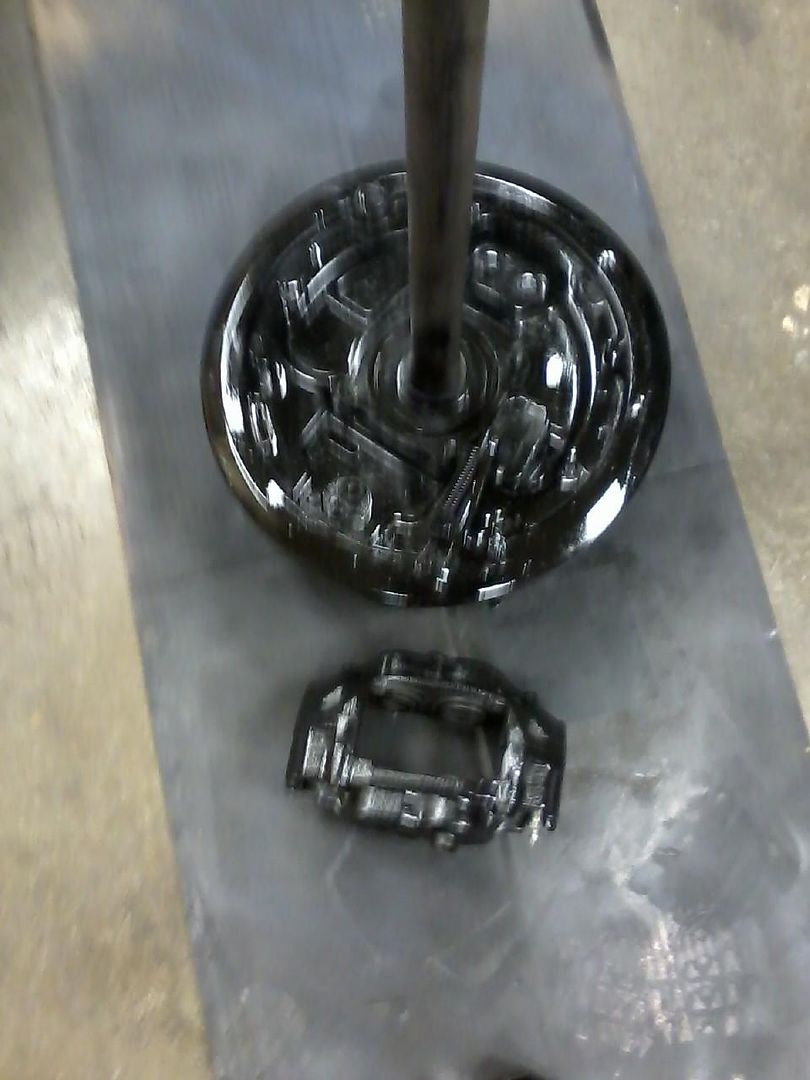
Got a lot done. Most of it was cleaning. The spare set I had for the left and right side are both frozen in good. I ordered a seal kit for $10, but for $35 I could of gotten a whole replacement caliper and you need a core or they will charge you nother $35. I wanted to save a few bucks and the challenge of doing it myself but would recommend just replacing the caliper.
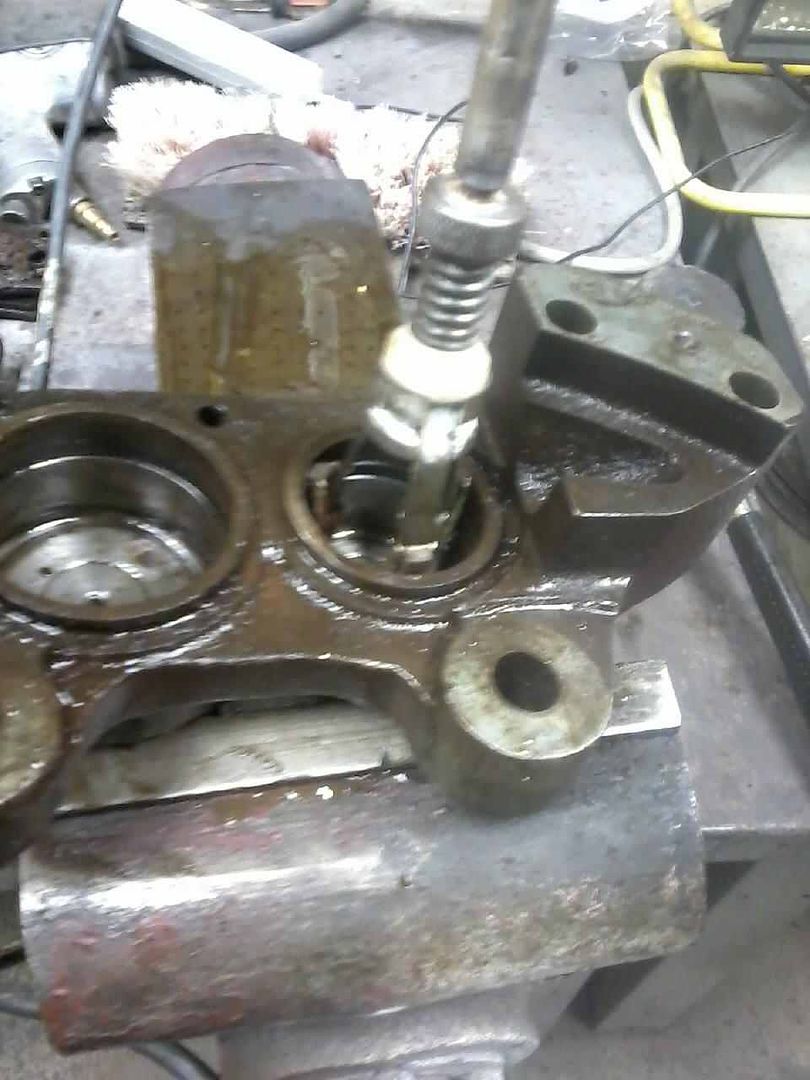
I took the one off of my runner and it only had one piston stuck. I used C clamps to keep the pistons that I wanted to stay in and then used an air hose to force the piston out. Keep your fingers out of the way as when it does release, the piston will come out with alot of force. I then took a red brillo pad and cleaned the surface of the piston. I eventually did this to all 4 pistons in the caliper.
My caliper looked bad, but it cleaned up nice with a wire brush. Top part is what the bottom half looked like as well. Where my finger is pointing is the main seal that can be a pain to swap out. I left it in and didnt swap it out and ran test on the pistons and no air would leak out. Will test it with fluid when I have the wife or kids home to help bleed the brakes.
I then used a cylinder hone and cleaned the cylinder out.
I did replace the dust covers on the pistons. Getting the wire clamp at the bottom of the piston area was made easier by lubing them with WD-40.
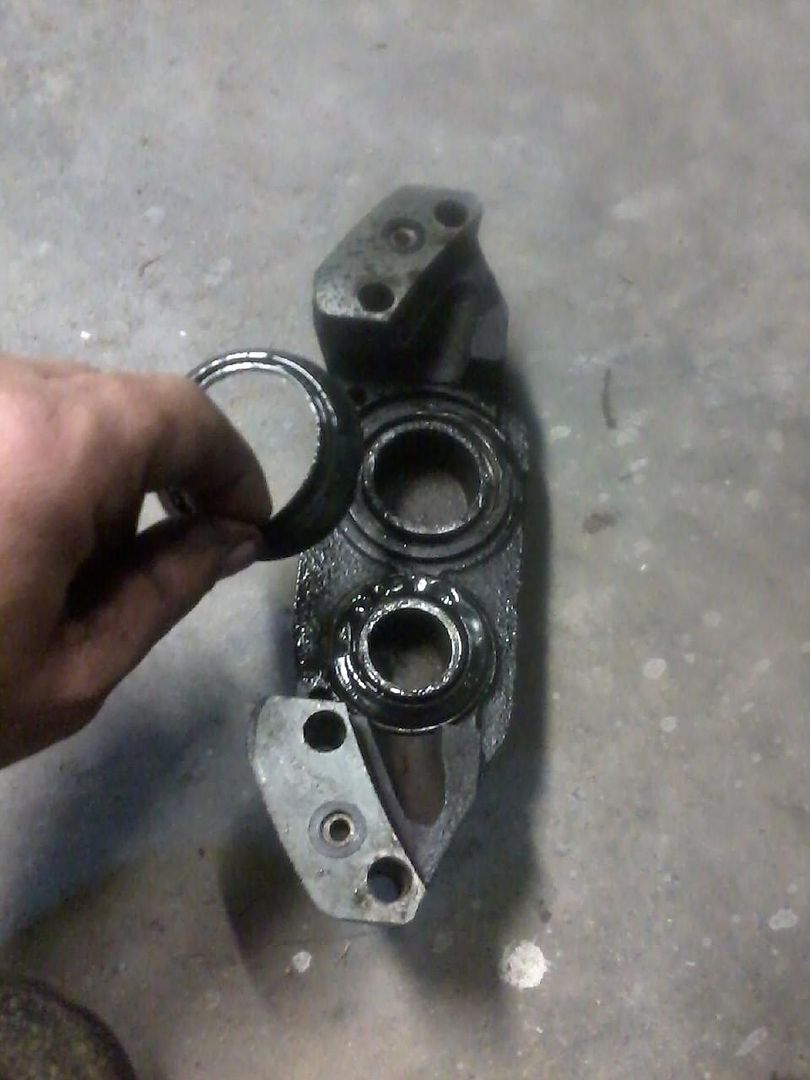
Here is the caliper and axle all cleaned and ready to go. It is actually on the truck now. Didnt get any pics of it on.
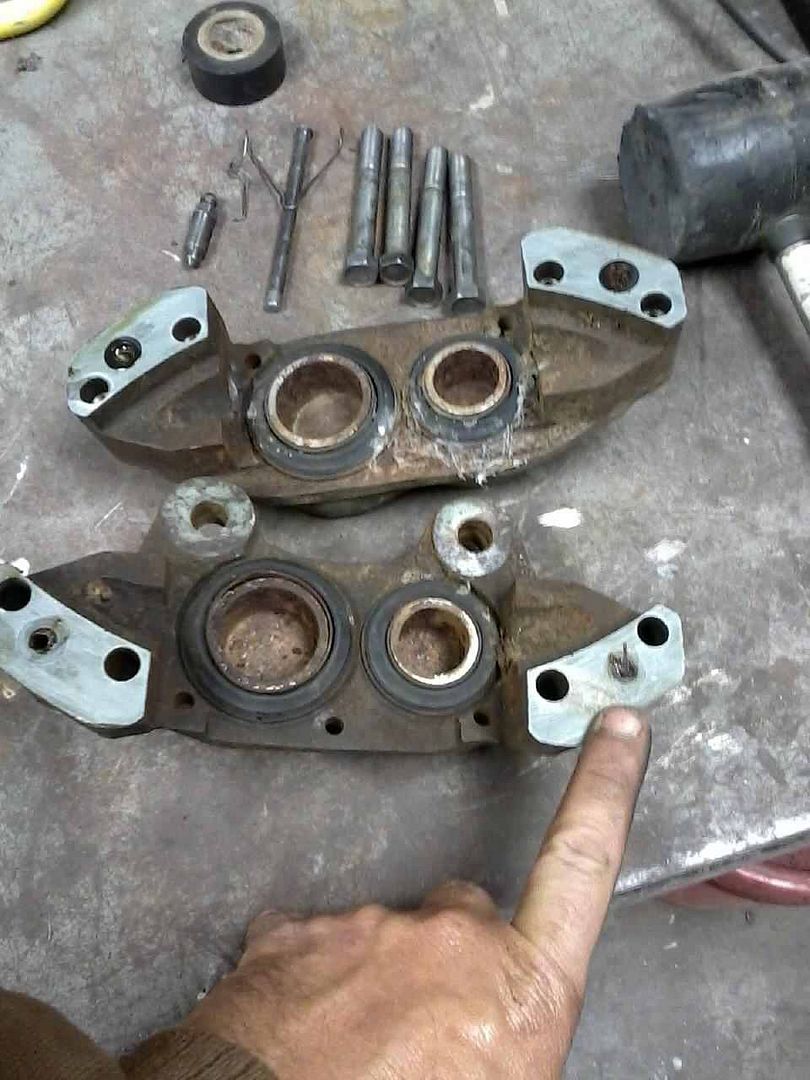
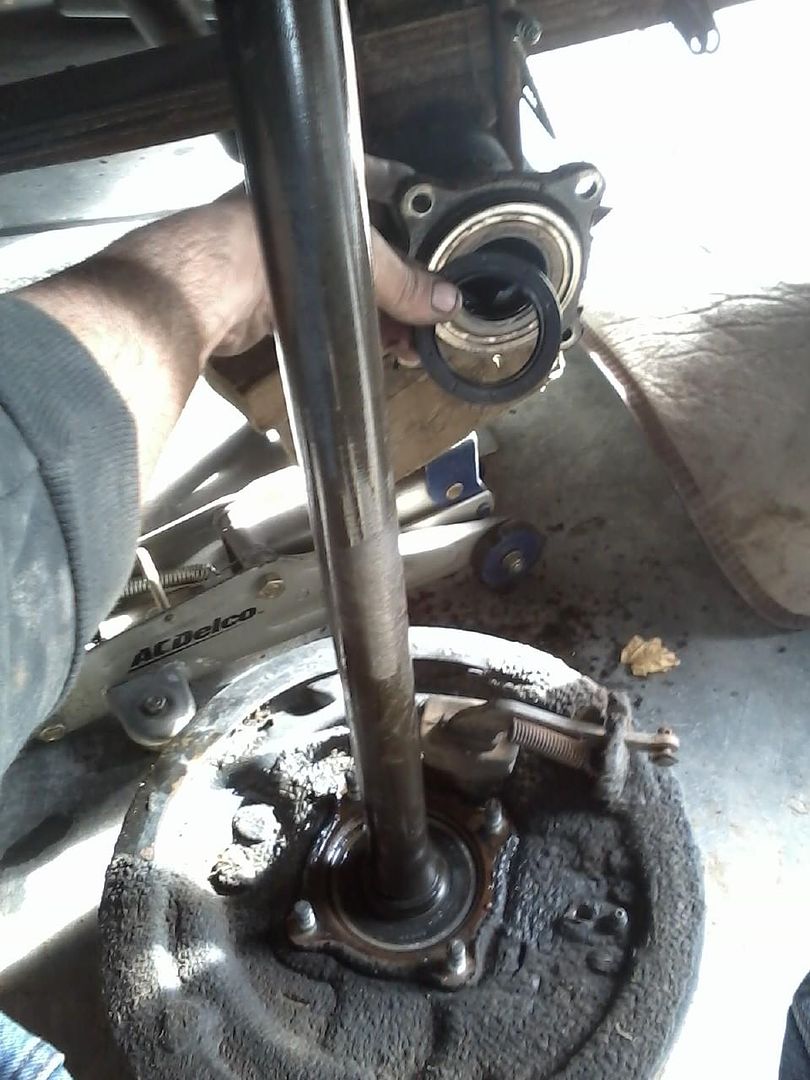
Then I started on the rear inner seal. Remove 4 nuts that hold it on the the axle. One brake hydraulic line and one wire brake line and remove tire and it slides out. I used a hammer to hook the edge of the old seal to pop it out.
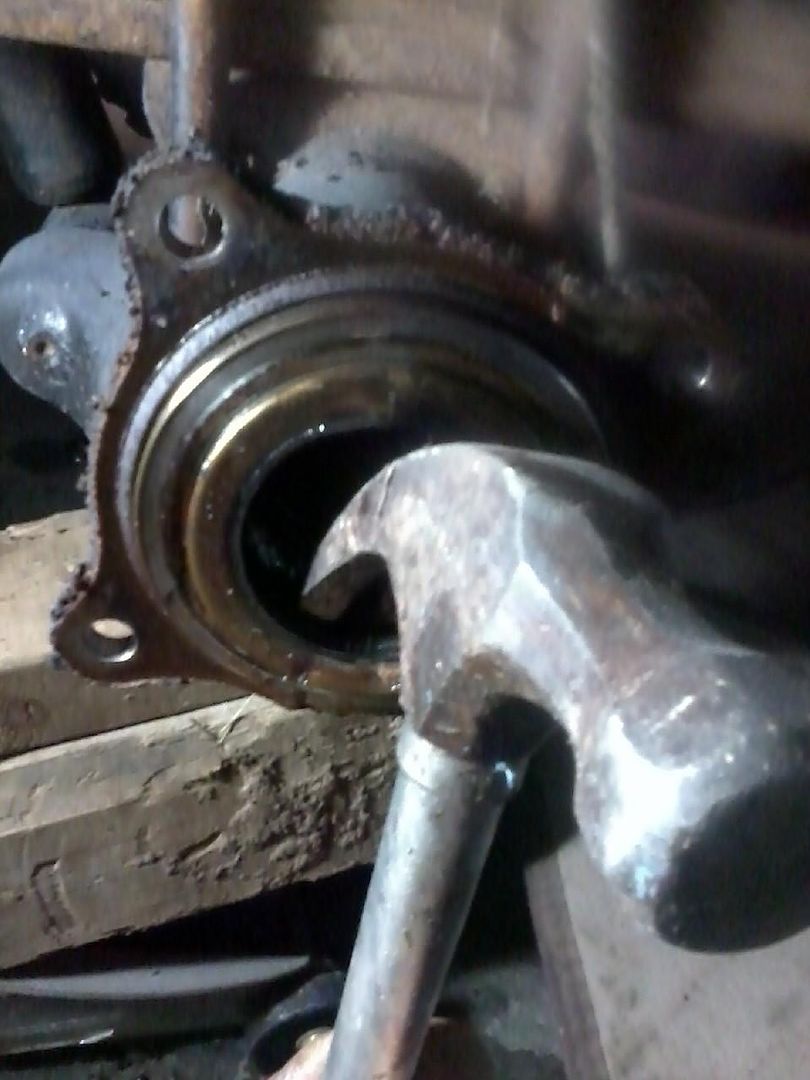
Used a piece of wood to drive the new seal in. Note how deep the old seal is for a reference for the new seal. I will add this to my 88 Runners build thread at a later time is the reason for this post.
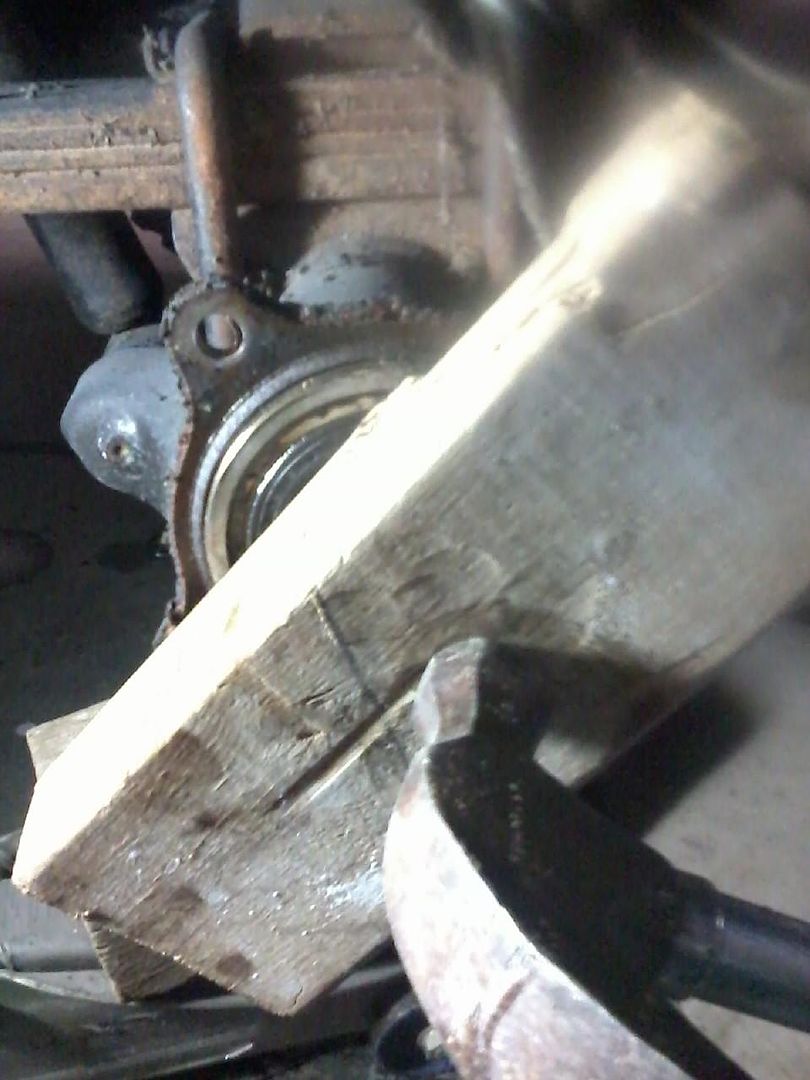
I then cleaned the surface of the axle with some 400 grit sand paper and noticed a nick in the axle. I know to be gentle when removing the axle and am sure that it is from the PO prior work on it. If it is still leaking I get to replace the axle. I need to get some gear oil and add to the rear end still.

I took the one off of my runner and it only had one piston stuck. I used C clamps to keep the pistons that I wanted to stay in and then used an air hose to force the piston out. Keep your fingers out of the way as when it does release, the piston will come out with alot of force. I then took a red brillo pad and cleaned the surface of the piston. I eventually did this to all 4 pistons in the caliper.
My caliper looked bad, but it cleaned up nice with a wire brush. Top part is what the bottom half looked like as well. Where my finger is pointing is the main seal that can be a pain to swap out. I left it in and didnt swap it out and ran test on the pistons and no air would leak out. Will test it with fluid when I have the wife or kids home to help bleed the brakes.
I then used a cylinder hone and cleaned the cylinder out.
I did replace the dust covers on the pistons. Getting the wire clamp at the bottom of the piston area was made easier by lubing them with WD-40.
Here is the caliper and axle all cleaned and ready to go. It is actually on the truck now. Didnt get any pics of it on.
Then I started on the rear inner seal. Remove 4 nuts that hold it on the the axle. One brake hydraulic line and one wire brake line and remove tire and it slides out. I used a hammer to hook the edge of the old seal to pop it out.
Used a piece of wood to drive the new seal in. Note how deep the old seal is for a reference for the new seal. I will add this to my 88 Runners build thread at a later time is the reason for this post.
I then cleaned the surface of the axle with some 400 grit sand paper and noticed a nick in the axle. I know to be gentle when removing the axle and am sure that it is from the PO prior work on it. If it is still leaking I get to replace the axle. I need to get some gear oil and add to the rear end still.
Last edited by Terrys87; 12-14-2012 at 05:33 AM.
10-31-2012, 12:08 PM
#776
Dude, you just really made me think out my V6 upgrade. I WANT too keep the OEM Calipers... But in order to make it fruitful for longevity... I'd likely have to rebuild them, right? (or at least inspect them for heavy pitting, etc.). .... The 95 4runner they came off had GREAT looking rotors, OEM pads that were nearly new... and no leaking. SO, I'm not sure I should do anything but maybe replace the dust boots? The rig had 148K on it. They can go 1million miles, I know... BUT, with Murphy always lingering and trailing me, hahahaha... Ya know? What do you suggest? I don't know if the V6 Calipers are 35$, unless I go to Autozone... And then I'd feel BAD handing them over for some reman'd from China, ya know? I like them having the same size piston and more braking power... Especially with the winter wheeling I want to eventually get back to.
10-31-2012, 07:30 PM
#777
Registered User
that nick on the axle doesnt look good buddy, but you may get lucky with it fingers crossed for ya. the one in my 3rd gen was a little differant than that the seal sat a lot deeper int the axle tube, but it also has anti lock brakes with a stater on the end of the axle but chaneing it was the same principle. glad to see you back on this one man great work on the caliper rebuild.
10-31-2012, 08:16 PM
#779
Registered User
terry if youve got a welder around you they can put a bit of weld on that an smooth it off use a bit of that 1K grit sand paper on it to polish it off maybe even run a buffing wheel on it for a second it'd work great


