
Terrys87 86 4Runner with a 2nd Chance
 09-22-2012, 03:01 AM
#681
Super Moderator
Staff
Thread Starter
iTrader: (1)
Join Date: Aug 2008
Location: Anderson Missouri
Posts: 11,788
Likes: 0
Received 25 Likes
on
22 Posts
Hello Cyberhorn..If all goes well in the morning, I should get some pics of it together. I am eager as well.
Hello Jason..I think it is going to be okay. I do have alot of buffing but think it will be ok. If I can get it to what it looks like wet. It will be worth the effort.
Hello Mark..I think you have one of the cleanest runners on here and I use alot of your pics on what it should look like in new condition. Some things I probably wont be able to do as yours is a true SR5 as mine wont have the harness for doors and the things yours has, but it gives me ideas.
 09-22-2012, 03:25 AM
#682
Super Moderator
Staff
Thread Starter
iTrader: (1)
Join Date: Aug 2008
Location: Anderson Missouri
Posts: 11,788
Likes: 0
Received 25 Likes
on
22 Posts
Jason, Cyberhorn, and Nervo are a few that I know have painting in their future so want to add some info that might help. Each painting I have learned something.
I painted the truck in pieces, I had the gas door and windshield cowl seperate. If I had a valance, I would of painted it seperate. One thing I did wrong on this paint job was I had them in different areas. Normally I keep them in the same area and if I put 4 coats of paint on the truck, I put 4 coats of paint on the seperate pieces. Do a round on the truck and then do a round on the pieces.
Apparently I missed doing the cowl on one of the rounds and it is lighter then the rest of the truck. When I cleared it, it seemed to match so I may have dodged a bullet on that one. Apparently I didnt skip the gas door and it looks to match the rest. May seem like common sense but not having them all together bit me. Lesson I wont soon forget.
I also had my water seperator attached to the gun as I have several other times, but this time I had the truck as low to the ground as I could get it. If the seprator had been attached to the tank, it would of made it easier to get under the doors as I did hit the ground and had to angle the gun to get them.
I went thru 3 sets of shoes as my feet kept getting wet. Even got my army boots out and soaked them. Next time I will make sure I have some good water proof shoes. Working with soggy feet was getting old and once you start, there really isnt any stopping.
Try painting during the daylight. I did try, but no matter what, it was late evening before I could get started. This would of kept the bugs out and I did feed the mosquitos well. When I did get a bug, I took some masking tape and was able to make him stick to the sticky part of the tape and get him off.
Jason suggested using a kitchen measuring cup and thanks Jason as that really helped. I had a 4 to 1 mix ratio on the clear and my gun is 20 ounces. I mixed 16 clear and 4 hardner and it worked out perfect for the gun. If I didnt have enough clear to make a complete pass down the side or area I was working in, I would shoot the last ounce under the fender well or a spot that may need it before filling up again.
I drained the tank every so often and still got moisture but the water seperator got it. If I can think of anything else I will mention it. I will post some better pics of how I masked as I basically did a full color change. Other then the engine compartment, I think it turned out well.
Soggy feet and having more room to work would be nice. I did make some practice runs with the gun and hose to see where I might have any problem. Then I tried as best as possible to remember my steps.
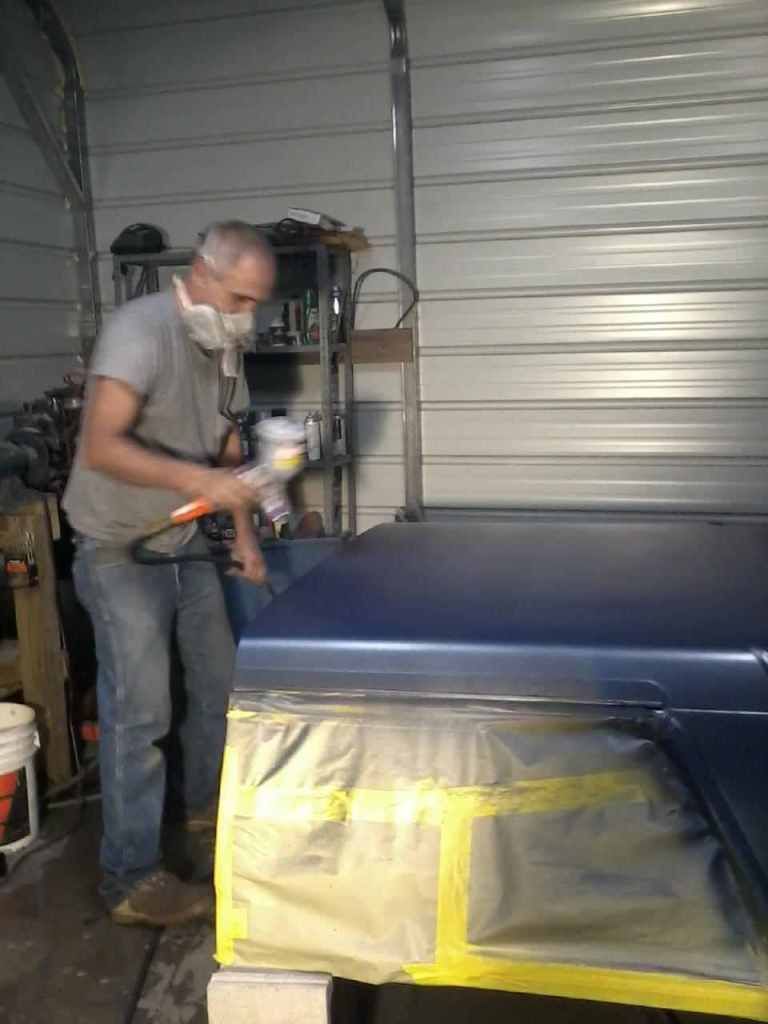
Water Seperator. Blue is good, Pink is not. Will move to the tank next time.
I painted the truck in pieces, I had the gas door and windshield cowl seperate. If I had a valance, I would of painted it seperate. One thing I did wrong on this paint job was I had them in different areas. Normally I keep them in the same area and if I put 4 coats of paint on the truck, I put 4 coats of paint on the seperate pieces. Do a round on the truck and then do a round on the pieces.
Apparently I missed doing the cowl on one of the rounds and it is lighter then the rest of the truck. When I cleared it, it seemed to match so I may have dodged a bullet on that one. Apparently I didnt skip the gas door and it looks to match the rest. May seem like common sense but not having them all together bit me. Lesson I wont soon forget.
I also had my water seperator attached to the gun as I have several other times, but this time I had the truck as low to the ground as I could get it. If the seprator had been attached to the tank, it would of made it easier to get under the doors as I did hit the ground and had to angle the gun to get them.
I went thru 3 sets of shoes as my feet kept getting wet. Even got my army boots out and soaked them. Next time I will make sure I have some good water proof shoes. Working with soggy feet was getting old and once you start, there really isnt any stopping.
Try painting during the daylight. I did try, but no matter what, it was late evening before I could get started. This would of kept the bugs out and I did feed the mosquitos well. When I did get a bug, I took some masking tape and was able to make him stick to the sticky part of the tape and get him off.
Jason suggested using a kitchen measuring cup and thanks Jason as that really helped. I had a 4 to 1 mix ratio on the clear and my gun is 20 ounces. I mixed 16 clear and 4 hardner and it worked out perfect for the gun. If I didnt have enough clear to make a complete pass down the side or area I was working in, I would shoot the last ounce under the fender well or a spot that may need it before filling up again.
I drained the tank every so often and still got moisture but the water seperator got it. If I can think of anything else I will mention it. I will post some better pics of how I masked as I basically did a full color change. Other then the engine compartment, I think it turned out well.
Soggy feet and having more room to work would be nice. I did make some practice runs with the gun and hose to see where I might have any problem. Then I tried as best as possible to remember my steps.
Water Seperator. Blue is good, Pink is not. Will move to the tank next time.
Last edited by Terrys87; 10-07-2013 at 05:56 AM.
09-22-2012, 04:09 AM
#684
Super Moderator
Staff
Thread Starter
iTrader: (1)
Join Date: Aug 2008
Location: Anderson Missouri
Posts: 11,788
Likes: 0
Received 25 Likes
on
22 Posts
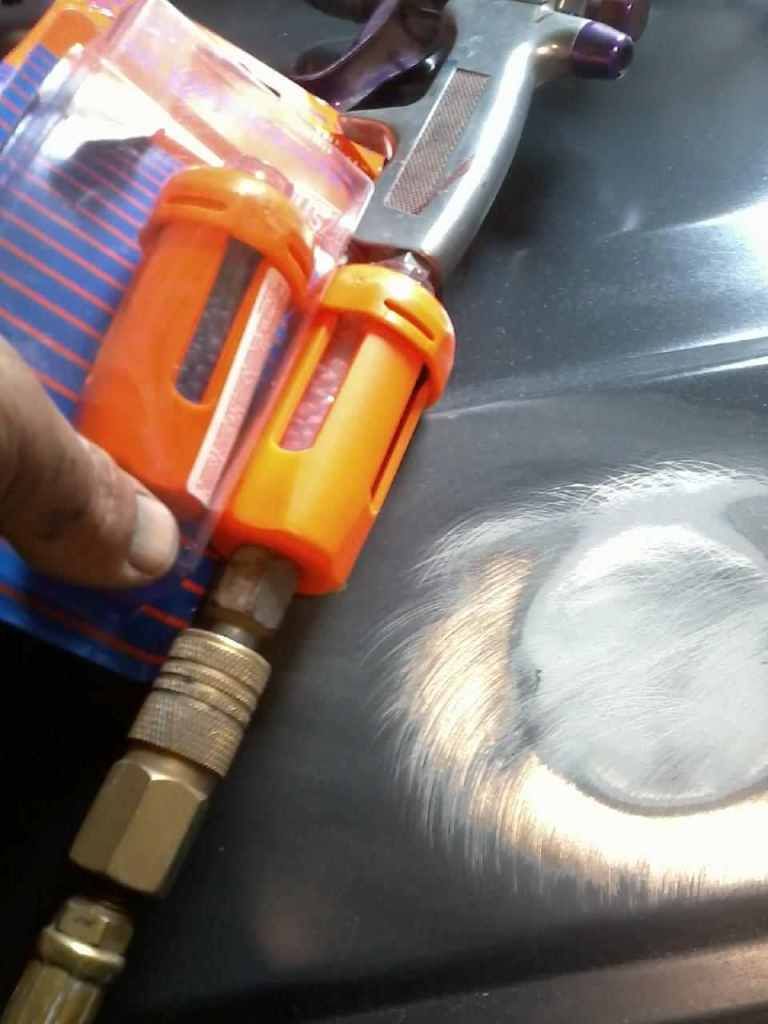
Hello Jason.. I got mine from the Oriellys paint store. It was $20 for the both of them. They have one that is solid and you cant see the media in the filter so I went with these. The individuals ones were $10 a piece.
09-22-2012, 07:25 AM
#685
Super Moderator
Staff
Thread Starter
iTrader: (1)
Join Date: Aug 2008
Location: Anderson Missouri
Posts: 11,788
Likes: 0
Received 25 Likes
on
22 Posts
Here it is with the top. It looks kid of purple but is actually a blue. Still need to buff an blacken the trim back in. No tailgate. Will post more pics later.

09-22-2012, 10:36 AM
#686
Registered User
that is an awesome color terry comes across a royal blue in the pictures
thank you for the tips my friend kris bought the HVLP guns as he had the old school big cup gun (which he's going to use for primers now) i got him a couple inline filters larger than yours we also have water catcher/regulator at the main inlet to the shop so i suspect were good on air quality
that is really a gorgeous color on a runner!
09-22-2012, 03:54 PM
#687
Registered User
Did you go with medium metallic blue or stay with the blueberry? From here it looks metallic. It looks sooo good. I'm envious. I like the blue roof too. It will look less like a pickup with a cap. Did you sand the fiberglass smooth?
09-23-2012, 01:03 AM
#688
Super Moderator
Staff
Thread Starter
iTrader: (1)
Join Date: Aug 2008
Location: Anderson Missouri
Posts: 11,788
Likes: 0
Received 25 Likes
on
22 Posts
Hello Cyberhorn..I did the same thing, using the old style gun for priming and the gravity for feed for painting. They both have their pros and cons. My nephew told me to get a torch head cleaner for helping to clean the air holes in the paint nozzle. I thought that was a good idea.
One thing I meant to mention and I dont remember if it was yours or my thread, but you said you use rattle can paint for protecting the surface til you paint later, I have done that in the past and I would suggest going light on it as when I had to take it back off, it really gummed up my sand paper. I may of tried to use it as a guide coat and that may of caused the gumming up of paper.
Thanks Nervo.. I envy you that you are able to do patch panels. That is something I have always wanted to learn. I want to learn all aspects of bodywork, but need to get the tools such as a welder and that is going to be awhile off yet.
It is a medium metallic blue, I wanted something a little different and I personally like the tops to match the color of the body. I knew from the beginning of this build that I would have the top the same. Others like the black top.
That was the condition of my top when I got it. I am sure it has never been worked on before and it is smoother then most. I didnt sand it or anything, dont know what caused it. I had thought of adding a rougher texture or smoothing it out all the way and just left it as it was. On Mistys truck I was working some of hers down with 320 on the larger chunks that it had. If you want the rougher, I would of probably used some sort of Rhino liner. I actually like a smooth top myself.
I know you got your work cut out for you and that is what makes it more yours then anything is when you build it yourself. That is what brings the satisfaction as well versus buying one. I hope my build is inspiring as yours overall has to be in better conditon then what I started with.
Mine looks good in the pics and it is overall, but it does have its flaws and as hard as I tried to get it perfect, it didnt turn out that way. I will post some pics of the flaws, some were from a simple mistake like forgetting to strain my paint before putting it in the paint gun to some clear coat runs that I tried to prevent, but even as frustrating it is to me that I didnt get the results that I wanted, I know I did my best and am quite satisfied how it turned out.
Hopefully you get better results, but I know what you are going thru and the effort it takes to get it there, that if you do have some flaws, you did your best, what more could you ask for. It is still rewarding.
09-23-2012, 02:07 AM
#689
Registered User
yeah ive had that happen some older primers had a lot of solids that would gum things up i think the stuff i used should be okay if not well wiping it all down with carb cleaner will really strip it off fast lol
09-23-2012, 08:47 AM
#691
Wow, you really did a good job! I see what you mean by it looking a sort of Royal Blue'ish Purple.... in the pics I guess. I'd have to see it in person, but I LIKE IT! Are those the wheels meant to stay on there? Quite impressed with all ya do, buddy.... and WOW, painting the WHOLE rig.. now that's a lil intimidating, haha.
Thanks for the compliments on my rig, man.... that means a LOT coming from you. And trust me, in person, it's got PLENTY of flaws you can see up close... But, yeah, it is pretty clean... And it's also original paint, which I CAN NOT take any credit for, hahaha. Just try to keep it clean and remove the oxidization as it arises(stupid toyota messed up on the RED on the driver side, Terry... I'M CONVICED!(with no proof, of course hehehhee) .
Now, OF COURSE, after reading your thread.....I'd love to get some stuff done to my rig today.... but honestly? I'm ACHING, man! hahaha. The PYP-yard work was a bit of work, indeed... BUT, ..... crawling into the back of a 4Runner with the back window up at 90*F and higher than normal humidity for an hour wrenching on brackets and such? hehehe... YEAH, it adds to the 'ugh' lol. Course..... could have been in Iowa or something right now..... 90* and 100% humidity .... so I know, complaining to you guys in the south east... WOW, gutsy of me, right? heehehehe.
How did you choose your paint, Terry? Didja get a code or something?... I gotta tell ya, It's already grown on me, if the pic is an accurate representation of the 'actual/literal' color?(Like a red heavy lighter royal blue with some metal flake in it?) I told you before, that light Silver blue with a hint of purplish to it? I LOVE that color..... And NOW, "Terrywinkle Blue" is added to one of my fav's I can literally imagine this being one of Scotty's of Addicted, and SAS, crazy fab art all over it.... His trademark Skull thingymadoers.... Like the one for his son he did THAT IS NOW FOR SALE! :
Curious.... You keeping those rims on there?
Thanks for the compliments on my rig, man.... that means a LOT coming from you. And trust me, in person, it's got PLENTY of flaws you can see up close... But, yeah, it is pretty clean... And it's also original paint, which I CAN NOT take any credit for, hahaha. Just try to keep it clean and remove the oxidization as it arises(stupid toyota messed up on the RED on the driver side, Terry... I'M CONVICED!(with no proof, of course
hehehhee) . Now, OF COURSE, after reading your thread.....I'd love to get some stuff done to my rig today.... but honestly? I'm ACHING, man! hahaha. The PYP-yard work was a bit of work, indeed... BUT, ..... crawling into the back of a 4Runner with the back window up at 90*F and higher than normal humidity for an hour wrenching on brackets and such? hehehe... YEAH, it adds to the 'ugh' lol. Course..... could have been in Iowa or something right now..... 90* and 100% humidity
.... so I know, complaining to you guys in the south east... WOW, gutsy of me, right? heehehehe. How did you choose your paint, Terry? Didja get a code or something?... I gotta tell ya, It's already grown on me, if the pic is an accurate representation of the 'actual/literal' color?(Like a red heavy lighter royal blue with some metal flake in it?) I told you before, that light Silver blue with a hint of purplish to it? I LOVE that color..... And NOW, "Terrywinkle Blue" is added to one of my fav's
I can literally imagine this being one of Scotty's of Addicted, and SAS, crazy fab art all over it.... His trademark Skull thingymadoers.... Like the one for his son he did THAT IS NOW FOR SALE! : Curious.... You keeping those rims on there?
09-23-2012, 12:36 PM
#694
Like that, eh? 
"Terrywinkle Blueberry... Now ready for shipping to 49 states(Minus California because it's not CONFORMING to the CARB standards of 'It comes out of a can so IT MUST kill you in seconds' Policy)..." ...... Or waittttttt... Was it 57 states? ........ hehehe.
"Terrywinkle Blueberry... Now ready for shipping to 49 states(Minus California because it's not CONFORMING to the CARB standards of 'It comes out of a can so IT MUST kill you in seconds' Policy)..." ...... Or waittttttt... Was it 57 states? ........ hehehe.
09-23-2012, 04:10 PM
#695
Registered User
Did you eliminate the plastic gravel/rock guards in front of the rear wheels? It looks like you closed up the square hole there. I'm thinking about closing mine up and getting that clear film or whatever it's called. My '00 has something like that on the rocker panels from the factory. The only way I'll put the plastic back is if I don't get the body work just right.
I bet your wife is going to want the blue one now. Your only defense is to get a set of these and make it too manly:
Not what they sound like:
http://www.ebay.com/itm/Truck-nuts-t...9321f9&vxp=mtr
I bet your wife is going to want the blue one now. Your only defense is to get a set of these and make it too manly:
Not what they sound like:
http://www.ebay.com/itm/Truck-nuts-t...9321f9&vxp=mtr
09-23-2012, 06:32 PM
#696
Registered User
more pics more pics more pics this time with some of the chrome back on it come on terry we know you been working on it its not fair to make us sit here and drool over day old pics. so more pics more pics more pics LOL. I know you want it back together worse than we want to see it, hope all is well with you and yours buddy.
09-23-2012, 08:30 PM
#697
Registered User
more pics more pics more pics this time with some of the chrome back on it come on terry we know you been working on it its not fair to make us sit here and drool over day old pics. so more pics more pics more pics LOL. I know you want it back together worse than we want to see it, hope all is well with you and yours buddy.
http://www.ebay.com/itm/Truck-nuts-t...9321f9&vxp=mtr
LOL ok those are funny wrong but funny bad to give dragon ideas
polished brass
Last edited by Cyberhorn The Dragon; 09-23-2012 at 08:31 PM.
09-23-2012, 10:23 PM
#698
Super Moderator
Staff
Thread Starter
iTrader: (1)
Join Date: Aug 2008
Location: Anderson Missouri
Posts: 11,788
Likes: 0
Received 25 Likes
on
22 Posts
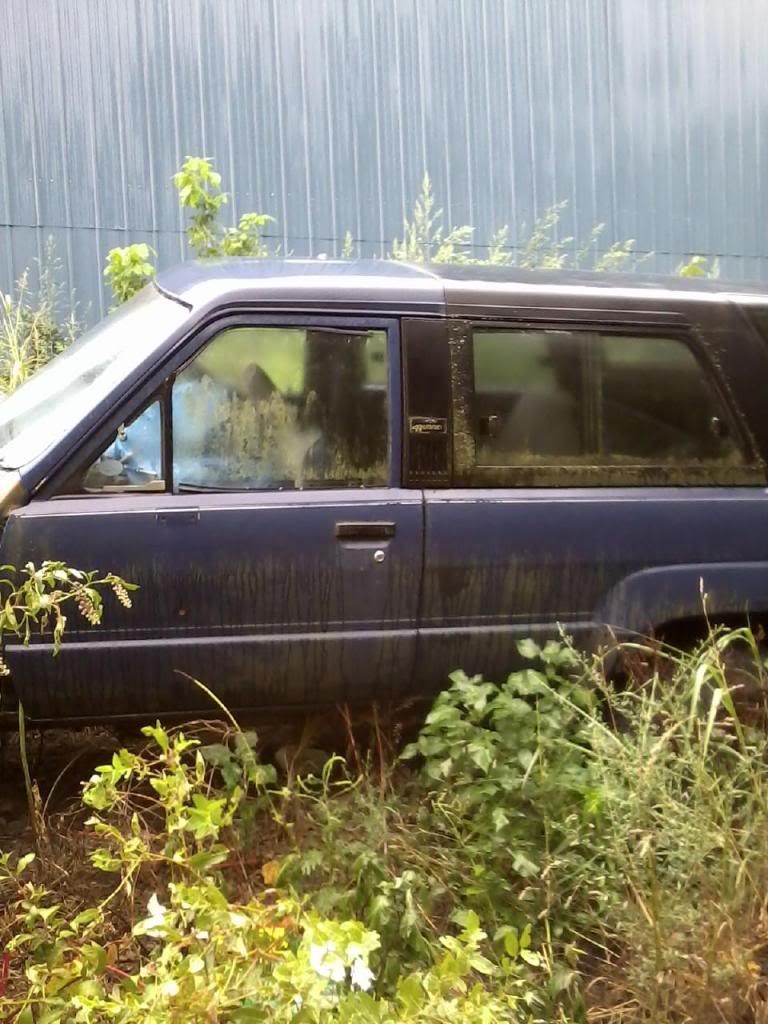
Thanks dsal 86Yota...It all started from this. It had snake skins in it (from live ones) to a mouse that made it home for awhile. It was a just a frame and shell really when I started on it. Alot of work involved. It was used for parts by 3 different people including me. Poor workmanship on it from a PO that I am not sure they knew what they were doing. It looks solid in the pics, but Jason seen it when it was nearly at its worse. Wish I would of named it "Here is hope for your project", not necessarily talking about yours, but others in general and to remind me where I was at. I have some nice plans for it.
09-24-2012, 12:31 AM
#699
Super Moderator
Staff
Thread Starter
iTrader: (1)
Join Date: Aug 2008
Location: Anderson Missouri
Posts: 11,788
Likes: 0
Received 25 Likes
on
22 Posts
Wow, you really did a good job! I see what you mean by it looking a sort of Royal Blue'ish Purple.... in the pics I guess. I'd have to see it in person, but I LIKE IT! Are those the wheels meant to stay on there? Quite impressed with all ya do, buddy.... and WOW, painting the WHOLE rig.. now that's a lil intimidating, haha.
Thanks Mark..It turned out better then I thought it would. I was my second time of painting metalic and it did Tiger Stripe on me on the first two coats but after that, all went well. Even for some of the things that did go wrong and my dumb butt mistakes that could of easily been prevented such as straining the paint one time that I didnt, and having all of the pieces in the same area, doh!!, It really gave me a boost in confidence.
Painting a whole truck is a bigger job then you might think. Keeping the same speed, pattern, distance, and where you are going is alot of concentration. Still have alot of wetsanding to do and that will help get rid of some flaws as well. I am keeping the wheels on it. I like them and have been working on one to see what I need to do to get it to shine up and when I get it there think they will really "pop" with the paint.
Thanks for the compliments on my rig, man.... that means a LOT coming from you. And trust me, in person, it's got PLENTY of flaws you can see up close... But, yeah, it is pretty clean... And it's also original paint, which I CAN NOT take any credit for, hahaha. Just try to keep it clean and remove the oxidization as it arises(stupid toyota messed up on the RED on the driver side, Terry... I'M CONVICED!(with no proof, of course hehehhee) .
Now, OF COURSE, after reading your thread.....I'd love to get some stuff done to my rig today.... but honestly? I'm ACHING, man! hahaha. The PYP-yard work was a bit of work, indeed... BUT, ..... crawling into the back of a 4Runner with the back window up at 90*F and higher than normal humidity for an hour wrenching on brackets and such? hehehe... YEAH, it adds to the 'ugh' lol. Course..... could have been in Iowa or something right now..... 90* and 100% humidity .... so I know, complaining to you guys in the south east... WOW, gutsy of me, right? heehehehe.
lol, at our age it isnt as easy to crawl over the back seats like we used to.
How did you choose your paint, Terry? Didja get a code or something?... I gotta tell ya, It's already grown on me, if the pic is an accurate representation of the 'actual/literal' color?(Like a red heavy lighter royal blue with some metal flake in it?) I told you before, that light Silver blue with a hint of purplish to it? I LOVE that color..... And NOW, "Terrywinkle Blue" is added to one of my fav's I can literally imagine this being one of Scotty's of Addicted, and SAS, crazy fab art all over it.... His trademark Skull thingymadoers.... Like the one for his son he did THAT IS NOW FOR SALE! :
At first I wanted to just add metalic to it and then he had a ton of paint chip samples for ONE color and that applies to any color. I tried to match the back side of the gas door to the chip samples and I had twenty that were the same and still none of them were the same. I could of used the paint code and had metallic added to it but wasnt sure what it would look like so I went with the chip samples. Once you have paint mixed, it is yours. I have a gallon of green that I was orginally going to put on the 88 pick up and things changed so I will see if I can find a project for it at a later time. There is no taking it back.
He had one container about the size of a handlotion bottle and it alone was $700 for him. It is interesting to watch what all is added as far as color wise.
Thanks Mark..It turned out better then I thought it would. I was my second time of painting metalic and it did Tiger Stripe on me on the first two coats but after that, all went well. Even for some of the things that did go wrong and my dumb butt mistakes that could of easily been prevented such as straining the paint one time that I didnt, and having all of the pieces in the same area, doh!!, It really gave me a boost in confidence.
Painting a whole truck is a bigger job then you might think. Keeping the same speed, pattern, distance, and where you are going is alot of concentration. Still have alot of wetsanding to do and that will help get rid of some flaws as well. I am keeping the wheels on it. I like them and have been working on one to see what I need to do to get it to shine up and when I get it there think they will really "pop" with the paint.
Thanks for the compliments on my rig, man.... that means a LOT coming from you. And trust me, in person, it's got PLENTY of flaws you can see up close... But, yeah, it is pretty clean... And it's also original paint, which I CAN NOT take any credit for, hahaha. Just try to keep it clean and remove the oxidization as it arises(stupid toyota messed up on the RED on the driver side, Terry... I'M CONVICED!(with no proof, of course
hehehhee) . Now, OF COURSE, after reading your thread.....I'd love to get some stuff done to my rig today.... but honestly? I'm ACHING, man! hahaha. The PYP-yard work was a bit of work, indeed... BUT, ..... crawling into the back of a 4Runner with the back window up at 90*F and higher than normal humidity for an hour wrenching on brackets and such? hehehe... YEAH, it adds to the 'ugh' lol. Course..... could have been in Iowa or something right now..... 90* and 100% humidity
.... so I know, complaining to you guys in the south east... WOW, gutsy of me, right? heehehehe. lol, at our age it isnt as easy to crawl over the back seats like we used to.
How did you choose your paint, Terry? Didja get a code or something?... I gotta tell ya, It's already grown on me, if the pic is an accurate representation of the 'actual/literal' color?(Like a red heavy lighter royal blue with some metal flake in it?) I told you before, that light Silver blue with a hint of purplish to it? I LOVE that color..... And NOW, "Terrywinkle Blue" is added to one of my fav's
I can literally imagine this being one of Scotty's of Addicted, and SAS, crazy fab art all over it.... His trademark Skull thingymadoers.... Like the one for his son he did THAT IS NOW FOR SALE! : At first I wanted to just add metalic to it and then he had a ton of paint chip samples for ONE color and that applies to any color. I tried to match the back side of the gas door to the chip samples and I had twenty that were the same and still none of them were the same. I could of used the paint code and had metallic added to it but wasnt sure what it would look like so I went with the chip samples. Once you have paint mixed, it is yours. I have a gallon of green that I was orginally going to put on the 88 pick up and things changed so I will see if I can find a project for it at a later time. There is no taking it back.
He had one container about the size of a handlotion bottle and it alone was $700 for him. It is interesting to watch what all is added as far as color wise.
those rims are dang impressive id have a set if they were available an funds permitting
Thanks Cyberhorn.. They came with a truck that I was going to fix and sell and wound up the frame would be dangerous to put on the road. On a fix and sell, you usually cant get your money back out of the extras that you put on so I was just going to throw on a set of stock rims. Best to sell one as a stocker instead of adding all of the extras, they try to negotiate a cheaper price. They dont realize a SR5 guage alone usually runs about $75 to $100.I try to be more then fair in my price, but they always try to barter for less not realizing what you got into it. I am sure they are expensive rims is how I come across them.
terrywinkleblue... epic lol
Like that, eh?
"Terrywinkle Blueberry... Now ready for shipping to 49 states(Minus California because it's not CONFORMING to the CARB standards of 'It comes out of a can so IT MUST kill you in seconds' Policy)..." ...... Or waittttttt... Was it 57 states? ........ hehehe.
"Terrywinkle Blueberry... Now ready for shipping to 49 states(Minus California because it's not CONFORMING to the CARB standards of 'It comes out of a can so IT MUST kill you in seconds' Policy)..." ...... Or waittttttt... Was it 57 states? ........ hehehe.
Did you eliminate the plastic gravel/rock guards in front of the rear wheels? It looks like you closed up the square hole there. I'm thinking about closing mine up and getting that clear film or whatever it's called. My '00 has something like that on the rocker panels from the factory. The only way I'll put the plastic back is if I don't get the body work just right.
Hello Nervo...I am going to put the rock guards back on. I still have to paint the tail gate and have thought of painting them blue, but think I will paint them black to kind of match the top as it will help to bring the top and bottom together. I dont have a welder to patch holes, so I still have them, they are just to far to see in the pictures.
I bet your wife is going to want the blue one now. Your only defense is to get a set of these and make it too manly:
LOL...You must of been a fly on the wall at our house and heard the conversation that her and I had yesterday. She likes it, but I done headed that off at the pass. I did a 89 Standard Cab and bought the Downey bed for it. That truck was junk when I got it and turned out nice. She said she needed a Extended Cab as the 89 was too small for her and the kids and got a 91 Extended Cab and I put alot of work into it as well. Still have a Lund Visor in the box and Side Step bars in the shed for it. When I got the 88 Runner painted and running well, she got to drive it and really liked it and sure enough, the extended cab was to small for her and the kids, so I let her have it.
Told her I would take the 86 and I was building it for myself and that this truck was going to be mine and that was when it was snake and mouse infested. When they look bad, I dont have to worry about her wanting to drive them.
I could tell yesterday that she is starting to like it and refreshed her mind about when I started this build that I wasnt going to give it up. She has always wanted a green one like the 70's dodge Challenger or the Cuda or what I call the Slimer green or Incredible Hulk Green if I understand her right. I told her she needs to sit down and come up with what she really wants and direction she wants to go with it and have several threads marked that show different runners in different colors and stages. I am running out of time as far as weather wise to paint as my shop isnt insulated or able to heat during the cooler seasons and I still have a truck to paint soon.
I told her cost wise it would be about $300 for paint,$100 for carpet and another hundred for interior paint, to get it in the condition it is at now. I can have the interior out and done in a day easy. In one day I can have all of the trim off, paint sanded and in sealer and it would another couple of days to have it in paint. I also let her know that she is going to have to be involved in the teardown and prep work to do all if that. What I didnt tell her that even though I could have it done in a week or so since her truck is mostly finished except for some things like getting the seats done is that it will be a long and slow process as I think she needs to get some blood sweat and tears into it to really appreciate what goes into a build.
I will help, but believe me I am going to be in slow mode. I try to encourage her to make her trucks her own and to have something she can be proud of. She is still debating about if she wants to do something like that and she has to take the funds out of her hobbies. It will be spring time before anything happens and I am going to help her with ideas. I can see what I am going to do with a build when I start one and mine will be coming along so I am sure she is going to get serious about it. I hope in 2 months to have mine nearly as nice as hers is now.hehe.
Not what they sound like:
http://www.ebay.com/itm/Truck-nuts-t...9321f9&vxp=mtr
more pics more pics more pics this time with some of the chrome back on it come on terry we know you been working on it its not fair to make us sit here and drool over day old pics. so more pics more pics more pics LOL. I know you want it back together worse than we want to see it, hope all is well with you and yours buddy.
One thing I dont like about living in town is trying to keep my neighbors all happy with a couple of trucks in the yard. I need to get my brothers truck done and that ought to make things a little better. Depending on how things go in the morning, I will set the pieces on the truck and see what it looks like with the parts I do have. Wont be any pics of the back end as the tailgate and no rear bumper is missing.
I do have some wetsanding to do and then polishing it when I get that done. I am looking forward to seeing what it looks like after that is done. I will get some pics up with the pieces on temporarily as I think it will look good.
yes more pictures
You guys got me wanting to see what it will look like with everything on now,lol, I am also looking forward to seeing the tires shined and all the shiney stuff shiney and black all done.
http://www.ebay.com/itm/Truck-nuts-t...9321f9&vxp=mtr
LOL ok those are funny wrong but funny bad to give dragon ideas
polished brass
09-24-2012, 12:35 AM
#700
Super Moderator
Staff
Thread Starter
iTrader: (1)
Join Date: Aug 2008
Location: Anderson Missouri
Posts: 11,788
Likes: 0
Received 25 Likes
on
22 Posts
Hello Mark..I hit the multi quote and some how didnt get the question about the "L" trims. I plan on painting them a black color and the same with the pillar trim. On those items I just use a good quality rattle can paint. That is what we would use in a body shop that I work at for awhile. If used right it does turn out great on small things.


