
RogueYota's 87 Budget Build Thread!!
 02-18-2013, 08:14 PM
#321
Registered User
Thread Starter
I actually bought Ford towers from Low Range lol
Yeah I got a welder and grinder and such...I have the welding skills...but I have a hard time getting the welder settings to make good beads.
But a torch i am lacking
Yeah I got a welder and grinder and such...I have the welding skills...but I have a hard time getting the welder settings to make good beads.
But a torch i am lacking
 02-19-2013, 09:11 PM
#322
Registered User
Thread Starter
Little bit of progress tonight. Also have a few questions.
Put her on stands

Put the tires on so its easier to move around.

This shot is sooooooooo tantalizing!!

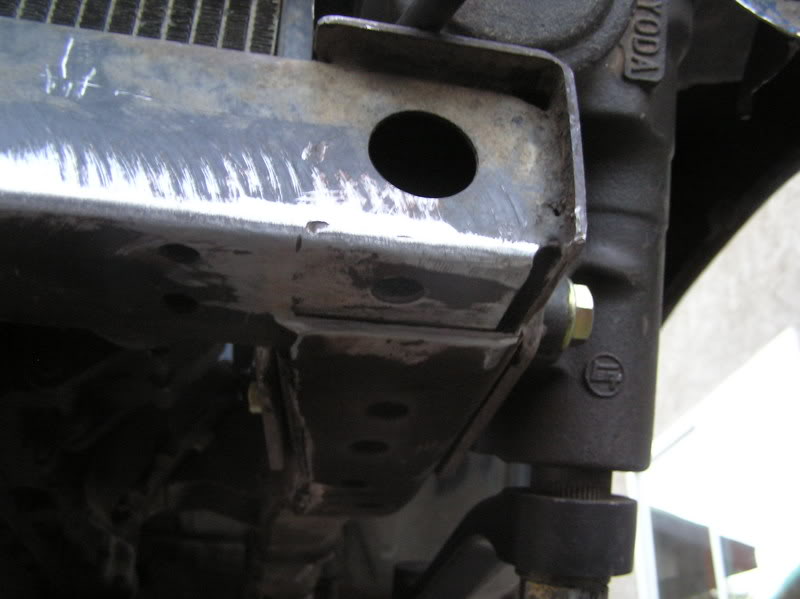
Ok heres the question. The hanger rides along this whole crossmember. However...the sides of the member are raised....leaving a gap all the way across. So do you just gap weld it or make up the gap with some strip steal maybe?

And even though its an inch im going to swap in the IFS hubs to the SFA. Not only for the width but also for the vented rotors.
Hopefully ill be cutting soon!!!
Put her on stands
Put the tires on so its easier to move around.
This shot is sooooooooo tantalizing!!
Ok heres the question. The hanger rides along this whole crossmember. However...the sides of the member are raised....leaving a gap all the way across. So do you just gap weld it or make up the gap with some strip steal maybe?
And even though its an inch im going to swap in the IFS hubs to the SFA. Not only for the width but also for the vented rotors.
Hopefully ill be cutting soon!!!
02-19-2013, 11:55 PM
#324
Registered User

I don't believe you can use the ifs vented rotors, even with the ifs hubs. The calipers are still located by the knuckle. The options I've seen people use so far is turning down the hub enough that Tacoma rotors can slip over and sandwich between the wheel and mounting surface, or the regular vented land cruiser discs used on most of the solid axle brake upgrades. Then there's the option of drilling those to match the bolt pattern on the back of the ifs hub, or Sky's spacer kit which is $
As for the gap, I'm not entirely sure, but I think it just usually gets done in 2 passes with the welder, but hopefully someone who actually knows a thing or 2 will come along with some clarification.
As for the gap, I'm not entirely sure, but I think it just usually gets done in 2 passes with the welder, but hopefully someone who actually knows a thing or 2 will come along with some clarification.
02-20-2013, 07:02 AM
#325
Registered User
Thread Starter
Yeah I may just run spacers for the time being. I think the vented rotors im thinking of are the FJ rotors. Like I said its only an inch.
I found out last night how to deal with the gap from Marlin. You can just cut it off with a cutoff.
This is the pic from Marlin.
Gunna go out in the shop in a bit and tear out as much of the IFS as I can without a torch. Torch should be here tonight.
I found out last night how to deal with the gap from Marlin. You can just cut it off with a cutoff.
This is the pic from Marlin.
Gunna go out in the shop in a bit and tear out as much of the IFS as I can without a torch. Torch should be here tonight.
02-20-2013, 07:16 AM
#326
Registered User
Thread Starter
Did a little research....My IFS hub including rotors and calipers will fit the SFA. Little bit of grinding on the rotor is needed but thats ok.
02-20-2013, 08:48 AM
#327
Registered User
Join Date: Feb 2010
Location: N. Lake Tahoe/Chico CA
Posts: 1,934
Received 0 Likes
on
0 Posts
Making good progress. You are correct, just grind or cut that little lip off. i used FJ60 rotors on mine from Marlin, and the ifs hub kit from Skys. Worked great
02-20-2013, 01:44 PM
#330
Registered User
Thread Starter
I found one last night...ill try to find it again.
Anyways made some more progress.


Yeah I wheeled my IFS hard lol

Tried to unbolt the torsion bar stuff.....yeah almost died lol so ill cut it when the torch gets here.

Another poser shot....this thing is going to be BIIIGG lol Maybe too big.

Anyways made some more progress.
Yeah I wheeled my IFS hard lol
Tried to unbolt the torsion bar stuff.....yeah almost died lol so ill cut it when the torch gets here.
Another poser shot....this thing is going to be BIIIGG lol Maybe too big.
02-20-2013, 02:13 PM
#331
As far as the gap between the frame and the hanger its fine, mine has it. I Just put a few think strong beads on the hanger and it works perfect, if you are looking to make it super beefy you could fill the gap with a piece of metal and weld it all together all the way around
02-21-2013, 07:12 PM
#333
Registered User
Thread Starter
Worlds Fastest SAS?
Sooo...I ran out of Acetylene yesterday. Talked the guy into letting me use the torch is I paid for new tanks. He said deal. Got home about 3pm today. Cut the driver side out...and torsion bar bracket on one side due to the Ebrake running through the other one....so I just took out the bar on that side. Making the frame tube holes was a chore with an oxy torch lol During all this cutting I managed to get liquid metal in my left eye. I can still see but its burnt pretty good. Anyways got the axle in there and on its own weight. Still need to finish welding the hanger and shock towers. Few little odds and ends to do but shes pretty much done!!  Finished up about 7:30..thats including clean up

Pretty dang good I think.

Need to finish grinding too. This was mock up

Welded.

Axle hung...steering on.

Sweeeeeeet. On her own weight.

I like!!

Not too bad of an angle??

Kinda wish it was further forward :/

All in all and good day
Like I said few odds and ends left.
Finished up about 7:30..thats including clean up Pretty dang good I think.
Need to finish grinding too. This was mock up
Welded.
Axle hung...steering on.
Sweeeeeeet. On her own weight.
I like!!
Not too bad of an angle??
Kinda wish it was further forward :/
All in all and good day
Like I said few odds and ends left.
Last edited by RogueYota; 02-21-2013 at 07:14 PM.
02-21-2013, 07:24 PM
#335
Registered User
Thread Starter
lol right? Like Forrest Gump said "I thought since I came this far....I might as well keep goin." Once I finished one thing I had to keep going.
Yeah the slug was hell....I thought for sure my eye was gone. But its still workin lol
So its your turn now! Get that axle in! lol
Yeah the slug was hell....I thought for sure my eye was gone. But its still workin lol
So its your turn now! Get that axle in! lol
02-22-2013, 07:21 PM
#339
Registered User
Thread Starter
Well got a few more things done today 
Pure awesome!

Welded the hanger in there purty good!!

Garage flex!! lol Can go alot more.

Close to the wall lol

Shocks in...need longer ones!!

Few more things to do...
Put the other shock in....brake lines... stuff like that.
Almost had an ordeal with the steering...stripped one castle nut...but got one off the IFS stuff and broke out the Drimmel and fixed the rod end threads. Then on another rod end it just spun...so I put tension on it...then threaded the bolt.
Cant wait to drive it!!!!!!
Pure awesome!
Welded the hanger in there purty good!!
Garage flex!! lol Can go alot more.
Close to the wall lol
Shocks in...need longer ones!!
Few more things to do...
Put the other shock in....brake lines... stuff like that.
Almost had an ordeal with the steering...stripped one castle nut...but got one off the IFS stuff and broke out the Drimmel and fixed the rod end threads. Then on another rod end it just spun...so I put tension on it...then threaded the bolt.
Cant wait to drive it!!!!!!
02-22-2013, 07:38 PM
#340
Registered User
Thread Starter
Tomorrow ill be welding in the other shock tower...and lifting the rear about an inch. Also going to order TG extended brake lines....so she should be on the road next week sometime...im worried how it will go down the road alignment wise....my steering wheel is dang near upside down with the wheels "straight". We shall see. May have to "chalk line" align it. lol


