
RAD4Runner's 1986 4Runner dlx Build-up
 01-07-2018, 11:44 AM
#941
Registered User
Thread Starter
Sorry about our Yota brethren struggling with too sporty a weather, but now is a great time to enjoy the desert.
I got sick of breaking French press glass so I found the Stainless Steel double-wall . Clean, elegant lines but will withstand a lifetime of rough and tumble car camping life so it's goes from dining table at home to trail camp - LOL! It has poor reviews but I think mostly from people who do not know how to enhance and make the most of a robust platform - like we do with out trucks; I replaced the plastic and silicone strainer with old-school steel mesh from a broken press.
 01-09-2018, 02:26 PM
#942
Registered User
Thread Starter
I could spend time making her look pretty and rugged, or I can put her to work so I can go to pretty and wild places... I prefer the latter...
Domelands, Anza-Borrego Desert...

WINDMILLS OF OCOTILLO IN BACKGROUND


LOTS OF FOSSILIZED SHELLFISH...

GOTTA RE-HYDRATE, RIGHT?
Domelands, Anza-Borrego Desert...
WINDMILLS OF OCOTILLO IN BACKGROUND
LOTS OF FOSSILIZED SHELLFISH...
GOTTA RE-HYDRATE, RIGHT?


 01-09-2018, 04:43 PM
#944
Registered User
Thread Starter
01-10-2018, 05:22 PM
#945

After going through your thread (the first thread I have started to read on the yotatech site), I believe it is safe to say I have picked the right community-forum to participate in. Well, and that you are pretty much my hero.
You have some amazing ideas that I will be borrowing for my build. Even simple spec labels on the outside fenders makes a huge amount of sense. I did the same on my rock buggy fenders, writing part numbers and wrench sizes for everything needed to rebuild the axles. Of course, I didn't care much about the beat up skins and their appearance, but the labels you did look great and I will most definitely be doing the same thing thanks to you.
I think what I find so amazing about your build (besides the fact that I can now throw away my Haynes manuals, lol), is that everything you have done fixes what already exists and not dumping a lot of money in unnecessary parts to bypass common 4runner/age issues. You are simply correcting and improving. Secondly, the fact that you use your truck as a truck and not a project that sits in a garage.
I am probably the 100th guy to say all of this....
I do have a few questions.
- What is your favorite modification/correction that you have done on your 4runner since day one?
- What haven't you've done that you have always wanted to do on the 4runner?
- Is there any excursions that you would really love to do with the 4runner that have not yet been done?
Ill be going back through your thread quite often. Thanks for all of the hard work!
01-10-2018, 07:59 PM
#946
Registered User
Thread Starter
... What is your favorite modification/correction that you have done on your 4runner since day one?
- Finding out and fixing the starter relay that Toyota wired wrong at the factory that caused intermittent C.O.R. click but no crank, then fixing it (write-up here) a few months after I bought the truck. (I wished the problem occurred when I was inspecting the truck so I could have bargained more.)
- my $70 Zuk mod that I did a few months after I bought the truck. I;m very happy with how it solved the saggy rear suspension and the way it drives now, including how I could go at max legal speed over dips that I used to have to slow down for before - LOL!
What haven't you've done that you have always wanted to do on the 4runner?
- Swap battery and intake (and eventually add a snorkel) to:
- Clean up the engine compartment.
- Minimize heating of intake air by being too close to radiator and radiator intake hose,
- Reduce restriction in intake air path; It does not make sense that the duct crossing over the radiator and the intake of the airbox have smaller inner diameter than the I.D. of the intake manifold.
- Shorten intake air path to make up for added length if and when I add snorkel. I do not plan to do water crossing but driving behind others with intake that is low and sucks from behind the grille in So Cal deserts means sucking up a lot of dust.
- Fixing my gutter leak and touching up the faded / worn-out paint on roof as well as touching up wind-rash here and there.
Is there any excursions that you would really love to do with the 4runner that have not yet been done?
- I drove Route66 fro So Cal to mid-point the south to Texas last year and I wish I had done the a Bajada Switchbacks (but I lacked information and company) and continued on to New Orleans (but I had to leave the truck for transmission rebuild in Dallas while I drove a loaner to Houston).
- Did Death Valley a few months ago but friends had to be back to So Cal too early and I did not want to go off-road alone. Wanna do again... Beatty, NV through Titus Canyon (wish), Scottys Castle Road to Ubehebe Crater (re-do), Racetrack Playa (re-do), to camp at Homestake Dry Camp (re-do), back on Lippincott Road to Saline Valley Hot Springs (wish)...
- Road-trip with kayak fishing and camping in Baja California / Sea of Cortez.
Last edited by RAD4Runner; 01-10-2018 at 08:00 PM.
01-11-2018, 06:56 AM
#947
Have you ever done the NMBDR or similar trail systems? I am on the east coast, but we are driving out in mid July for two weeks to do the trails from TX to CO. The farthest I have gone is mid Texas (well, and Vegas but that doesn't count), and mostly southern states at that. I haven't really explored central northern states nor the west coast states.
Also, I was hoping to do a 'dust snorkel' before our trip this year (more of a want and not a need) and love the idea of the topspin they use for construction equipment. I saw one done really well on a 2nd gen 4runner (http://soaztim.blogspot.com/2009/03/...e-snorkel.html) which I am sure you have seen before. We use topspin for our machines here at work and they have been maintenance free for the most part. I use to run a regular snorkel on one of my old builds and it would get super filthy internally due to dust (but I also could NOT rotate my top intake 180 degrees which may have eliminated some of this).
Cannot wait to see more of your journeys.
01-14-2018, 10:16 PM
#948
Registered User
Thread Starter
Things Falling Into Steering Column
I've had a screw fall into the steering column here...


Imagine how unsafe and unreliable the steering system could be if that foreign object were not removed?
Before working on the cluster to find rattles, I covered that opening with a rag....

... Then later realized... Why not make it semi-permanent?
So I put a half-inch thick soft foam over it, and held it down with the steering column cover...

keywords: foreignobjectdamage, fod, foreign objects
Imagine how unsafe and unreliable the steering system could be if that foreign object were not removed?
Before working on the cluster to find rattles, I covered that opening with a rag....
... Then later realized... Why not make it semi-permanent?
So I put a half-inch thick soft foam over it, and held it down with the steering column cover...
keywords: foreignobjectdamage, fod, foreign objects
01-15-2018, 04:01 PM
#949
Registered User
Thread Starter
Have you ever done the NMBDR or similar trail systems?... love the idea of the topspin they use for construction equipment. I saw one done really well on a 2nd gen 4runner (http://soaztim.blogspot.com/2009/03/...e-snorkel.html) ...
Meanwhile, more from Anza-Borrego Desert....
CRAWLING THROUGH ONE OF THE WIND CAVES
(Split Mountain / Fish Creek Area)
(Split Mountain / Fish Creek Area)
THE BORREGO BADLANDS FROM FONT'S POINT
Last edited by RAD4Runner; 01-15-2018 at 04:03 PM.
01-16-2018, 03:50 AM
#950
Very nice!
01-22-2018, 11:49 AM
#951
This fixes the poor wiring design on early Toyota trucks, while retaining the switched-ground system that will allow Truck-lites to plug-and-play into the first-generation 4Runner and those with similar headlight housing and circuits.
To minimize additional parts I rewired the headlight circuit, instead of buying or making an add-on h4 conversion harness.
Stock:
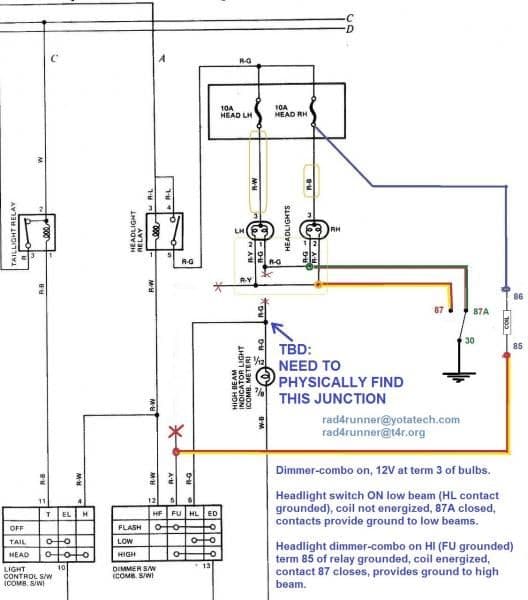
Procedure:
I replaced all thin stock wire (in yellow rectangles) from headlight fuses to positive side (pin 3) of bulbs. Just physically trace wires and replace.
Looking at colored wire:
Bulb pin 1 (low beam) was disconnected from dimmer contact "HL" and moved to normally-closed relay contact 87A, This contact now provides ground to pin 1 to turn on low beam.
Bulb pin 2 (hi beam) was disconnected from dimmer contact "FU" and moved to normally-open relay contact 87. This contact now provides ground to pin 2 to turn on high beam.
Pin 5 ("FU") of dimmer switch connected to negative side of added relay (pin85).
Operation:
When switch is turned to headlight on, headlight relay closes providing +12V to pin 3 of bulb AND positive side of added relay. Normally-closed contact 87A of relay already provides ground to pin2 so low beam comes on. (In stock circuit, contact HL of dimmer switch combo (stalk) provided this ground and carried the high current.)
When dimmer switch stalk is pulled to "flash" momentarily or pushed forward to turn on high beam, FU contact of dimmer provides ground to negative side of added relay and turns relay on. Contact 87 closes, provides ground to pin 2 of bulb and turns on high beam. (contact 87a opens and low beam turns off.)
Voltage Drop Comparisons:
With Sealed Beam & Engine off
Stock Wiring
After Retrofit:
Still To Do:
High beam indicator circuit to be wired later.
keyword search H4 conversion, H4 convert, rewiredheadlight, rewired
To minimize additional parts I rewired the headlight circuit, instead of buying or making an add-on h4 conversion harness.
Stock:
- Wires are thin (AWG 18/20?)
- Ground circuit goes from bulbs, to cabin, to dash to dimmer switch, back to engine compartment to ground inside passenger-side fender - What 4crawler calls a convoluted path (http://www.4crawler.com/4x4/CheapTri...adlights.shtml) - causing a lot of resistance, a lot of voltage drops and reducing power that actually reach the bulbs.
- Dimmer (combo) stalk switch contacts carry high current (10 Amps on 60-watt high beam, 17 Amps on 100-watt high beams). This will shorten contact life.
- Used only one additional part, a 5-pin relay, plus solder & wiring supplies.
- Uses existing headlight fuses
- Upgraded to thicker 12AWG wires, from fuses to ground
- Ground path goes directly from bulb to relay to fender ground (relay pin 30), minimizing voltage drops.
- Relay, not the dimmer combo switch, carries headlight current, helping extend dimmer switch life.
- Using normally-closed contact 87A replicates stock circuit for low beam. Even IF coil of the added relay or wiring to it fails, low beam will still work.
STOCK
IMPROVED
(Stock wiring is in black. Red "X"'s are where I cut stock wiring.)
(Stock wiring is in black. Red "X"'s are where I cut stock wiring.)
Procedure:
I replaced all thin stock wire (in yellow rectangles) from headlight fuses to positive side (pin 3) of bulbs. Just physically trace wires and replace.
Looking at colored wire:
Bulb pin 1 (low beam) was disconnected from dimmer contact "HL" and moved to normally-closed relay contact 87A, This contact now provides ground to pin 1 to turn on low beam.
Bulb pin 2 (hi beam) was disconnected from dimmer contact "FU" and moved to normally-open relay contact 87. This contact now provides ground to pin 2 to turn on high beam.
Pin 5 ("FU") of dimmer switch connected to negative side of added relay (pin85).
Operation:
When switch is turned to headlight on, headlight relay closes providing +12V to pin 3 of bulb AND positive side of added relay. Normally-closed contact 87A of relay already provides ground to pin2 so low beam comes on. (In stock circuit, contact HL of dimmer switch combo (stalk) provided this ground and carried the high current.)
When dimmer switch stalk is pulled to "flash" momentarily or pushed forward to turn on high beam, FU contact of dimmer provides ground to negative side of added relay and turns relay on. Contact 87 closes, provides ground to pin 2 of bulb and turns on high beam. (contact 87a opens and low beam turns off.)
Voltage Drop Comparisons:
With Sealed Beam & Engine off
Stock Wiring
Low Beam:
Batt: 12.05V, Across low beam filament (pins 1 & 3): 11.15V
Voltage drop in wiring: 0.9V
volt drop = 7.5% of battery voltage
High Beam:
Batt 11.94, Across high beam filament (pins 2 & 3): 10.07
Volt drop: 15.7% of battery voltage!
Batt: 12.05V, Across low beam filament (pins 1 & 3): 11.15V
Voltage drop in wiring: 0.9V
volt drop = 7.5% of battery voltage
High Beam:
Batt 11.94, Across high beam filament (pins 2 & 3): 10.07
Volt drop: 15.7% of battery voltage!
After Retrofit:
Low Beam:
Batt: 12.31V, : Across low beam filament (pins 1 & 3): 12.11V
Volt Drop: 0.2 = 1.6% of Battery voltage
High Beam:
Batt: 12.24V, Across high beam filament (pins 2 & 3): 11.78V
Voltage drop: =0.46V = 3.75% of battery voltage
Batt: 12.31V, : Across low beam filament (pins 1 & 3): 12.11V
Volt Drop: 0.2 = 1.6% of Battery voltage
High Beam:
Batt: 12.24V, Across high beam filament (pins 2 & 3): 11.78V
Voltage drop: =0.46V = 3.75% of battery voltage
Still To Do:
High beam indicator circuit to be wired later.
keyword search H4 conversion, H4 convert, rewiredheadlight, rewired
01-24-2018, 12:40 PM
#952
Registered User
Thread Starter
Block (Log) Lift, Anyone? - LOL!

LEAF SPRING PROBLEM?
NO PROBLEM...

SEE IT HERE:
https://www.4x4australia.com.au/expl...cape-york-1975
01-24-2018, 11:10 PM
#953
Registered User
Thread Starter
Sonoma Coast, Jan 2018
I can spend time making her pretty, or I can drive her to pretty places
#1stgenmorefunner #rad4runner #minimizeandexplore
We drove from San Diego to Point Reyes, Camped at Wright's Beach north of Bodega Bay and toured Sonoma Coast, camped in Point Reyes, drove down PCH through Bolinas, CA (where I spotted a surfer's brown 1987 4Runner), through Mount Tamalpais State Park (birthplace of mountain biking), to San Francisco, then back to So Cal...

ON PCH ON THE WAY TO DISOBEYING LEVITIUS 11:9

DISOBEYING LEVITIUS 11:9

WHERE THE RUSSIAN RIVER EMPTIES INTO THE PACIFIC


VIEW OF ARCHED ROCK FROM GOAT ROCK BEACH
Note the side markers, a la 80-Series but they double as turn signals

SCHOOLHOUSE BEACH, IIRC

DUNCAN'S LANDING (SO WINDY AND LARGE WAVES, CAMERA LENSES GET FOGGED UP IN SECONDS)

ORION AND RUBY TUESDAY AT OLEMA CAMPGROUND, POINT REYES

SISTERS IN BOLINAS, CA
#1stgenmorefunner #rad4runner #minimizeandexplore
We drove from San Diego to Point Reyes, Camped at Wright's Beach north of Bodega Bay and toured Sonoma Coast, camped in Point Reyes, drove down PCH through Bolinas, CA (where I spotted a surfer's brown 1987 4Runner), through Mount Tamalpais State Park (birthplace of mountain biking), to San Francisco, then back to So Cal...
ON PCH ON THE WAY TO DISOBEYING LEVITIUS 11:9
DISOBEYING LEVITIUS 11:9
WHERE THE RUSSIAN RIVER EMPTIES INTO THE PACIFIC
VIEW OF ARCHED ROCK FROM GOAT ROCK BEACH
Note the side markers, a la 80-Series but they double as turn signals
SCHOOLHOUSE BEACH, IIRC
DUNCAN'S LANDING (SO WINDY AND LARGE WAVES, CAMERA LENSES GET FOGGED UP IN SECONDS)
ORION AND RUBY TUESDAY AT OLEMA CAMPGROUND, POINT REYES
SISTERS IN BOLINAS, CA
Last edited by RAD4Runner; 01-24-2018 at 11:31 PM.
01-30-2018, 09:11 AM
#954
Registered User
I saw your blinker mod, looks great. I used a trailer light wiring kit on a buddies truck to take all the marker lights and turn them into indicators. Basically a wire harness for a trailer will come with a junction box to turn marker lights into brake, and indicator lights. We used that little device to turn all the single filament bulbs into markers and blinkers, was super simple.
Good luck
RB
Good luck
RB
02-19-2018, 08:38 PM
#955
Registered User
Thread Starter
Anza-Borrego: Seventeen Palms, Font's Point, Pumpkin Patch
I can spend time making her look pretty... or I can just drive her to pretty- and wild- places.


SEVENTEEN PALMS (There are actually 21 now)


INTERESTING ROCKS THAT LOOK LIKE THEY ARE EXTRUSIONS, sticking out of the mud hills...

DINNER AT FONT'S POINT

SUNRISE AT FONT'S POINT

THE RIDGE BEHIND ME IS THE ROUTE UP AND DOWN FONT'S POINT. Not for the faint at heart nor the gravity-challenged

VIEW FROM FONT'S FOOT A FEW WEEKS AGO... Someone separated from the group, scrambled up the wrong gully, got spooked and got stuck. Ranger threw him a rope for protection and showed him the way to safe descent.
DRONE VIDEO OF FONT'S POINT AND THE BADLANDS

TAILGATE BREAKFAST AT FONT'S POINT

PICKING PUMPKINS AT THE PUMPKIN PATCH

OOPS - WRONG ALBUM - LOL!, but someone's truck is being put to good use!
SEVENTEEN PALMS (There are actually 21 now
)INTERESTING ROCKS THAT LOOK LIKE THEY ARE EXTRUSIONS, sticking out of the mud hills...
DINNER AT FONT'S POINT
SUNRISE AT FONT'S POINT
THE RIDGE BEHIND ME IS THE ROUTE UP AND DOWN FONT'S POINT. Not for the faint at heart nor the gravity-challenged
VIEW FROM FONT'S FOOT A FEW WEEKS AGO... Someone separated from the group, scrambled up the wrong gully, got spooked and got stuck. Ranger threw him a rope for protection and showed him the way to safe descent.
TAILGATE BREAKFAST AT FONT'S POINT
PICKING PUMPKINS AT THE PUMPKIN PATCH
OOPS - WRONG ALBUM - LOL!, but someone's truck is being put to good use!
Last edited by RAD4Runner; 02-21-2018 at 10:08 AM.
02-20-2018, 04:52 AM
#957
Registered User
Love the adventure pics Ray. You really do get out there. I'm hoping to do your headlight relay mod here soon, maybe when those Hilux corner lights come in.
02-20-2018, 11:16 PM
#958
Registered User
Thread Starter
Found a Good Mattress To Fit the First-Gen!
I'm a minimalist, I sleep on ONE 3/4-length closed-cell foam Ridgerest sleeping pad here, but I want my wife to be more comfortable so we tried a self-inflating pad for her half of the truck. However, she kept on rolling off the pad, so we returned it, and shopped for one that will cover the whole width between wheel-wells. We found the "Roll Out Lounger" by Novaform at Costco.
Fits just about right!
It is made of memory foam, and comes with its own cover, so you can unzip cover, take it off the foam and wash it separately. Also comes with buckle straps so you can roll foam as compact as possible and strap it down. Comes in a rather flimsy carry bag- Be careful, operating the zipper. I ripped the seams pulling to hard and fast on the zipper, the zipper slider came off and I could not open the bag again. Costco replaced the whole thing, of course.
I could not find "roll out lounger" online but I found it at our local Costco store. Here it is on my truck...
Video from Costco:
https://video.costco.com/v/176180588...-roll-lounger/
NOTE1:
1-inch thick foam I used as template/interim inner quarter panels. I'll replace them with wood eventually.
NOTE2:
The roll-bar in a 4Runner with topper on is a bad location for the fire extinguisher. A fire would most likely be an electrical-oil/grease combo in front and would most likely disable the stupid roll-up rear window and require that someone from outside breaks the window to access it then... "Bye-Bye, Stupid Roll-up Window!", OR driver would have to scramble back to the grab it from rear deck, in order to fight a fire that's most likely would be in front.
, but I want my wife to be more comfortable so we tried a self-inflating pad for her half of the truck. However, she kept on rolling off the pad, so we returned it, and shopped for one that will cover the whole width between wheel-wells. We found the "Roll Out Lounger" by Novaform at Costco.Fits just about right!
Mattress is 39 inches wide and space between wheel-wells is 40 inches wide. A little narrow but good enough.
With headrest in lowest position, rear seat backrest folded down mattress' length fits just right from cargo deck threshold to the top of the headrest. I still need to find a way to support the whole width of the mattress at that area.
Thickness is 2 inches.
With headrest in lowest position, rear seat backrest folded down mattress' length fits just right from cargo deck threshold to the top of the headrest. I still need to find a way to support the whole width of the mattress at that area.
Thickness is 2 inches.
It is made of memory foam, and comes with its own cover, so you can unzip cover, take it off the foam and wash it separately. Also comes with buckle straps so you can roll foam as compact as possible and strap it down. Comes in a rather flimsy carry bag- Be careful, operating the zipper. I ripped the seams pulling to hard and fast on the zipper, the zipper slider came off and I could not open the bag again. Costco replaced the whole thing, of course.
I could not find "roll out lounger" online but I found it at our local Costco store. Here it is on my truck...
Video from Costco:
https://video.costco.com/v/176180588...-roll-lounger/
NOTE1:
1-inch thick foam I used as template/interim inner quarter panels. I'll replace them with wood eventually.
NOTE2:
The roll-bar in a 4Runner with topper on is a bad location for the fire extinguisher. A fire would most likely be an electrical-oil/grease combo in front and would most likely disable the stupid roll-up rear window and require that someone from outside breaks the window to access it then... "Bye-Bye, Stupid Roll-up Window!", OR driver would have to scramble back to the grab it from rear deck, in order to fight a fire that's most likely would be in front.
Last edited by RAD4Runner; 04-20-2018 at 06:46 AM.
02-21-2018, 09:20 AM
#959
Registered User
Awesome thread, love all the pics, thank you for your service. I plan on moving back to CA in June maybe we can plan something, my sister lives in San diego so I have an excuse to come down that way.
02-21-2018, 10:05 AM
#960
Registered User
Thread Starter


