RAD4Runner's 1986 4Runner dlx Build-up
#421
Polishing
Hi guys!
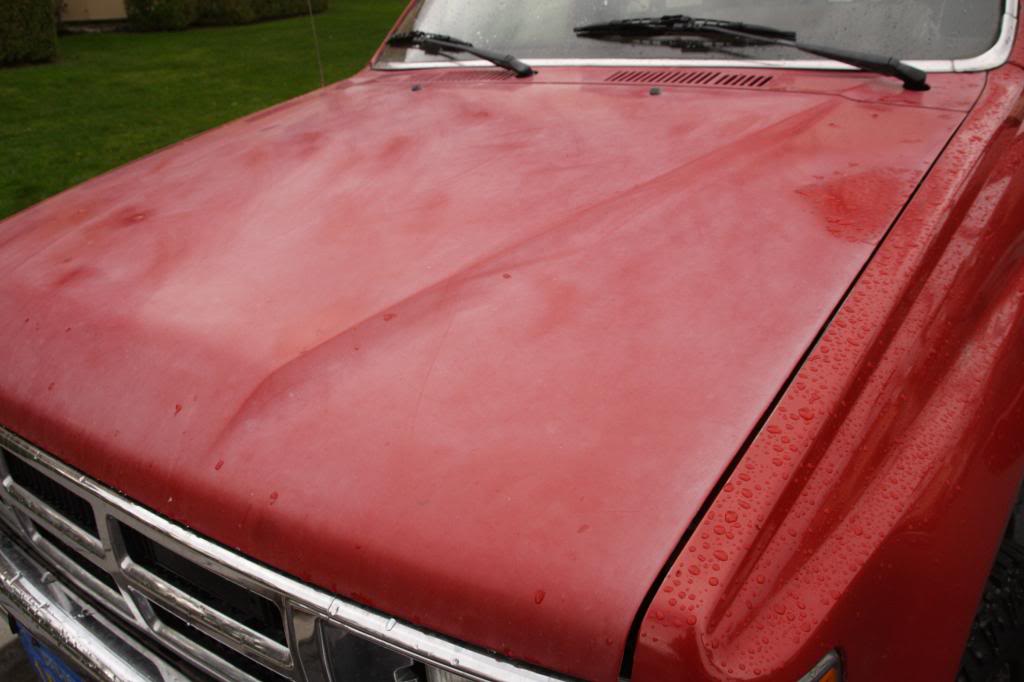
If last nightís drizzle is a good test, looks like I may not need abrasives. All Iíve got is some haze and thorough washing and then application of good glaze (I got TR3), then good wax and further buffing should work. Deeper red with beading is where I hand-rubbed and hand-buffed with TR3.
Hereís view of hood and fender:
Closer view:
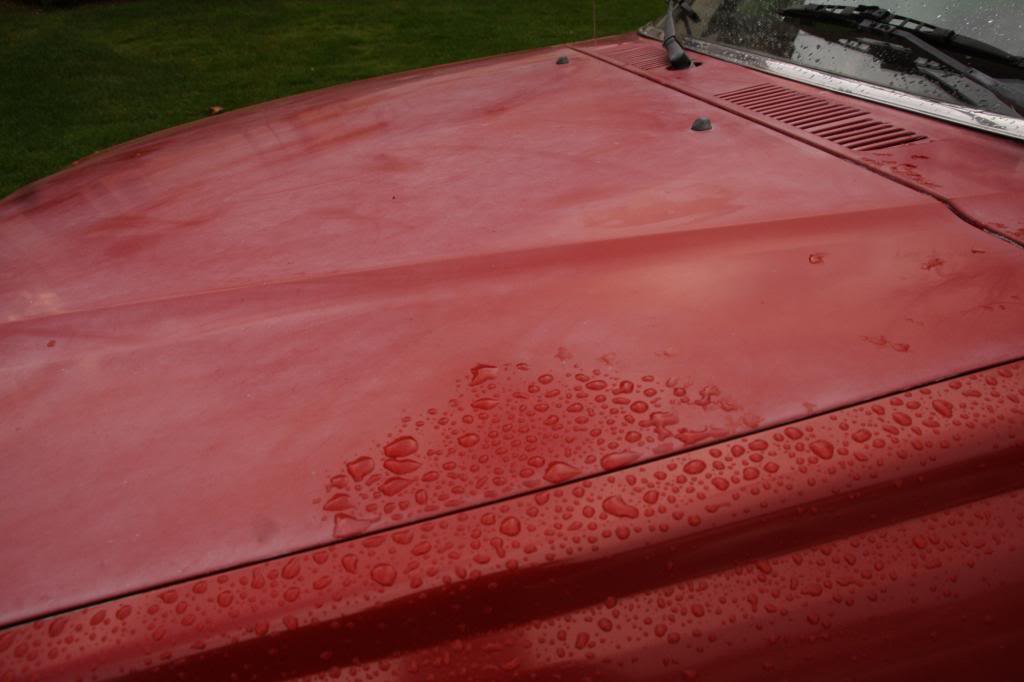
BTW, also started poking into chrome windshield trim and the rust it encourages. Took one trim off and gap does not look bad. I'd rather have a gap than have something that absorbs and retains debris and moisture, especially salt water.
If last nightís drizzle is a good test, looks like I may not need abrasives. All Iíve got is some haze and thorough washing and then application of good glaze (I got TR3), then good wax and further buffing should work. Deeper red with beading is where I hand-rubbed and hand-buffed with TR3.
Hereís view of hood and fender:

Closer view:

BTW, also started poking into chrome windshield trim and the rust it encourages. Took one trim off and gap does not look bad. I'd rather have a gap than have something that absorbs and retains debris and moisture, especially salt water.
#422
A good rubbing compound and then wax will make a big difference in your shine. I have seen red, silver, and black make the biggest difference on cars and trucks. What yoru hood is showing with the white glaze is one that can be brought back to a nice finish. I prefer Meguiars but several brands will work just as good.
I like to use a 5inch foam pad and attach it to a drill and keep it wet and then add my compounds to the pad. They make some light duty ones as well that just mostly do a lot of vibrating. Those will save your arms a lot of wear and tear. I know I have a picture of what I am talking about somewhere and will see if I can find it. A cheap and easy set up that works great.
For some of your chrome, try wadding up some aluminum foil and get it wet with water and lightly rub chrome. Find a small spot to practice on and you can get the feel for it. It is good about removing rust and adding shine to chrome. I practiced while in the boneyard. Had some foil in my pocket and a bottle of drinking water.
I got a pad similar to the picture below from Oriellys. It has a 1/4 inch drill bit attached and if you keep it wet, you don't have to worry about burning the paint.
http://www.ebay.com/itm/6-MEDIUM-FOAM-BUFF-BUFFING-POLISH-POLISHING-PAD-Buffer-/191026165964?pt=Motors_Car_Truck_Parts_Accessories&hash=item2c7a0bf8cc&vxp=mtr
Last edited by Terrys87; 02-01-2014 at 01:36 AM.
#423
A good rubbing compound and then wax will make a big difference in your shine.....
...I like to use a 5inch foam pad and attach it to a drill and keep it wet and then add my compounds to the pad.
...For some of your chrome, try wadding up some aluminum foil and get it wet with water and lightly rub chrome...
...I like to use a 5inch foam pad and attach it to a drill and keep it wet and then add my compounds to the pad.
...For some of your chrome, try wadding up some aluminum foil and get it wet with water and lightly rub chrome...
Cool to learn that you're training your son early on restoration!
Yeah, most of the paint is good or better than that hood. I got this orbital hing from Autozone for around $20. That would help save time.
There are wind/sand rash where primer is showing on some spots. I'll just touch those up bit by bit.
Somehow all of my chrome (actually feels like stainless steel) trim is excellent; no sign of rust. However, I have removed all the wheel well and rocker panel trim. I also removed the vertical piece on passenger side of windshield to start fixing the rust spots. I will not re-intall the chrome trim. Reasons I do not want a windshield trim:
1) It catches debris/dust that absorbs and retains moisture, and worse yet salts if loaded with ocean sports equipment.
2) IF chrome, I think it makes matters worse by http://en.wikipedia.org/wiki/Galvanic_corrosion. So I'm guessing that thos who have replaced chrome trim with rubber ones would see less rusting in the future.
I'll make separate post on my windshield frame rust...
BTW, regarding my Fiberglas cap, Do you think the following steps would work?
1) On spots where resin/fiberglass is starting to show, sand with 300 grit and prime with fiberglas primer.
2) Sand primer with 600-grit
2) On spots where finish is still good, sand with 600
3) Take to paint shop for final coat of paint. Someone (Nervo19?) mentioned Brightside Polyurethane earlier. Should be good because shell is fiberglas and I will end up loading salty equipment on top.
Happy weekend
Last edited by RAD4Runner; 02-01-2014 at 10:09 PM.
#424
Great info on the windshield trim... Thanks for posting that. And, use an orbital with the TR 3... It's way too much work, especially with red paint, and that tr3 with a couple applications on that hood will come out nice and shiny. How you doing buddy? Holy crap, I just remembered I have to ship you something! Lol.
#425
Windshield Trim Delete and Cowl Project
Need to revise write-up because original solution failed. During curing the flap of the rubber trim was pushing against the body. I think it prevented proper sealing by the urethane. Even I if I had silicone sealant over the urethane, it still leaked.
Chrome trim is only there for looks. IT IS ACTUALLY BAD for the body. It catches and TRAPS debris and worse yet, saltwater dripping from water sports equipment.
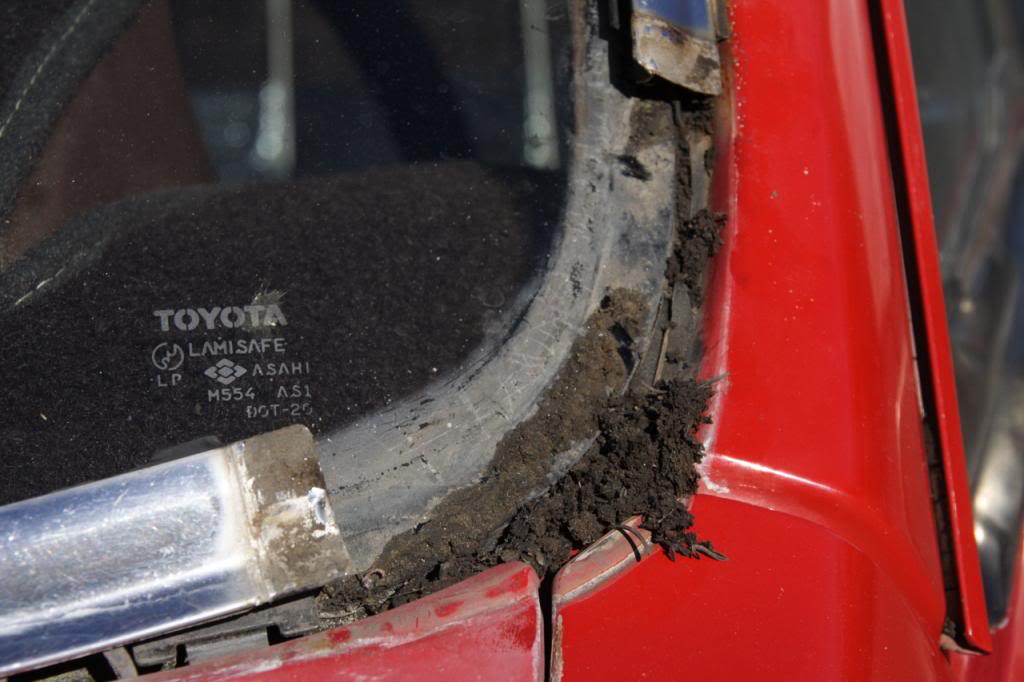
IF you only have freshwater dripping on your windshield, the rubber gasket like on old VW Beetles may work. However, water still seeps into the interface between rubber and body metal and stays there longer than if it were openly exposed to air.
HERE's the FINAL SOLUTION:
Safelite replaced under warranty as follows:
Removed old glass
Removed old sealant
Applied rubber trim around glass. Trim is not used to seal. It is merely to protect edge of glass from accidental stresses.
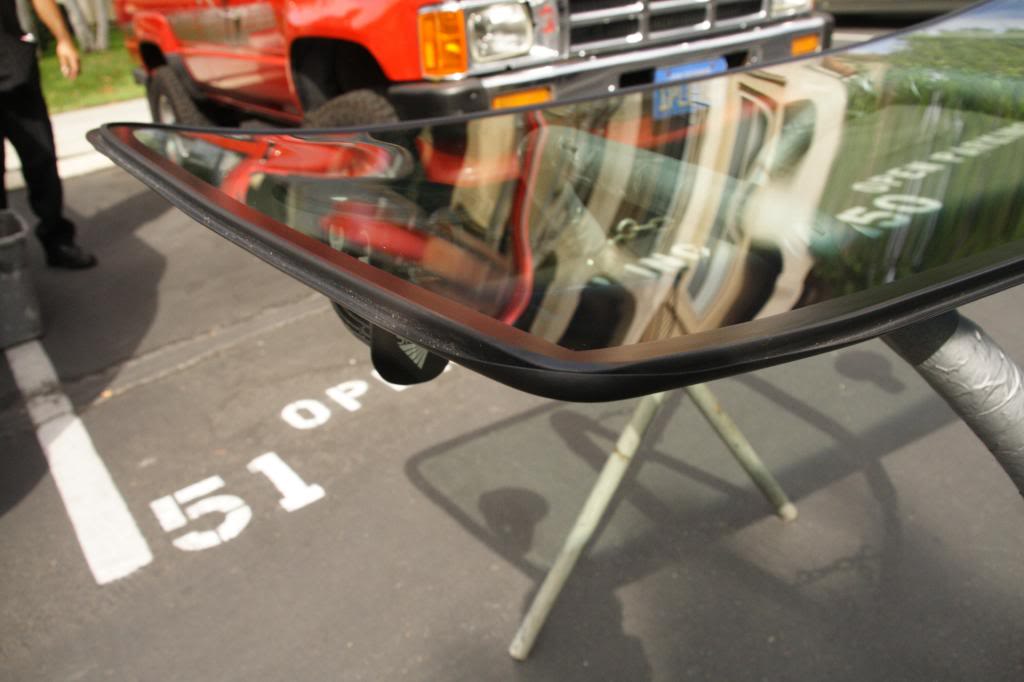
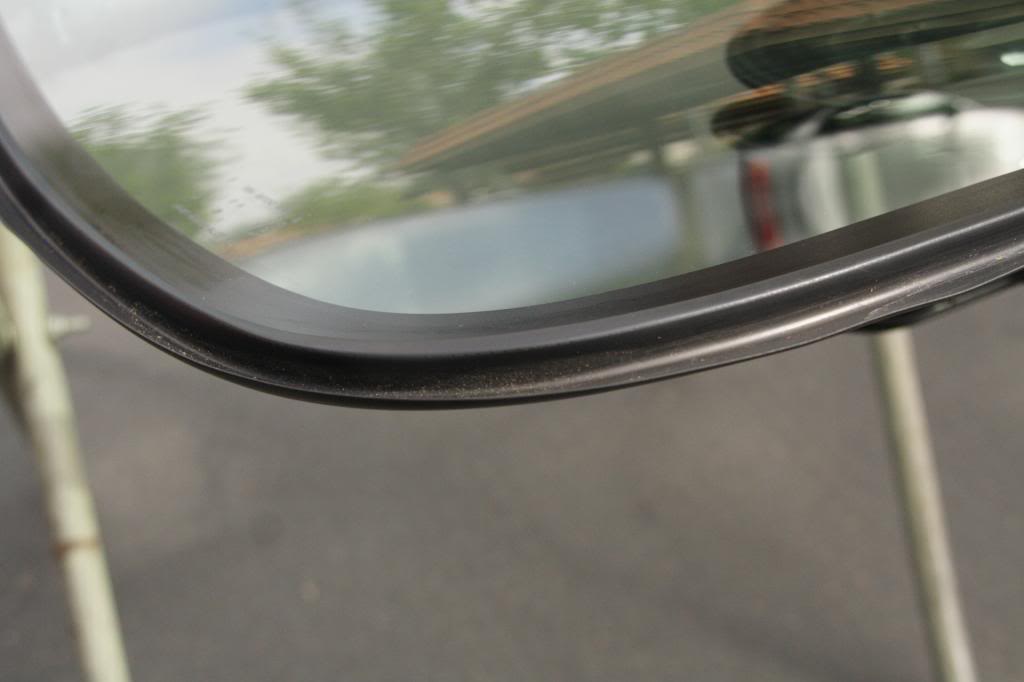
CUT OFF the "wings/flap" before installing the glass. No actual pic but here's an illustration: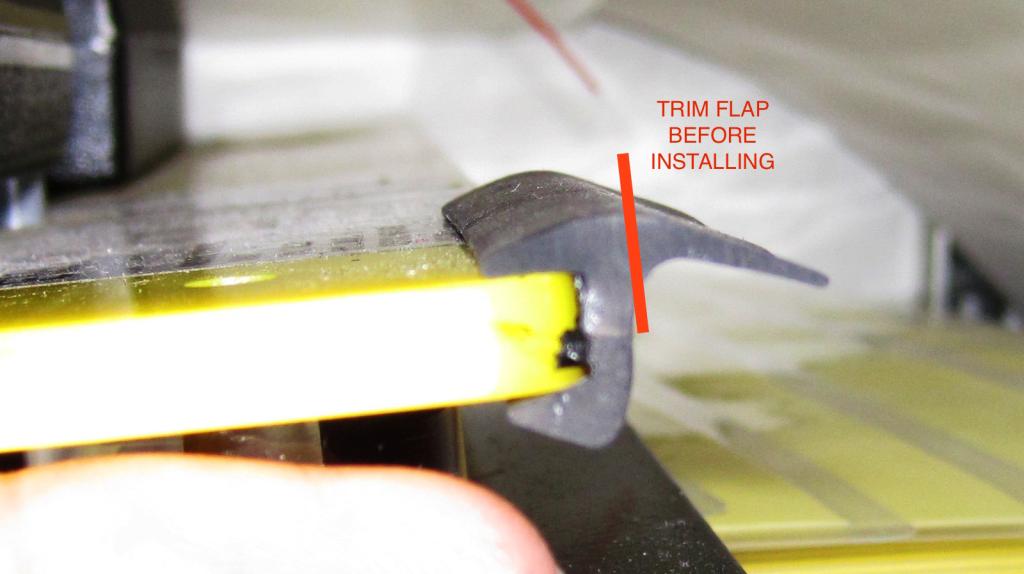
Installed glass as usual.
Left gap so it does not TRAP debris and is easy to rinse/clean.
It kinda looks like this now (pic of Corolla rear window), except glass edge is protected by rubber trim..
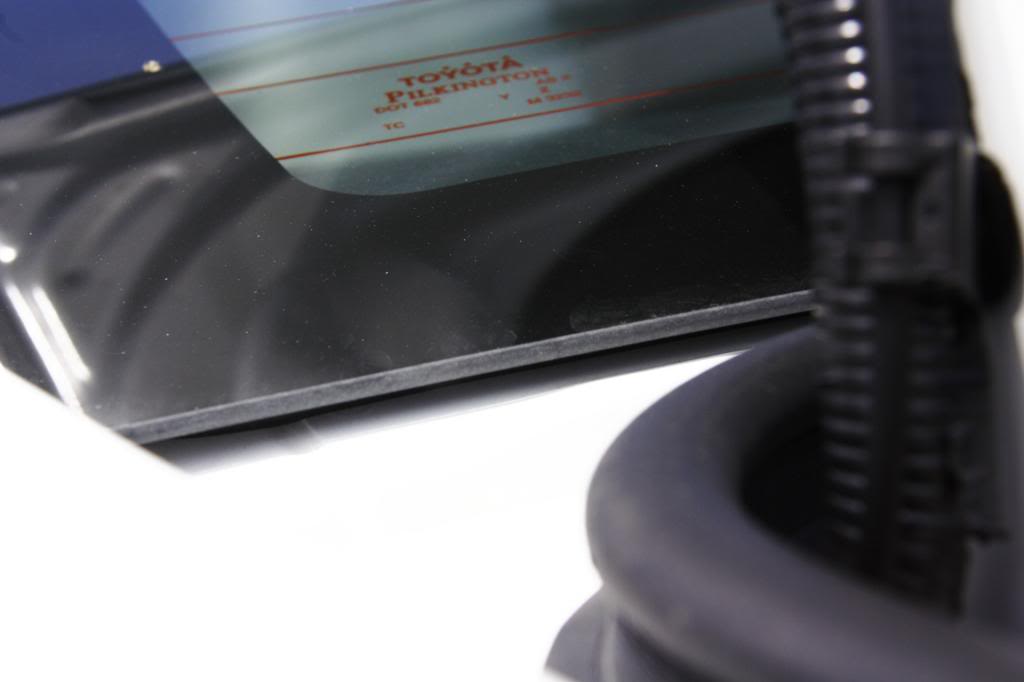
It does not look bad. Even IF it looked ugly, I'd rather have an ugly gap than rusted body around windshield.
This is what I mean by rinsing the gap. You could not do this effectively if gap is covered by rubber or chrome trim...
Chrome trim is only there for looks. IT IS ACTUALLY BAD for the body. It catches and TRAPS debris and worse yet, saltwater dripping from water sports equipment.

IF you only have freshwater dripping on your windshield, the rubber gasket like on old VW Beetles may work. However, water still seeps into the interface between rubber and body metal and stays there longer than if it were openly exposed to air.
HERE's the FINAL SOLUTION:
Safelite replaced under warranty as follows:
Removed old glass
Removed old sealant
Applied rubber trim around glass. Trim is not used to seal. It is merely to protect edge of glass from accidental stresses.


CUT OFF the "wings/flap" before installing the glass. No actual pic but here's an illustration:

Installed glass as usual.
Left gap so it does not TRAP debris and is easy to rinse/clean.
It kinda looks like this now (pic of Corolla rear window), except glass edge is protected by rubber trim..

It does not look bad. Even IF it looked ugly, I'd rather have an ugly gap than rusted body around windshield.
This is what I mean by rinsing the gap. You could not do this effectively if gap is covered by rubber or chrome trim...
Last edited by RAD4Runner; 04-18-2018 at 04:31 PM.
#427
#428
Registered User
iTrader: (4)
Joined: May 2010
Posts: 720
Likes: 15
From: People's Republic of California
BOOOOOOOO....!!!!!! I like a little chrome! 
Ray, if you spend a lot of time in ocean sports like I do it will pay off to make yourself a freshwater rinser. I have a 16 gallon water tank with a 4 gpm wash down pump hooked up to a garden nozzle spray head. It will save your roof and anywhere the saltwater drips onto. My kayak and fishing gear gets completely rinsed off on the beach at la jolla or in the parking lot at other places I launch from. People use to think I was going overboard....UNTIL, one of my friends tacoma's roof completely rotted away! no lie, it took about 7 years time. Half of his cab roof had to be replaced. Almost everyone I know now rinses their kayak and gear off before loading up

Ray, if you spend a lot of time in ocean sports like I do it will pay off to make yourself a freshwater rinser. I have a 16 gallon water tank with a 4 gpm wash down pump hooked up to a garden nozzle spray head. It will save your roof and anywhere the saltwater drips onto. My kayak and fishing gear gets completely rinsed off on the beach at la jolla or in the parking lot at other places I launch from. People use to think I was going overboard....UNTIL, one of my friends tacoma's roof completely rotted away! no lie, it took about 7 years time. Half of his cab roof had to be replaced. Almost everyone I know now rinses their kayak and gear off before loading up

#429
LOL! Functional chrome is good. I like the grille, and my favorite is the the vent window latch!! So old-school- reminds me of my family's Bel-Air when I was growing up.
Nice! Yeah, that's a good idea.
LOL! My buddy's Camry's roof also rusted through- Poor guys. He just sold it.
Ray, if you spend a lot of time in ocean sports like I do it will pay off to make yourself a freshwater rinser. I have a 16 gallon water tank with a 4 gpm wash down pump hooked up to a garden nozzle spray head. It will save your roof and anywhere the saltwater drips onto. My kayak and fishing gear gets completely rinsed off on the beach at la jolla or in the parking lot at other places I launch from. People use to think I was going overboard....UNTIL, one of my friends tacoma's roof completely rotted away! no lie, it took about 7 years time. Half of his cab roof had to be replaced. Almost everyone I know now rinses their kayak and gear off before loading up 

LOL! My buddy's Camry's roof also rusted through- Poor guys. He just sold it.
Last edited by RAD4Runner; 05-03-2017 at 10:46 PM.
#430
Check my thread buddy! Your wonderful well wishes paid off! By the way, I will get some pictures now that my windshield is out of the red one. Most all of the clips like that one picture came out okay, but the ones at the bottom all broke when my windshield and windshield frame flexed. Luckily I am good to go now! Lol. Go meet Suzy-Q the Silverback!
#431
I haven't worked with fiberglass that much but you have the steps down alright. If just a few strands are showing, you could get away with a light coat of body filler. I had my windshield shop to install a rubber gasket. It fits and forms very well and there is no metal to it to cause rust. I don't know about the urethane. I would think clear coat would work great. If you want have to sand and want to get the rough texture back on the top, I would use a little bed coating to add the roughness back to it.
I pulled my windshield out and sanded the rust with 300 grit and then used a rust converter over it. The windshield shop then sealed the converter up with a sealant and reinstalled my windshield. With the gasket and labor they charged me around $80. If you want I can see what they charge for the gasket. It is charged by the foot.
Also I got some information on Marks thread somewhere fairly recent about cost of new plastic clips. Seems like it was less then $20 for them to ship them if you need to go that route. Any windshield shop in your area should be able to get them.
Last edited by Terrys87; 02-22-2014 at 10:36 PM.
#432
When I get another warm day, I am doing your starter wire upgrade. I have put in a new battery (old one died) new terminal, cleaned the starter relay contacts, replaced starter contacts in the starter and the other day I still got a couple of clicks before it cranked over. It may have been a bad contact at the battery and I will double check that again, but I want to get the starting system rock solid.
I seen on American Restoration that you can use hair spray to but a protective coating over the battery terminals after hooking up the battery. Something I never thought of .
I seen on American Restoration that you can use hair spray to but a protective coating over the battery terminals after hooking up the battery. Something I never thought of .
#433
Thanks for the tips, Terry.
Guys,
Bummer... after I pulled the trims and cleaned the gap, windshield started cracking. Could be the stress from pulling and digging out the clips?
Now I don't have a choice but have it replaced. Will go to windshield place today and ask them for options on glass and trim.
My plan is (like Terry):
1) Take of glass myself,
2) Clean mounting surface,
3) Fix Rust spot,
4) Call shop for onsite service. (I'll ask them for quote to do that where they would not need to remove glass or clean mounting surface)
While I'm doing that, I'm also refurbishing the cowl area. Mine's missing the plastic screen for the left-most opening here:
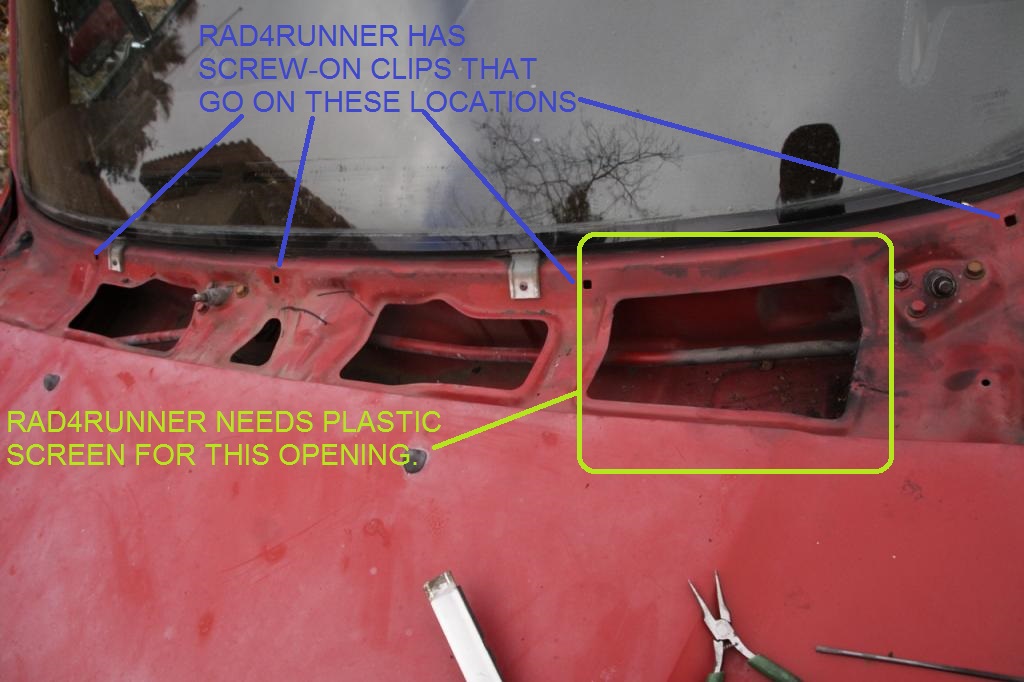
Mark,
I hope you could spare me one from Suzy or Ruby Red.
TIA
Guys,
Bummer... after I pulled the trims and cleaned the gap, windshield started cracking. Could be the stress from pulling and digging out the clips?
Now I don't have a choice but have it replaced. Will go to windshield place today and ask them for options on glass and trim.
My plan is (like Terry):
1) Take of glass myself,
2) Clean mounting surface,
3) Fix Rust spot,
4) Call shop for onsite service. (I'll ask them for quote to do that where they would not need to remove glass or clean mounting surface)
While I'm doing that, I'm also refurbishing the cowl area. Mine's missing the plastic screen for the left-most opening here:

Mark,
I hope you could spare me one from Suzy or Ruby Red.
TIA
#434
I broke a windshield on a 1st gen truck the other day helping a friend to part it out. (Cab and Frame rusted in two.) I did not have much pressure on it at all. That is frustrating. Guess the glass is so old it is brittle.
Try to get the vent cover with screens on them. Some have screens and some don't. Also on the passenger side there is a stove pipe, try so see if any crud has built up around it. On the far edges of the cowl, is where water drains out and then it runs behind the inner fenders, just in front of the mud flap. A lot of junk gets behind the mud flap area as well.
Try to get the vent cover with screens on them. Some have screens and some don't. Also on the passenger side there is a stove pipe, try so see if any crud has built up around it. On the far edges of the cowl, is where water drains out and then it runs behind the inner fenders, just in front of the mud flap. A lot of junk gets behind the mud flap area as well.
#435
Try to get the vent cover with screens on them. Some have screens and some don't. Also on the passenger side there is a stove pipe, try so see if any crud has built up around it. On the far edges of the cowl, is where water drains out and then it runs behind the inner fenders, just in front of the mud flap. A lot of junk gets behind the mud flap area as well.
#436
I should have that screen for you buddy. & I have two black corner lights. I don't have Chrome. You can't change the lenses from what I know, otherwise I might have or chrome housing for you of the ones that I broke the lenses on. I ordered all four new. I will likely not be selling any of the extra ones as I will have for the rear. I've broken 2 already in the last year just with little backing up into brush mishaps and so forth.
#437
Thanks, Mark. I'll take the screen and the CSI timer switch. No rush but please let me know how much I owe you.
BTW, thought I'd share a shot taken during this weekend's Border Run Regatta from Newport Beach to San Diego... Wind was so low, it would have taken us until Monday to get back to San Diego. We abandoned the race, turn on engine and headed home... This is our consolation, taken just offshore of Dana Point:

Catalina Island is barely visible to right of the setting sun.
BTW, thought I'd share a shot taken during this weekend's Border Run Regatta from Newport Beach to San Diego... Wind was so low, it would have taken us until Monday to get back to San Diego. We abandoned the race, turn on engine and headed home... This is our consolation, taken just offshore of Dana Point:

Catalina Island is barely visible to right of the setting sun.
#438
Been reading through the build thread RAD4Runner... sucks about your windshield.
I think there may be some shops that can solve both the replacement windshield AND elimination of the trim.
Also, not to be a smart ass, glass doesn't really get more or less brittle, it can have damage to it from use over time that is unseen by the naked eye and only needs tiny bit more stress to go. Actually, 'technically, glass isn't a solid even.. just a very viscous fluid.
Anyway, thought I'd share that, although I couldn't find the place right now, I did come across it a while back that said they will eliminate trim etc...
Beautiful sunset! love nature

#439
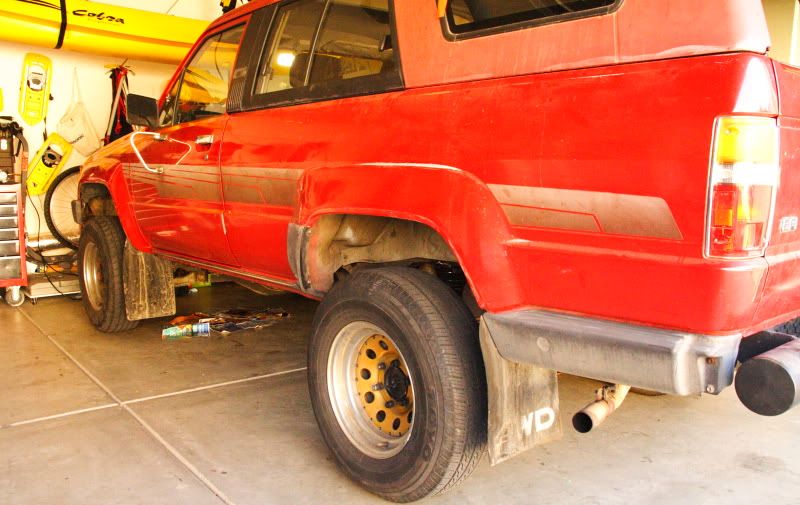
Stock Alloy Rims from 2nd Gen 4Runner now installed. Thanks for your help with the decision to go stock, guys!
Before:

After:
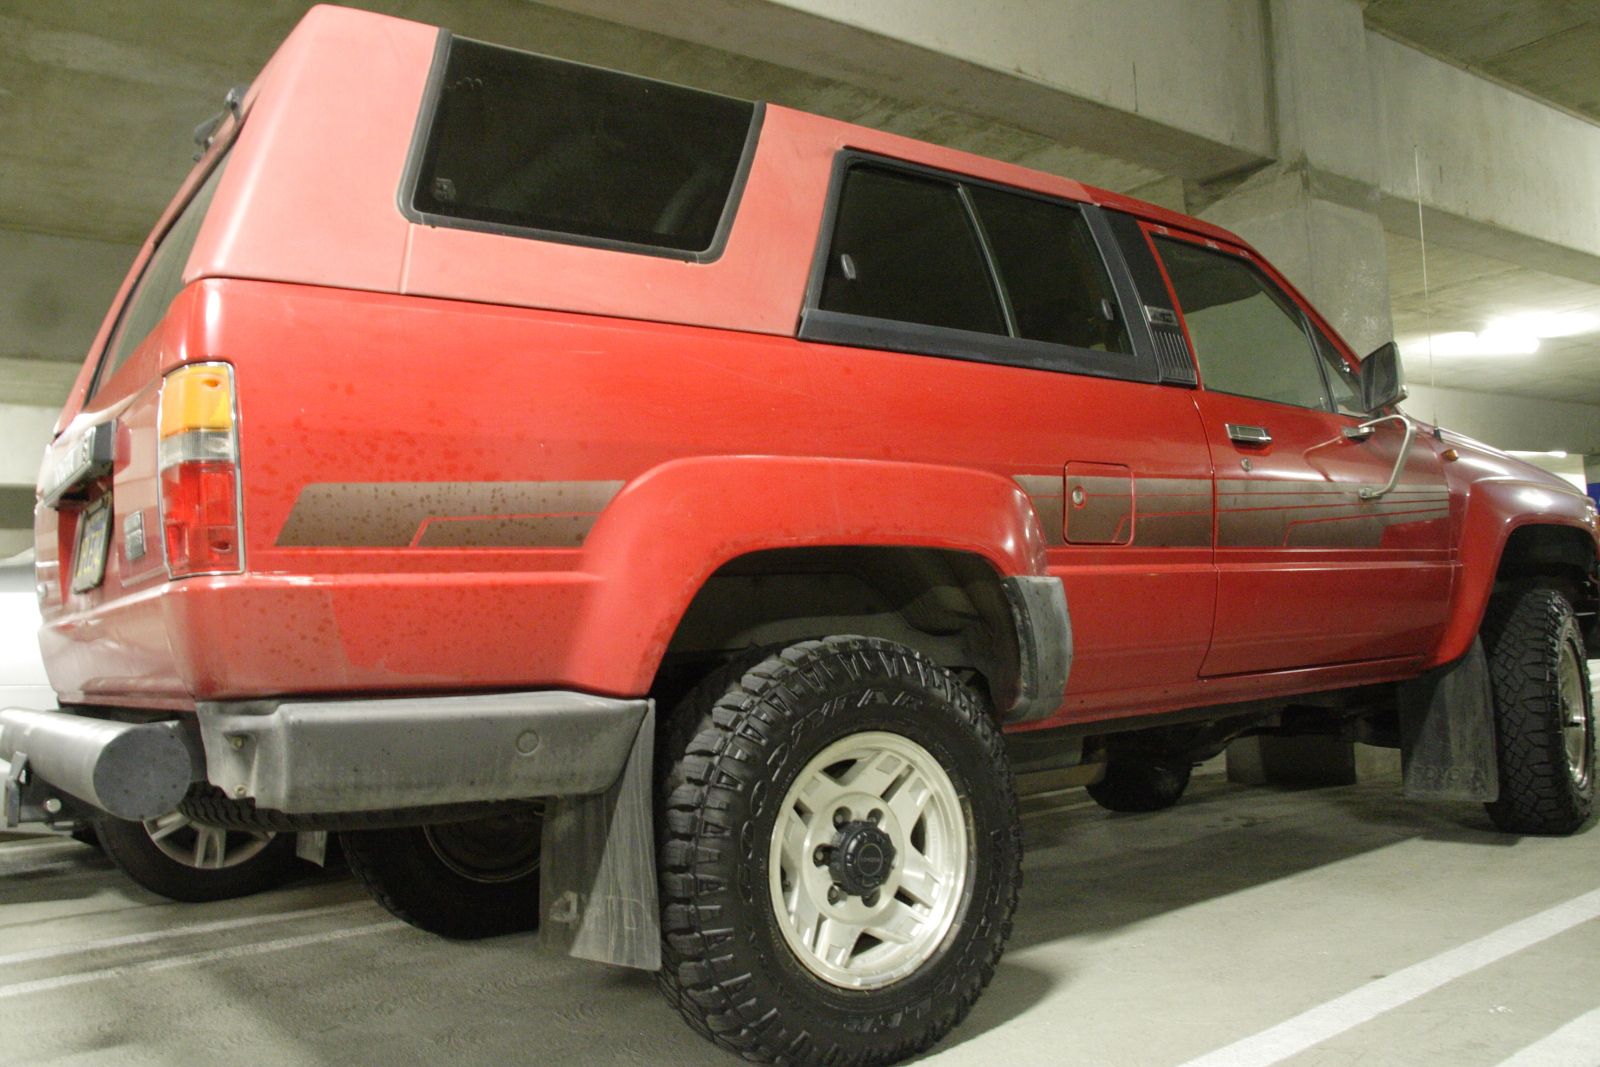
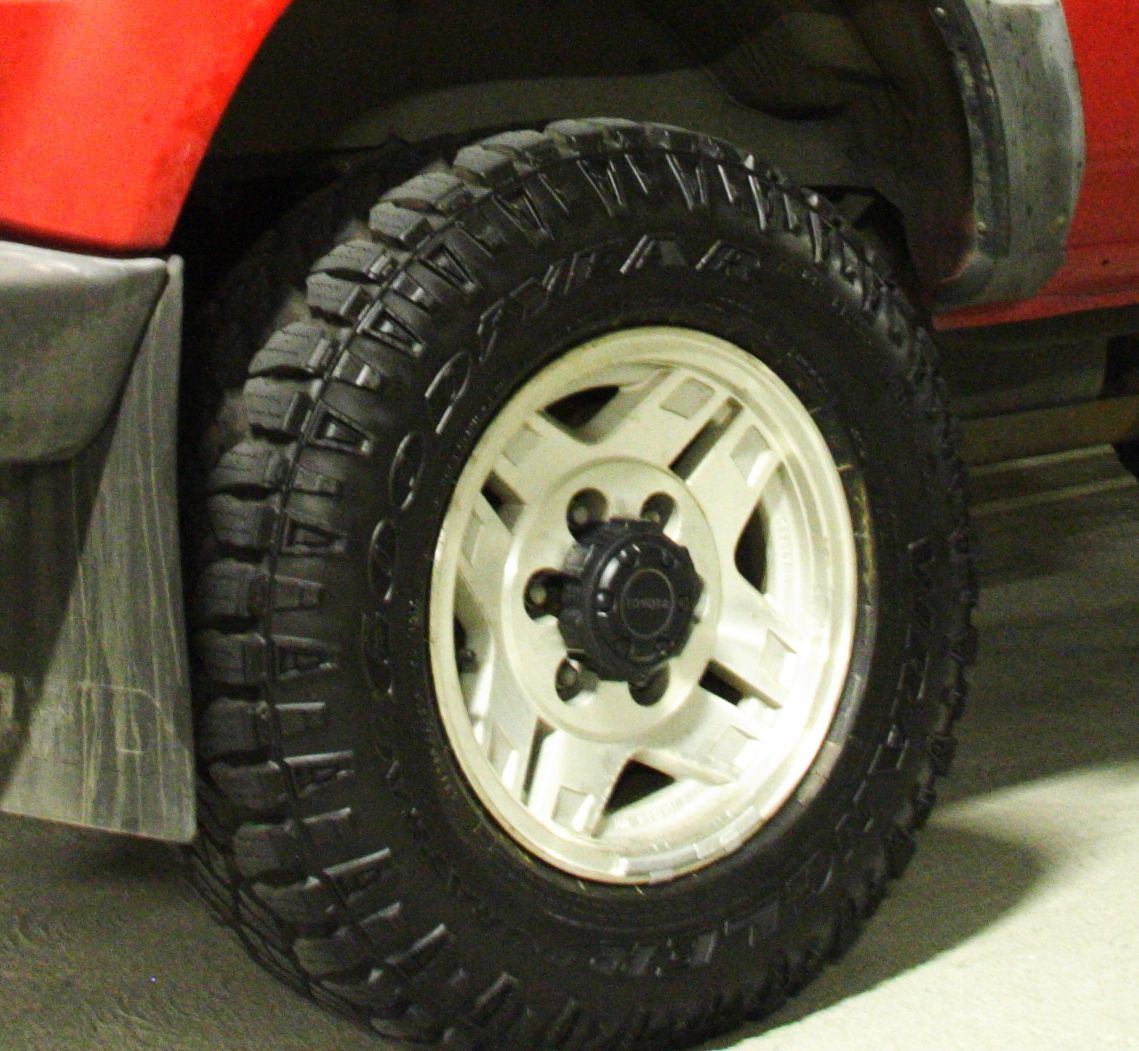
Now tires are just about even with the fender flares. Not sticking out too much, but does not look recessed into wheel well / goofy-looking like a Land Rover Discovery
......................
Before:


After:


Now tires are just about even with the fender flares. Not sticking out too much, but does not look recessed into wheel well / goofy-looking like a Land Rover Discovery

......................
My rims....

#440
Windshield and Rims
Thanks for the inputs, Gevo!
Safelite happens To have a very minimal rubber trim. It just covers edge of glass, and it has a fairly flexible "wing" to span between glass and body. I may just get that. After installation I can simply lift/flexi it up/open and squeeze silicone under.
Funny... the gentleman who bought my steel/chrome/gold rims has a second gen with the SR5 rims; we could have simply traded - LOL!
Speaking of nature, it's raining lightly in San Diego; We're backpacking this weekend. Looking forward to waking up in a snow-covered tent.


