
RAD4Runner's 1986 4Runner dlx Build-up
 07-27-2013, 08:38 AM
#281
rad4r,
excellent write-ups, pics, and diagrams. helped with my rear gate key switch issues.
seemed like a good idea to "fix" the starter wiring flaw, even though my 87 4r (22re, 5speed) doesn't exhibit any starter issues (knock on wood), if only to save the key switch. in checking the relay connector, i don't have the same baseline data. no 12v power to the diagonal large black wire (key off, key acc, key on), no resistance between the two large black wires (0.00).
wonder if toyota fixed the flaw with the 87s, or if i have other problem with the system (again, no issues with the starter engaging and turning the ring gear).
wally
 07-27-2013, 03:10 PM
#284
Registered User
Thread Starter
Tnx, wallytoo
Correct, Prime evidence is KidVermicious' (in t4r.org) early 86 4Runner without a starter relay. Mine, made in August 86, has starter relay.
Your readings indicate they haven;t fixed it yet.
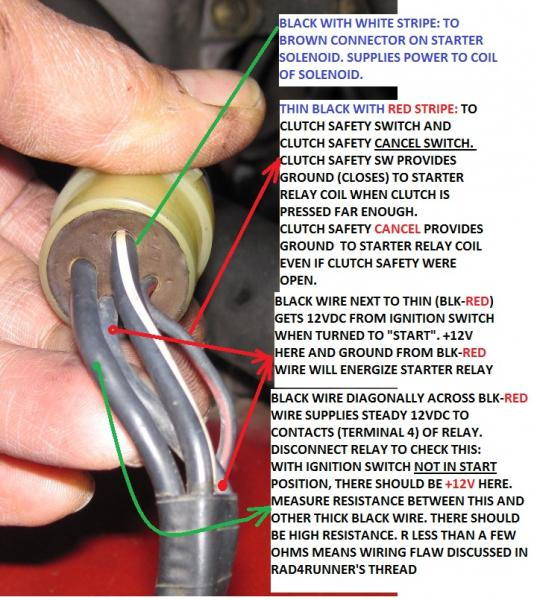
Black wire diagonally across thin blk-red wire should have 12V even if IGN switch is not in start position, unless there is a separate switch to disconnect it from battery when IGN in OFF position..
It should have no continuity with blk wire next to blk-red wire.
Currently you have 0 ohm between them, meaning they are on same circuit,a and they both get 12V only when IGN is in start position
Last edited by RAD4Runner; 07-27-2013 at 03:13 PM.
07-28-2013, 04:24 AM
#285
ahh. i got it.
i interpreted it as saying the "incorrect" wiring should show those voltage ratings, not that that was how it "should" have been wired.
now i've got a project for the day.
thank you again,
wally
i've got more reading to do, so i can interpret my own results better. damn, though, the "spaghetti" schematics are difficult to follow (factory, not yours). the MS paint additions help a lot.
07-28-2013, 11:38 AM
#286
Registered User
Thread Starter
ahh. i got it.
i interpreted it as saying the "incorrect" wiring should show those voltage ratings, not that that was how it "should" have been wired.
now i've got a project for the day.
...
i've got more reading to do, so i can interpret my own results better. damn, though, the "spaghetti" schematics are difficult to follow (factory, not yours). the MS paint additions help a lot.
Simple but appropriate project that should have been a recall. I guess it's fair to say that during those times Toyota had better mechanical (i.e., 22RE-liable) engineers than electrical engineers (headlight and starting circuit boo-boo's).
Yeah, hard to find where wires branched off. One needs to peel the loom in order to find splices, and many connectors are not documented, much less pin-outs.
07-28-2013, 12:07 PM
#287
and i've fixed the starting circuit. cut the appropriate wire, added a 14 awg from the connector to the 40 amp in the fuse box (and soldered the splice).
tested, and i have 12v at the connector, key off etc. and it still starts, so at least i didn't fix something, and immediately make it worse.
i need to practice my soldering. i got it, but it looks ugly. hidden in tape.
tested, and i have 12v at the connector, key off etc. and it still starts, so at least i didn't fix something, and immediately make it worse.
i need to practice my soldering. i got it, but it looks ugly. hidden in tape.
07-28-2013, 02:25 PM
#289
and i can verify that the rear, lower bump stops are solid rubber, and they will shear off. one of mine was "rust jacked" off. still have the passenger side, although that's half off.
wally
07-28-2013, 02:31 PM
#290
Registered User
RAD, I know you modified your headlight harness, but did you ever get anywhere with complete new harness?
07-28-2013, 09:29 PM
#291
Registered User
Thread Starter
Glad it worked. LOL!
Yes, Wally, got the solution, but haven't implemented yet. Basically:
In stock circuit, voltage from negative side of High Beam Filament "pulls" ups voltage on positive side of HB indicator light when LB contacts open. This means when LB contacts are closed, they still carry 12V/Resistance of HB filament (still a high current. I'll connect Positive side of HB indicator bulb to 12V, through a higher resistance (47 ohms i think), instead - to lower that current.
Better explained with a a schematic
LOL yeah, Mark gotta get together again. Might need your help with suspension refurb, too
Sorry, Cory, no time to do the plug-n-play harness. Been so busy.
speaking of the headlight rewire, i'm probably going to do that next. i don't plan to upgrade the headlights themselves, just fix the wiring to "save" the combo switch. i couldn't tell from the discussion/schematics - did you find a solution for the hi-beam indicator? wally
In stock circuit, voltage from negative side of High Beam Filament "pulls" ups voltage on positive side of HB indicator light when LB contacts open. This means when LB contacts are closed, they still carry 12V/Resistance of HB filament (still a high current. I'll connect Positive side of HB indicator bulb to 12V, through a higher resistance (47 ohms i think), instead - to lower that current.
Better explained with a a schematic
Sorry, Cory, no time to do the plug-n-play harness. Been so busy.
07-29-2013, 03:55 PM
#292
Registered User
Thread Starter
Drained and Replaced Tranny and Transfer Gear Oil This weekend
I do not know when tranny and transfer gear oil were replaced by previous owner. When I got the truck I simply checked if gear oil was clean in both location and topped off.
Finally got the chance to drain and replace this weekend.
Findings:
Gear Oil Used & how much:
Redline MT-90, 75W-90. One Gallon plus two quart bottles was sufficient, with some left-over.
Finally got the chance to drain and replace this weekend.
Findings:
- Tranny oil was "Silver" from iron filings, oil not burnt, iron filings on drain plug magnet seemed normal- only fine particles. No "chunks" of metal. Shifting had been normal, except of occasional difficulty getting into first gear. You guys think that's normal or should gear oil have been replaced earlier? Anyway, I have almost a quart left. After a few miles, I plan to drain tranny by about a quart, then use left-over to top off, to get rid of some more iron filings.
- Transfer gear oil looked clean! Minimal iron filings on drain plug magnet.
Gear Oil Used & how much:
Redline MT-90, 75W-90. One Gallon plus two quart bottles was sufficient, with some left-over.
07-30-2013, 04:46 AM
#293
that sounds pretty normal to me.
if you saw what i drain from the diffs on my cj after i wheel it, and how many hard off-road miles i've put on it, you'd think the oil you drained from your tranny and x-fer were brand-new. includes a lock-right in the back and an open front diff that receives water through a leaking p-side axle seal (on the to-do list).
i use the contaminated gear oil as rust-proofing on my vehicles. spray it with an old wagner power painter, cover the frames, inner panels, etc. stinks for a few days, but is quite effective at inhibiting rust from the salty winter roads.
the hard shift into first is possibly from synchro wear. could have been alleviated by changing the oil, but more likely a function of shifting habits over 25 years (and different drivers), and would not have mattered too much about the newness of the tranny oil. cleanliness of x-fer is sort of expected. if you, and previous owners, didn't shift into 4wd a lot, it should be clean, as long as it doesn't have leaks allowing water in.
Last edited by wallytoo; 07-30-2013 at 04:50 AM.
07-30-2013, 05:00 AM
#294
Registered User
Thread Starter
Thanks, wallytoo. Will just monitor, seems good so far.
08-02-2013, 10:24 AM
#295
Registered User
Thread Starter
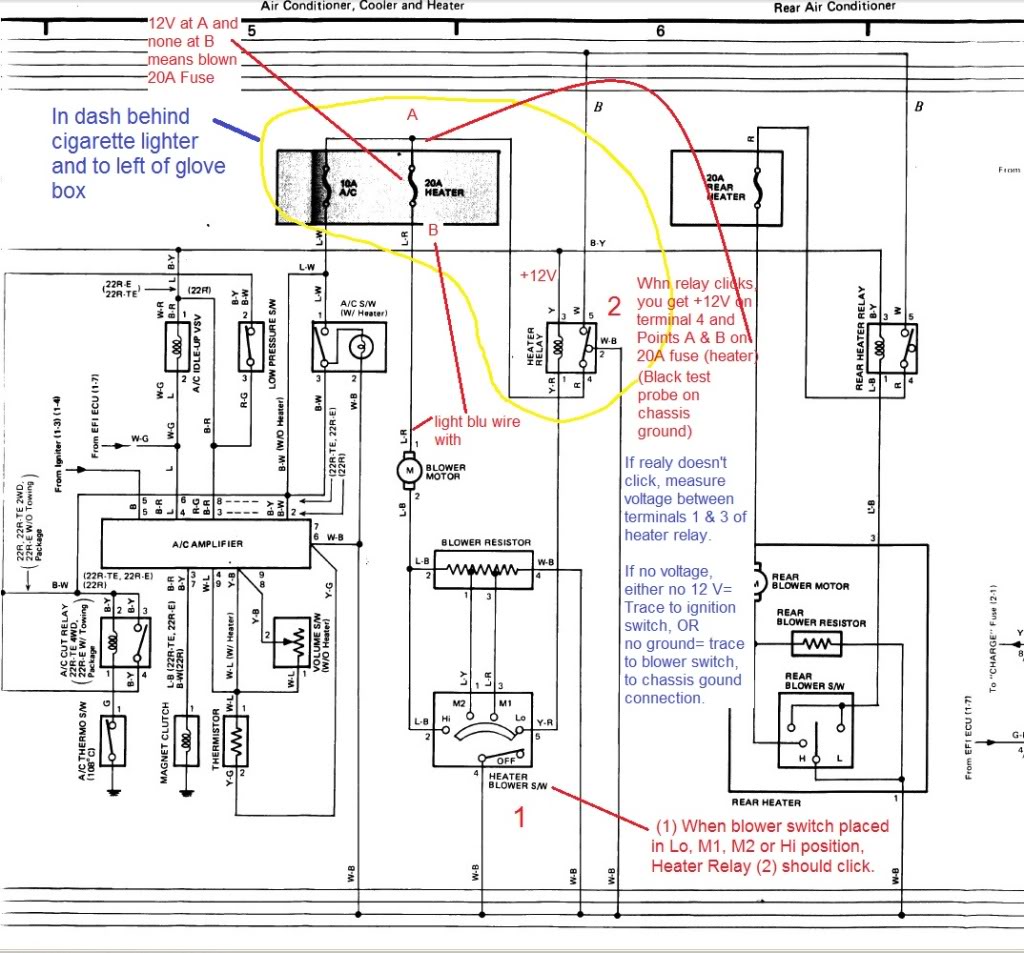
AC, Blower System
For easy reference, I'm putting my info on AC-Blower-Heater system here
1986-1988 4Runner circuit is here:
Location
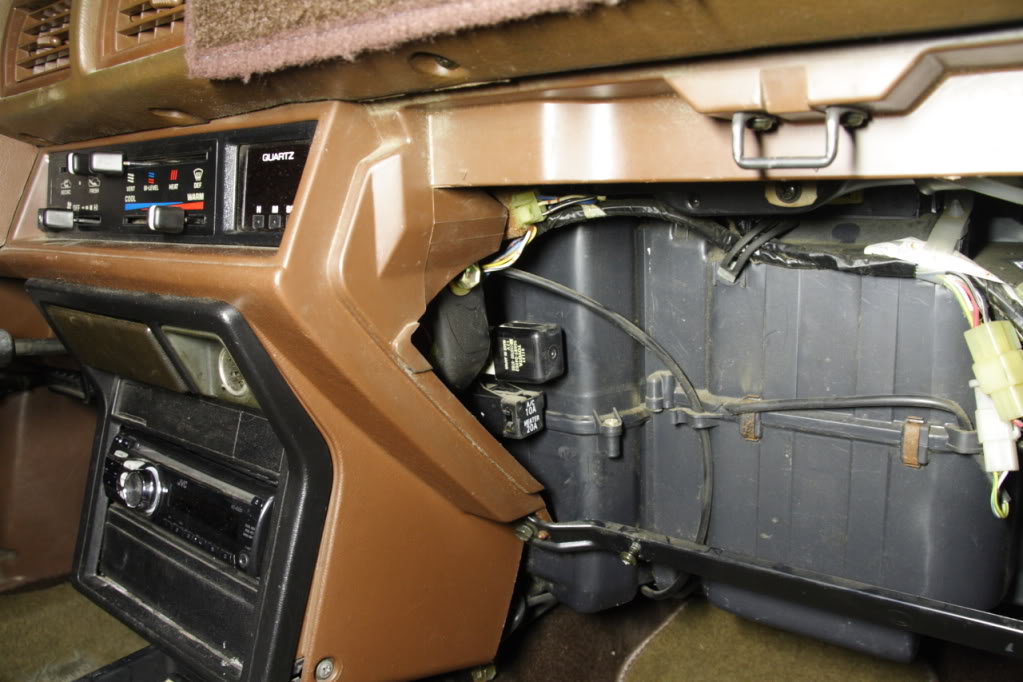
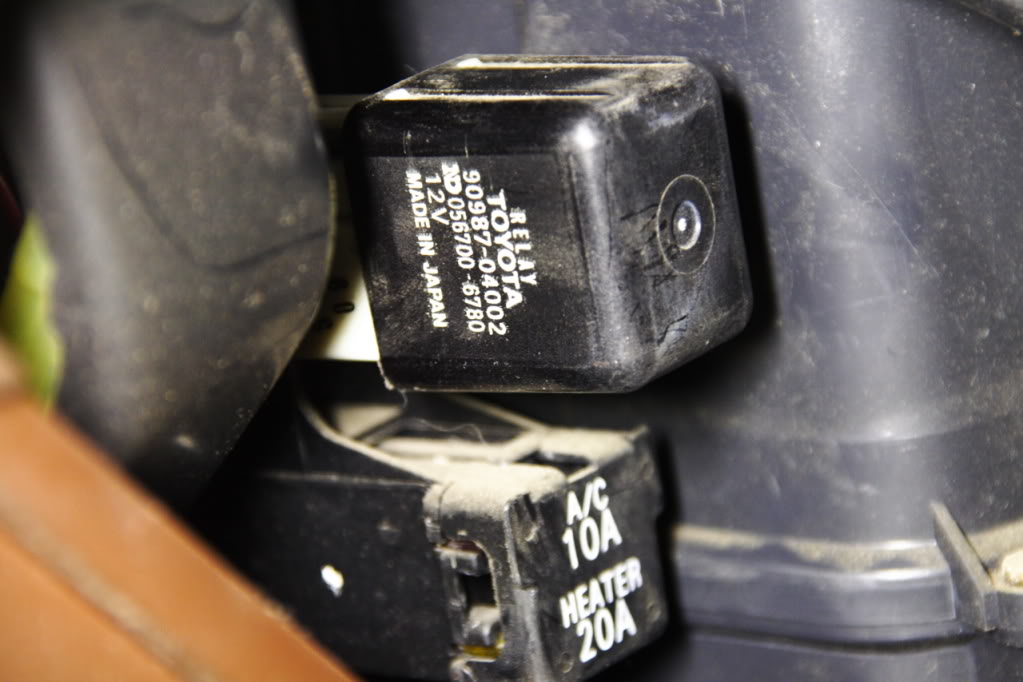
1986-1988 4Runner circuit is here:
Location
 08-02-2013, 11:09 AM
#297
Hey RAD, just wanted to say thanks for all the awesome writeup's, pics and wiring schematics that you've done! I had a problem with my back window not rolling up after putting the top back on, after a quick read through of your "rear window cargo switch" writeup and I found out about the "topoff switch". I had put too short of a bolt in and it wasn't engaging the switch! Anyway thanks again, now I just got to get around to implementing all of the other cool electrical wizardry that you've done write ups on!
08-02-2013, 11:31 AM
#298
Registered User
Thread Starter
Mark,
Sure will post more pics of her.
Cool! Always a pleasure to help
I painted the bolt head of mine, and the area surrounding it's hole red as a reminder.
Sure will post more pics of her.I painted the bolt head of mine, and the area surrounding it's hole red as a reminder.


