When you click on links to various merchants on this site and make a purchase, this can result in this site earning a commission. Affiliate programs and affiliations include, but are not limited to, the eBay Partner Network.
My issue isn't the copper crush washers (although thanks for the awesome tip), it's the stupid banjo fittings and my hose running from my fuel filter to the rail (completely shot). The only place I've been able to find a new hose is the dealership, and they want $180. I had thought about TIG welding a couple of fittings to the end of the banjo lines, like what was shown, or even just brazing a barb fitting on to them and using standard fuel hose.
I've priced the whole thing out (minus the adjustable regulator) and it's all about $150 for the adapters, hoses, and fittings. I know it's overkill to go with Army Navy (AN) fittings, but this is the "Quest for a more bulletproof 22RE" and hoses that are good enough for a deuce and a half, should be fine for this little rig.
I thought about doing the setup you have shown, but it's not worth the non-existent gains to me. The stock regulator works just great and has no problem keeping the fuel pressure in check. The Banjo's are also no problem either, they seal up every time. But hey, it's your truck do as you please. The Aeromotive stuff works great. I have a full Aeromotive setup going on my LS swapped truck, because it actually needs that.
I thought about doing the setup you have shown, but it's not worth the non-existent gains to me. The stock regulator works just great and has no problem keeping the fuel pressure in check. The Banjo's are also no problem either, they seal up every time. But hey, it's your truck do as you please. The Aeromotive stuff works great. I have a full Aeromotive setup going on my LS swapped truck, because it actually needs that.
I'm going to try and find some Banjo to barb fittings (for standard fuel hose), or see if I can't order some metric to NPT adapters and then get NPT barb fittings. All of this before I drop the cash on the crazy AN upgrade. I totally agree....not a huge benefit versus cost other than being better hoses and fittings...and to be quite honest, I'd rather spend the money elsewhere....just frustrated at the constant fuel leak.
Ordered banjo fittings with barbs for standard fuel line today from belmetrics. After looking into the AN fittings, they seemed too exotic and would be more difficult to replace if something happened, versus a standard hose barb / fuel line setup which would be much more inexpensive and easier to find at any auto parts store.
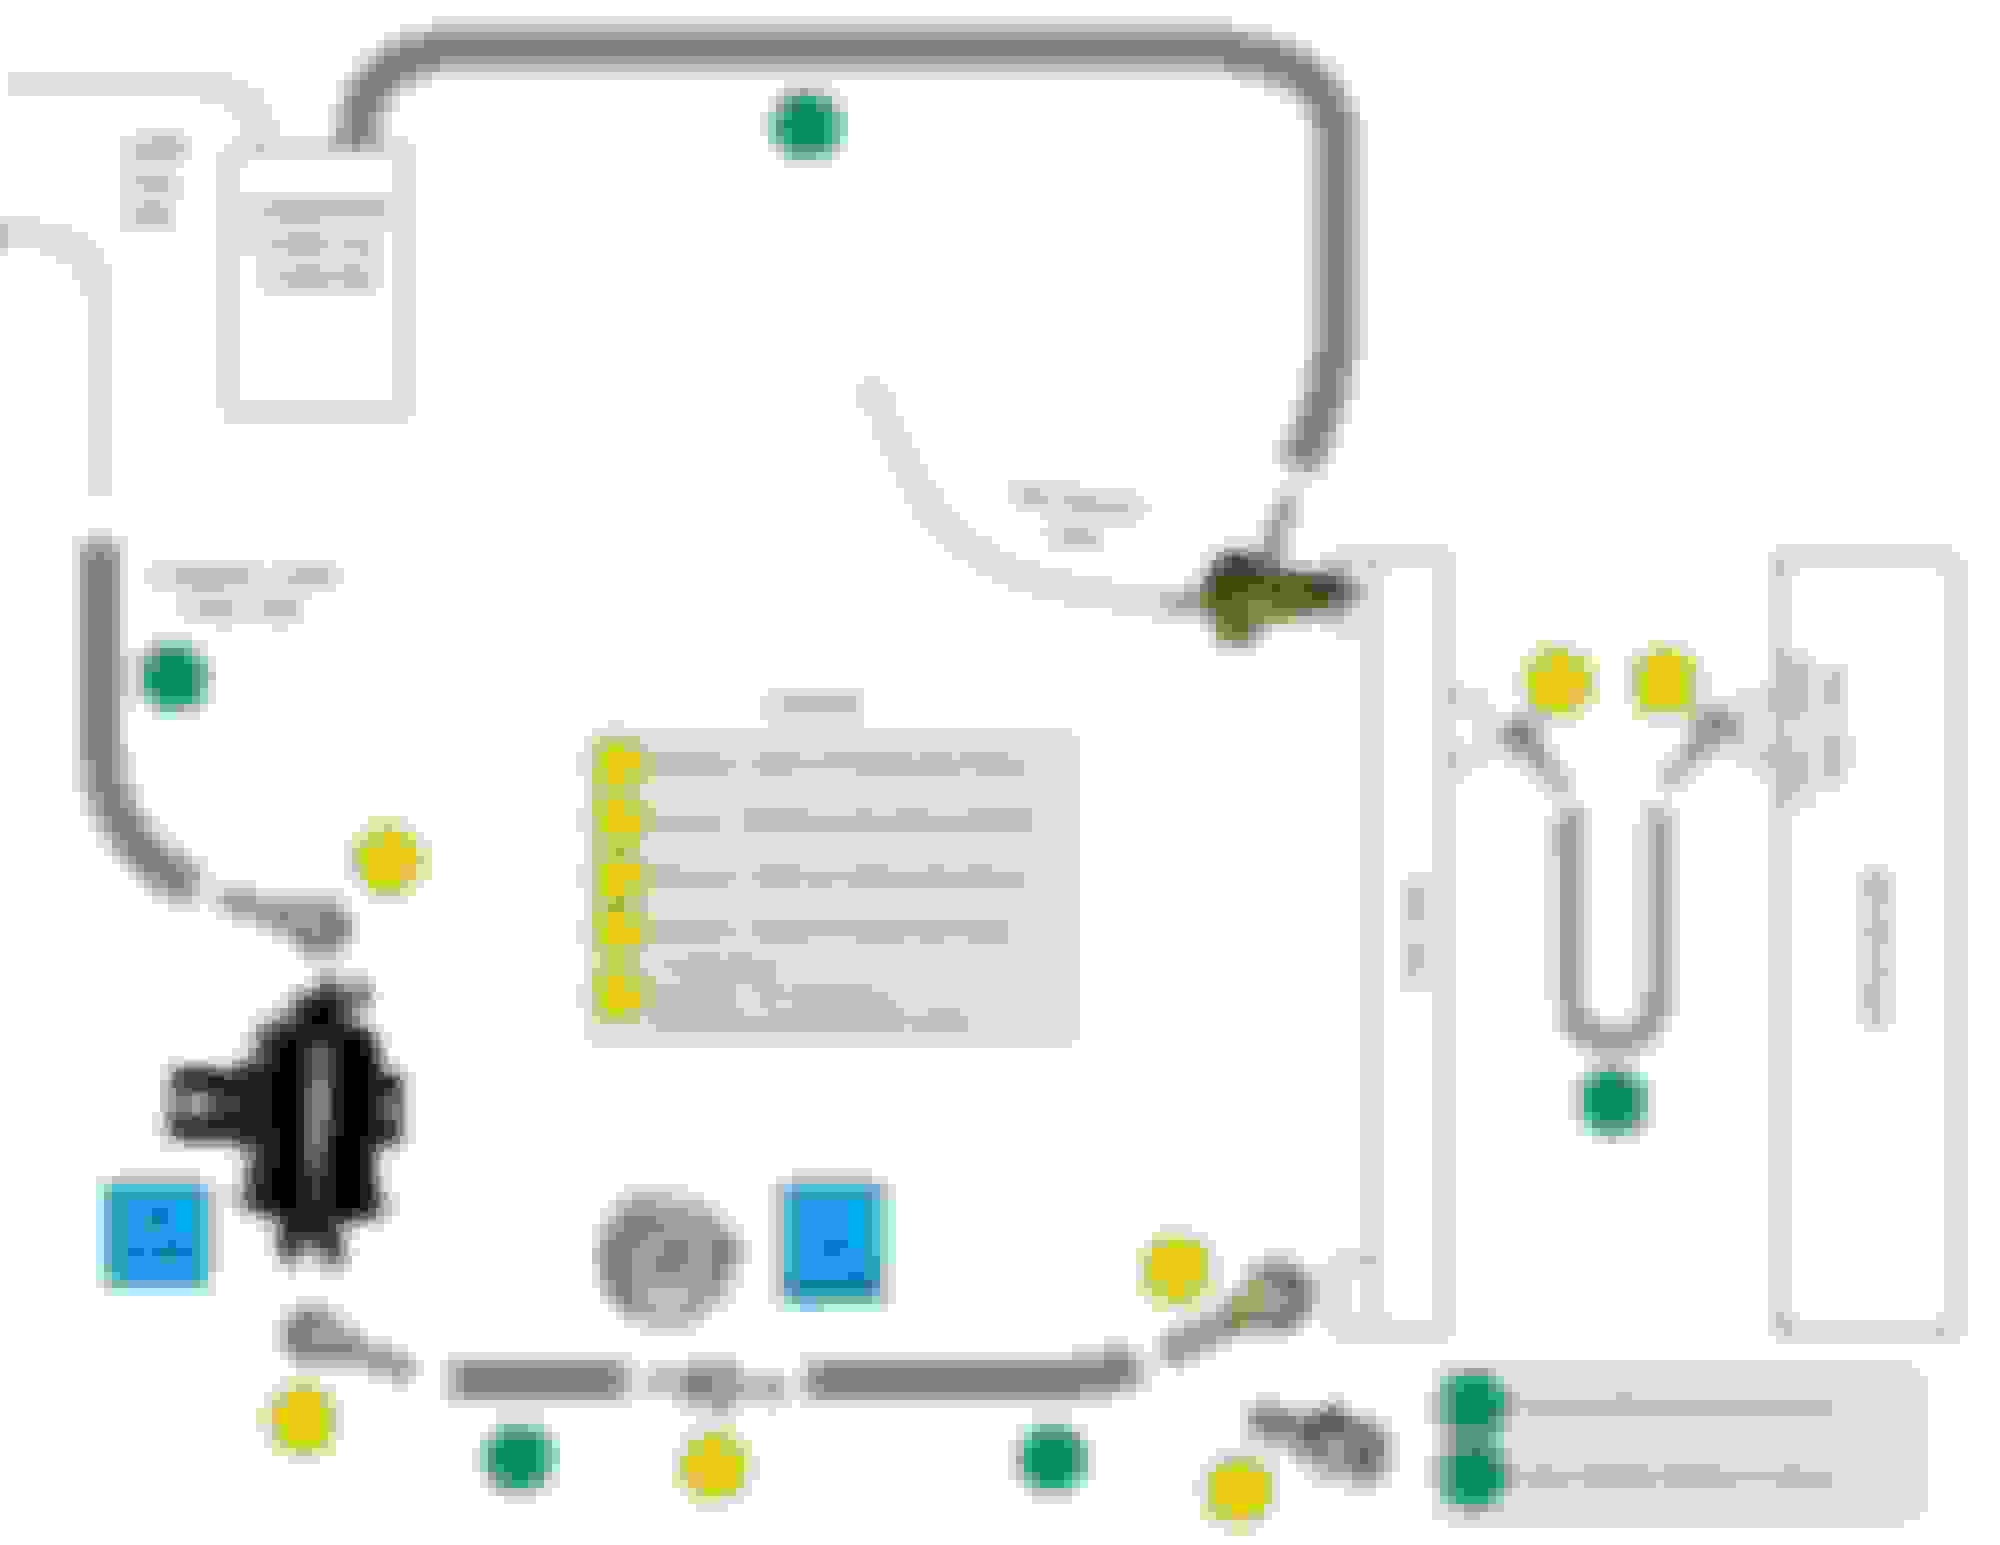
2 @ M8 w/ 1/4" barb - for fuel rail to cold start injector
2 @ M12 w/ 5/16" barb - for fuel filter
1 @ M14 w / 5/16" barb - for fuel rail
I also got an inline 5/16" double barb with a 1/8" NPT female fitting for the Fuel pressure gauge from LCE (also on the way). Those gauges don't read correctly when heated up, so I figured having it out of the way and over to the side on the Fuel filter line (Not on the cold start injector where they have it) would give me a better reading. All total was under a hundred bucks with the gauge, so I'm thinking that I still came out ahead of the AN fittings and the stealership.
Just wanted to post an updated version of the fuel layout with the Banjo fittings I ordered instead of the Army-Navy fittings. This was a much cheaper route and I can keep some extra fuel hose handy in case there are any issues / problems.
Part numbers and sources are listed in the legend.
After traveling for work from Dallas to LA to NYC to St. Louis for a week, I'm finally getting some time over the long weekend to work on the rig. Hopefully I can get the fuel line issue resolved and the shock tower braces welded in this weekend. I'll keep everyone posted on the progress.
Got the fuel system completely re-done this weekend. New Fuel injection hose and all of the metric banjo fittings I had ordered. Put the gauge off to the side and re-located the fuel filter on it's original mount (with some rubber washers) to the fender. Overall, it's a much simpler system than the AN fittings and much easier to maintain in the future. I even changed out the Fuel rail to cold start injector hard-line with M8 banjo fittings and hose. Hopefully this will allow me to remove the top plenum of the intake and bend it out of the way without having to remove the fuel line.
Also, according to what I've read, the fuel pressure should be between 30-33 psi, but I'm reading 41, so that might need some further tweaking (possibly my supra/swap MAF set too advanced) to make sure i'm not running too rich and getting decent gas mileage.
M14 x 1.5" banjo fitting from Belmetric (Main fuel into fuel rail). I had to grind down one of the tangs that originally held the other fuel line in place
M8 x 1.0 Banjo fitting from fuel rail to cold start injector
Fuel Pressure gauge mounted on original bracket (later attached to fender) Very easy to read from the front of the vehicle and away from most of the heat you would get closer to the intake
2X M12 x 1.25 Banjo bolts going to the fuel filter - I had a straight M14 x 1.5 barb fitting from the hard fuel line to the filter intake
I also spent a good 6 hours welding up 1/4" plate (yeah free scrap!) to reinforce / fix my shock tower. I went ahead and "beefed" up both sides so it would be even and fixed for good. Don't know why I didn't get any pictures of the finished project or in-process photos, but it was dark, late, and I was tired. I'll try to snap some photos later of the finished result. Truck rides a lot smoother now (Still needs an alignment) and shifts like a dream. I don't want to jinx it, but the truck may actually be good to go as a daily driver now....I'll give it a week or two to see how well it performs before I give my dad back his farm truck.
Here's some pics of the finished shock-towers with 1/4" plate welded into the old "cups" to make it smooth across the top and repair the blown out shock tower.
Looking at these make me wish I had a TIG and didn't have to go searching for a needle in a haystack finding those metric banjo barb fittings....but really happy with how it turned out.
Remember how I said I needed to build a plate bumper....
have been driving the rig less than a few weeks and was at a stoplight sitting still.....waiting to turn right, the kid behind me thought I had already gone, and when a gap came up in traffic, he floored it right into the back of me. Without the factory or a smitty built bumper (I have two sitting at the house) on, it completely crushed the back tailgate....and hopefully that's all.
I've got to go pull one from a junkyard and then the fun part: I can't open the crushed tailgate to remove it unless the window is down. I can't get the window down with the tailgate crushed. So instead of breaking the defroster rear windshield, I'm going to try and drill some 1/2" holes and use some drywall zip togglers and a 2x4 to pull the dent back enough that I can roll the window down. Otherwise, I'll just have to bust out the angle grinder and cut the entire back tailgate skin off.
I knew I needed a mean plate bumper up front and in the back, and that was my next project, but I was waiting for funds and a free weekend.
Even with the crushed tailgate, I got it to my trusted mechanic back home to take a look at it overall, and finally get that alignment after having the front suspension completely pulled out. He replaced both front bearings, the passengers rotor and caliper (was completely seized up) and new break pads all around. Yes, most of which I could have done, but have been so busy lately I felt it was worth paying him to do just to get the rig back up and running.
I'ts also making some heavy timing chain sounds which I'll have to take a look at, and I had an epiphany on what might be causing so much oil blow by. Obviously the machine shop bored the valves, ported and polished, and installed the LCE Pro guides and SS valve seats on the wrong head (81-84) I bought more SS seats and guides for them to put on the new head, but I don't remember seeing the iconic oversized bronze manganese guides on the head when I got it back. Why would that matter? Because the stupid LCE pro viton oil seals I put on there ONLY go with the oversized pro guides (aka they're loose as a goose and I'm losing compression out the top of the valve guides. I'm thinking I may need to change out the valve seals to the standard set, and am also going to try and properly degree the camshaft when I check the timing now that I picked a dual row adjustable cam sprocket (secondhand off craigslist). I'm hoping that the new (correct) seals will cut down on the compression loss, and setting the proper degree on the camshaft will help with pickup, torque, and overall performance. Of course, replacing the seals without taking the head off will require the spark plug insert that has an air hookup so you can get the valve to close and stay close (with the air compressing the cylinder) while you compress the spring, remove the retainers / keepers/ and replace the seals....otherwise, you'll have the valve drop down into the cylinder and have to take the head off.
I know....sounds like a PITA. just another thing I'm going to chalk up to the machine shop if they did in fact not put the SS seats and Pro guides in the new head.....I still need to double check that.
Anyway, I finally have a semi-free weekend and plan on grabbing another tailgate from the junkyard and possibly picking up the final component I need to start designing my bumpers - a decent winch.
Those Smitty built bumpers are worth their weight in gold. I've got a 1987 SR-5 pickup, and I've got smitty's on both front and back.
I've been rear ended twice.
Once by a minivan when I was stopped to turn, with turn signals on, and he wasn't even paying attention. He hit the bumper, and he really messed up the van. The whole driver side panel(s), lights, door, etc all torn up, and all he did was scratch the paint on the bumper.
The second time was at a four-way stop. I got tagged by a semi-sized vacuum truck who was watching his rear view camera, and not the road ahead. All he did was bend the bumper a little, and tweaked the frame a tiny bit. His insurance gave me enough to replace the Smitty built; but it was fine, so I bought a new set of tires instead.
Totally worth the cost. I'm sorry about the timing of the accident, and I hope you find what you need to keep it going. I've been following along as you go.
Thanks GlenH865. I'm an Industrial Designer that works in 3D Solidworks pretty much all day creating folded sheetmetal parts and things to be lasercut. SOOOOO......I was planning on designing up a really mean looking plate bumper that could just be cut out and has tabs and slots to fit together like a puzzle. Going to do a front bumper with integrated winch mount and lights, and a rear bumper with swing gate and Jerry Can holder. However, I haven't been able to get a winch until hopefully this weekend....which is the last thing I needed to make sure everything will fit and work correctly before I mock it up in cardboard and start modeling everything up.
I'm not super into crawling, and this is my daily driver, so I'm less concerned about approach angle and weight than I am a mad mom in a minivan rear ending me or some honda pulling out in front of me. That's why I was planning on making them more for impact / durability / functionality than what most of the crawlers would do.
I'll def. keep everyone posted on the progress, and hopefully will be getting in some parts and other fun things this weekend as I just got a nice bonus at work. Wet Okoles? Winch? Bumpers? who knows....
p.s. I'm picking up a Warn M10000 Saturday and the guy is throwing in a 8274 with a burned up motor for free. $200? Yes please.
I was able to roll down my window by removing the covers from the inside, unplug the connector to the motor, and put 12V on the pins in the motor connector. I used the battery from my cordless drill - bogged a bit, but did the job.
Glad the license plate didn't get damaged - need to keep sharing that message.
If you do design a rear with a swinging spare, let us know, or better, share the design.
22REs have been known to stick the oil rings. More likely than losing compression through valve guides. Valve closed - no pressure at the guide, valve open - no compression happening.
Good luck.
Undo the tailgate access panel, release the cables, then lift the top from inside to clear the glass and give the gate a kick, but have some crates ready to catch the gate. I've done this twice in boneyards.
22REs have been known to stick the oil rings. More likely than losing compression through valve guides. Valve closed - no pressure at the guide, valve open - no compression happening.
Good luck.
I totally understand that, and phrased it wrong. There's definitely oil getting into the cylinders. I put the rings in myself, so that isn't it. I talked to the guy at LCE and I do have the wrong seals on there (their pro bronze manganese guides are wider therefore the seals I have on there for the pro guides are loose on the standard guides). So, I'll be swapping those out and doing some other work on degreeing the camshaft and checking that timing noise.
I'll keep everyone posted on the progress. Heading down tomorrow to get that winch and hopefully another tailgate.
Drove a good ways to pick up a Warn M10000 for $200 and the guy threw in a Warn 8274 with a burned up motor for free. I'll probably clean and paint the M10000, throw a new hook on it and sell it (for 2x+ what I paid for it) as it's way bigger than what I need. Super excited about the 8274 as that's the winch I've been looking for. I'll probably tear it apart, sandblast everything and repaint, then see what it needs (new motor / solenoid pack / 150' of winch line) and use the cash I make off the M10000 to get it up and running. In the mean time, I can at least use the dims to start mocking up my front plate bumper.
I finally put in an order for the Wet Okole Seat covers I've been wanting for a while - all black with red piping. Yes. They're expensive. But I've been working my tail off at work and saving up for them, so it's more of a bonus for me for all of the extra work I've put in than a cost. I also ordered an extra 1/2 sheet of material to do some shift boot and console topper stuff. BTW, they don't show it on their website, or in the catalog, but they do have the Toyota logos if anyone is interested....pages below: (I went with TY4010 - 4Runner SR5 in Red even though mine isn't an SR5)
I also picked up another tailgate from the junkyard and will hopefully be replacing the smashed one shortly. Method of popping out the crushed area so I can roll down the window still TBD, but I'll get there at some point this next weekend when I pick it up from my folks place in Waco.
***Huge junkyard bonus*** The rig I was pulling the tailgate off of had a really nice aftermarket trailer hitch. No one had pulled it because they set the car on the rims right on it. I was able to get the bolts out and deadlift the rear end of the car while pulling it out. Obviously, with the really beefy brackets that slide into the frame rail, this will make a great starting platform for the rear bumper / tire swingout.
I ordered 2 full kits of the UPOL Raptor black liner to line the interior and exterior of the '86 I'm trying to sell and made sure to get the better Wacom Shutz gun instead of the crap aluminum one that comes with the kit (everyone I've talked to says the best way to make it look even and nice is to use the better gun). This is the liner I've got on my '89 4runner and I planned on getting some to do the front and rear bumpers once I get them built.
I already had a 15'x7' roll of 1/8" polyvinyl diamond tread garage floor liner come in, and ordered the pinch on trim to trim out the custom interior panels I'll be making for the '86. I'm planning on using 3/16" masonite and gluing the diamond tread plastic over the top, using the trim around the edges. More than likely, I'll loop this material over the sides of the bed and cut the diamond tread off in that area and use it as the gasket material for the top shell. This way, even with the top off, there's no chance of rain getting behind the panels. Best source for this material I found was home depot online - $100 / roll. It'll probably work for headliner and potentially for the full floorboard as well (with the use of a heatgun), although I'm just going to do the interior panels first.
I also picked up a Topline Head with dual springs for the turbo/non-turbo build I've got going on ($50 steal) and had SS valves laying around that I'll be putting into it. Still need to get new rings, take the block apart and go through it thoroughly and ream and re-crosshatch the cylinders, but it only had 5K miles on it since the build (I paid $250) and has $600 CP forged pistons and a $400 ACT clutch on it along with all ARP hardware (minus the head studs). I'm putting the dual side draft weber setup on it (another steal at $250) and it should be a beast once it's done....but I'll start another thread for that (and probably one for the '86 interior / refresh). Hoping to get that motor finished and when I sell the '86, I'll try to pick up a truck with a blown motor or head gasket and just drop it in.
Really excited about the weekend, because for the last several....I've been tied up or working and haven't been able to make much headway on things. I feel like a lot of projects got the wheels turning and are well on their way.
Forgot to mention.....I went ahead and got the Cylinder leak down tester (will aid in changing out the valve seals without pulling the head) and the cam degree kit from LCE, along with the correct valve seals.
I figured with the '89 motor I wanted to make sure the timing was dead on and have a dual row adjustable timing cog I picked up used and will be able to properly degree the camshaft for low-end torque. The leak down tester will also help diagnose things and I'll be able to check compression in the cylinders as i go along.
Most people have a decent set of tools, and I've started another tool kit with automotive specific tools like gear pullers, valve spring compressors, etc. These two kits will go into that box and will prove useful I'm sure.
I thought about the best way I knew how to easily and quickly pull out the smashed in rear tailgate on the 4Runner so I could get it swapped out for the one from the junkyard. I got some 1/4-20 toggler dry wall anchors (the kind with the zip tie retainers) from Home Depot. I drilled a couple of 1/2" holes (required for installing the zip togglers) and put in some anchors into the tailgate. I whipped it around to the back of my building and hooked up some 1000# come-a-longs to the dock (immovable object). It worked like a champ, pulled the dent right out and I was able to get the old tailgate off and swap out the new one.
Before:
During / After:
1/4-20 toggler with eye hook (stretched out after / during pull
multi-point hookup to pull the dent
sort of the setup I had against the dock
what the toggler drywall anchors look like from behind
I've still got to secure some of the wiring and there's a possibility that the track assembly also got bent as the window is not laboring going up and down, but luckily there was no other damage to the body, floorboard, or frame.
so the motor was obviously burning oil and I knew for a fact that it was a stock LCE Pro head with the standard guides because the machine shop had not installed the PRO bronze manganese guides i had bought, however they did install the seals meant only for those guides. Therefore, my assessment was that I was literally sucking oil into the cylinders every time the valves opened. So.....I ordered in the correct valve seals and decided to attempt the impossible (or from what I had read....the very difficult at the least).....and try to swap the valve seals with the head still installed.
I removed the valve train so I would have access to the valves and had an extra valve train laying around, so I disassembled it and just bolted down the main cast iron rocker shaft holders in order to keep pressure on the headgasket and make sure it didn't blow under the pressure from the leak down tester.
once everything was torqued down I got the spring compressed and hooked up the air to the cylinder. VERY CAREFULLY pulled out the keepers tweezer style and removed the old viton seals made for the Pro guides and replaced them with LCE's viton stock seals. Below you can see a bit of the process as well as the difference between the old and new seals (old were very loose):
valve train removed....spare cast iron rocker shaft holders bolted in and torqued down
New adjustable cam sprocket installed (I degreed the camshaft and adjusted it to compensate the block being decked a bit and then advanced it some more to move the power band into the lower end RPM range
Leak down tester reading good.....and keeping the cylinders pressurized so the valves don't fall down into them with the springs and keepers removed
Compressing the springs - the intake side was pretty tight without removing the intake, but I managed
VERY CAREFULLY removing the keepers.....you DONT want to drop one of those down into the motor
new stock viton seals installed....
I used a 12MM socket to apply even pressure all the way around the seal and very gently bumped it on with a rubber mallet
This is where you can see I installed the old cam sprocket backwards and the area circled in red is where the chain was rubbing from not having the correct backspace. This was corrected when I installed the new adjustable cam sprocket
Old seals meant ONLY for the LCE PRO bronze manganese guides (that the machine shop never installed) on the left....new stock viton seals on the right
For some reason, I didn't take any pictures of the process or document it, but I pulled the fan and belts off as well as the shroud and installed the degree wheel. Dialed in proper TDC, degreed the camshaft (was supposed to be 106....I was at 103.5). advanced the cam to make up, and then advanced it another 2 degrees to lower the power band down into the lower RPM range. I bit the bullet and bought the kit from LCE, which uses a SUMMIT Racing degree wheel with an LCE sticker over their logo a micrometer, and a couple of other assembled into a kit parts. It'll be worth it to have when I rebuild that other motor.
Even after figuring out the chain was rubbing on the guide rail and solving that problem, along with adjusting a couple of the loose valves that were chattering, I've still got a metal clanging noise in the engine that sounds like a rod knocking, piston slap, or a valve lightly tapping..... and the engine is still using oil. I'm hoping that the noise is one of the following: my harmonic balancer, a bearing out in one of the idler pulleys, or the crank hitting the stupid full perimeter crank scraper (one of those parts I'm still not sure why I bought or put on there).
However, the oil issue may be more serious. I'm not sure if the oil getting by the seals prevented the rings from seating, but from what I've read, it sounds like the same symptoms that some rebuilders experience when their rings don't seat properly. Another tear down? Man.....I hope not.
I'm going to put the PCV Valve back on (there's some oil coming out of the top of the motor via the exhaust breather (aftermarket). I'm also planning on adding in some Lucas synthetic to the Royal Purple 10w30, and possibly disconnecting the oil cooler and dual filter to see if that doesn't help eliminate the oil issue. I'll probably run it through the ring seating procedure again if it isn't too late already just to see if that finally seats the rings (if that is the problem) after installing the new valve seals. I'll run a compression check and leak down test to determine if there is just massive blowby on the current rings as well....otherwise it's back to the drawing board if everything checks out o.k.
for the metal clanking noise, I'm going to try and pull the belts one by one to see if the noise may be the idler pulleys. If that doesn't work, I'll grab one of the diagnostic stethoscopes and try and determine where in the motor the metal clanking noise is coming from. If it's the stupid crank scraper, I'll probably just pull the oil pan and see if I can't get the thing out of there and just pull it completely off. Of course, if it's something else, I may end up having to pull the motor again =/
I've got the other block pretty much ready to go and it wouldn't take me long to assemble it, so If I do pull the engine, I'll be able to swap it out with the other engine I have and put it on a stand for a while to diagnose as this is now my daily driver and I don't have a backup truck anymore as I returned my dad's farm truck a week or two ago.
I've got a nice long holiday weekend coming up and will hopefully try to trouble shoot this sometime this weekend......I really don't want to drive it too much when it sounds like this although once you get it up to 60 in the 2500 RPM range the noise drastically reduces and smooths out (although that may just be because I can't hear it with the road noise)
On a lighter note, My seat covers come in this weekend....so at least that's going for me!
 08-20-2015, 02:03 PM