
Ocell's 88 4Runner build thread


 10-13-2012, 01:37 PM
#182
Registered User
Thread Starter
Yeah as I'm going through your build I'm VERY jealous of how clean everything is. I usually fall in to that trap. I'm doing my best to resist and drive the truck for the time being. I want to chase all the leaks down eventually, but I didn't want to tear everything apart yet. One step at a time. At least now I know how to drop the front diff for future work. It will be much faster next time.
10-14-2012, 07:07 PM
#183
Registered User
Thread Starter
A couple hours with some Simple Green and some podcasts does wonders... Getting the old diff cleaned up for storage/sale.
Before:
http://www.flickr.com/photos/ocell/8080773463/http://www.flickr.com/photos/ocell/8080773463/ by http://www.flickr.com/people/ocell/, on Flickr
After:

Thanks to Zuk's page on removing the IFS front diff (http://www.gearinstalls.com/ifs.htm) I got the half shaft off of the stock diff. I carried it over to my new V6 4.88 diff to bolt up, and realized things don't look the same.
Here's my stock 4 cylinder diff where the half shaft mounts:

Here's the V6 diff:

And here's my axle:

So I did some more looking through Erik's Diff Page and I think I've got it figured out. This V6 diff must have had ADD (Automatic Differential Disconnect) so this is an intermediate axle. Now I wish I hadn't already sealed up the front cover, since I'm going to have to open it back up to pop this out. (This is old news to a lot of you I'm sure, I'm posting to give other newbs more Google search results to look at.)
I do have a question though, and maybe it will be obvious when I get this intermediate shaft out... will the oil seal from my 4 cylinder diff pop in to this diff? Or is there one under there already? The housings do look like they're machined away a bit differently.
I guess I'll find out on my own in the next couple days when I feel like redoing my front cover gasket. I'll probably do a better job the second time, anyway.
Before:
http://www.flickr.com/photos/ocell/8080773463/http://www.flickr.com/photos/ocell/8080773463/ by http://www.flickr.com/people/ocell/, on Flickr
After:
Thanks to Zuk's page on removing the IFS front diff (http://www.gearinstalls.com/ifs.htm) I got the half shaft off of the stock diff. I carried it over to my new V6 4.88 diff to bolt up, and realized things don't look the same.
Here's my stock 4 cylinder diff where the half shaft mounts:
Here's the V6 diff:
And here's my axle:
So I did some more looking through Erik's Diff Page and I think I've got it figured out. This V6 diff must have had ADD (Automatic Differential Disconnect) so this is an intermediate axle. Now I wish I hadn't already sealed up the front cover, since I'm going to have to open it back up to pop this out. (This is old news to a lot of you I'm sure, I'm posting to give other newbs more Google search results to look at.)
I do have a question though, and maybe it will be obvious when I get this intermediate shaft out... will the oil seal from my 4 cylinder diff pop in to this diff? Or is there one under there already? The housings do look like they're machined away a bit differently.
I guess I'll find out on my own in the next couple days when I feel like redoing my front cover gasket. I'll probably do a better job the second time, anyway.
Last edited by Ocell; 10-14-2012 at 07:35 PM.
10-15-2012, 08:13 PM
#184
Registered User
Thread Starter
I was looking over the front diff I removed a bit more and noticed some metal chunks in the oil. I rotated the ring gear and this came around.

Looks like I chose a good time to re-gear.
I'm thinking maybe this is the clunking/popping noise I heard at the end of my trip to Hidden Falls. It WAS popping while the truck was sitting still in neutral, so that still has me a bit confused.
Looks like I chose a good time to re-gear.
I'm thinking maybe this is the clunking/popping noise I heard at the end of my trip to Hidden Falls. It WAS popping while the truck was sitting still in neutral, so that still has me a bit confused.
10-16-2012, 01:01 AM
#185
HOLY CARNAGE, BATMAN! wowee!
Nice work so far..... Sorry you've hit the 'not bolt on direct' snag... but you'll get it. I'd just email Zuk and see what he says... Even Wabbit(Brian) I'm sure has done MANY of these...
Interesting.... that's a new one for me, ... never taken one down with ADD. It should also have a vacuum line on the tube or diff or something that the other one doesn't. ???
10-16-2012, 01:04 AM
#186
PS> From what I see, the seals are totally different... The 4Cyl seal is encased what seems to be a brass housing that gets tapped into that channel/sleeve... I would think that will fill that void behind the gear on the end of the V6 Diff. Maybe? hahaha.
10-16-2012, 06:51 AM
#187
Registered User
Thread Starter
My buddy found this thread that covers this exact issue: https://www.yotatech.com/forums/f116...d-axle-182177/
It looks like I may just need to order the right oil seal.
Unfortunately, I don't have the ADD tube, I've only got the tube off of the 4 cylinder diff. I'm a little annoyed that the guy I bought this diff from didn't include the ADD tube and half shaft, but I'm also annoyed that I didn't know enough to ask for it.
I would have wanted to get the solid non-ADD axle on there anyway, so it's really no loss. Just more learning, and more time.
10-16-2012, 08:23 AM
#188
Registered User
Thread Starter
I've been struggling to break my new seal on the diff front cover to pop out the ADD shaft from the inside. I had already tried prying it out from the outside with one screwdriver, but obviously I was only thinking of half the solution. Zuk posted this photo on his site.
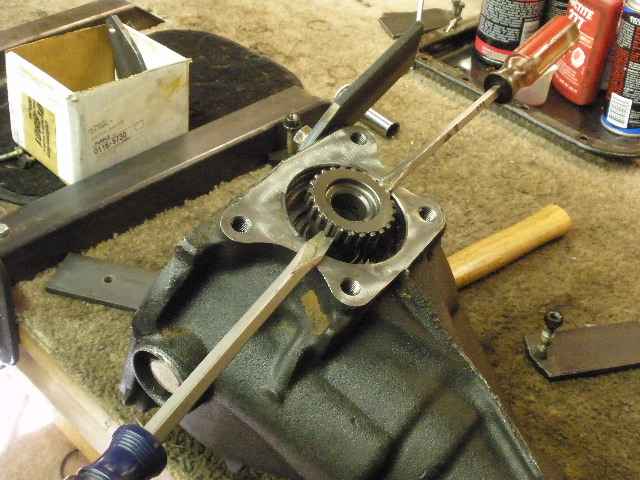
I'll give it a shot with two screwdrivers when I get home today.
I'll give it a shot with two screwdrivers when I get home today.
10-16-2012, 08:28 AM
#189
Registered User
Thread Starter
You're right that the brass base of the seal fills that void under that spline. I ordered a seal from RockAuto (TIMKEN Part # 710419), it should be here in a couple days. If I can get the ADD stub axle out without drama I should be back on track for getting this done.
If I can't get the stub axle removed from the outside, I'll be struggling to get my newly sealed front cover off the diff. I tried all night last night... it's stuck on good.
Thanks for checking in, Chef!
10-16-2012, 10:08 AM
#191
Registered User
Thread Starter
 10-16-2012, 10:33 AM
#192
I would stick something under the screwdrivers, where they meet the diff(not to protect the spline shaft).... just to avoid scratchies, lol. You could just stick a wooden bbq skewer under the driver or a Popsicle stick even better...It'd also serve to keep the screwdriver still.
Far as getting the diff cover off, ..... eeek, sorry bout that, man... It happens.
I would probably start with a Razor(The type that goes in a razor knife/trapezoidal shape, cuz it's longer).... Stick the blade edge/corner in along an area you're trying to break free, then tap it in and down(carefully slicing through the sealer). AND, then, once you've broken through around 75% of the seal, wedge TWO RAZOR BLADES IN THERE.......Then start a THIN HEADED flathead screwdriver in between the two blades and turn the screwdriver handle sideways to pry the cover from the diff. >>>> THE REASON you stick 2 blades in there and tap the entire blade edge in there is to avoid cutting grooves into the metal... When you pry in and then turn a driver side to side to finish separating the diff... That's also to prevent dinging the Diff or cover.... Instead of the driver digging into the diff or cover as you turn it, it'll be pushing against a 'leverage' item that's solid, FLAT metal area, 1x1" or so......... Make ANY sense? Sorry, I'm trying to word it right.
I have a large blade for scrapers that I use.... It's 3" long and 2" tall. That allows me to get that things edge in there, through the sealer JUST BARELY, and then just tap on the non blade top side of the blade and kinda cut around the entire thing. EVEN THAT has to be done very carefully... Cuz a Razor Blade WILL cut into that aluminum cover, ya feel me?
Last edited by ChefYota4x4; 10-16-2012 at 10:34 AM.
 hahahaha.
10-16-2012, 08:17 PM
hahahaha.
10-16-2012, 08:17 PM
#195
Registered User
Thread Starter
I couldn't get the thing to budge with the screw drivers. I'll pick up some gasket remover and start working on the front cover tomorrow.
I'm really kicking myself for sealing the thing up before I had the whole picture figured out.
I'm really kicking myself for sealing the thing up before I had the whole picture figured out.
10-18-2012, 07:17 AM
#196
Registered User
Thread Starter
The gasket remover said it's not for use on RTV seals... so that was a no go.
I decided to go for broke with the 3lb hammer and a block of wood.

I decided to go for broke with the 3lb hammer and a block of wood.
10-18-2012, 09:47 PM
#198
Registered User
Thread Starter

I'm so close... I'm going to a specialty hardware shop here in Austin in the morning, hoping to find the right size bolts to replace the diff flange studs.
Apparently it's Wheeltober at Hidden Falls this weekend. If I can't get my 4Runner rolling again in time, I'll at least ride along in my friend's Tacoma.
10-20-2012, 11:06 AM
#199
Registered User
Thread Starter
Ok, I got the front diff put back in. That was pretty tricky alone... I used two floor jacks and a jack stand. Took quite a while, but it's up there.
Now I'm having trouble getting the new axles in. They won't clear the diff flanges after the 1" drop. I haven't done a TON of searching yet, just saying where I'm at. Hopefully I'll find the right bit of wisdom on how to make this work.
Now I'm having trouble getting the new axles in. They won't clear the diff flanges after the 1" drop. I haven't done a TON of searching yet, just saying where I'm at. Hopefully I'll find the right bit of wisdom on how to make this work.


