
irab88's 1993 PickUp Build-Up Thread


 10-22-2010, 12:11 PM
#43
look what was waiting for me on the front steps! my cat!

haha no, but seriously, my cat in a box:
http://www.flickr.com/photos/ianrab/5105834760/hey there, hot stuff
and my aal's shouldn't be too far behind
now to go attach some shocks...
edit: i think my rear-view mirrors work a little too well
http://www.flickr.com/photos/ianrab/5105834758/http://www.flickr.com/photos/ianrab/5105267533/
Last edited by irab88; 10-22-2010 at 12:18 PM.
10-22-2010, 02:24 PM
#45
thanks.
and in 45 mins, i got the front shocks on
before:
http://www.flickr.com/photos/ianrab/5105512929/
a tad out of round
http://www.flickr.com/photos/ianrab/5105512923/
http://www.flickr.com/photos/ianrab/5105512917/
after:
http://www.flickr.com/photos/ianrab/5105512909/
http://www.flickr.com/photos/ianrab/5105512905/
and, of course...
http://www.flickr.com/photos/ianrab/5105512899/
it was too hard to see on the window
cool. i got ride
10-23-2010, 01:56 PM
#46
brand spankin' new exhaust:
http://www.flickr.com/photos/ianrab/5108762074/
ooh. shiny
http://www.flickr.com/photos/ianrab/5108762070/
http://www.flickr.com/photos/ianrab/5108762066/
and the cat's too short. i think they sent me the non-cali version. boo.
http://www.flickr.com/photos/ianrab/5108762074/
ooh. shiny
http://www.flickr.com/photos/ianrab/5108762070/
http://www.flickr.com/photos/ianrab/5108762066/
and the cat's too short. i think they sent me the non-cali version. boo.
10-24-2010, 03:52 PM
#48
Registered User
Join Date: Apr 2010
Location: Kingston, Ontario CANADA
Posts: 815
Likes: 0
Received 0 Likes
on
0 Posts
I agree with you on this design, much better looking and you will be able to get a mattress the entire size of your box without loosing valuable space.
 10-25-2010, 08:23 AM
#50
Registered User
Join Date: Apr 2010
Location: Kingston, Ontario CANADA
Posts: 815
Likes: 0
Received 0 Likes
on
0 Posts
Excellent, looking forward to see the rest of your buildup and end result.
10-25-2010, 08:32 AM
#51
heh, the "end result" probably won't be 'till spring, but i should have a bunch done before the end of the year. the cap is going to take some time, and the platform a bit more
i plan on making the platform out of steel tube for the frame (~.030 sq) and plywood for the surfaces, with hardware bolted down
i plan on making the platform out of steel tube for the frame (~.030 sq) and plywood for the surfaces, with hardware bolted down
10-25-2010, 01:07 PM
#52
Registered User
Join Date: Apr 2010
Location: Kingston, Ontario CANADA
Posts: 815
Likes: 0
Received 0 Likes
on
0 Posts
heh, the "end result" probably won't be 'till spring, but i should have a bunch done before the end of the year. the cap is going to take some time, and the platform a bit more
i plan on making the platform out of steel tube for the frame (~.030 sq) and plywood for the surfaces, with hardware bolted down
i plan on making the platform out of steel tube for the frame (~.030 sq) and plywood for the surfaces, with hardware bolted down
10-25-2010, 08:47 PM
#53
yes! 3 pages! haha.
anyway...
if you do find them, i'd like to see  . i get a lot of ideas from other people
here are the pics of the insulation installation:
1 can of 3m spray adhesive
1 roll of 16" x 25' insulation
http://www.flickr.com/photos/ianrab/5116284455/
laying it out before gluing
http://www.flickr.com/photos/ianrab/5116890342/
and then the glue...
http://www.flickr.com/photos/ianrab/5116284481/
http://www.flickr.com/photos/ianrab/5116284479/
http://www.flickr.com/photos/ianrab/5116284471/
important to cut holes for the seats and belts
http://www.flickr.com/photos/ianrab/5116284467/
http://www.flickr.com/photos/ianrab/5116284459/
also took this time to clean the carpet
http://www.flickr.com/photos/ianrab/5116882972/
http://www.flickr.com/photos/ianrab/5116882966/
also cleaned the boot
http://www.flickr.com/photos/ianrab/5116882964/
ooh. it's so clean
http://www.flickr.com/photos/ianrab/5116882944/
http://www.flickr.com/photos/ianrab/5116882940/
and the junk goes back in. if i wasn't carpooling on the way back from school, that pass chair would be out in an instant. i drove with it out for a day, and it was great
http://www.flickr.com/photos/ianrab/5116882938/
also items of interest: i got a scanner for cheap, so i'm planning where to put it
anyway...
. i get a lot of ideas from other peoplehere are the pics of the insulation installation:
1 can of 3m spray adhesive
1 roll of 16" x 25' insulation
http://www.flickr.com/photos/ianrab/5116284455/
laying it out before gluing
http://www.flickr.com/photos/ianrab/5116890342/
and then the glue...
http://www.flickr.com/photos/ianrab/5116284481/
http://www.flickr.com/photos/ianrab/5116284479/
http://www.flickr.com/photos/ianrab/5116284471/
important to cut holes for the seats and belts
http://www.flickr.com/photos/ianrab/5116284467/
http://www.flickr.com/photos/ianrab/5116284459/
also took this time to clean the carpet
http://www.flickr.com/photos/ianrab/5116882972/
http://www.flickr.com/photos/ianrab/5116882966/
also cleaned the boot
http://www.flickr.com/photos/ianrab/5116882964/
ooh. it's so clean
http://www.flickr.com/photos/ianrab/5116882944/
http://www.flickr.com/photos/ianrab/5116882940/
and the junk goes back in. if i wasn't carpooling on the way back from school, that pass chair would be out in an instant. i drove with it out for a day, and it was great
http://www.flickr.com/photos/ianrab/5116882938/
also items of interest: i got a scanner for cheap, so i'm planning where to put it
10-26-2010, 05:12 AM
#56
thanks guys. yeah, it's a little quieter, but not as much as i expected. however, i am noticing where sound is getting in, so i'm gonna do the same thing in the roof, rear panel, and doors/sides. the most noticeable difference is the thermal insulation. no more drafts. i'm gonna guess that it'll work great in the summer with the a/c.
10-28-2010, 07:24 AM
#58
update on the insulation: it's nice and toasty. on cold mornings i have no use for the heater. the sun just pours in, and with the insulation, i need to crack the window to cool off. best $25 spent yet (on the interior).
i picked up the rest of the mounting hardware today for the exhaust. the dealer put one of the bolts on too tight (i tried getting it off with a 3' breaker and a 6 point), so i'm taking it back next week to get it loose.
next up: aal's. as soon as they show up
i picked up the rest of the mounting hardware today for the exhaust. the dealer put one of the bolts on too tight (i tried getting it off with a 3' breaker and a 6 point), so i'm taking it back next week to get it loose.
next up: aal's. as soon as they show up
10-28-2010, 05:31 PM
#59
platform update:
ok, so i did the math, and for the platform, i need 75 feet (yes, exactly 75) of .035 1" x 1" 4130 square tubing. that comes to 121.59 cubic inches, and about 35 lbs (close to 4 gallons of water). with the addition of hardware and plywood, it sould put it close to 50 lbs. not too bad. i'm going to call up the place soon to price it out
ok, so i did the math, and for the platform, i need 75 feet (yes, exactly 75) of .035 1" x 1" 4130 square tubing. that comes to 121.59 cubic inches, and about 35 lbs (close to 4 gallons of water). with the addition of hardware and plywood, it sould put it close to 50 lbs. not too bad. i'm going to call up the place soon to price it out
10-29-2010, 06:58 AM
#60
platform pics:
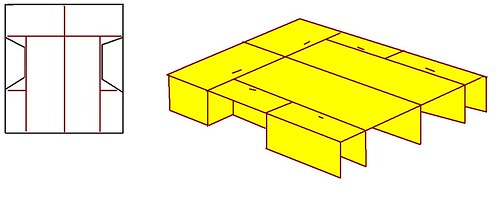
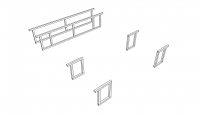
here are the "ribs" of the platform. i wanted to keep a large area in the center for larger items, and keep the general shape simple:
after adding longitudinal members, the distinct "U" shape is apparent. in total, this platform only uses 6 different lengths of tube
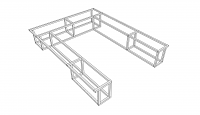
in keeping it low, it'll give me plenty of head room and some space to flip the (to be added) center portion up and out of the way
list of members:
[qty x length]
2 x 8"
26 x 10"
8 x 22"
6 x 36"
2 x 52"
2 x 56"
edit: i just went out and measured, and i need to make a few adjustments. the design will be the same, but made to better fit the liner. also, it'll use less steel and give me more headroom
here are the "ribs" of the platform. i wanted to keep a large area in the center for larger items, and keep the general shape simple:

after adding longitudinal members, the distinct "U" shape is apparent. in total, this platform only uses 6 different lengths of tube

in keeping it low, it'll give me plenty of head room and some space to flip the (to be added) center portion up and out of the way
list of members:
[qty x length]
2 x 8"
26 x 10"
8 x 22"
6 x 36"
2 x 52"
2 x 56"
edit: i just went out and measured, and i need to make a few adjustments. the design will be the same, but made to better fit the liner. also, it'll use less steel and give me more headroom
Last edited by irab88; 10-29-2010 at 11:00 AM.
The following users liked this post:
Ericmunns (01-24-2023)


