
Gevo's 91 4Runner Build Thread
 02-10-2014, 08:50 AM
#181
Registered User
Thread Starter

OK! I think after reading many many things online I was able to adjust my idle properly.. So, it's working well now. I need to take it for a smog.
A new symptom I found is that SOMETIMES when taking off from a stop or below ~5mph, it has NO POWER, I feel it is starving for fuel. But most of the time it's getting the right mixture and has good power (what's good power for these 3.0's??? lol) I haven't gotten around to my fuel tank. I suspect there is debris holding up the fuel draw at the strainer.. soon to do fuel tank cleaning
On the bright side, I had some extra time off of engine work to spend on interior remodeling. Generally i stay away from painting plastic because I've had bad experiences, but with some good prep work and a good primer I figured what do I have to lose?
So, look at this UGLY POS column cover.. why is it that color???

This is much better! (thorough cleaning --> Light sanding --> heavier sanding on imperfections or scratched areas --> Primer --> 3 very light coats of paint)


It came out so well, I decided I will do the whole instrument cluster bezel/cover later, and went ahead and did the plastic covers of the gear shifter and the piece to the front of it. (pics later when everything installed after upholstery work)
Here is pic of shifter area cover, it's cleaned and sanded at this point.

Next thing I did this weekend.. self explanatory, easy, totally worth it and thanks for the guys on here for the recommendation! (I hope i have the flow direction right )
)
Before

After

A new symptom I found is that SOMETIMES when taking off from a stop or below ~5mph, it has NO POWER, I feel it is starving for fuel. But most of the time it's getting the right mixture and has good power (what's good power for these 3.0's??? lol) I haven't gotten around to my fuel tank. I suspect there is debris holding up the fuel draw at the strainer.. soon to do fuel tank cleaning
On the bright side, I had some extra time off of engine work to spend on interior remodeling. Generally i stay away from painting plastic because I've had bad experiences, but with some good prep work and a good primer I figured what do I have to lose?
So, look at this UGLY POS column cover.. why is it that color???
This is much better! (thorough cleaning --> Light sanding --> heavier sanding on imperfections or scratched areas --> Primer --> 3 very light coats of paint)
It came out so well, I decided I will do the whole instrument cluster bezel/cover later, and went ahead and did the plastic covers of the gear shifter and the piece to the front of it. (pics later when everything installed after upholstery work)
Here is pic of shifter area cover, it's cleaned and sanded at this point.
Next thing I did this weekend.. self explanatory, easy, totally worth it and thanks for the guys on here for the recommendation! (I hope i have the flow direction right
)Before
After
 02-10-2014, 11:32 AM
#182
Registered User
Thread Starter
Im at the 2nd muffler/mechanic shop today and both told me the cat is not the right one, ots for 4 cylinder chevy engines. Of course, why wouldnt it be. Lol. Well might as well get the whole system replaced, it was on my short list anyway. He is asking for $290 for cat, said I need a good one to pass smog in CA. Sounds like there is a little bs in there to get me to buy expensive one. Anyway, my hands are a little tied now I need the car! I think ill be spending $500 on cat and cat back system. I wonder how much of the lack of power is due to ˟˟˟˟ty cat...?
02-10-2014, 11:48 AM
#183
Registered User
Thread Starter
Ok, final word is in. The shop is installing a new converter and walker muffler ($290 + $160). I'm hoping this was the cause of my 'power' issues. But I doubt it was the only cause.
As I was driving around i noticed the 4x4 light come on, indicating the 4x4 is activated. I stopped and tested to see if the light was giving an accurate reading, in fact it was not, my 4x4 system mechanically was NO engaged. Then the light started to flicker, adn exactly with that flickering I got a very weak engine and it would't rev. So... I am pretty sure this is some sort of short. This is relatively new, after I did the dash work.... will trace those wires to check.
At this point the problem solving engineer in me is getting a bit tired. lol
After cat and muffler system, the guy is gonna do a test to see if it will pass smog, if it comes out with some problem he'll let me know, after being sure it will pass he will test it finally.
Last edited by Gevo; 02-10-2014 at 01:36 PM.
02-12-2014, 12:58 AM
#184
Registered User

Check your shifter area wiring first for the 4x4 since you were just in there painting.
The dash light is activated from an electronic sensor in your front diff. But there are electrical, mechanical, and vacuum portions to the system, so hopefully it's just something knocked loose in the shifter area...
The dash light is activated from an electronic sensor in your front diff. But there are electrical, mechanical, and vacuum portions to the system, so hopefully it's just something knocked loose in the shifter area...
 02-12-2014, 06:46 AM
#186
Registered User
iTrader: (4)
Join Date: May 2010
Location: People's Republic of California
Posts: 720
Likes: 0
Received 15 Likes
on
12 Posts
Where about in Cali are you? those interior pieces are extremely plentiful at the yards, specially grey. There are so many 2nd Gen 4runners at the yards because I think everyone just gives up on the 3VZ when the head gasket blows. Kudos to you for keeping it alive!
Also, if you go with "painting" don't just use any ol' paint. Use an interior dye type paint. Duplicolor interior paint is good and won't flake or chip off, any autozone/o'reilly type stores carries it. I clean the piece with simple green, use the duplicolor adhesion promoter, and then the 3 light coats of dye paint. Try not to sand the pieces or you'll lose the molded texture. My own little trick is to put a another light coat of adhesion promoter on after it all dries for a day or so. It will give it a bit of a darker color to match your unpainted pieces.
Good luck with your build!
02-17-2014, 09:26 AM
#187
Registered User
Thread Starter
Grego,
I did make sure to get a good quality plastic paint so I don't have the fading and flaking issue... time will tell. Most of my plastic interior pieces are in good shape, so I dont mind painting them instead of grabbing another used one from the junkyard. The used one won't look as nice as a newly painted one
I didn't think about applying a coat after the paint coats, I will see what I can find. I like the idea.
I do a very light sand of the surfaces to get rid of dirt/grime that hasn't been cleaned, i make sure not to get carried away and take away from the original texture.
I've done more pieces I will share soon, it's looking good. And The paint is holding up to scratches relatively well.
02-22-2014, 06:30 AM
#188
Registered User
Thread Starter
So, I finally had time to go pick up the passenger seat and leave the driver seat for re-upholstery. I decided to have some fun with the colors....
Before

After (I forgot to leave the headrest, which he is doing as well to match the middle section.

Before
After (I forgot to leave the headrest, which he is doing as well to match the middle section.
02-22-2014, 06:31 AM
#189
Registered User
Thread Starter
As far as the 4wd light flickering, i seems it was the relay going bad. I ordered a new one, I'm pretty sure that's it. I checked all the wiring, it's not a very involved system...
02-22-2014, 05:03 PM
#191
Registered User
Thread Starter
A guy named Carlos in Burbank CA, PM me if you want his number. His prices are much better than any big shop, his quality I would say is pretty good. Depends on what you tell him you want out of the job and what you're willing to pay.
For both seats, two tone and 10 pieces each plus headrest and additional support/foam work i paid $250, labor. If I haggled I may be able to save a few more bucks, but he's a good guy. Compare that with $400+ at other bigger shops.
For both seats, two tone and 10 pieces each plus headrest and additional support/foam work i paid $250, labor. If I haggled I may be able to save a few more bucks, but he's a good guy. Compare that with $400+ at other bigger shops.
02-22-2014, 09:13 PM
#192
Registered User
Thread Starter
So, I got to ripping out some of the carpet today. I'm taking the car to get it detailed at my buddies car wash. Then next week take it in for new carpet by Carlos!
I finally took a pic (albeit kinda crappy one) of the painted instrument cluster cover. Clearly I have to do something about those switches!

I was very surprised to find that under the carpet and padding is in amazingly great condition! Very clean!

Oh, here is the carpet.. I don't like a dirty car!

Carpet mostly out.


I removed the front passenger seat belt and took out the most often used portion from the winding and tie it up so it stays out. I put the dirty parts in a bucket of tide and oxyclean. Preliminary results look good! The seat belt has even softened up. It was having trouble winding back, so after it gets cleaned up I'll see if I can wind up the coil spring a bit more for some umph. I looked and looked to get new-er seat belts, but I just couldn't find any.
Next step is to fix the two front seat belt receivers, broken and a pain to fish out every time from between the seats!
Anyone ever work on the windings of these seat belts?
I finally took a pic (albeit kinda crappy one) of the painted instrument cluster cover. Clearly I have to do something about those switches!
I was very surprised to find that under the carpet and padding is in amazingly great condition! Very clean!
Oh, here is the carpet.. I don't like a dirty car!
Carpet mostly out.
I removed the front passenger seat belt and took out the most often used portion from the winding and tie it up so it stays out. I put the dirty parts in a bucket of tide and oxyclean. Preliminary results look good! The seat belt has even softened up. It was having trouble winding back, so after it gets cleaned up I'll see if I can wind up the coil spring a bit more for some umph. I looked and looked to get new-er seat belts, but I just couldn't find any.
Next step is to fix the two front seat belt receivers, broken and a pain to fish out every time from between the seats!
Anyone ever work on the windings of these seat belts?
Last edited by Gevo; 02-22-2014 at 09:15 PM.
02-23-2014, 04:42 PM
#193
Registered User
Thread Starter
Got it washed today!

After the wash I realize that in a few months I am going to get her body all banged back into shape (just a couple spots that need it) and painted where necessary. Paint has stayed on fresh, impressive.

Now that she is running well, I can dedicate time to making it pretty and more importantly, clean!!!
After the wash I realize that in a few months I am going to get her body all banged back into shape (just a couple spots that need it) and painted where necessary. Paint has stayed on fresh, impressive.
Now that she is running well, I can dedicate time to making it pretty and more importantly, clean!!!
02-23-2014, 05:40 PM
#194
Registered User
Yes, I'd say it's probably the top half dozen or so things I've done from a cabin driver experience/comfort that really make a big difference for me: seat belts cleaning and that so they retract, front speakers replace, headlights, cabin overhead light led for increased brightness, door weatherstrip replace for noise reduction, cutting an old bubble wrap type foil sunshade to fit above my sunroof cover to keep the cab cooler the summer, replacing my driver door check assembly so it doesn't fully open in the slightest breeze/hill when opened, and running good A/C cleaning foam like BG through my system once or twice every summer until I decide to evacuate my AC system and replace the entire evaporator...
I've taken the belt out of it's winder thing. Use a trim tool/screwdriver/knife (in that order) to pry the belt out of it's winder. (Fully extract belt first, hold winder cylinder in place, return some slack to the belt while holding winder, then pry -- comes out the opposite direction you pull it to retract.) One you pry it out, there's a piece of plastic in the loop. Remove that plastic from loop and belt will pull through (with sewn connection/doubling, it's tight but pulls through). Hold onto that barrel thing and then twist as far as you can to tighten.
*Not the same gen/setup as my pickup in these directions but good info nonetheless.
http://www.4x4wire.com/toyota/minutemods/seatbelt/
*These two posts are from this thread: https://www.yotatech.com/forums/f116...ou-get-268974/
Another thread covering washing if interested, but you already did that: https://www.yotatech.com/forums/f116...t-swap-272851/
I've taken the belt out of it's winder thing. Use a trim tool/screwdriver/knife (in that order) to pry the belt out of it's winder. (Fully extract belt first, hold winder cylinder in place, return some slack to the belt while holding winder, then pry -- comes out the opposite direction you pull it to retract.) One you pry it out, there's a piece of plastic in the loop. Remove that plastic from loop and belt will pull through (with sewn connection/doubling, it's tight but pulls through). Hold onto that barrel thing and then twist as far as you can to tighten.
*Not the same gen/setup as my pickup in these directions but good info nonetheless.
http://www.4x4wire.com/toyota/minutemods/seatbelt/
Yotatech logged me out and lost my full step by step. Sorry. Don't have 30 minutes to retype.
It's not a minute mod. 4x4 wire is a previous generation. Ours the belt can't be fully separated from the mechanism.
I'd recommend washing your belt too -- removes the weight of all that dirt, oil, and grime. Extend all the way. Tie belt nearest mechanism to a cabinet drawer handle, and wash in the sink. Extend,tie up, anchor mechanism, and put a fan on to dry overnight.
The 93 service manual on the interwebs has step by step for Xtra cab in the body mechanical section. Remove all the back stuff except bottom seats, and then you remove the side panels.
Get the blue trim tools at Harbor Freight -- saves your trim a load of hurt. Be prepared to break/need to replace some of the white trim clips on the side panels. I moved them aroudn so broken ones were nearest bottom door for quick replace. I needed 3 total. YMMV.
And if cleaning the dust and dirt from trim pieces and interior frame, plan on at least a 5 hour project in cramped quarters.
Lastly, consider replace your quarter cab side windows' weatherstripping while all of this is removed. ~$50 total for new weatherstripping.
And lastly here's a pic of seatbelt locations: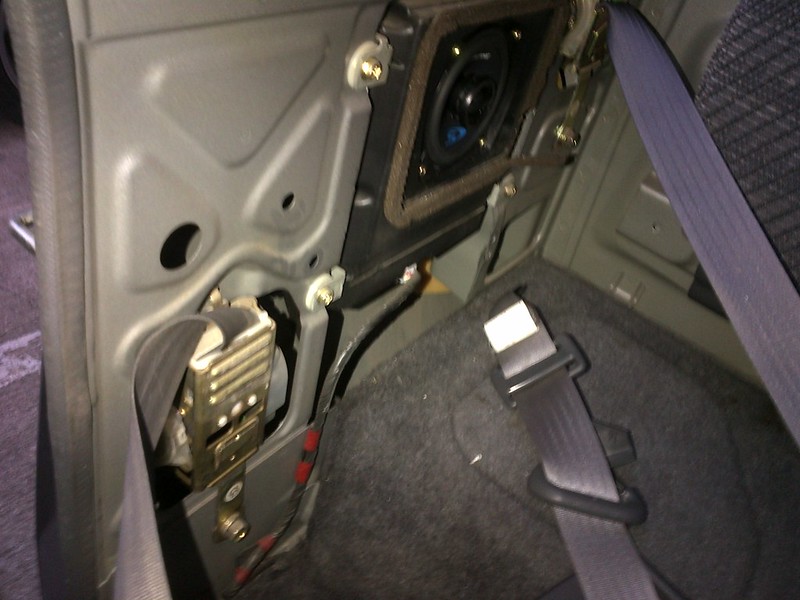
Oh, and to remove seatbelt from spring keeper barrel mechanism required a flat screwdriver, needle nosed pliers and a trim tool (the screwdriver likes to snag the belt, so I tried to limit its use).
And if you have a sunroof, you may need put your hoses back in their frame keeper holders -- a slot at bottom of that cubbie hole thing for the hose to slide into to direct closest to that cubbie's drain.
And if you have a sunroof, you may need put your hoses back in their frame keeper holders -- a slot at bottom of that cubbie hole thing for the hose to slide into to direct closest to that cubbie's drain.
Another thread covering washing if interested, but you already did that: https://www.yotatech.com/forums/f116...t-swap-272851/
02-23-2014, 06:32 PM
#195
Registered User
Thread Starter
Great post RSR, thanks.. since I have not started the re-winding of the seat belts I had not searched yet, thanks for the links!
I'll be testing/filling AC system soon.. I pretty much don't know ANYTHING about the AC system at all... Only about the thermodynamics of it that I learned back in college. lol... useless for everyday life
Weatherstripping around door is definitely on the list as well. But even before that, the weatherstripping/rubber molding that goes around the windows (on all doors) is all shrunk. Every window, I'll get a picture of it and share. I haven't yet spent any time finding new/used ones to replace. It will allow a lot of water in between the window and the rubber pieces, I don't like that!
02-25-2014, 05:15 PM
#196
Registered User
Thread Starter
Got my driver seat back today and I gotta say, I am very proud of my colorblind (literally) self for chosing a great composition of black and grey! With the headrests re-done as well, looks great! Cost of fabric and foam ~$60, Labor $250.


I went to see what I can do with the seat belt, and keeping RSR's post in mind I started looking at the spring mechanism. I saw that I can remove the spring section separately and decided to give it a try a different way. You have to push the 3 cylinderical plastic pieces out of the expanding plastic posts.

Dont lose them

Once it is out, I wrapped the seatbelt as far as it would go back onto the seatbelt assembly, then put the spring assembly back into its place. I pulled the seatbelt out of the assembly and this put tension on the spring. One of these was not enough tension, so I slipped a dohicky/tool (think butter knife like metal) in between the assembly housing metal frame and the sprin ghousing and pushed against the spring housing to keep the spring from rolling back out and losing it's tentions. It's tricky, took a couple of tries but it's easy enough. Then with that (help would be nice here) i wraped the seatbelt back into the housing and released the spring assembly. It made a couple of revolutions before i snapped it into place. Now, it is a bit better! I do want to remove it and put even more tension on it though. Also, the best part, it is very clean and looks much much better. Cleaning works!
I went to see what I can do with the seat belt, and keeping RSR's post in mind I started looking at the spring mechanism. I saw that I can remove the spring section separately and decided to give it a try a different way. You have to push the 3 cylinderical plastic pieces out of the expanding plastic posts.
Dont lose them
Once it is out, I wrapped the seatbelt as far as it would go back onto the seatbelt assembly, then put the spring assembly back into its place. I pulled the seatbelt out of the assembly and this put tension on the spring. One of these was not enough tension, so I slipped a dohicky/tool (think butter knife like metal) in between the assembly housing metal frame and the sprin ghousing and pushed against the spring housing to keep the spring from rolling back out and losing it's tentions. It's tricky, took a couple of tries but it's easy enough. Then with that (help would be nice here) i wraped the seatbelt back into the housing and released the spring assembly. It made a couple of revolutions before i snapped it into place. Now, it is a bit better! I do want to remove it and put even more tension on it though. Also, the best part, it is very clean and looks much much better. Cleaning works!
Last edited by Gevo; 02-25-2014 at 05:17 PM.
02-28-2014, 12:05 AM
#197
Registered User
Hard to tell from your pics, but I basically just removed the seatbelt from it's post/barrel that it wraps around and connects to the spring, and wind that post until it wouldn't wind any further. You can see when the spring is wrapped completely tight and pulling on its plastic anchor through the plastic window; don't break the old plastic and free the captive spring. Similar to how your second to last picture looks. Turning that center barrel looked like it pulled the spring a little tighter on mine though.
It's still not the strongest seatbelt puller, but now my front ones both pull themselves all the way in, unless there's a twist in the belt...
Yeah, I used trim tools or flat (smaller sized w/ long handles) screw drivers jammed into the slot to keep the spring from unwrapping.
So you undid the cover over the spring and tightened it somehow that way?
Last edited by RSR; 02-28-2014 at 12:16 AM.
03-03-2014, 10:21 AM
#198
Registered User
Thread Starter
RSR, yes I undid the tabs on the spring cover and messed around with that. That was in fact the more difficult way to do it. The other side I decided not to reinvent the wheel and took your way.. much easier! lol. Regardless, i am not happy with them. They cleaned up very well at least.. I want more powerful springs!!
I am frustrated, I can't find a replacement overdrive button.. I lost a tiny piece of it upon removal.. now the switch doesn't stay in to get overdrive. Currently a penny and some electrical tape are holding it in. lol. any ideas?
I will get my new carpet this week, delay in pad shipment cause i got a different one with much better sound and heat shielding.
Last edited by Gevo; 03-03-2014 at 10:28 AM.
03-06-2014, 06:43 AM
#199
Registered User
Thread Starter
FINALLY my carpet is in. Total cost of carpet with the back area and new heatshield carpet pad $330 (with labor), which is a much better deal than even the cheapest pre-cut options available with padding (~480). Looks ok, not as great as I was picturing.. the carpet seems a little to soft, to thick... oh well it's not bad either.


I'll finally put the trim pieces on this weekend.
I have to make a trip to the junkyard for my OD switch.. otherwise I'm gonna bypass it and put a switch in the dash somewhere...
I'll finally put the trim pieces on this weekend.
I have to make a trip to the junkyard for my OD switch.. otherwise I'm gonna bypass it and put a switch in the dash somewhere...
03-09-2014, 09:42 PM
#200
Registered User
Thread Starter
Got to put my new speakers in today! Admittedly I don't care to much about loud and amazing sound, so I bought medium to low end speakers. I did decide to upgrade the rears to the 6.5 size as others have on this forum. I was surprised that these 4Runners came with individual speaker boxes for the rear... anyway, cut them out (used a drywall cutting knife, easy peasy and very clean!) put some of my universal weatherstrip behind the speakers and screwed them in. No problems.


I did have one problem though, the rear right side speaker was not working. Plugged new one in to test, still no good. Check wires for continuity and it was good, checked output of stereo (some sony aftermarket one) to another speaker, it was good. Only thing left was that circuitry inside the speaker box. Bypassed that and it worked (red and white wires are directly for speaker, other wires I presume split the lows/mid/highs to multiple speakers in the car??? My rear only has the 2, no tweeters or plugs for tweeters that I could find.. ANyway, decided I don't care enough to 'fix' or get new one, so I bypassed the circuitry on that one speaker and all is well! Plus the new speaker is a 3 way, the originals i believe are 2 way.
And as I posted in a pointless new thread that I made earlier... I went to town on my CV axle (front right) due to some intermittent grinding noise at speed.. cleaned it all out, checked and tested anythign I can think of.. no problems at all.. turns out it was some plastic trim piece in the wheel well that was loose and at speed wind would push it against the tire.. lame! During test drive on freeway i pulled over as soon as the noise came back and the ambient wind was moving plastic trim piece around.. so that's how i figured that out. lol.
FIXED!


