
Dutchbelly's 1988 4runner Build-up

 06-17-2011, 07:54 PM
#202
Registered User
Thread Starter
Join Date: Apr 2011
Location: Southern Ontario
Posts: 428
Likes: 0
Received 0 Likes
on
0 Posts
Yep all is well. I've been taking friday nights off from working on the truck to recuperate. Hoping to get back at it tomorrow. I need to call the company that sold me the OME suspension as well, to get an updated eta. Think their original eta was 3 weeks, and if memory serves, that would have been today.
06-17-2011, 10:52 PM
#205
Registered User
Thread Starter
Join Date: Apr 2011
Location: Southern Ontario
Posts: 428
Likes: 0
Received 0 Likes
on
0 Posts
No it's not Rocky Road, and I do remember your post on the subject, Chef. I went through National 4wd. It's a Canadian company so I wouldn't have to deal with the border taxes etc. I'm ok with waiting a bit longer because I'm not out of work yet, but I'll still be making the call just to touch base.
Last edited by Dutchbelly; 07-16-2011 at 10:40 AM.
06-18-2011, 12:00 AM
#206
Registered User
Join Date: Jun 2011
Location: Coeur d'Alene, ID
Posts: 15
Likes: 0
Received 0 Likes
on
0 Posts
Dang, i'm pretty impressed. I got an 88 4Runner and I really wish I could do what your doing with your truck. I had the same problem with my tires as you did. Bought some 31s to put on and went to pull the tire off and I could never get it. After a lot of WD-40 and slamming the rims with a sledge they eventually came off, really frustrating.
I'm looking at clearing up under the hood on my rig and was wondering if you have any idea if the AC and rear heating units are similar to the 3.0 as they are with the 22re?
I'm looking at clearing up under the hood on my rig and was wondering if you have any idea if the AC and rear heating units are similar to the 3.0 as they are with the 22re?
06-20-2011, 04:14 AM
#207
Super Moderator
Staff
iTrader: (1)
Join Date: Aug 2008
Location: Anderson Missouri
Posts: 11,788
Likes: 0
Received 25 Likes
on
22 Posts
I am just checking in on you. Sorry to hear about OME. It is nice to take a break. Need one every now and then.
Seen in another post you talking about rebuilding a 22re. The head can be bought for atond $250ish. They arent bad to rebuild at all. But the cost of a getting a head machined and reworked can exceed a new head fast. I know you arent planning on a rebuild now, but just wanted to let you know.
Looking forward to seeing your new gadgets on.
06-20-2011, 04:34 AM
#208
Registered User
Thread Starter
Join Date: Apr 2011
Location: Southern Ontario
Posts: 428
Likes: 0
Received 0 Likes
on
0 Posts
Thanks for the info Terry. the engine rebuild would definitely have to wait for a while. I'll probably take some time off to recover financially and physically after getting this truck back together but it doesn't mean i'll be waiting that long to research what i'd be getting into. didn't get anything done this weekend. i need a 54 mil socket for the nuts on the hubs to repack the bearings and put on the front brakes so i'll see if i can borrow one today. sorry blue i'm unsure of the differences but i'd assume the rear heater at least would be the same.
06-20-2011, 06:16 AM
#209
Registered User
Thread Starter
Join Date: Apr 2011
Location: Southern Ontario
Posts: 428
Likes: 0
Received 0 Likes
on
0 Posts
So just an update. I called national 4x4 for an eta on my suspension and body lift and all they're waiting on are the torsion bars so i'm getting him to check the difference in shipping to see if he can just send out what he's got now. should hear from him today. fingers crossed
06-20-2011, 02:53 PM
#210
Registered User
Thread Starter
Join Date: Apr 2011
Location: Southern Ontario
Posts: 428
Likes: 0
Received 0 Likes
on
0 Posts
Just a shout out here in case any of you guys read this in the next little while. i'm at the farm posting from my phone. do you guys think it would be a bad idea to just repack the outer bearings? the rotors look like they have good life left so i was thinking i could just do the outer bearings and maybe put the new calipers and pads on still tonight. i'll check in again shortly. cheers!
I found this diagram in my FSM after this process was all over. I'll stick it here in case anyone uses this thread as a reference.
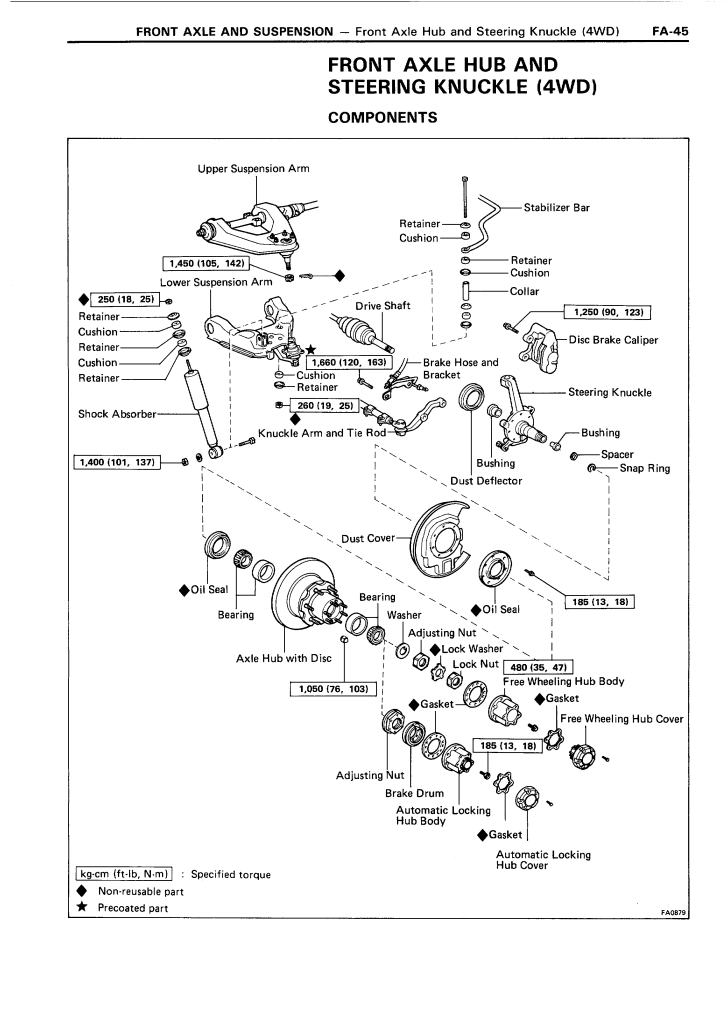
I found this diagram in my FSM after this process was all over. I'll stick it here in case anyone uses this thread as a reference.
Last edited by Dutchbelly; 07-16-2011 at 10:34 AM.
06-20-2011, 03:58 PM
#211
Registered User
If the races aren't pitted and the bearings don't seem super lose I always really use them. But that's me I rebuilt my engine bought as much new as I could but didn't have my injectors checked trying to get out cheap LOL.
06-20-2011, 05:06 PM
#212
Registered User
Thread Starter
Join Date: Apr 2011
Location: Southern Ontario
Posts: 428
Likes: 0
Received 0 Likes
on
0 Posts
The outer bearings and race looked really good. I didn't tear the hub down to the inner bearing because I didn't get new seals and i really wanted to get a bunch done tonight. that didn't happen anyway because I was the only one at the farm and it looked like rain and there was a load of hay outside that i knew the father in law wouldn't want wet so I loaded it into the mow instead of continuing on the truck. I'm thinking now that i'll just play it safe and order new seals and check and repack the inside bearings despite the delay. It doesn't pay to rush on a project like this and i'll feel better about it when Its done. Thanks for the input though jason I probably will be reusing the bearings.
I'm just continuing this post with an edit so I can't be accused of padding my thread with posts.
So I talked to the guys at National 4x4 about my suspension as I mentioned in an earlier post today, and found out later that the shipping was going to be over $200 bucks. I'm really not impressed with this because the guy I ordered the stuff from three weeks ago said he figured it would be around $50 bucks for shipping for the whole thing. They still don't have the torsion bars in, and figured it would take a couple weeks for them because ARB shorted them during their last shipment, and they had to pull in an order from Colorado. I figure at this point despite wanting to pull the order out of principal I just want the darn stuff so I can keep moving. Right now I've got almost my full suspension kit, body lift kit and bushing kit sitting just under 2hrs away so instead of paying for the shipping I'm going to drive down this Saturday and just pick up what they have myself, and then probably just eat the bill for them to ship the torsion bars later. So thats the plan.
Recapping a bit just to help out with the timeline of all of this, I tried to get some work done during the weekend, but didn't really get anything accomplished.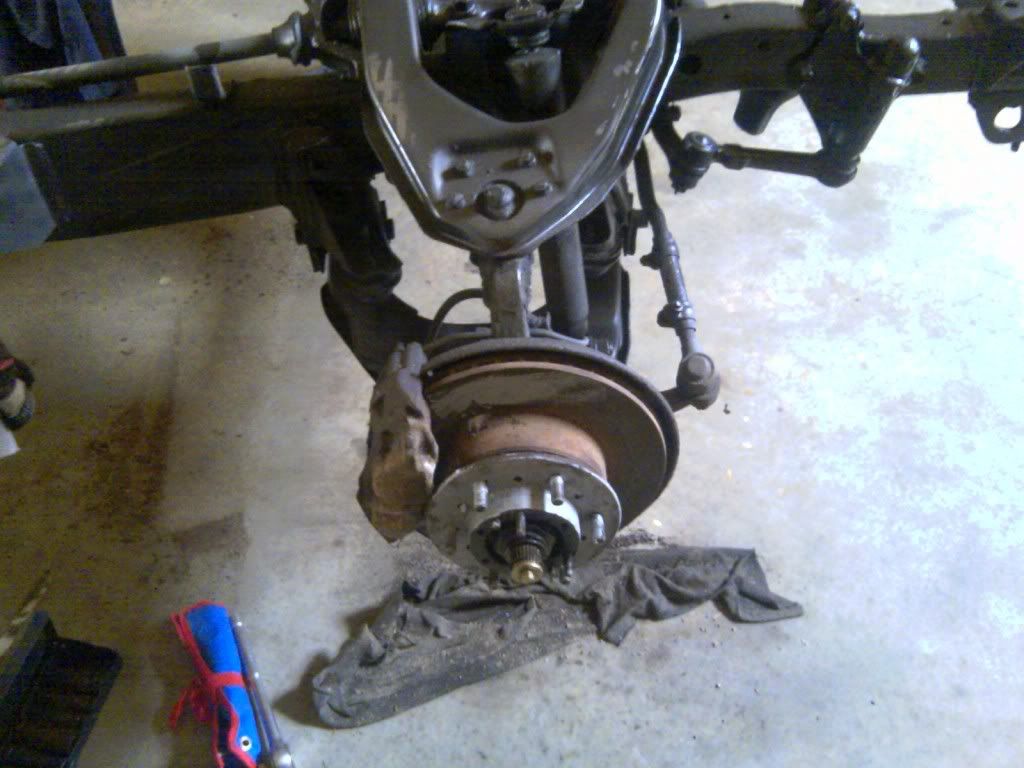
You can see how much never seize I threw on there after sanding the gunk off the hubs.
Edit: I just realized you can see my footprints on the upper control arm from when I was standing on it and beating the crap out of the top of the rims with a sledge.
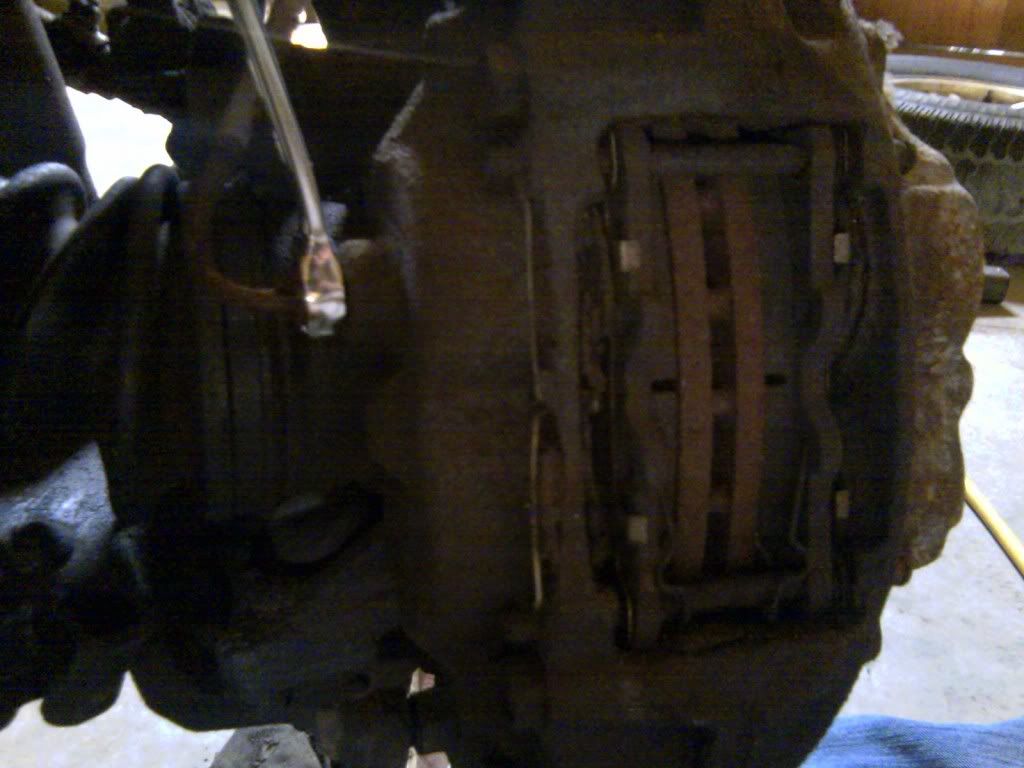
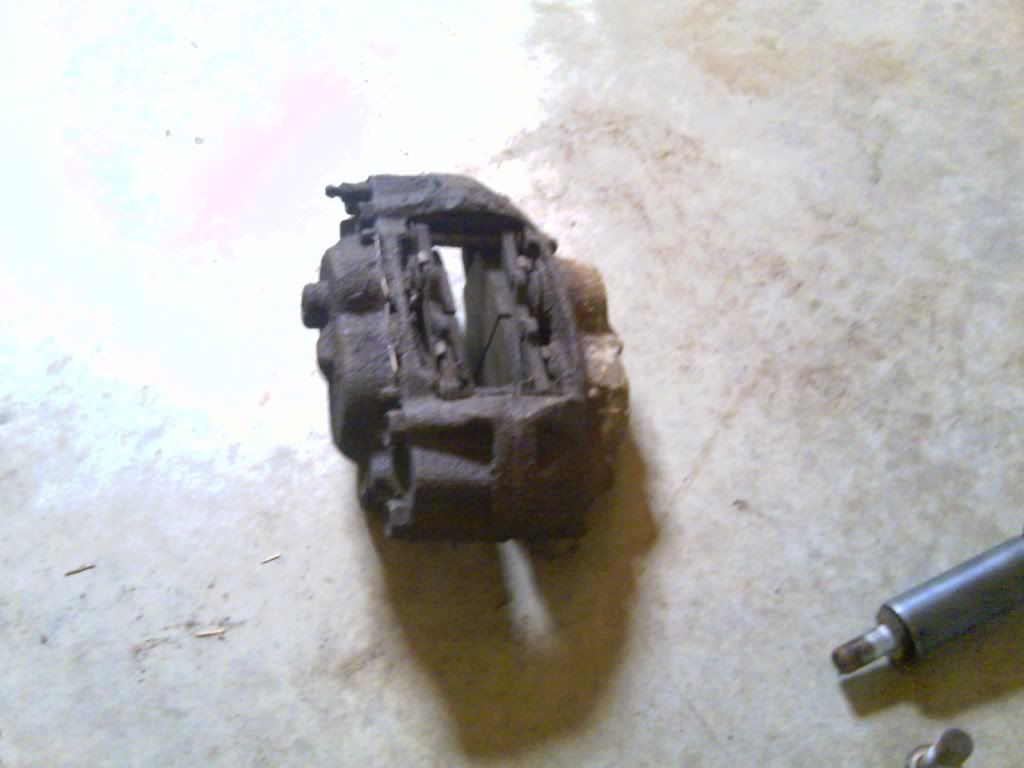
Took the line off the right front caliper with my new metric line wrenches. Was hard to swallow paying 50 bucks for 4 wrenches, but I know these are tools I'll use for many years. You can see the pads were darn near brand new when this truck began it's long sit at the PO's property. The rotors look to have a lot of meat left on them too, so I'm thinking I'll return the new ones I bought and just smooth out these ones a bit.
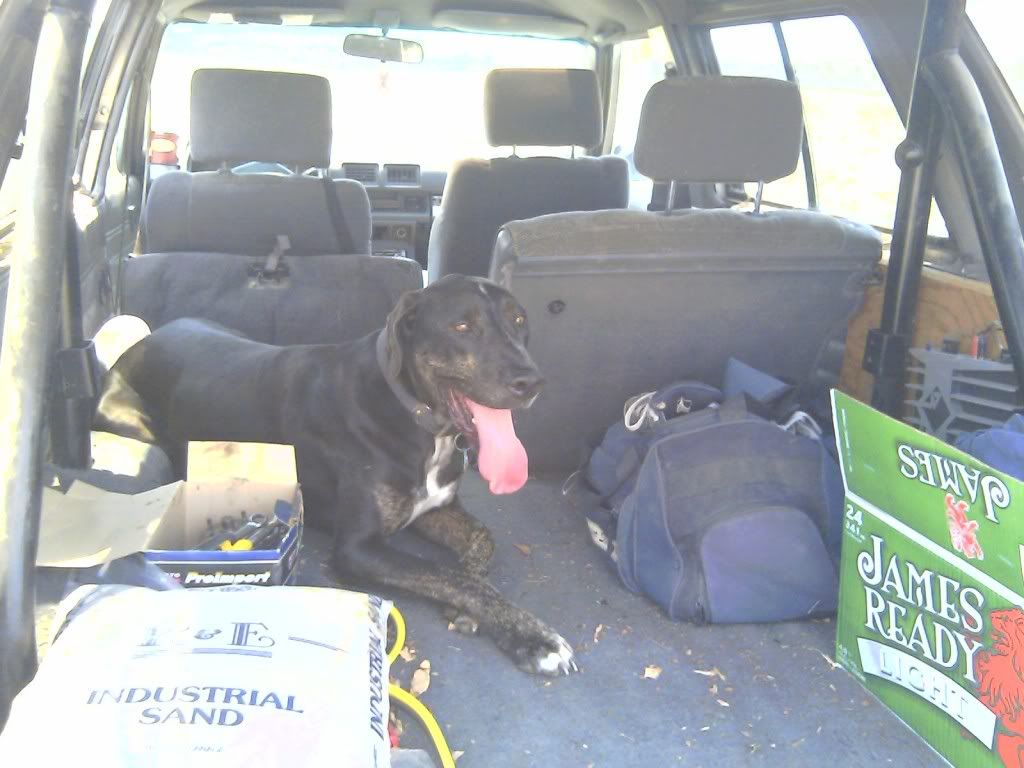
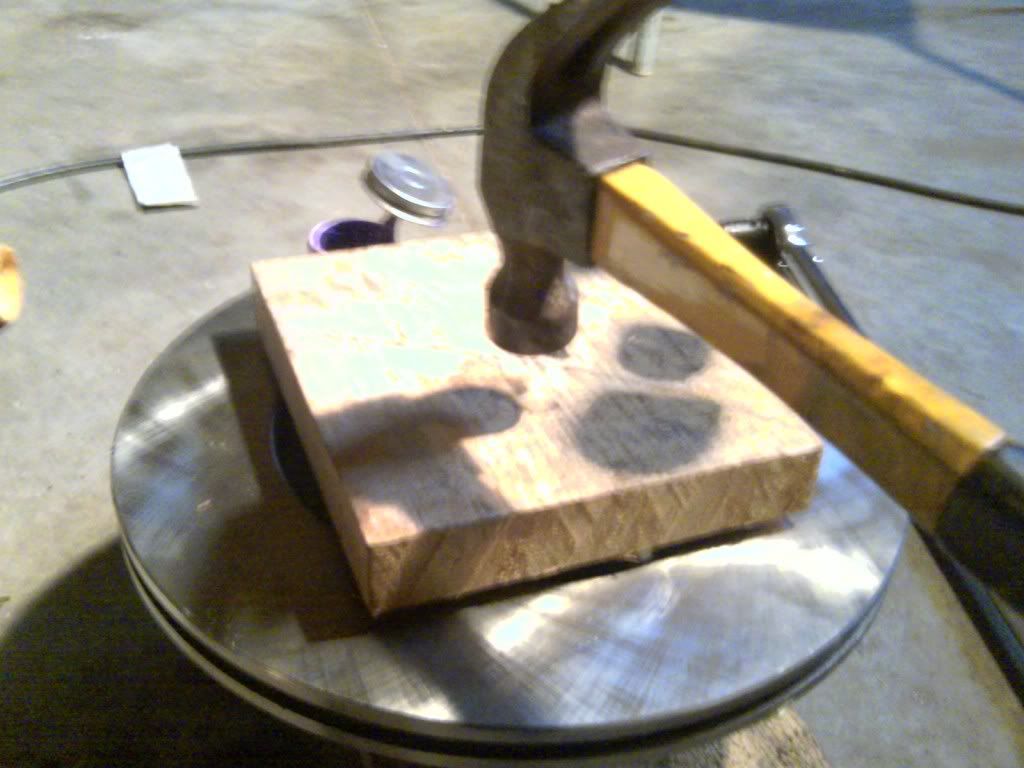
And off. I was hoping to continue with the bearings etc. but I ended up doing hay all Saturday instead and realised Sunday that I didn't have any solvent to clean out the bearings and everything was closed. That, and I wanted to remove the lock nut and adjusting nut with a socket instead of just tapping the corner of one with a screwdriver to free it up, so I could actually use the socket later to set the proper torque. I've never done that on past hubs I've worked on, usually I just tighten up the thing till I feel too much friction while turning the hub and then back it off a fraction, and then consider that good enough. I'd really like to do this one by the book, but no one in town had a 54mil socket in stock today when I looked so I just figured I'd do it the old fashioned way tonight so I could get something done. Before I continue here's a pic I really like. My dog would jump up in the back of my truck to get some shade while we were pulling the hay wagons off the field:
Ok back to the build.
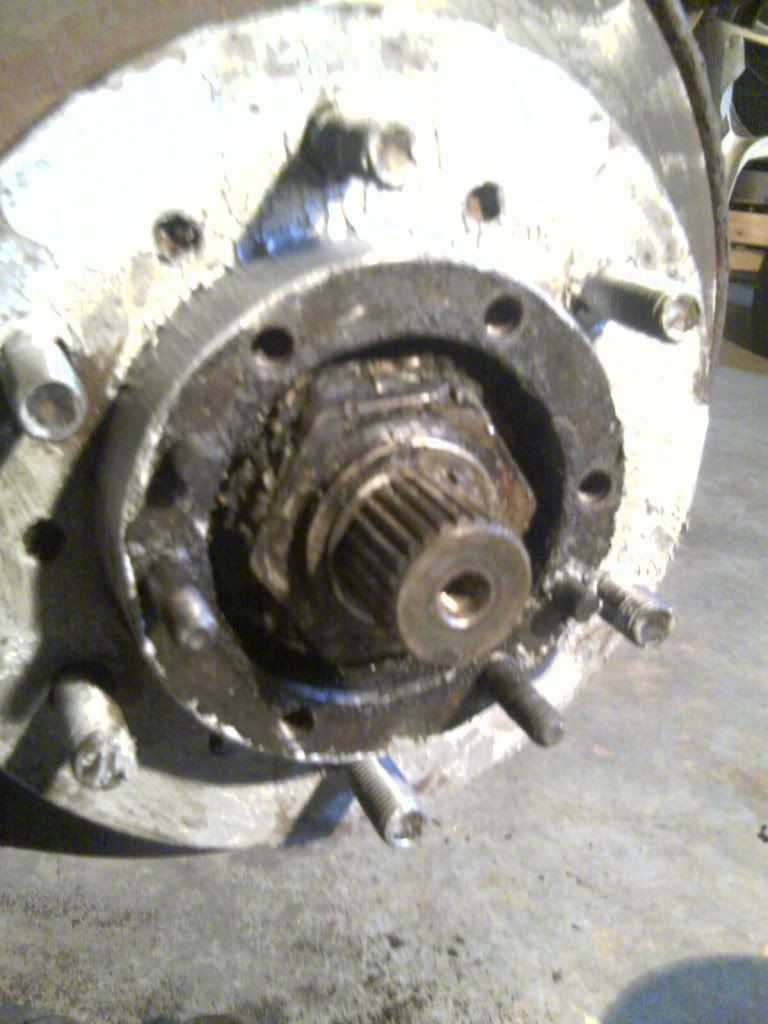
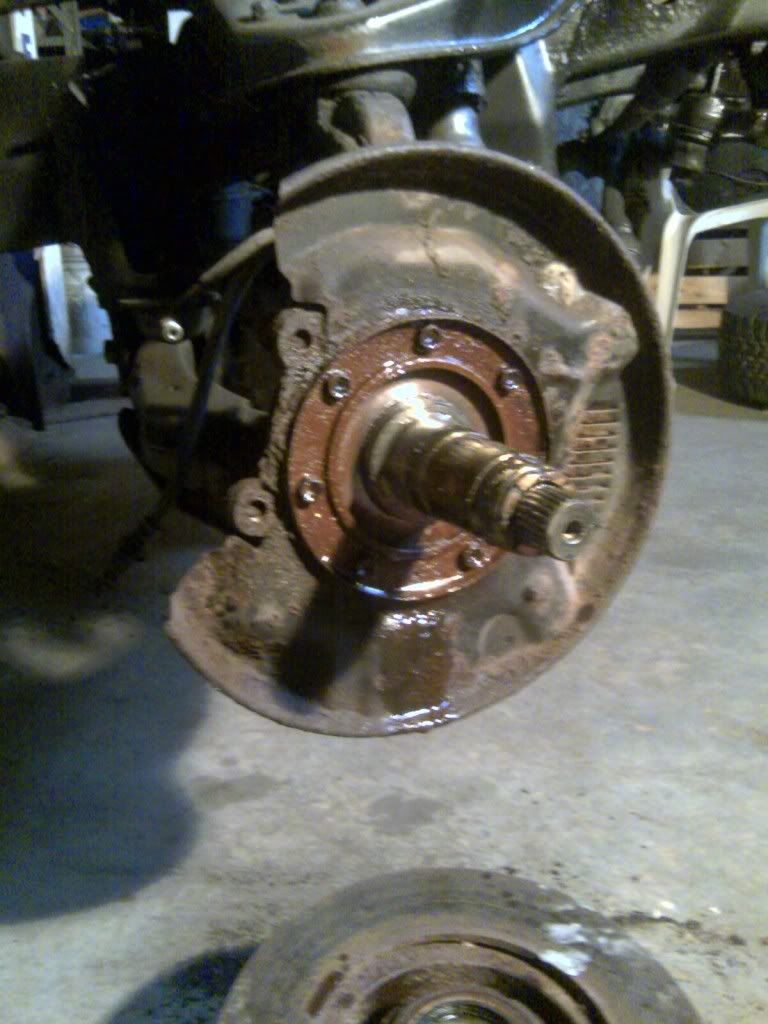
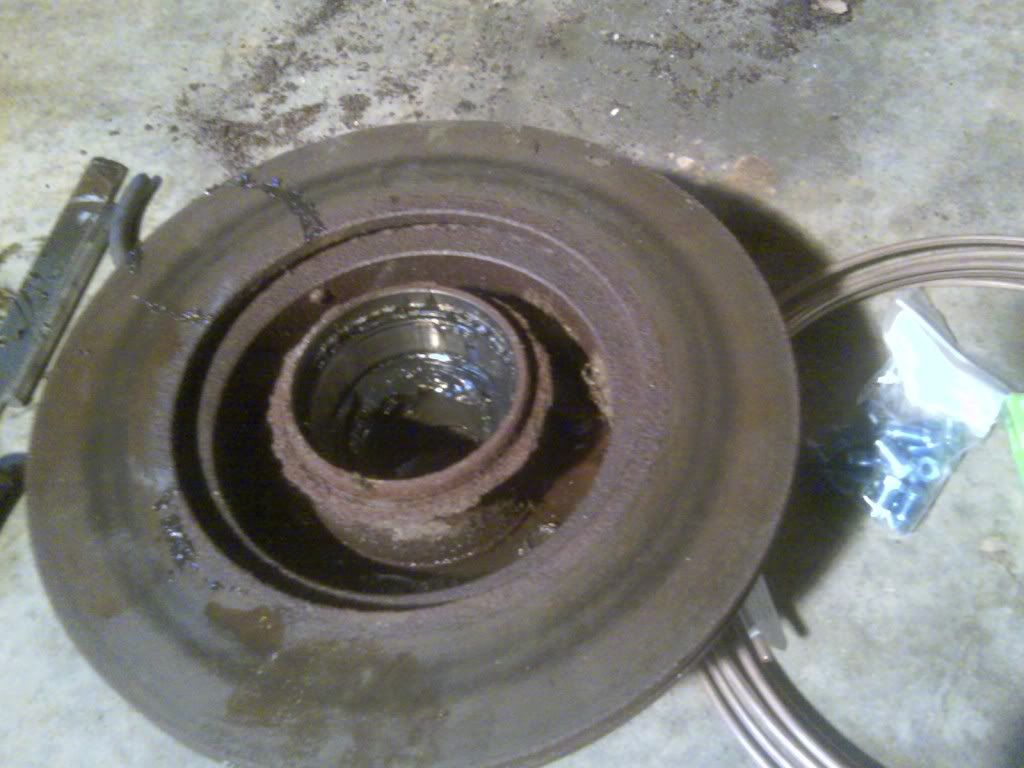
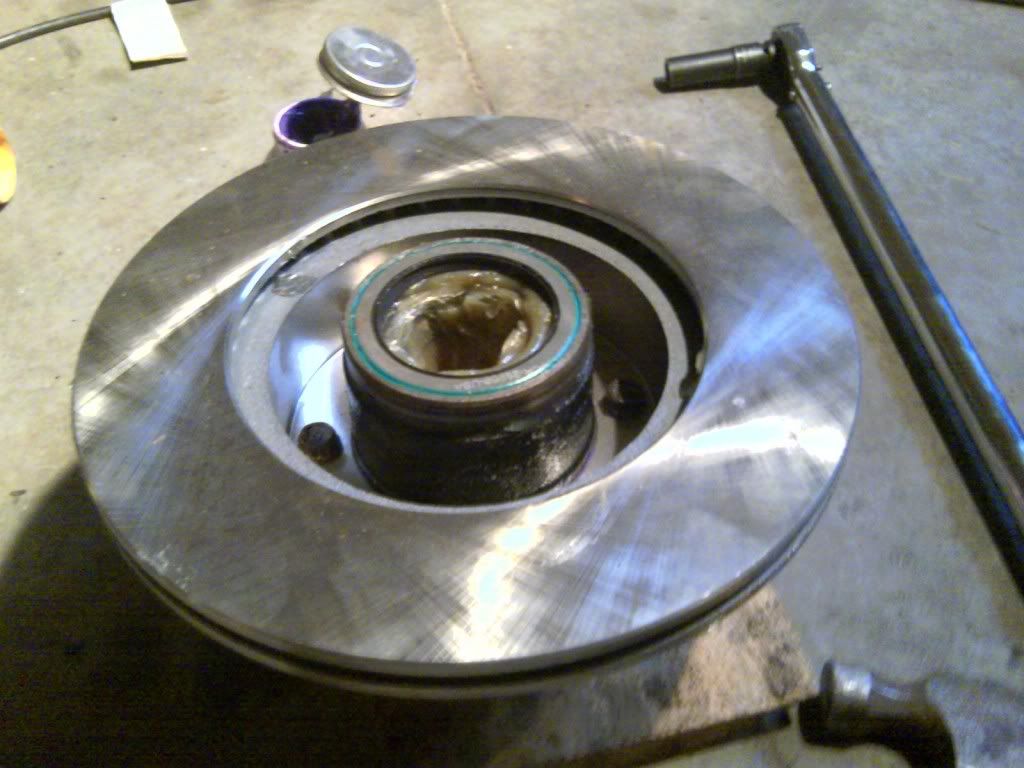
So the freewheel hub assembly is off, and the face of the hub that the assembly bolted to was where I threw all the heat with the torch to finally break the rims free. It's why I know the bearings need to be cleaned out and repacked, that much heat does bad things to lubricants.
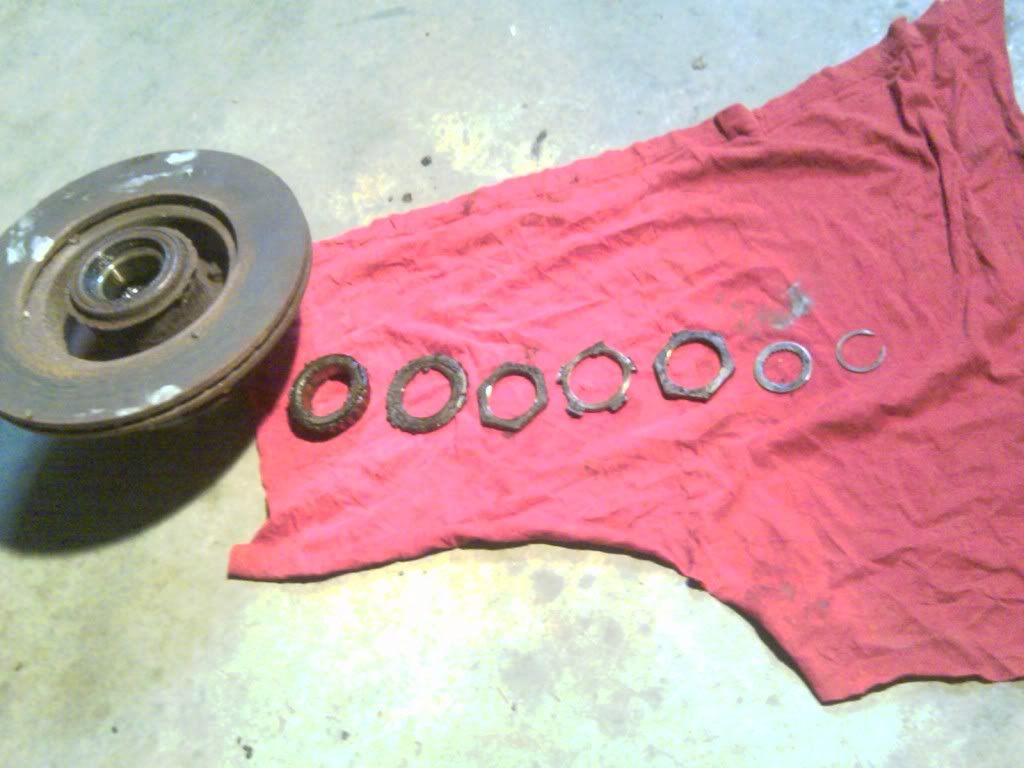
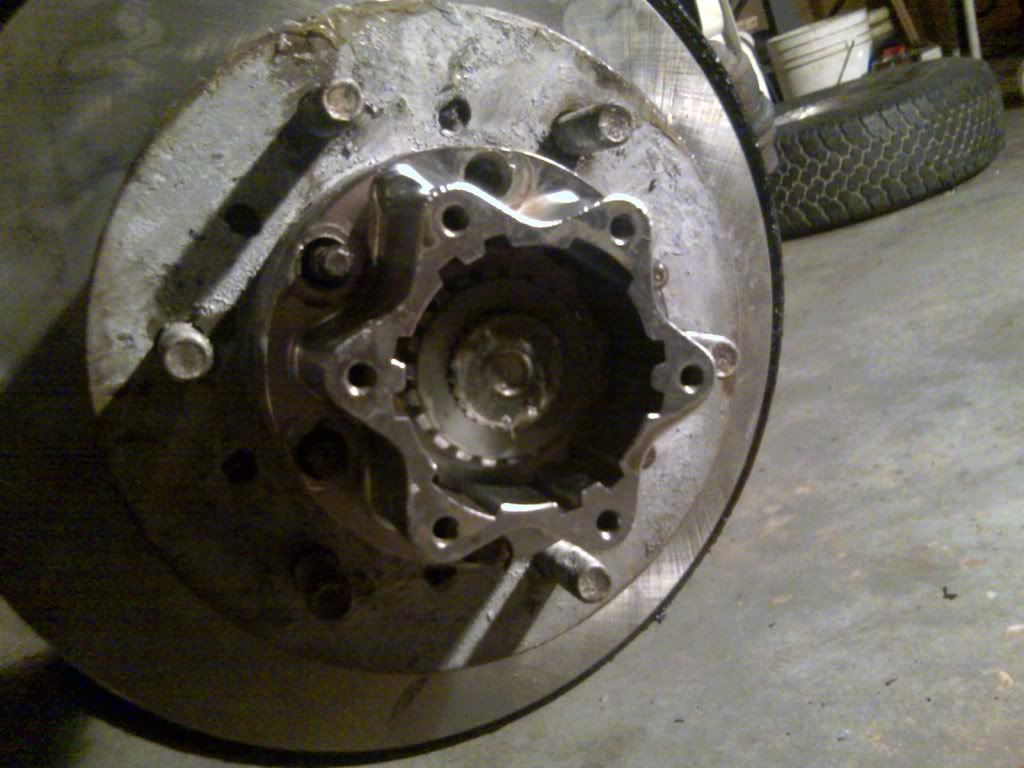
The first clip is sunk in the groove on the CV axle that helps to keep it in place, behind it is a washer, behind that is the 54mil lock nut, behind that is a funky lock washer that has tabs that get bent over both the lock nut and farther into the hub over the adjustment nut, after the adjustment nut is another washer that I believe acts as a dam to keep grease in the bearing, then the outer bearing, which rests against it's race that's pressed into the hub. I'm probably not giving the proper terms for all of those, so if anyone wants to correct for clarity, please do. Every time I get corrected I get smarter . Here's a pic of all the components:
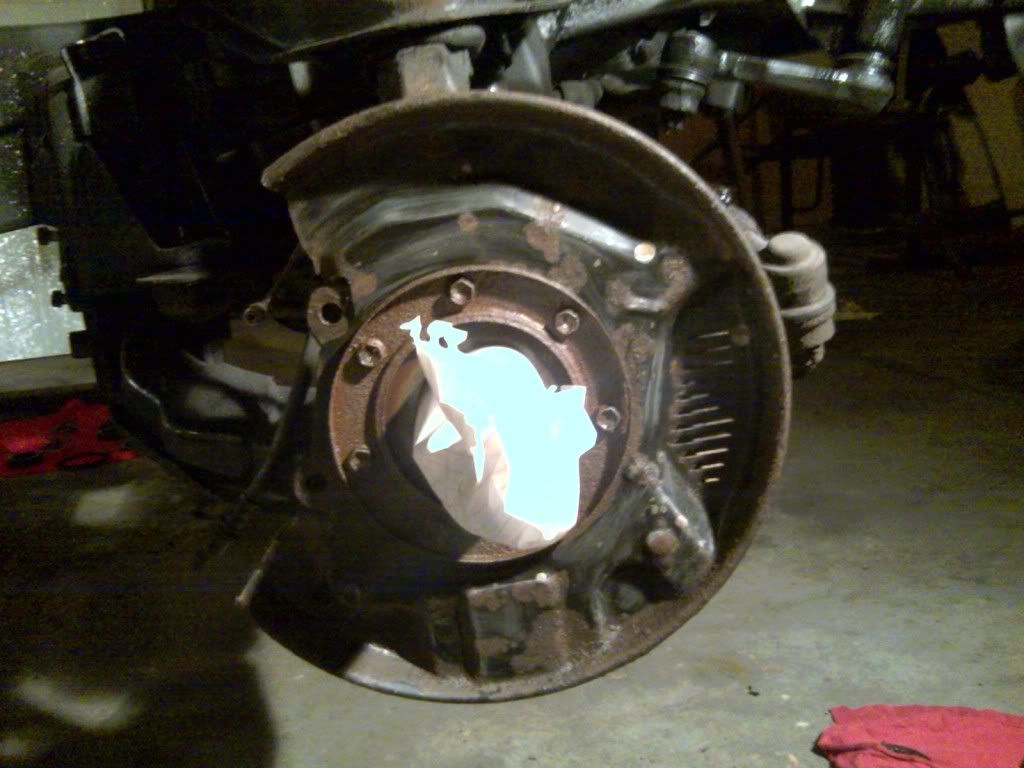
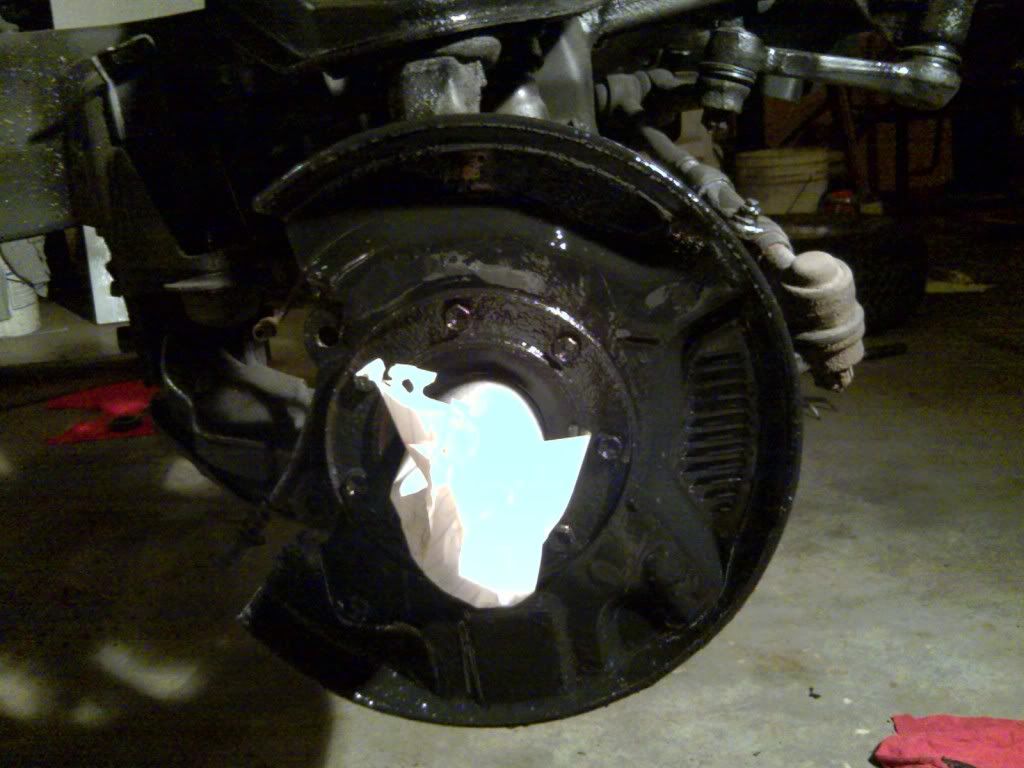
I soaked the bolts on the guard, I'm thinking if it goes smoothly I'll take it off sandblast and paint it before I put it back on. If the first bolt snaps I'll likely just say forget it, clean it best I can in place and paint it.
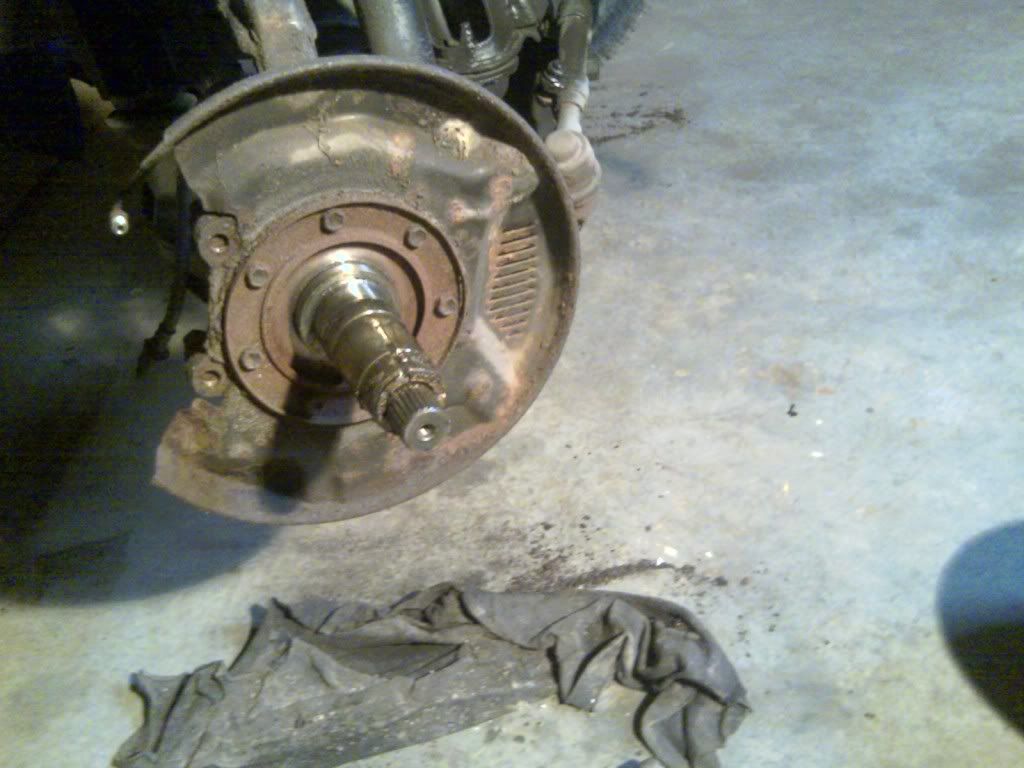
I soaked the bolts that hold the rotor on, in case I change my mind about returning the new ones I bought. It's also a good pic of the seal holding the inner bearing against it's race, as well. That was it for the night, left it that way, and I'll likely not get much done tomorrow either unless the seals I order in the morning come in before the end of the day. Back to baby steps.
I'm just continuing this post with an edit so I can't be accused of padding my thread with posts.
So I talked to the guys at National 4x4 about my suspension as I mentioned in an earlier post today, and found out later that the shipping was going to be over $200 bucks. I'm really not impressed with this because the guy I ordered the stuff from three weeks ago said he figured it would be around $50 bucks for shipping for the whole thing. They still don't have the torsion bars in, and figured it would take a couple weeks for them because ARB shorted them during their last shipment, and they had to pull in an order from Colorado. I figure at this point despite wanting to pull the order out of principal I just want the darn stuff so I can keep moving. Right now I've got almost my full suspension kit, body lift kit and bushing kit sitting just under 2hrs away so instead of paying for the shipping I'm going to drive down this Saturday and just pick up what they have myself, and then probably just eat the bill for them to ship the torsion bars later. So thats the plan.
Recapping a bit just to help out with the timeline of all of this, I tried to get some work done during the weekend, but didn't really get anything accomplished.
You can see how much never seize I threw on there after sanding the gunk off the hubs.
Edit: I just realized you can see my footprints on the upper control arm from when I was standing on it and beating the crap out of the top of the rims with a sledge.
Took the line off the right front caliper with my new metric line wrenches. Was hard to swallow paying 50 bucks for 4 wrenches, but I know these are tools I'll use for many years. You can see the pads were darn near brand new when this truck began it's long sit at the PO's property. The rotors look to have a lot of meat left on them too, so I'm thinking I'll return the new ones I bought and just smooth out these ones a bit.
And off. I was hoping to continue with the bearings etc. but I ended up doing hay all Saturday instead and realised Sunday that I didn't have any solvent to clean out the bearings and everything was closed. That, and I wanted to remove the lock nut and adjusting nut with a socket instead of just tapping the corner of one with a screwdriver to free it up, so I could actually use the socket later to set the proper torque. I've never done that on past hubs I've worked on, usually I just tighten up the thing till I feel too much friction while turning the hub and then back it off a fraction, and then consider that good enough. I'd really like to do this one by the book, but no one in town had a 54mil socket in stock today when I looked so I just figured I'd do it the old fashioned way tonight so I could get something done. Before I continue here's a pic I really like. My dog would jump up in the back of my truck to get some shade while we were pulling the hay wagons off the field:
Ok back to the build.
So the freewheel hub assembly is off, and the face of the hub that the assembly bolted to was where I threw all the heat with the torch to finally break the rims free. It's why I know the bearings need to be cleaned out and repacked, that much heat does bad things to lubricants.
The first clip is sunk in the groove on the CV axle that helps to keep it in place, behind it is a washer, behind that is the 54mil lock nut, behind that is a funky lock washer that has tabs that get bent over both the lock nut and farther into the hub over the adjustment nut, after the adjustment nut is another washer that I believe acts as a dam to keep grease in the bearing, then the outer bearing, which rests against it's race that's pressed into the hub. I'm probably not giving the proper terms for all of those, so if anyone wants to correct for clarity, please do. Every time I get corrected I get smarter
. Here's a pic of all the components:I soaked the bolts on the guard, I'm thinking if it goes smoothly I'll take it off sandblast and paint it before I put it back on. If the first bolt snaps I'll likely just say forget it, clean it best I can in place and paint it.
I soaked the bolts that hold the rotor on, in case I change my mind about returning the new ones I bought. It's also a good pic of the seal holding the inner bearing against it's race, as well. That was it for the night, left it that way, and I'll likely not get much done tomorrow either unless the seals I order in the morning come in before the end of the day. Back to baby steps.
Last edited by Dutchbelly; 06-24-2011 at 08:34 PM.
06-20-2011, 09:25 PM
#213
looking good man. i see you already got the lock nut and adjustment nut off, but wanted to ask if you had tried looking for a 2 1/8in socket
2 1/8in = 2.125
54mm = 2.1259842519708
just some thought for next time
o yea i think the washer in between the 2 nuts is just called a lock washer, tht is what i have been calling it on my SAS. but tht may be wrong. goos luck with it all.
2 1/8in = 2.125
54mm = 2.1259842519708
just some thought for next time
o yea i think the washer in between the 2 nuts is just called a lock washer, tht is what i have been calling it on my SAS. but tht may be wrong. goos luck with it all.
Last edited by twistedyota; 06-20-2011 at 09:26 PM.
06-20-2011, 10:41 PM
#214
Super Moderator
Staff
iTrader: (1)
Join Date: Aug 2008
Location: Anderson Missouri
Posts: 11,788
Likes: 0
Received 25 Likes
on
22 Posts
I remember my hay days. When I was small and all there was square bales, seemed like I was always involved in hauling hay.They would put the truck in granny gear and I just steered. Later I got so start throwing it in the truck. Now we just got round bales.
Im glad you got good pics of the hub rebuild. I havent done one a 4x4 in so long, it will be a good refresher.
The shipping is costly for you. That would go a long ways on parts.
Twisted..thanks about the 2 1/8 socket. That could be a good substitute, I will be doing this fairly soon.
Im glad you got good pics of the hub rebuild. I havent done one a 4x4 in so long, it will be a good refresher.
The shipping is costly for you. That would go a long ways on parts.
Twisted..thanks about the 2 1/8 socket. That could be a good substitute, I will be doing this fairly soon.
06-22-2011, 08:05 AM
#215
Registered User
Thread Starter
Join Date: Apr 2011
Location: Southern Ontario
Posts: 428
Likes: 0
Received 0 Likes
on
0 Posts
In other news, I found a guy who's parting out a 1995 5runner close enough to be worth a drive, and he tells me the axle code is G254, which would mean it's a 4 pinion with 4.56 gearing. Which is perfect. Mine's only the usual 2pinion 4.10. I'm checking to see how much he wants for the diff's but having never regeared a truck my question is this: Will the beefier 4 pinion diff be a straight swap for my present one or do they have a different axle housing? I'd prefer to just swap diffs instead of swapping axles. How much is realistic to pay this guy? I know it's a much more rare setup, requires the 6cyl auto with the 31" tire package from the factory.
06-22-2011, 04:01 PM
#216
Registered User
Thanks for the detailed brake rebuild I to will be doing this just as soon as the get it running right thing sorts itself out. Sorry can't help ya with whether the gears will work or not but I wouldn't pay much more than you'd pay for a new ring and pinion around $150.
06-22-2011, 05:14 PM
#217
Super Moderator
Staff
iTrader: (1)
Join Date: Aug 2008
Location: Anderson Missouri
Posts: 11,788
Likes: 0
Received 25 Likes
on
22 Posts
Thanks for the info on the cones. I will pay close attention to them. Cant help you on the gears and cost. I have swapped axles before, but havent been into gears themselves.
I know the salvages here go for $100-$150 as they have quite a few of them. That is on the rear. Front solid axle... through the roof.
I know the salvages here go for $100-$150 as they have quite a few of them. That is on the rear. Front solid axle... through the roof.
06-23-2011, 07:04 PM
#218
Registered User
Thread Starter
Join Date: Apr 2011
Location: Southern Ontario
Posts: 428
Likes: 0
Received 0 Likes
on
0 Posts
Continued working on the truck last night, but the power was out from a storm when I got home, so prepare for two nights worth of pics in one overly long post.
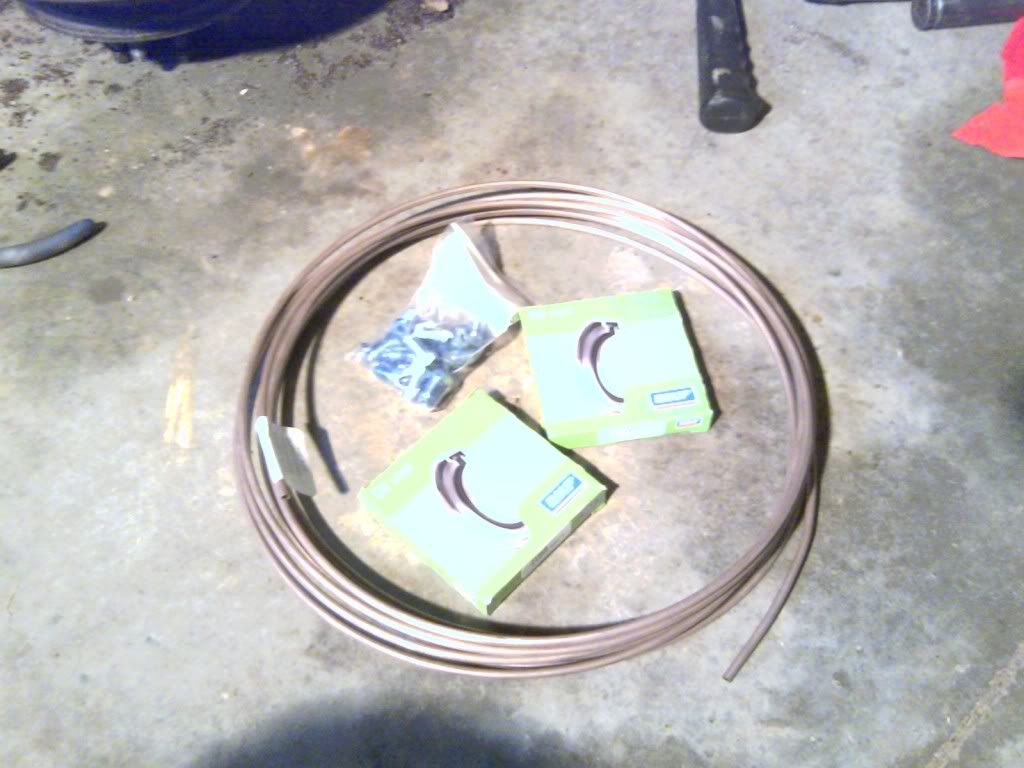
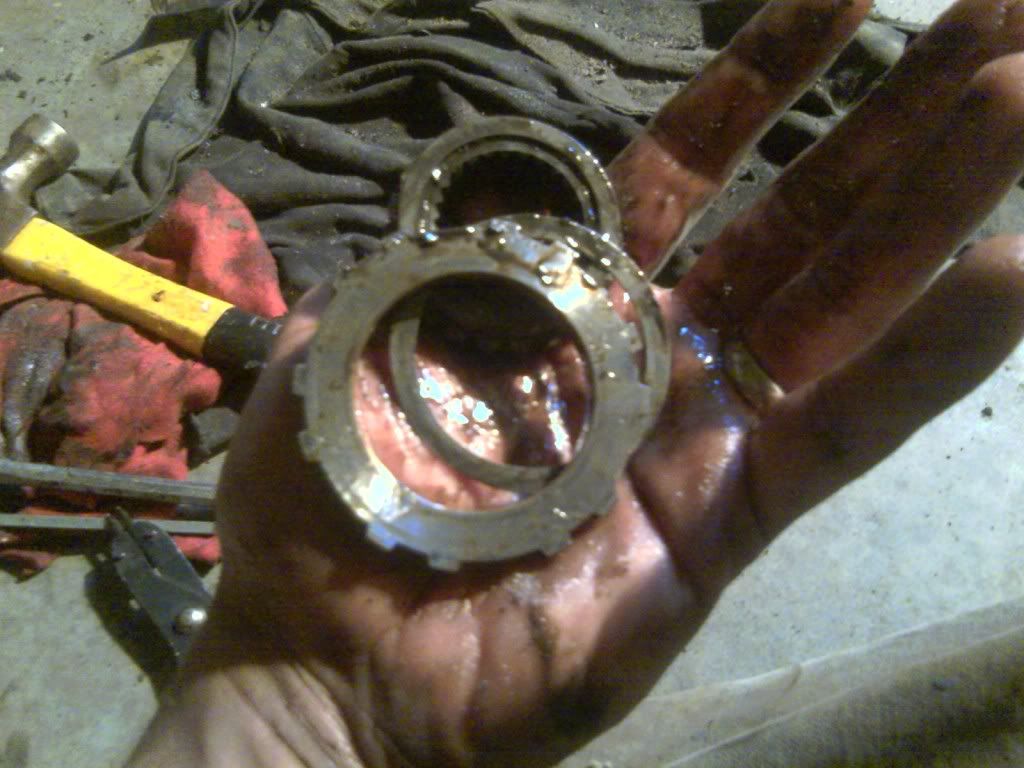
I kid you not that's a pic of 100 bucks worth of parts. 25 feet of the extra flexy brake line, a bag of 20 fittings for the lines, and two seals for the inner bearings on the front hubs. The seals were like 20 bucks a piece, blew my mind. My parts guy couldn't find more than one company that made them, he said I could check with toyota to see if they were cheaper, I just laughed at the thought and took them. He's a good guy, and I've known him long enough to trust that he tried to find the best deal. He gives me better prices than my boss, probably because I always pay up front. The price hit was lightened by the fact that I finally returned the calipers tonight, and it pretty much evened it out. Here's a pic of me prying out the old seals:
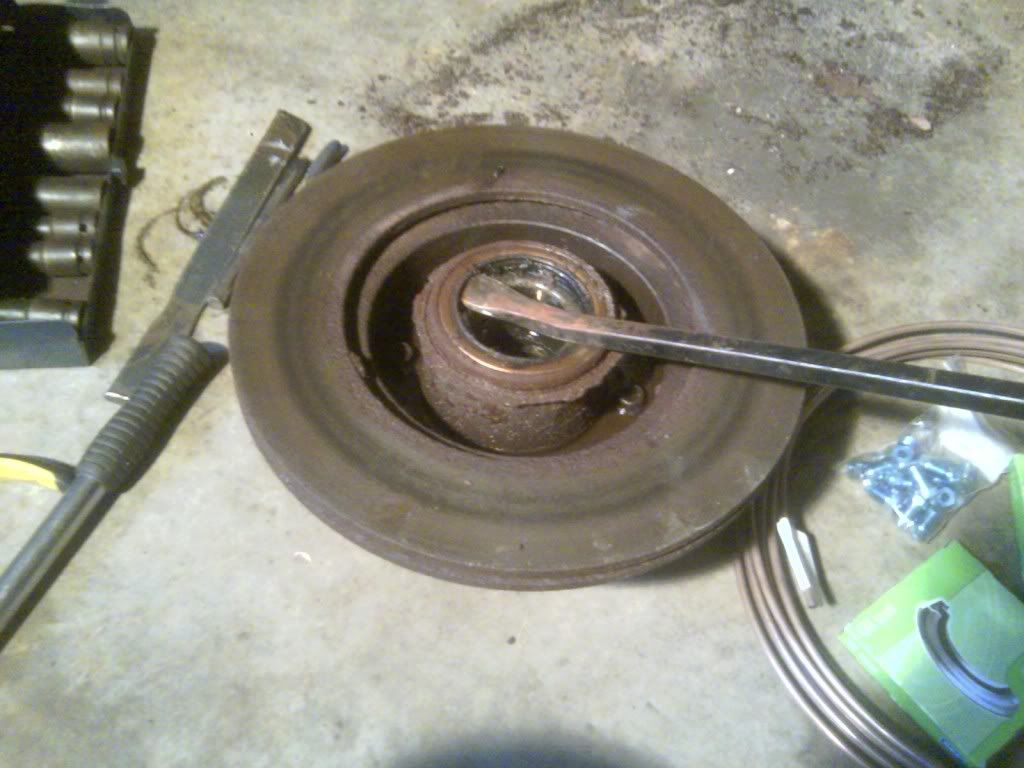
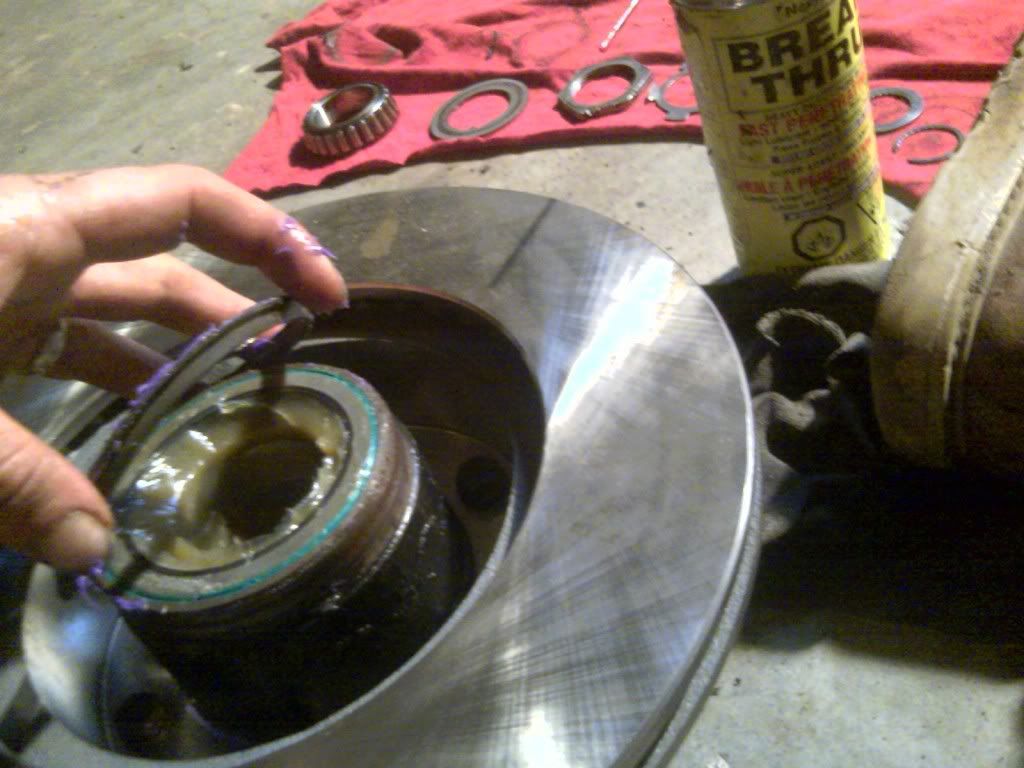
Just ensure you're prying on the seal, and don't touch the bearings.
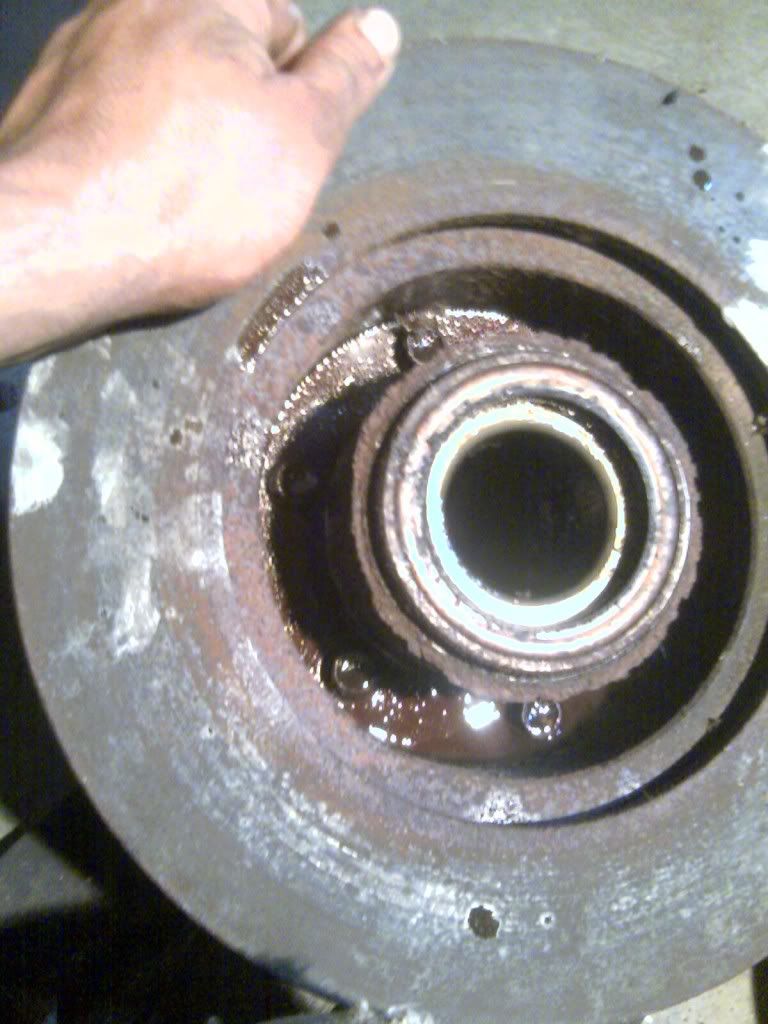
So the seal and bearings are out, and the both the bearings and race look really good. Knowing that for sure was worth the 20 dollar seal. If you look close around the edge of the rim of the hub is a rusty looking ring. I thought it was just junk from the guard, but I found out later there was a rubber ring in there. Think it serves as a seal between the hub and the guard. Here's a pic of all the components together:
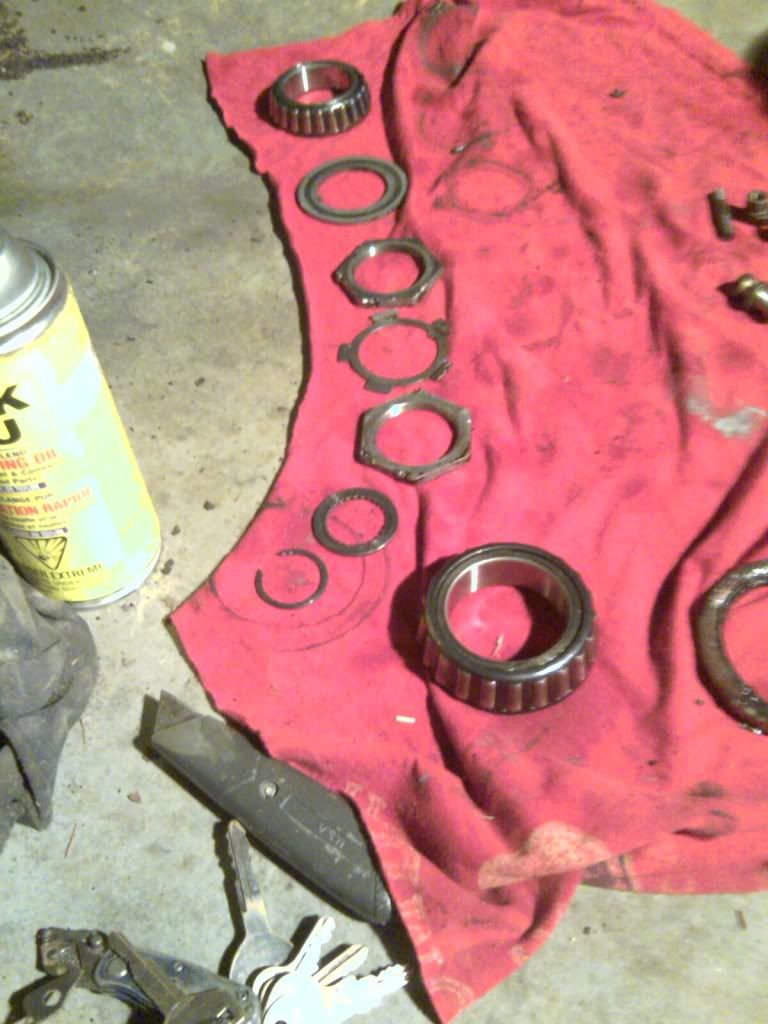
The larger bearing is the inner one, and the old seal is beside it. It's actually a pic I took later on after I cleaned them all. I changed my mind on reusing the old rotors, I've already bought the new ones, and I'll keep the used ones around I need to replace the ones on my daily driver in the future. I didn't take pics of it, but I unbolted the old rotors and gently pried it from the hub. This is when that rust caked seal I mentioned fell off, and I realised it existed. I figured this was as good a time to clean the crusty old gasket off of the face of the hub. I really hate scraping gaskets, but forced myself to take my time.
I then cleaned off the hub as best I could and threw a coat of rust inhibiting black paint on for good measure.
I also cleaned up the guard as well as I could without removing it and threw some paint on there.
It was actually a bit of a pain to pry the rotor from the hub earlier, so I put some high temp brake lubricant where the rotor would bolt against the hub. I figured it couldn't hurt.
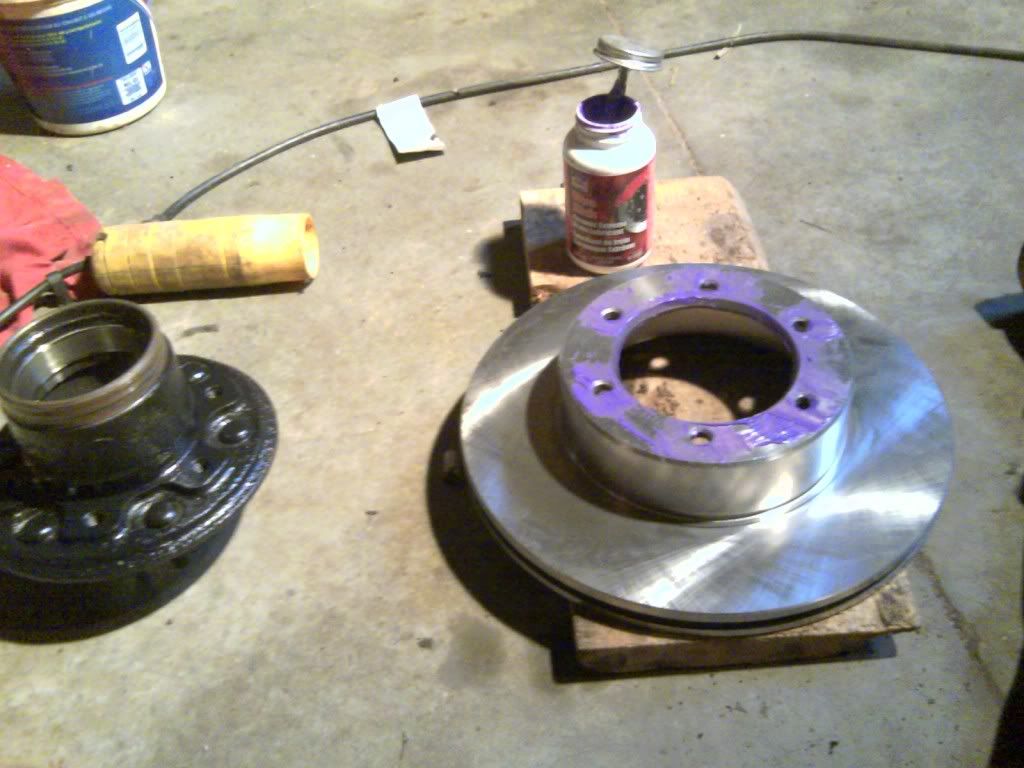
So here's a pic of the rotors bolted onto the hubs, and the outer bearing inserted after being packed with grease. I had to phone up my wife and ask her to look up the proper torque for those bolts, because I had brought the Haynes manual home last night to read during the power outage. It was 29-39 foot lbs, so I set the wrench for 34.
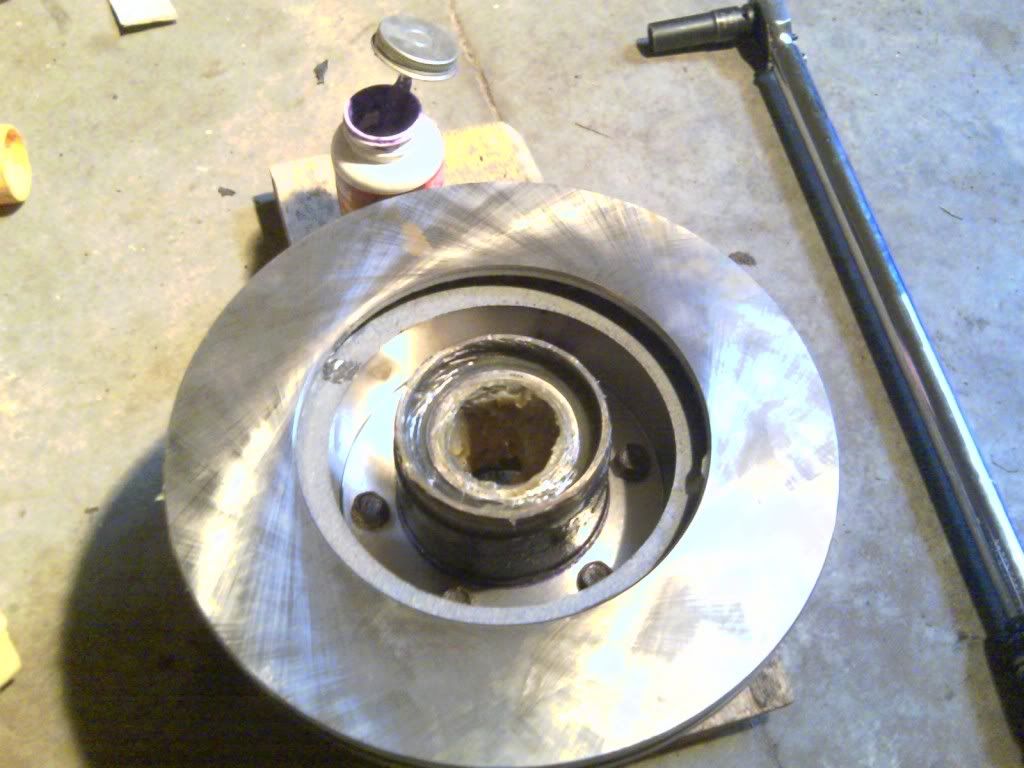
I'm really not a big fan of those manuals, you always have to jump from one section to another to another just to do one task because they don't want to repeat any process during the book to keep the size of the book down. I have a copy of the FSM on my computer at home, but it's 1400 pages, so I haven't printed it out. I put the seal back in place and set a block of wood onto it so I wouldn't dent it while I tapped it into place. If you're going to do this yourself, I hope you payed attention to which way they go in, because it's not really that obvious by looking at them.
And there's the seal after tapping it flush with the hub. And a pic of me replacing that rubber seal I didn't know about until it fell out earlier:
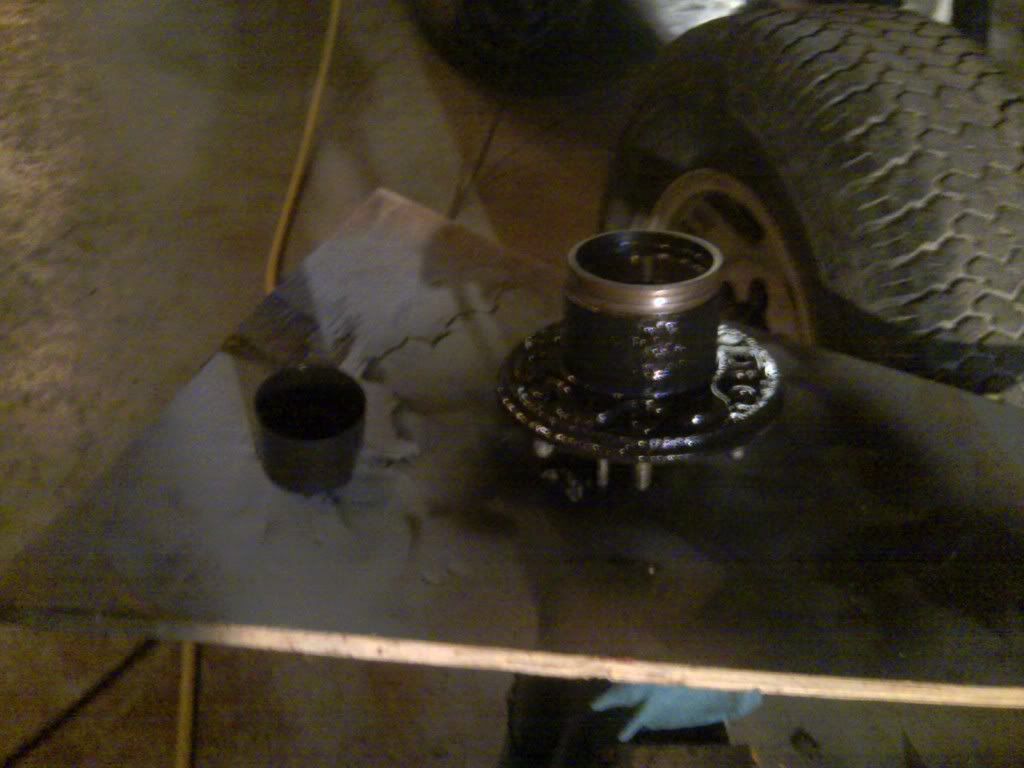
I threw the hub back onto the axle and packed and inserted the front bearing, as well. Here's a couple pics of all the other components before they go on:

That's all pretty straight forward, just make sure you bend the tabs forward and back over both the adjustment nut and the lock nut so they can't move.
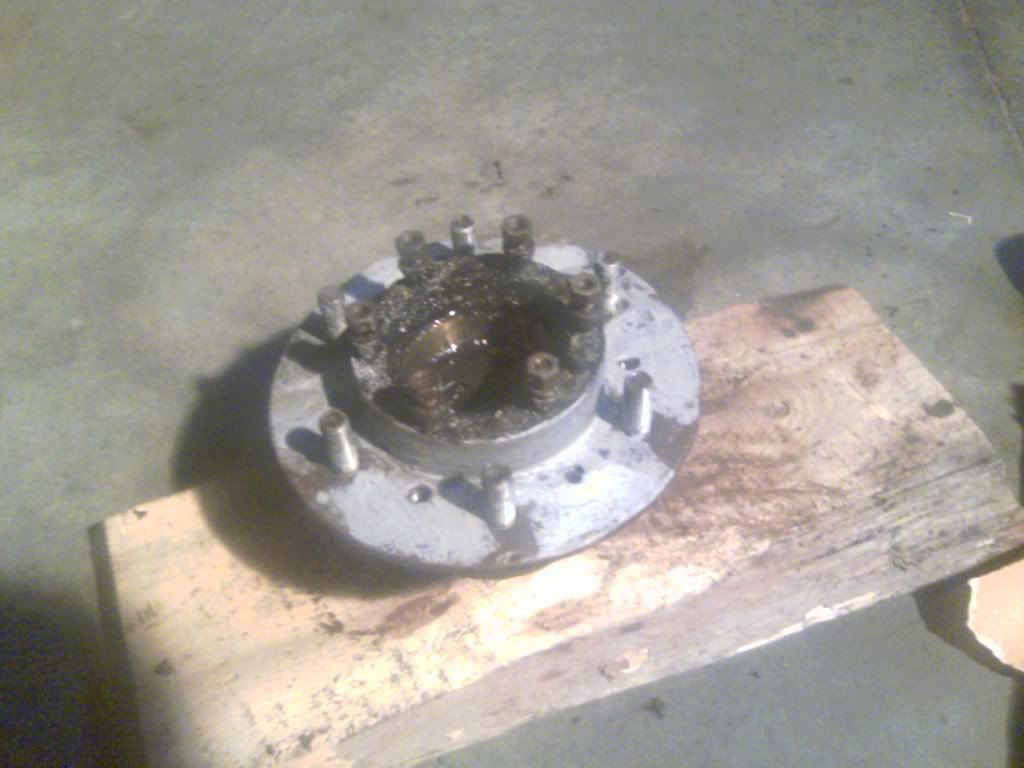
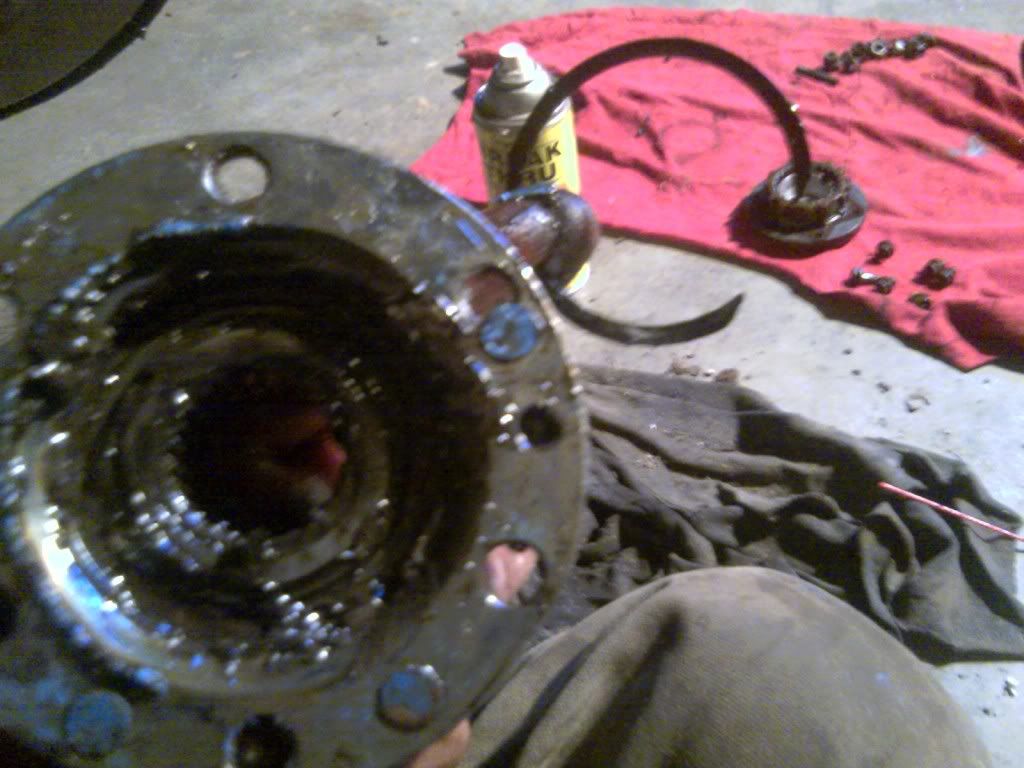
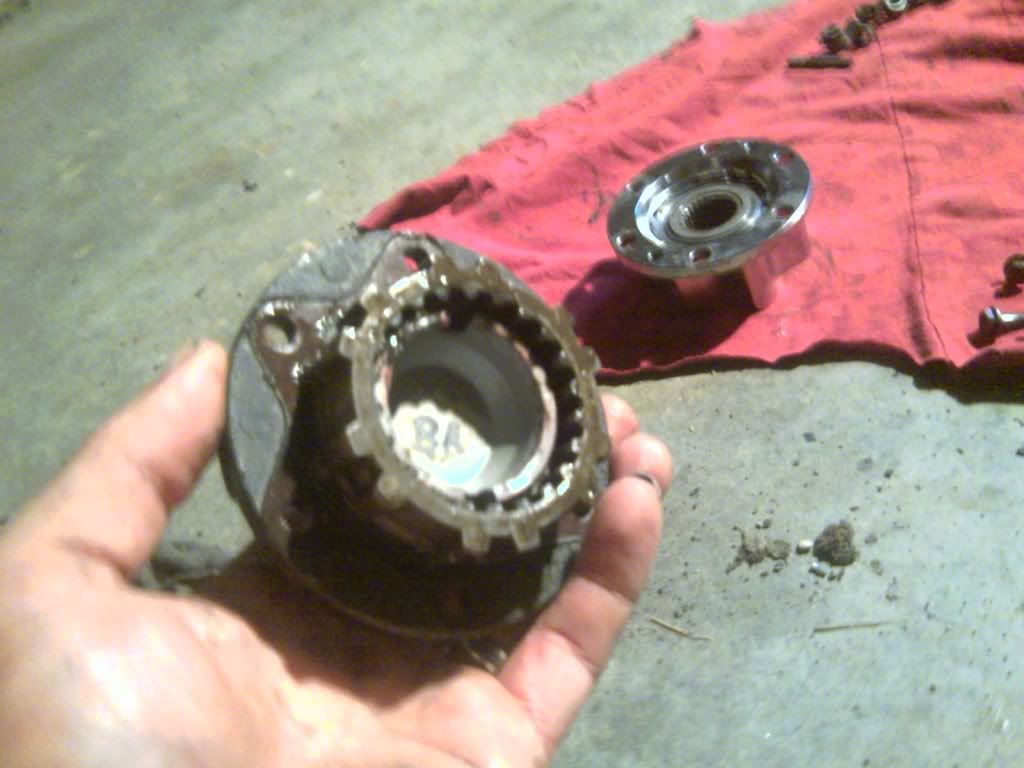
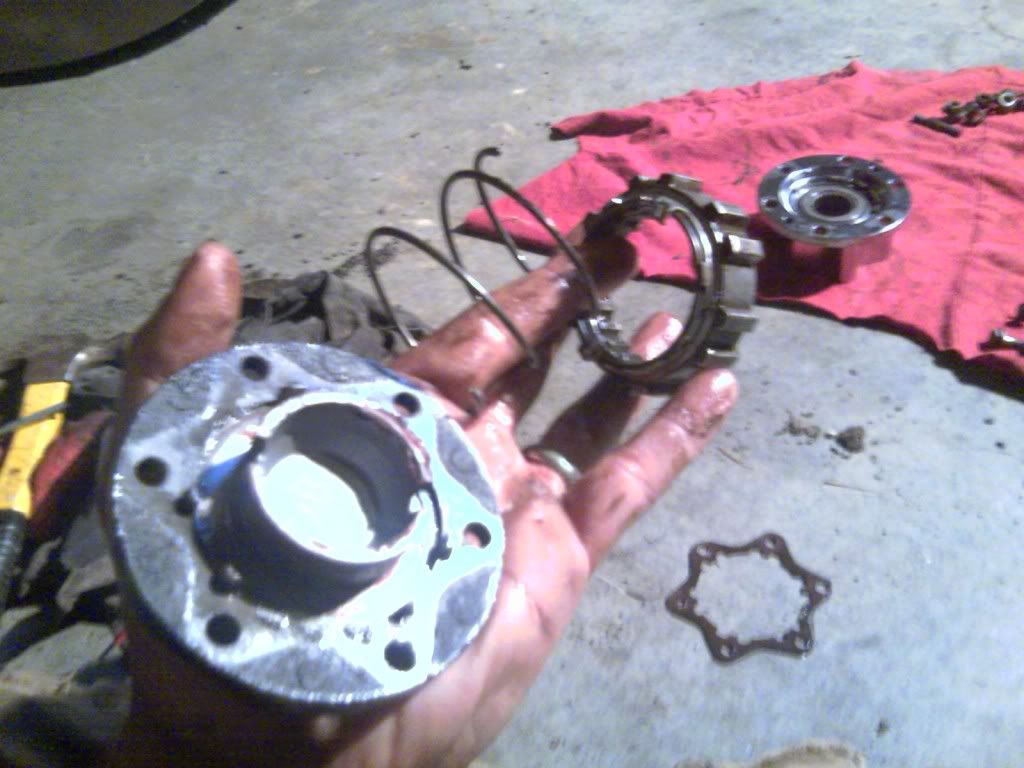
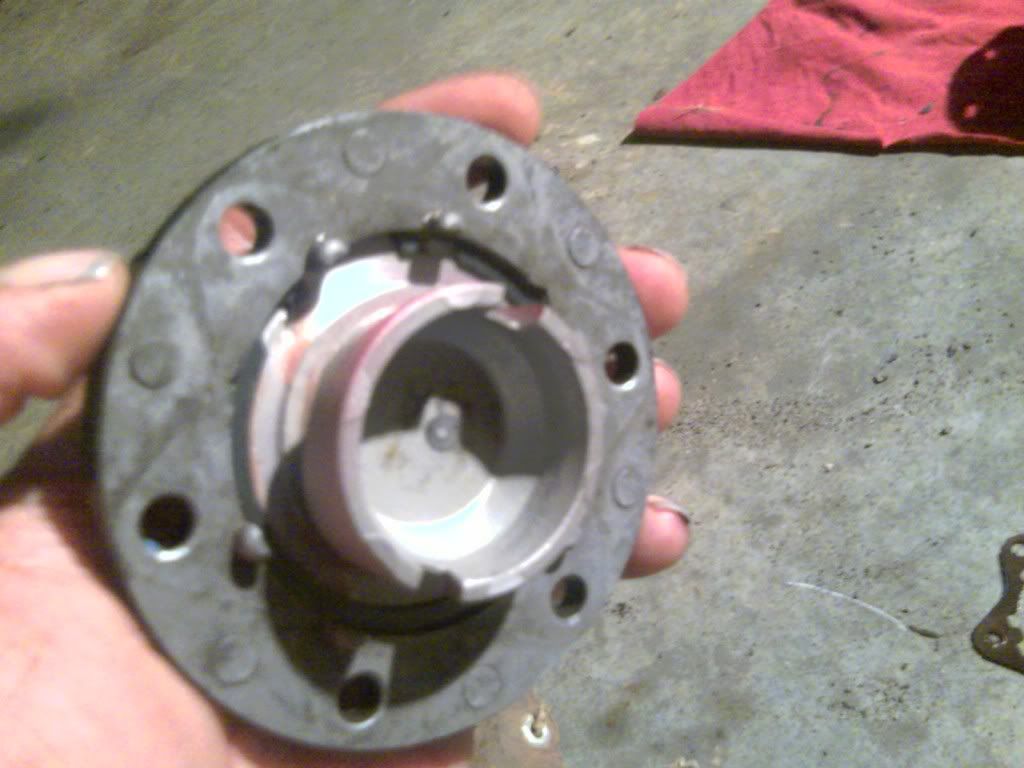
I haven't picked up the new gaskets for the freewheel hub assembly and the cap, but I wanted to put them back on temporarily so nothing could get into the new grease. They would need to be cleaned, as you can see:
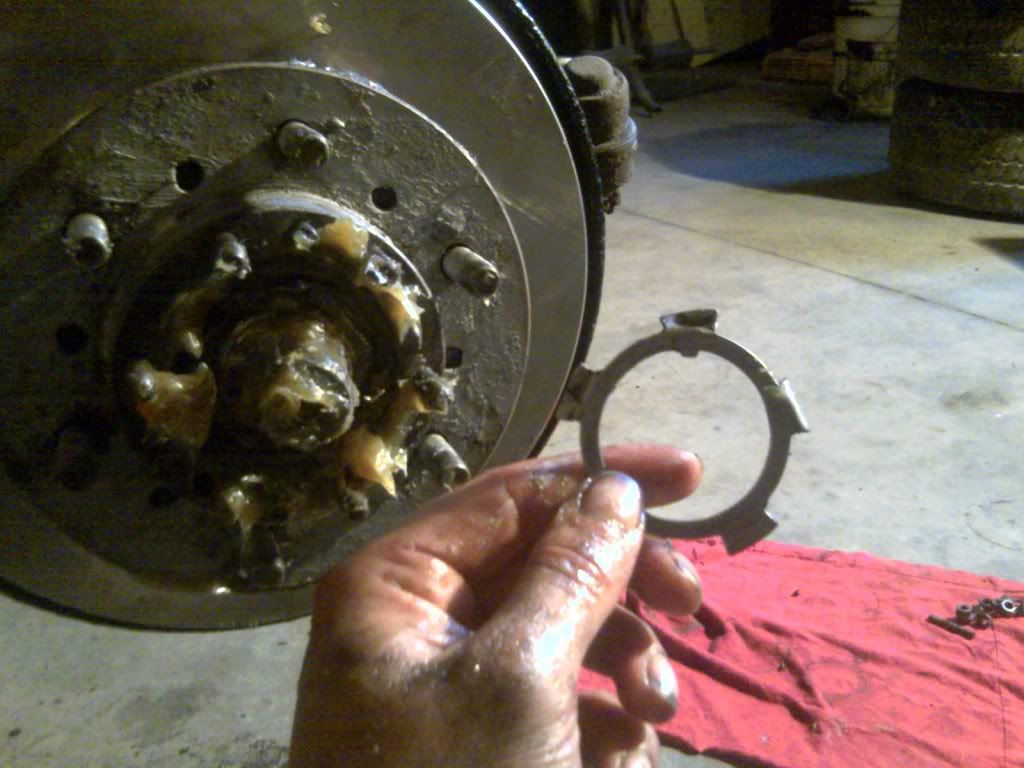
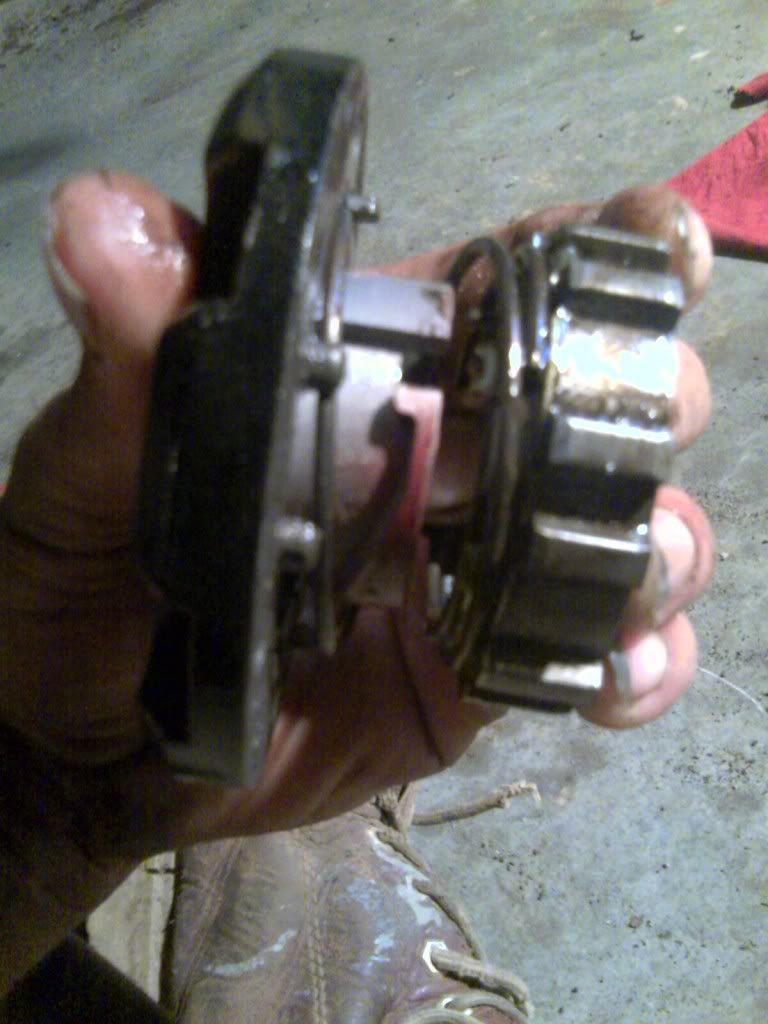
There's a snap ring on the outer edge of the freewheel hub body.
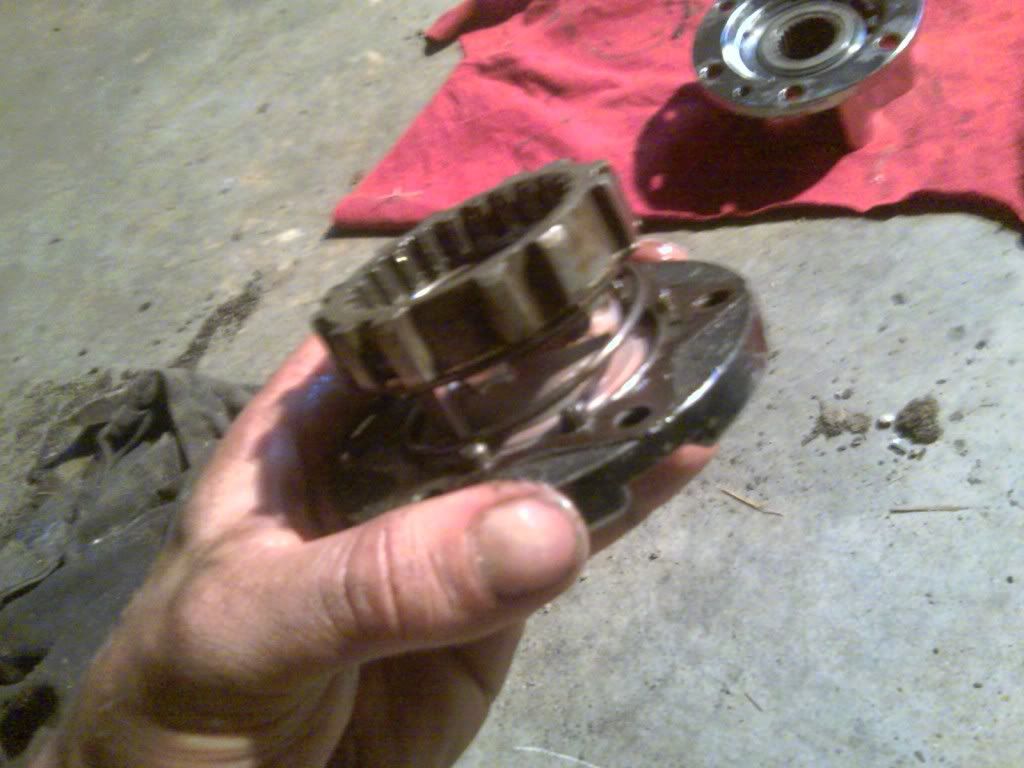
Once it's off it allows you to pull this section out:
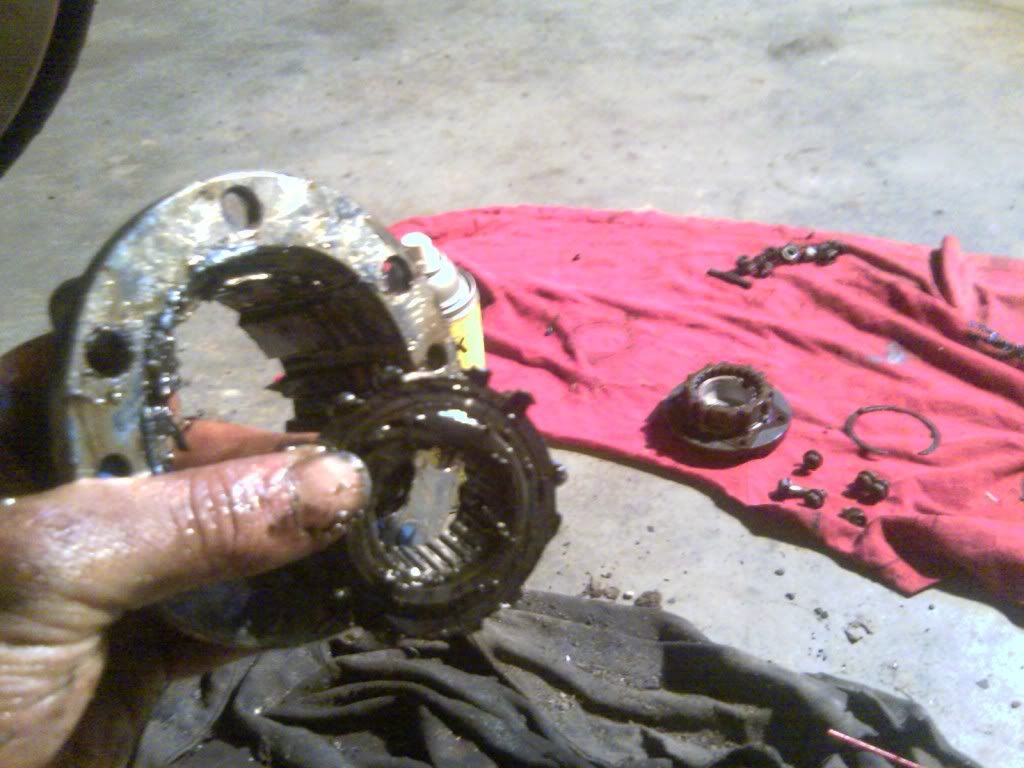
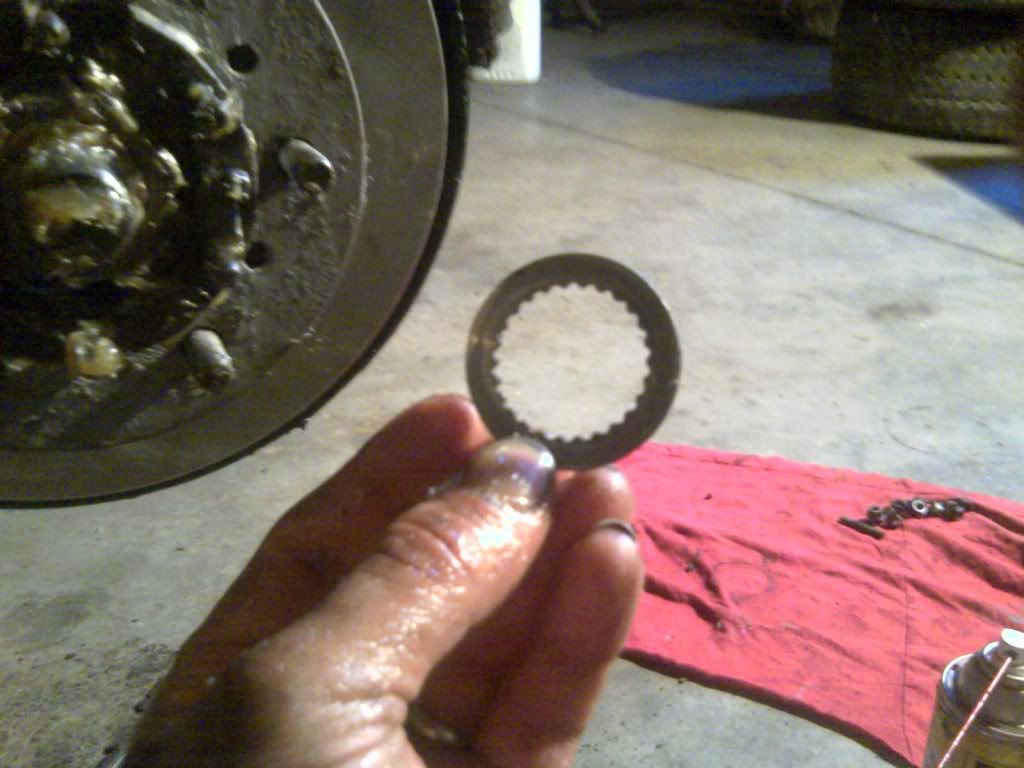
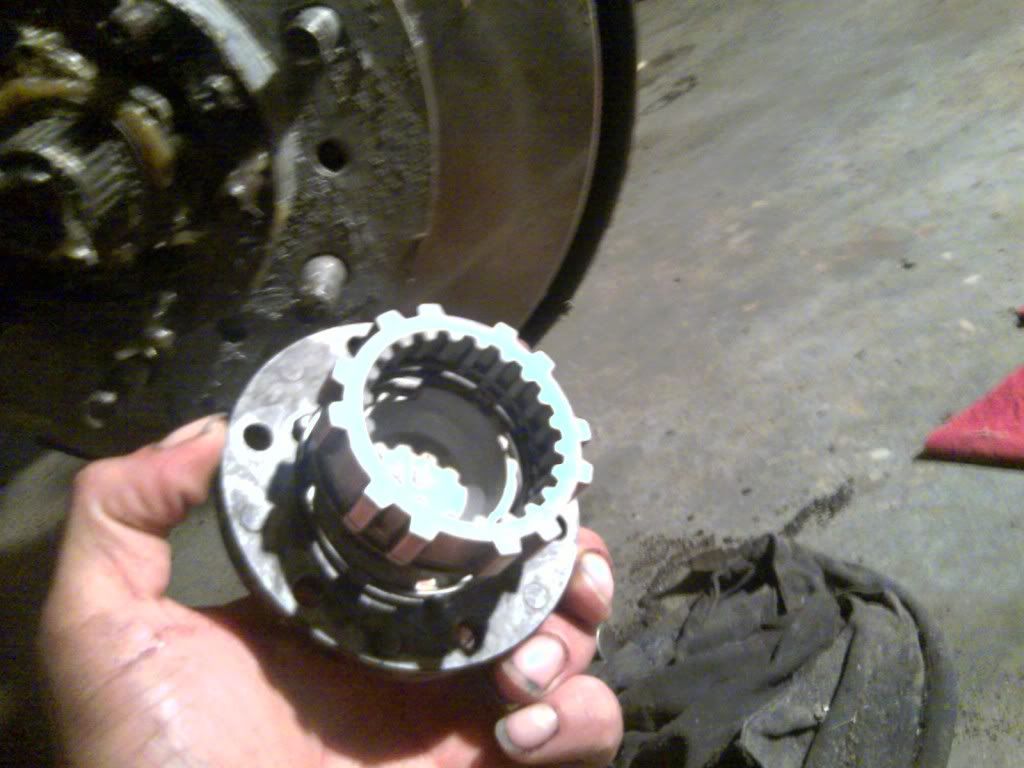
Cleaned it up a bit so you can see the next snap ring. Snap ring off:
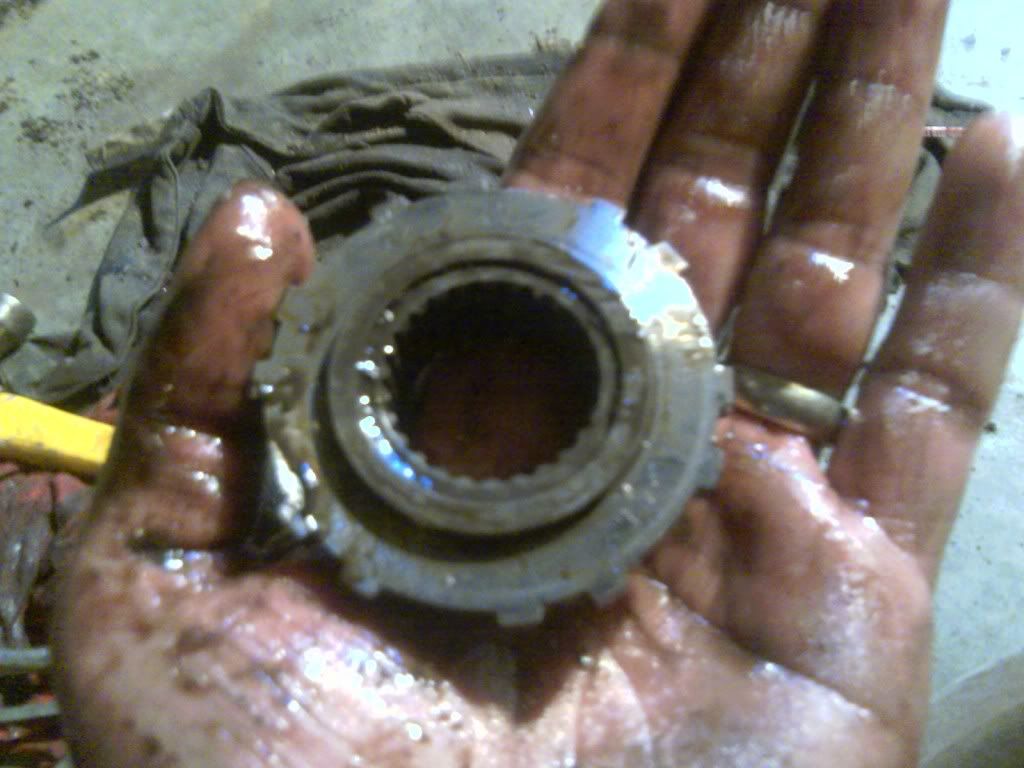
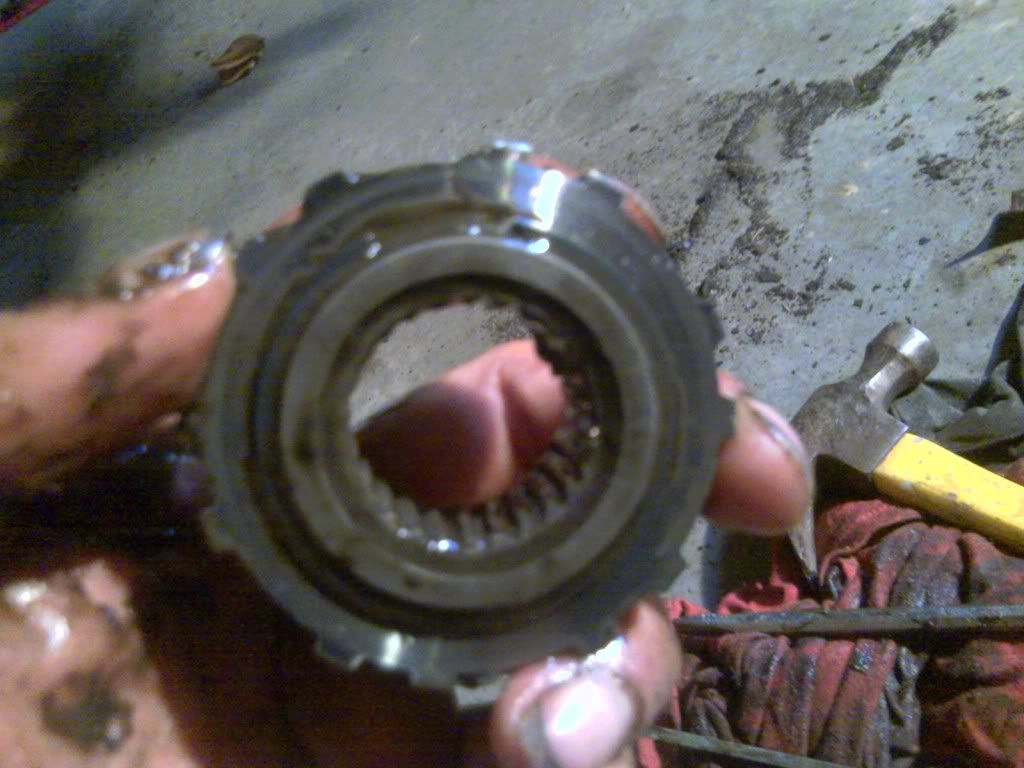
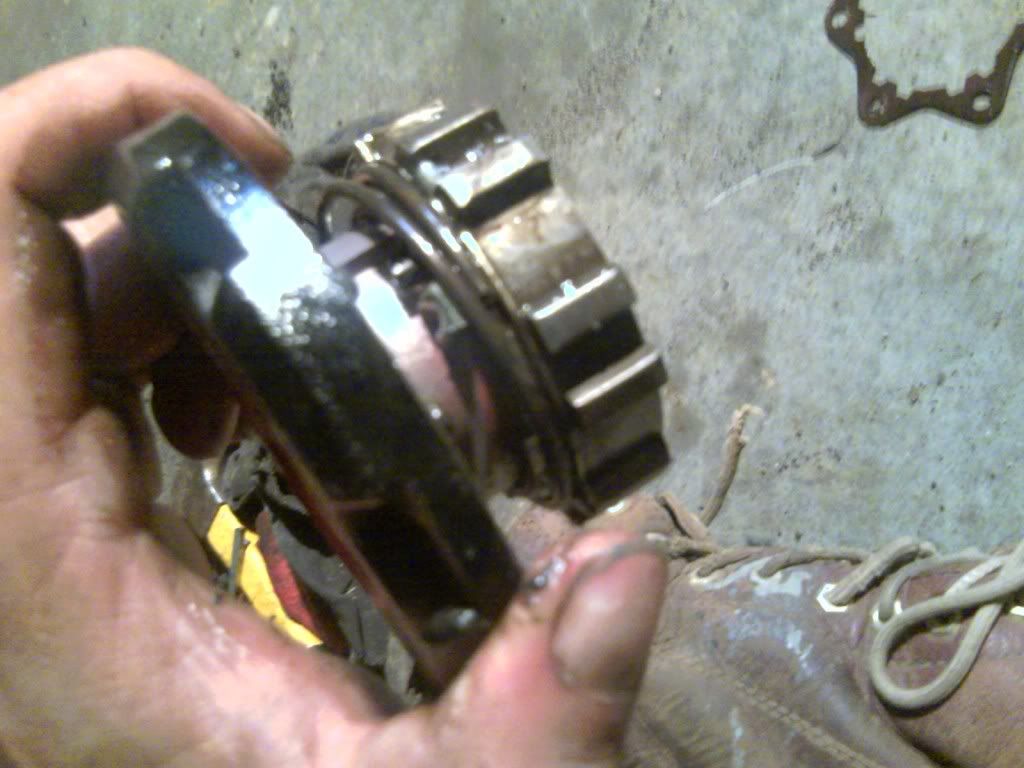
Not sure of the names, but there's a big washer with teeth that locks into the piece I removed this assembly from earlier, a spacer, and then an inner hub that has the splines on them. I cleaned them up, reassembled the whole thing in reverse, and picked up the cap that has the free/lock handle.
The second pic is what it looks like when you lock it. The clutch releases and a spring engages it into the assembly I just finished with.
I'm hoping those pics give an idea of how it comes apart. You have to press them together, and rotate the inner section until the little tab can pop out of the slot you can sort of see in the second pic. It's kinda like a child lock bottle.
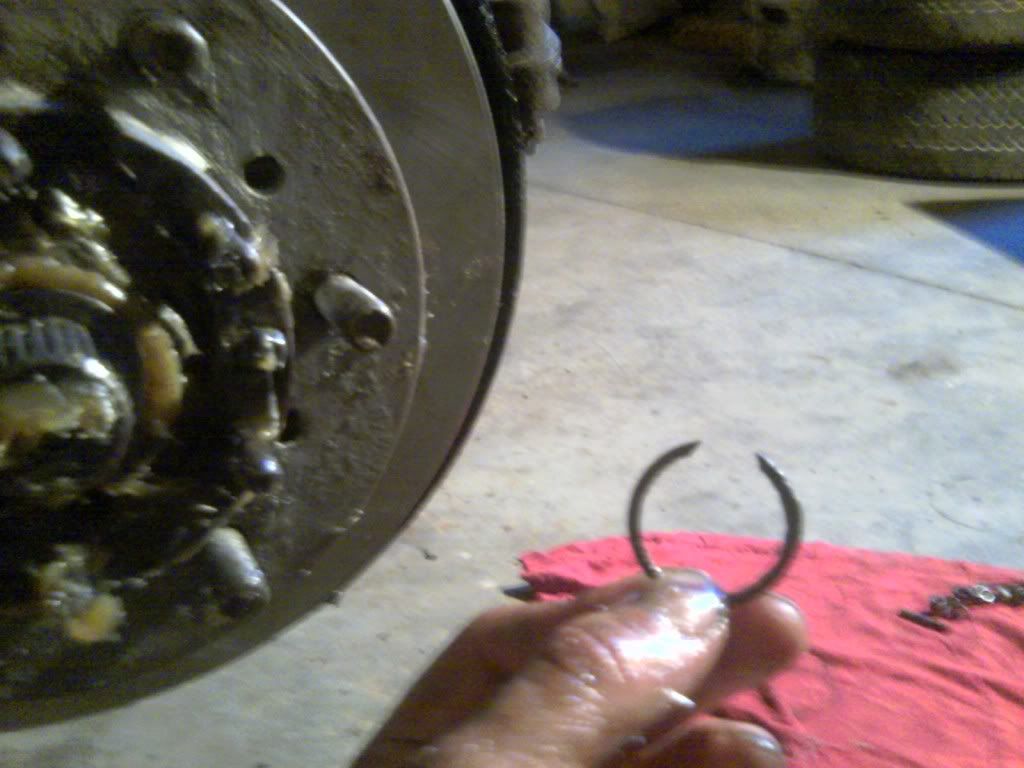
And now it's apart. You can see I've removed the gasket for the cap assembly now, it's on the floor and the clean star on the cap is where it came from. I took this pic to show how to pull the switch out of the centre of the cap in case someone wanted to separate them to paint them. I might do that some day, it would only cost me the outer gasket. You can see the snap ring in there, after that's removed they should come apart easily.
Cleaned it all up and put it back together:

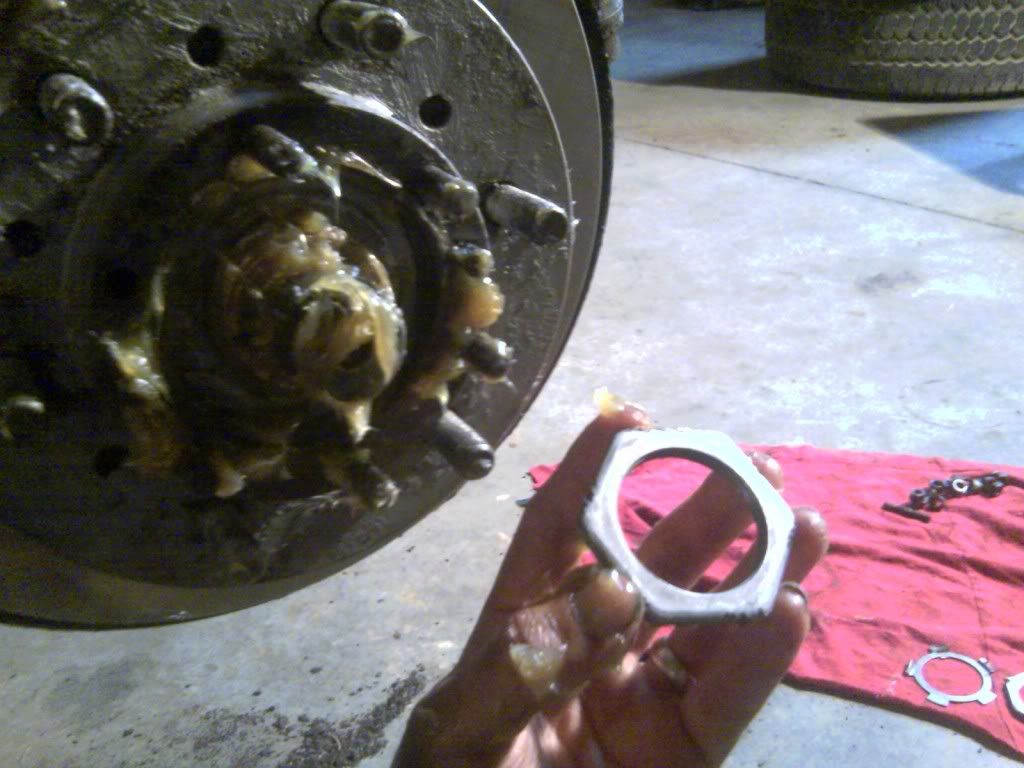
Here's a pic of the cone washer I mentioned toyota wants 6 bucks for in an earlier post:
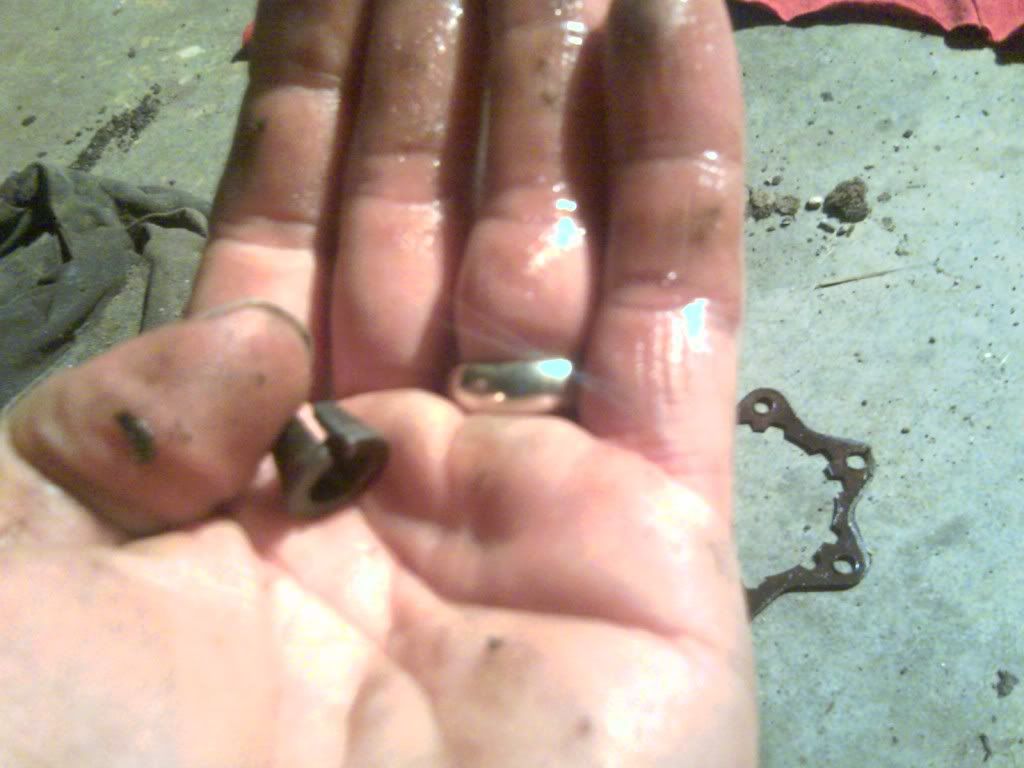
One of those goes on each stud that holds the freewheel assembly on the hub, and then a small washer, and then the nut. They compress until there's almost no gap, and you have to put a really thin screwdriver or a tapered punch into the gap and tap them gently to get them to separate when removing them. I butchered a couple of them because I didn't realise they were so expensive to replace. I put hardware on only two studs because I'll be taking it apart to put gaskets in later, and then put the cap on:
At this point I've taken apart both sides, and only cleaned, repacked and assembled one of the two. The second side will take much less time because I don't need to keep cleaning my hands to take pics lol
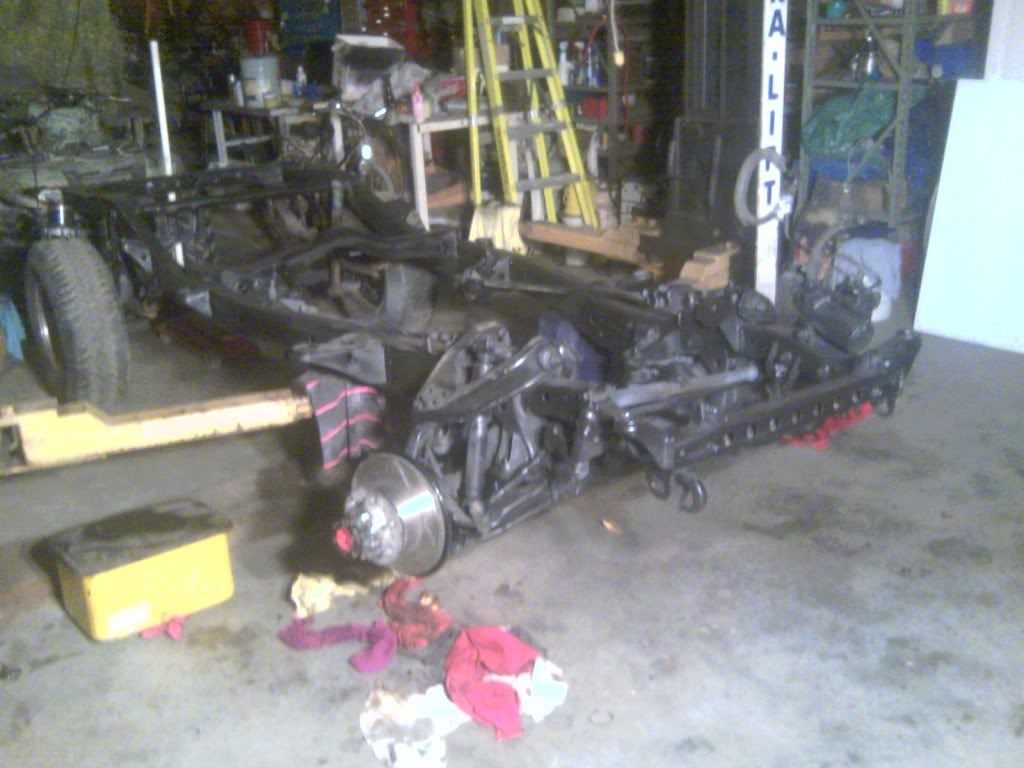
That's how she sits at the moment. I'm looking forward to posting pics of my truck when it actually looks like a truck. Grats if you actually made it all the way through that lengthy post, and Cheers!
I kid you not that's a pic of 100 bucks worth of parts. 25 feet of the extra flexy brake line, a bag of 20 fittings for the lines, and two seals for the inner bearings on the front hubs. The seals were like 20 bucks a piece, blew my mind. My parts guy couldn't find more than one company that made them, he said I could check with toyota to see if they were cheaper, I just laughed at the thought and took them. He's a good guy, and I've known him long enough to trust that he tried to find the best deal. He gives me better prices than my boss, probably because I always pay up front. The price hit was lightened by the fact that I finally returned the calipers tonight, and it pretty much evened it out. Here's a pic of me prying out the old seals:
Just ensure you're prying on the seal, and don't touch the bearings.
So the seal and bearings are out, and the both the bearings and race look really good. Knowing that for sure was worth the 20 dollar seal. If you look close around the edge of the rim of the hub is a rusty looking ring. I thought it was just junk from the guard, but I found out later there was a rubber ring in there. Think it serves as a seal between the hub and the guard. Here's a pic of all the components together:
The larger bearing is the inner one, and the old seal is beside it. It's actually a pic I took later on after I cleaned them all. I changed my mind on reusing the old rotors, I've already bought the new ones, and I'll keep the used ones around I need to replace the ones on my daily driver in the future. I didn't take pics of it, but I unbolted the old rotors and gently pried it from the hub. This is when that rust caked seal I mentioned fell off, and I realised it existed. I figured this was as good a time to clean the crusty old gasket off of the face of the hub. I really hate scraping gaskets, but forced myself to take my time.
I then cleaned off the hub as best I could and threw a coat of rust inhibiting black paint on for good measure.
I also cleaned up the guard as well as I could without removing it and threw some paint on there.
It was actually a bit of a pain to pry the rotor from the hub earlier, so I put some high temp brake lubricant where the rotor would bolt against the hub. I figured it couldn't hurt.
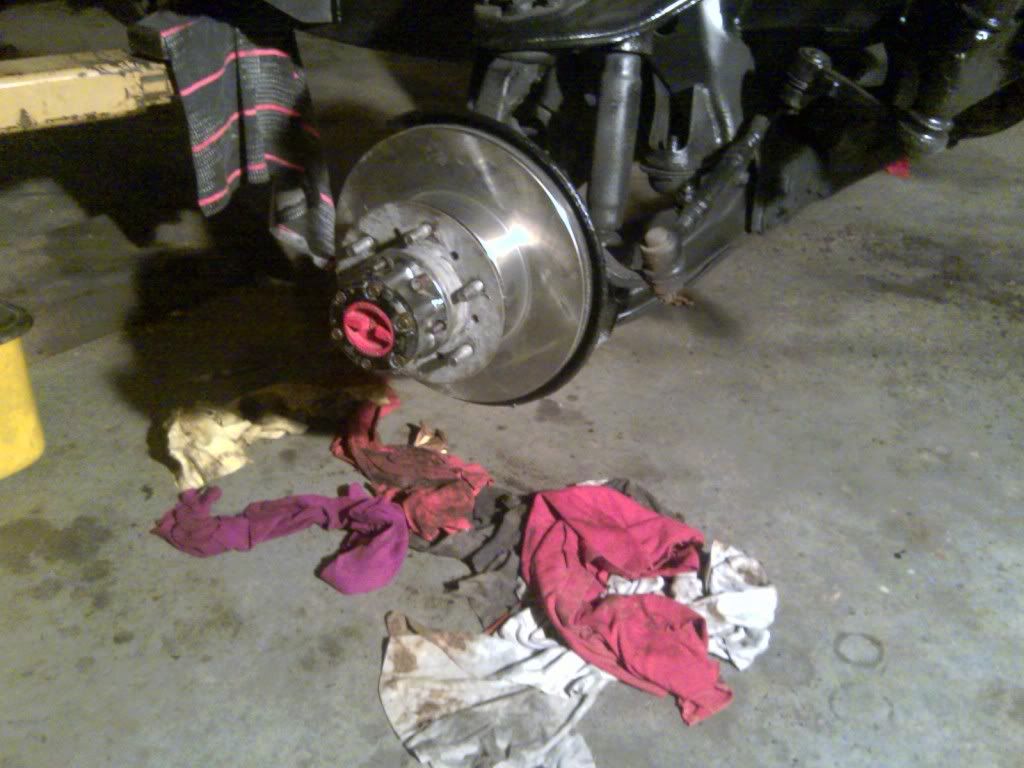
So here's a pic of the rotors bolted onto the hubs, and the outer bearing inserted after being packed with grease. I had to phone up my wife and ask her to look up the proper torque for those bolts, because I had brought the Haynes manual home last night to read during the power outage. It was 29-39 foot lbs, so I set the wrench for 34.
I'm really not a big fan of those manuals, you always have to jump from one section to another to another just to do one task because they don't want to repeat any process during the book to keep the size of the book down. I have a copy of the FSM on my computer at home, but it's 1400 pages, so I haven't printed it out. I put the seal back in place and set a block of wood onto it so I wouldn't dent it while I tapped it into place. If you're going to do this yourself, I hope you payed attention to which way they go in, because it's not really that obvious by looking at them.
And there's the seal after tapping it flush with the hub. And a pic of me replacing that rubber seal I didn't know about until it fell out earlier:
I threw the hub back onto the axle and packed and inserted the front bearing, as well. Here's a couple pics of all the other components before they go on:
That's all pretty straight forward, just make sure you bend the tabs forward and back over both the adjustment nut and the lock nut so they can't move.
I haven't picked up the new gaskets for the freewheel hub assembly and the cap, but I wanted to put them back on temporarily so nothing could get into the new grease. They would need to be cleaned, as you can see:
There's a snap ring on the outer edge of the freewheel hub body.
Once it's off it allows you to pull this section out:
Cleaned it up a bit so you can see the next snap ring. Snap ring off:
Not sure of the names, but there's a big washer with teeth that locks into the piece I removed this assembly from earlier, a spacer, and then an inner hub that has the splines on them. I cleaned them up, reassembled the whole thing in reverse, and picked up the cap that has the free/lock handle.
The second pic is what it looks like when you lock it. The clutch releases and a spring engages it into the assembly I just finished with.
I'm hoping those pics give an idea of how it comes apart. You have to press them together, and rotate the inner section until the little tab can pop out of the slot you can sort of see in the second pic. It's kinda like a child lock bottle.
And now it's apart. You can see I've removed the gasket for the cap assembly now, it's on the floor and the clean star on the cap is where it came from. I took this pic to show how to pull the switch out of the centre of the cap in case someone wanted to separate them to paint them. I might do that some day, it would only cost me the outer gasket. You can see the snap ring in there, after that's removed they should come apart easily.
Cleaned it all up and put it back together:
Here's a pic of the cone washer I mentioned toyota wants 6 bucks for in an earlier post:
One of those goes on each stud that holds the freewheel assembly on the hub, and then a small washer, and then the nut. They compress until there's almost no gap, and you have to put a really thin screwdriver or a tapered punch into the gap and tap them gently to get them to separate when removing them. I butchered a couple of them because I didn't realise they were so expensive to replace. I put hardware on only two studs because I'll be taking it apart to put gaskets in later, and then put the cap on:
At this point I've taken apart both sides, and only cleaned, repacked and assembled one of the two. The second side will take much less time because I don't need to keep cleaning my hands to take pics lol
That's how she sits at the moment. I'm looking forward to posting pics of my truck when it actually looks like a truck. Grats if you actually made it all the way through that lengthy post, and Cheers!
06-24-2011, 03:19 AM
#220
Registered User

If you still have your old seals or if you haven't done the other side yet, here's a few tips for you.
Seals and bearings all have specific numbers and sizes. What I mean is when you take the other side apart, try not to destroy the seal too badly, clean it up and you will find a number such as CR1234, then you will also see numbers like 38 8 56 (not necessarily in that order), but what these numbers tell you that id = 38mm od = 56mm and the seal is 8mm thick. This CR1234 number is universal to that seal. It doesn't matter if it is a National seal or a Koyo seal it will be that size and have that number. Also for the bearings your outboard bearing should be a Koyo LM102949, the corresponding race is LM 102910, the inboard bearing is a Koyo JLM 104948-N the race is JLM 104910-N. These bearing #'s are pretty much universal they are the generally same # for a Koyo bearing, Timken, NTN or SKF of the same dimensions, though some of the letters may vary. I'm partial to Koyo bearings, but I've used lots of Timken bearings in all the years I've been working on vehicles. One thing I've always done is record the bearing, race and seal #'s in the appropriate section of my FSM, I do the same with serpentine, or v-belts, etc.
I've been a little long winded, but here's the point I'm trying to make. If you have the bearing #'s and the seal #'s and go to a bearing place instead of the dealer you will get the parts you are looking for at probably 1/2 the cost and save yourself a lot of money. Many times you will get the same parts as the dealer will sell you. Even if you don't have the numbers most bearing places have a book that they can look in and tell you that an 88 4Runner front bearing is supposed to be this #. Also if you have a Koyo bearing and they sell Timken, they just look it up in a cross reference book. Never install a new bearing without installing a new race! The old race has the wear pattern of the bearing that was installed with it, if you put a new bearing in an old race it will probably be noisy and you will get a premature bearing failure, so always buy sets! Bearing and races have specific numbers stamped in them, but a set may have a variation of the numbers, but if you take them out of the box the bearing and the race will have the same #'s as the old ones.
And "Finally" in side the hub there is generally a relief cut in each side of the seat that allows you to drive out the race, many FSM's will tell you to use a brass drift to install the new race, but many back yard mechanics don't have a brass drift and a steel one could damage or deform the race when it is installed. So what do you do? Once to drive the old races out thoroughly clean them so that they don't slip out of your fingers, flip them over match them face to face with the new race and use the old one to tap the new one into place, when you are done keep 2 for the next time you rebuild the front end. These are things that I've learned over the years...hope they help you!
Last edited by Hadmatt54; 06-24-2011 at 03:29 AM.


