
dark_fairytales 1986 Pickup Build-Up Thread

 11-09-2011, 09:29 AM
#102
Registered User
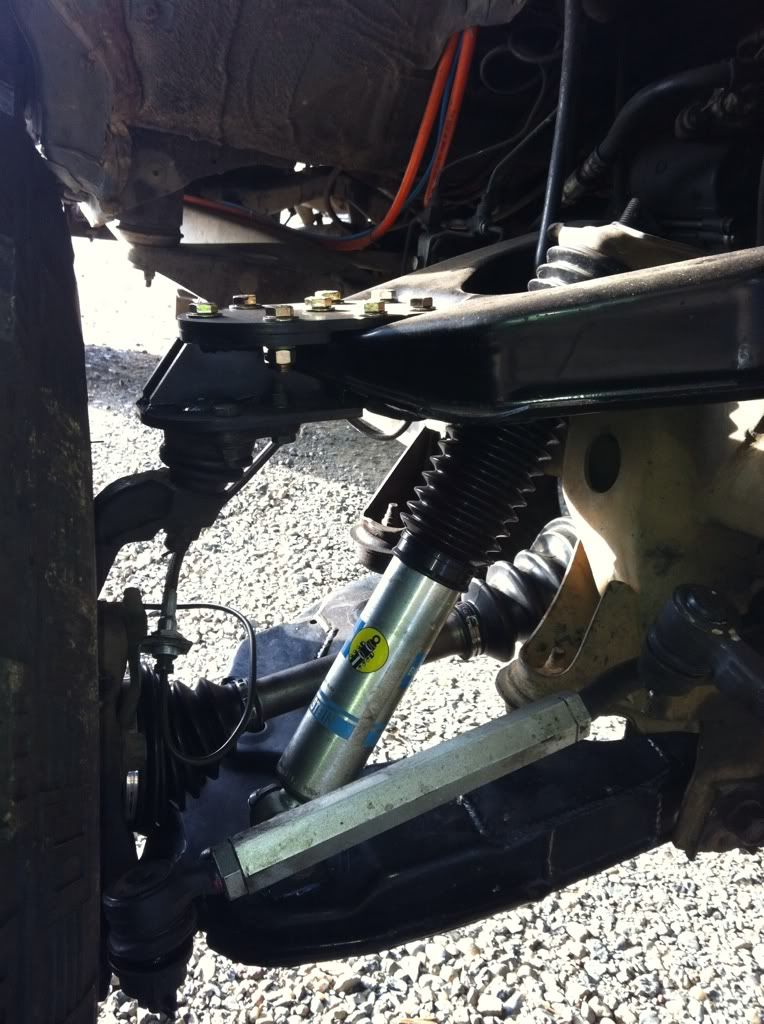
Looks good and thanks for the complement! Just an FYI- I noticed a lot of thread showing on the bayonet end of the shock. Be careful not to overtighten and over compress the shocks rubber bushings. The bushings need to allow movement as the shock angle is exaggerated with this LT geometry. If its overtigtened it puts a lot of stress on the shaft. The shock should extend and compress in a linear direction with minimal side load. The Bilstein HW includes a nylock nut so it shouldn't back off.
 11-09-2011, 10:30 PM
#104
Registered User
Thread Starter
Join Date: Oct 2008
Location: Sacramento, Crawlifonia
Posts: 1,621
Likes: 0
Received 7 Likes
on
4 Posts
Looks good and thanks for the complement! Just an FYI- I noticed a lot of thread showing on the bayonet end of the shock. Be careful not to overtighten and over compress the shocks rubber bushings. The bushings need to allow movement as the shock angle is exaggerated with this LT geometry. If its overtigtened it puts a lot of stress on the shaft. The shock should extend and compress in a linear direction with minimal side load. The Bilstein HW includes a nylock nut so it shouldn't back off.
no problem man. I will let you know when I get the rear done. then we can meet up some where so you can drool.
11-09-2011, 10:34 PM
#105
Registered User
Join Date: Apr 2011
Location: Southern Ontario
Posts: 428
Likes: 0
Received 0 Likes
on
0 Posts
Any clue what the difference is between the upper control arms in the kit and factory UCA's? The modified LCA's are obviously very different, but the UCA's look the same to me
11-09-2011, 10:53 PM
#106
Registered User
Thread Starter
Join Date: Oct 2008
Location: Sacramento, Crawlifonia
Posts: 1,621
Likes: 0
Received 7 Likes
on
4 Posts
N8 at blazeland, re-drills the upper control arm to accept larger bolts for the bracket extention and replaces the rubber bushings with poly ones. other then that the upper control arms are the same as stock.
11-09-2011, 11:45 PM
#107
Registered User
Join Date: Apr 2011
Location: Southern Ontario
Posts: 428
Likes: 0
Received 0 Likes
on
0 Posts
Thanks Dark. That would explain why they looked no different. As an answer to anyone else following along, I was curious earlier to find out if I could use the Old Man Emu shocks with the blazeland kit instead of the bilstein ones suggested on the Blazeland web page. I looked it up and finally found the shocks suggested are 3-4" longer than stock, and I know my OME shocks are only 2" longer, so I'd assume I'd have to adjust bump stops more conservatively to use what I've got, or replace them.
11-10-2011, 11:18 PM
#109
Registered User
Dutch & Dark,
I have no info on the Old Man Emu stuff so I didn't comment, but thanks Dutch for letting us know your findings! As far as finding a shock that fits within the factory mounting locations (with the Blazeland long arms) I do not believe that anyone makes one that is the ideal fit. Fortunatly for us finacially challenged, the shocks for a Drop Bracket kit (4" lift) are really close.
The Bilstein shock I recommend is specific for a 1986-1995 4" lifted toyota 4x4. The stroke spec is as follows: 17.95" ext, 11.67" collapsed. If you measure the mounting points on the vehicle when cycling the suspension the measurements are nearly the same. As you can see from the photos when the suspension is cycled the bump stops do engage. Unfortunatly it is also about this point the shock collapses onto itself. So yes Dark the shock turns out to be a tiny bit too long.
I discussed this with scenerio with Bilstein years ago. I was reminded that the eye bushing and the bayonet bushings on the shock will also compress. Bilstein thought this particular case would be acceptable. I have found this to be true in customer feedback and personal experience. As long as you keep with the factory bump and droop stops I don't believe this situation to be an issue for the moderate average Joe.
For those of you who are forseeing extreme abuse on your rig you should upgrade your shocks anyway. The Bilstein is a good shock and an upgrade but it is what it is. Larger shock body diameter, longer shock length, remote res., larger shaft, rebuildable, re-valvable, etc. Add some shock hoops and decrease the shock angle to as close to 1:1 as possible for maximum efficiency.
Last edited by BlazeN8; 11-10-2011 at 11:47 PM.
 11-11-2011, 01:24 PM
#113
Registered User
Thread Starter
Join Date: Oct 2008
Location: Sacramento, Crawlifonia
Posts: 1,621
Likes: 0
Received 7 Likes
on
4 Posts
I have been running an idea in my head for several years now. I have been thinking and planing, how too go about remote turbocharging a stock 22re. Before you start too laugh, take a moment to read about the work I have done. Don't just dismiss this as a search for more power.
I understand the 22re is a low revving, slow and efficient engine. I am not looking for Horse-power. I am after responsive efficient torque that does not change when the altitude changes. I have decided on a remote mount turbo, because I live in California. The remote mount does not mess with any of the emissions and will keep my yota CARB legal. I am planing at some point to do a 7mge swap, and that swap will include a remote turbo. Please not mention the 7mgte, I know that engine is turbo-ed already. The 7mgte is not as efficient as the ge. As I mentioned before I am not after max horse-power, or high revs. It would be nice to get the potential out of the 22re before I do the engine swap.
I am looking at using a K03 turbocharger from a VW that has the 1.8L 20vt. Here is a graph of the relation between the RPM and PSI of the K03 turbocharger on the 1.8L 20vt. Look for the yellow line.
The K03 turbo starts boost with 2PSI at 2000RPM, works its way to 17PSI at 3100RPM and finishes off with 12PSI at 6000RPM.
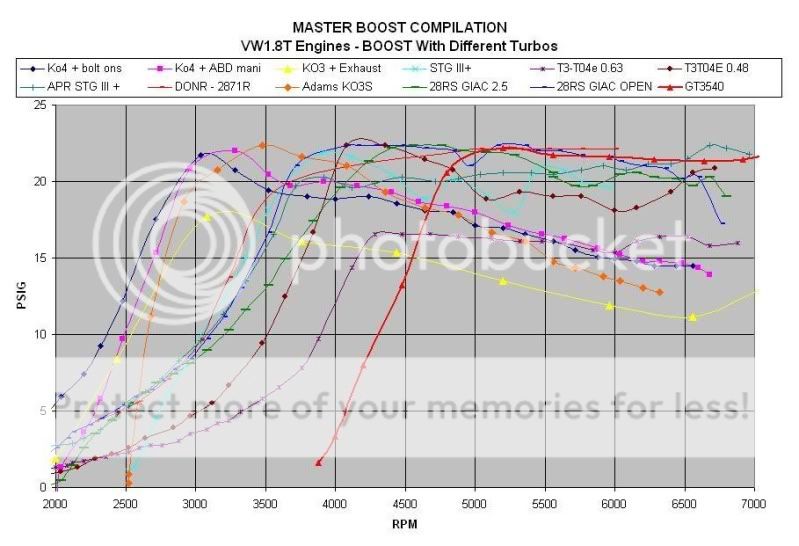
Also a Flow-map of K03 turbocharger.
 (if you would like to know more about Flow-maps, check out this link
http://hondaswap.com/threads/compres...ummies.129194/ )
Here are some quick comparisons between the turbo-ed VW engine and the 22re:
1RPM volume for the VW = 890.5cc
1RPM volume for the 22re = 1168cc
Hours-power limit VW = 5800RPM
Horse-power limit 22re = 4800RPM
VW engine flow rate at 12psi= .0845cms
22re engine flow rate at 5psi = .0628cms
The 22re flows 24% more volume per. the same RPM of the VW engine. There for the 22re would spool up 24% faster using the K03 turbo. Given the VW makes 2PSI of boost at 2000RPM. The 22re would make the same boost at 1520RPM. I am planing on limiting the boost to 5PSI and the 22re will reach 5PSI of boost at 1675RPM. The 22re with 5PSI of boost will max out the flow limit of the K03 turbo at 6200RPM. I also never plan to rev the 22re to anywhere near that high. Too date I have never gone over 4200rpm.
So please give me your comment and input as to what you think. I will give more details about the 7mge swap in the future.
I understand the 22re is a low revving, slow and efficient engine. I am not looking for Horse-power. I am after responsive efficient torque that does not change when the altitude changes. I have decided on a remote mount turbo, because I live in California. The remote mount does not mess with any of the emissions and will keep my yota CARB legal. I am planing at some point to do a 7mge swap, and that swap will include a remote turbo. Please not mention the 7mgte, I know that engine is turbo-ed already. The 7mgte is not as efficient as the ge. As I mentioned before I am not after max horse-power, or high revs. It would be nice to get the potential out of the 22re before I do the engine swap.
I am looking at using a K03 turbocharger from a VW that has the 1.8L 20vt. Here is a graph of the relation between the RPM and PSI of the K03 turbocharger on the 1.8L 20vt. Look for the yellow line.
The K03 turbo starts boost with 2PSI at 2000RPM, works its way to 17PSI at 3100RPM and finishes off with 12PSI at 6000RPM.
Also a Flow-map of K03 turbocharger.
http://hondaswap.com/threads/compres...ummies.129194/ )
Here are some quick comparisons between the turbo-ed VW engine and the 22re:
1RPM volume for the VW = 890.5cc
1RPM volume for the 22re = 1168cc
Hours-power limit VW = 5800RPM
Horse-power limit 22re = 4800RPM
VW engine flow rate at 12psi= .0845cms
22re engine flow rate at 5psi = .0628cms
The 22re flows 24% more volume per. the same RPM of the VW engine. There for the 22re would spool up 24% faster using the K03 turbo. Given the VW makes 2PSI of boost at 2000RPM. The 22re would make the same boost at 1520RPM. I am planing on limiting the boost to 5PSI and the 22re will reach 5PSI of boost at 1675RPM. The 22re with 5PSI of boost will max out the flow limit of the K03 turbo at 6200RPM. I also never plan to rev the 22re to anywhere near that high. Too date I have never gone over 4200rpm.
So please give me your comment and input as to what you think. I will give more details about the 7mge swap in the future.
Last edited by dark_fairytales; 04-13-2016 at 06:52 PM.
 11-12-2011, 09:21 AM
#116
Registered User
Join Date: Aug 2010
Posts: 109
Likes: 0
Received 0 Likes
on
0 Posts
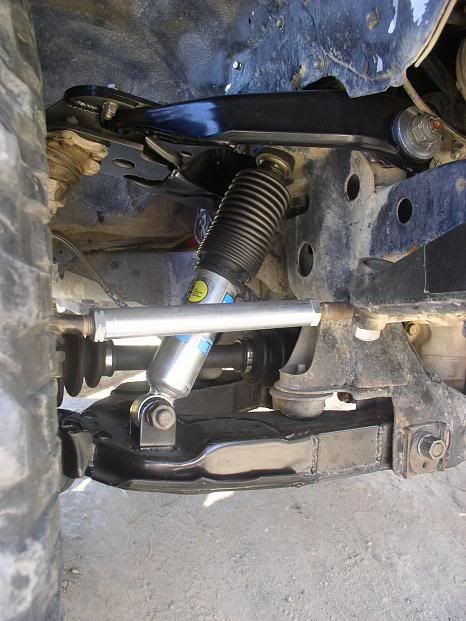
...If you measure the mounting points on the vehicle when cycling the suspension the measurements are nearly the same. As you can see from the photos when the suspension is cycled the bump stops do engage. Unfortunatly it is also about this point the shock collapses onto itself...
(yes I know the welds are ugly as ˟˟˟˟, but there wasn't much room to get a grinder in there to clean them up)

Now that I have a drop bracket installed, I bet I can fit a 12" travel shock in there. Tons of options for external resi and such when you get to that size mounting eye to eye instead of the damn pin
Last edited by drew02a; 11-12-2011 at 09:24 AM.
11-12-2011, 11:15 AM
#118
Registered User
Drew02a,
Valving of 255/70 (Rebound/Compression) is better suited for Double Shock in an IFS configuration. Single shock should be 400/117- as found on the Billy shock I mentioned. This is per the Bilstein website. I found this to be the case in personal experience as well. Now that you have a drop bracket/LA combo kit you could probably drop the mounting brackets below the shock buckets and double shock it.
A Yotatech member (Crazytoyota4x4) has a build thread on a an alternative shock location that you guys might want to read. Here is the link: https://www.yotatech.com/forums/f199...l#post51818315
Last edited by BlazeN8; 11-12-2011 at 11:24 AM.
 11-13-2011, 06:45 PM
#120
Registered User
Join Date: Aug 2010
Posts: 109
Likes: 0
Received 0 Likes
on
0 Posts
Drew02a,
Valving of 255/70 (Rebound/Compression) is better suited for Double Shock in an IFS configuration. Single shock should be 400/117- as found on the Billy shock I mentioned. This is per the Bilstein website. I found this to be the case in personal experience as well. Now that you have a drop bracket/LA combo kit you could probably drop the mounting brackets below the shock buckets and double shock it.
Valving of 255/70 (Rebound/Compression) is better suited for Double Shock in an IFS configuration. Single shock should be 400/117- as found on the Billy shock I mentioned. This is per the Bilstein website. I found this to be the case in personal experience as well. Now that you have a drop bracket/LA combo kit you could probably drop the mounting brackets below the shock buckets and double shock it.
I don't really feel like double shocking it either, for the same reason


