
coryc85's 1988 4Runner Build-Up Thread
 07-22-2012, 02:19 PM
#141
Super Moderator
Staff
iTrader: (1)
Join Date: Aug 2008
Location: Anderson Missouri
Posts: 11,788
Likes: 0
Received 25 Likes
on
22 Posts
I would grind out the rust and then put a patch panel over it and since it wont be noticeable, I would coat it with some rubber coating.
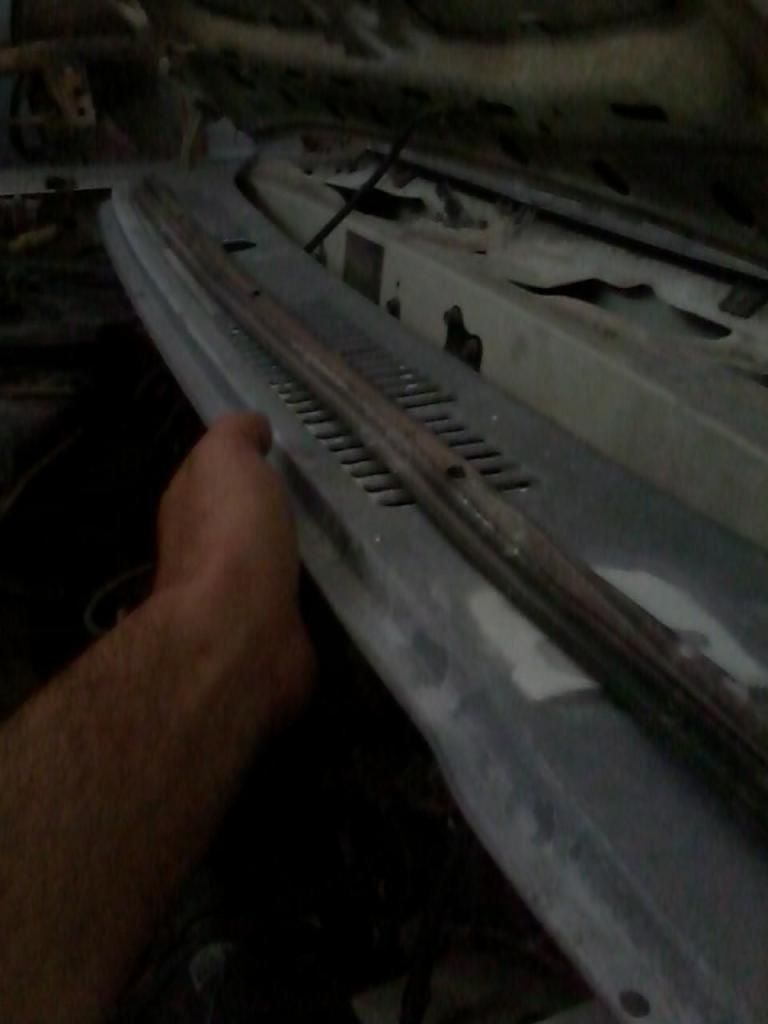
My 91 extended cab had a leak in it when raining. I pulled the cowl off in front of the windshield and lots of leaves, mud, and debri was under there and caused a leak. From now on when I get a Toyota, I pull the cowl off. There are 4 or 5 tabs that hold it on and the rubber trim. Once you get it off there is 2 black covers that just have squeeze tabs and you can easily remove them. I then take a shop vac and am able to clean it up under there. With the fenders off, I use a high pressure air hose and clean just as well.
That might be causing some of your problem. No idea how it gets in there, but there isnt away for it to get out. Sometimes you might notice some dust or debri when turning on the heater. This could be alot of the reason it started n the first place.
Also can you see if the leak isnt caused by the windshield channel being rusty? Not saying to pull the windshield, just see if you can trace where the water is coming from. Hopefully it is just from the cowl area and that is an easy fix. I am just thinking you have a found the results of a problem and not the cause of it.
Last edited by Terrys87; 07-22-2012 at 02:28 PM.
 07-22-2012, 02:46 PM
#142
Wow, what a great read, man! Great, thorough work! Good find on the diff's... and finding the guide explosion as well!  hahah...
Terry is a great guy with LOTS of resto-experience... Got a good helper/second set of eyes on your side!
Very interesting on the evap box.... I'ma have a feel back there, check it out. I think my compressor is a LIL tired, but after nearly 300K(allowing for 31's for 166K miles), I'm amazed it still blows as cold as it does still! I redid all the o-rings, new OEM Drier(as recommended by EVERY AC guy that stopped in my thread while I had it open/was planning things out) and ran R12 and R12 Oil after a good Evac/cleaning of system..... It's PRETTY DARN COLD in town.. But soon as I get out on the AZ highways on trips, etc., it's a lil less cool. I found a trick to mine was, even when moving the REALLY bound up cable with help of moving the heater control valve cable from under the hood... I also reached under the dash on the right side and found that cable has a second line that runs to the evap box and GATE... My gate was NOT opening over to the AC side of things all the way, and after pulling the Evap gate by hand completely, it got even colder! I still need to replace that cable/system.... but not looking forward to it, ...and I'd rather just reach under there for now when I need heat/or/cold, ya know? hahaha. There's also a cycling adjustment up in there, where you can dial the cycle time in. This allows for it to compress longer/or less, and go from idling down for 1min/up for 10 seconds to 50sec./20sec. cycle.
Guess I should just bite the bullet and sound/insulate this thing already. I noticed the carpet in back getting a lil damp when camping in the Sequoias near hot springs in the Winter(snow, etc.)..... So maybe that would help stop some of the condensation, too? Also help with the 'sound system', right? 
As I said, great read, good looking runner... I LIKEY!
hahah... Terry is a great guy with LOTS of resto-experience... Got a good helper/second set of eyes on your side!
Very interesting on the evap box.... I'ma have a feel back there, check it out. I think my compressor is a LIL tired, but after nearly 300K(allowing for 31's for 166K miles), I'm amazed it still blows as cold as it does still! I redid all the o-rings, new OEM Drier(as recommended by EVERY AC guy that stopped in my thread while I had it open/was planning things out) and ran R12 and R12 Oil after a good Evac/cleaning of system..... It's PRETTY DARN COLD in town.. But soon as I get out on the AZ highways on trips, etc., it's a lil less cool. I found a trick to mine was, even when moving the REALLY bound up cable with help of moving the heater control valve cable from under the hood... I also reached under the dash on the right side and found that cable has a second line that runs to the evap box and GATE... My gate was NOT opening over to the AC side of things all the way, and after pulling the Evap gate by hand completely, it got even colder!
I still need to replace that cable/system.... but not looking forward to it, ...and I'd rather just reach under there for now when I need heat/or/cold, ya know? hahaha. There's also a cycling adjustment up in there, where you can dial the cycle time in. This allows for it to compress longer/or less, and go from idling down for 1min/up for 10 seconds to 50sec./20sec. cycle.Guess I should just bite the bullet and sound/insulate this thing already. I noticed the carpet in back getting a lil damp when camping in the Sequoias near hot springs in the Winter(snow, etc.)..... So maybe that would help stop some of the condensation, too?
Also help with the 'sound system', right? As I said, great read, good looking runner... I LIKEY!
07-22-2012, 05:12 PM
#143
Registered User
Thread Starter
I would grind out the rust and then put a patch panel over it and since it wont be noticeable, I would coat it with some rubber coating.
My 91 extended cab had a leak in it when raining. I pulled the cowl off in front of the windshield and lots of leaves, mud, and debri was under there and caused a leak. From now on when I get a Toyota, I pull the cowl off. There are 4 or 5 tabs that hold it on and the rubber trim. Once you get it off there is 2 black covers that just have squeeze tabs and you can easily remove them. I then take a shop vac and am able to clean it up under there. With the fenders off, I use a high pressure air hose and clean just as well.
That might be causing some of your problem. No idea how it gets in there, but there isnt away for it to get out. Sometimes you might notice some dust or debri when turning on the heater. This could be alot of the reason it started n the first place.
Also can you see if the leak isnt caused by the windshield channel being rusty? Not saying to pull the windshield, just see if you can trace where the water is coming from. Hopefully it is just from the cowl area and that is an easy fix. I am just thinking you have a found the results of a problem and not the cause of it.
Wow, what a great read, man! Great, thorough work! Good find on the diff's... and finding the guide explosion as well! hahah...
Terry is a great guy with LOTS of resto-experience... Got a good helper/second set of eyes on your side!
Very interesting on the evap box.... I'ma have a feel back there, check it out. I think my compressor is a LIL tired, but after nearly 300K(allowing for 31's for 166K miles), I'm amazed it still blows as cold as it does still! I redid all the o-rings, new OEM Drier(as recommended by EVERY AC guy that stopped in my thread while I had it open/was planning things out) and ran R12 and R12 Oil after a good Evac/cleaning of system..... It's PRETTY DARN COLD in town.. But soon as I get out on the AZ highways on trips, etc., it's a lil less cool. I found a trick to mine was, even when moving the REALLY bound up cable with help of moving the heater control valve cable from under the hood... I also reached under the dash on the right side and found that cable has a second line that runs to the evap box and GATE... My gate was NOT opening over to the AC side of things all the way, and after pulling the Evap gate by hand completely, it got even colder! I still need to replace that cable/system.... but not looking forward to it, ...and I'd rather just reach under there for now when I need heat/or/cold, ya know? hahaha. There's also a cycling adjustment up in there, where you can dial the cycle time in. This allows for it to compress longer/or less, and go from idling down for 1min/up for 10 seconds to 50sec./20sec. cycle.
As I said, great read, good looking runner... I LIKEY!
hahah... Terry is a great guy with LOTS of resto-experience... Got a good helper/second set of eyes on your side!
Very interesting on the evap box.... I'ma have a feel back there, check it out. I think my compressor is a LIL tired, but after nearly 300K(allowing for 31's for 166K miles), I'm amazed it still blows as cold as it does still! I redid all the o-rings, new OEM Drier(as recommended by EVERY AC guy that stopped in my thread while I had it open/was planning things out) and ran R12 and R12 Oil after a good Evac/cleaning of system..... It's PRETTY DARN COLD in town.. But soon as I get out on the AZ highways on trips, etc., it's a lil less cool. I found a trick to mine was, even when moving the REALLY bound up cable with help of moving the heater control valve cable from under the hood... I also reached under the dash on the right side and found that cable has a second line that runs to the evap box and GATE... My gate was NOT opening over to the AC side of things all the way, and after pulling the Evap gate by hand completely, it got even colder!
I still need to replace that cable/system.... but not looking forward to it, ...and I'd rather just reach under there for now when I need heat/or/cold, ya know? hahaha. There's also a cycling adjustment up in there, where you can dial the cycle time in. This allows for it to compress longer/or less, and go from idling down for 1min/up for 10 seconds to 50sec./20sec. cycle.As I said, great read, good looking runner... I LIKEY!
And yeah, I'm glad to have Terry reading my thread and pointing me in the right direction.
07-30-2012, 04:47 AM
#144
Registered User
Thread Starter
Well I put those V6 brake calipers on the front, so finally my brake upgrades are over, new extended brake lines, larger bore rear wheel cylinders, 1" bore master cylinder, and these new calipers. I did have to grind the backing plate a little to get these to fit. Comparing to the old calipers, the old ones have one large and one small piston on each side, these have 2 large pistons on each side.
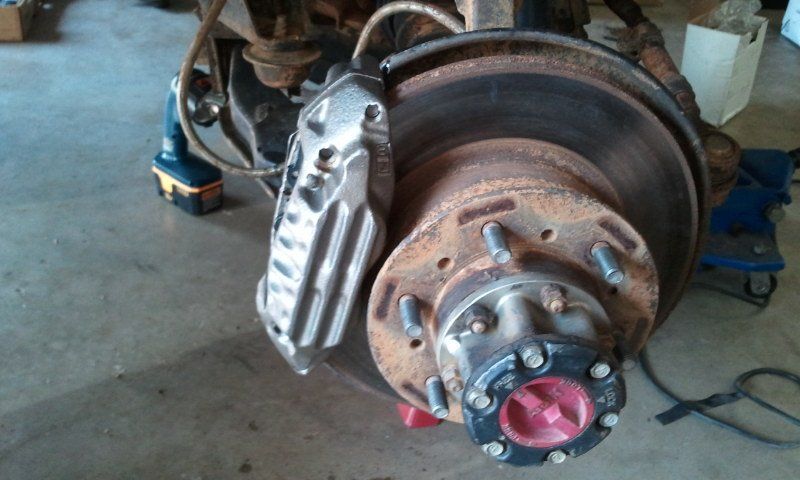
I've only been on a short around the block trip, seems to stop pretty well, but I STILL have this odd issue with the pedal. I push down, truck is braking, if I keep pushing, the pedal moves like another 1" maybe less, pedal never feels soft, it feels like you push and then something frees up and releases the pedal, but the truck never feels like it's not going to stop. I thought it was the booster, but I changed that and have the same problem, could possibly be the master but I'm almost certain it did the same thing with the old one. I could swap it back just to check I suppose. The LSPV is the only original component in the brakes right now, so I'll see if there is any troubleshooting for that.
I've only been on a short around the block trip, seems to stop pretty well, but I STILL have this odd issue with the pedal. I push down, truck is braking, if I keep pushing, the pedal moves like another 1" maybe less, pedal never feels soft, it feels like you push and then something frees up and releases the pedal, but the truck never feels like it's not going to stop. I thought it was the booster, but I changed that and have the same problem, could possibly be the master but I'm almost certain it did the same thing with the old one. I could swap it back just to check I suppose. The LSPV is the only original component in the brakes right now, so I'll see if there is any troubleshooting for that.
Last edited by coryc85; 12-14-2012 at 08:05 AM.
07-30-2012, 07:00 AM
#146
Registered User
Thread Starter
Outsane - I swapped the booster for one from a Turbo truck, which is slightly different from the normal 22re booster in size, but seems to have made no difference. When I first swapped, it seemed to have eliminated the problem, but I think that was wishful thinking. Part of me thinks there might be a pocket of air somewhere in the system, but I have bled the heck out of these suckers, so I'm not too hopeful that is the problem, but you never know. I might try bleeding them again and see if that helps.
Last edited by coryc85; 07-30-2012 at 07:02 AM.
07-30-2012, 11:40 AM
#148
I was told the 95 and up Taco Boosters are dual diaphragm and 1" bore Master Cyl's. Someone had told me a bit back in my build thread... around 100 pages ago or so, haha... I KNOW there are tons of threads on it... I remember someone specifying 97 Taco Booster and Master to me for some reason... Gonna have to look into it again, some day.. But for now, all my orig stuff is fairly new, rotor to drums... So I'll have to wait til I wear it out! hahaa. They stop well for me, very well.. I guess that's often not the case...Yeah, I get the upgrade, I do. Just can't justify it just yet... I guess if they give out and I roll back into a tree...... I might change my mind, eh? hahaha.
07-30-2012, 05:11 PM
#149
Registered User
Thread Starter
Chef - I think you are right about the dual diaphragm, not sure on the MC bore for the Tacos. I don't think I have a booster problem right now, but not 100% certain about that.
I drove the 4Runner tonight to the gym, it's about 1 mile or so, and today the brakes do feel a little bit spongy so I'm gonna bleed everything this weekend, rears, LSPV, and fronts again. I am scratching my head on this one, but it must be air in there because the LSPV really doesn't have anything but a rod inside there, so probably not much to go wrong.
I drove the 4Runner tonight to the gym, it's about 1 mile or so, and today the brakes do feel a little bit spongy so I'm gonna bleed everything this weekend, rears, LSPV, and fronts again. I am scratching my head on this one, but it must be air in there because the LSPV really doesn't have anything but a rod inside there, so probably not much to go wrong.
07-31-2012, 04:11 AM
#150
Super Moderator
Staff
iTrader: (1)
Join Date: Aug 2008
Location: Anderson Missouri
Posts: 11,788
Likes: 0
Received 25 Likes
on
22 Posts
I know I was about to give up on my brakes when I finally got a pocket of air out. It took alot. Seriously, I probably did 15 times on each side on the front end before I got them solid. I finally got a pocket of air on the front passenger side and then it was nice and firm.
07-31-2012, 09:33 AM
#151
Registered User
Thread Starter
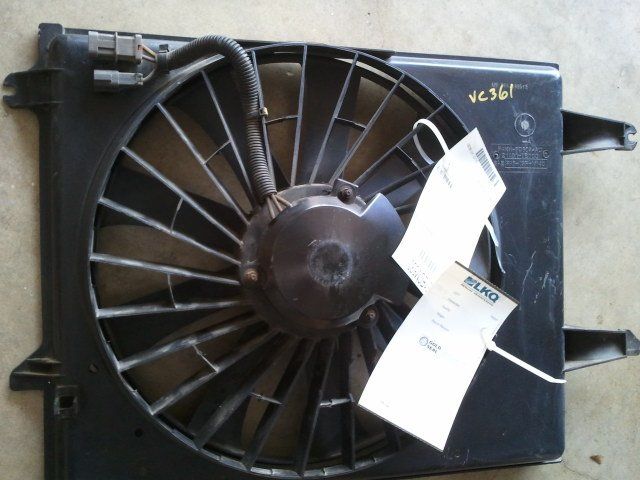
Been doing a lot of thinking about adding some extra fans to move air across the AC condenser when not moving and in traffic the AC does not work well. Works fine when going down the road. Instead of coming up with some pusher fans and figuring out how to fit them in there, I read irab88's install of the Mercury Villager fan here:irab88's Villager fan link
So I found http://www.vikingautosalvage.com had a used one for $50 shipped, so I bought it.
Probably gonna go with a controller from these guys http://www.dccontrol.com/relay_controllers.htm
Looks like the relay handles kicking on the Low speed of the fan when the AC comes on, which is exactly what I want.
Last edited by coryc85; 07-31-2012 at 09:35 AM.
07-31-2012, 09:47 AM
#152
Registered User
Double check that the RPM's are high enough at idle..
At one point my AC would not work at idle because the idle kick up was not working.
I wish I would have bought the DC controller....
At one point my AC would not work at idle because the idle kick up was not working.
I wish I would have bought the DC controller....
07-31-2012, 09:51 AM
#153
Registered User
Thread Starter
Outsane, yeah will definitely check that. Chef mentioned a way to adjust the cycle time on/off but I have not seen that in the FSM or online anywhere. I need to hook up my tach and check the idle up and all that, so thanks for the push.
I saw what you bought too for the taurus fan, but looks like I would have needed some other circuitry to make the AC turn it on, so I think I'll just go with the DCC one. This is all a few weeks or months away from a reality for me, I gotta get the brakes right, then fix those holes in the inner fender so I can finish the floor insulation, then maybe get on the electric fan install.
I saw what you bought too for the taurus fan, but looks like I would have needed some other circuitry to make the AC turn it on, so I think I'll just go with the DCC one. This is all a few weeks or months away from a reality for me, I gotta get the brakes right, then fix those holes in the inner fender so I can finish the floor insulation, then maybe get on the electric fan install.
07-31-2012, 10:02 AM
#154
Registered User
I think its the VSV connected to the white screw thing connected to the intake manifold that controls the idle up, unless that is the power steering one..
DCC controller is the way to go
DCC controller is the way to go
07-31-2012, 11:13 AM
#155
Hey Cory.......
Yeah, the RPM A/C Cycle setting thingymadoer is behind the glove box in some models... In others, I guess it's not. I have, just the other day, read new to me stuff that threw me off a bit....(I will find it) where a member was saying "The RPM Cycle AC knob behind the glove, I found it... But my Pick Up(or maybe it was 2nd Gen 4runner) it must be in a different location." ........ I have to find that posting.... it was an "AC" thread on here... I believe I'm subscribed. Lemme look for it, k?
PS> The RPM Cycle adjustment is really to allow the Compressor to Cycle for longer/shorter periods of time, IIRC! haha.... The Idle Up Vacuum Control on older systems like ours is therein the White Screw on the Plenum.... Which also works to Idle Up for Power Steering. If you look at your vacuum routing diagram... as I remember(I'd have to look at mine, but seem to remember that....)>>> One of the AC VSV Vacuum Hoses goes directly into that White Screw Idle Up Valve on the Plenum.
A couple fairly Toyota Guru Status mechanics that I've spoken to have told me, ......."DON'T TOUCH THAT WHITE SCREW like it's the Idle/Air adjustment Screw on the t-body! Get in the FSM and learn whatcha need to do with it".... Not sure how dangerous messing with it is... But I need to look into my "IDLE UP" as well, Cory..... Mainly because, when my system cycles on and off, I expect to 'FEEL THAT LOAD', lol.... BUT, mine is dropping to nearly 500rpm every time now.... Sooooo, either;
1. My AC VSV is not acting right
2. Maybe I need to check the smaller vacuum port that is on that White Screw Idle Up Valve(see if it's clogged? Something?)....
I'm leaning toward the AC VSV, .... BUT, hahaa..... But, the last 2 times I checked it(including after having to replace it with a YARD one when I broke off one of the vacuum ports)... It passed the FSM testing section. YEP, you can test that VSV and even reverse the hoses and listen for the 'WHIIIEEEEEEEEEEEEEEEEEEEEEE' through the basket/filter on the end.... I did, and mine whined away, all ticked off! hahaha. You check it with vacuum gauge under certain situations, etc., etc., .... and you can verify if it's in fact switching on when the clutch kicks in
Sorry this is all over the place.... I'm just a few months out of messing with mine and I need to refresh on it when I have time, k?
Last edited by ChefYota4x4; 07-31-2012 at 11:14 AM.
07-31-2012, 11:33 AM
#156
PS> I just wanted to add..........some speculative/"let's discuss this" banter, hahaha...>> ;
1. The "White Screw" Idle up contraption on the Plenum? It's a "NO ELECTRICAL SWITCHING VALVE" idle up with the Steering(which is adjustable by the white screw)... ....Which does NOT have a VSV that senses/get's switched on/ under situations of 'LOAD'. The steering pump has a pressure valve on top of it that allows CONTROLLED vacuum/but NOT FLUID to get BACK through.(Steering is often under pressure of HUNDREDS of pounds, IIRC... Which is why it is SO IMPORTANT to bleed it properly and make sure no leaks, etc.) When you turn, the pressure is INCREDIBLE(a guy told me 1100# ???) .... And it's a LOAD, to say the least.... So to allow some added vacuum/air into the plenum, that valve on top of the pump opens for vacuum/idle up assist... I'm guessing that valve on the pump top opens at a certain pressure rating? (I'm GUESSING, again, that the reason the Power Steering has 2 HOSES off that valve on top? One line is 'CONSTANT' assist.... The other is a LOAD assist which goes into a different port on that "White Screw Thingymadoer"(we need the name for that! hahaha)....
2. The AC VSV DOES in fact switch ON at times of load(Caused by the compressor kicking in/AC clutch load/... in 'cycles', which is therein controlled as to 'how often it does so' by the AC Cycle RPM Adjustment Knob(???) )...... When the system is under load, it switches that AC VSV ON and then 'VACUUM' can be allowed to complete it's cycle back through the Plenum, THROUGHHHH the White Screw Vacuum Port(I don't think it's a VALVE, technically.... It's more an 'ADJUSTABLE PORT'... Adjusted by the White Screw, allowing more or less Vacuum to be pulled in/Allowing more Idle UP under load, whether pulled by the Steering or AC........ make any sense? I'M PRETTY sure that's how it all works as far as Idle Up.... NOT POSITIVE
Last edited by ChefYota4x4; 07-31-2012 at 11:35 AM.
08-10-2012, 08:20 AM
#157
Registered User
Thread Starter
Chef - thank you for the info. I believe I now 'kindof' understand the AC idle up. I can adjust the white knob to increase or decrease the speed that the engine idles up to, and of course the VSV opens/closes based on the cycling of the compressor. The only thing I don't understand is if there is any adjustment on the length of time the compressor is engaged vs disengaged. The Amplifier has a temperature probe on the Evaporator according to the FSM, so perhaps it uses that to determine when to shut off the compressor, I really don't know. Regardless, I think I need to adjust the idle up speed, so I might mess with that this weekend if I get a chance.
I got my Villager fan the other day:
Still need to order the DCC controller. I'll probably just get the basic 2sp model, which I believe should be fine for me.
Once I get the controller, I think I'll pull the radiator, cut the Villager shroud to size, and make my mounting brackets. Oh, and according to irab88's thread, I need to space the fan motor away from the radiator with washers and likely do some grinding on the back of the fan motor for clearance.
Last edited by coryc85; 12-14-2012 at 08:02 AM.
08-10-2012, 11:00 AM
#158
Registered User
Thread Starter
So my updated work list is:
1. Install bj spacers and rear spring leaves, adjust LSPV bracket.
DONE 2. Install IFS frame brace that has been sitting for a year.
DONE 3. New dash speakers.
4. Fix the water leak on driver & passenger side. This might be body work since I noticed a rust hole in the inner fender above the driver tire.
Reglued my old rubber for now 5. Replace rubber window gaskset on driver side, the one in the window track, it's torn in the upper rear corner.
New Drivers Side 6. New CVs
Started 7. Install some peel & seal to make it quieter.
MOSTLY DONE 8. New battery cables and terminals and new grounds.
9. Put LED lights from Superbright into dome, deck, and backup lights.
10. Upgraded headlight wiring harness.
DONE 11. Fix AC, but not so important now that fall is here.
12. I'd like to have my injectors cleaned at WitchHunter.
DONE 13. Brake upgrades: V6 front calipers, 1" bore master cylinder, extended brake lines.
14. Install my Villager fan and get DCC Controller.
Brakes are pretty good now, but I think still some air in the lines. AC works pretty well, hopefully better after floor insulation and electric fan. Still have to finish my Tite Seal insulation, but first need to close up those holes in the inner fenders.
08-10-2012, 01:34 PM
#159
The CV busted or just want new rather than reboot the OEM's? Just curious.. .I'm about to reboot, they seemed to be 'bind and click' free at full stuff steer, etc.... Just a bit old and dry on the boots.... like me! hahaha.
Nice list,...KILL IT, MAN!
Nice list,...KILL IT, MAN!
08-10-2012, 01:36 PM
#160
Got me insterested in the E-fan again, dang you! lol...
Nice on the brake upgrade... Been wanting to do it for a while.. But EVERYTHING front to back is new altrom on mine... eeek.. just hate spending a bunch when mine work, ya know? (plus you get out lots more than me/than I used to... I'm less likely to roll back into a tree on a muddy hill than you, I suspect, hehe.)
Nice on the brake upgrade... Been wanting to do it for a while.. But EVERYTHING front to back is new altrom on mine... eeek.. just hate spending a bunch when mine work, ya know? (plus you get out lots more than me/than I used to... I'm less likely to roll back into a tree on a muddy hill than you, I suspect, hehe.)


