
coryc85's 1988 4Runner Build-Up Thread

 03-20-2014, 03:55 AM
#502
Not a lot to report, but a few weeks ago I ordered a 1ft long, 1.25in diameter Delrin rod from Amazon. It was like $10. I took it out in the garage and cut off a piece with the hacksaw that is the right length for the plastic mirror support piece. Next I drilled a pilot hole, then a larger hole (45/64ths) in the piece. I really needed the hole to be 3/4", but I did not have a drill bit that size. I want a tight fit anyway, so I'm going to work the hole with a round file to open it up a bit so it will slide onto the metal shaft of the mirror.
Here is the piece of Delrin with the hole drilled
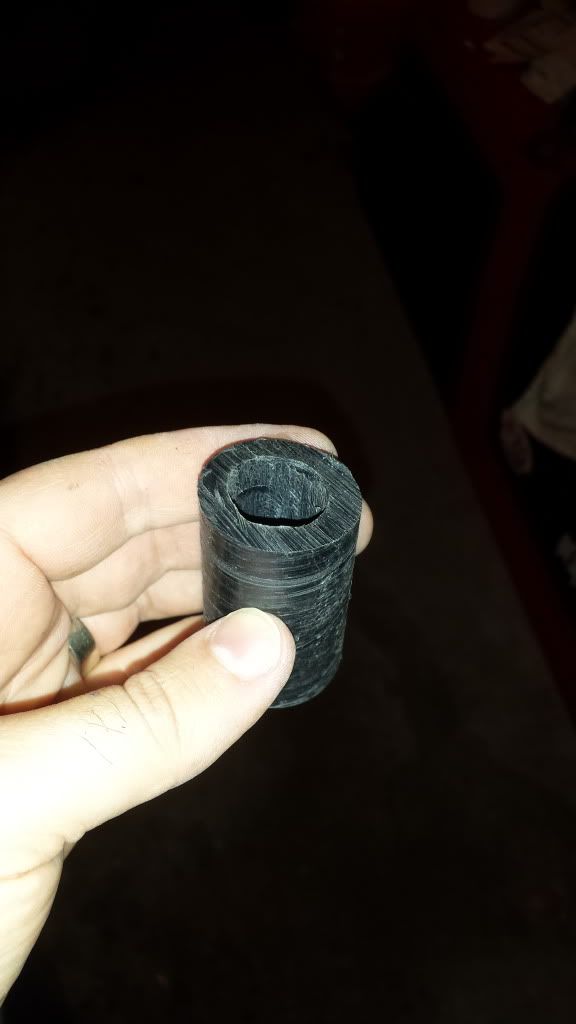
So I need to open the hole up a bit to fit onto the mirror stem, and then trim one end of it to have the moon shaped tab that sits in the metal mirror bracket. I think this is going to work to be a suitable replacement for the brittle plastic piece.
On a side note, I took the top off the Runner a few weeks ago and I've been keeping it in the garage to keep it dry. It was a beautiful day here on Saturday, so we installed the car seats and took both boys out for lunch in the truck.

Here is the piece of Delrin with the hole drilled
So I need to open the hole up a bit to fit onto the mirror stem, and then trim one end of it to have the moon shaped tab that sits in the metal mirror bracket. I think this is going to work to be a suitable replacement for the brittle plastic piece.
On a side note, I took the top off the Runner a few weeks ago and I've been keeping it in the garage to keep it dry. It was a beautiful day here on Saturday, so we installed the car seats and took both boys out for lunch in the truck.
Cory that piece for the mirror is turning out pretty good. I hope you get it all figured out. you can do what cyberhorn says, that's seems to be the way to go. Or you do it my way the poor mans way. Get the drill bit and wrap a it with some sand paper and start drilling keep adding a warp of sand paper till you get the thickness you need, works for me sometimes.
Kids looking like they are having fun.
03-22-2014, 11:40 PM
#503
Super Moderator
Staff
iTrader: (1)
Join Date: Aug 2008
Location: Anderson Missouri
Posts: 11,788
Likes: 0
Received 25 Likes
on
22 Posts
Glad to see the kiddos getting to enjoy your runner. It will become their favorite ride soon with just a few trips with the top off. Makes loading them easier in the carseats as well with the top off. We still have a few months before we can take the tops off of ours but when the tops are off, the first gen runners are our kids fav. They will be out of the carseats before you know it, enjoy them while you can.
03-30-2014, 09:33 AM
#504
Registered User
Thread Starter
Cory that piece for the mirror is turning out pretty good. I hope you get it all figured out. you can do what cyberhorn says, that's seems to be the way to go. Or you do it my way the poor mans way. Get the drill bit and wrap a it with some sand paper and start drilling keep adding a warp of sand paper till you get the thickness you need, works for me sometimes.
Kids looking like they are having fun.
Kids looking like they are having fun.
Glad to see the kiddos getting to enjoy your runner. It will become their favorite ride soon with just a few trips with the top off. Makes loading them easier in the carseats as well with the top off. We still have a few months before we can take the tops off of ours but when the tops are off, the first gen runners are our kids fav. They will be out of the carseats before you know it, enjoy them while you can.
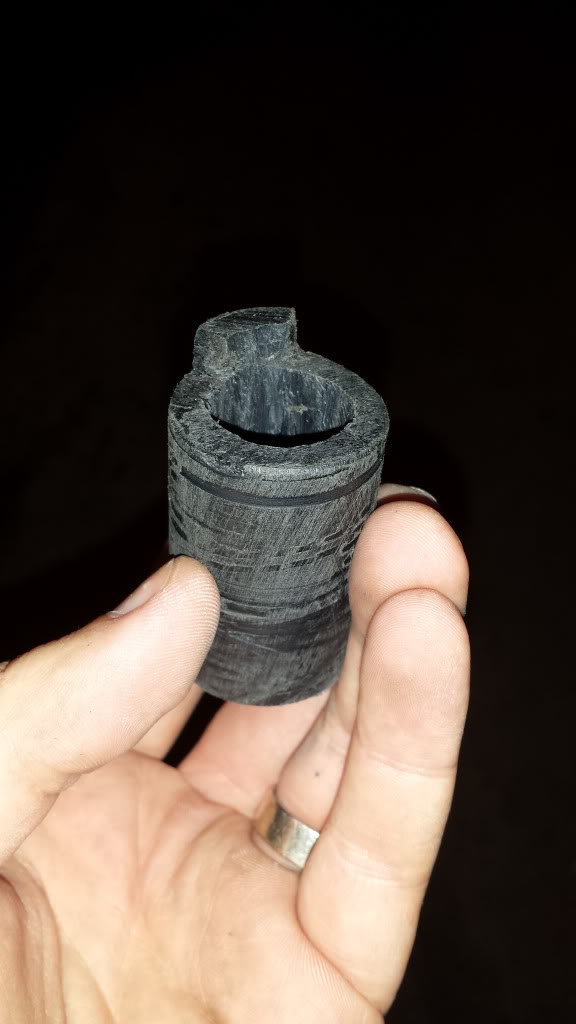
Ok, well, I finished the piece. As I said above, probably about an hour with a round file, filing the inside of the hole, checking how it fits, filing some more. After that, I marked it for that little tab that fits into the mirror bracket and I cut it with one of those vibrating cutoff saws. Here is the finished product:
Here it is on the mirror:
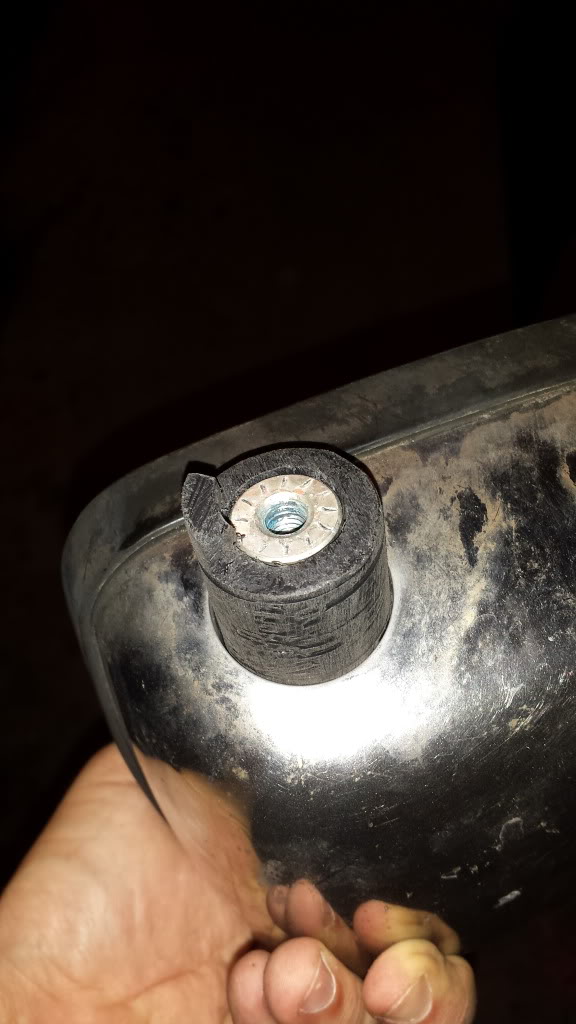
This one is a bit blurry, but here it is looking up from the bottom of the mirror bracket. You can see the tab sticking into the pie shaped slot of the bracket:
And finally here it is all tightened down:
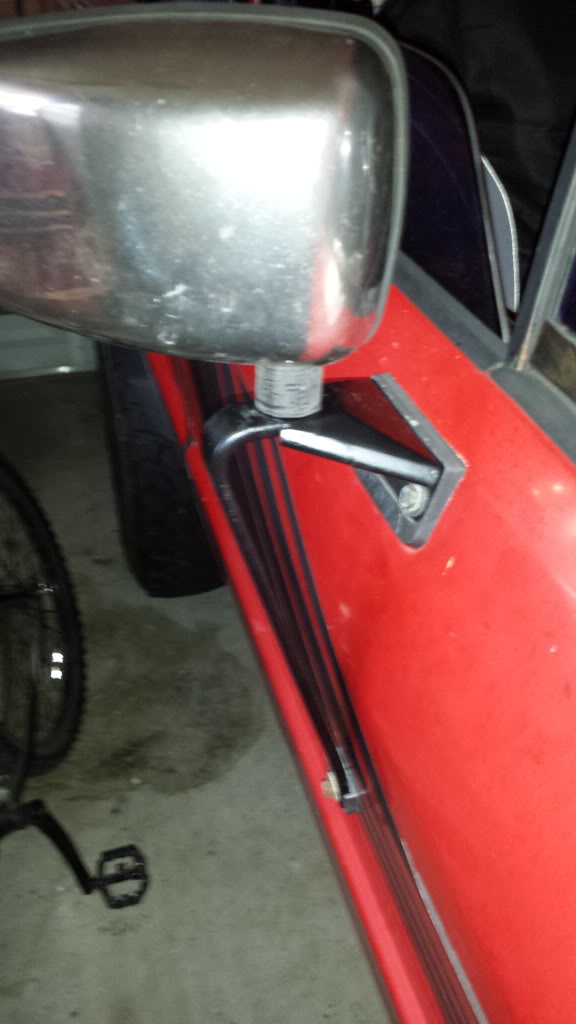
I should probably spend some time sanding the outside surface to smooth it. It got pretty marred up by my vise while I was drilling, cutting, and filing.
The mirror is solid and I'm very happy with how it turned out. It's great to have 2 non-wobbly mirrors now. I've got plenty of the Delrin rod left, I might start working on another one so I have an extra in case my driver's side OEM piece breaks.
05-07-2014, 04:04 AM
#506
Registered User
Thread Starter
I happened to notice the other day when walking toward my truck that the inside of the front tires were rubbing on something, it had scored both tires. I crawled underneath and looked around, thought it would be the tie rod end being loose or bad or something, but I didn't really see anything that would contact the tire. After driving home, I was thinking and thinking, and then I thought maybe it was the control arm since I did install BJ spacers not that long ago. Searching on Yotatech I found this thread:
https://www.yotatech.com/forums/f116...s-help-234193/
I wish I had known this before I installed the BJ spacers, I guess I did not read the fine print, but glad I caught it before my tires were totally ruined.
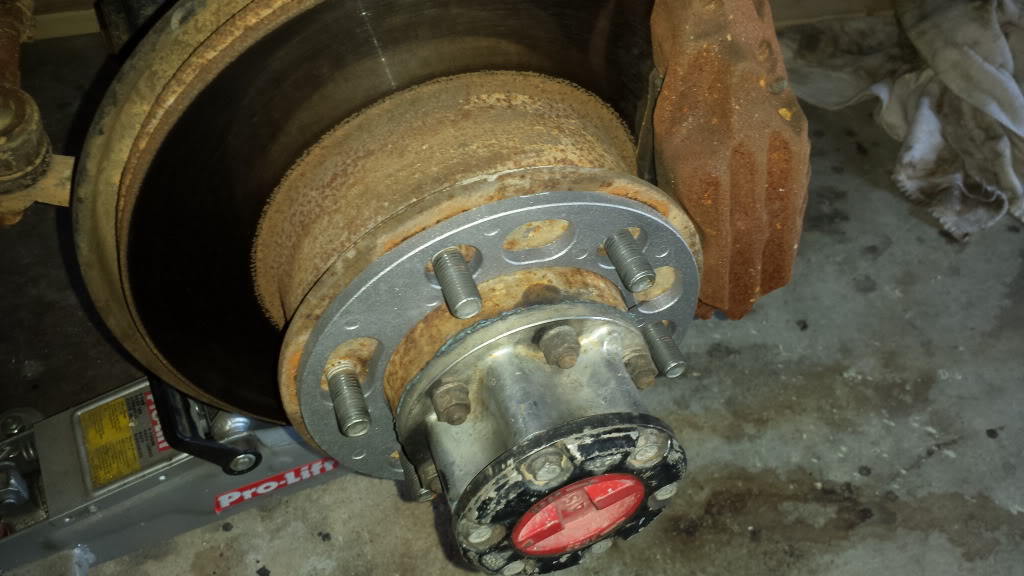
And so I quickly ordered some 1/4" wheel spacers from Summit. They were the Gorilla SP603 spacers, it was like $18 shipped.
Here is the driver side tire:
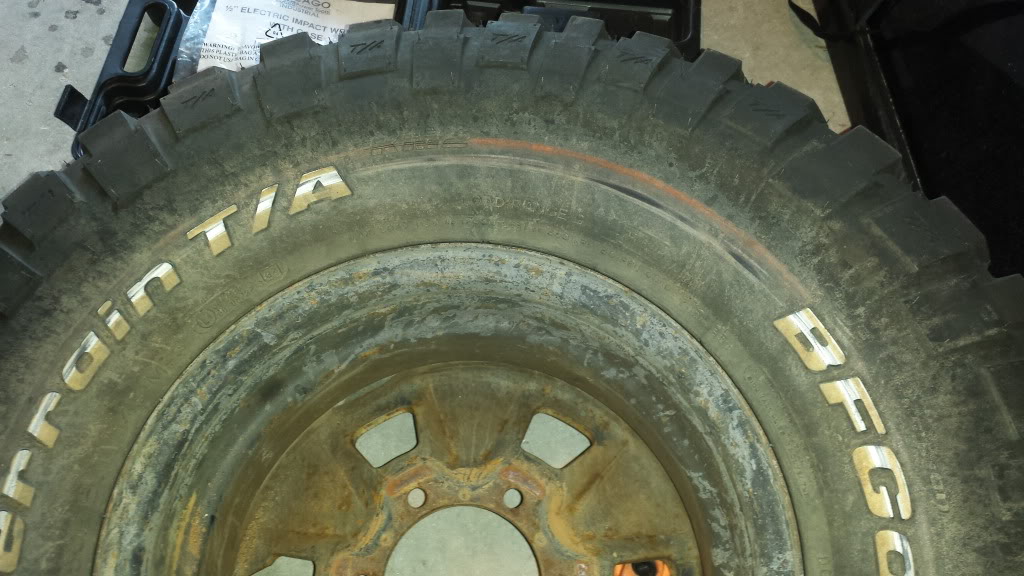
And here is a shot of the spacer in place:
https://www.yotatech.com/forums/f116...s-help-234193/
I wish I had known this before I installed the BJ spacers, I guess I did not read the fine print, but glad I caught it before my tires were totally ruined.
And so I quickly ordered some 1/4" wheel spacers from Summit. They were the Gorilla SP603 spacers, it was like $18 shipped.
Here is the driver side tire:
And here is a shot of the spacer in place:
05-09-2014, 01:59 AM
#508
Super Moderator
Staff
iTrader: (1)
Join Date: Aug 2008
Location: Anderson Missouri
Posts: 11,788
Likes: 0
Received 25 Likes
on
22 Posts
Glad you mentioned that as I am wanting to Ball Joint spacers to level my truck out, now I know I need to add some more parts to the list. Thanks for mentioning it and glad yo caught it in time.
05-09-2014, 04:51 PM
#509
Registered User
Thread Starter
Terry - me too, I never heard a noise or anything, just saw the marks. I have no idea how long it has been rubbing, maybe it only happens when I corner or something. Anyway, it appears to be common with the BJ spacers and the 1/4" wheel spacers do the trick.
05-12-2014, 08:11 AM
#510
Registered User
iTrader: (1)
Join Date: Nov 2012
Location: Elko NV, at the foot of the Rubys
Posts: 358
Likes: 0
Received 0 Likes
on
0 Posts
[QUOTE=coryc85;52194460]Chukar (it's Cody, right?) - Thanks for reading. I'll look for your build thread and watch what you do with that ring & pinion.
[QUOTE]
Yes sir, that is it. Hopefully I will get to it this week. Wife has rehearsal most nights so that will leave me to myself in the garage. Scares the wife cause she knows I will find something to tear apart.
[QUOTE]
Yes sir, that is it.
Hopefully I will get to it this week. Wife has rehearsal most nights so that will leave me to myself in the garage. Scares the wife cause she knows I will find something to tear apart.
05-18-2014, 05:51 PM
#511
Registered User
Thread Starter
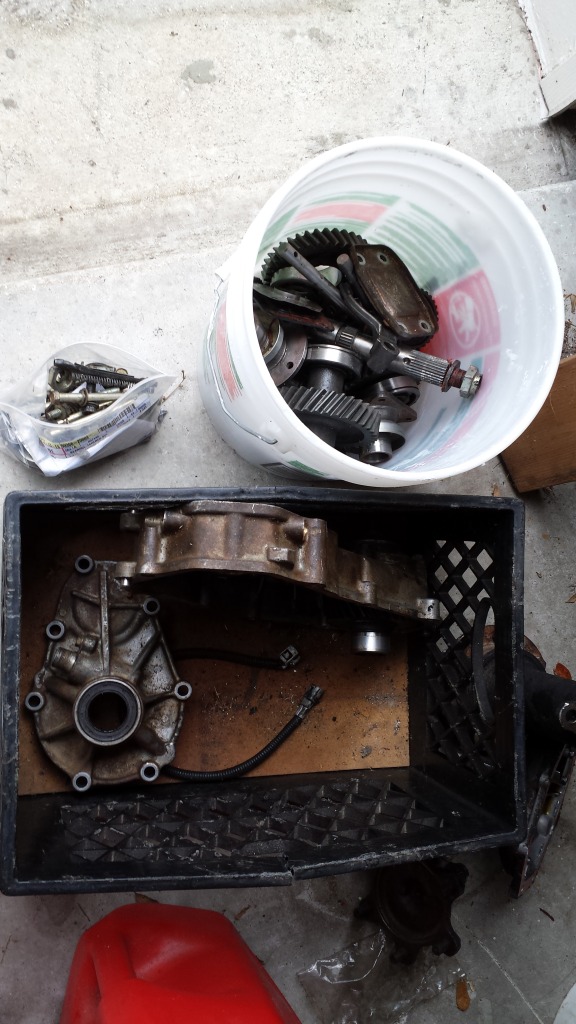
In trying to clear my endless backlog of projects, I went outside this morning and cleanup up the garage a little bit, and then that inspired me to do something about that transfer case that is sitting there all torn apart on the bench. Months and months ago I bought a set of Marlin 4.7 tcase gears and a fully disassembled case from a guy on this forum. The case was missing some little parts, which I ordered long ago, and then it had a forward shift rail which I needed to cut up to make into a top shift rail. Well Terry was kind enough to send me a top shift rail from one of his old cases and so I really had no excuse not to put this thing together. I did have to cut 3/8" off the rail Terry sent me according to Marlin's 4.7 instructions, so I did that first:
Then you have to grind a bit out of the front cover to get those big 4.7 gears to clear:
After that, it's pretty much just following directions to put a paper gasket on, put a cover on, turn 10 bolts, put another gasket on, another cover, more bolts, etc.
Here's how it sits right now, I finally got a chance to use this new Marlin triple drilled flanges that I've had for about 8 years:
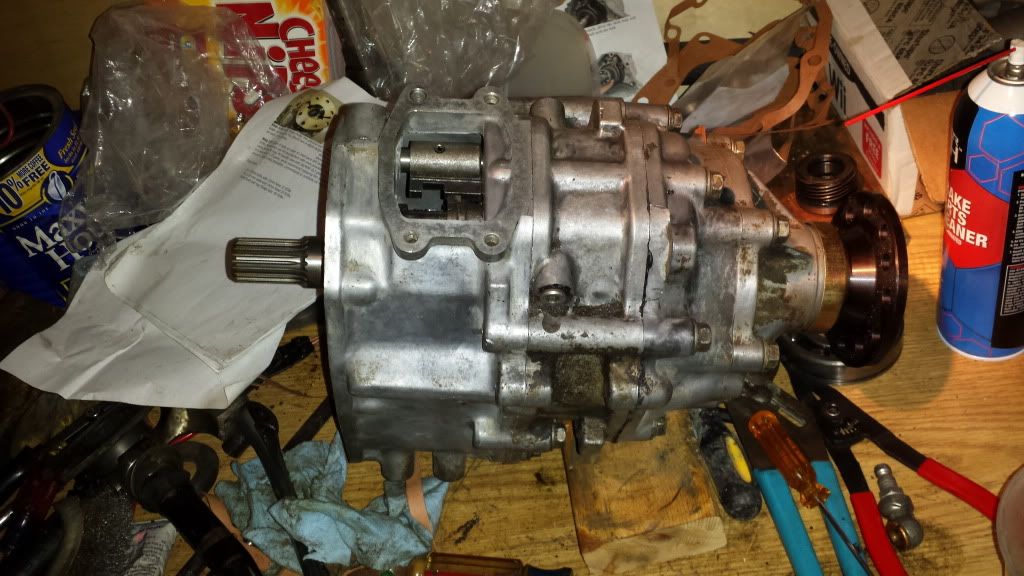
Hopefully I'll install it over the long Memorial Day weekend.
Then you have to grind a bit out of the front cover to get those big 4.7 gears to clear:
After that, it's pretty much just following directions to put a paper gasket on, put a cover on, turn 10 bolts, put another gasket on, another cover, more bolts, etc.
Here's how it sits right now, I finally got a chance to use this new Marlin triple drilled flanges that I've had for about 8 years:
Hopefully I'll install it over the long Memorial Day weekend.
09-11-2014, 08:32 AM
#515
Registered User
Thread Starter
Thanks kornhusker...I'm ashamed to say that the 4.7 case is still sitting there on the bench.
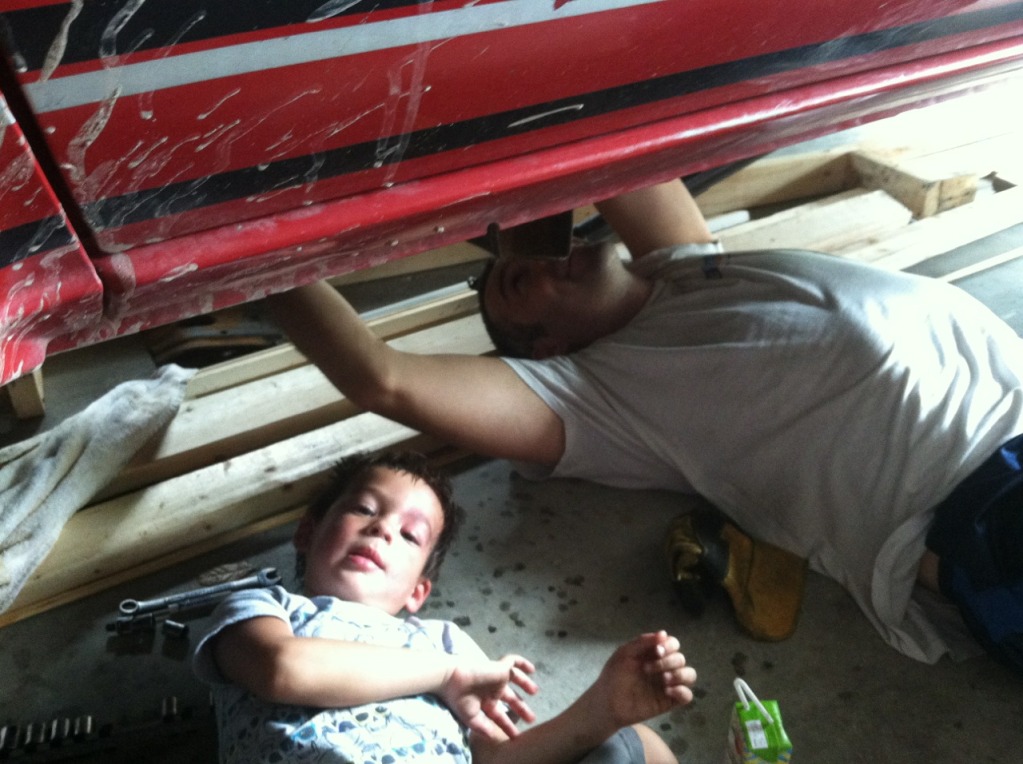
You guys got to me, so I did a little bit of work in the garage this weekend...got my little helper checking out what I'm doing
I managed to get the driveshafts off, drained the oil out of the tcase, removed the shifter, and put 1 coat of red paint on my new BudBuild skid plate.
Also put all my old tcase parts together, if anyone needs a part for a tcase just let me know, I might have it.
I think this weekend I should be able to get the new case installed. After that I'll be dying to find somewhere to go put it in low gear.
09-15-2014, 05:42 PM
#516
Registered User
Thread Starter
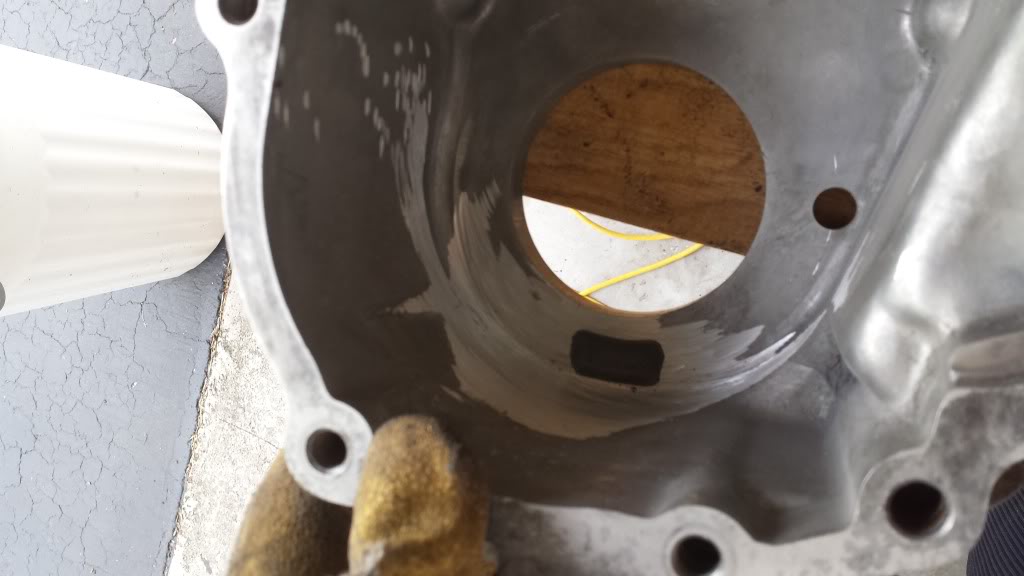
Took a ton of work, but the old case is out....
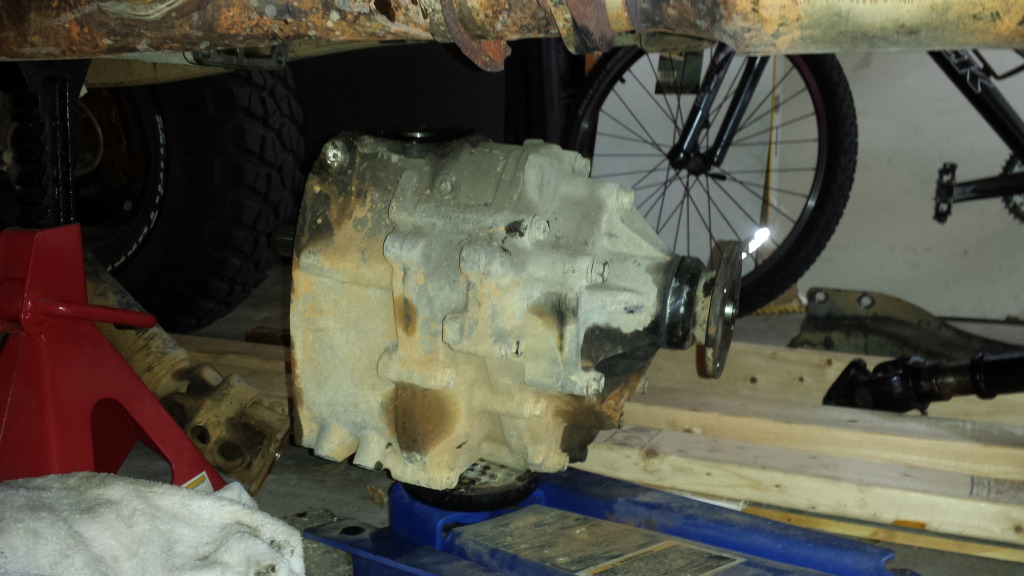
There's what the rear end of the tranny looks like. I guess I knew there would be a seal in there, but I did not have a new one handy to replace it with...hope that one doesn't come back to bite me.
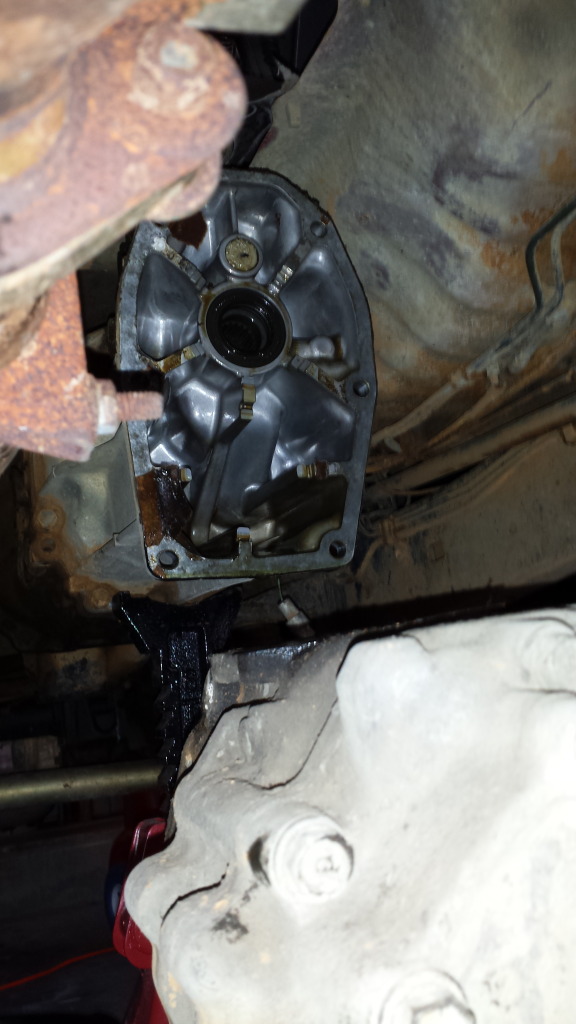
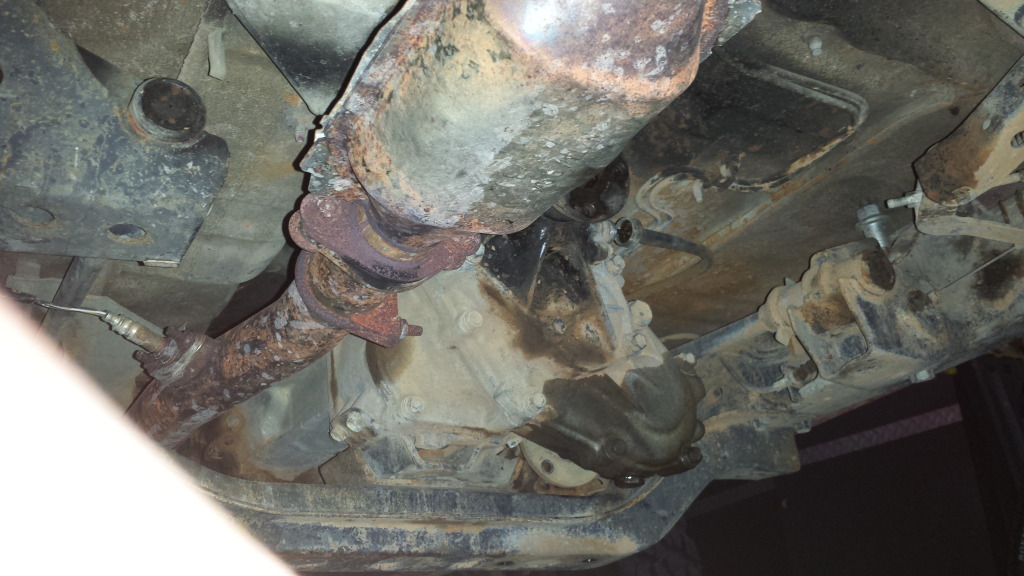
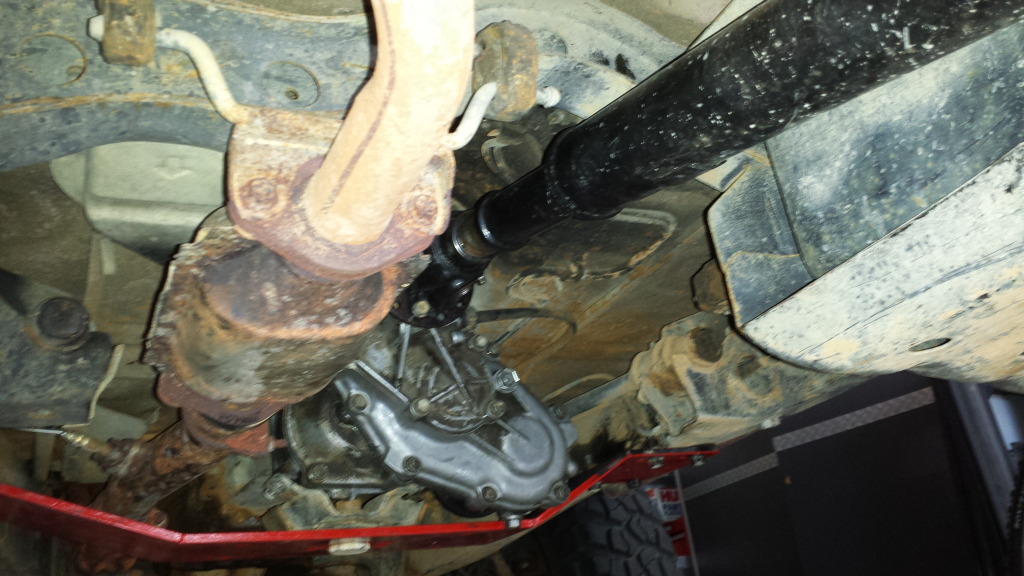
And like magic....the new case went right in, really wasn't much to it.
I painted the Budbuilt red to get some color under there. Here's a shot of the back of the new case. I didn't have the skid plate part bolted on to the Budbuilt yet.
Took me most of the day Sunday to get all that done. I didn't get a chance to road test it, but I did back it out of the garage and go up and down driveway a little. First of all, it was "stuck" in 4WD, I could shift between hi and lo, but it would not come out of 4WD for anything. Eventually I took the shifter out and used a screwdriver and hammer to tap the shift block back. It moves now with the shifter, but it's still a little stiff. Also the 4WD indicator light is stuck on, I'm wondering now if the 2 are related. Maybe that little switch that you screw in there for the 4WD light is interfering with the shift block. I'll try unscrewing it and see if it helps.
There's what the rear end of the tranny looks like. I guess I knew there would be a seal in there, but I did not have a new one handy to replace it with...hope that one doesn't come back to bite me.
And like magic....the new case went right in, really wasn't much to it.
I painted the Budbuilt red to get some color under there. Here's a shot of the back of the new case. I didn't have the skid plate part bolted on to the Budbuilt yet.
Took me most of the day Sunday to get all that done. I didn't get a chance to road test it, but I did back it out of the garage and go up and down driveway a little. First of all, it was "stuck" in 4WD, I could shift between hi and lo, but it would not come out of 4WD for anything. Eventually I took the shifter out and used a screwdriver and hammer to tap the shift block back. It moves now with the shifter, but it's still a little stiff. Also the 4WD indicator light is stuck on, I'm wondering now if the 2 are related. Maybe that little switch that you screw in there for the 4WD light is interfering with the shift block. I'll try unscrewing it and see if it helps.
09-22-2014, 05:31 PM
#519
Registered User
Thread Starter
Thanks Kornhusker and thanks Chef. I am slowly getting there.
So in putting in that new case, I have 2 small hiccups.
1. The tcase was hard to shift out of 4WD, I saw was because I crawled under there and loosened the 4WD switch about a turn or so and the shifter now freely moves in and out of 4WD. So I'm suspecting that switch for reasons unknown to me protrudes too far into the case. I also noticed the 4WD light will not go off. I pulled the switch out completely to see if that little plunger was mashed, and it looks fine and I can depress it with my finger, I have not Ohm'd it out, but it is not damaged. The switch is the original off the truck, but the case could be from a different year. I've got some more investigating to find out if this switch is working and why it jams up the shifter if I tighten it down.
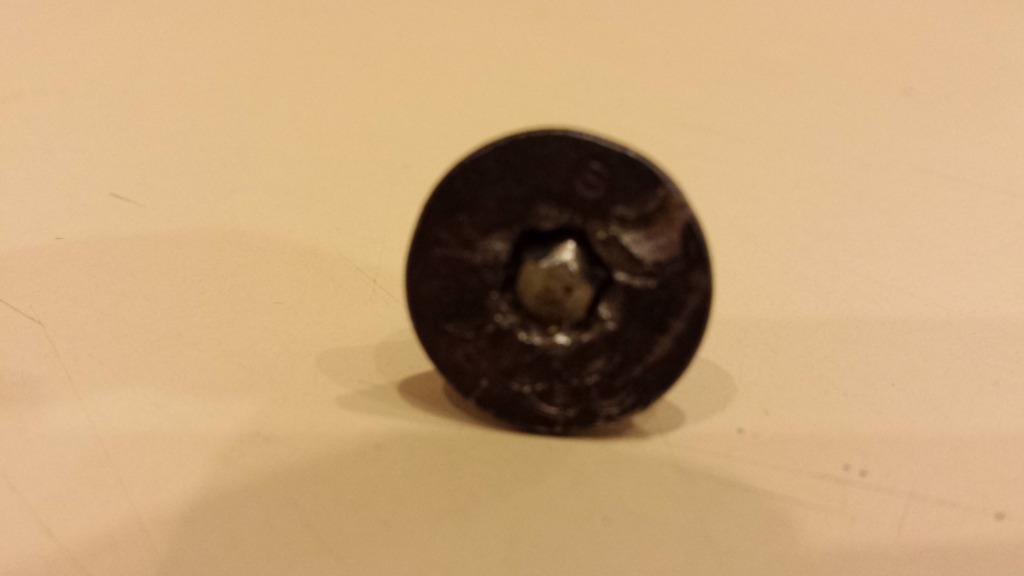
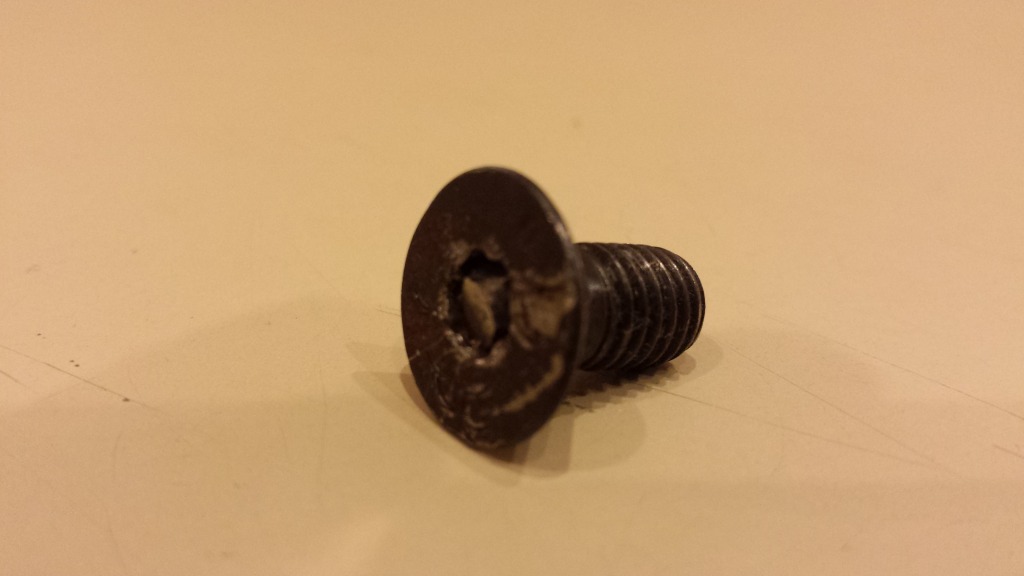
2. The other issue is that when I was taking apart the Budbuilt cross member to paint and install it, I broke the tip off my allen wrench in the bolt. The Budbuilt bolts are allen head machine screws and stupid me put the ball end of my allen wrench in there and it snapped right off somehow. Anyway, the little allen wrench piece is lodged in there. I thought I'd find a new one at Lowe's, but they don't have a grade 8 allen head machine screw in M8-1.25. They do have some that are not metric, but metric choices are slim. So how on earth can I get this allen wrench piece out of there?
So in putting in that new case, I have 2 small hiccups.
1. The tcase was hard to shift out of 4WD, I saw was because I crawled under there and loosened the 4WD switch about a turn or so and the shifter now freely moves in and out of 4WD. So I'm suspecting that switch for reasons unknown to me protrudes too far into the case. I also noticed the 4WD light will not go off. I pulled the switch out completely to see if that little plunger was mashed, and it looks fine and I can depress it with my finger, I have not Ohm'd it out, but it is not damaged. The switch is the original off the truck, but the case could be from a different year. I've got some more investigating to find out if this switch is working and why it jams up the shifter if I tighten it down.
2. The other issue is that when I was taking apart the Budbuilt cross member to paint and install it, I broke the tip off my allen wrench in the bolt. The Budbuilt bolts are allen head machine screws and stupid me put the ball end of my allen wrench in there and it snapped right off somehow. Anyway, the little allen wrench piece is lodged in there. I thought I'd find a new one at Lowe's, but they don't have a grade 8 allen head machine screw in M8-1.25. They do have some that are not metric, but metric choices are slim. So how on earth can I get this allen wrench piece out of there?
09-22-2014, 05:51 PM
#520
Registered User
ya might contact budbuilt? and check around town see if any hardware places are available they carry the crazy stuff more often
as for the ball stuck in there your not getting it out without damaging the bolt beyond use its like the head bolt in my block with the easy out broken off in that a week with diamond dremil bits an still had to have it heli coiled
as for the ball stuck in there your not getting it out without damaging the bolt beyond use its like the head bolt in my block with the easy out broken off in that a week with diamond dremil bits an still had to have it heli coiled


