
coryc85's 1988 4Runner Build-Up Thread
 05-24-2013, 06:47 AM
#341
Super Moderator
Staff
iTrader: (1)
Join Date: Aug 2008
Location: Anderson Missouri
Posts: 11,788
Likes: 0
Received 25 Likes
on
22 Posts
Just going thru your thread and it may be the way the picture is showing, but is the end of your drive shaft yoke flared and that is possibly the reason the U-joint come out? It may just be the picture, but thought I would mention it to you.
The axle bearing tool looks like it is a well made tool.
The axle bearing tool looks like it is a well made tool.
 05-24-2013, 08:33 AM
#343
Registered User
Thread Starter
Just going thru your thread and it may be the way the picture is showing, but is the end of your drive shaft yoke flared and that is possibly the reason the U-joint come out? It may just be the picture, but thought I would mention it to you.
The axle bearing tool looks like it is a well made tool.
The axle bearing tool looks like it is a well made tool.
And yeah that bearing tool is pretty nice, fits in my press nicely and I love that it screws apart from the flat plate, that makes it easier to get into the press.
05-25-2013, 05:14 PM
#345
Registered User
Thread Starter
Dragon - the tool was $125 plus $31.50 shipping on ebay.
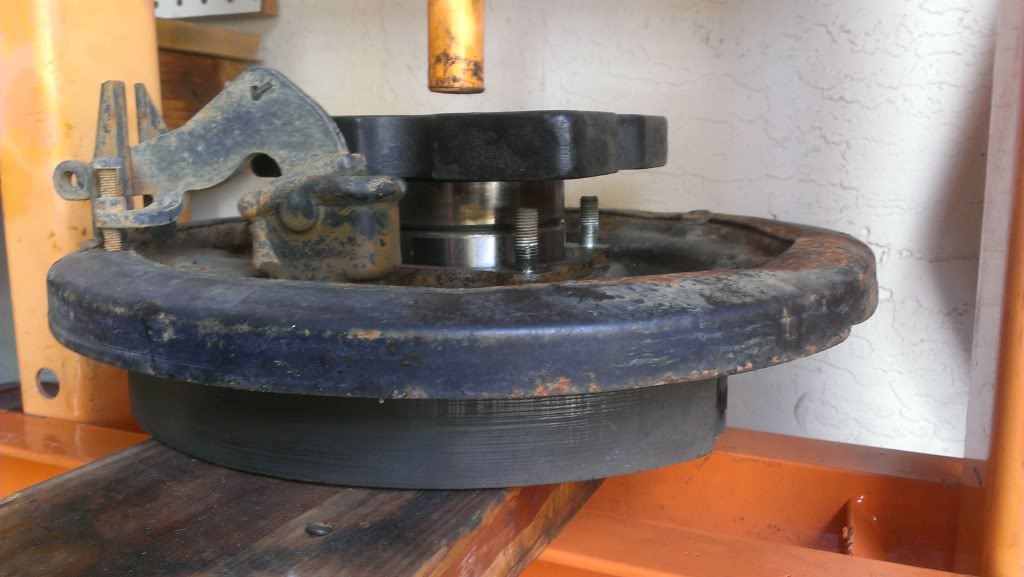
Spent a few hours working on things today. First up, I had to grind all the paint and a good bit of material off the inner surface of the tool's tube and a bit of the lower threads on the plate. The axle bearing retainer was hitting the threads on the hole in the plate.
Once I ground both pieces, I was able to bolt the plate down to the backing plate, put the whole thing into the press and screw the tube on. Took a lot of force from that press, but finally I heard a pop and the axle started easing its way out.
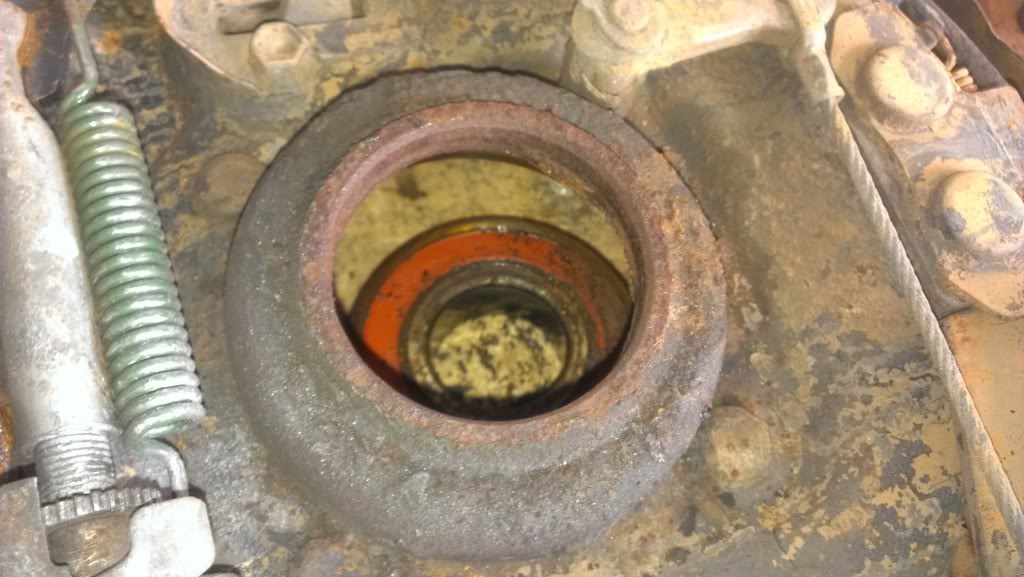
I didn't take a whole lot of pics of the removal, once the axle is free from the backing plate, you remove the old outer axle seal and tap the bearing out of the backing plate.
Here's a shot of the new bearing (I pressed it into the backing plate) with the retainer just sitting on the shoulder of the axle.
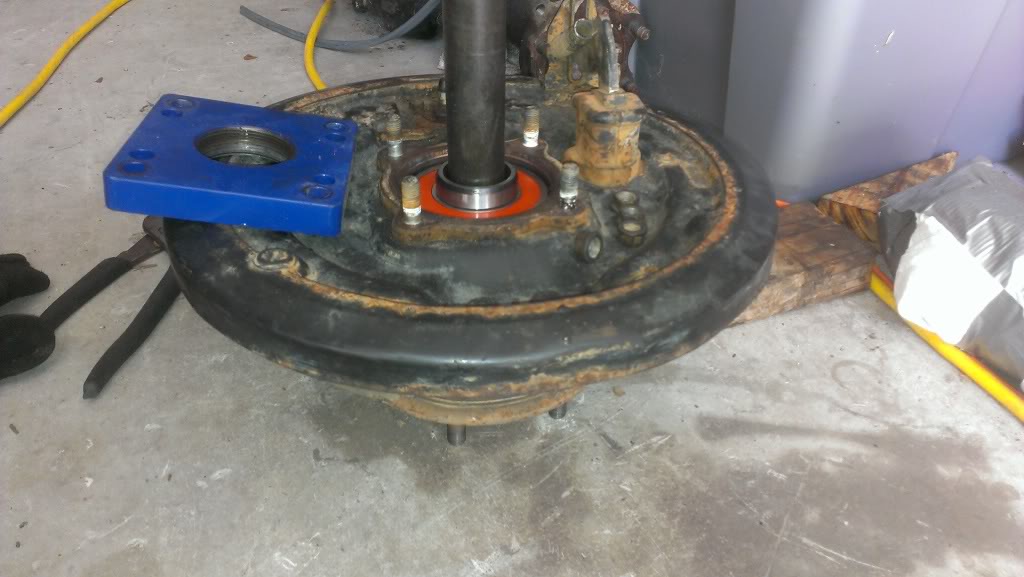
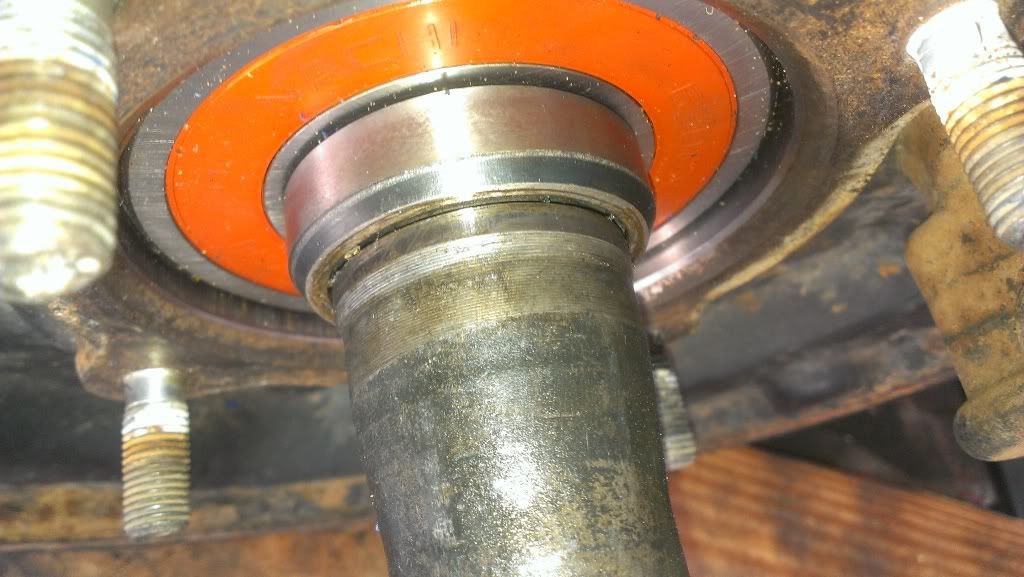
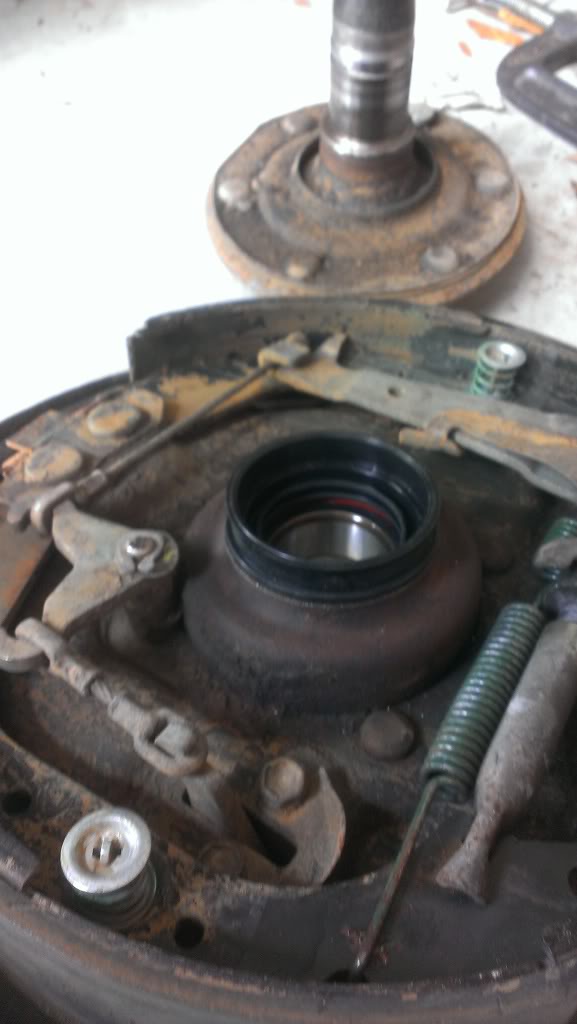
I used the tool in reverse to press the axle back into the backing plate. You can just kindof see the new outer axle seal in there between the axle flange and the backing plate.
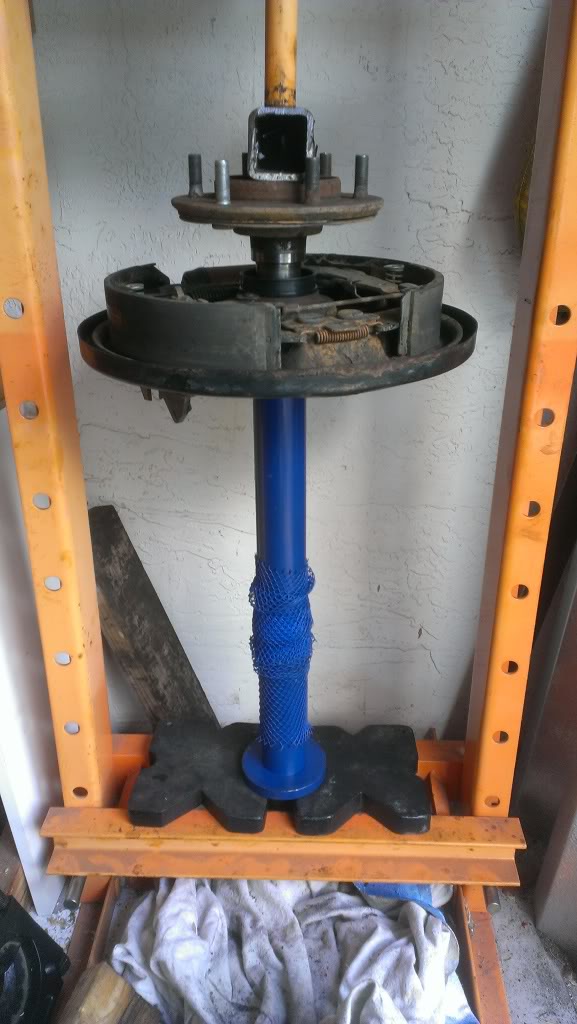
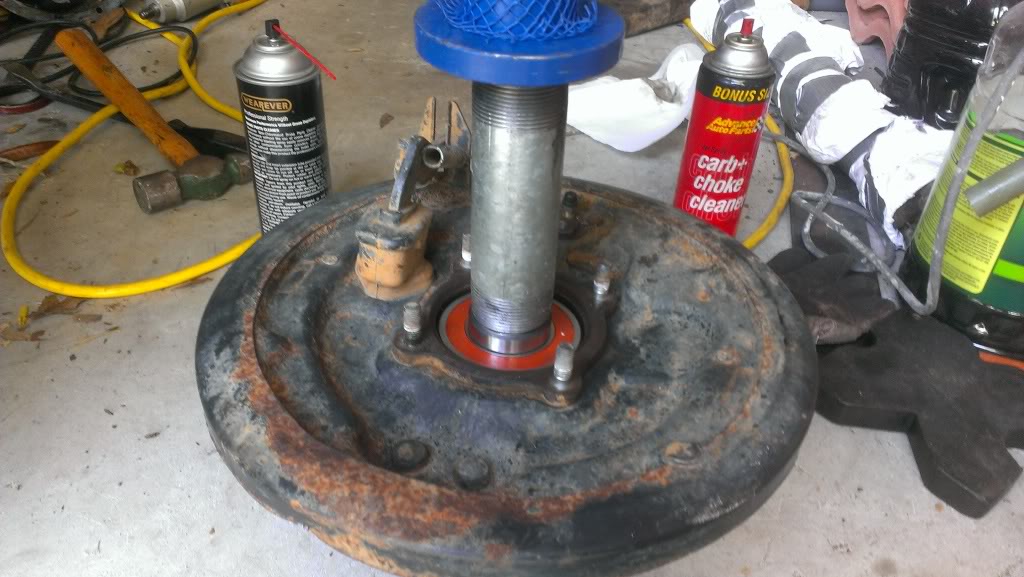
I pressed it like you see in the pic, then pulled it out to see if I was far enough to get the c clip on...
Nope, not quite, so then I slid a short piece of 1.5in pipe onto the axle right over the bearing retainer, then slid the tube part of the tool backwards onto the axle until it rested on the pipe, and then loaded that into the press and pressed it the rest of the way on.
Skipping ahead a bit...
I only got one side done and the differential put back in. Tomorrow I'll do the other side, hook the brakes back up, bleed everything...oh and still have to paint and install the dshaft.
Spent a few hours working on things today. First up, I had to grind all the paint and a good bit of material off the inner surface of the tool's tube and a bit of the lower threads on the plate. The axle bearing retainer was hitting the threads on the hole in the plate.
Once I ground both pieces, I was able to bolt the plate down to the backing plate, put the whole thing into the press and screw the tube on. Took a lot of force from that press, but finally I heard a pop and the axle started easing its way out.
I didn't take a whole lot of pics of the removal, once the axle is free from the backing plate, you remove the old outer axle seal and tap the bearing out of the backing plate.
Here's a shot of the new bearing (I pressed it into the backing plate) with the retainer just sitting on the shoulder of the axle.
I used the tool in reverse to press the axle back into the backing plate. You can just kindof see the new outer axle seal in there between the axle flange and the backing plate.
I pressed it like you see in the pic, then pulled it out to see if I was far enough to get the c clip on...
Nope, not quite, so then I slid a short piece of 1.5in pipe onto the axle right over the bearing retainer, then slid the tube part of the tool backwards onto the axle until it rested on the pipe, and then loaded that into the press and pressed it the rest of the way on.
Skipping ahead a bit...
I only got one side done and the differential put back in. Tomorrow I'll do the other side, hook the brakes back up, bleed everything...oh and still have to paint and install the dshaft.
05-26-2013, 04:08 PM
#347
Registered User
Thread Starter
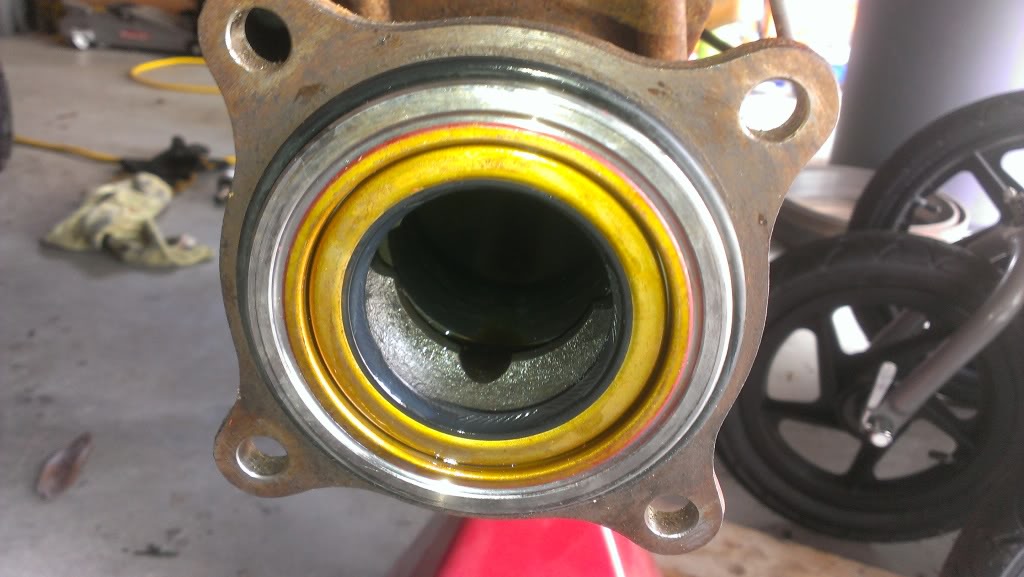
On with the pics. I finished the other side axle bearing today, it was MUCH easier the 2nd time. Here is a pic of the axle and tool all ready for pressing off the bearing.

Once you hear the big POP and you get the bearing and retainer off, you just tap the old bearing out of the backing plate.
Here I am pressing the new bearing back into the backing plate, using the old bearing to press on it.
With the new bearing in place, I flip the backing plate over and install the new outer axle seal.
This is how I press the new bearing and retainer on. Slip the backing plate with fresh outer axle seal down onto the axle, drop the retainer on there with the tapered in up (toward the c clip). Then what you see there is a 6 inch piece of 1.5" pipe. It seems to fit the retainer just right. Finally I put the tube part of the bearing tool on there upside down. Here's a pic
And one final shot, my new axle seal and o-ring waiting for that freshly rebuilt axle...
Both sides are DONE. I painted the driveshaft today, so I'll put it in tomorrow and bleed the brakes.
05-28-2013, 05:37 AM
#349
Registered User
Thread Starter
Took the truck on its maiden voyage yesterday to get gas for the lawn mower. Put my son's car seat in so he could go along. The TG break in procedure for new gears is to drive it for 20 to 30 minutes, then let them cool for at least 2 hours. Change gear oil in 500 miles.
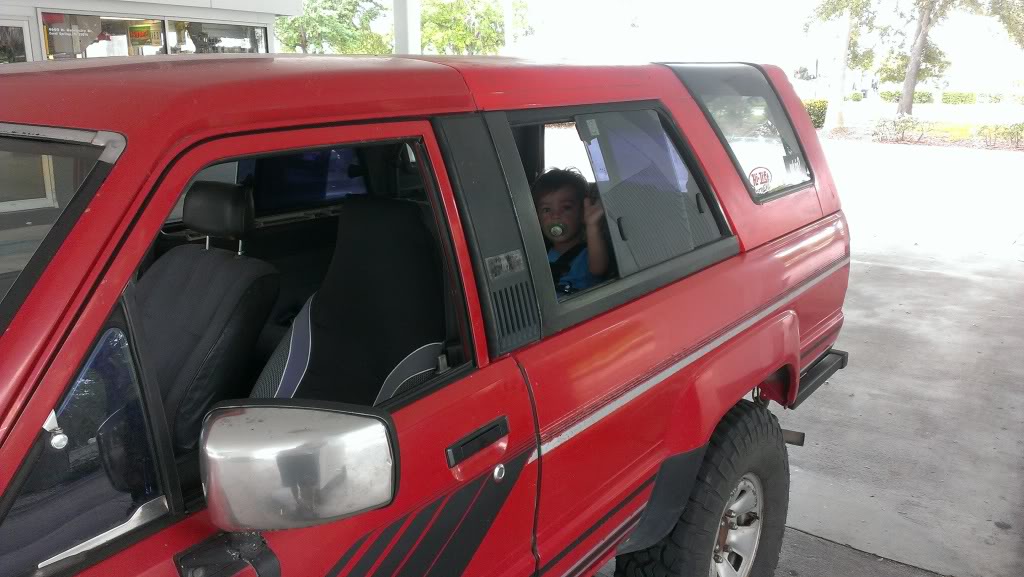
I'm at 183,500 right now. Drove the truck to work this morning and I'm very happy so far. The gears seem quiet, at least I can't hear them over the roar of my BFG MTs. Also, I'm loving Ray's starter relay mod, I feel so confident that it will start every time.
Still got loads more stuff piled up in the garage to do to this truck...I think I'm gonna fix those holes in the inner fenders next.
05-29-2013, 05:55 AM
#352
Registered User
Thread Starter
Cool - might need some tips when I get started on it.
Thanks junk! I'm assuming the crank is waiting for you at home. Are you still up in Okeechobee?
I've got a couple of things to do on the truck kicking around in my head.
- I really need to fix those holes in the inner fenders, the driver side one leaks a little bit and causes my floorboard to rust in the corner. I'm thinking about a fiberglass patch, I don't need good looks since you really can't see it, I just need a good seal.
- Once the holes are fixed, I'm gonna swap in that fuse panel that Terry sent me (still have your harness Terry, hopefully I'll get on this and send it back to you soon)
- After the fuse panel, I want to finish the Peel & Seal (or Tite Seal) on the driver's side floor, and the rear passenger area.
- When I have the floor insulated, I'd really like to order this vinyl floor kit from here http://www.auto-interior.com/toyota1.htm#8489
- And then finally I'd like to get a new radiator and install my Mercury Villager electric fan.
05-30-2013, 08:54 AM
#354
Yup I'm back, kind of scattered though and trying to get back on track. Crankshaft arrived and it looks good only at a glance. Weather stinks, so i guess it's going to have to wait for now. I tried working on the mower yesterday around 5pm and got it together with the new starter recoil and it cranked up on the first pull, started to rain again so I went in and took a drink to see if the rain would stop or at least just drizzle down. Well it did around 7pm and tried starting it up again, well I guess leaving it out in the rain kind of screw something up, but I was coming down and I didn't run out and drag it in, boy am I going to pay for that.
Anyhow, I am hoping for a little sun this afternoon though it says it suppose to be cloudy 5% chance of rain and I guess down south we got the 5% chance. Hope that changes this afternoon so I could at least finish cutting the grass which is about 6" high now.
 06-06-2013, 05:25 AM
#355
Registered User
Thread Starter
I found a deal on some Marlin 4.7 gears here in the classifieds, so I bought them. The guy also had a completely dismantled top shift tcase, so I went ahead and bought that too. Since it's already out and dis-assembled, I'll put the 4.7s in it, then throw that case into my truck. Shipped from California, so UPS says they will be here by June 10th. I'd really like to find a deal on a budbuilt skid plate to raise the belly of the runner up a bit. Anyhow, it seems like I'm continuing my trend of buying more parts than I'm installing.
Forgot, I also ordered some bondo hair fiberglass filler. Says it fills up to 1" holes, so I'm gonna clean up those inner fender holes and just put the bondo hair on. It does not have to look pretty, just seal it up to keep the water out. Also bought some EvapoRust, which got some good reviews. I'll clean up the metal with wire wheel, then hit it with the EvapoRust to remove any remaining rust, then use the fiberglass on both the inside and outside surfaces.
Forgot, I also ordered some bondo hair fiberglass filler. Says it fills up to 1" holes, so I'm gonna clean up those inner fender holes and just put the bondo hair on. It does not have to look pretty, just seal it up to keep the water out. Also bought some EvapoRust, which got some good reviews. I'll clean up the metal with wire wheel, then hit it with the EvapoRust to remove any remaining rust, then use the fiberglass on both the inside and outside surfaces.
Last edited by coryc85; 06-06-2013 at 05:48 AM.
06-07-2013, 08:17 AM
#357
Registered User
Forgot, I also ordered some bondo hair fiberglass filler. Says it fills up to 1" holes, so I'm gonna clean up those inner fender holes and just put the bondo hair on. It does not have to look pretty, just seal it up to keep the water out. Also bought some EvapoRust, which got some good reviews. I'll clean up the metal with wire wheel, then hit it with the EvapoRust to remove any remaining rust, then use the fiberglass on both the inside and outside surfaces.
06-07-2013, 08:27 AM
#358
Registered User
Thread Starter
Thanks, yeah I'm really thinking I'll love that extra low gearing. Checked our your truck...uhh wow!
I will certainly take some pics. The stuff is on its way to me, but have not received it yet. I might need to take the fenders off to get better access, but not sure yet. Also, getting up under the dash to the inside is not gonna be easy...especially on the passenger side where the ac evaporator is sitting.
I will certainly take some pics. The stuff is on its way to me, but have not received it yet. I might need to take the fenders off to get better access, but not sure yet. Also, getting up under the dash to the inside is not gonna be easy...especially on the passenger side where the ac evaporator is sitting.
 06-17-2013, 12:44 PM
#360
Registered User
Thread Starter
Newberry - I'm pretty sure it is a Downey IFS frame brace, I bought it used from a member on here a couple years ago. I don't know if anyone makes this tubular style anymore. I guess all I can say is keep watching the classifieds, read all the SAS threads you can in case somebody in there has a brace they are removing. Good luck and welcome to the forum.


