
ChefYota4x4's 1987 4Runner Build-Up Thread
 02-02-2011, 03:16 AM
#1221
Registered User
 02-02-2011, 05:48 AM
#1222
Registered User
Join Date: Mar 2010
Location: Sc Pa
Posts: 365
Likes: 0
Received 0 Likes
on
0 Posts
Hey Chef I was looking back at your thread and I thought I saw that you put springs in the rear. What benefits does this give you? ANd if it wasn't your thread my bad I kinda get lost on this site. haha
02-02-2011, 06:06 AM
#1223
Registered User
B-yodaful your probably talking about the ZUK mod. Helps cure the saggy butt syndrome the yotas are prone to. And because many of us have springs that are wore out to the point our trucks are riding on the overload leaf (myself included), this can significantly improve the ride quality as well. There are a few ways to accomplish the "ZUK mod". There are several threads on here that you will find by searching for "zuk mod" or "zuk spring".
02-02-2011, 06:43 AM
#1226
Registered User
I know I'm a bit late on the chime in here but I'll give my 2 cents worth...
We'll start a few pages back. Oil pan, I didn't pull my front end apart to get the pan out...I raised the motor, unbolted the 2 engine mounts and raised the motor and pulled the steering dampener.
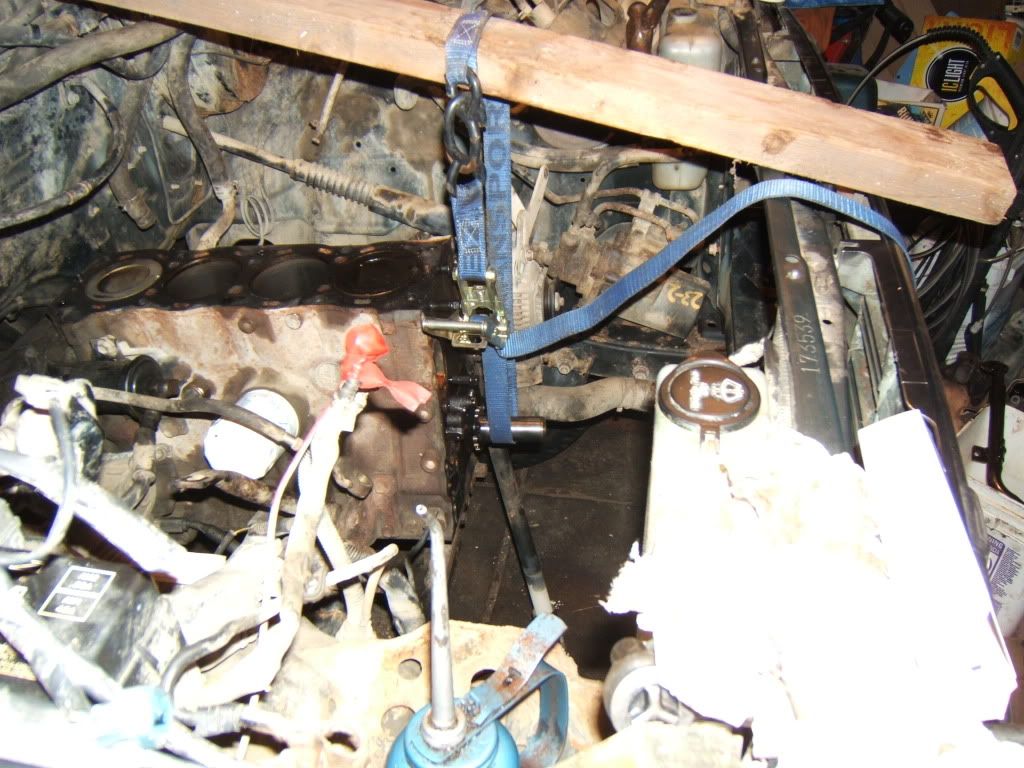
As for the timing cover gasket, I only used a wee bit of the Toyota sealant goop (FPIG i think) just enough to hold it on and keep it from falling the gasket supplied was all I used. Now for the oil pan I gooped the hell out of it except for the front. I put the pan in first, then gooped the front of the pan then installed the timing cover. I hope that makes sense.
As far as the cam goes...I'm running the 268 with the Street R/V head. I installed the Cam over a year ago and it made quite the difference. You get a bit more off idle and around 2800 it really comes alive. Then last summer I installed the Street R/V head, I can feel a bit more now. My next step will be the 261 because I don't run her over 4K I feel no need to I rarely run over 3500 rpm. For what I do I think the 261 pullin harder in the lower end will suite me better.
Now that I've hijacked again...On to your regular scheduled program.
.
We'll start a few pages back. Oil pan, I didn't pull my front end apart to get the pan out...I raised the motor, unbolted the 2 engine mounts and raised the motor and pulled the steering dampener.
As for the timing cover gasket, I only used a wee bit of the Toyota sealant goop (FPIG i think) just enough to hold it on and keep it from falling the gasket supplied was all I used. Now for the oil pan I gooped the hell out of it except for the front. I put the pan in first, then gooped the front of the pan then installed the timing cover. I hope that makes sense.
As far as the cam goes...I'm running the 268 with the Street R/V head. I installed the Cam over a year ago and it made quite the difference. You get a bit more off idle and around 2800 it really comes alive. Then last summer I installed the Street R/V head, I can feel a bit more now. My next step will be the 261 because I don't run her over 4K I feel no need to I rarely run over 3500 rpm. For what I do I think the 261 pullin harder in the lower end will suite me better.
Now that I've hijacked again...On to your regular scheduled program.
.
02-02-2011, 12:04 PM
#1228
Hey guys, ..... I'm still waiting on an answer from them, as to, "where is my timing kit?". LCE called me back and said, "Looked at the pics....that's not ours, not even if it was the plastic guide set we sell....which is about 2 per year. And, you never returned it to us... sorry man." So, there you have it. LCE sent me a print out of EVERYTHING, including the couple returns I made of things totally unrelated to this.
I'll deal with him, later. I have a couple new crises just popped up. Daughters truck got towed, .....my portion was 300$ to get it out. Can't leave it in there, it just accumulates. Long story, anyway...... now I'm really strapped. I'm going to pull the diff down today, etc., and try to get the pan out so I'm ready to put it back together with the stuff I ordered from engnbldr, yesterday. I just don't have time to wait for a judgment or anything right now, guys. Obviously, if they'd found it laying around their shop, i would think they'd return it. I don't take him for a thief, he doesn't need to be, seriously. Just something happened, I think, where the guy who took over on the top end, etc., didn't get the message to use that. Either way, I have NO idea where it is, lol. Now, what I DO have an idea on is that, someone, in that shop, was CLEARLY negligent. First the CAM, then the timing cover leaking like a pig?
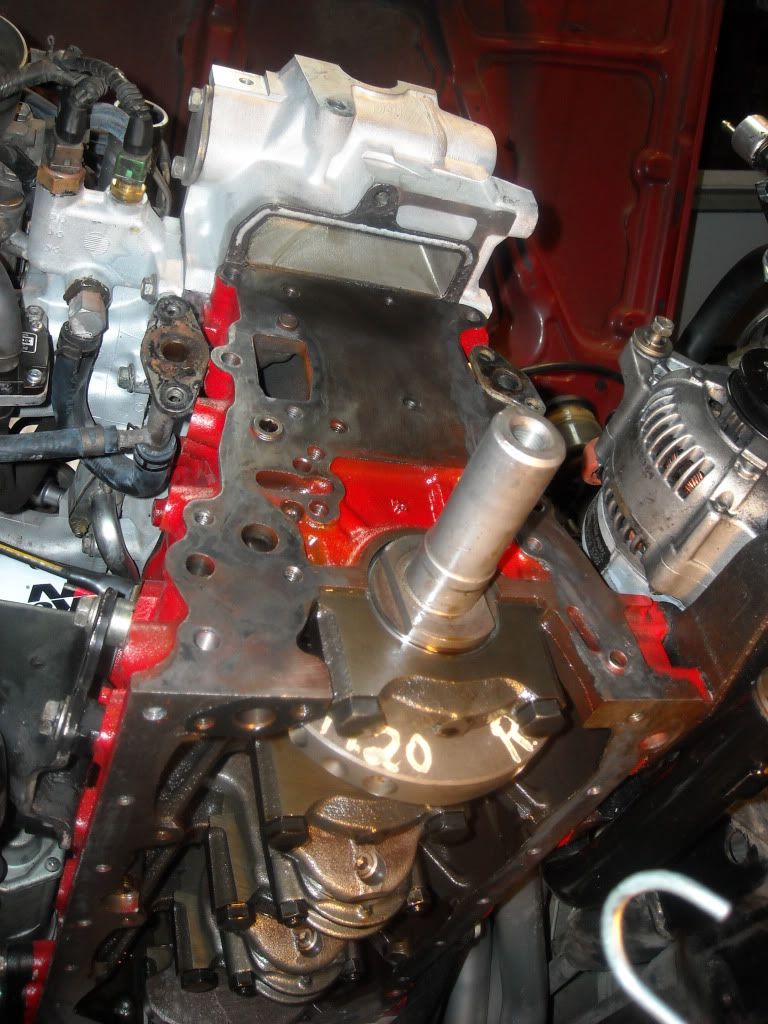
I hear ya all on the "no sealant on the rubber gaskets", ...but even Tod said, "Yeah, I put some here, there, ...and there and here", lol. You kwimean. haha. One thing I DID notice, just last night, ..... When looking at the oil channel in the cover where the oil galley is on the block.... there was NO SEALANT, period. It's just got the impression on the cover of that recess in the cover. Not sure if that did it, but I think it did. Pretty sure this gasket is paper....wont know till I peel the thing off the block, hopefully today.
Gotta read up today on the install of the new chain, etc., ...wish me luck, guys!
Mark
PS> Lumpy, howzit? Thanks for chiming in. Don't sweat it man. I highjack your thread all the time, lol. Not sure if you're saying, ............"didn't use ANY sealant on the outside of the timing cover gasket, between the gasket and cover.">>>>>>?????? I think that's clearly why mine leaked. I'm going to do a video of some things later, that included, before I slap it all together.
Brandon, ...thanks. Not sure I'm really comfortable with not using sealant on both sides of the gasket. That oil valley(lil squigly pit that archs around the oil pump galley, bottom left front side of the motor, facing the front) seems to be what caused my leak. It started out mild, but progressively, after I plugged up the bolt that it was leaking from,....it found another route, I believe above it. Kinda hard to do diagnosis with it off, ya know? But that's what I think.
I'll deal with him, later. I have a couple new crises just popped up. Daughters truck got towed, .....my portion was 300$ to get it out. Can't leave it in there, it just accumulates. Long story, anyway...... now I'm really strapped. I'm going to pull the diff down today, etc., and try to get the pan out so I'm ready to put it back together with the stuff I ordered from engnbldr, yesterday. I just don't have time to wait for a judgment or anything right now, guys. Obviously, if they'd found it laying around their shop, i would think they'd return it. I don't take him for a thief, he doesn't need to be, seriously. Just something happened, I think, where the guy who took over on the top end, etc., didn't get the message to use that. Either way, I have NO idea where it is, lol. Now, what I DO have an idea on is that, someone, in that shop, was CLEARLY negligent. First the CAM, then the timing cover leaking like a pig?
I hear ya all on the "no sealant on the rubber gaskets", ...but even Tod said, "Yeah, I put some here, there, ...and there and here", lol. You kwimean. haha. One thing I DID notice, just last night, ..... When looking at the oil channel in the cover where the oil galley is on the block.... there was NO SEALANT, period. It's just got the impression on the cover of that recess in the cover. Not sure if that did it, but I think it did. Pretty sure this gasket is paper....wont know till I peel the thing off the block, hopefully today.
Gotta read up today on the install of the new chain, etc., ...wish me luck, guys!
Mark
PS> Lumpy, howzit? Thanks for chiming in. Don't sweat it man. I highjack your thread all the time, lol. Not sure if you're saying, ............"didn't use ANY sealant on the outside of the timing cover gasket, between the gasket and cover.">>>>>>?????? I think that's clearly why mine leaked. I'm going to do a video of some things later, that included, before I slap it all together.
Brandon, ...thanks. Not sure I'm really comfortable with not using sealant on both sides of the gasket. That oil valley(lil squigly pit that archs around the oil pump galley, bottom left front side of the motor, facing the front) seems to be what caused my leak. It started out mild, but progressively, after I plugged up the bolt that it was leaking from,....it found another route, I believe above it. Kinda hard to do diagnosis with it off, ya know? But that's what I think.
02-02-2011, 12:13 PM
#1229
Registered User
I don't recall using anything on the timing cover...I might have used just a weee bit on there but not too much at all...
I think it'll be easier raising the motor a wee bit than pulling the diff out. See what all you have to do it's not much to do it. Worst part is getting the pan back in with FPIG on it and trying to get the pickup tube back on and staying clean...doesn't happen.
I hope you get your girls truck sorted out...Hate to hear about a tow just a waste of $$$ if you ask me. Don't like paying those guys but when you do need them well I guess ya gots to use them.
02-02-2011, 12:57 PM
#1230

Say it like this, When i rebuilt the front of my 22R with a new timing set, water pump, and oil pump i decided NOT to overdo the FIPK and just use a little bit to hold the gasket on,
What that resulted in was a water leak, i believe on the side of the timing chain cover somewhere or on the water pump itself.
I then had to tear it back down and this time i made sure it wasn't going to leak again.
I applied the FIPK generously to both the timing chain cover AND the front of the block.
Never had another leak from it.
If i were you id apply enough to both sides so that when you tighten the bolts it squeezes out about 1/4 inch of the FIPK out,
Then let it sit for 5 to 10 hours to give it plenty of time to dry and cure.
Then go out and tighten the bolts up the rest of the way.
If im correct thats the actual instructions on the stuff, Otherwise you just push it all out when you tighten the bolts up snug.
Last edited by Bojangles; 02-02-2011 at 01:01 PM. Reason: Accidently sent it before i was done :D
02-02-2011, 09:52 PM
#1232
Hey Lumpy, Bo, Spacer, ...... Sup guys? Thanks for the info/advice/input!
Well, including my rig project, work, dealing with the CA. Hwy Patrol Office(daughters truck....640$ IN REG., FEES AND TOW FEES!....yeah, not happy), Taking her to ER to get her stitches out......, my day started at 5am and ended at 9:45pm, including dinner....NON STOP RUNNING today! lol. Very wiped out, but it all worked out for the good!
Went with XXX's method(CAKE!...I know, I have NO rust and going back on WILL NOT be cake, lol). It honestly took me an hour, first bolt to last, to drop the pan. Of course, I had a good jack and HD stands, ....SURELY that helped. Anywhoooo, some pics and a video will explain it all as to "WHERE I'Z AT!" lol......
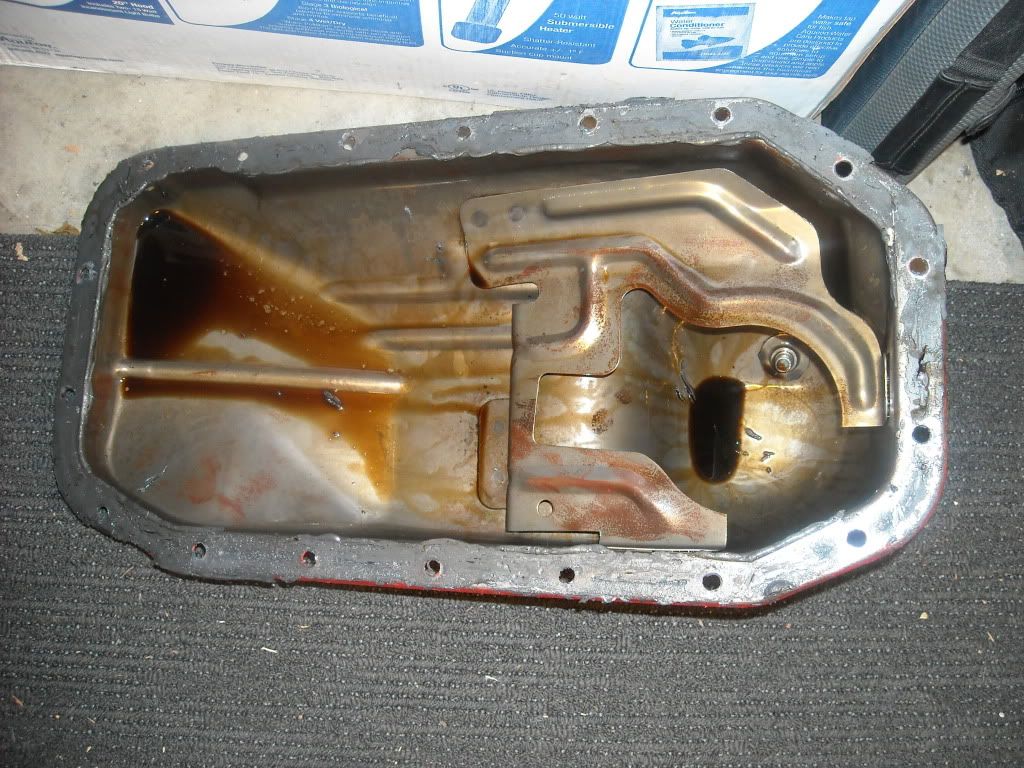
Couldn't find ANY metals at all in the pan, not a flake. I'm sure it's there, since all these tear downs, CRAP CAM that was in there, etc.,.....but luckily, nothing even visible. SERIOUSLY, thanks again, guys.... I'm a bit overwhelmed with just CRAP STORM AFTER CRAP STORM! lol......kinda stinks, hahaha.....but s'all good. Just have to keep on at it, ya know? And btw, ....YES, PISMO is a GOOD JOE! lol. Very good guy, and I respect him with age being of no factor at all. He HAS ALWAYS at least tried to help, and he often has... Looks like I'm ok though...but hey, ANY tips, I'd be grateful.

Well, including my rig project, work, dealing with the CA. Hwy Patrol Office(daughters truck....640$ IN REG., FEES AND TOW FEES!....yeah, not happy), Taking her to ER to get her stitches out......, my day started at 5am and ended at 9:45pm, including dinner....NON STOP RUNNING today! lol. Very wiped out, but it all worked out for the good!
Went with XXX's method(CAKE!...I know, I have NO rust and going back on WILL NOT be cake, lol). It honestly took me an hour, first bolt to last, to drop the pan. Of course, I had a good jack and HD stands, ....SURELY that helped. Anywhoooo, some pics and a video will explain it all as to "WHERE I'Z AT!" lol......
Couldn't find ANY metals at all in the pan, not a flake. I'm sure it's there, since all these tear downs, CRAP CAM that was in there, etc.,.....but luckily, nothing even visible. SERIOUSLY, thanks again, guys.... I'm a bit overwhelmed with just CRAP STORM AFTER CRAP STORM! lol......kinda stinks, hahaha.....but s'all good. Just have to keep on at it, ya know? And btw, ....YES, PISMO is a GOOD JOE! lol. Very good guy, and I respect him with age being of no factor at all. He HAS ALWAYS at least tried to help, and he often has... Looks like I'm ok though...but hey, ANY tips, I'd be grateful.
02-03-2011, 04:05 AM
#1234
Registered User
I thought ya might not be comfortable with putting it back on that way. I knew ya can get it out though. Good job. Did you wind up lifting the motor any?
02-03-2011, 08:23 AM
#1235
Thanks, Rob! Always enjoy hearing from ya. Chime in with anything ya gotz, k? Appreciate it, as always.
Nope, Brandon, ...no motor lift...... I had to try, w/out doing so, because, ....well, I was just EXHAUSTED, wanted to know if it'd be enough and am starting to push it on days into this! lol. I know, I only have so much time, waiting on parts, etc., etc.... so I'm not mad at myself or anything, hahaha.
Question, .....As it hangs there, is it REALLY hard on the hubs/CV's? I'm gonna support it from the Pinion with my jack, just in case, until I get it back in. Hope I haven't damaged anything. BTW, YES, THAT THINK IS FRIGGEN HEAVY! lol
02-03-2011, 08:33 AM
#1236
Registered User
haha I told ya, that's why I said, if your gonna remove the crossmember the LCA's won't like that weight, but you should be fine. Mine stayed that way just sitting with the tires on the ground for almost 2 months while I built the motor. No support under it whatsoever. Some people might feel differently though. But to me, when your in 4wd spanking the heck outta the CV's it's much more stress then the diff etc etc sitting propped up on the LCA's.
And that's also why I said it might take two people to put it back in place. Unless you can bench about 300lbs haha. Not sure how Jerry did his as he took the whole unit out due to the auto trans.
And that's also why I said it might take two people to put it back in place. Unless you can bench about 300lbs haha. Not sure how Jerry did his as he took the whole unit out due to the auto trans.
02-03-2011, 08:55 AM
#1237
Well, I can do it no problem with a jack.........meaning, NO PROBLEM on getting it back up and off the LCA's... I'm trying to figure out...."IF" I lift the motor as well..... can I possibly put the pick up tube on, first, then also have more room to get it in and quick.......Yeah, just thinking it over. I should be ok, and think there is more than enough room, w/the diff dropped, to actually coat it while it's up in there, AFTER I do the pick up tube. With this toyota-fipk stuff...... "wait for it to tac up" is NOT REALLY an issue, as it dries in like 4 minutes! lol.
02-03-2011, 11:14 AM
#1239
Registered User
iTrader: (4)
Join Date: May 2010
Location: People's Republic of California
Posts: 720
Likes: 0
Received 15 Likes
on
12 Posts
If you're just looking for a couple of extra hands and pair of eyes to help put it in place I can come help you, I'm in Torrance.
All I know is your having a heck of a time with this project and haven't had the time to read through the 50 pages of posts!...hahahaha. I wouldn't likely understand it all anyhow since I'm learning myself.
So, I can't help you with technical stuff on the 22re, but I can help you with my hands. I am putting a 2vz-fe back together on a 90' camry (changed head gaskets) and have had done very little work (knock on wood) on my 92' 22RE.
I'm available on Fridays in the morning and early afternoon. Let me know.
Greg
Last edited by Grego92; 02-03-2011 at 11:16 AM.
02-03-2011, 11:53 AM
#1240
haha I told ya, that's why I said, if your gonna remove the crossmember the LCA's won't like that weight, but you should be fine. Mine stayed that way just sitting with the tires on the ground for almost 2 months while I built the motor. No support under it whatsoever. Some people might feel differently though. But to me, when your in 4wd spanking the heck outta the CV's it's much more stress then the diff etc etc sitting propped up on the LCA's.
And that's also why I said it might take two people to put it back in place. Unless you can bench about 300lbs haha. Not sure how Jerry did his as he took the whole unit out due to the auto trans.
And that's also why I said it might take two people to put it back in place. Unless you can bench about 300lbs haha. Not sure how Jerry did his as he took the whole unit out due to the auto trans.


