
ChefYota4x4's 1987 4Runner Build-Up Thread

 01-29-2011, 09:23 AM
#1142
Registered User
Hey B,
Thanks. Yeah, what I meant about the Water Pump out pipe(yeah, it's part of the cover)....Can I slide out the cover and back on without removing the steering pump brace? I don't think the brace bolts through the cover, just onto the block in front on an open space. I would REALLY like to leave the steering attached to the head.... if possible It's not that bad once I get the dizzy out, true.... but MAN, they just don't seem to line up very easily when slapping that part back together.... PLUS....they can strip when you're having trouble, GRRR! LOL.
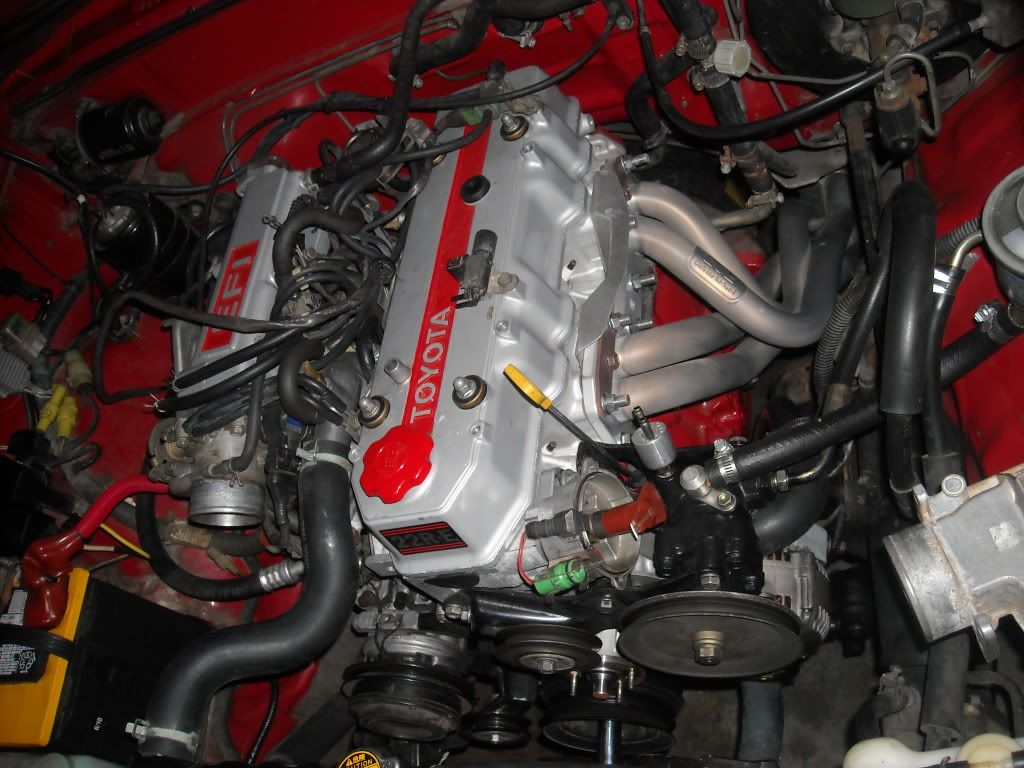
Here's where I got in an hour.......
Seems to be steaming right along here..... IN THIS "FANTASTICALACIOUS FUN TIME" OF EXACTLY WHAT I WANTED TO BE DOING,....still......to this day since April 2010~! hahaha. I mean, it's not as if I work slow, right guys? Has this friggen thing been a nightmare for me, over and over?....or am I just crazy?
Oh well, it's all good.... I got to meet MANY good people, and I'm still learning.... And........What's the first thing we should learn, boys and girls? "IF YOU CAN FIX IT YOURSELF, AND YOU'RE NOT A LAZY KNOB...... FIX IT YOURSELF!" lol. Lesson for the day, DONE! woot! Seriously, though....DON'T BE SCARED TO TRY, if it's not your only vehicle and you're wanting to learn,....FOR GOSH SAKES, LEARN! I could have built 3 FREAKIN TRUCKS BY NOW! lol. If you've been screwed over by MULTIPLE Auto mechanics and machinists, like me..... LEARN, or shut up! Fair enough? lol.
Thanks. Yeah, what I meant about the Water Pump out pipe(yeah, it's part of the cover)....Can I slide out the cover and back on without removing the steering pump brace? I don't think the brace bolts through the cover, just onto the block in front on an open space. I would REALLY like to leave the steering attached to the head.... if possible It's not that bad once I get the dizzy out, true.... but MAN, they just don't seem to line up very easily when slapping that part back together.... PLUS....they can strip when you're having trouble, GRRR! LOL.
Here's where I got in an hour.......
Seems to be steaming right along here..... IN THIS "FANTASTICALACIOUS FUN TIME" OF EXACTLY WHAT I WANTED TO BE DOING,....still......to this day since April 2010~! hahaha. I mean, it's not as if I work slow, right guys? Has this friggen thing been a nightmare for me, over and over?....or am I just crazy?
Oh well, it's all good.... I got to meet MANY good people, and I'm still learning.... And........What's the first thing we should learn, boys and girls? "IF YOU CAN FIX IT YOURSELF, AND YOU'RE NOT A LAZY KNOB...... FIX IT YOURSELF!" lol. Lesson for the day, DONE! woot! Seriously, though....DON'T BE SCARED TO TRY, if it's not your only vehicle and you're wanting to learn,....FOR GOSH SAKES, LEARN! I could have built 3 FREAKIN TRUCKS BY NOW! lol. If you've been screwed over by MULTIPLE Auto mechanics and machinists, like me..... LEARN, or shut up! Fair enough? lol.
PS - Man your motor still looks BRAND NEW! Mine has a nice brown dirt and mud huge to it since I spent all of that time cleaning it up, I guess that is what wheeling will get you, a dirty motor!
Last edited by yotarob2005; 01-29-2011 at 09:24 AM.
01-29-2011, 10:08 AM
#1143
Thanks, Rob, ....
I'm batting around ideas. I have to remove the steering pump and stuff's, AC pump and stuffs, then decide whether to go up with the motor or drop the diff....or both, lol. Brandon was saying, I THINK, Just loosen the bolt an inch or so and then the pan can SQUEEZE out... but as he said, he then pulled the motor. I just don't see how one would have time to get the pan back in with that lil room w/out risking the Toyota-OEM FIPK drying up or smudging on everything it's rubbin against, lol...then get the slathered bolts and nuts up and set without having some isssues.....
Guess it's probably best as the book says, "Unbolt the Diff, remove the idler/drop down steering linkage and remove crossmember to drop pan right out"....they make it sound so easy, hahaha.
Then, of course, there's the wrap around water pipes(they have to be ready when the cover goes on, as does the TC-HG surface....get some bolts in, etc., ...then I could worry about the pan going back up and on, last of all. Does that make any sense?
Anyone know of any 'THREADS' or tutorials, elsewhere, that I might find this job of re-doing the timing cover without removing the head? I'll look again, can't seem to find a good one.
Thanks, Rob,
Mark
01-29-2011, 10:18 AM
#1144
Registered User
I didn't pull the motor when I first dropped it. I dropped it by undoing all 3 diff bolts and layed the diff and cv's on the lower control arm. Also removed the steering shock and the oil pickup tube buy unbolting it from the block and laying it in the pan. This gave enough room to get it out, but was still tight. Enough to where I think a bead of silicone would get smudged upon install. The oil pan went back on the motor before it was installed. I used a gasket but don't do that, I didn't know I wasn't supposed to use the one that came with the kit. lol.
01-29-2011, 10:57 AM
#1145
Hey Brandon,
Thanks for the info. So, you did it the way the book said, eh? Seems like it. But I guess you didn't remove the idler arm with all attached, etc., right?
Still trying to get the steering pump and brace out.....the alternator bracket is in the way, I'll have to remove it from the timing cover and block, first, I think, in order to keep the whole steering pump aparatus bolted to the brace and idler pulley, etc. It's SO HARD to get that lined up once it's all broken down(was for me, anyway, lol).... so I'm trying to do it that way. Oh yeah, forgot to mention.. My brand new steering pump from O'reilly???? ....LEAKING! Its' leaking from the snap ring slot on the back, closest to and facing the head(that snap ring, bout 3/4" diameter)... Might be leaking from the larger seal too(where the front of the pump body bolts to the rest of the pump body), but I'm not screwing around with it. I'd go OEM, but even with dealerdirectparts.com being 38% less,...it's still 325$. Maybe I'll see if they have a better version or try Napa or something. I just don't have 325$ for this at the moment. FANTASTIC, EH? lol.
Next would be the AC and brace.....(probably gonna re-seal with my O-ring kit, the AC and hoses, while I have it out. Seem like a good idea or no?
Thanks again, B, Rob, etc....... I would still love to find a thread with step by steps for the removal of the pan on this friggen thing, lol. Maybe someone could spell out the order for me? Or, just go by the book?
01-29-2011, 11:01 AM
#1146
Registered User
nope steering stayed intact. Don't know what the FSM said how to do it. I did it on the fly with whatever tools I had in the truck making an off-road trip and dropped it in the middle of a field. lol.
01-29-2011, 11:25 AM
#1147
Actually, just battled with the pump pulley for 20 min.! lol. It's off, on to the rest to get it out.
Ok, but would you think it might be easier if I dropped the steering stuff's, w/idler, cross member and diff, to get it out and in clean? Or, am I getting into something I might not be up to? lol. Wish I had YOU and a FIELD to work on it with/in right about now, Brandon! lol.
Ok, but would you think it might be easier if I dropped the steering stuff's, w/idler, cross member and diff, to get it out and in clean? Or, am I getting into something I might not be up to? lol. Wish I had YOU and a FIELD to work on it with/in right about now, Brandon! lol.
01-29-2011, 11:32 AM
#1148
Registered User
if your gonna undo the motor mounts you "should" have enough room to get it out. Use your judgment. I don't know how much room you will need to feel comfortable.
01-29-2011, 11:36 AM
#1149
Right, I know... ok, well, I guess I COULD lift it a lil bit and drop the diff a lil bit, ....that's possible, right? And, yeah,I see what you mean about the pick-up tube... dang, that does change dimensions a bit. Ok, I'll think this out after I get all the crap off, lol... sound good?
Thanks, Brandon... sorry for asking silly questions, honest, lol. I just wanna plan ahead, borrow whatever I might need from my neighbor, etc. Can't be down for too long...but then again, I can't just work on it all day like I'd like to, either, haha.
Have a good one, ......I'm sure I will! lol
Thanks, Brandon... sorry for asking silly questions, honest, lol. I just wanna plan ahead, borrow whatever I might need from my neighbor, etc. Can't be down for too long...but then again, I can't just work on it all day like I'd like to, either, haha.
Have a good one, ......I'm sure I will! lol
01-29-2011, 11:42 AM
#1150
Registered User
make sure you have a 6 point socket (I wanna say 12mm) to fit those oil pickup tube bolts (3). I don't know if your motor was ever tore apart yet on the bottom end and those bolts were a major PITA to get loosened on mine. That pan will not come out with the tube still connected.
Just pay attention on where you jack the motor up don't put the jack on the oil pan. lol and make sure its not gonna be in the way taken the pan out. To get the pan out I had to lower the pan push it forward and then tilt it down on the back side and pull it out towards the trans.
Just pay attention on where you jack the motor up don't put the jack on the oil pan. lol and make sure its not gonna be in the way taken the pan out. To get the pan out I had to lower the pan push it forward and then tilt it down on the back side and pull it out towards the trans.
01-29-2011, 12:32 PM
#1151
make sure you have a 6 point socket (I wanna say 12mm) to fit those oil pickup tube bolts (3). I don't know if your motor was ever tore apart yet on the bottom end and those bolts were a major PITA to get loosened on mine. That pan will not come out with the tube still connected.
Just pay attention on where you jack the motor up don't put the jack on the oil pan. lol and make sure its not gonna be in the way taken the pan out. To get the pan out I had to lower the pan push it forward and then tilt it down on the back side and pull it out towards the trans.
Just pay attention on where you jack the motor up don't put the jack on the oil pan. lol and make sure its not gonna be in the way taken the pan out. To get the pan out I had to lower the pan push it forward and then tilt it down on the back side and pull it out towards the trans.
1. The entire motor was rebuilt, drop tanked and everything is new/tanked. Including the Oil Tube, which I installed to FSM specs, last. I think it was 14-24#? I found it in the book, so I'll find it again. But, long story short, yes, they should come right out with only 3K on a fresh motor, yeah?
2. CHECK! I will NOT jack it up by the oil pan, hahaha. I was gonna do it from the BHousing or borrow the hoist again and put my Snap-On cable on it, hoisting it up to it's max(safely) and go from there.
Far as the wiring I was asking about....anything I should remember, before lifting the motor?(I'ma look, but just wanna be sure in case I miss something. I know, the EFI is MUCH different on the 'harness' end of things... just curious.
01-29-2011, 02:10 PM
#1153
EXHAUST STUD QUESTION; .............PLEASE? LOL.
Ok, so, like I have said, "All the studs but the left top and right top go in tight, to 33#, no problem...no slipping, stripping, etc."....
I decided to try and fix the problem without removing the header and all the studs.. and I FIXED ONE! The Right Top(driver firewall) with a double nut procedure went in over a half inch, clean, and I have it tightened down to 31#, ...no problem! WOOT.
HOWEVER, ...when trying to do the same to the Top Left(radiator side).... The stud DID cruise in another almost half inch, using the double nut method. BUT...... THE NUT, EVEN IF IT'S BRAND NEW, just turns and turns at no more than 18# or so. WTH???? I marked the top of the stud with permanent marker, used a closed end wrench on it..... THE STUD IS NOT TURNING! again, WTH????? To answer this, now, ....THE STUD THREADS LOOK FINE AND THE LOCKER NUT IS BRAND NEW.......IT STILL WONT TIGHTEN! WTH? HAHAHA.
I just would LOVE to have something go my way, so if you all think it's ok to try using a lock washer behind the nut...... I'll try that. Don't wanna damage anything, so let me know either way if it's ok, ....OK? haha
Last edited by ChefYota4x4; 01-29-2011 at 02:11 PM.
 01-29-2011, 02:19 PM
#1155
Yeah, that's the thing....it's ALREADY all new LCE studs and nuts.....from their packaging.....and every single one but this one will tighten! BTW, how could it be the stud if the stud is seated and not turning?(you saying maybe the threads are lunch meat? ...cuz they look spotless, and so does the nut, and I see NO metal shavings, etc.)...
I have a whole new LCE stud and lock nut kit, .....but I wanna try to use this exhaust gasket(came with the LCE header) and stud and nut kit until, well, it blows up! lol. That way, when it finally needs changing(60K-100K or so?) I'll have the Remflex gasket and LCE stud kit, ready to go in my storage closet.
Any clue how the nut could be turning but not the stud and no threads seem to be damaged??? I even tried an old exhaust nut..... same thing.
IS IT OK TO USE A LOCK WASHER?
01-29-2011, 02:29 PM
#1156
Registered User
ah didn't realize you already got the lce kit, try this, flip that stud around and try using the other side. When I did mine, I locktied the head side threads with red locktite and used anti-seize on the outer threads.
01-29-2011, 02:32 PM
#1157
Ok, .... I'll try that, for sure. I definitely don't wanna damage the head, and considering that the stud IS IN TIGHT AND NOT SPINNING.... I can't see why it's not doing it's job. I might just use one of the new LCE studs and pop it in there, goot'n'tight! hahaha. I guess the only thing that makes sense is that the stud threads are either machined wrong(GO FIGURE, A MACHINIST SCREWING ME AGAIN! HAHA)... orrrrrrrrrr, it's just munched down from trying to tighten it a few times...thus, not letting the lockers lock on there.
Make any sense? I seem to have the craziest crap happen to me, hahaha.
Make any sense? I seem to have the craziest crap happen to me, hahaha.
01-29-2011, 02:51 PM
#1158
Registered User
wait your using the old studs with the new LCE nuts? Thought you were just switching them out now. Shouldn't be an issue though. But you never know.
the studs themselves don't need to be tight. When I did mine I just made them finger tight with the loctite. That way if they happened to turn while putting the nuts on that I knew the stud itself wouldn't damage the threads in the head.
the studs themselves don't need to be tight. When I did mine I just made them finger tight with the loctite. That way if they happened to turn while putting the nuts on that I knew the stud itself wouldn't damage the threads in the head.
01-29-2011, 03:00 PM
#1159
OOHRAHHHH!
Hahaha..... Well, as I was about to head off the Home Depot... that lil voice of perseverance in my head said, 'HELL NO, YOU'RE GONNA GET OUT THAT STUD, PUT IN A NEW ONE, RED LOCK TITE, NEW LOCK NUT....AND IT'S GONNA WORK!!!!', hahaha.... Yep, it worked, and I'm STOKED!
Thanks, Brandon, so much. That's why I needed just an all around "try this or this or this", ...ya see? lol. Cuz I couldn't figure out why it was spinning. The head lost a couple rows of threads, as I cleaned it out and got a shower of aluminum, hahaha. But not too much, and when I re-inserted the new stud, it WENT WAY further in(ok, that didn't sound right, but you KWIMean! lol)
Seriously, thanks man! Simple plan I overlooked, because I have a bunch of stuff on my mind!
Ok, well that's good, now on to removing the AC!
Last edited by ChefYota4x4; 01-29-2011 at 03:08 PM.
01-29-2011, 03:21 PM
#1160
Registered User


