
ChefYota4x4's 1987 4Runner Build-Up Thread
 11-12-2013, 10:35 PM
#7981
Registered User
I need to fill the void areas in my rack. I got the suggestiion to use plastic mesh. Forgot the type. Not done yet of course so I have character dents on the roof.
 11-13-2013, 08:45 AM
#7982
Contributing Member
Join Date: Mar 2003
Location: COTKU,Ontario,Canada
Posts: 11,334
Likes: 0
Received 0 Likes
on
0 Posts
Looking good Chef... very clean install... curious do your side lights have the option for "both" or just left/right... just thinking it might be helpful sometimes to be able to light up a full 360... when evading zombies for example lol...
11-13-2013, 10:12 AM
#7983
Thank you, Paul! I'm not sure I understand exactly what you're asking me. The switch on the left in my dash controls the forward facing roof lights and 20 inch on the bumper... The center switch controls both sides at once on the roof rack, let's see East / West, if the front bumper is north... The farthest switch to the right controls the a-hole or rear facing lights... They are soft touch so basically by sweeping my finger across the three and considering the fact LED's are instantaneous in regards to switch/illumination... I can definitely do it zombie apocalypse lighting and have all of them lit within one tenth of a second... Is that okay? Hahaha.
Actually, I think I've explained, but in case people are wondering why I even have different switches... On the trails at night, most people have a forward facing lights but not reverse or side facing. It really depends where I should be in the convoy, because one of the problems wheeling rocks at night is being able to backup, which happens constantly. It can take 2 hours to get up 100 yards if the trailer extreme enough. Obviously having lights to the side wouldn't hurt either to see if there is a better line and to speed things up... Because, wheeling at night takes much longer than it takes already! Lol....
My real point and having multiple switches is that if someone is behind me, I can decide not to blame them right in their face with 6000 lumen!...lol... I simply select the side lights and forward facing, and the guy behind me has his own lights for the ground in front of him... I can only run forward facing or only run side facing... I think it's really helpful when wheeling with the group, which people should always do and especially at night! Also, if somebody loses their off road lights are doesn't even have them, I could go ahead of them and light up the trail with my backup lights. I could also like the proportion of camp and not the entire campground... I would love to have they switch for each side, but I could not fit 4 switches in that portion of the dash, and the more you add... You know what I mean? That would mean 4 relays for my off road lights.
I hope that answers your questions of the questions of others. Goodness, is this the 400th page???????? Wow... That's kind of cool!
11-13-2013, 10:37 AM
#7984
Registered User
You're catching up to the page count of the Post your Pix thread lol jk
Lights came out great Mark. Hurry up and finish them. I wanna see a video of them in action!
I'm hoping it starts getting dark this saturday toward the end of the trip so we can test out the lights and illuminate the entire forrest lol well at least you will. Mine will only be with what is in front of me.
11-13-2013, 03:12 PM
#7986
11-14-2013, 12:19 AM
#7987
Thanx guys! You crack me up! Haha.....
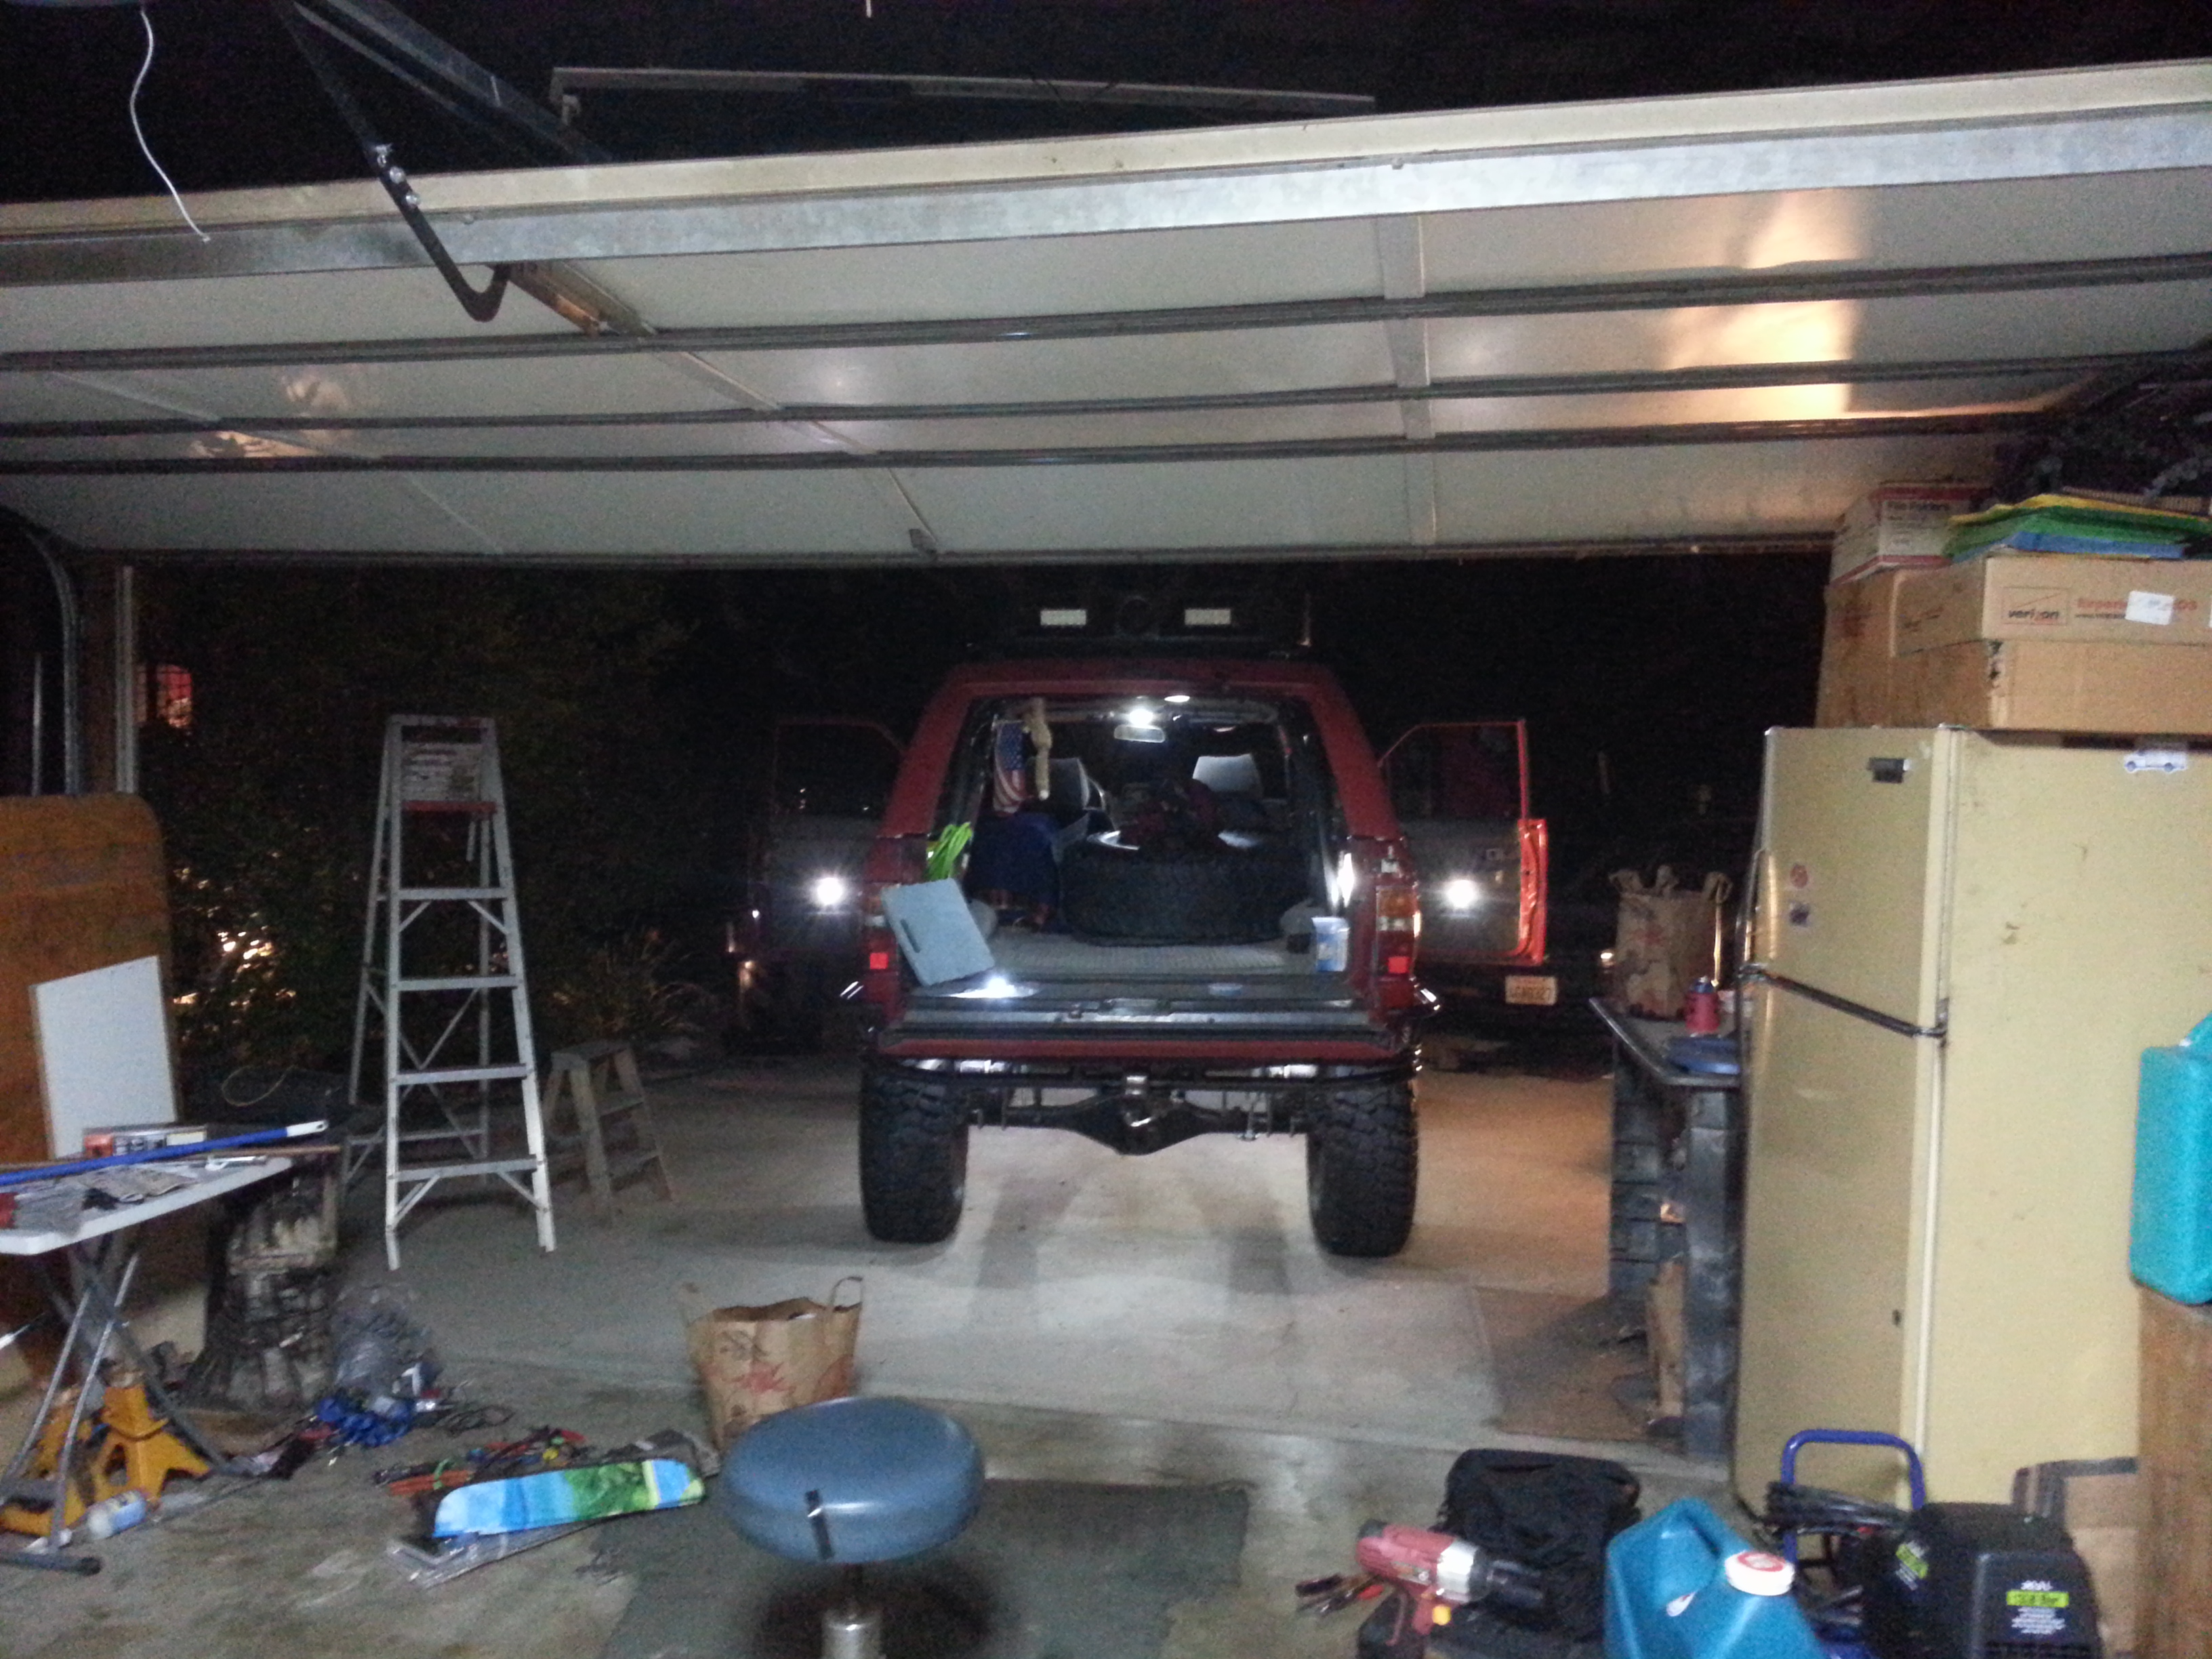
READY TO MOUNT THE DAYummLIGHT Rack! Haha! .... Really excited, they work really well....
Doing the wiring for the roof lights was quite the tedious job... If I ran the mall on one switch, it would have been a different story... But I didn't, lol. That's okay, it's well worth it...
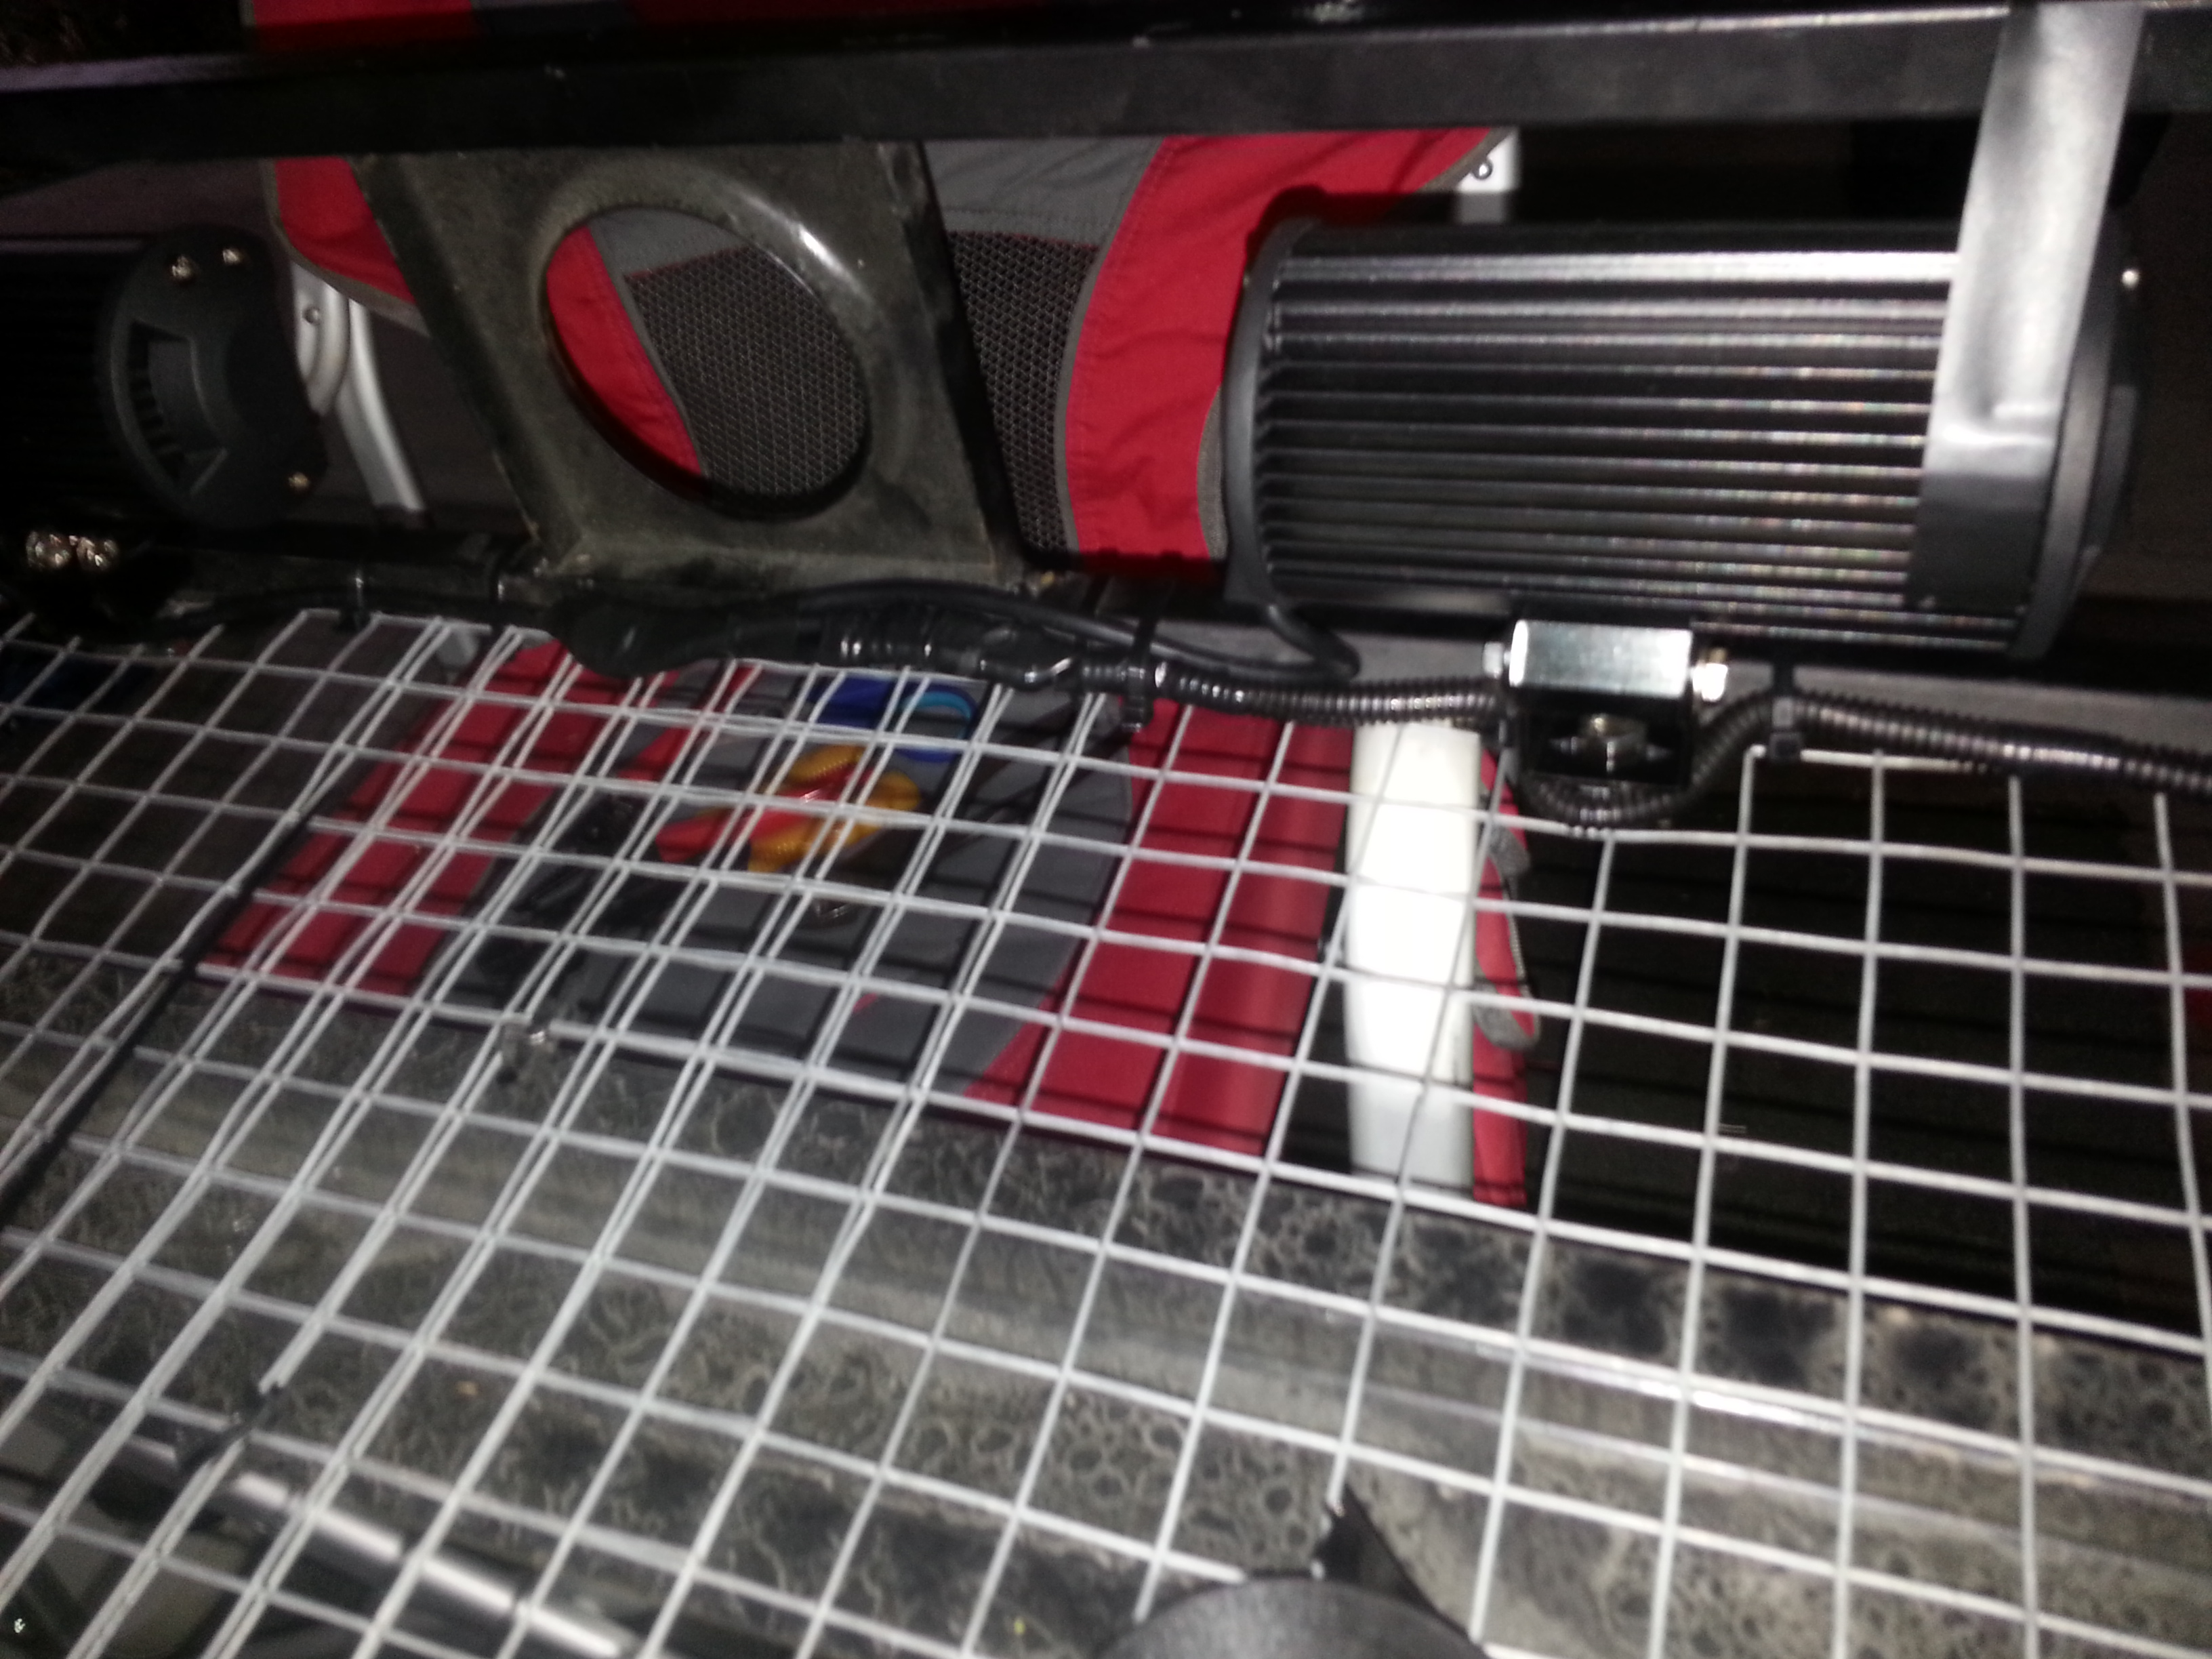
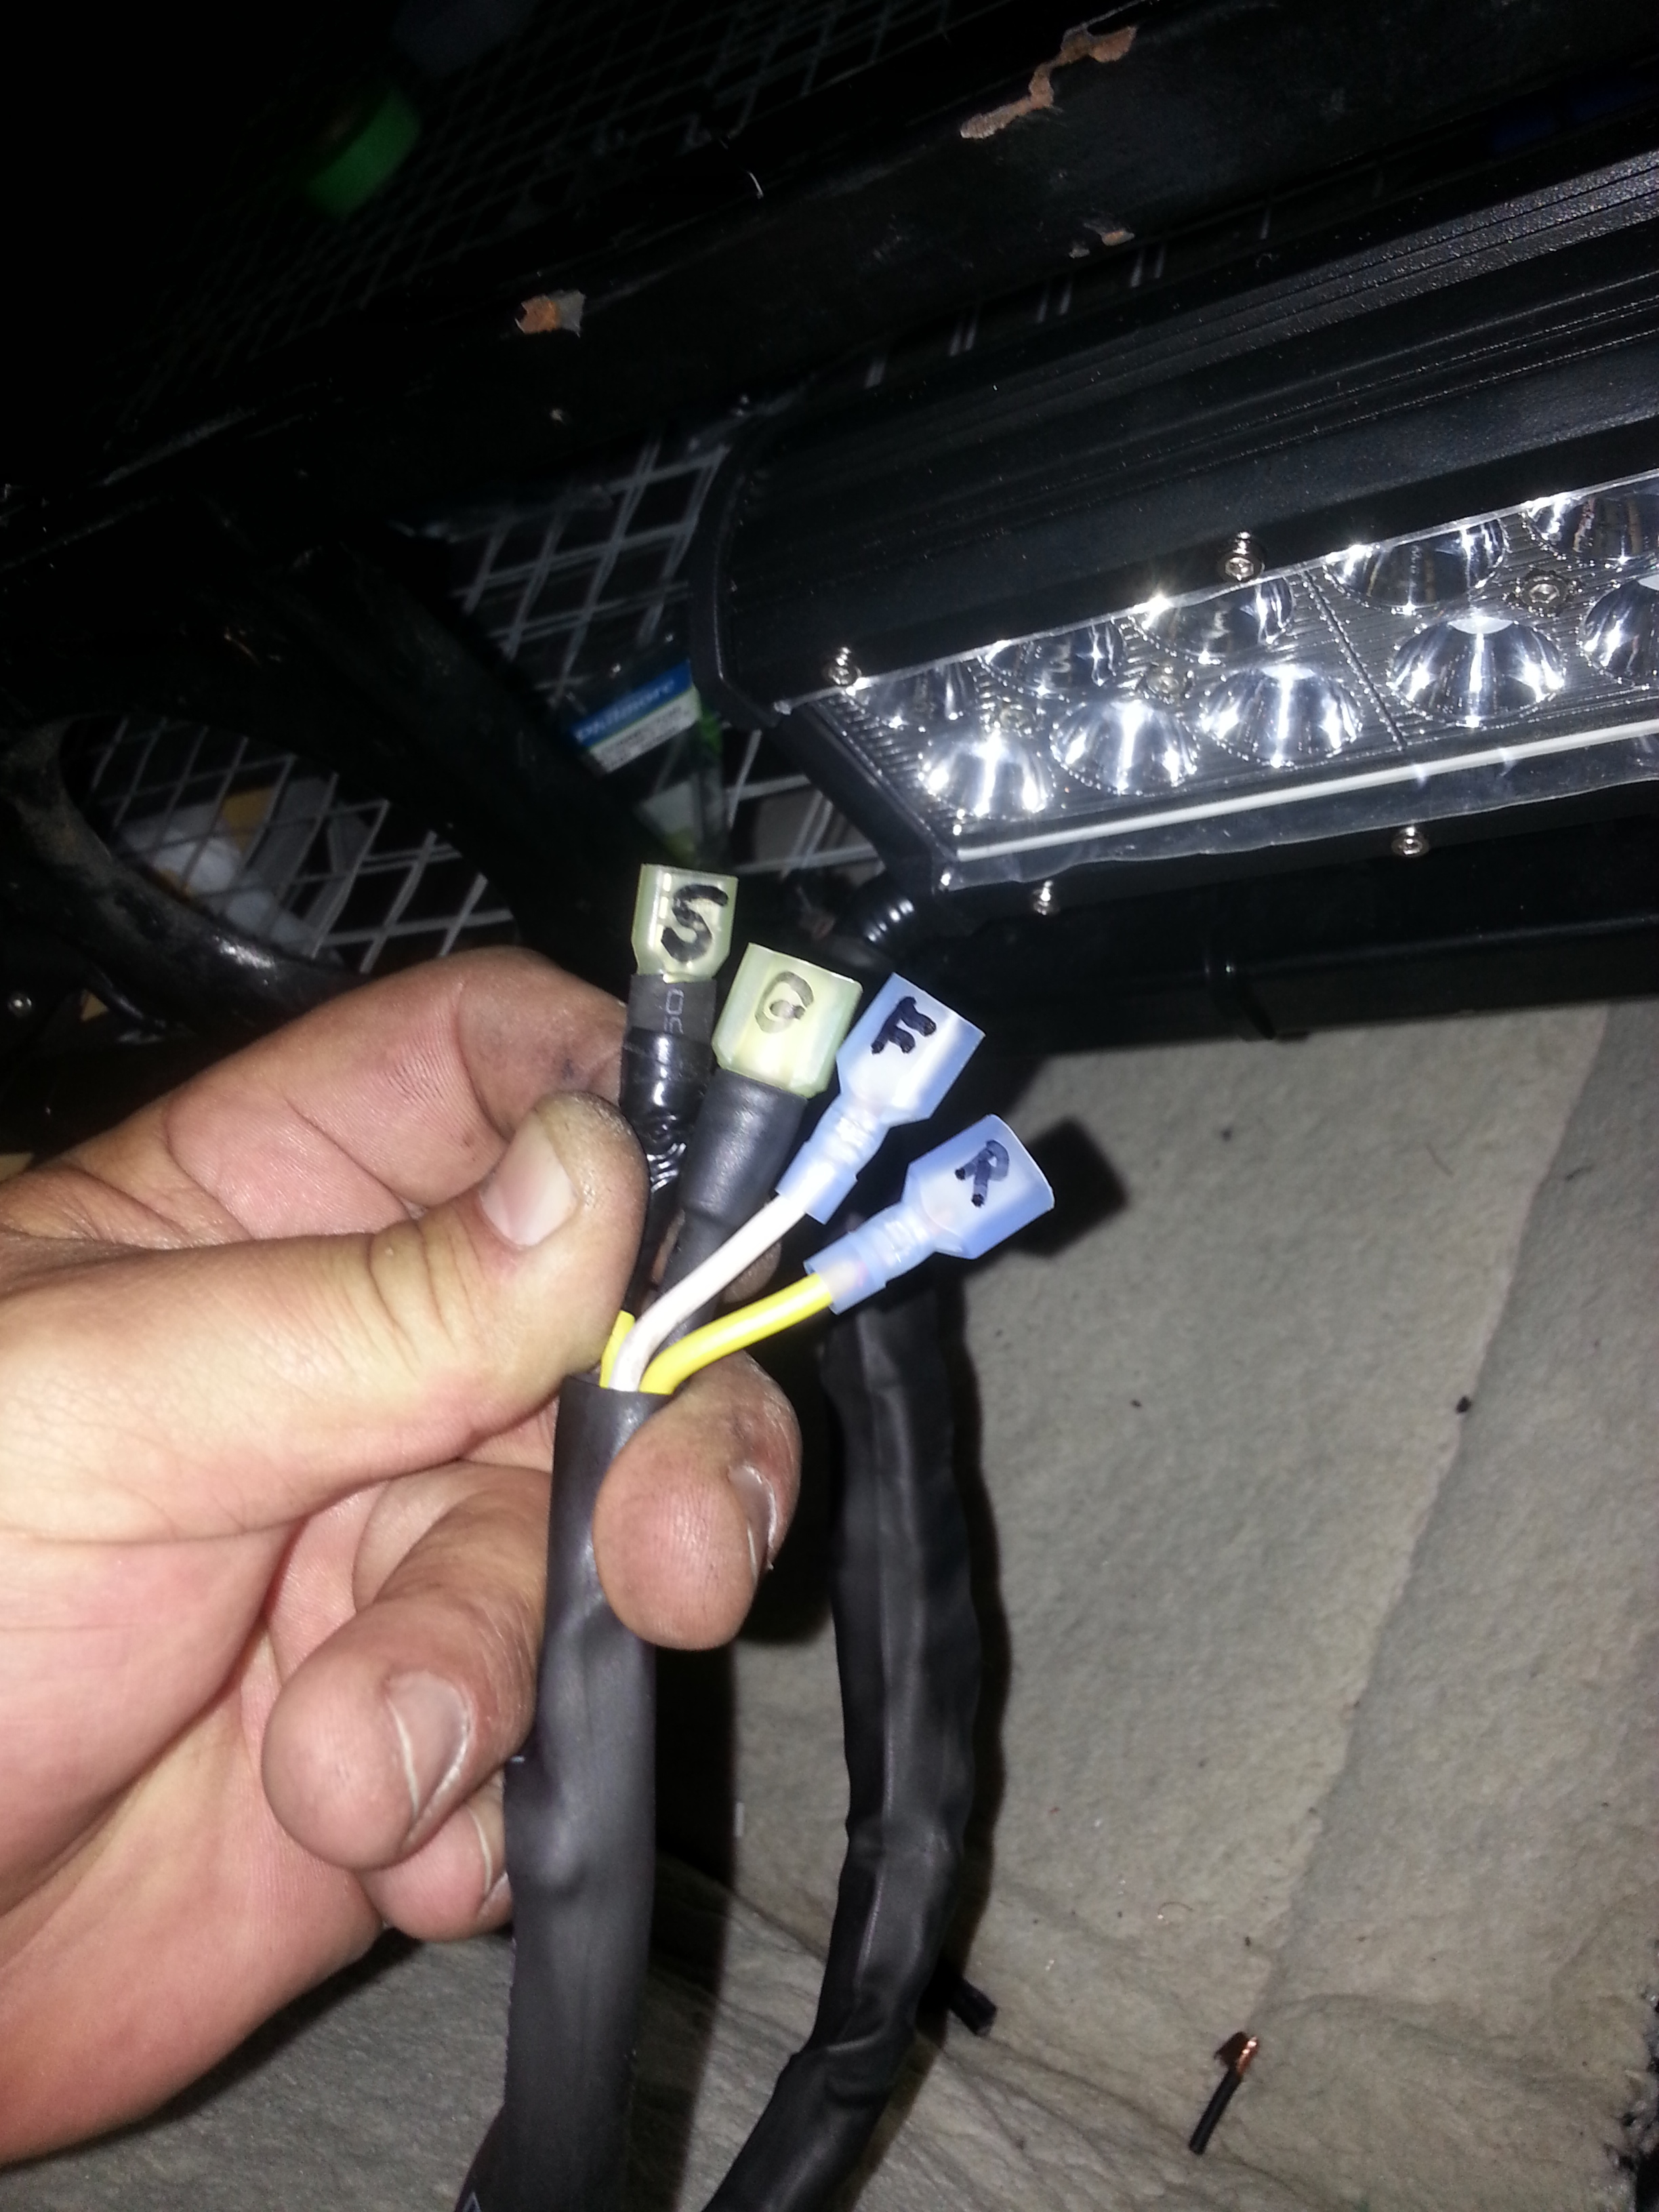
First, I tide the rear facing life together and write on them along the driver side of the rack... I used one ground for all the lights, tying them all together fine try to ring the pairs together and then running background to the next set, and then out the front. Positives worked differently obviously... But, I had to tie both SIDES lights pairs together into one in the front... Here's some pictures of the wiring and my quick connects at the very end which is on around a 15 inch strand that is all heart shrunk and tied tightly together ...
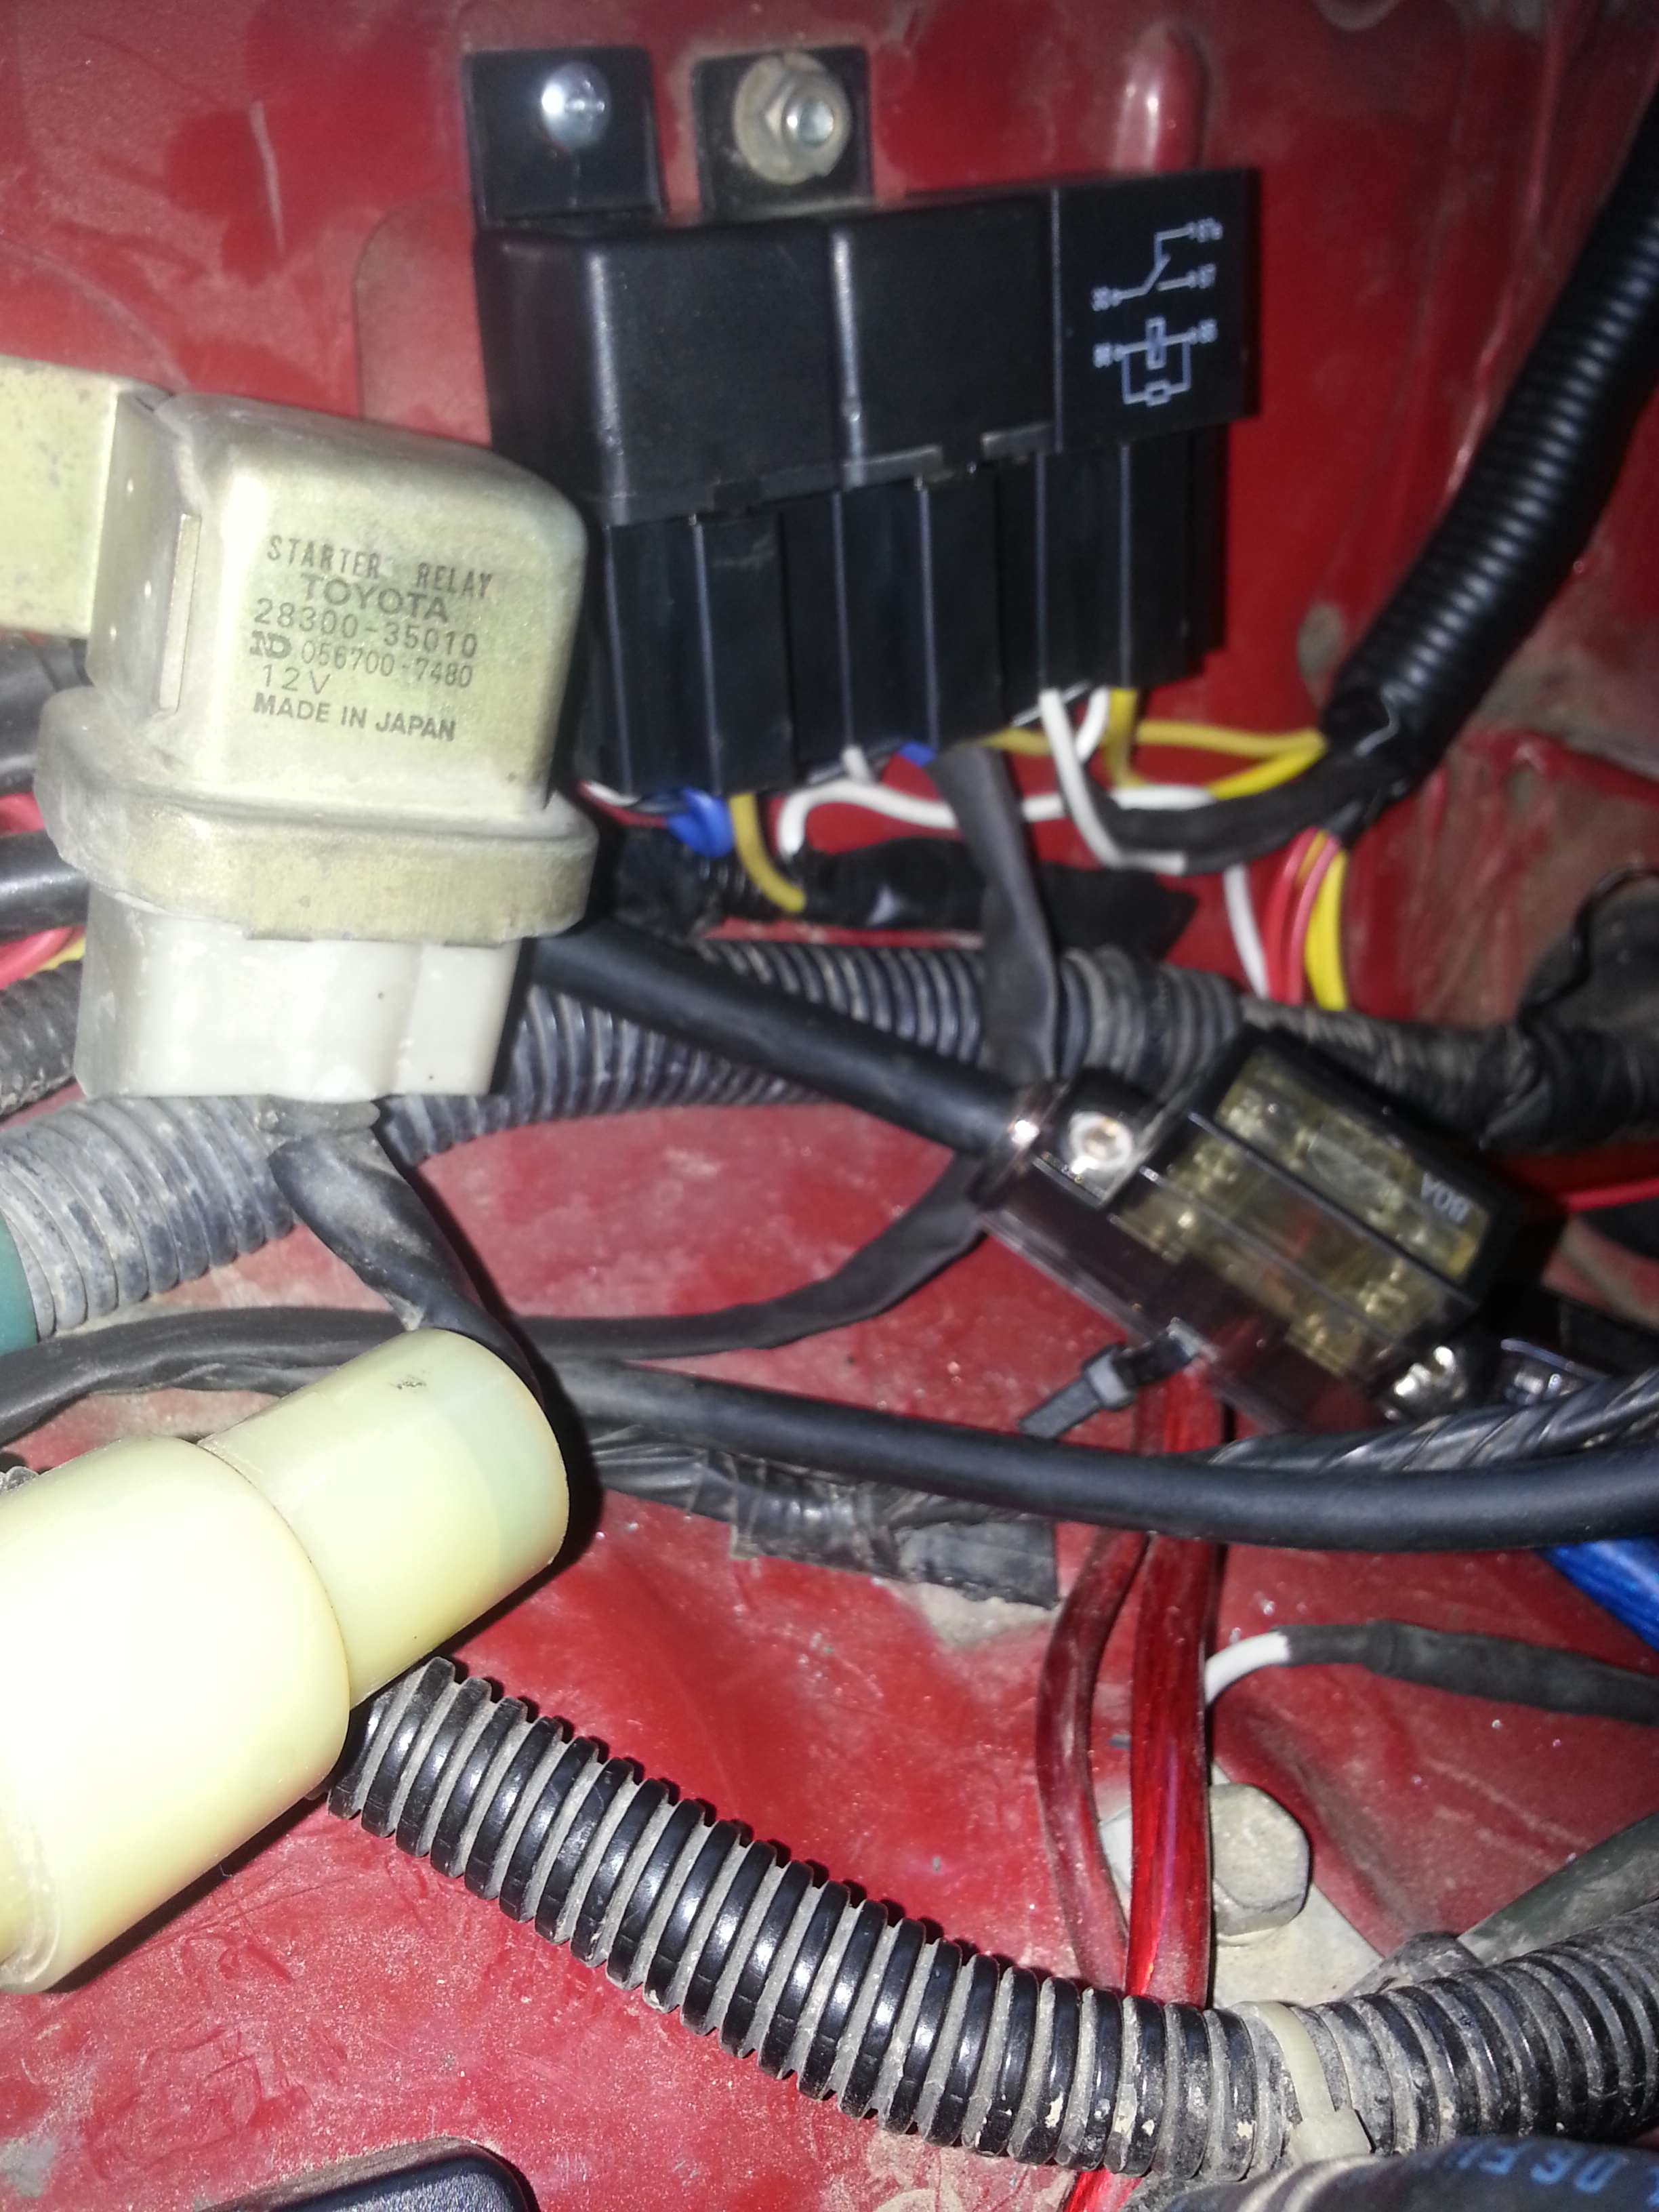
But first, the relays, which I've cleaned up a little bit more... Still, its all clean and all three grounds are tied together as shortly as possible right behind the relays/ to the left... The loom off to the right is all going down and was tied tightly together and ran through the grommet....
Her some pictures of the rack wiring and the Loom that will get its related hour through the roof....
Little video for my homies and for reflection... I worked really hard on this, to make sure its clean and will not give me any problems. Felt really good today all lit up instantly the first time!....
READY TO MOUNT THE DAYummLIGHT Rack! Haha! .... Really excited, they work really well....
Doing the wiring for the roof lights was quite the tedious job... If I ran the mall on one switch, it would have been a different story... But I didn't, lol. That's okay, it's well worth it...
First, I tide the rear facing life together and write on them along the driver side of the rack... I used one ground for all the lights, tying them all together fine try to ring the pairs together and then running background to the next set, and then out the front. Positives worked differently obviously... But, I had to tie both SIDES lights pairs together into one in the front... Here's some pictures of the wiring and my quick connects at the very end which is on around a 15 inch strand that is all heart shrunk and tied tightly together ...
But first, the relays, which I've cleaned up a little bit more... Still, its all clean and all three grounds are tied together as shortly as possible right behind the relays/ to the left... The loom off to the right is all going down and was tied tightly together and ran through the grommet....
Her some pictures of the rack wiring and the Loom that will get its related hour through the roof....
Little video for my homies and for reflection... I worked really hard on this, to make sure its clean and will not give me any problems. Felt really good today all lit up instantly the first time!....
11-14-2013, 05:53 AM
#7989
Registered User
Major props on the lights dude.
Not sure if you covered this already or not, but what was the reason you didn't use a trailor-like connector again? I thought you said it would have been easier that route because it'd be just one big connector for all of the lights. I'm assuming it was probably cleaner and and took up less space with the way you did it. Right?
So you mounting this baby on today?
Last edited by Redeth005; 11-14-2013 at 06:58 AM.
 11-14-2013, 03:04 PM
#7992
... what was the reason you didn't use a trailor-like connector again? I thought you said it would have been easier that route because it'd be just one big connector for all of the lights. I'm assuming it was probably cleaner and and took up less space with the way you did it. Right?
11-15-2013, 01:19 AM
#7993
Major props on the lights dude.
Not sure if you covered this already or not, but what was the reason you didn't use a trailor-like connector again? I thought you said it would have been easier that route because it'd be just one big connector for all of the lights. I'm assuming it was probably cleaner and and took up less space with the way you did it. Right?
So you mounting this baby on today?
Not sure if you covered this already or not, but what was the reason you didn't use a trailor-like connector again? I thought you said it would have been easier that route because it'd be just one big connector for all of the lights. I'm assuming it was probably cleaner and and took up less space with the way you did it. Right?
So you mounting this baby on today?
Actually, the reason that I used separate connectors is so that if I have a problem I can disconnect them one of the time... If I connect all for it once or pairs, the ground will have to run with something ... I will post more pictures later but the way I've done it it's completely sealed and yet I can still get in there fairly easily. I will possibly be doing a connector, it's actually around one that would fit in the hole and mount flush with the roof ... II connectors would be on the opposite side... Something similar to say the turn signal connector.... But with more pins. I explained all this to Richard on the phone shortly after he posted this question....
11-15-2013, 08:40 AM
#7994
How's it going guys? Well... another lengthy post deleted about 5 seconds before I was going to post it. I don't have the time right now nor the patience to redo it. Trying to get out of here... Hopefully sometime today I can do a good quality video write-up: all the wiring and we'll a set ups and the very funny, after the fact, troubleshooting I had upon first touch of the switch to turn on the lights. It should be a good write-up with a good video tutorial..... It's just that all the write-up portion takes forever and it was gone in an instant... So I have to wait till I can sit down by the fireplace or something pop open the laptop and lay it out! Lol.
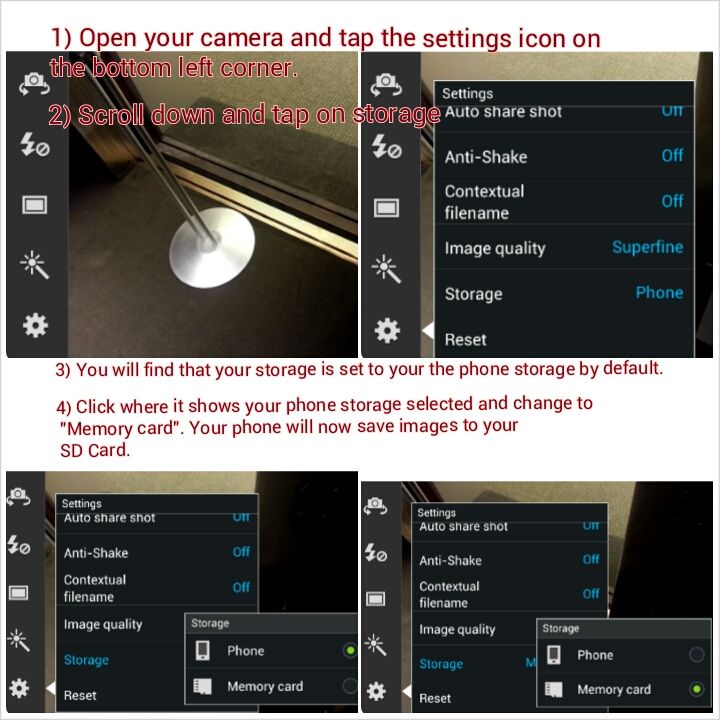
I have a question though, does anyone know how I can get my phone to record videos and store them into the microSD 64 gigabyte card? Lol... I know I can move in there but that's such a pain in the b*** to have to stop and do that. Can I just have them go directly to their while recording? Probably not I would imagine. I have so much space in there, and I get super upset when I miss something because it stops recording due to memory... Anyhow, that's all I was wondering as far as that goes. I can't wait to explain all that stuff about the wiring or relay or switch, so forth... I don't want to tell you until I can type it all out. Haha. But I'm going to point out a bunch of good bullet points on checking stuff out as you go and at the end how to rule out culprits as quickly as possible.
I have a question though, does anyone know how I can get my phone to record videos and store them into the microSD 64 gigabyte card? Lol... I know I can move in there but that's such a pain in the b*** to have to stop and do that. Can I just have them go directly to their while recording? Probably not I would imagine. I have so much space in there, and I get super upset when I miss something because it stops recording due to memory... Anyhow, that's all I was wondering as far as that goes. I can't wait to explain all that stuff about the wiring or relay or switch, so forth... I don't want to tell you until I can type it all out. Haha. But I'm going to point out a bunch of good bullet points on checking stuff out as you go and at the end how to rule out culprits as quickly as possible.
11-15-2013, 08:53 AM
#7995
Suppose I could post a couple pictures already have on Photobucket & YouTube( the videos are Instagram video so they're only 15 seconds long... Doesn't give me much time, haha... So I will do better ones, hopefully tonight)
All cleaned up and cleaned out... I had so much crap in there, you can't believe it, including tools and wire clipings & the carpet was pulled back and all that... I'm anxious to show you guys how clean I did this as far as the wiring going up to the relays.... Up to the roof... et cetera... Just a little interior shot or two as I was getting ready last night, for Big Bear....
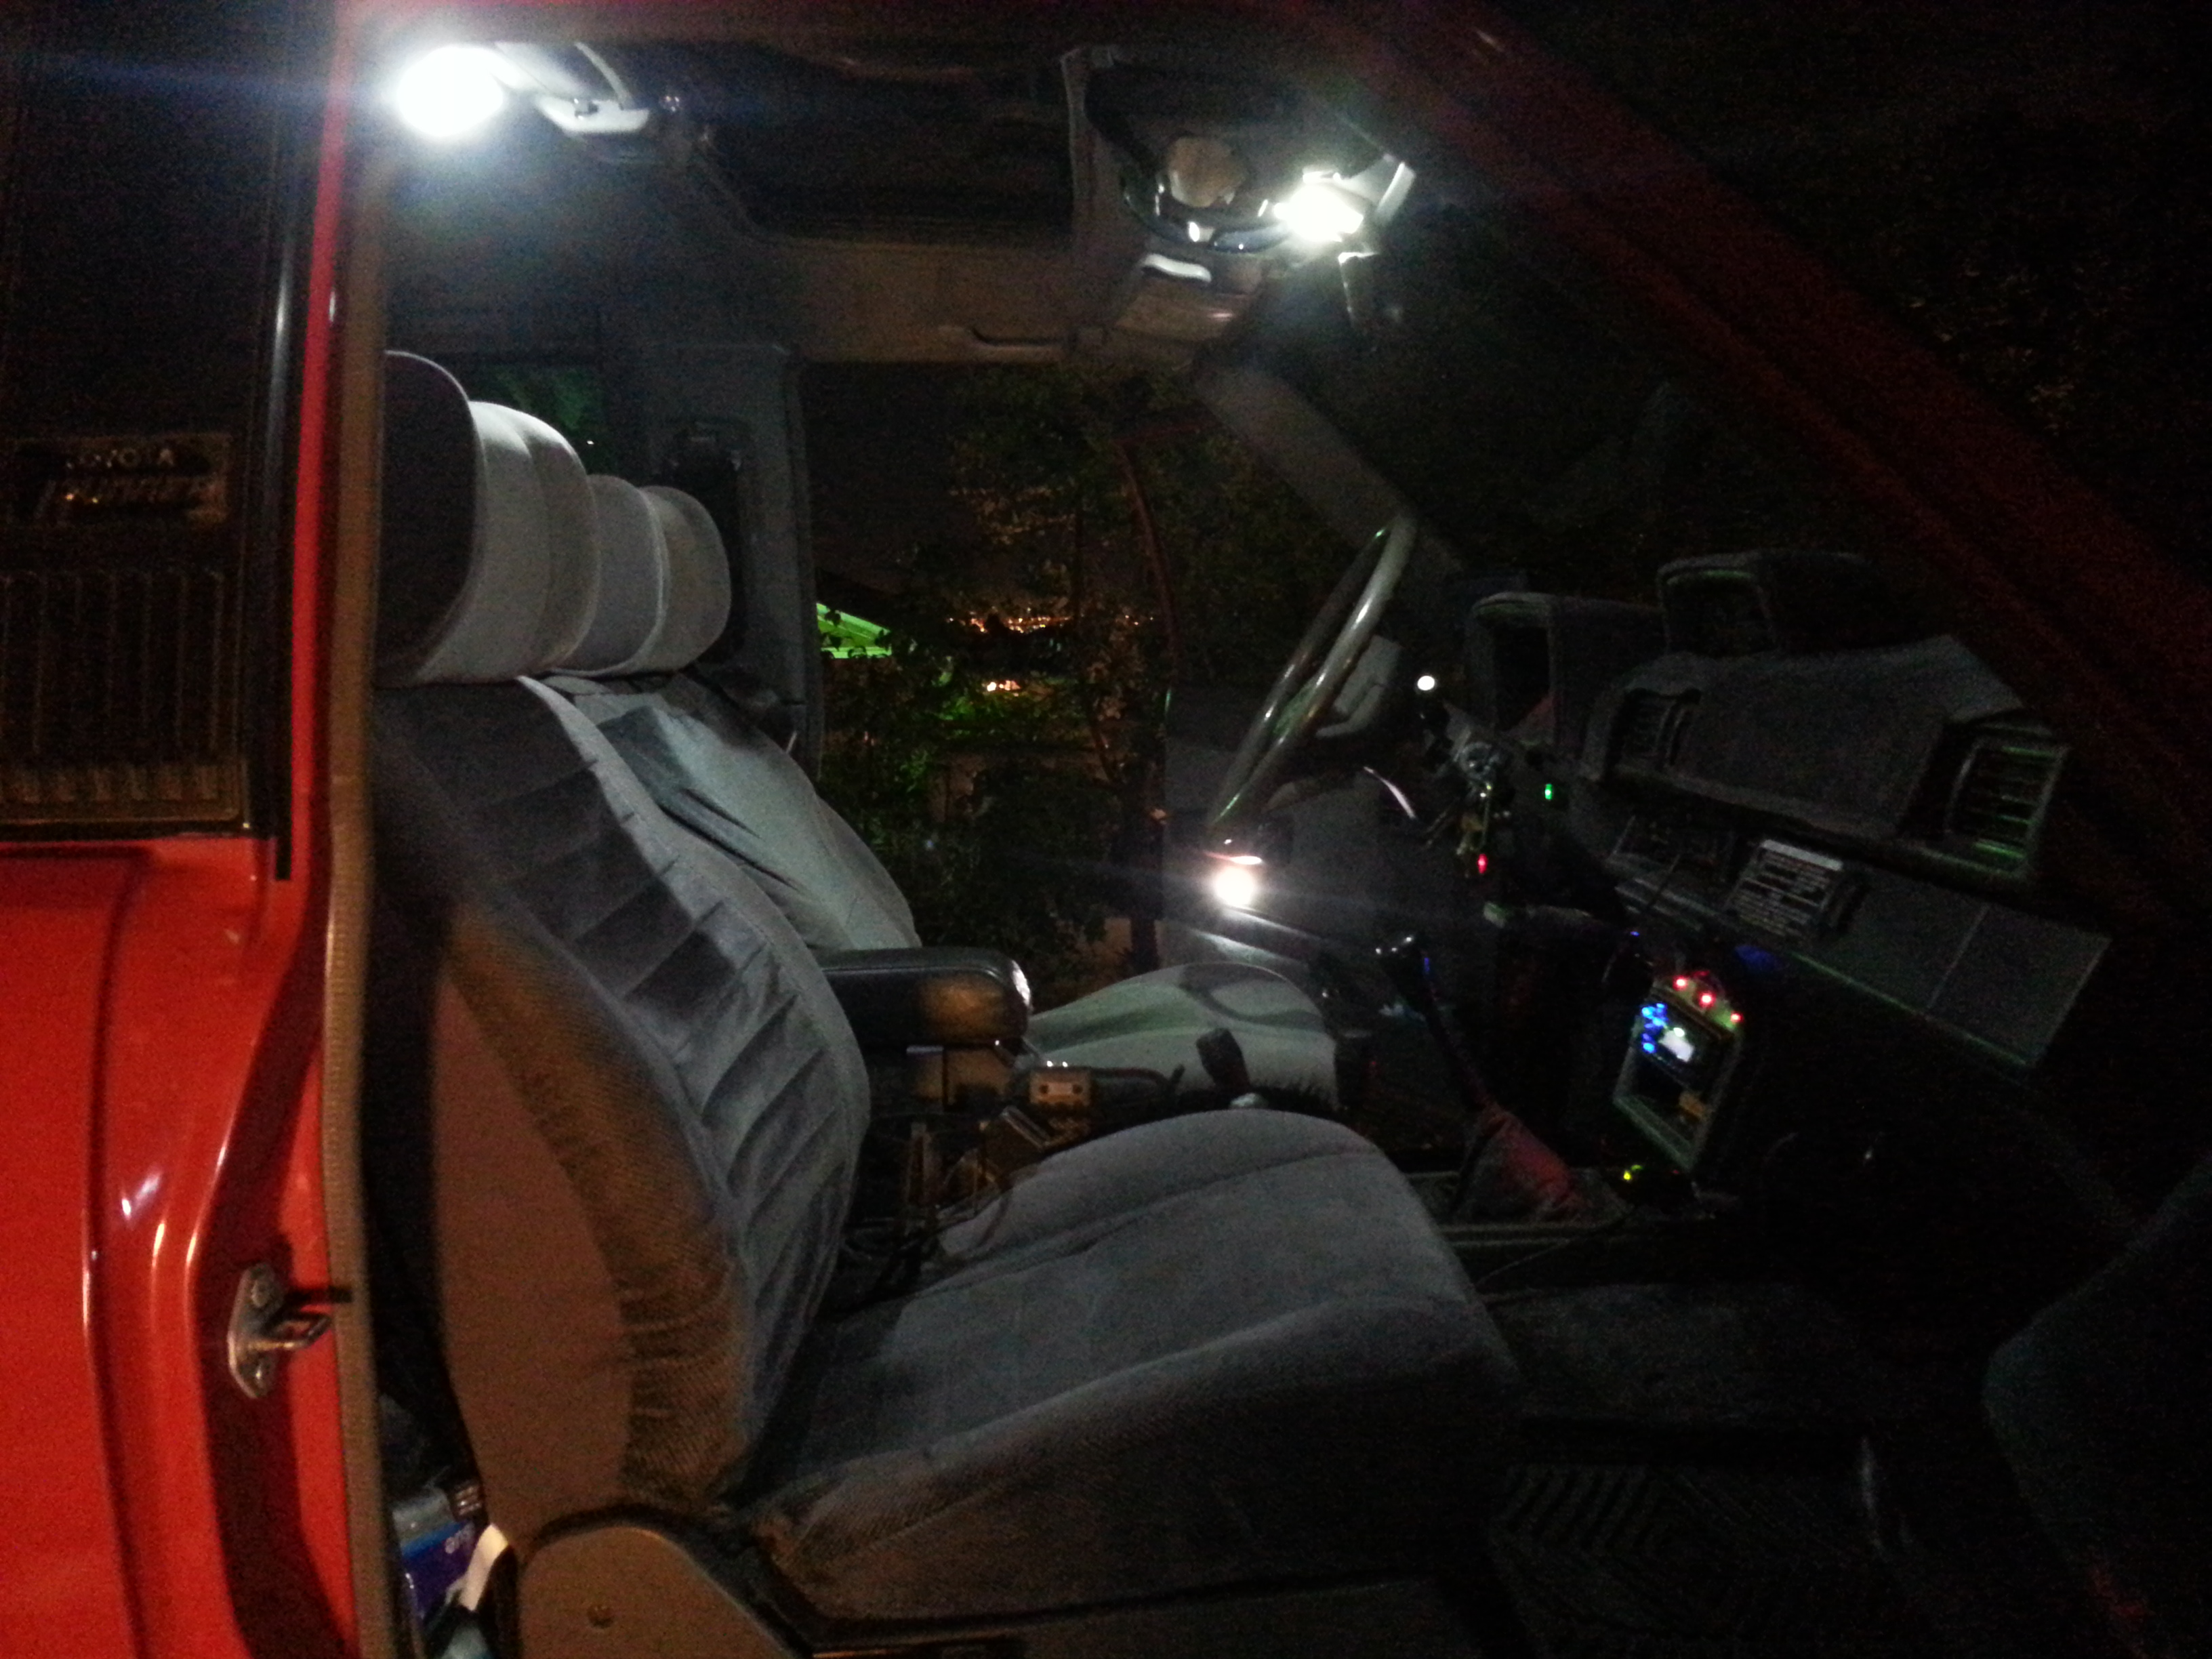
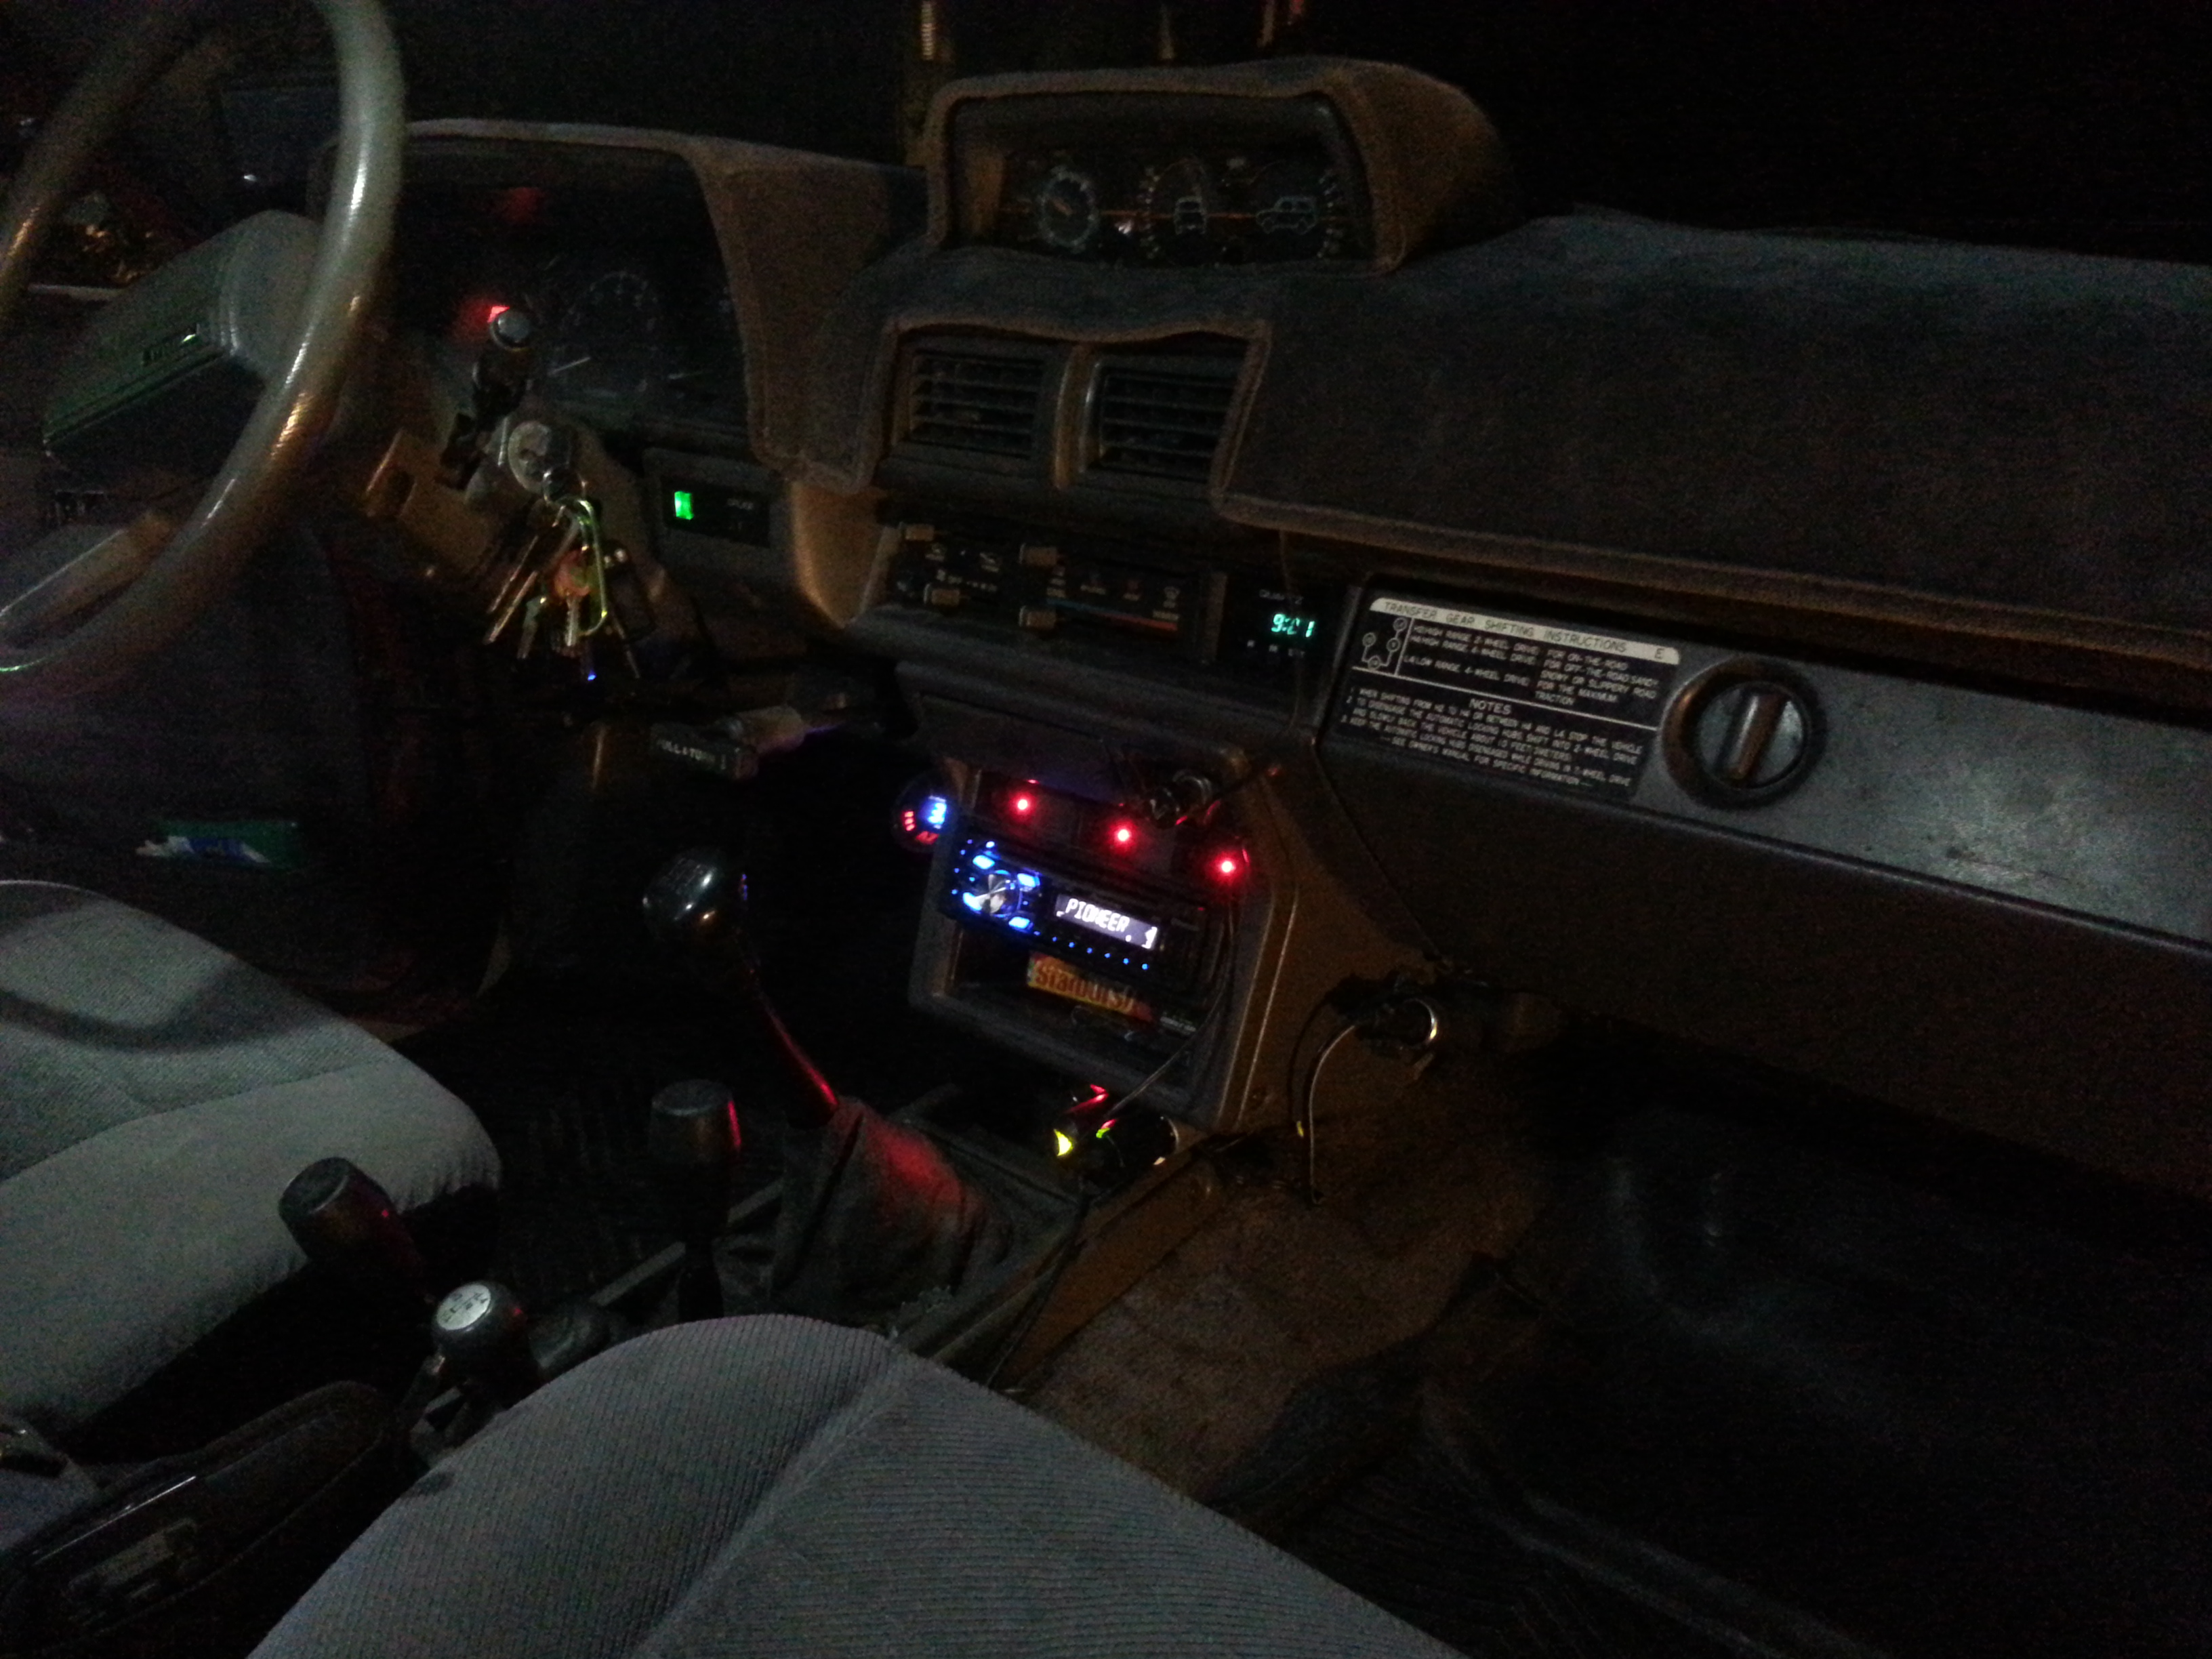
All cleaned up and cleaned out... I had so much crap in there, you can't believe it, including tools and wire clipings & the carpet was pulled back and all that... I'm anxious to show you guys how clean I did this as far as the wiring going up to the relays.... Up to the roof... et cetera... Just a little interior shot or two as I was getting ready last night, for Big Bear....
 11-15-2013, 09:59 AM
#7997
Registered User
beat me too it!
Not only do i need to have my shoulder heal and get the rig back together i need to get a passport so i can go on some wheeling adventures south of the border. Always nice to check out what other people call home.
Not only do i need to have my shoulder heal and get the rig back together i need to get a passport so i can go on some wheeling adventures south of the border. Always nice to check out what other people call home.
11-15-2013, 12:14 PM
#7998
Contributing Member
Join Date: Mar 2003
Location: COTKU,Ontario,Canada
Posts: 11,334
Likes: 0
Received 0 Likes
on
0 Posts
I was going to suggest the same thing for the camera phone too...
Got it now Mark... from your original description of the side light switch function it sounded like it was an on-off-on switch [one side at a time] not just an on-off switch [both sides together].
My opinion is that full spectrum light would be the best anti-zombie lighting since that would cover any sub-species differentials that might exist. As a side benefit it is the best for your eyes and provides maximum definition and true colour illumination.
11-15-2013, 07:09 PM
#7999

Damn!! Sweet job! Hey, are those factory seats? Also are there only km2 tires on the rear?
11-16-2013, 02:59 AM
#8000
Registered User


