
ChefYota4x4's 1987 4Runner Build-Up Thread
 09-08-2013, 01:58 PM
#7681
Met "City Slicker" at my house. He drove out to bring me the TTTS #2..... VERY classy dude, as was his pretty lady.
Redeth stoped by as well for his 20# or so of Avocados, freshly picked yesterday! Him and his pops are Avo-addicts like me! Hahaha.... BLTA's and ABC Burgers for all!
Redeth stoped by as well for his 20# or so of Avocados, freshly picked yesterday! Him and his pops are Avo-addicts like me! Hahaha.... BLTA's and ABC Burgers for all!
Last edited by ChefYota4x4; 09-08-2013 at 02:40 PM.
 09-08-2013, 06:19 PM
#7683
Registered User
Join Date: Apr 2013
Location: NC
Posts: 15
Likes: 0
Received 0 Likes
on
0 Posts
Great about things working out for your mom. The stress lever up until that meeting had to be tough on both of you.
Clean light cover, I need to replace one of mine. Broke one last year, replaced it and I think it only bothers me, but cant stand the two different shades/fade of the tail lights. I find myself looking at them while I mow past it ever week....
Clean light cover, I need to replace one of mine. Broke one last year, replaced it and I think it only bothers me, but cant stand the two different shades/fade of the tail lights. I find myself looking at them while I mow past it ever week....
09-09-2013, 12:27 AM
#7684
Registered User

So how much for 20# of avocados shipped to 93545...
I kid, I barely got to eat all the ones I took last time before they went bad, had to push them on the guys on the crew a little even! They're delicious, though. Pretty much the only thing that made the fire lunches edible while I was on that fire on the Sierra nat'l forest.
Sweet to see the axle put to use! Can't wait to see what you come up with next to mod.
09-09-2013, 08:35 PM
#7686
Yum! On my way! Haha
Pretty cheap fix anf riddance of a possible ticket eyesore. lol
Really glad u got to get a few of em. Sure u dont want any flat rated to ya? 
Thanks, buddy.... appreciated! I'm dealing with all the drama and upgrades first. Just wanna be done with this round of tries on the POE/for the gremlins! Next will be air, lights (rock and roof) and some interior stuffs.
Gotcha, not a bad idea in a pinch/otherwise I would imagine.
Great about things working out for your mom. The stress lever up until that meeting had to be tough on both of you.
Clean light cover, I need to replace one of mine. Broke one last year, replaced it and I think it only bothers me, but cant stand the two different shades/fade of the tail lights. I find myself looking at them while I mow past it ever week....
Clean light cover, I need to replace one of mine. Broke one last year, replaced it and I think it only bothers me, but cant stand the two different shades/fade of the tail lights. I find myself looking at them while I mow past it ever week....
lolSo how much for 20# of avocados shipped to 93545...
I kid, I barely got to eat all the ones I took last time before they went bad, had to push them on the guys on the crew a little even! They're delicious, though. Pretty much the only thing that made the fire lunches edible while I was on that fire on the Sierra nat'l forest.
Sweet to see the axle put to use! Can't wait to see what you come up with next to mod.
Thanks, buddy.... appreciated! I'm dealing with all the drama and upgrades first. Just wanna be done with this round of tries on the POE/for the gremlins! Next will be air, lights (rock and roof) and some interior stuffs.
Gotcha, not a bad idea in a pinch/otherwise I would imagine.
09-09-2013, 11:43 PM
#7687
Well,................
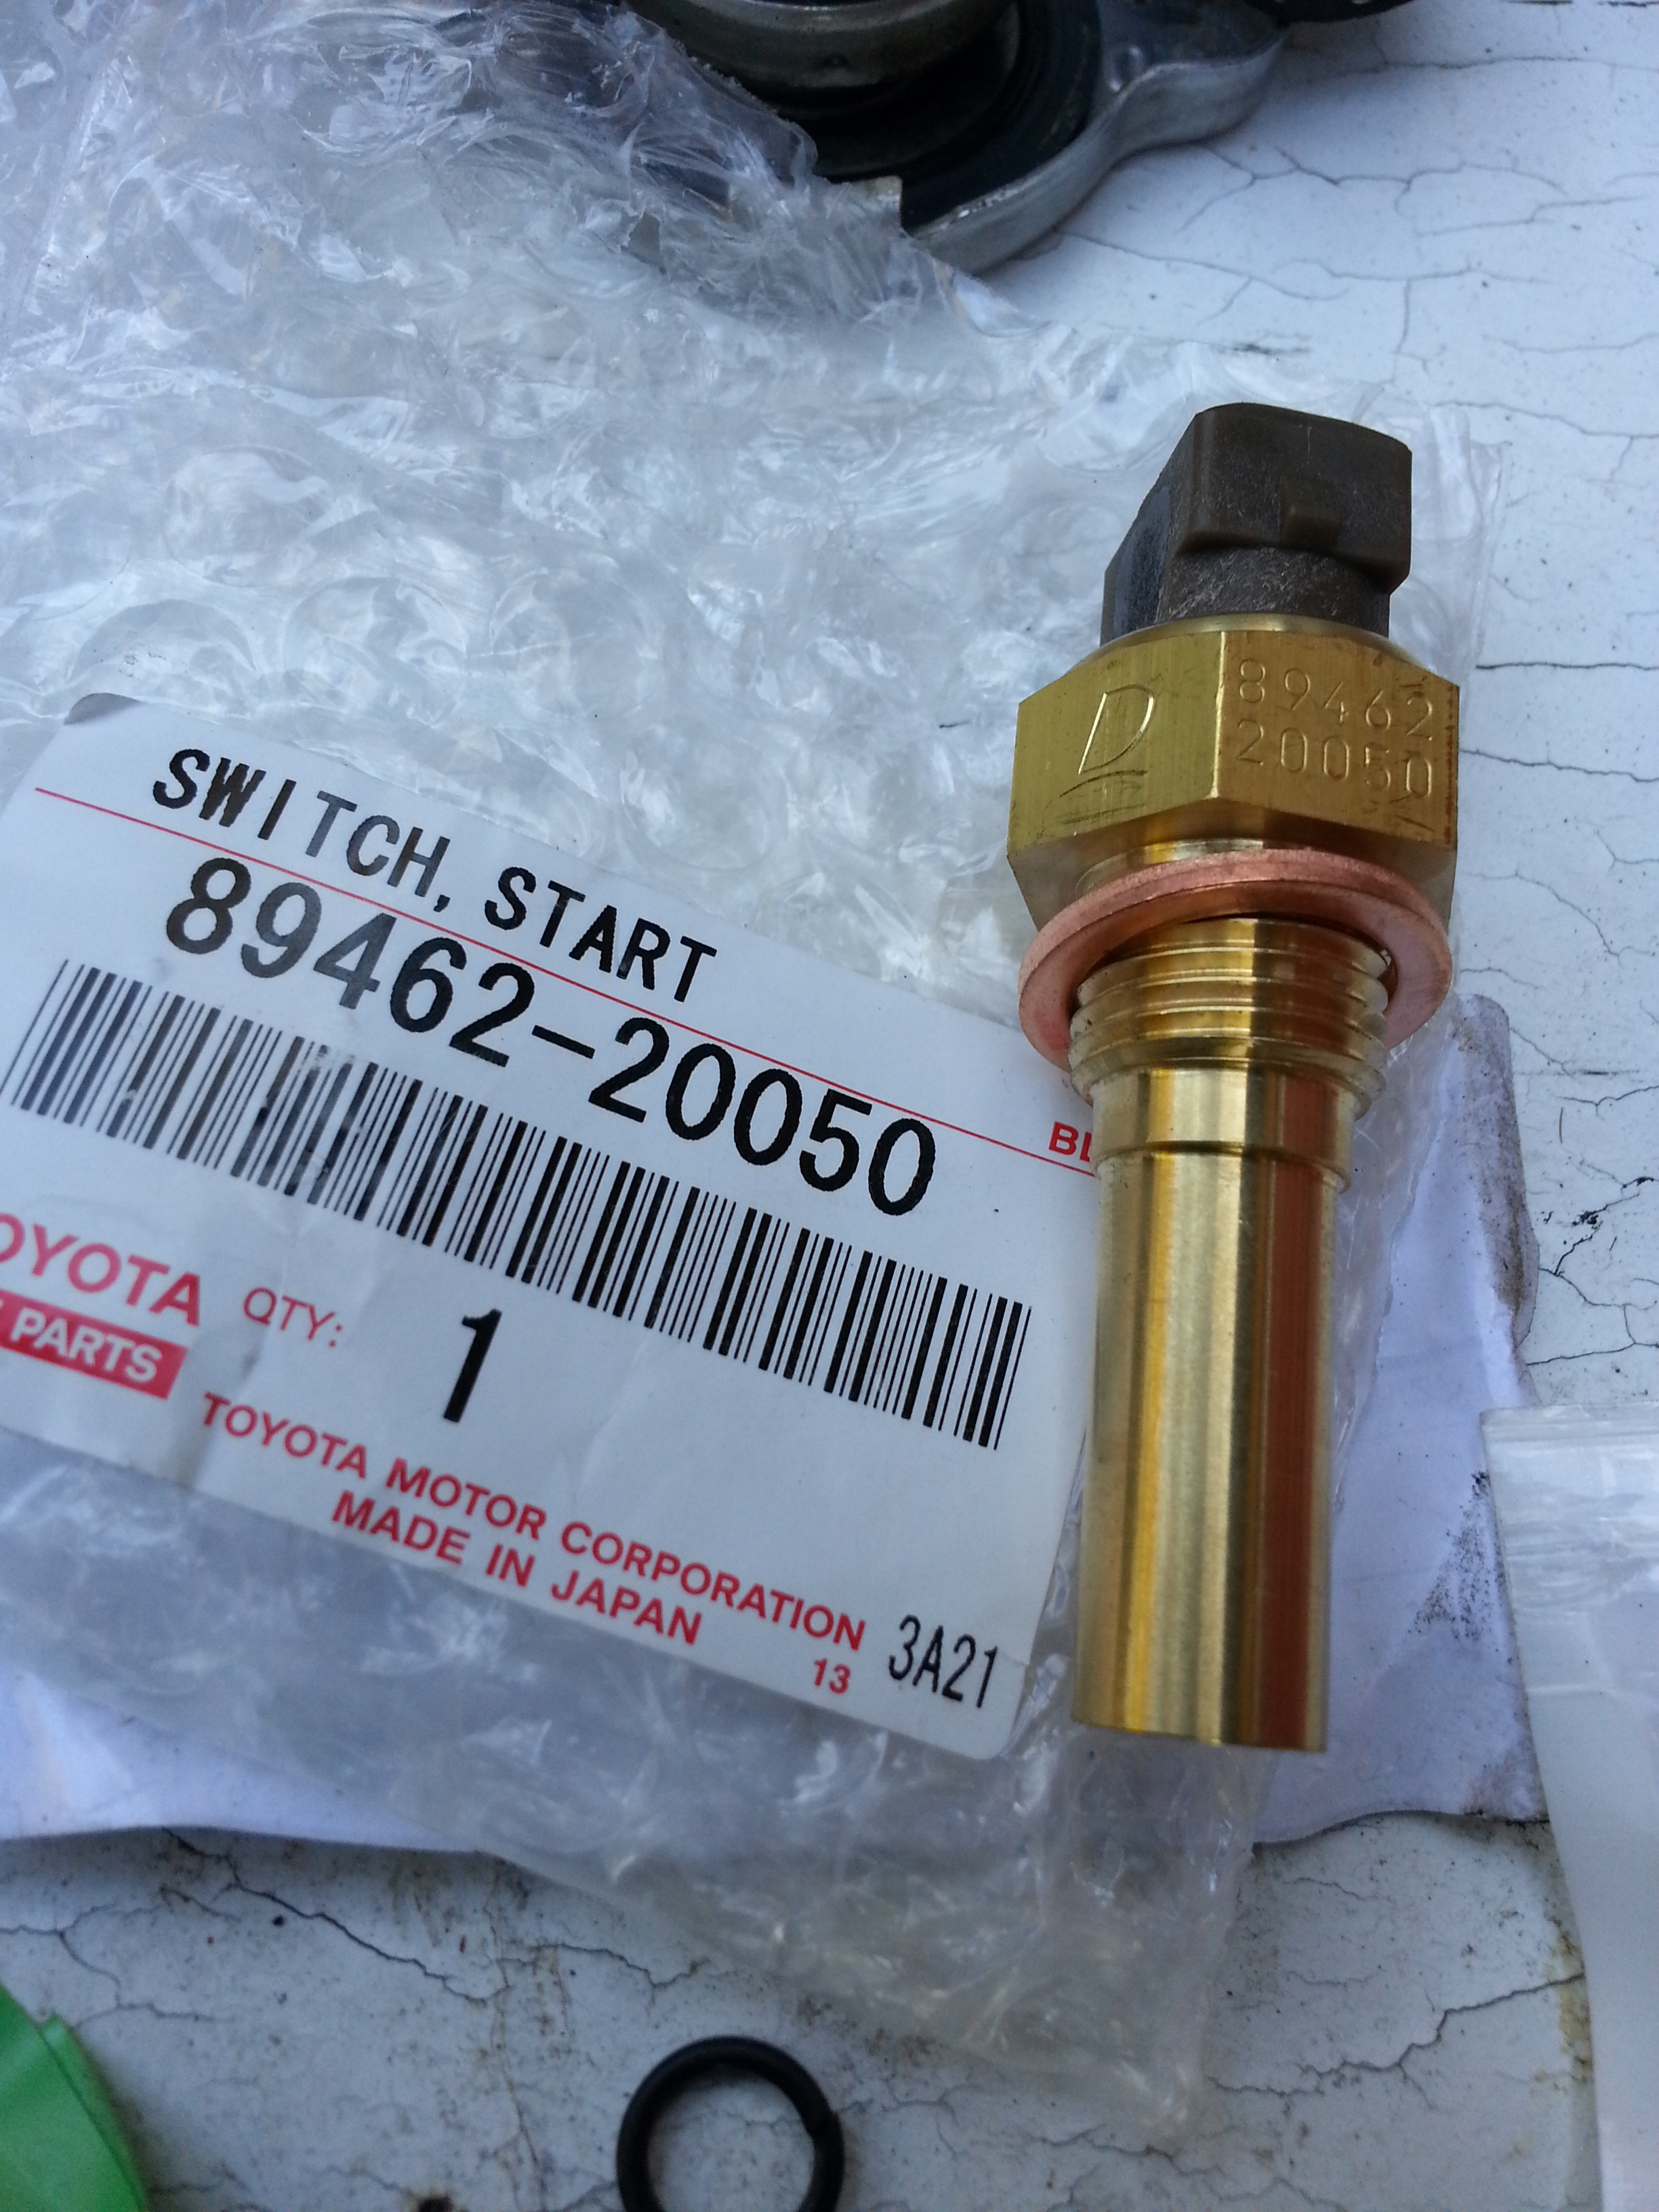
So far, after installing the 2 replacement sensors involved in the bulletin;
* CSI Time Switch ..... : 89462-20050
* Themo Temp Sw #2 : 89428-26020
.....Running even more odd in some ways...
I burped it pretty good, then ran round the town a bit.... it seems to be idling lower now once warmed up... around 700rpm, lil chunky. Kinda all over the place in RPM.....
The thing seems to be running up at 1100rpm when cold/IACV working, then it quickly idles down upon closed loop entry,...., stumbling a lil and then coming out of it pretty quick, especially if I'm giving a lil throttle(It's been doing that for about a week/before the new sensors).
I'll see, decisively, if it idles down on hot restart, tomorrow. Seemed to do that a bit on first try, but I got an important call that cause me to have to kill it and go to dealing with some stuff for the rest of the night. I just finished and I don't feel like starting it and warming it up and then coming back a half an hour later before going to bed at 1AM if I'm lucky. .... Especially is I'm only going to be finding out what I think is likely the case....'Nothing has changed'....
I spoke to a mechanic buddy of mine today, he said that he just had this problem and after replacing those sensors in a couple of things he wound up having to replace the air flow meter. No matter how well it read it was reading on the books tests, it wasway off on the readings related to ambient temperature and idle.
Whateverrrrrrrr.... haha. . I mean, really, what can I do at this point besides laugh, right? Lol. Aside from the knock sensor this makes pretty much every since ur on the entire truck brand new Toyota factory. Air flow meter? Nope. Fuel pressure regulator? Nope. Damper? Nope. We'll see... I'm not going to panic about it because whatever it is it just seems to be all over the place. Anyone ever see the Twilight Zone episode with William Shatner?... Yeah, you all know the one! Little bit about a plane & a creature on the wings that nobody saw but him? Yeah.........
Last edited by ChefYota4x4; 09-09-2013 at 11:44 PM.
09-10-2013, 06:21 AM
#7688
Maybe disconnecting the battery for 10min early morning before starting. Hoot battery back up. So a cold start but don't drive it or touch throttle. Let it sit till fully warmed up and go for a drive. I know these old cars isn't affected by what I just said much but worth a shot. It's what I always did when I installed a mod on my Hondas.
09-10-2013, 10:33 AM
#7689
Registered User
I like this for diagnostic purpose. I wonder if OK to leave it installed, or should it only be installed while troubleshooting? Would it handle constant vibration and high temps of the engine compartment?
For real-time monitoring, what's a better / more reliable practice:
For real-time monitoring, what's a better / more reliable practice:
- To run a hose to the dash and install this hydraulic gauge there? OR
- To install pressure sensor (transducer) and run wire to electrical gauge on dash?
I would feel better with a pressure sensor, with wires over a tube filled with gasoline.
If the tube fails for some reason, cut, abraded, pulled then you will have a possible gasoline leak in your engine bay. If the wires get cut or fail for the same reason your fuel pressure gauge will not read correctly.
09-10-2013, 10:58 AM
#7690
Maybe disconnecting the battery for 10min early morning before starting. Hoot battery back up. So a cold start but don't drive it or touch throttle. Let it sit till fully warmed up and go for a drive. I know these old cars isn't affected by what I just said much but worth a shot. It's what I always did when I installed a mod on my Hondas.
I disconnected the battery before even starting yesterday. I almost always do in any situation where I will deal with the connector. So it got plugged in after a couple hours and started fresh when booting up these new sensors.
Unfortunately buddy, I just felt like it was really walking after putting that new stuff in.... I can't say for sure that it was idling down to the point of stalling but it seems like it was starting to, it just did it a little differently. Either way, its okay, and if I ever do figure out what the problem is, and if I do the eventual motor swap within 50,000 miles or so,.... Somebody might be getting a pretty damn good motor with all new sensors. But, needless to say, while I am NOT depressed or anything, I'm definitely discouraged that this is, yet again, seemingly not my fix.
I thought I should post a couple pictures in a little more detail this time... There are lots of threads ard that recall or service bulletin anyway, and yet I never saw much besides the PDF regarding that removal of the ECU pin, which I did in fact remove.
CSI Time Switch switched from original 89462-30011 to 89462-20050 ....

Temp gauge you see on the right in this picture was not recalled, however it was concerning me that my original one was kinda mangled on the installation portion on top. I don't think there's anything wrong with it, but as you can see it was pretty calcified and maybe it possibly I was reading accurately. Either way, I think after nearly 300,000 miles it's a good thing grab that before they too are no longer available... The center on the right is the one I replaced for the gauge temperature sender in the center of the intake between injectors 2&3... ( the center on the left is the wrong part the Toyota gave me just last year at the dealership. Apparently they have plenty of those left but none of the replacement that was noted in the bulletin )...
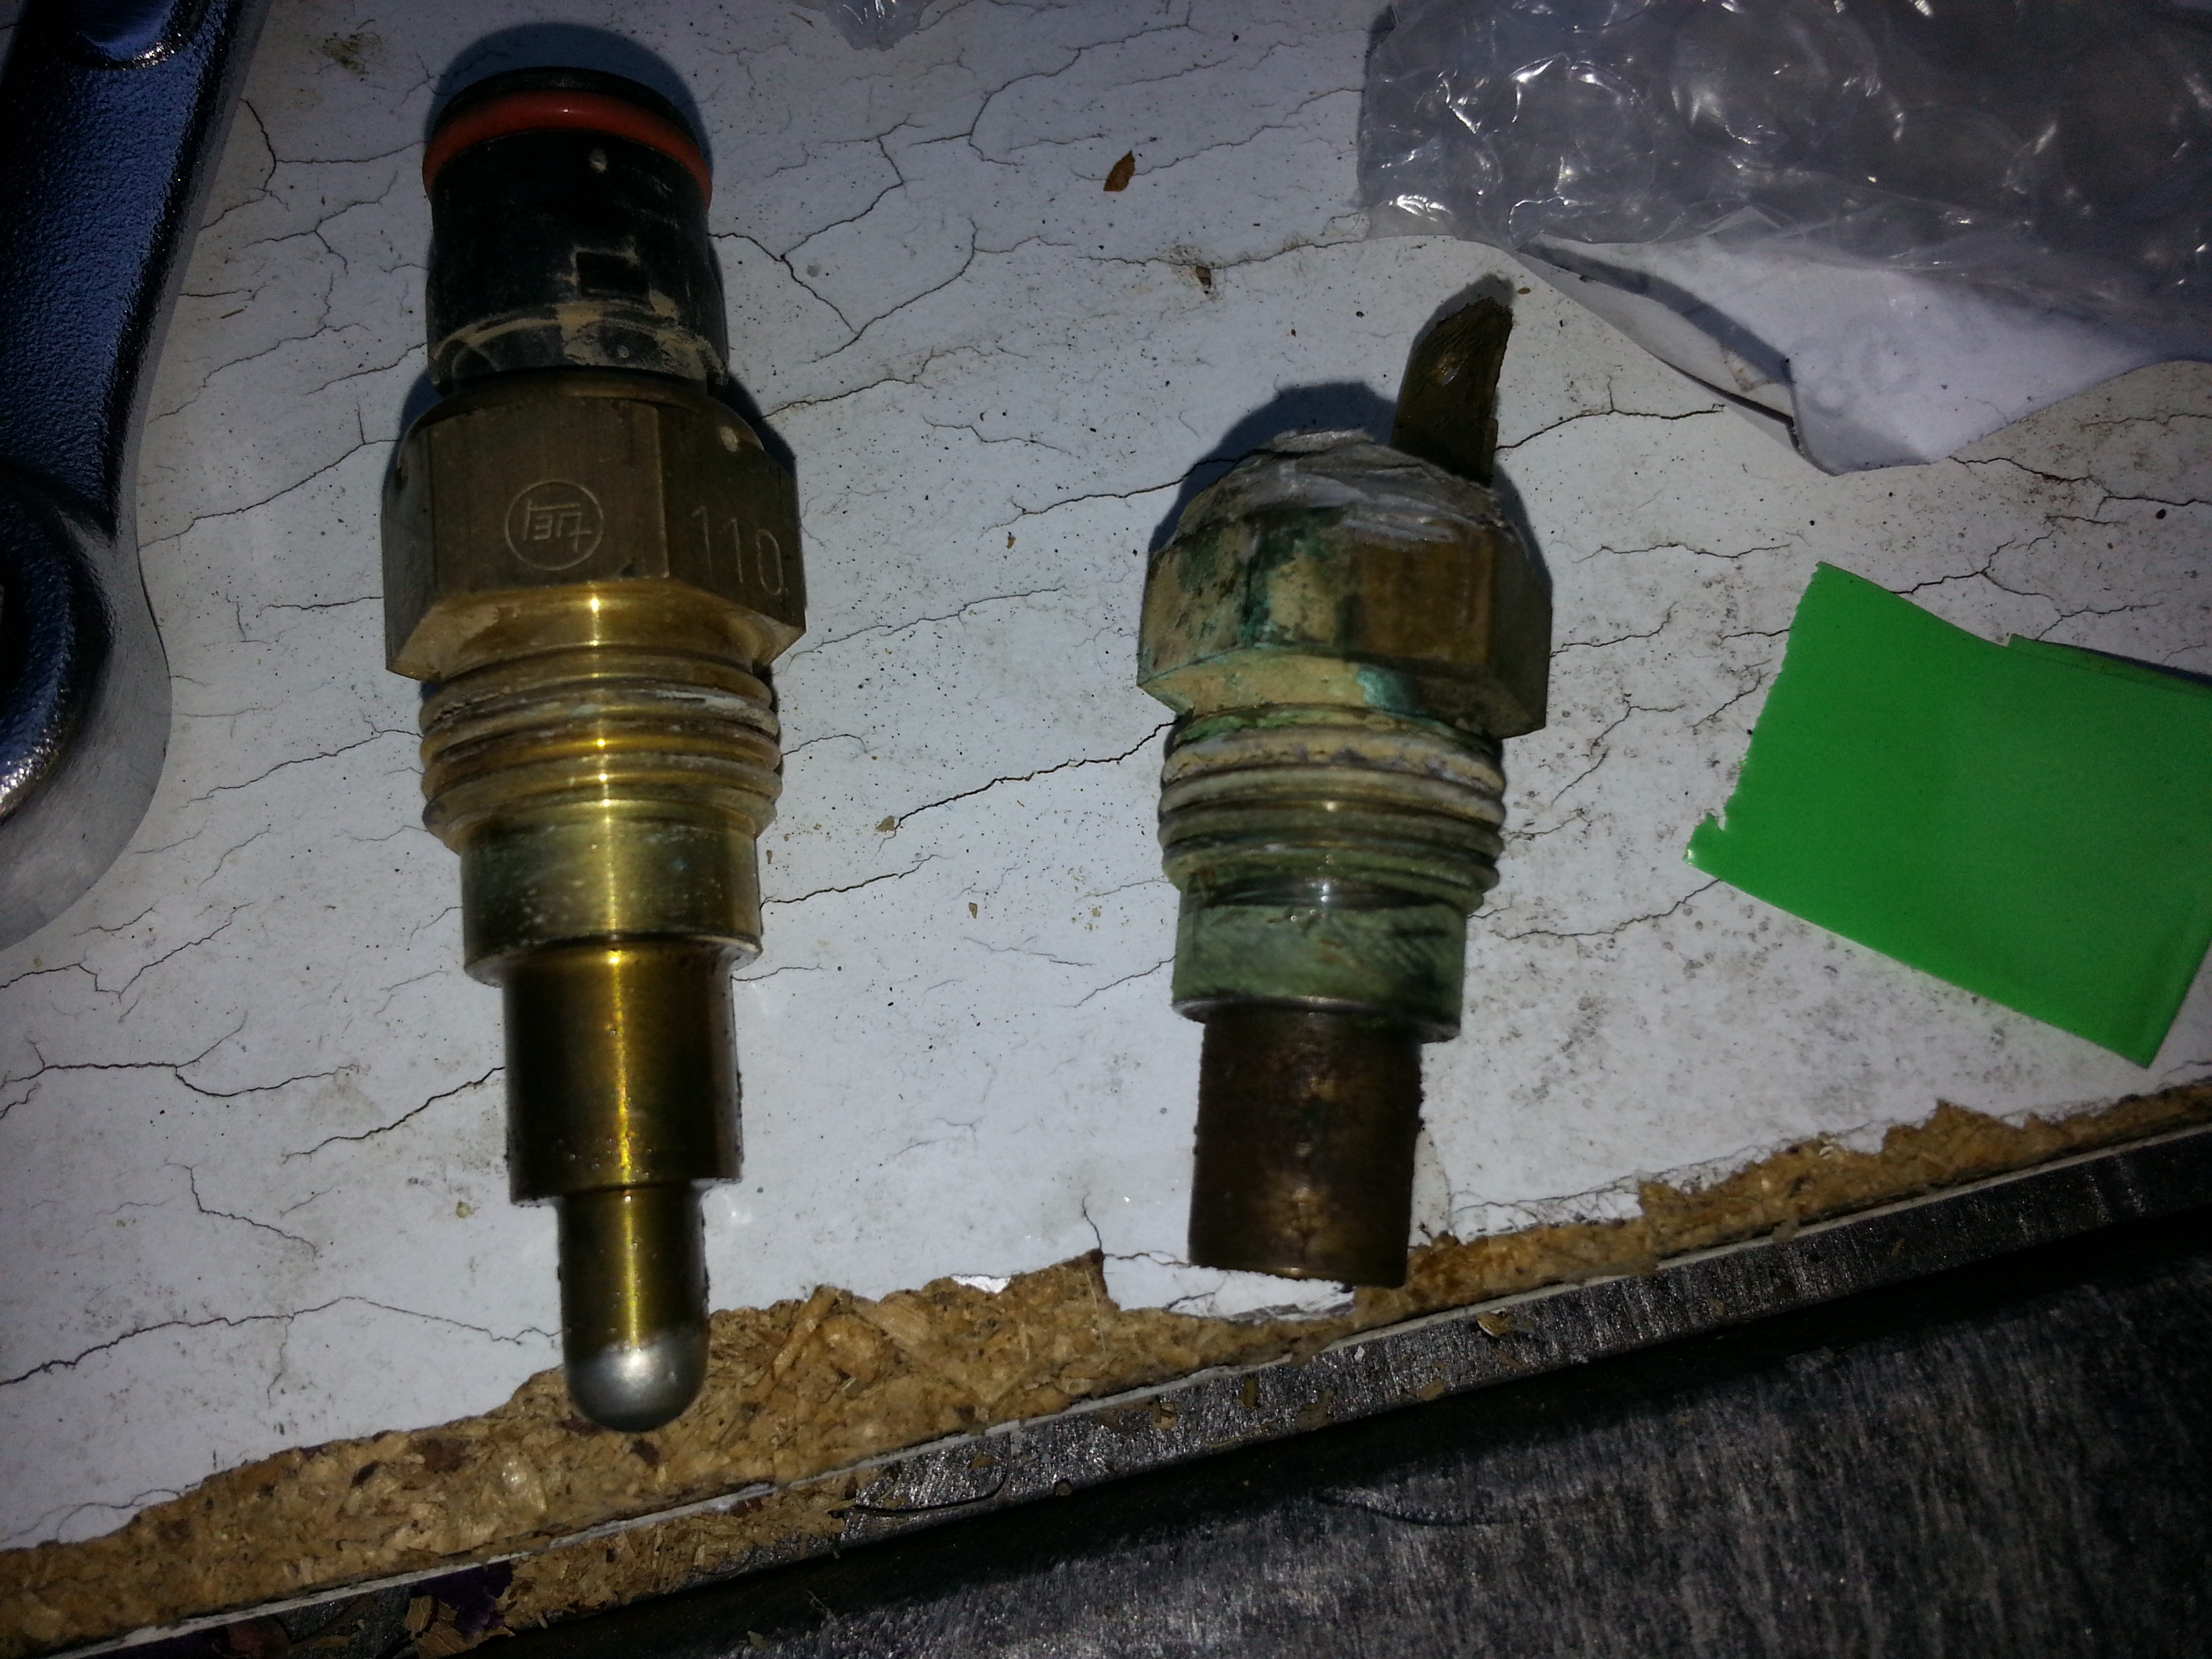
The one on the left in the picture above, as I said, I was also part of that Toyota Service Bulletin in late 1988. It actually informs the ECU of the temperature in what it considers to be hot soak conditions, and there after the ECU is supposed to shut off vacuum to the fuel pressure regulator VSV, allowing full pressure through under hot soak... Just for reference to anyone who is curious... If you have an 86 or 87 4 runner or pick up with a black tip sensor like that one... You have the wrong sensor. The upgraded one is always white on the connector, and is a different number of the side in regards to temperature.....
Original thermal temp time switch #2 was 89428-28030... Which was replaced with 89428-26020.....
Below is a video but I just thought I would show for removing a pin in your ECU. In this case it was actually for that particular pin that controls A/C idle up in relation to that time switch #2...( supposedly, if you don't remove that pin, the I'll remain elevated even after you shut off the air conditioning... Obviously I already have a problem with my a/c idle up.... So I don't want to add to it exasperate the situation do I? Lol )...
Good luck to anyone else with my symptoms whom hope this will fix it.... Is worth a shot, right?
PS: Got my ARB Tire-deflator from LROR. Once again, props to Low Range Off Road for great & quick service!
09-10-2013, 12:25 PM
#7691
Registered User
2 Avos
Fresh Cilantro/corriander
half a red onion
small tomato
1 or 2 limes depending on how zesty you want it but at least one to keep it going all brown
1 jalapeno or serrano pepper
course salt of some sort
fresh ground black pepper
Dice all the veggies tiny bits smash avos with a fork fine chopped cilantro
Done.
I do it all by hand, I don't like using a food processor for stuff like this. I like the texture in how this turns out.
Chef, you ever do duck confit?
I have fat from two Christmas ducks and four duck legs in the freezer. I LOVE duck confit but have never done it.
Last edited by Red Wagon; 09-10-2013 at 12:31 PM.
09-10-2013, 10:22 PM
#7692
Pretty much what I do for Aguacate! ... I add a tiny pinch of Cumin, And occadionally, for a couple clients, I add a bit of roasted garlic as well. Guac is something I pretty much nevrr tire of and use often in anything from Omlettes to Burgers to the obvious, Tacos al Carbon/Carne Asada Tacos..... I add avos to my freshly cooked pintos many times..... and most often, I eat avos right from the skin, dash of espica de picante y limon.....or just plain.
Here's pretty much what I do for Duck Confit....
Ingredients
*3 tablespoons salt
*4 cloves garlic, smashed
*1 shallot, peeled and sliced
*6 sprigs thyme
*Coarsely ground black pepper
*4 duck legs with thighs
*4 duck wings, trimmed
*About 4 cups duck fat
Preparation
1. (CRITICAL)>>> Sprinkle 1 tablespoon of salt in the bottom of a dish or plastic container large enough to hold the duck pieces in a single layer. Evenly scatter half the garlic, shallots, and thyme in the container. Arrange the duck, skin-side up, over the salt mixture, then sprinkle with the remaining salt, garlic, shallots, and thyme and a little pepper. Cover and refrigerate for 1-2 days.
2. Preheat the oven to 225�F. Melt the duck fat in a small saucepan. Brush the salt and seasonings off the duck. Arrange the duck pieces in a single snug layer in a high-sided baking dish or ovenproof saucepan. Pour the melted fat over the duck (the duck pieces should be covered by fat) and place the confit in the oven. Cook the confit slowly at a very slow simmer — just an occasional bubble — until the duck is tender and can be easily pulled from the bone, 2-3 hours. Remove the confit from the oven. Cool and store the duck in the fat.˟
BON APPETIT! ......
( I really try not to tell people how 2 server duck... I often did mine with white beans, carrots, onions and herbs, a little bit of salt and pepper an a dash or two of nutmeg.).....
Another of my favorite dishes(speaking of white beans, hehe)....
Julia Childs' Cassoulet;
For the beans:
*2 pounds (5 cups) dry white beans,such as Great Northern
*1 pound fat-and-lean salt pork (rind optional)
*1 large herb bouquet made up of 8 parsley sprigs, 4 garlic cloves,1/2 teaspoon thyme and 2 imported bay leaves,all tied in washed cheesecloth
*Salt, to taste
For the cassoulet:
*4 pounds bone-in lamb shoulder, sawed into stewing chunks
*Rendered goose fat(Or Duck Fat), or cooking oil
*2 large onions, sliced
*4 or 5 large garlic cloves, minced
*4 or 5 tablespoons tomato paste
*1/2 teaspoon thyme
*2 imported bay leaves
*2 cups dry white wine
*3 cups beef stock or bouillon, or more if needed
*Salt and pepper, to taste
*5 pounds preserved goose, cut in pieces, plus cracklings
*1-1/2 to 2 pounds sausage, such as kielbasa or chorizo, or sausage meat formed into cakes
*3 tablespoons rendered goose fat(or Duck Fat) or melted butter; more if needed
*2 cups moderately pressed-down fresh white crumbs from crustless,nonsweet French or Italian bread
*1/2 cup moderately pressed-down minced fresh parsley
Make the beans:
Pick over the beans to remove any debris, wash and drain them, and place in a large pot. Add 4-1/2 quarts water, cover and bring to a boil. Boil uncovered for exactly 2˟minutes. Cover and let sit for exactly 1 hour.
Meanwhile, if you are using the salt pork, remove the rind and cut pork into slices 1/2 inch thick. Simmer rind and pork in 3 quarts water for 15 minutes to remove excess salt. Rinse in cold water, drain and set aside.
When the beans have finished soaking, bring them to a simmer, adding the optional pork and rind, the onion and herb bouquet, and 1 tablespoon salt if you have not used salt pork, 1/2 tablespoon if you have. Simmer slowly, partially covered until the beans are just tender, about 11/2 hours, adding boiling water if needed to keep beans covered at all times, and salt to taste near the end of the cooking. (May be done up to 3 days in advance; refrigerate. Bring just to a simmer before proceeding with the cassoulet.)
To make the lamb:
Dry lamb pieces. Film casserole with fat or oil, heat to very hot, but not smoking, and brown lamb pieces, a few at a time, removing the browned pieces to a dish. Pour out excess fat and brown the onions lightly. Return lamb to casserole, add garlic, tomato paste, herbs, wine and enough stock just to cover lamb. Salt lightly, cover and simmer slowly until lamb is tender, about 1-1/2 hours. Correct seasoning. When cool, remove and discard bones from lamb. (May be cooked up to 3 days in advance; when cold, cover and refrigerate lamb in its cooking liquid. Discard congealed surface fat before using.)
To assemble the cassoulet:
Remove bones from preserved goose and, if you wish, the skin. Cut goose into serving chunks the same size as the lamb pieces. If using salt pork, cut it into thin slices. If using sausage, cut in half lengthwise, then into chunks, and brown lightly in a frying pan with goose fat or oil. If using sausage meat, form into cakes about 1-1/2 inches across, and brown in fat or oil.Using a slotted spoon, remove beans from their liquid, but reserve liquid. Arrange a third of the beans in the bottom of a 6-quart casserole. Cover with a layer of lamb, goose, sausage, a handful of goose cracklings and, if using it, half the salt pork. Repeat with a layer of beans, then meat. End with a layer of beans, coming to within about 1/4 inch of the rim of the casserole. Ladle the lamb cooking liquid plus as much bean cooking liquid as needed just to cover the beans. Spread breadcrumbs and parsley over the top. (Recipe may be prepared to this point up to 2 days in advance, but if the beans and lamb have not been freshly cooked, bring them to a simmer for several minutes before assembling cassoulet, to prevent any chance of spoilage. When cool, cover and refrigerate.)
Cooking the cassoulet:
If you have assembled and refrigerated the cassoulet in advance, place the covered casserole in a 325-degree oven for an hour or more until its contents are bubbling and the center of the cassoulet reaches 212 degrees when tested with an instant-read thermometer, then proceed as directed below. Heating the cassoulet on the stove to this point may cause the beans on the bottom to scorch.)Heat oven to 400 degrees. Bring casserole to a simmer on top of the stove, then set it in the oven. Bake for 20 to 30 minutes, until breadcrumb topping has crusted and browned lightly. Break the crust into the beans with the back of a spoon and return casserole to the oven. Lower temperature to 350 degrees and continue baking 15 minutes or more until a second crust has formed. Break it into the beans, and if the cooking liquid seems too thick or the beans dry, add a spoonful or so of the bean-cooking liquid. When the crust forms again, the cassoulet is ready to serve.....
... I add a tiny pinch of Cumin, And occadionally, for a couple clients, I add a bit of roasted garlic as well. Guac is something I pretty much nevrr tire of and use often in anything from Omlettes to Burgers to the obvious, Tacos al Carbon/Carne Asada Tacos..... I add avos to my freshly cooked pintos many times..... and most often, I eat avos right from the skin, dash of espica de picante y limon.....or just plain. Here's pretty much what I do for Duck Confit....
Ingredients
*3 tablespoons salt
*4 cloves garlic, smashed
*1 shallot, peeled and sliced
*6 sprigs thyme
*Coarsely ground black pepper
*4 duck legs with thighs
*4 duck wings, trimmed
*About 4 cups duck fat
Preparation
1. (CRITICAL)>>> Sprinkle 1 tablespoon of salt in the bottom of a dish or plastic container large enough to hold the duck pieces in a single layer. Evenly scatter half the garlic, shallots, and thyme in the container. Arrange the duck, skin-side up, over the salt mixture, then sprinkle with the remaining salt, garlic, shallots, and thyme and a little pepper. Cover and refrigerate for 1-2 days.
2. Preheat the oven to 225�F. Melt the duck fat in a small saucepan. Brush the salt and seasonings off the duck. Arrange the duck pieces in a single snug layer in a high-sided baking dish or ovenproof saucepan. Pour the melted fat over the duck (the duck pieces should be covered by fat) and place the confit in the oven. Cook the confit slowly at a very slow simmer — just an occasional bubble — until the duck is tender and can be easily pulled from the bone, 2-3 hours. Remove the confit from the oven. Cool and store the duck in the fat.˟
BON APPETIT! ......
( I really try not to tell people how 2 server duck... I often did mine with white beans, carrots, onions and herbs, a little bit of salt and pepper an a dash or two of nutmeg.).....
Another of my favorite dishes(speaking of white beans, hehe)....
Julia Childs' Cassoulet;
For the beans:
*2 pounds (5 cups) dry white beans,such as Great Northern
*1 pound fat-and-lean salt pork (rind optional)
*1 large herb bouquet made up of 8 parsley sprigs, 4 garlic cloves,1/2 teaspoon thyme and 2 imported bay leaves,all tied in washed cheesecloth
*Salt, to taste
For the cassoulet:
*4 pounds bone-in lamb shoulder, sawed into stewing chunks
*Rendered goose fat(Or Duck Fat), or cooking oil
*2 large onions, sliced
*4 or 5 large garlic cloves, minced
*4 or 5 tablespoons tomato paste
*1/2 teaspoon thyme
*2 imported bay leaves
*2 cups dry white wine
*3 cups beef stock or bouillon, or more if needed
*Salt and pepper, to taste
*5 pounds preserved goose, cut in pieces, plus cracklings
*1-1/2 to 2 pounds sausage, such as kielbasa or chorizo, or sausage meat formed into cakes
*3 tablespoons rendered goose fat(or Duck Fat) or melted butter; more if needed
*2 cups moderately pressed-down fresh white crumbs from crustless,nonsweet French or Italian bread
*1/2 cup moderately pressed-down minced fresh parsley
Make the beans:
Pick over the beans to remove any debris, wash and drain them, and place in a large pot. Add 4-1/2 quarts water, cover and bring to a boil. Boil uncovered for exactly 2˟minutes. Cover and let sit for exactly 1 hour.
Meanwhile, if you are using the salt pork, remove the rind and cut pork into slices 1/2 inch thick. Simmer rind and pork in 3 quarts water for 15 minutes to remove excess salt. Rinse in cold water, drain and set aside.
When the beans have finished soaking, bring them to a simmer, adding the optional pork and rind, the onion and herb bouquet, and 1 tablespoon salt if you have not used salt pork, 1/2 tablespoon if you have. Simmer slowly, partially covered until the beans are just tender, about 11/2 hours, adding boiling water if needed to keep beans covered at all times, and salt to taste near the end of the cooking. (May be done up to 3 days in advance; refrigerate. Bring just to a simmer before proceeding with the cassoulet.)
To make the lamb:
Dry lamb pieces. Film casserole with fat or oil, heat to very hot, but not smoking, and brown lamb pieces, a few at a time, removing the browned pieces to a dish. Pour out excess fat and brown the onions lightly. Return lamb to casserole, add garlic, tomato paste, herbs, wine and enough stock just to cover lamb. Salt lightly, cover and simmer slowly until lamb is tender, about 1-1/2 hours. Correct seasoning. When cool, remove and discard bones from lamb. (May be cooked up to 3 days in advance; when cold, cover and refrigerate lamb in its cooking liquid. Discard congealed surface fat before using.)
To assemble the cassoulet:
Remove bones from preserved goose and, if you wish, the skin. Cut goose into serving chunks the same size as the lamb pieces. If using salt pork, cut it into thin slices. If using sausage, cut in half lengthwise, then into chunks, and brown lightly in a frying pan with goose fat or oil. If using sausage meat, form into cakes about 1-1/2 inches across, and brown in fat or oil.Using a slotted spoon, remove beans from their liquid, but reserve liquid. Arrange a third of the beans in the bottom of a 6-quart casserole. Cover with a layer of lamb, goose, sausage, a handful of goose cracklings and, if using it, half the salt pork. Repeat with a layer of beans, then meat. End with a layer of beans, coming to within about 1/4 inch of the rim of the casserole. Ladle the lamb cooking liquid plus as much bean cooking liquid as needed just to cover the beans. Spread breadcrumbs and parsley over the top. (Recipe may be prepared to this point up to 2 days in advance, but if the beans and lamb have not been freshly cooked, bring them to a simmer for several minutes before assembling cassoulet, to prevent any chance of spoilage. When cool, cover and refrigerate.)
Cooking the cassoulet:
If you have assembled and refrigerated the cassoulet in advance, place the covered casserole in a 325-degree oven for an hour or more until its contents are bubbling and the center of the cassoulet reaches 212 degrees when tested with an instant-read thermometer, then proceed as directed below. Heating the cassoulet on the stove to this point may cause the beans on the bottom to scorch.)Heat oven to 400 degrees. Bring casserole to a simmer on top of the stove, then set it in the oven. Bake for 20 to 30 minutes, until breadcrumb topping has crusted and browned lightly. Break the crust into the beans with the back of a spoon and return casserole to the oven. Lower temperature to 350 degrees and continue baking 15 minutes or more until a second crust has formed. Break it into the beans, and if the cooking liquid seems too thick or the beans dry, add a spoonful or so of the bean-cooking liquid. When the crust forms again, the cassoulet is ready to serve.....
 09-11-2013, 10:09 AM
#7694
Registered User
Copied, pasted and printed!!!
Thanks! Her last day of work is Sept 23rd. I think this with some nice French bubbles would be a nice evening.
So duck confit, beans and what would be a good French style vegi? Will the duck skin get crispy this way? I love that.
I'll make creme brule for dessert. I make a mean vanilla bean one and I love creme brule. One of my favorites and so easy.
I use the torch I loosen rusty nuts and bolts to brown the sugar.
Does the skin of the duck come out crispy this way? I love that.
I'm pretty sure I've had those beans. I really liked it.
I think I've got the perfect thing to cook it in. It's an old school cast iron stew pot with a ceramic coated lid. It's got 3" sides and should get all the duck in perfect. I got it for $8 at a garage sale. No idea why you can't find cookware of this quality anymore. I think it's from the 70's. The lid is a creme colour with brown knob of that era.
The ceramic isn't even dinged.
I'll never get rid of it.
Edit///
I googled and I think it's called a Chasseur?
___
Last edited by Red Wagon; 09-11-2013 at 10:35 AM.
09-11-2013, 12:11 PM
#7695
Hahaha... "You so crazy Robbbbb"! lol...
Hey red, it really depends on the crispy end. You're basically cooking an animal in its own fat when you do confit (Cone-Feat).... Hehehe..... There are ways to alter the recipe where you cook it 300 degrees and cranking up to 375 for the last 15 minutes... Just remember this dramatically shorten the time. If you want truly melting butter tenderness, then you have to be careful how long you do this even at the end, because the key is to never create a boiling situation... Brown the legs fairly well before placing down and then smothering with fat making sure that at least the bottom portions of the fat near the base of the pan are submerged . Also, without overlapping yet having them tightly together, that is another portion of the directions are very important. You can just brown the crap out of them and then put them in the method listed above. Just cranking up at the end if you find them to be not crispy enough and don't prolong that portion of this method.
Here is a good recipe from the Hungry Mouse for roast duck ...
http://www.thehungrymouse.com/2009/0...o-crispy-skin/
I love.....http://www.epicurious.com/recipes/fo...lOrange-233535 .... as well, and as far as the roast duck, the hungry mouse recipe is largely how I roast a duck but I use a little bit different ways with homemade orange marmalade, tamari, Grand Marnier and few other items... I don't object to the Sriracha, but I don't overdo it with it either. You can also use the duck fat to roast vegetables and to answer your earlier question as to sticking with a more traditional French recipe, you might want to do a hericovert sauteed and served with roast root vegetables basted with duck fat. I usually throw some onions or whole peeled shallots in with the root vegetables in the roasting pan... Season well to taste with kosher salt and cracked black pepper and sometimes I dust it very very slightly with nutmeg.... One good pinch for an entire sheet pan.
Last edited by ChefYota4x4; 09-11-2013 at 12:14 PM.
09-11-2013, 08:09 PM
#7697
BACK ON TRACK! LOL.....
Air Supply of the 12V nature......I know, but I've been distracted and wanted to get all the info I could. ....
The long and short of it is that I would like it to be a more "portable" unit and do not really want too hard mount anything in my truck.... At least not at this point... I'm thinking, for now that I want to put it in a portable box that I can close up and tie down... In this box I can also keep my hose and ARB tire deflator and whatever other accessory I might need, including an inflator gun, etc..... Something where I can have the compressor mounted to the bottom but still removable, and all the other crap involved stored therein.
After speaking with Toyo, I've also added the Puma to the list and have narrowed it down to these three...
If someone can convince me that it is a mistake to do anything but hard mount air compressor and possibly even a five gallon skinny tank in the spare tire location... I would love to know exactly why and get your input. I realize most have shared why they would go either way... I just feel like the chances that either could sustain damage being mounted with hard wiring under the truck, open two elements or whatever I expose them to over the next several years... Well, I just feel that it might be best to start this way, more portable, and then if I find I don't like it, none of these units are too difficult to then turn into a hard mount...
I have done lots of reading on this and become fairly busy as with most mods, by reading multiple opinions and threads on the subject( on top of a million other things I have going on) ... As many of you know, opinions are like... Well you know what I mean. Hahaha. Actually I'm just kidding, most people are just showing their personal experience, and for example, I would say, that many people, in fact most that I read who have been using a puma are very satisfied and impressed, both by the speed and especially considering the price. Most of them that I read were grabbing that 2 gallon sidetank kit version... Just as many seem to be very pleased with the ARB and even some with the Puma or even air zenith ob2's have shared that their buddies beat them in airing up and that they don't seem to ever have any problems with them overheating or otherwise... The Puma owners also mention that the kit with the two gallon tanks, mounted to the platform, is very large and almost 50 pounds. Compared to the ARB / 21 pounds for the entire kit..... The first air zenith products were having problems and supposedly from everything I've read in the low rider or otherwise bagged car & truck world are saying, the obd2 is a pretty decent monster for its size and is very quick and never seems to shut off from overheating cycles or anything of the sort. They also like the fact that it is pretty much completely waterproof on the fan and that like some, the air filter can be remotely mounted.
As I said, I've been reading and watching videos and going nuts, but I thought I would share some of the information at least on these three.....
My findings upon reviewing all three;
1. ARB-TWIN:
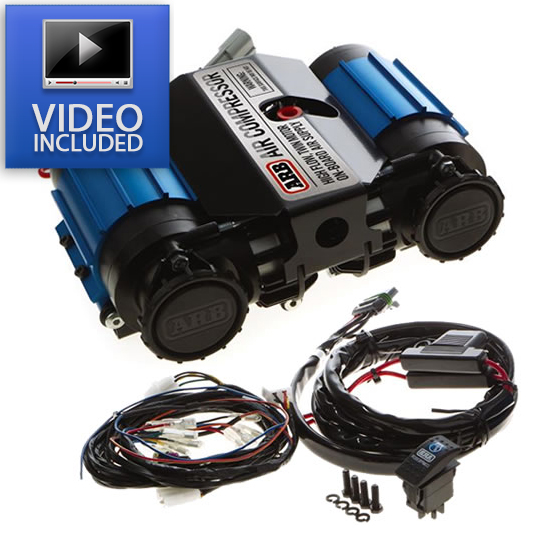
*Will probably be the quickest at airing up my tires
[Specifications]:
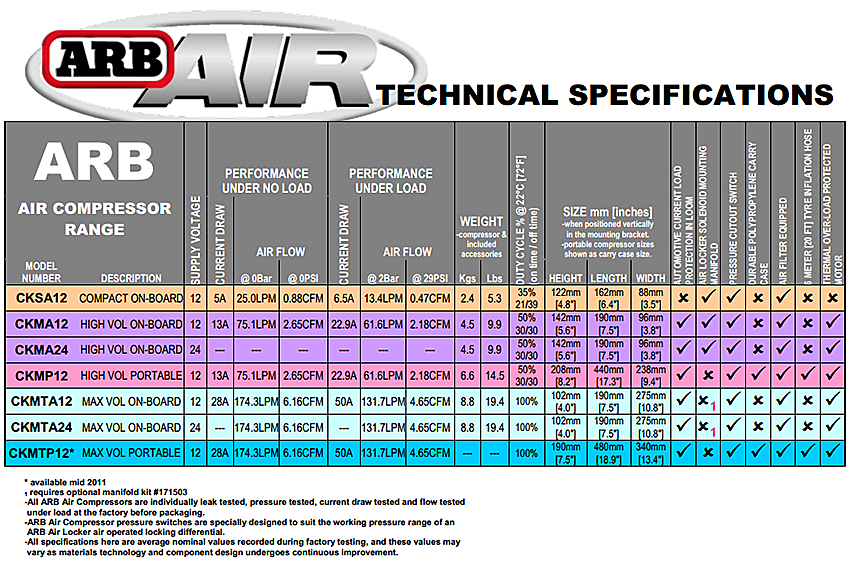
*100% duty/150 psi max/˟
*[6.14CFM] @ 0 psi
*[3CFM] @ 6Bar [90PSI]
*A continuous supply draws 56 amps at max air flow
*ARB offers tons of accessories and would not be too difficult mount in a box, including one of ARB's own boxes that you can get with the larger kit which includes an air tank.(not really interestes/ would source my own tank if I'm going to go that route, most likely for less than $200 as well)
*Around $550 to complete my setup.($449 from www.fuel4wd.com )....
Source for purchase.....
http://item.mobileweb.ebay.com/viewi...290&cmd=VIDESC
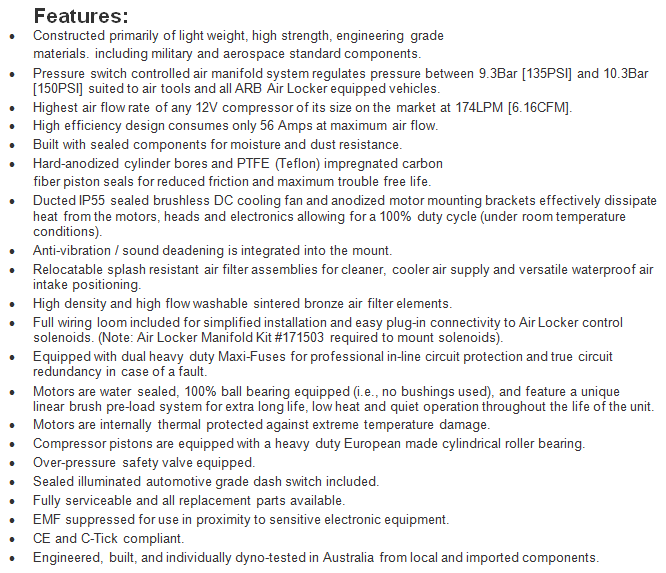
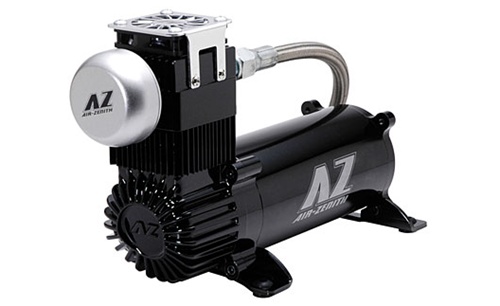
2. Air Zenith OB2 Black Compressor 200 Psi Max with Cooling Fan on Top of the compressorPerformance Chart:-Specifications:
■ Voltage: 12V DC˟
■ Working Pressure: 200 PSI˟
■ Air Flow: 4.25 CFM
■ Duty Cycle: 100% @ 200 PSI˟
■ Max. Amp Draw: 35A˟
■ Motor: 3/4 HPStandard Features:˟
● Oil-free design, non-lube piston & cylinder.
● Patented Interchangeable Piston Technology.
● Long-life, PTFE compound piston ring.
● Balanced connecting rod, low vibration, low sound levels.
● Direct driven motor with automatic reset thermal overload protector.
● IP55 certified waterproof cooling fan.
● 1/2-inch DOT certified PTFE-lined stainless steel braided air hose.
● 1/2-inch NPT air tank fitting.
● Heavy duty check valve.
● Remote mountable waterproof air filter.● 80A heavy duty relay with factory prewired relay socket.
● Integrated 3-position mounting brackets with NYLOCK self-locking mounting hardware.
● 2 Years Manufacturer Warranty.
Source for purchase.....
http://www.autoanything.com/suspensi...A4912A0A0.aspx
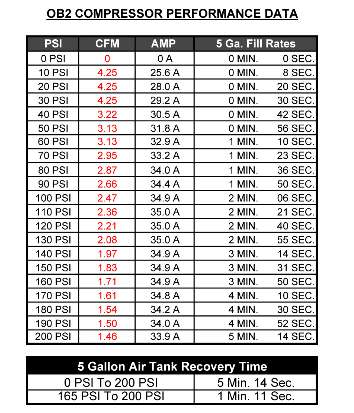
3. 12 Volt 2 Gal Puma Portable Compressor:
*Great unit to take to the field with a tractor, put in your motor home, or use on your off road vehicle.˟ Connect to the battery direct or use alligator clamps or jumper cable ends to connect the unit to the battery.˟ You should not connect with a cigarette lighter unit as it draws 30 amps.˟ It comes with the wire bare so you can go direct or add the clamps.
Specifications:
*1 Horsepower
*2 Gallon Tank (2 of the 1 gallon tanks connected)
*3.4 cfm
*135 psi
*17" High, 14" wide, and 19" long
*Weight 42 lbs.
Source for purchase.....
http://item.mobileweb.ebay.com/viewi...d=310410020250
Air Supply of the 12V nature......I know, but I've been distracted and wanted to get all the info I could. ....
The long and short of it is that I would like it to be a more "portable" unit and do not really want too hard mount anything in my truck.... At least not at this point... I'm thinking, for now that I want to put it in a portable box that I can close up and tie down... In this box I can also keep my hose and ARB tire deflator and whatever other accessory I might need, including an inflator gun, etc..... Something where I can have the compressor mounted to the bottom but still removable, and all the other crap involved stored therein.
After speaking with Toyo, I've also added the Puma to the list and have narrowed it down to these three...
If someone can convince me that it is a mistake to do anything but hard mount air compressor and possibly even a five gallon skinny tank in the spare tire location... I would love to know exactly why and get your input. I realize most have shared why they would go either way... I just feel like the chances that either could sustain damage being mounted with hard wiring under the truck, open two elements or whatever I expose them to over the next several years... Well, I just feel that it might be best to start this way, more portable, and then if I find I don't like it, none of these units are too difficult to then turn into a hard mount...
I have done lots of reading on this and become fairly busy as with most mods, by reading multiple opinions and threads on the subject( on top of a million other things I have going on) ... As many of you know, opinions are like... Well you know what I mean. Hahaha. Actually I'm just kidding, most people are just showing their personal experience, and for example, I would say, that many people, in fact most that I read who have been using a puma are very satisfied and impressed, both by the speed and especially considering the price. Most of them that I read were grabbing that 2 gallon sidetank kit version... Just as many seem to be very pleased with the ARB and even some with the Puma or even air zenith ob2's have shared that their buddies beat them in airing up and that they don't seem to ever have any problems with them overheating or otherwise... The Puma owners also mention that the kit with the two gallon tanks, mounted to the platform, is very large and almost 50 pounds. Compared to the ARB / 21 pounds for the entire kit..... The first air zenith products were having problems and supposedly from everything I've read in the low rider or otherwise bagged car & truck world are saying, the obd2 is a pretty decent monster for its size and is very quick and never seems to shut off from overheating cycles or anything of the sort. They also like the fact that it is pretty much completely waterproof on the fan and that like some, the air filter can be remotely mounted.
As I said, I've been reading and watching videos and going nuts, but I thought I would share some of the information at least on these three.....
My findings upon reviewing all three;
1. ARB-TWIN:
*Will probably be the quickest at airing up my tires
[Specifications]:
*100% duty/150 psi max/˟
*[6.14CFM] @ 0 psi
*[3CFM] @ 6Bar [90PSI]
*A continuous supply draws 56 amps at max air flow
*ARB offers tons of accessories and would not be too difficult mount in a box, including one of ARB's own boxes that you can get with the larger kit which includes an air tank.(not really interestes/ would source my own tank if I'm going to go that route, most likely for less than $200 as well)
*Around $550 to complete my setup.($449 from www.fuel4wd.com )....
Source for purchase.....
http://item.mobileweb.ebay.com/viewi...290&cmd=VIDESC
2. Air Zenith OB2 Black Compressor 200 Psi Max with Cooling Fan on Top of the compressorPerformance Chart:-Specifications:
■ Voltage: 12V DC˟
■ Working Pressure: 200 PSI˟
■ Air Flow: 4.25 CFM
■ Duty Cycle: 100% @ 200 PSI˟
■ Max. Amp Draw: 35A˟
■ Motor: 3/4 HPStandard Features:˟
● Oil-free design, non-lube piston & cylinder.
● Patented Interchangeable Piston Technology.
● Long-life, PTFE compound piston ring.
● Balanced connecting rod, low vibration, low sound levels.
● Direct driven motor with automatic reset thermal overload protector.
● IP55 certified waterproof cooling fan.
● 1/2-inch DOT certified PTFE-lined stainless steel braided air hose.
● 1/2-inch NPT air tank fitting.
● Heavy duty check valve.
● Remote mountable waterproof air filter.● 80A heavy duty relay with factory prewired relay socket.
● Integrated 3-position mounting brackets with NYLOCK self-locking mounting hardware.
● 2 Years Manufacturer Warranty.
Source for purchase.....
http://www.autoanything.com/suspensi...A4912A0A0.aspx
3. 12 Volt 2 Gal Puma Portable Compressor:
*Great unit to take to the field with a tractor, put in your motor home, or use on your off road vehicle.˟ Connect to the battery direct or use alligator clamps or jumper cable ends to connect the unit to the battery.˟ You should not connect with a cigarette lighter unit as it draws 30 amps.˟ It comes with the wire bare so you can go direct or add the clamps.
Specifications:
*1 Horsepower
*2 Gallon Tank (2 of the 1 gallon tanks connected)
*3.4 cfm
*135 psi
*17" High, 14" wide, and 19" long
*Weight 42 lbs.
Source for purchase.....
http://item.mobileweb.ebay.com/viewi...d=310410020250
Last edited by ChefYota4x4; 09-12-2013 at 09:08 AM.
09-11-2013, 09:13 PM
#7698
all good options. after having mine being able to move around. the skinny wire with alligator clips just doesnt put out as much amp as it could if hard wired.
i noticed with alligator clips compared to my upgraded hardwire version now using jump cables as wiring (removed clamps on each end) the pump runs even faster now. i have them running along/above the frame and zipped tied from the battery all the way back. i dont see how you could damage the wiring at all when off roading. if you havent ripped out your factory trailer harness, your not gonna rip out any wiring under there.
i dont see any issues with a small, low profile tank in the spare tire location. i just added one and havent posted/ updated yet since its just temporary mounted with zip ties till i get the correct mounting straps for it hehe
i know you wanna have the option of using the compressor in other vehicles but if its just street vehicles, i would get a smaller, cheaper compressor for that. again just throwing ideas. since i picked up my tundra and it will see pismo often. i plan on adding another hard mounted compressor. i like the option of just jumping in any vehicle and its already geared for any trip
i know i got a little cared away with my "opinion" about compressors so im not gonna say anymore about which one to pick than again i never actually said which one to go with lol
one thing to consider. if you dont plan on adding a tank. than the 1st two compressors is a good option. if you plan to add tanks or more tanks. the adding of an extra tank to the puma is extremely easy. you just add the tank with hoses and t tab for your air hose line for tires.
with the other two compressors, you will need relays, wiring, pressure switch, air plumbing
if you are considering the puma, i would take another look at the smaller tank option like the one i have. its a smaller package and if you plan on adding tank(s) anyways. the smaller package will be better.
i would only look at buzzard-gulch ebay seller name. i believe they have a real non online store as well since i googled them and i think i was able to request a catalog from them. it was just cheaper to buy online from them due to free ship
found more info on the smaller tank version of the puma
http://www.ebay.com/itm/12-volt-1-5-...-/190836040515
1.5 gallon tank
Specs:
125 PSI
oil-Less compressor
Pressure Switch
Compact, lightweight 28 lbs
3.4 cfm @ 40 psi
3 cfm @ 90 psi
Specs
Dimentions: 16.5" High, 17.5" Long, 7.5" Deep
Dimentions of Tank Only 6-1/2" High, 14" Long, 5" Deep
Dimentions of Compressor/Motor : 11" High, 14" Long, 5" deep
100% Duty Cycle
30 amp draw
1750 rpm
60 dec noise level
23 lbs
1 Year warranty
Last edited by ToyoTech559; 09-11-2013 at 09:30 PM.
09-11-2013, 11:34 PM
#7699
Hey buddy, I'll get back in more detail tomorrow...
BUT, HECK, LOL......I just wanted to thank you for taking the time to share all that personal experience and information. One thing I will say is that I'm not worried about the wiring so much as the compressor or tank themselves. I think from what I've read the Air Zenith OB2 is likely the most weatherproof... The one thing I could do as far as a mounting location is where the old torsion bar adjusting bolt went on the passenger side. Obviously on the driver side my ebrake cable runs through there... So, I would have to put it on the other side... I really don't like the other side either because it runs so close to the exhaust. Not the wiring, I'm not worried about that because I have good quality, high temp wires, and I know that the high temp heat shrink I have would hold up as well. It would all be running off of my auxilliary fuse block anyway, which is closer to the rear firewall. Actually I think with any of those higher powered ones I would probably run it directly off the battery.
That brings me to one other thing I wanted to mention really quickly, which is, that I will be installing my 130 amp Denso alternator and a die hard AMG, the highest cranking amp version I can get in there that it is within the realm of reason..... I will likely replace the terminals because I want the type with multiple threaded posts fixed to it, at least two extras that I can run my winch and air compressor system without drama, if I hardwire the compressor.
You are running 33's, right Toyo? How long is it taking you? I know the difference between 33 and 35 this quite a bit more than people think in regards of volume... But it shouldn't be more than a minute or so, more, each tire.
As far as having a compressor for the car,.... I already have a slime, the bigger one that they make. Its a nice convenient little kit that you can zip up and take with you anywhere. But it's pretty slow, and yet I do take it with me on trips and whichever car. Even if the damn thing takes an hour, you gotta have something right? Hahaha. Another reason why I have AAA Premier... BEST roadside insurance you can get... I've had them for more than 25 years,..... since my 16th birthday!
One thing I like about that Air Zenith kit, that comes with the five gallon skinny tank, is that that skinny tank is so narrow, its only 7 inches tall...BUT 28 inches long, so would have to get pretty close to the exhaust to stay away from the drive shaft... But I think it could work. Of course, having a tank like that is only a real help to me with the first tire,.... maybe one and a half. It would be nice to switch it on and let it charge up..... Just not sure I NEEEED-need it, ya know??? As long as I could make everything fit I'm not against it.... I just gotta say, they're all really good choices. Very though for me! Grrrr, lol.
Last edited by ChefYota4x4; 09-12-2013 at 09:13 AM.
09-12-2013, 07:17 AM
#7700
Super Moderator
Staff
iTrader: (1)
Join Date: Aug 2008
Location: Anderson Missouri
Posts: 11,788
Likes: 0
Received 25 Likes
on
22 Posts
Glad to hear you got things worked out with the government on your moms issue. I like how they do that, lets just go back umpteen years and see if they can prove this or that. grrr.
As far as Helto and that truck, I would rather see someone over pay for a great truck then get a smoking deal on one that they have to send to the shop. That smoking deal can get expensive quick. I seen he spent $1300 for a repair. Ouch!!! There is an 86 SR5 extra cab in the works for me to be working on for a friend. Will be a few months, as I have a few things to wrap up.
With all of the new parts you have stuck in, it is suprising you still have your gremlin. Once you get it figured out, you know your runner is about as new as you can get it. So there is some good news out of all of this.
I have been out of town so getting caught up on what is going on. You are always getting something done. Makes me realize I need to get off of my rear.


