
ChefYota4x4's 1987 4Runner Build-Up Thread
 08-23-2013, 11:42 AM
#7521
don't mount it on the underside because it will rust and corrode. relays only last a few months, at best, so i'd be a bit more concerned about a compressor. i'd love to do something like what rb did with the trunk box. that would keep it totally watertight (depending on the seal used for cable and air hose pass-throughs).
Thanks on the tips and rust warning. So, even though its stainless and pewter or "no pewter model", it will rust? I thought that maybe I could just melt the mounting bracket and then music on trips with hangers to secure the hose and filter and then years just remove it when getting home?
I'm trying to make sure I get everything I need... I already have a 25 foot heavy duty half inch air hose, plenty of couple hours, and the kid comes with the filter and filter mounting bracket and mounting hardware for the feet.... Should I have A pressure regulator with gauge added to that kit? A lot of them provide a gauge that goes in your dash or somewhere on the interior... But they are with the kids that are for airbags lifts or air horns, things of that sort. Even have kids with two compressors the wind up being $200 each instead of $270... Wish I had someone near me doing the same thing at the same time. Lol. Thanks for stopping in, Ian!
your stretching using your toes an foot arch to push yourself higher and to retain your balance on a high spot its an unconscious reaction thus more muscle an bone movement than normal aggravating the issues in your feet
after losing 1/4 of my right foot i cant take a shower without having to hold onto the curtain rod or lean on the wall to lean my head back foot issues effect balance
after losing 1/4 of my right foot i cant take a shower without having to hold onto the curtain rod or lean on the wall to lean my head back foot issues effect balance
Last edited by ChefYota4x4; 08-23-2013 at 12:09 PM.
 08-23-2013, 11:53 AM
#7522
Registered User

Join Date: Aug 2013
Posts: 1
Likes: 0
Received 0 Likes
on
0 Posts
Hey guys, I'm new here and just got my first 4runner! I'm looking into purchasing a bikini top for the bed instead of a full rag top. My question is: How would I keep the inside safe from rain/weather? I'm sure you guys think its a stupid question, but hey, I'm new. Also, do you recommend any certain bed liner? right now my truck's got carpet. Anyways, thanks and hope to hear from ya'll soon!
08-23-2013, 01:52 PM
#7524
Registered User
08-23-2013, 02:09 PM
#7525
Hey guys, I'm new here and just got my first 4runner! I'm looking into purchasing a bikini top for the bed instead of a full rag top. My question is: How would I keep the inside safe from rain/weather? I'm sure you guys think its a stupid question, but hey, I'm new. Also, do you recommend any certain bed liner? right now my truck's got carpet. Anyways, thanks and hope to hear from ya'll soon!
Keep at posting on ppls threads, just giving props and such..... At 15 posts or so u can start a build thread, introduce yourself, post up some pics and get started on the 1st stages of Toyotaticulitus!
 ........
Far as a bikini in any way being even a fraction waterproof......Not sure I've ever seen that. Almost anything is possible I guess ..... Except that, lol. Gonna have to do a Canback and roll it up when wanting it open air style. Its not a stupid question....just not sure what u mean.

Yeah... , simply put, .......and 100% true!
 ....lol
08-23-2013, 03:29 PM
....lol
08-23-2013, 03:29 PM
#7527
Lil premature update! Lol....
I know I'm likely speaking too soon.... but just in regards to my miss..... Since resetting the valve lash at 7,000 mi. since my new valvles and springs and mang. bronze guides at rebuild..... just today for 20 miles or so, just stop and go w/some higher speeds and lots of idling....... the motor is EVEN QUIETER...., anddddddd, it seems to barely be missing at all!
One thing I have to add to the variables;
Doing the fuse block, the ground was pulled, and thus, the ECU was reset. And SOOOOO, I have to give it a day or so to reset itself. But DANGGGG is it smooth, even with the Bomb Proof Tcase mount. I think the valves were a lil off IMHO...... and I set them properly before break in... Just was really tight on some of em!
Warm Restart idle down gremlin still present.....grrr. lol
We'll see.
Should have my alternator and headlight wiring harness today or 2mrw!
Last edited by ChefYota4x4; 08-23-2013 at 06:21 PM.
08-23-2013, 06:23 PM
#7529
No Rob....I gotta check eBay again. I look it up last night and they're apparently some people have the same issue. Certain accounts get locked out from time to time for some reason. Ion loaded the app and reloaded it didn't work. But for some reason on Firefox I was able to sign in.... But then I couldn't see anything past "buy". FUUUUUUUUUUgglestix! Lol
08-23-2013, 09:31 PM
#7530
i been meaning to ask you, since your the only one other me i know that has a freshly redone IFS set up. but you did a SAS afterwards. everyone that had IFS and did a SAS says it rides much better. but they are comparing a worn out original 20 plus year old IFS to a fresh SAS with new parts.
now that you have had both fresh IFS and SAS. how would you compare the ride? is it really much better than IFS?
now that you have had both fresh IFS and SAS. how would you compare the ride? is it really much better than IFS?
08-23-2013, 11:32 PM
#7531
Sup Buddy?
Hmmmmmmm, well, I knew this would come up....I wanted to wait a while so it could break in a bit. Just solely on "comfortable/non-jarring ride"?.... It's definitely easier on the rump.... But LOTS of variables.... I ran OMEmu shocks in front and OME LEAF PACKS IN BACK...BUT ALL RUBBER OEM BUSHINGS up front.... When I hit a speed bump now.... its not as stabbing.... but it is a pretty fat stack of springs.... I'm sure it will continue to break in a lil... And yet, been told the TG lift can carry more weight as it has a lil more progressive spring rating...and yet you've seen it flex, yeah? On the uneven streets, it tends to "drive itself" a lil more....obviously, cuz is not independently articulating... But without sacrificing everything that makes this a little flexi monster, but cannot expect to have squishy ride like the CRV, which I can literally just fly over parking lot speed bumps without even feeling it... Translate that to the trail and try and take even 5 miles of that crap and it'll probably explode! Lol.
All in all, I can say that I felt a little more in control before... But, then again, I didn't have a 4 inch lift which is really sitting at like five and a half right now, and I didn't have 35's... But, what I can say, for sure, is aside from things breaking in, I am certainly getting a lot more use to it every time I Drive it. I doubt I've even put 300 miles on it since I've had it home.... But I know how to wheel and I plan to have a lot of fun with it and simultaneously avoid rolling it down a mountain! Hahaha. Wait, that's not funny. lol
Hmmmmmmm, well, I knew this would come up....I wanted to wait a while so it could break in a bit. Just solely on "comfortable/non-jarring ride"?.... It's definitely easier on the rump.... But LOTS of variables.... I ran OMEmu shocks in front and OME LEAF PACKS IN BACK...BUT ALL RUBBER OEM BUSHINGS up front.... When I hit a speed bump now.... its not as stabbing.... but it is a pretty fat stack of springs.... I'm sure it will continue to break in a lil... And yet, been told the TG lift can carry more weight as it has a lil more progressive spring rating...and yet you've seen it flex, yeah? On the uneven streets, it tends to "drive itself" a lil more....obviously, cuz is not independently articulating... But without sacrificing everything that makes this a little flexi monster, but cannot expect to have squishy ride like the CRV, which I can literally just fly over parking lot speed bumps without even feeling it... Translate that to the trail and try and take even 5 miles of that crap and it'll probably explode! Lol.
All in all, I can say that I felt a little more in control before... But, then again, I didn't have a 4 inch lift which is really sitting at like five and a half right now, and I didn't have 35's... But, what I can say, for sure, is aside from things breaking in, I am certainly getting a lot more use to it every time I Drive it. I doubt I've even put 300 miles on it since I've had it home.... But I know how to wheel and I plan to have a lot of fun with it and simultaneously avoid rolling it down a mountain! Hahaha. Wait, that's not funny.
lol
08-23-2013, 11:52 PM
#7533
I have to admit that I'm so exhausted I can barely remember if I even mentioned checking my TPS... But, I did, right before replacing the connector. Everything was in specs, plain and simple.
Pictures of test 1 through 5 in order... ...
1.) 0.00mm (0.000"): VTA - E2 *200-800
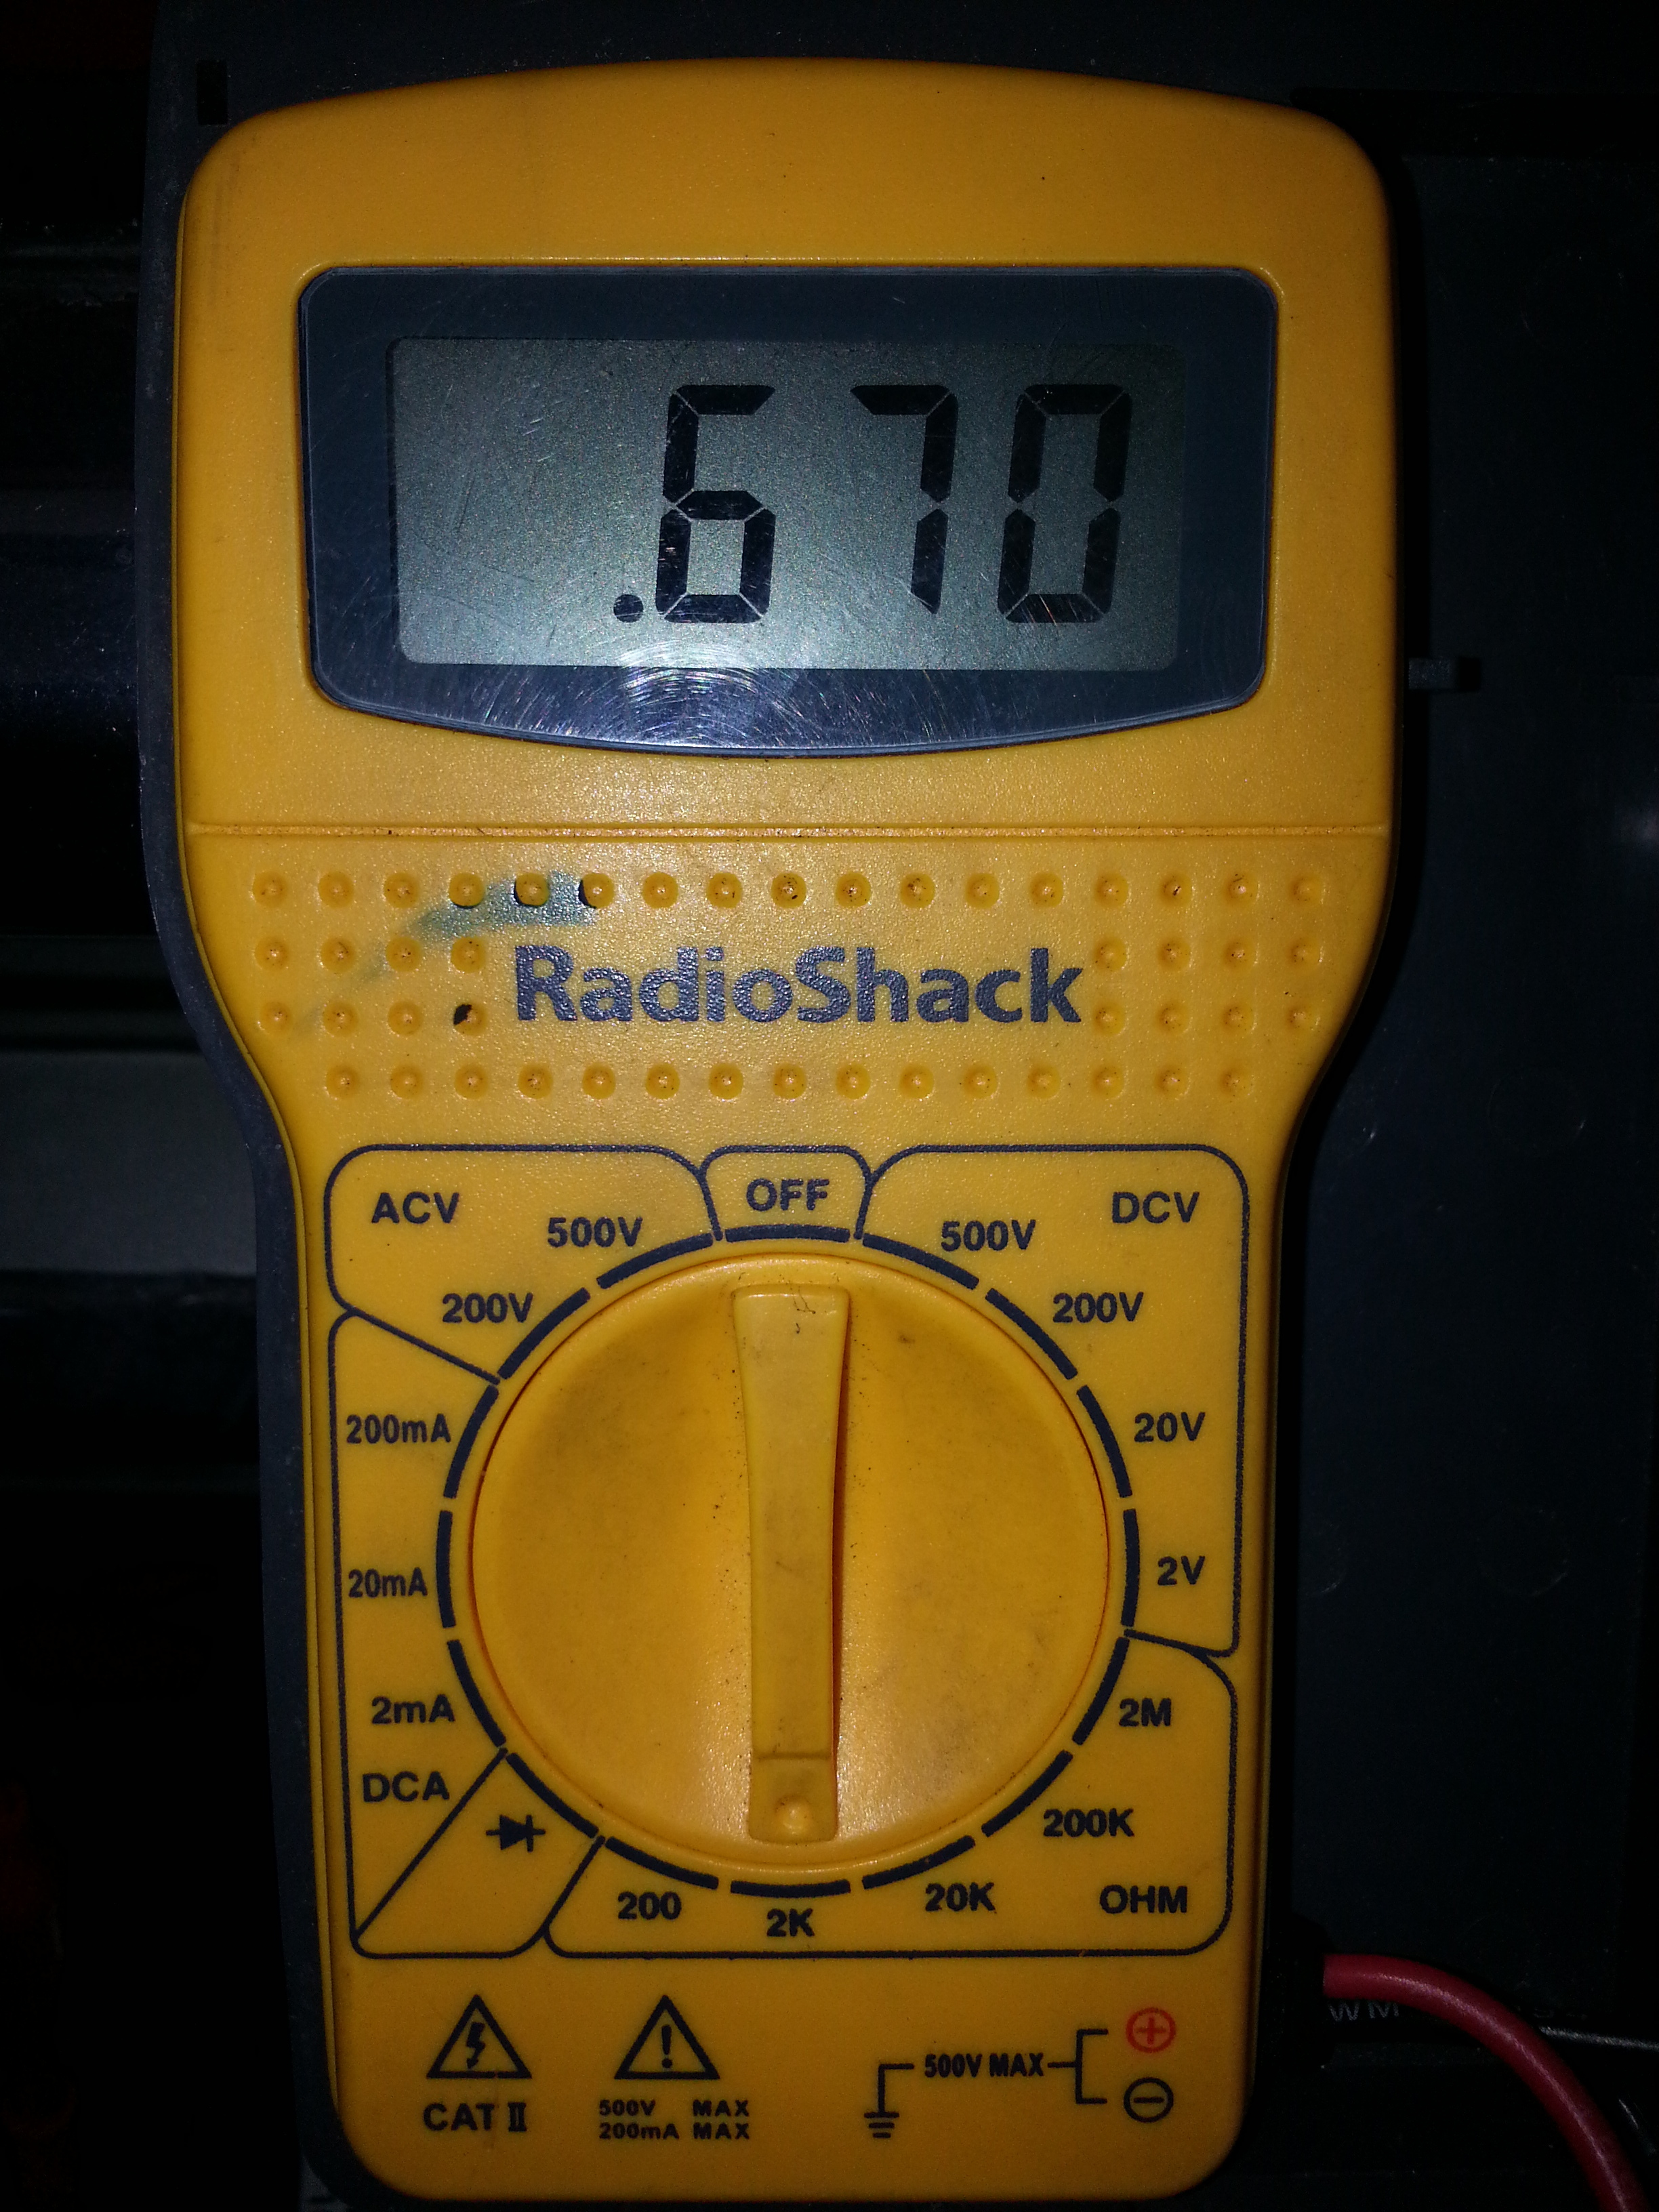
2.) 0.57mm (0.0224"): IDL - E2 *< 2.3K
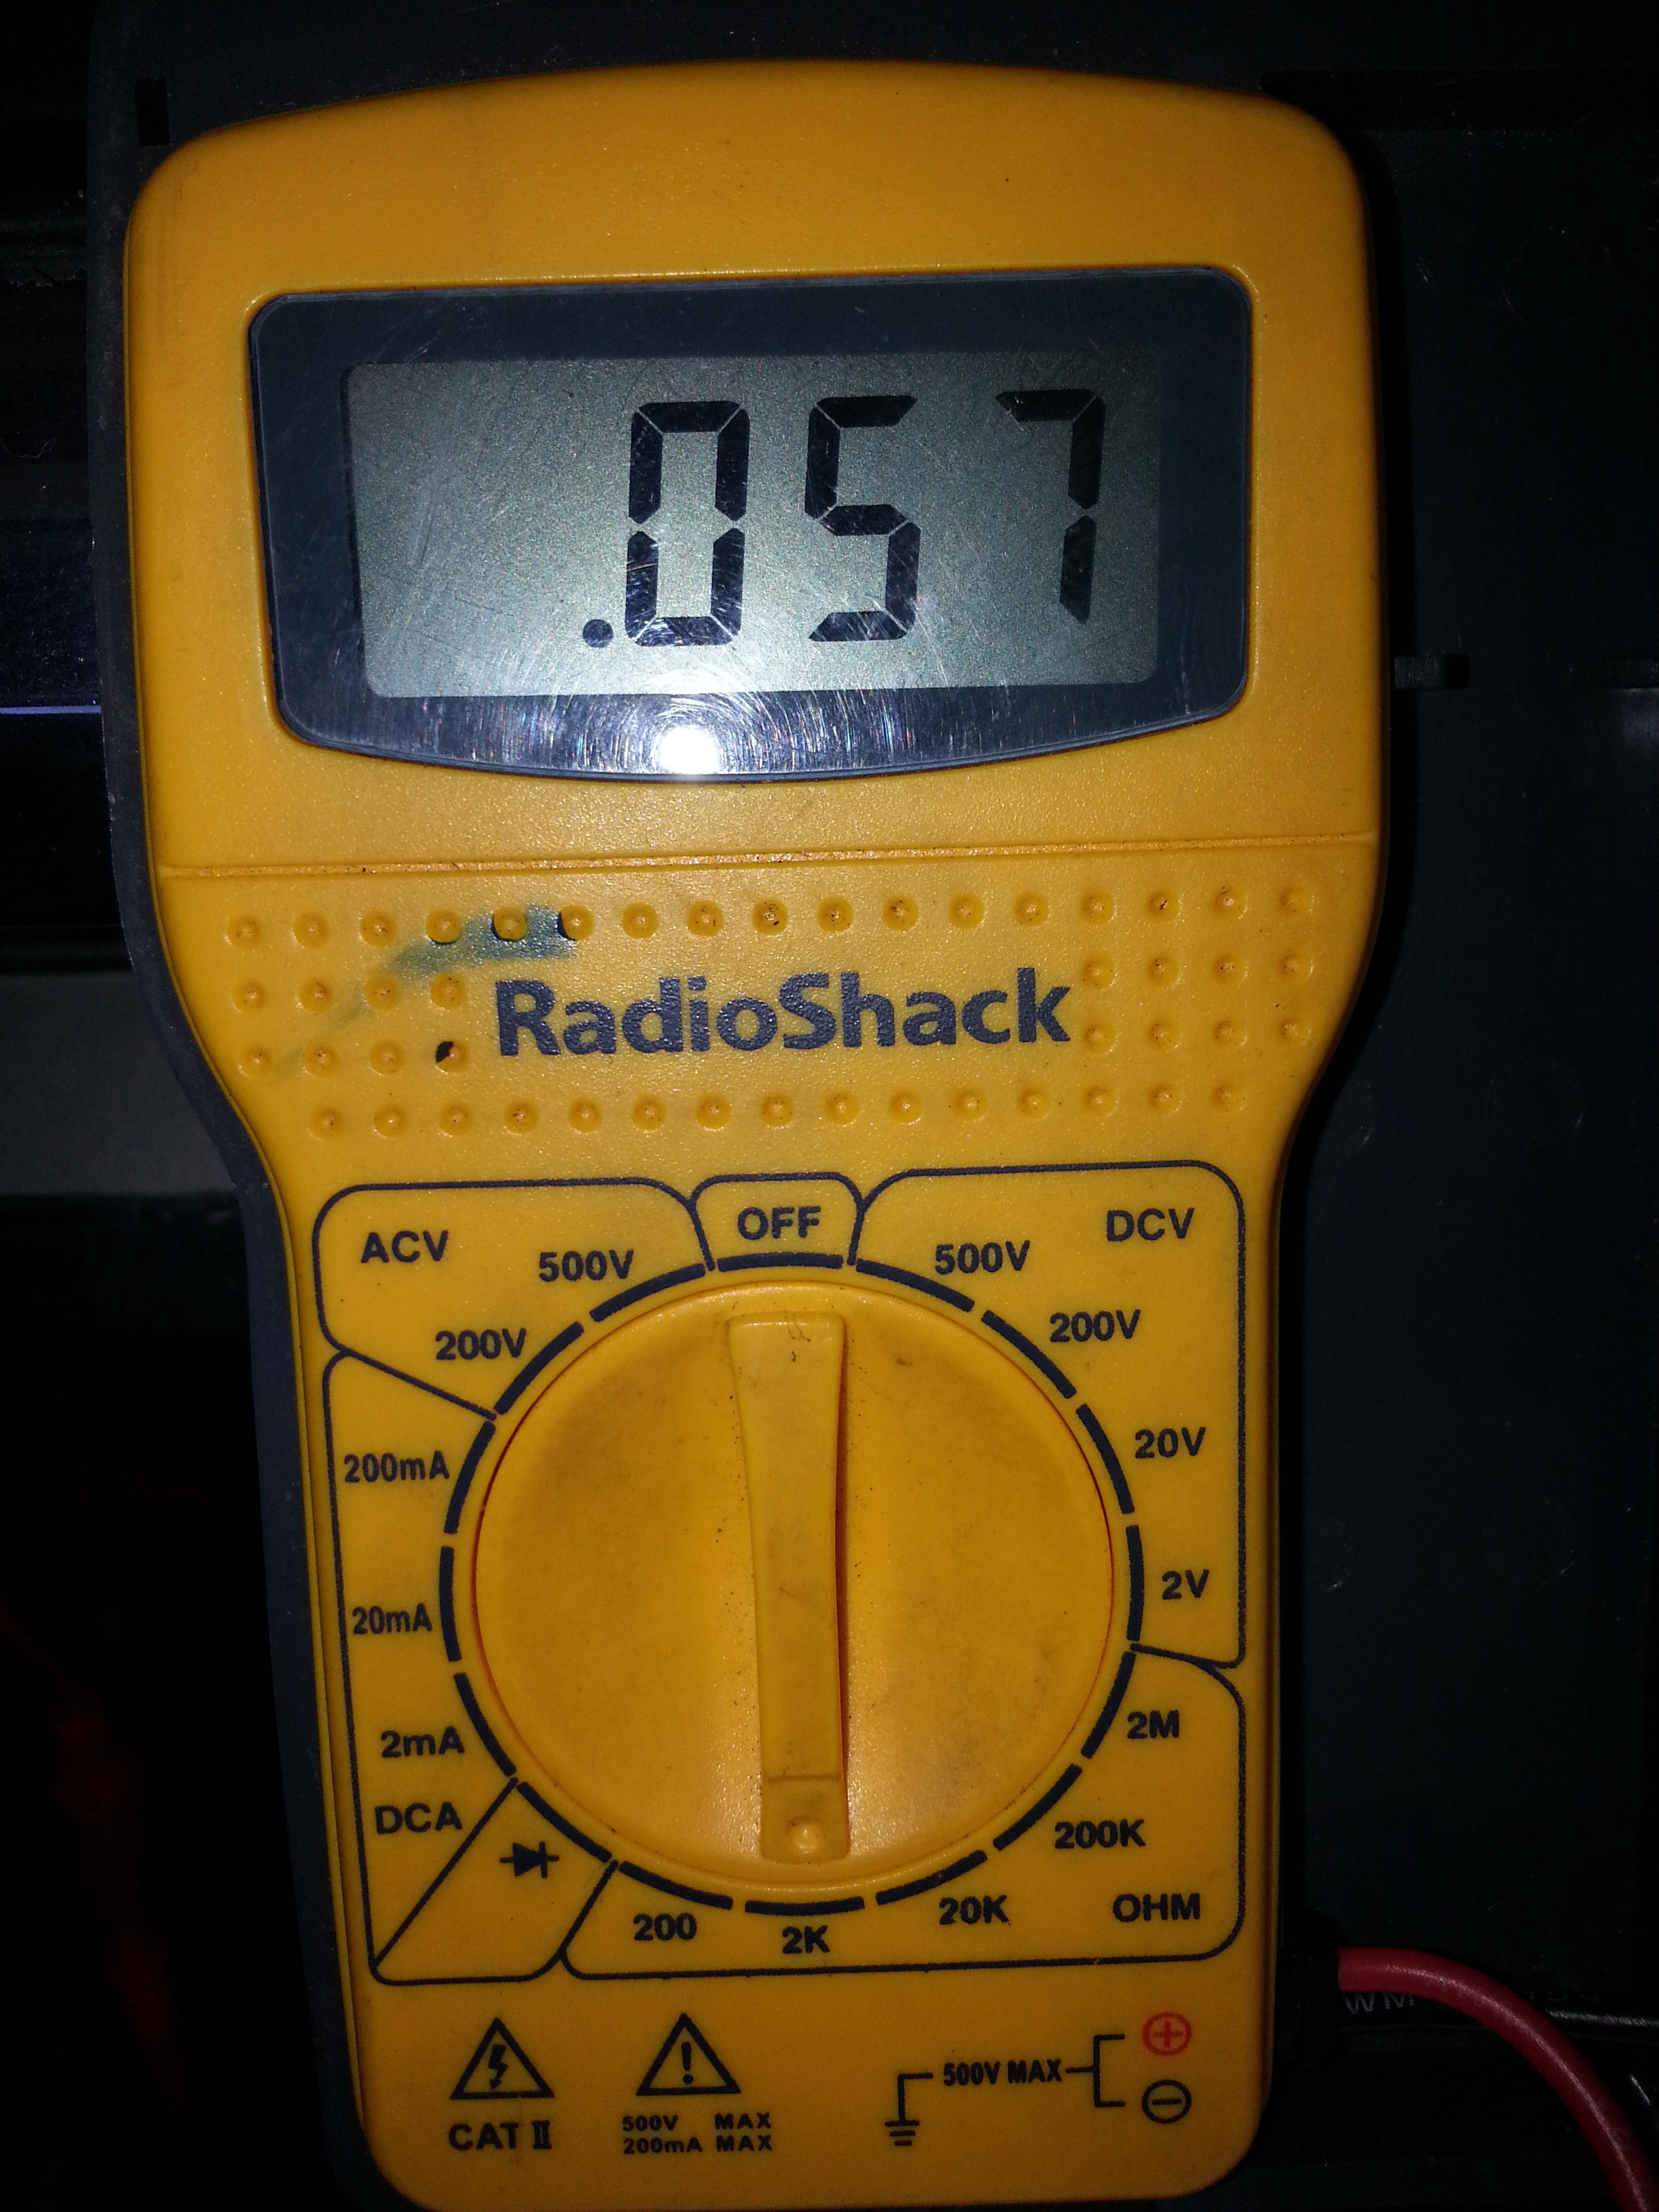
3.) 0.85mm (0.0335"): IDL - E2. *Open / Infinite
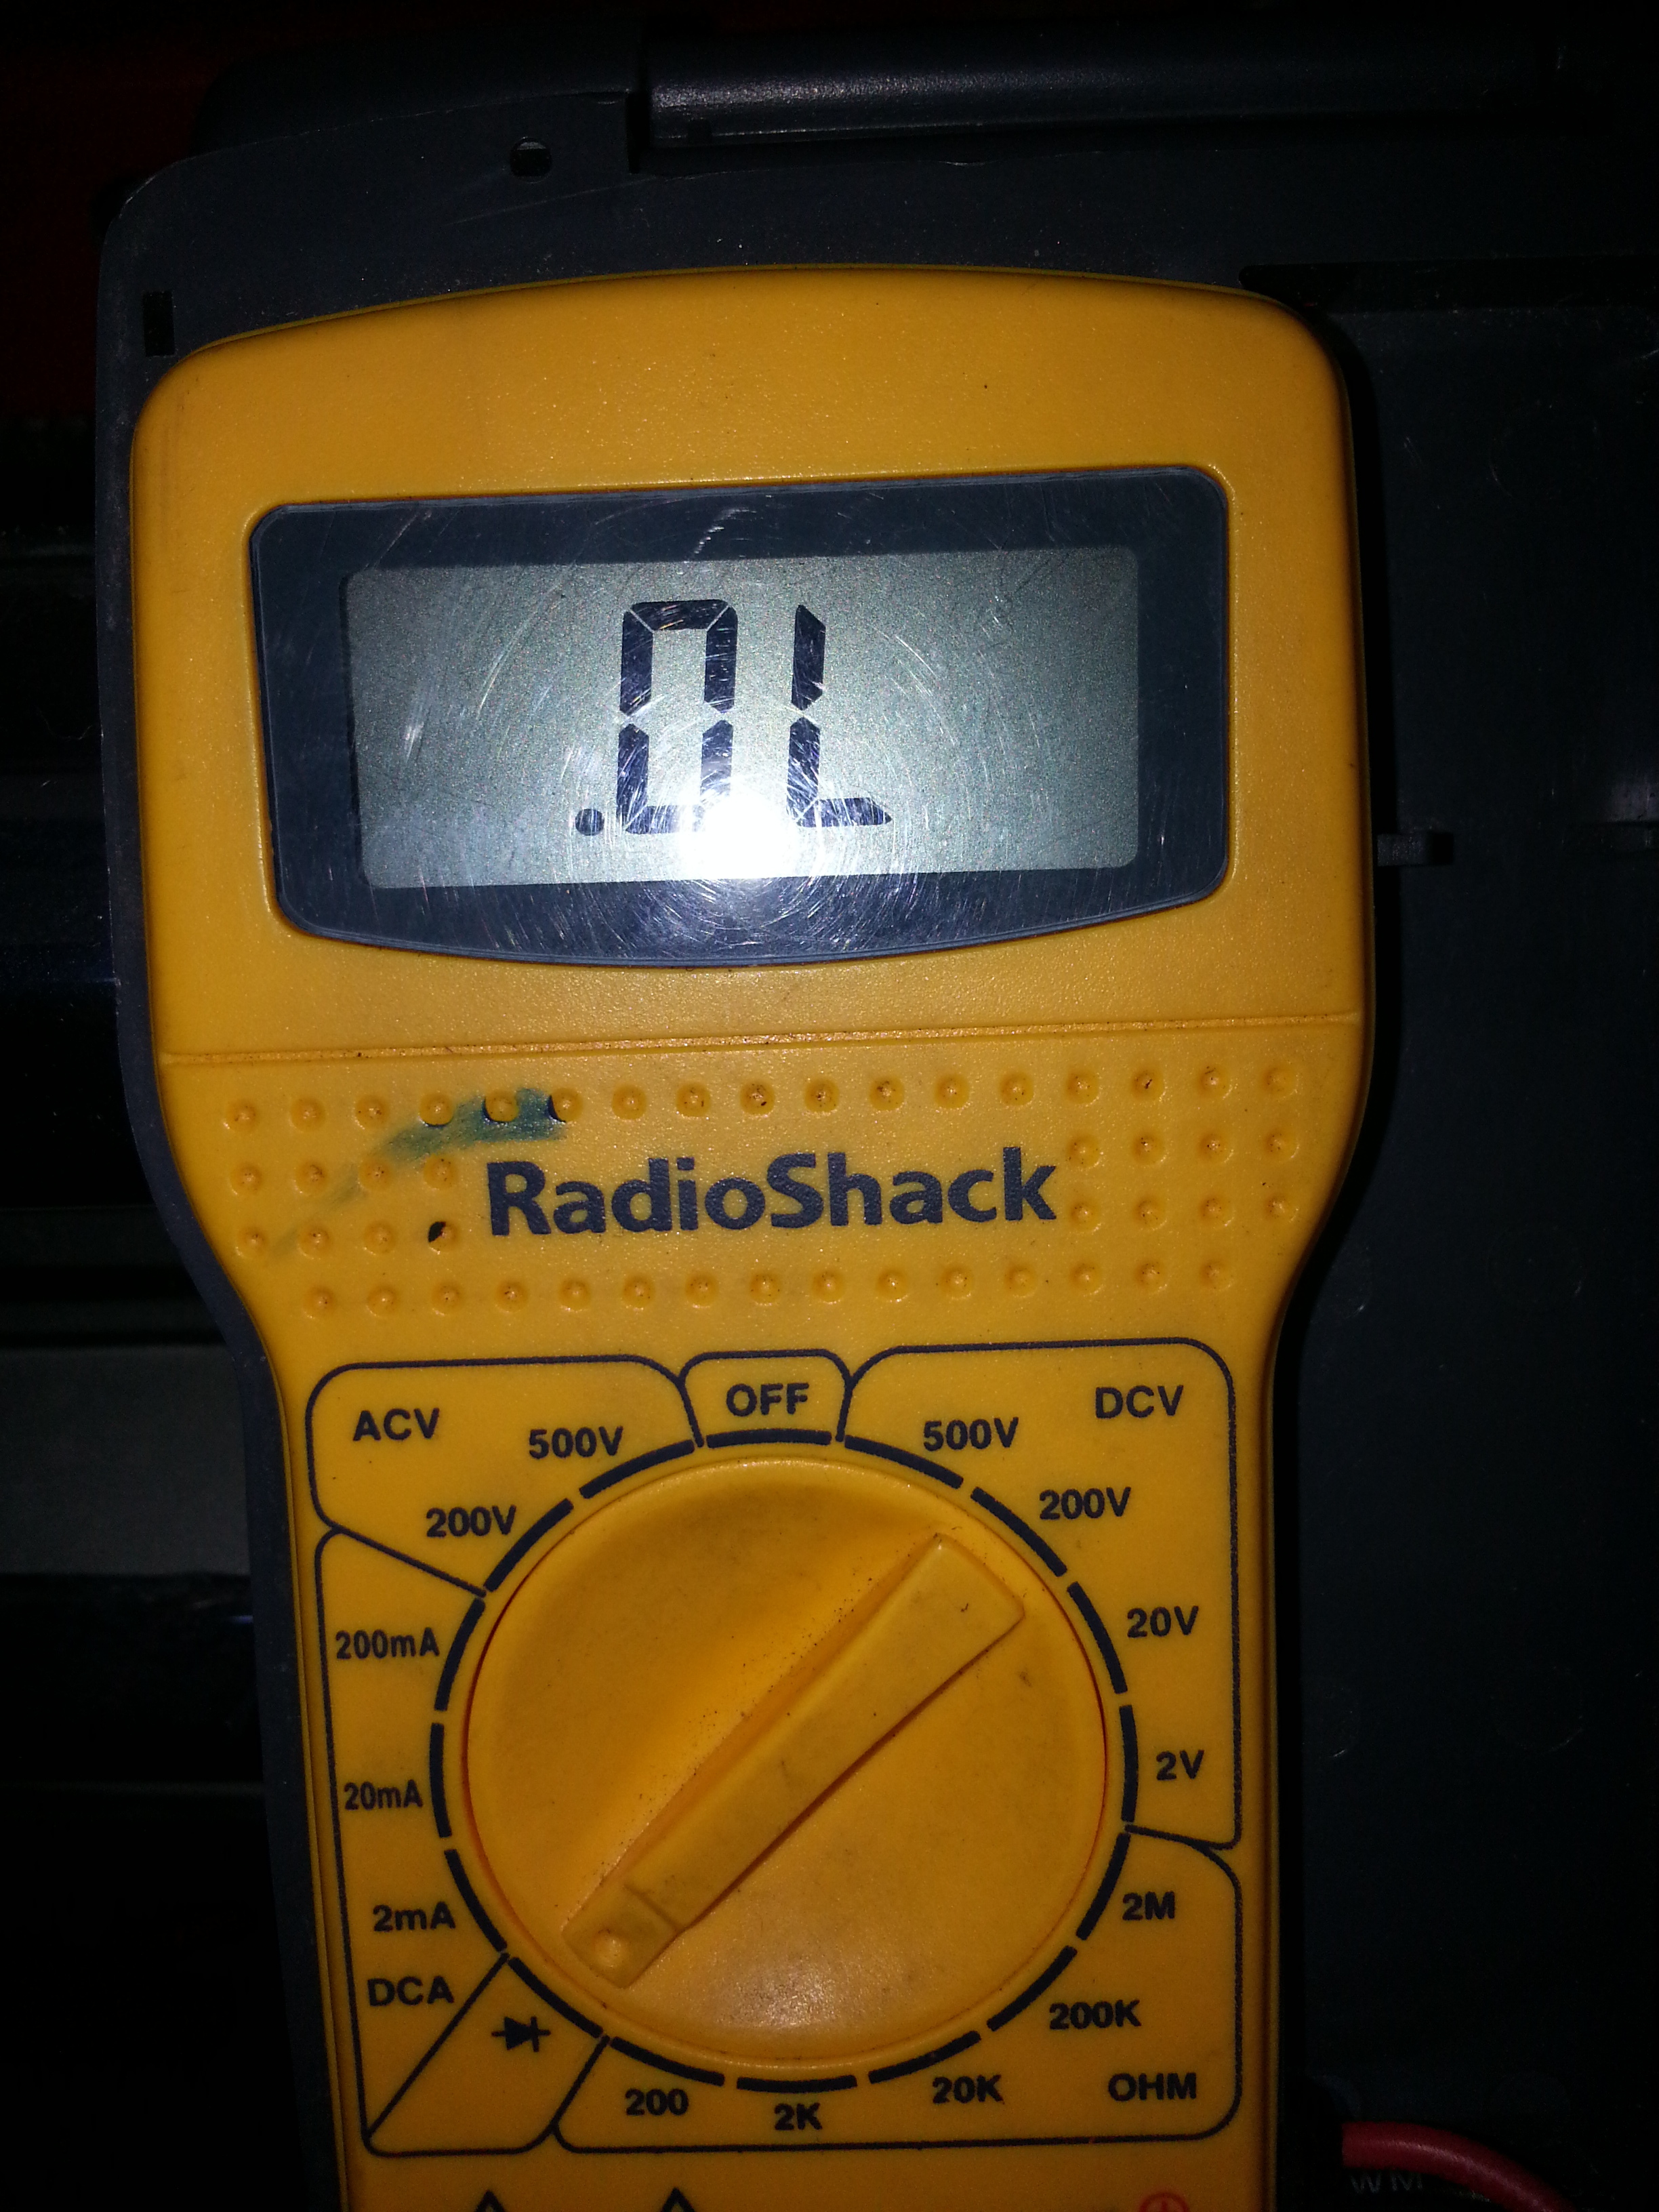
4.) Wide Open Throttle: VTA - E2 *3.3K-10K ( Some don't really get multimeters, and I DO understand that... I've been there. So I thought I would just explain really quick... * If you look at the meter, the reason that I am set to 20K/20,000 ohm is just because the test is showing a range of 3.3k-10k/3, 300-10,000 ohm to be within specification. ... The meter will say O.L /Over Limit )..... PS: You want the plain old "Ohm" setting for test #3.... That will read any amount of resistance, which is measured in ohms, numerically or buy a sign of infinite or in the case of this average Radio Shack meter... "O.L" . haha.
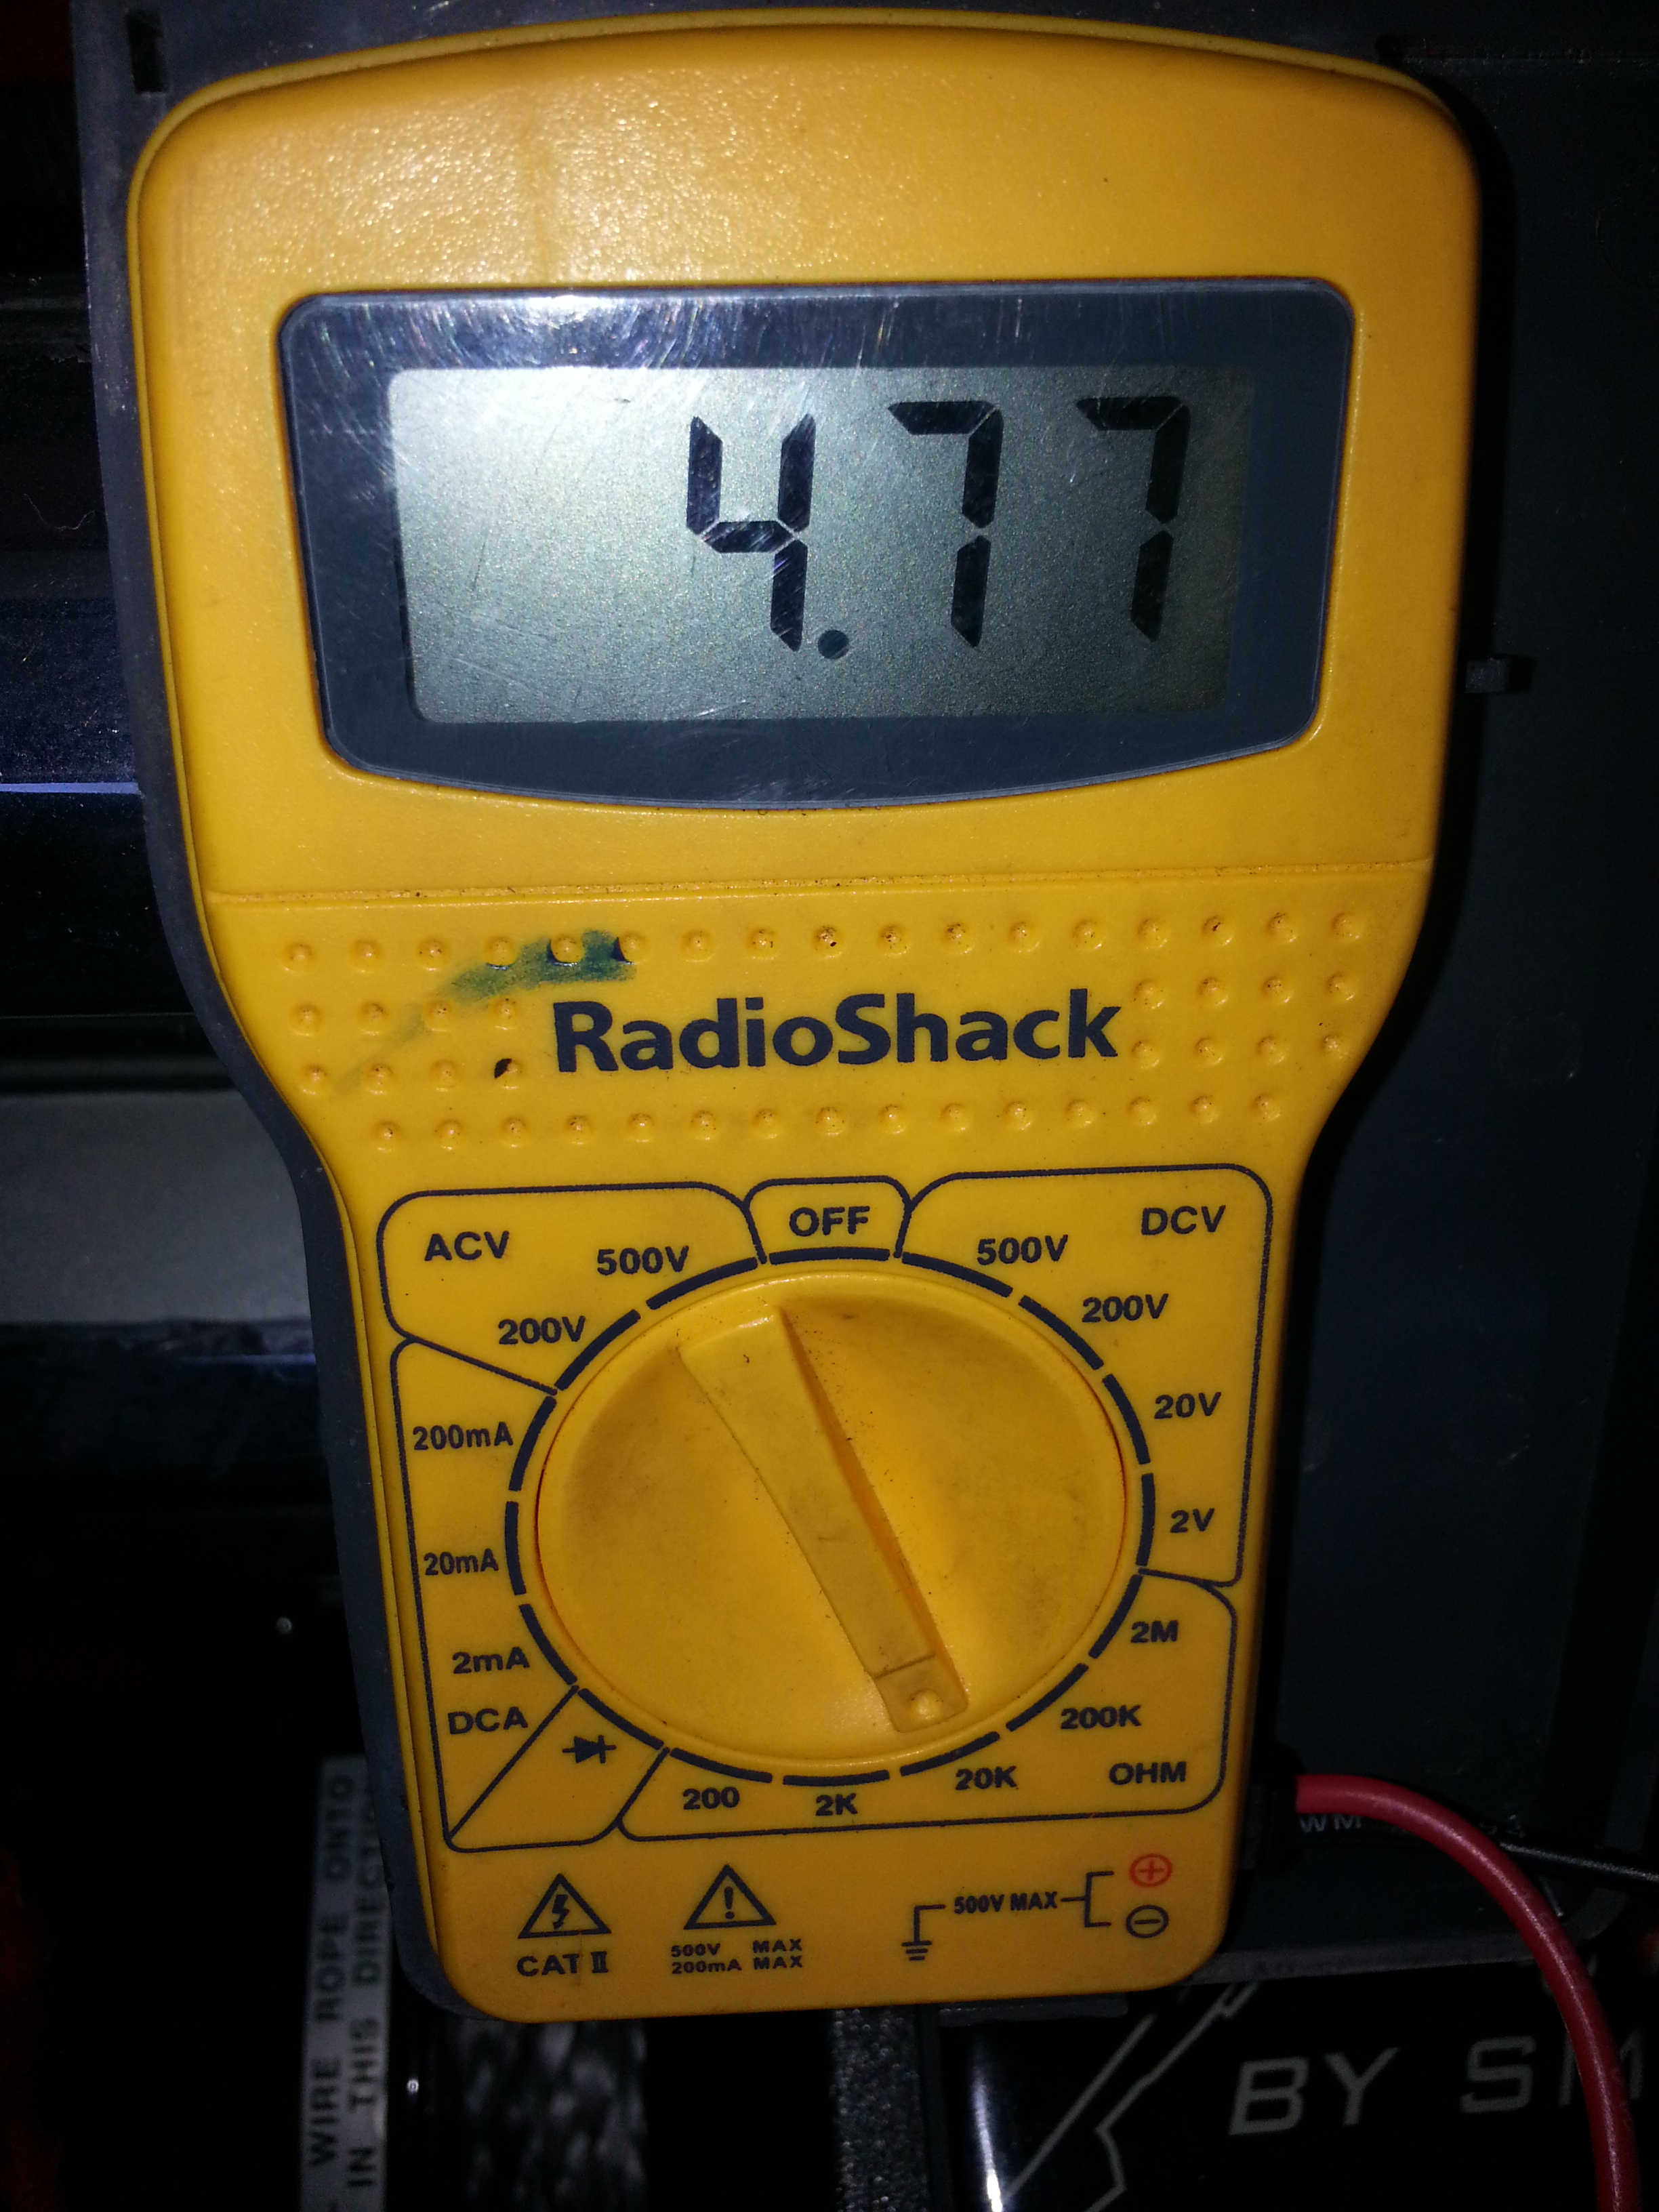
5.) n /a : Vcc - E2. *3.0K - 7.0K
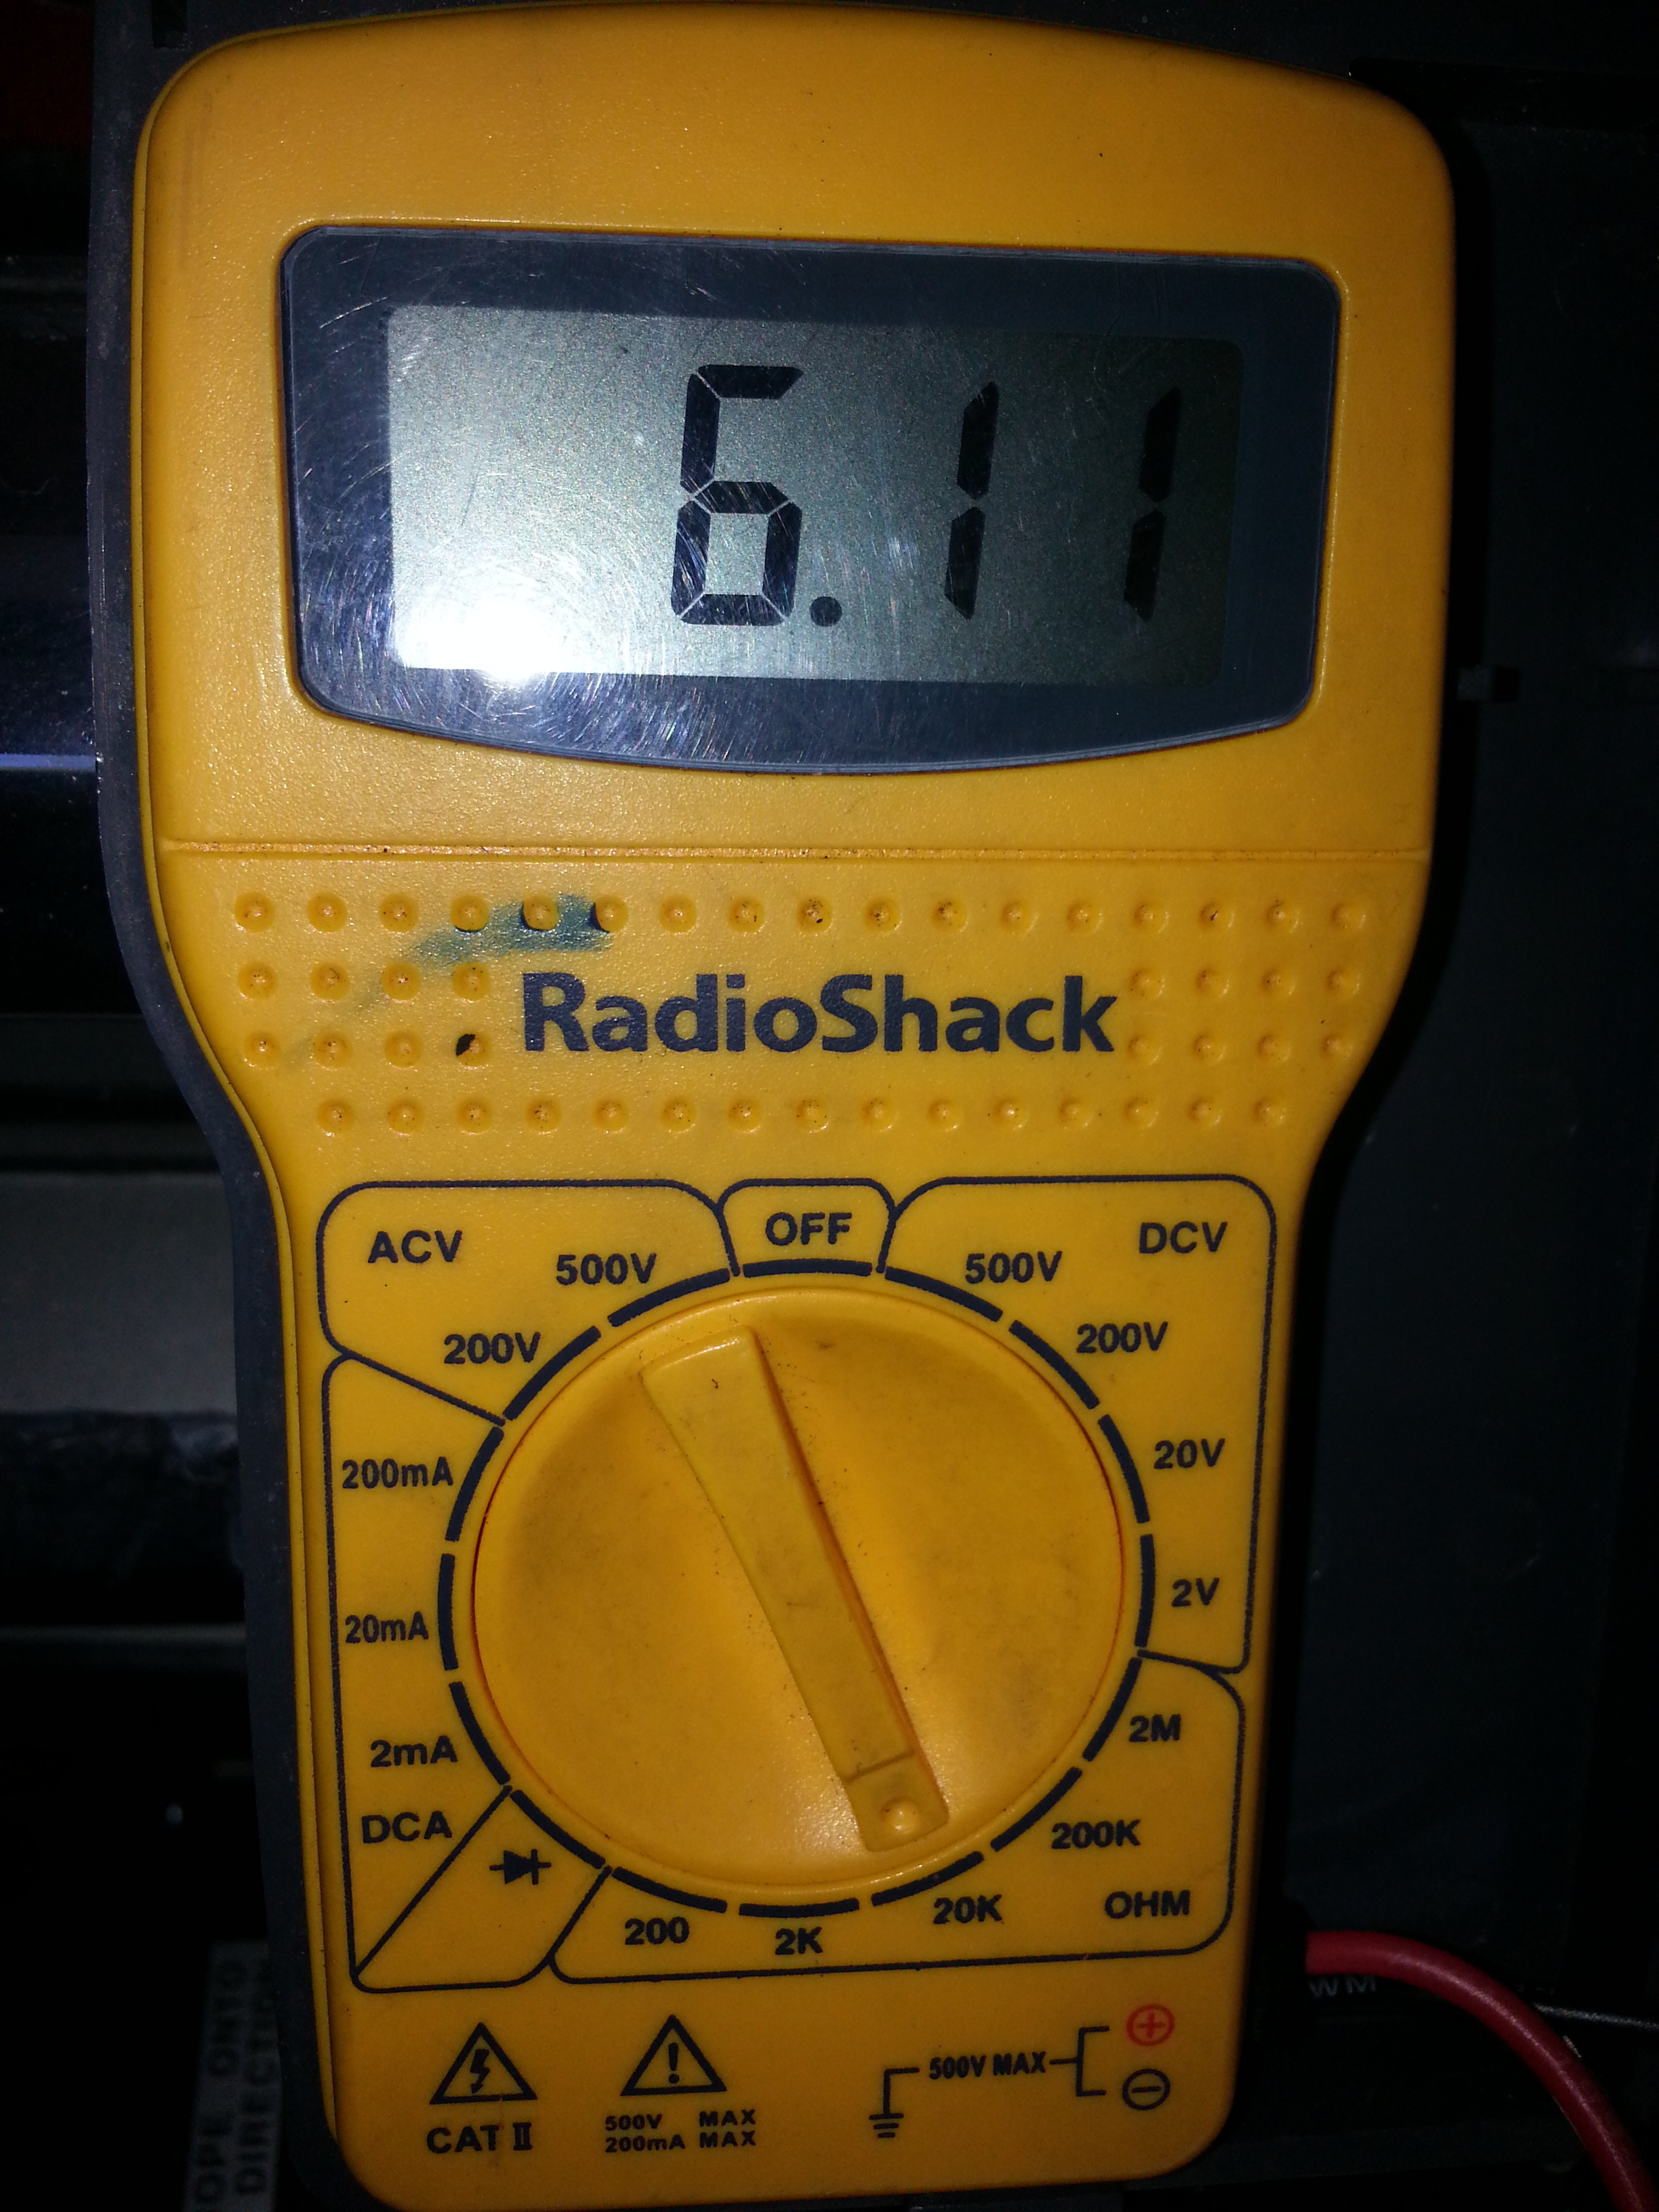
TPS?......CHECK! Lol.....
Pictures of test 1 through 5 in order... ...
1.) 0.00mm (0.000"): VTA - E2 *200-800
2.) 0.57mm (0.0224"): IDL - E2 *< 2.3K
3.) 0.85mm (0.0335"): IDL - E2. *Open / Infinite
4.) Wide Open Throttle: VTA - E2 *3.3K-10K ( Some don't really get multimeters, and I DO understand that... I've been there. So I thought I would just explain really quick... * If you look at the meter, the reason that I am set to 20K/20,000 ohm is just because the test is showing a range of 3.3k-10k/3, 300-10,000 ohm to be within specification. ... The meter will say O.L /Over Limit )..... PS: You want the plain old "Ohm" setting for test #3.... That will read any amount of resistance, which is measured in ohms, numerically or buy a sign of infinite or in the case of this average Radio Shack meter... "O.L" . haha.
5.) n /a : Vcc - E2. *3.0K - 7.0K
TPS?......CHECK! Lol.....
Last edited by ChefYota4x4; 08-24-2013 at 09:58 AM.
 08-24-2013, 12:14 AM
#7535
Registered User
08-24-2013, 12:26 AM
#7536
Ok, so I'm ready to bite the bullet on an OBA setup.... Almost! Lol....
I understand that there's only a couple logical choice is, but the trick comes in in regards to where to mount the compressor and where and how to mount the tank... I got looking today and found some good ideas.... Here's one. ..

That is a newer quad cab Tacoma, so he was able to drill through the bed... I am wanting to use my spare tire carrier frame . So I have to come up with something else. As far as morning the compressor I think it would be okay to mount the compressor to the frame rail using the Viair mounting bracket... I just have to come up with the way to do quick releases so that when I get home I can disconnect it. Then I have to mount the remote air filter a little bit higher, which shouldn't be a problem. The 480C can be mounted on a slight angle as long as the tank is at the low end. It is an oilless compressor, but it still can't remember did completely on its side or upside down as heat its to dissipate afford from the top of the head for optimal operation. They do have a temperature automatic shut off switch, so while I have heard of people mounting them in the engine bay, I decided against that... The only problem with mounting the compressor on to the brackets and then on to the frame rail is that the only spot of frame rail that I really can see that I could use to mount a 13 inch long compressor is directly above the exhaust. The other side has the fuel tank.... But I am trying to work it out... I could put it in the panel on the driver side inside my custom panels... And then run the air hose down where I ran the differential breather tube on the opposite side... The problem there is again, nothing can really release the heat that's generating inside the panel...
I'll figure it out, I just need to know exactly what size tank I want & exactly how to mount it so that I can order everything at once. I was going to grab the ARB twins which has a much higher CFM rating: 6.14........
I understand that there's only a couple logical choice is, but the trick comes in in regards to where to mount the compressor and where and how to mount the tank... I got looking today and found some good ideas.... Here's one. ..
That is a newer quad cab Tacoma, so he was able to drill through the bed... I am wanting to use my spare tire carrier frame . So I have to come up with something else. As far as morning the compressor I think it would be okay to mount the compressor to the frame rail using the Viair mounting bracket... I just have to come up with the way to do quick releases so that when I get home I can disconnect it. Then I have to mount the remote air filter a little bit higher, which shouldn't be a problem. The 480C can be mounted on a slight angle as long as the tank is at the low end. It is an oilless compressor, but it still can't remember did completely on its side or upside down as heat its to dissipate afford from the top of the head for optimal operation. They do have a temperature automatic shut off switch, so while I have heard of people mounting them in the engine bay, I decided against that... The only problem with mounting the compressor on to the brackets and then on to the frame rail is that the only spot of frame rail that I really can see that I could use to mount a 13 inch long compressor is directly above the exhaust. The other side has the fuel tank.... But I am trying to work it out... I could put it in the panel on the driver side inside my custom panels... And then run the air hose down where I ran the differential breather tube on the opposite side... The problem there is again, nothing can really release the heat that's generating inside the panel...
I'll figure it out, I just need to know exactly what size tank I want & exactly how to mount it so that I can order everything at once. I was going to grab the ARB twins which has a much higher CFM rating: 6.14........
08-24-2013, 10:43 AM
#7538
Well thanks much, KornHusker! I just edited it a bit to make more sense. Lol... I did mention I was tired right? Hahahahaha. But thank you. I remember, initially, having a bit of a hard time remembering the high school days of how to test resistance properly. The other factor is that not everybody has those exact feeler gauges. Roger does mention in his tutorial , that using the exact feelers to a ten thousandth is not necessary... But we gotta try and get close. The best way to do that is just to add a smaller and sicker feeler gauge together.
Roger has saved my rump more than once... And I'm very grateful. There's just something about reading technical data, especially in regards to electronics, that, well, I just can't seem to grasp right off the bat. One reason for that is that I'm a visual learner... But, another thing I noticed is, that one day RBX and RAD and I believe a couple others that were helping me with my cargo lighting modifications told me this..."You have to have a grasp on the schematic to really Excel and get better at doing even basic applications of Electronics... Once you get that down, you can look at your rig and back and forth to the schematic and really have a good grasp of exactly how everything works." <<<Absolutely the truth! In this case, it is more of a diagram of instructions, so as long as you know which pin is IDL and e2 and so forth... As long as you know where to put the feeler gauges, which is not between the dash pot rod and stop.... and then finally, once you have a grasp on how to use your multi meter... You can test pretty much anything in these trucks as I damn well have! Lol. But, roger is a master electrician, pretty much a PhD with a multimeter, hahahahaha. But his wording isn't too complicated, I just had to read it more than once... Now I can adjust a TPS with the best of them and trust me, it is a very touchy little bugger , which is why it's important to get close with the feeler gauges... If you have ever adjusted one of these, like when you're installing a brand new one, then you know how a couple of these settings are a total p.i.t.a to get right. I mean you move this thing clockwise or counterclockwise a millimeter and you just jumped through a range of hundreds of ohms. What he says, regarding getting the first setting in the middle... Usually the rest of them lineup.
Roger has saved my rump more than once... And I'm very grateful. There's just something about reading technical data, especially in regards to electronics, that, well, I just can't seem to grasp right off the bat. One reason for that is that I'm a visual learner... But, another thing I noticed is, that one day RBX and RAD and I believe a couple others that were helping me with my cargo lighting modifications told me this..."You have to have a grasp on the schematic to really Excel and get better at doing even basic applications of Electronics... Once you get that down, you can look at your rig and back and forth to the schematic and really have a good grasp of exactly how everything works." <<<Absolutely the truth! In this case, it is more of a diagram of instructions, so as long as you know which pin is IDL and e2 and so forth... As long as you know where to put the feeler gauges, which is not between the dash pot rod and stop.... and then finally, once you have a grasp on how to use your multi meter... You can test pretty much anything in these trucks as I damn well have! Lol. But, roger is a master electrician, pretty much a PhD with a multimeter, hahahahaha. But his wording isn't too complicated, I just had to read it more than once... Now I can adjust a TPS with the best of them and trust me, it is a very touchy little bugger , which is why it's important to get close with the feeler gauges... If you have ever adjusted one of these, like when you're installing a brand new one, then you know how a couple of these settings are a total p.i.t.a to get right. I mean you move this thing clockwise or counterclockwise a millimeter and you just jumped through a range of hundreds of ohms. What he says, regarding getting the first setting in the middle... Usually the rest of them lineup.
 08-24-2013, 12:26 PM
#7540


