
ChefYota4x4's 1987 4Runner Build-Up Thread
 04-07-2013, 04:22 PM
#6281

Waiting for the video to rebuffer in HD. But while I do I can answer some questions.
Yep big fat White-Black wire with the hoop connector is the ground, should be the only hoop style connector back there. In the parts locator pictures it's on the top mount, not that it matters, bottom should be fine.
...And I forgot what else I wanted to mention...
Oh yeah Top safety switch, thought you guys just shoved the bolt back in those w/ the top off. For whatever reasons, soft tops only maybe *shrug*.
You can do the addon switch wiring all at that rear plug (S1), except for tieing into the forward "Lock s/w". Let me translate those "simplified" directions to that plug, it really doesn't matter whos directions or photos you use. Certainly not to me, they're all essentially the same, long as they get the job done and you can understand one it's all good.
This might be identical to the diagram you gave, and is identical to the one RAD gave minus the lock switch.
Just throwing that out there cause you mentioned you can access that location thru the panel door.
Yep big fat White-Black wire with the hoop connector is the ground, should be the only hoop style connector back there. In the parts locator pictures it's on the top mount, not that it matters, bottom should be fine.
...And I forgot what else I wanted to mention...
Oh yeah Top safety switch, thought you guys just shoved the bolt back in those w/ the top off. For whatever reasons, soft tops only maybe *shrug*.
You can do the addon switch wiring all at that rear plug (S1), except for tieing into the forward "Lock s/w". Let me translate those "simplified" directions to that plug, it really doesn't matter whos directions or photos you use. Certainly not to me, they're all essentially the same, long as they get the job done and you can understand one it's all good.
Originally Posted by Edited from above
Really easy honest, just toss a spare window switch in.
Plug H Pin 2, to S1 Pin8 (Blue on gate side, or Blue-green on body side), goes to the top detection switch.
Plug H Pin 5, to S1 pin10 (Blue-black), window UP
Plug H Pin 2, to S1 pin9 (Blue-White), window DOWN
And done.
Plug H Pin 2, to S1 Pin8 (Blue on gate side, or Blue-green on body side), goes to the top detection switch.
Plug H Pin 5, to S1 pin10 (Blue-black), window UP
Plug H Pin 2, to S1 pin9 (Blue-White), window DOWN
And done.
Just throwing that out there cause you mentioned you can access that location thru the panel door.
 04-07-2013, 05:24 PM
#6282
Great videos like always. 
The window limit switch is the black device located just to the passenger side of the motor. It has a one wire plug, white plug in the video, it also looks like it has an individual ground wire to the large nut just to the P-side so what I said about it vibrating loose and having a "body/mount" ground seems incorrect.
No solid ideas on the wiper really. Sloppy/worn mechanicals, dry cams, all your basic R&R stuff.
You're likely neck deep into your install or replacing panels, or hopefully done and enjoying a nice cold drink and watching you flowers bloom. But best wishes still at any rate
04-07-2013, 06:01 PM
#6283
Contributing Member
Join Date: Mar 2003
Location: COTKU,Ontario,Canada
Posts: 11,334
Likes: 0
Received 0 Likes
on
0 Posts
Thanks for the door pin link cyber I need them too...
Mark can't help but wonder why you would want to be able to put the window up with the gate down... seems to be a recipe for disaster if you ask me...
though I suppose it would make working on the internals of the gate easier...
Mark can't help but wonder why you would want to be able to put the window up with the gate down... seems to be a recipe for disaster if you ask me...
though I suppose it would make working on the internals of the gate easier...
04-07-2013, 06:10 PM
#6284
Registered User
well to take my gate apart for repairs i had to make the gate think it was closed but i think mark is after a way to roll the window down without trying to turn on the key the safety aspect is the lockout which is easy to add
glad to help aviator! they have new hinges as well on fleabay but i can see where the rebuild kit would be better an you can pull the pin an the door comes off
glad to help aviator! they have new hinges as well on fleabay but i can see where the rebuild kit would be better an you can pull the pin an the door comes off
04-08-2013, 02:29 AM
#6285
Hey dudes, I'll be back 2mrw, but just wanted to thank ya all for the input!
For now, CO; Yep, I got the ground and limit switch info Street posting the vid, meant to update it with text, just too busy
....
Avi; dragon is right. And I removed the ground strap to that switch after repairing the motor, etc. I want a constant hot rear window switch, along with a lock switch. But, maybe I can find a way to tie the camping switch to the door lock detection switch, so when the gate is open the window doesnt operate? Thanx for shipping by and the props.
William, Thanx for taking my 6 on the explain.....
Well, I wanted to also mention. ... The window is already sticking/fluttering again. I'll figure it out. But I wont tur MN down any ideas! Hahaha
04-08-2013, 07:44 AM
#6286
04-08-2013, 09:11 AM
#6287
Registered User
called local toy dealer mark
rear glass weather strip IS available they changed the part # 39 bucks
*68160-89111*
68211-89106 CLIP, BACK DOOR GLASS WEATHERSTRIP is also available
rear glass weather strip IS available they changed the part # 39 bucks
*68160-89111*
68211-89106 CLIP, BACK DOOR GLASS WEATHERSTRIP is also available
04-08-2013, 10:05 AM
#6288
Mark,
I verified: Tailgate safety interlock works for rear-deck accessible window control, IF wired like I described above.^^
You will not be able to operate window when tailgate is down.
Not bad. My antenna mounting nut also cost only a $11.
So ...generally for little/ low-dollar parts, better to just go to the stealers. Would save us time and gas driving around for deals.
I verified: Tailgate safety interlock works for rear-deck accessible window control, IF wired like I described above.^^
You will not be able to operate window when tailgate is down.
So ...generally for little/ low-dollar parts, better to just go to the stealers. Would save us time and gas driving around for deals.
04-08-2013, 10:20 AM
#6289
Mark,
I verified: Tailgate safety interlock works for rear-deck accessible window control, IF wired like I described above.^^
You will not be able to operate window when tailgate is down.
Not bad. My antenna mounting nut also cost only a $11.
So ...generally for little/ low-dollar parts, better to just go to the stealers. Would save us time and gas driving around for deals.
I verified: Tailgate safety interlock works for rear-deck accessible window control, IF wired like I described above.^^
You will not be able to operate window when tailgate is down.
Not bad. My antenna mounting nut also cost only a $11.
So ...generally for little/ low-dollar parts, better to just go to the stealers. Would save us time and gas driving around for deals.
And THANK U FOR CHECKING! That was nice of ya man. .. . And didn't have to ask!
Btw, u guys saw that my cleaned up and new motor set up is already sputtering?...... �.�
04-08-2013, 10:40 AM
#6290
04-08-2013, 11:15 AM
#6291
Just a fresh/solo - info mssg. ;
My tailgate is still sputtering on occasion. Its weird, that as I prev mentioned, it's also:
*when I hold the button long enough, it will start going up after 10 seconds or so, almost like my now disconnected door ajar/seatbelt-buzzer timer(can't recall, but seem to remember that buzzer would go on and then shut off after the key was on and seat belt was left unclipped?)... I'm sure that's unrelated, but it just seems odd that afterva seemingly identical time period of holding the button down it will them go up most times. It still sputters SOMEtimes when doing that, but not every time. And most or at least half the time it works just fine.
I'll check the limit switch amd pins in the latch and relay module all, while back in there to add the camping/added switch.
04-08-2013, 01:29 PM
#6292
Registered User
tossin ideas here
clean the limit switches they might be sticky
grab hold of the tailgate as someone rolls the window up an shake it if it reacts more you've got a bad gate to body ground through the hinges an braces might be time to just add a wire from gate ground to the body anywhere you can get it
clean the limit switches they might be sticky
grab hold of the tailgate as someone rolls the window up an shake it if it reacts more you've got a bad gate to body ground through the hinges an braces might be time to just add a wire from gate ground to the body anywhere you can get it
04-08-2013, 01:34 PM
#6293
Registered User
DUDE! SHHHHHHHH! Hahaha.... jk, and really,..... THANKUM YOUSIE! Gonna call u actually..... Must speak......urgent.......Trying something Cyber-hornish and .....AHHHHHHHH! �.� .......Hehehe
And THANK U FOR CHECKING! That was nice of ya man. .. . And didn't have to ask!
And THANK U FOR CHECKING! That was nice of ya man. .. . And didn't have to ask!
am i?
weird &^$ weather here it was 31 when i got up BRR!! its now finally 48 its like old man winter GO HOME!
 04-08-2013, 03:21 PM
#6295
Contributing Member
Join Date: Mar 2003
Location: COTKU,Ontario,Canada
Posts: 11,334
Likes: 0
Received 0 Likes
on
0 Posts
Get some electrical contact cleaner and spray the limit switches and see if you can get at the internals of the activating switches themselves... who knows what gunk got in them before you pulled them... if they came out of a smoker's car they are full of nicotine/tar gunk which is probably messing up the current flow.
04-08-2013, 04:16 PM
#6296
Last edited by RAD4Runner; 04-09-2013 at 03:25 AM.
04-08-2013, 04:20 PM
#6297
Registered User
Yes, Harbor Freight is your friend - LOL!
04-08-2013, 07:06 PM
#6298
Throw a couple debug lights on it? Inline with the switch, the motor,and the relay supply. This will tell you which part of the system the problem is in, if they all go out at once I'd suspect the ground or the supply line.
percussive maintence "If it doesn't fit force it, if it breaks it needed replacing anyway"
percussive maintence
"If it doesn't fit force it, if it breaks it needed replacing anyway"
 04-09-2013, 12:42 AM
#6300
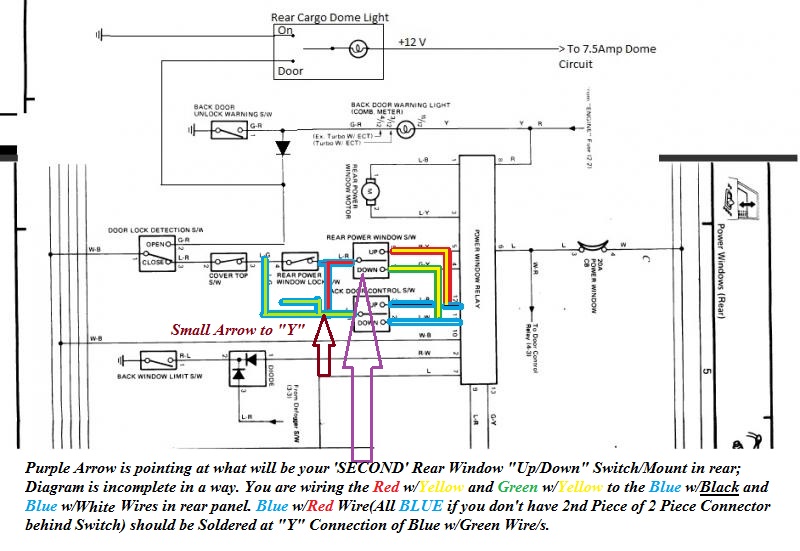
First, for personal reference, AGAIN, lol.... and sharing from the picture in another window...... I'm posting the Chefamadoodle Schematic I did off of either Bryan89's or RAD's original doodleage. haha. >>>>>>>>>>>>>>>>
Now, a copy right from my Haynes, including the omitted portions.... And without the doodle of the added dome light...........

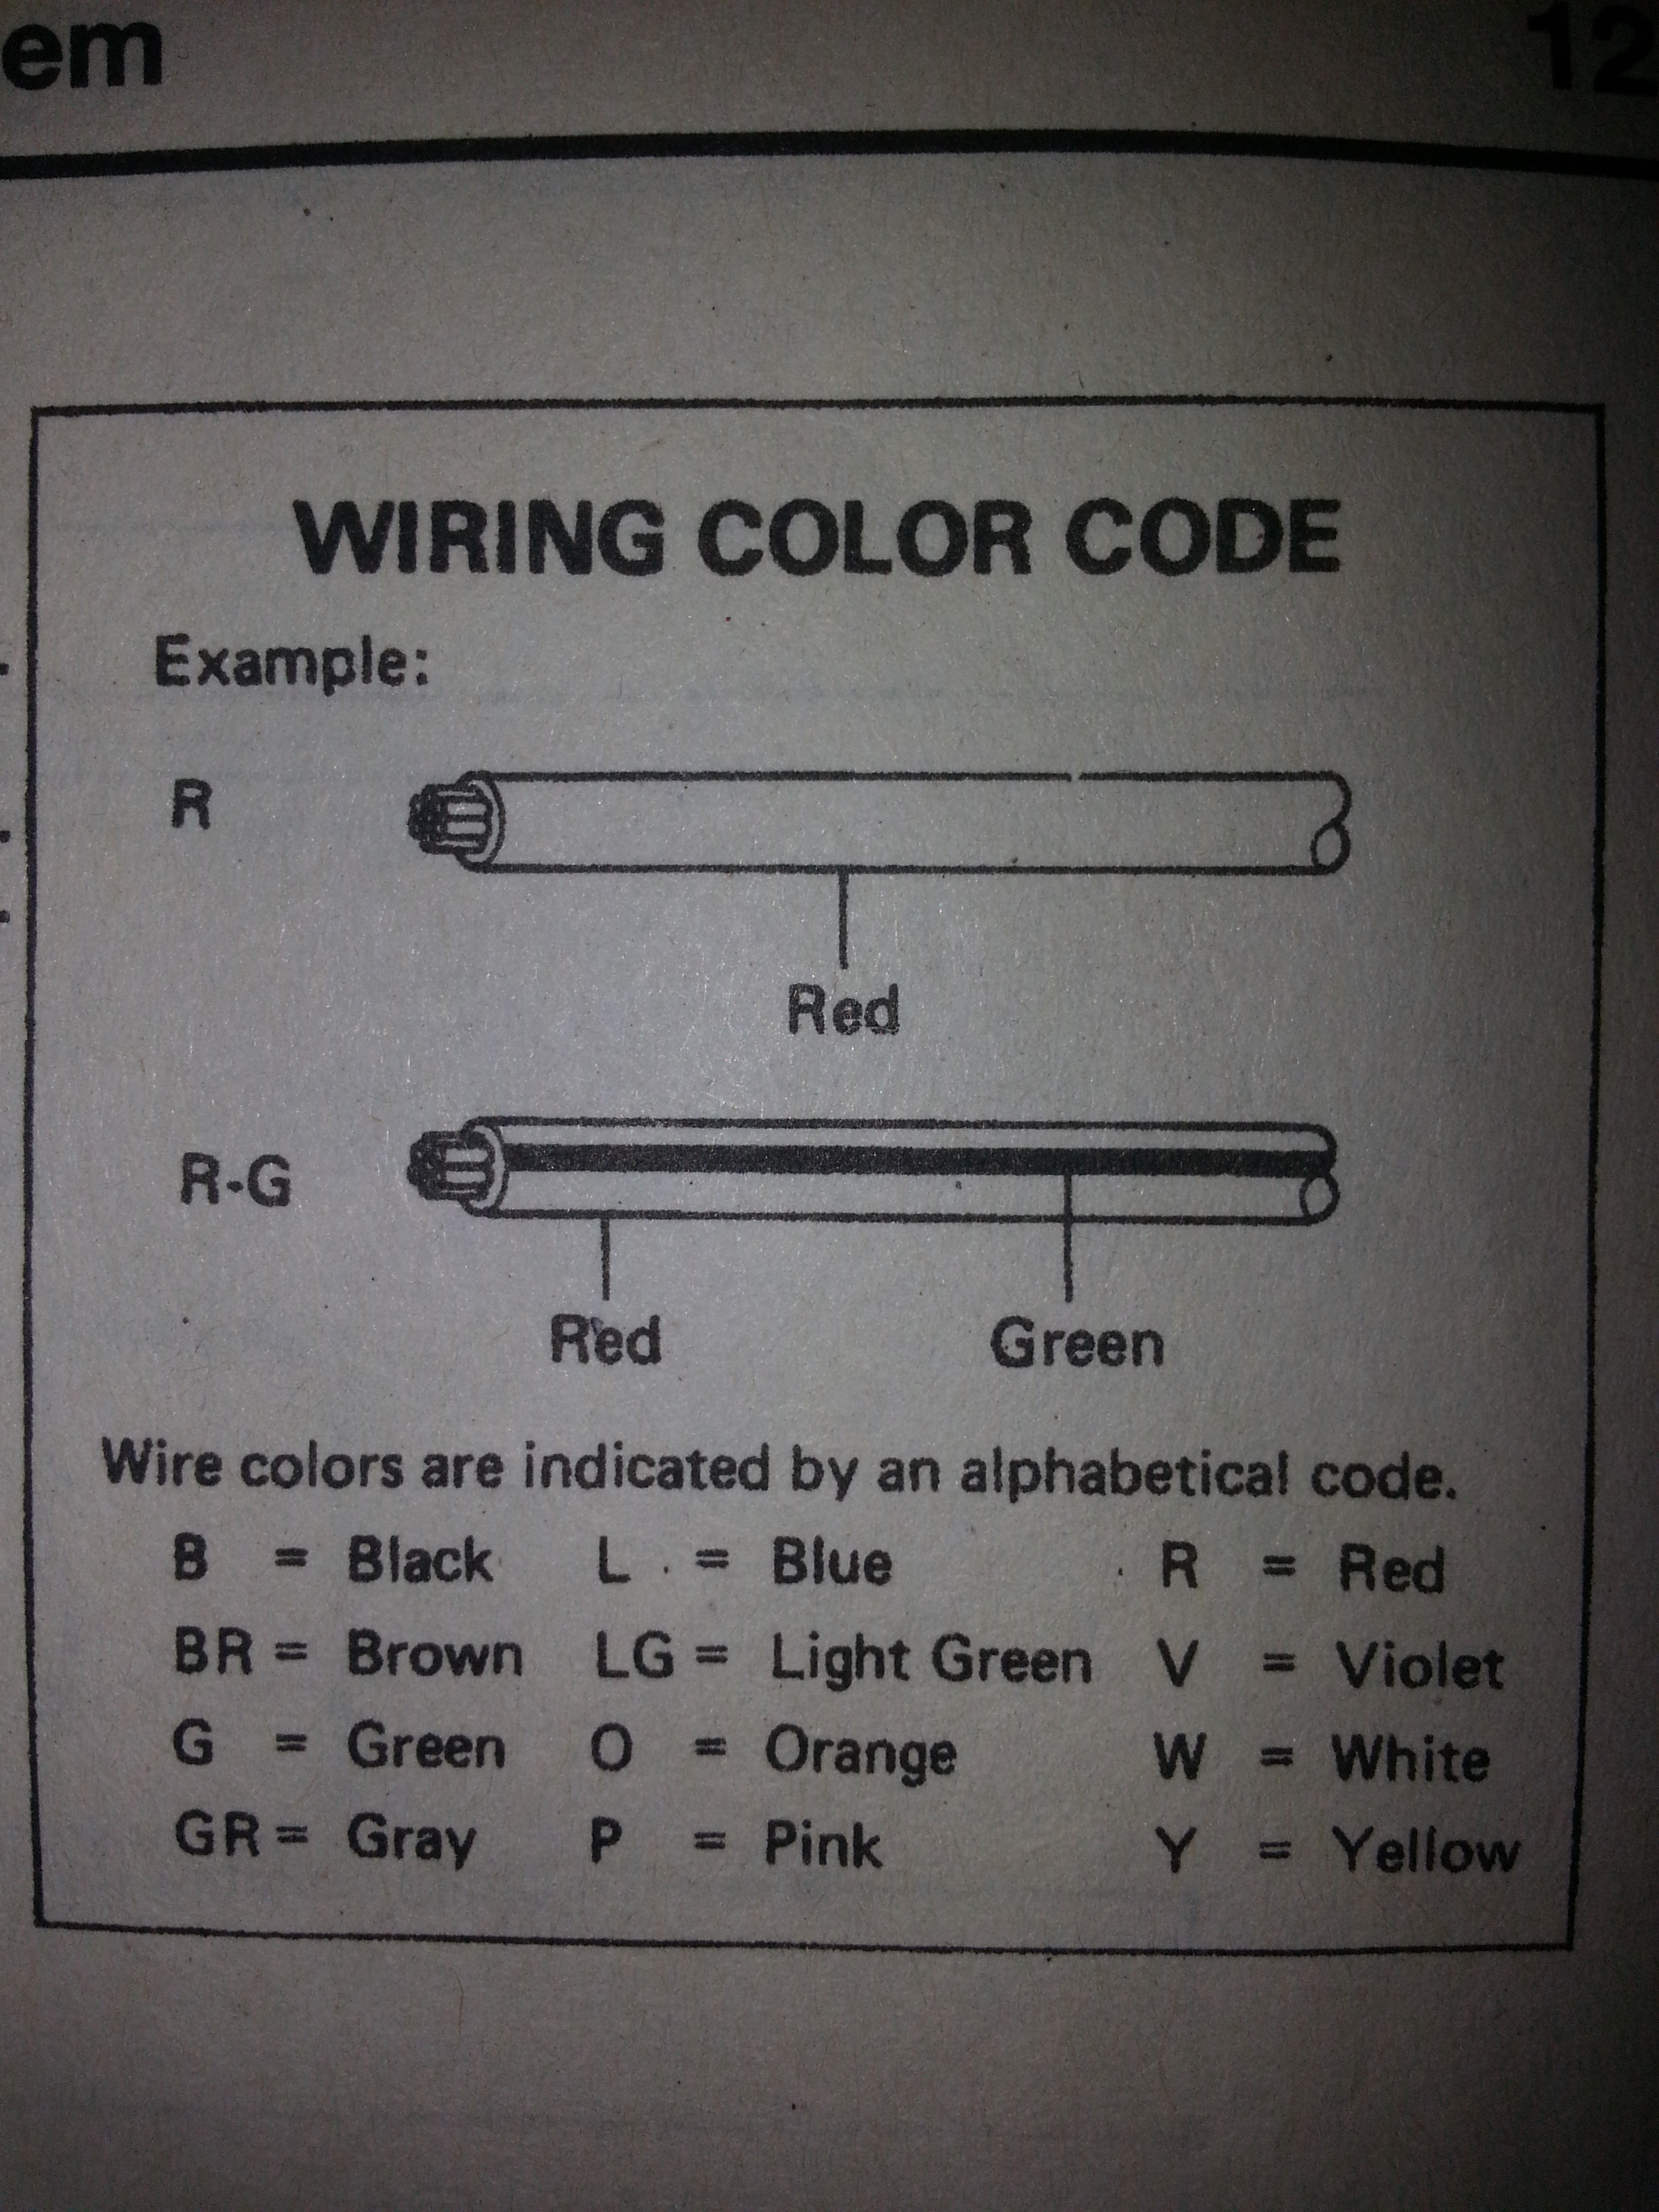
Just for further reference, the color code listing.....
************************************************** ********************
I colored the first picture, using paint, NOT to try to be cool or anything, hahaha.... No, really, it actually, REALLY helps me to see things on these schematics, even SLIGHTLY more 'actual', ya know?
************************************************** ********************
In the pic I just added, without the color.. Ignore the "DIODE" doodle I did. I noticed some things, ..... I think it's sinking in..... BUT, I have to get some sleep as I have a HUGE day tomorrow, just as today was, unexpectedly. I will edit this page, deleting this text right here, ...but really quickly... Just curious if I'm understanding this correctly..
*** The rear window motor, Back Door light and Rear Wiper Motor all get their power from the Kick Panel Fuse Block Power Source(Either "ENGINE" Fuse for the Back Door Light or "Main Kick Panel Circuit" for the Power Window Relay, which feeds the rest).......
??????? lol.
* The Power Window Relay is tied to EVERYTHING in and up to the tailgate, including the rear wiper fluid motor(which is activated at full throw of the rear wiper switch in the console).
* I see all those safety features/names, ...and the "BACK DOOR UNLOCK WARNING SWITCH" is just stabbing me in the eye, lol... Is that just part of the door lock detection switch? OR, is it actually inside the Latch, which does actually have wiring? (driver side latch)... I'm going to look at my pics, seeing if I can see the wiring color.... I have a spare pair of latches... So, while I WILL INDEED be adding a healthy ground strap... (HAVE IT MADE, ALREADY.... just totally forgot until I'd buttoned up the gate that day..... GRRR!) .... , I still want to understand how this all works, step by step, and as I said, "Hopefully knock this out through a good P.O.E. that I can absorb 1 step at a time, from beginning to end." I'm guessing that the wiring in the latch simply tells that the door is OPEN... But HOW? if that's how it works, does it do it by the gate latch not being on a hoop-keep anymore?
* (Curious if I'm getting this right)>>> ALL of the safety features, "Back Door Unlock Warning Switch", "Door Lock Detection Switch", "Cover Top Switch"(When topper bolts are removed over the switch in the rear panel), "Rear Wiper Retraction Detector Switch",.... ALL of them are GROUND to either inside the Panel or on the gate or body, directly...... And, IF ANY OF THEM are 'TRIPPING' a break in the completed circuit, they're doing so via "Breaking the Ground"..... Like a relay that I'm using to power my lights...... It has Power directly to the Relay, the Relay is ground to the body, ........ the Switch is thrown and completes a circuit and the relay is thrown, allowing power back from the battery through and then into the offroad lights. Some of these switches are different, and the Power Window Relay is clearly more complicated, dealing with circuit boards, etc... BUT, I figured, "If I can really go over this a few times, committing to memory just which part makes which work, which keeps them from working, which is TOTALLY reasonable and maybe even positive to bypass, ............ then I can dig through one thing at a time/using a good P.O.E.(AND TAKING NOTES and making a SINGLE written list as I go), ....and in no time at all, once I can get my hands on my truck again, ...... I WILL find and kill this freakin gremlin!
There is no reason why, when I'm putting/have put so much work and detail into this vehicle...., I should have to live with all these lil annoying glitches! lol...... Just gotta keep digging/writing down all you guys are telling me, then get at it.
PS> NOPE, ..... sorry William, that's not the secret! lol.... But always enjoy hearing from ya.
PSS> THANKS, Locked4Runner.... appreciated!
Now, a copy right from my Haynes, including the omitted portions.... And without the doodle of the added dome light...........
Just for further reference, the color code listing.....
************************************************** ********************
I colored the first picture, using paint, NOT to try to be cool or anything, hahaha.... No, really, it actually, REALLY helps me to see things on these schematics, even SLIGHTLY more 'actual', ya know?
************************************************** ********************
In the pic I just added, without the color.. Ignore the "DIODE" doodle I did. I noticed some things, ..... I think it's sinking in..... BUT, I have to get some sleep as I have a HUGE day tomorrow, just as today was, unexpectedly. I will edit this page, deleting this text right here, ...but really quickly... Just curious if I'm understanding this correctly..
*** The rear window motor, Back Door light and Rear Wiper Motor all get their power from the Kick Panel Fuse Block Power Source(Either "ENGINE" Fuse for the Back Door Light or "Main Kick Panel Circuit" for the Power Window Relay, which feeds the rest).......
??????? lol.
* The Power Window Relay is tied to EVERYTHING in and up to the tailgate, including the rear wiper fluid motor(which is activated at full throw of the rear wiper switch in the console).
* I see all those safety features/names, ...and the "BACK DOOR UNLOCK WARNING SWITCH" is just stabbing me in the eye, lol... Is that just part of the door lock detection switch? OR, is it actually inside the Latch, which does actually have wiring? (driver side latch)... I'm going to look at my pics, seeing if I can see the wiring color.... I have a spare pair of latches... So, while I WILL INDEED be adding a healthy ground strap... (HAVE IT MADE, ALREADY.... just totally forgot until I'd buttoned up the gate that day..... GRRR!) .... , I still want to understand how this all works, step by step, and as I said, "Hopefully knock this out through a good P.O.E. that I can absorb 1 step at a time, from beginning to end." I'm guessing that the wiring in the latch simply tells that the door is OPEN... But HOW? if that's how it works, does it do it by the gate latch not being on a hoop-keep anymore?
* (Curious if I'm getting this right)>>> ALL of the safety features, "Back Door Unlock Warning Switch", "Door Lock Detection Switch", "Cover Top Switch"(When topper bolts are removed over the switch in the rear panel), "Rear Wiper Retraction Detector Switch",.... ALL of them are GROUND to either inside the Panel or on the gate or body, directly...... And, IF ANY OF THEM are 'TRIPPING' a break in the completed circuit, they're doing so via "Breaking the Ground"..... Like a relay that I'm using to power my lights...... It has Power directly to the Relay, the Relay is ground to the body, ........ the Switch is thrown and completes a circuit and the relay is thrown, allowing power back from the battery through and then into the offroad lights. Some of these switches are different, and the Power Window Relay is clearly more complicated, dealing with circuit boards, etc... BUT, I figured, "If I can really go over this a few times, committing to memory just which part makes which work, which keeps them from working, which is TOTALLY reasonable and maybe even positive to bypass, ............ then I can dig through one thing at a time/using a good P.O.E.(AND TAKING NOTES and making a SINGLE written list as I go), ....and in no time at all, once I can get my hands on my truck again, ...... I WILL find and kill this freakin gremlin!
There is no reason why, when I'm putting/have put so much work and detail into this vehicle...., I should have to live with all these lil annoying glitches! lol...... Just gotta keep digging/writing down all you guys are telling me, then get at it.
PS> NOPE, ..... sorry William, that's not the secret! lol.... But always enjoy hearing from ya.
PSS> THANKS, Locked4Runner.... appreciated!
Last edited by ChefYota4x4; 04-09-2013 at 12:45 AM.


